Tag: Hamstrings
Dana Linn Bailey Shares ‘Hamstring-Glute-Focused’ Workout for Leg Gains
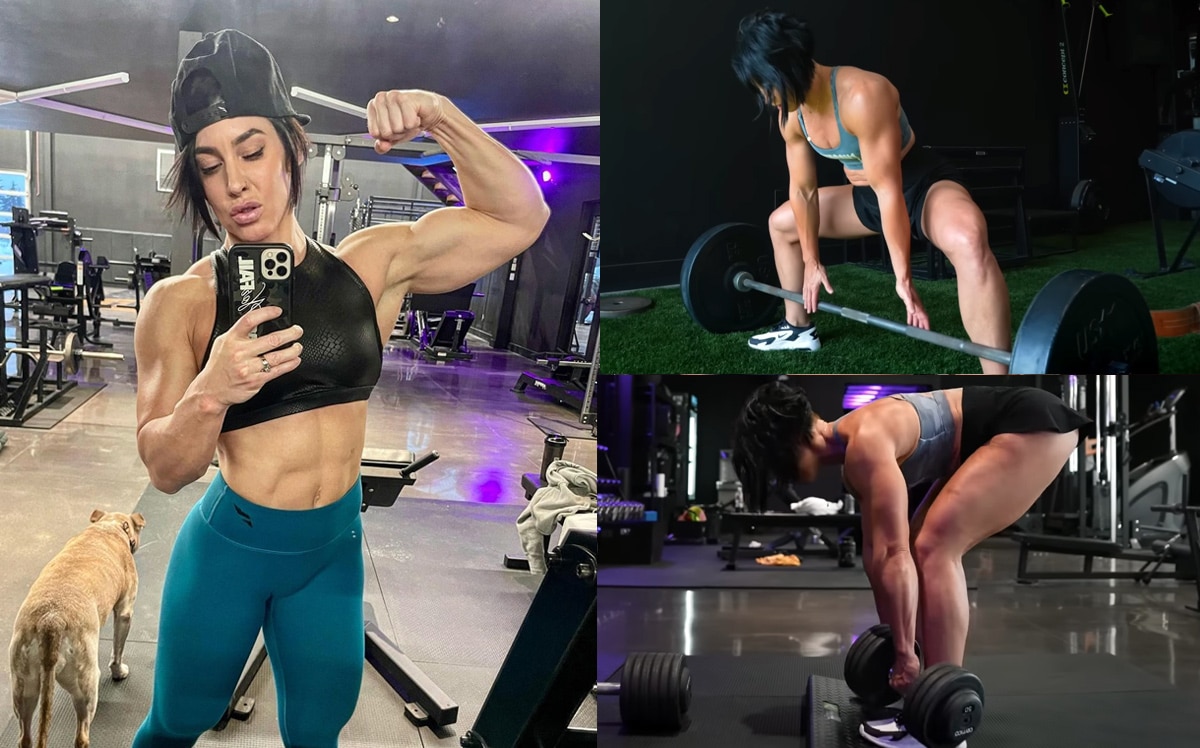
Dana Linn Bailey (DLB) is a pioneer of the Women’s Physique division who remains in stellar shape years after retirement. In a recent YouTube video, Bailey walked fans through a brutal hamstring-glutes-focused training session for growing muscle and building strength.
“So today, we’re focusing on hamstrings and glutes. I like to separate my leg days so I can really focus on quads one day and hamstrings and glutes [the next],” Dana Linn Bailey shared.
In the 2000s, DLB established herself as an all-time great in the Women’s Physique category. Her capped and striated shoulders helped her reach the top of the sport in 2013 when she claimed the inaugural Women’s Physique Olympia title. All signs pointed to utter dominance until Dana returned in 2014 when she was ousted from the throne by Juliana Malacarne.
Bailey’s love for the sport still fuels her today. While she’s stepped away from competing, Dana is a famous online influencer known for sharing fitness-related content such as workouts, nutrition information, and physique transformations.
In one of her latest endeavors, Bailey decided to revamp her physique in June. In what she’s titled the ‘Summer Shredded 4.0’ challenge, Dana plans to get ripped and lean at the same time in the months to come.
It remains uncertain if Dana Bailey will entertain a competitive return. Questions about her competing again were raised during her recent Cutler Cast Podcast appearance. Bailey even mentioned that she would undergo drug tests to prove her natural status if she did announce a comeback. With her attention shifting to a new physique goal, DLB updated fans with one of her leg day workouts.
Check Out Dana Linn Bailey’s Hamstring Glute-Focused Leg Day Workout
“We are doing a hamstring and glute-focused leg day. This is one of my favorite days of the week as far as legs go, you know. But today’s focus, we’re hitting that posterior, DLB said.
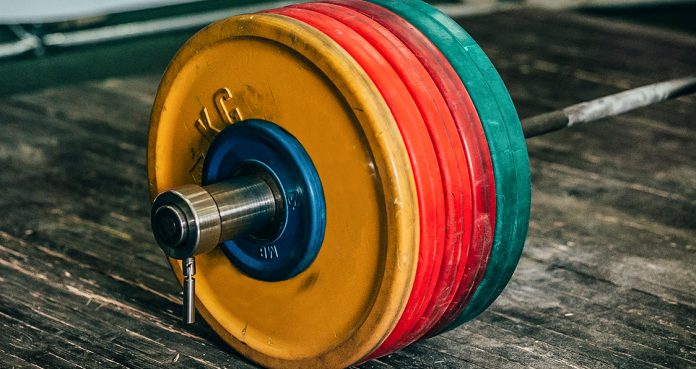
Sumo deadlifts – 12, 10, 8, 8 rep pattern 4 sets
Hip thrust machine (banded) – 10-12 reps with 5-8 pulse reps 4 sets
Abductions – 20 reps 4 sets
Toes-Elevated dumbbell Romanian deadlifts – 12 reps 4 sets
Sumo Squats – 12 reps 4 sets
Reverse squat – 10-12 reps 4 sets
banded/bodyweight hyperextensions – to failure
Sumo deadlifts
“We are starting off with sumo deadlifts. I love sumo deadlifts. I’m much stronger in them and I feel them not so much in my back, I feel it all in my legs and hamstrings. So, when I do deadlifts, I tend to not do deadlifts on back day, I tend to do my deadlifts on ham and glute day. So, we’re doing a sumo stance, the reps, I generally stay a little bit higher.”
“When you come up, I want you to really focus on thrusting those hips forward. When you do that, your butt will squeeze.”
Hip Thrust machine (banded)
“The whole point of this is it’s pushing your knees in. So, you actually have to engage your glutes even more by keeping your knees out. So, it’s just adding more tension to the glutes, which we’re always hitting a glute exercise so we’re going to go 10 to 12 reps on the hip thrust with the hip band. Once you get 10, we’re going to add let’s say five to eight pulses at the top. Just little half reps.”
Dana Linn Bailey shared that if you don’t have access to a hip thrust machine, try a barbell variation.
“If you don’t have a hip thrust machine, you can do this all on a barbell,” said DLB.
Abductions
“Abductions. So, now we’re trying to get our knees as far away as we possibly can. 20 reps here, holding for a good two-second count on each one. And your butt will be on fire.”
Toes-Elevated dumbbell Romanian deadlifts
“A little superset. One of my other favorite little supersets I do. We’re going toes elevated dumbbell RDLs. The reason we have our toes elevated if you’re like me – I’m pretty flexible, most girls, we’re pretty flexible. If you’re not as flexible, do it with your feet flat. This is just going to add a little more stretch in your calf, Achilles, and a little more stretch in the hamstrings. 12 reps here.”
Sumo Squats
“Sumo squats. So, the way I do it, if you prefer holding it this way [vertical] this isn’t going to be much of a squat, you would have to elevate yourself. So I keep the dumbbell that way [horizontal]. I want you to have a forward lean in your torso just like we talked with Bulgarians.”
Reverse squat
“Hamstring and glute day is all about your basically hinged at the hips the whole time. So we’re going to be facing away and the first part of the movement is you’re going to push your butt back just like you did with those RDLs, push your butt back then you’re going to squat down and you’re going to stay in that leaning torso position instead of being more upright. Upright quads, lean in is hamstring and glutes.”
Banded/bodyweight hyperextensions
“Then, I’m going to go over and do hypers. If you can’t do them at the same time that’s fine. I do this just to save time. We’re doing banded hypers and then drop set to just bodyweight hypers to failure.”
DLB isn’t opposed to working with high-profile names in the sport. Given her status as a former Olympia winner, she loves testing her strength in the company of other bodybuilding veterans. She recently joined hands with trainer Hany Rambod for a brutal FST-7 shoulders workout.
Bailey also teamed up with four-time Mr. Olympia Jay Cutler. Last July, they took part in a tough chest and triceps training session. By the end of the workout, Cutler was not only impressed with Dana’s strength but her endurance as well.
Despite having reached 40 years old, DLB doesn’t appear to be slowing down. Fortunately for her fans, she’s offered a consistent look at her physique as she aims to transform her body. Days ago, Dana revealed that she likely gained muscle ‘if anything.’ However, she plans to increase her cardio in the next few weeks to lean down.
Even though she’s long retired, DLB still attacks training sessions with the same attitude that saw her reach the top of the sport. She encourages anyone watching her videos to follow along as she enters the next stage of her ‘Summer Shredded 4.0’ body transformation challenge.
Watch the full video from DLB’s YouTube channel below:
More Leg Day Workouts:
Published: 23 July, 2023 | 9:30 AM EDT
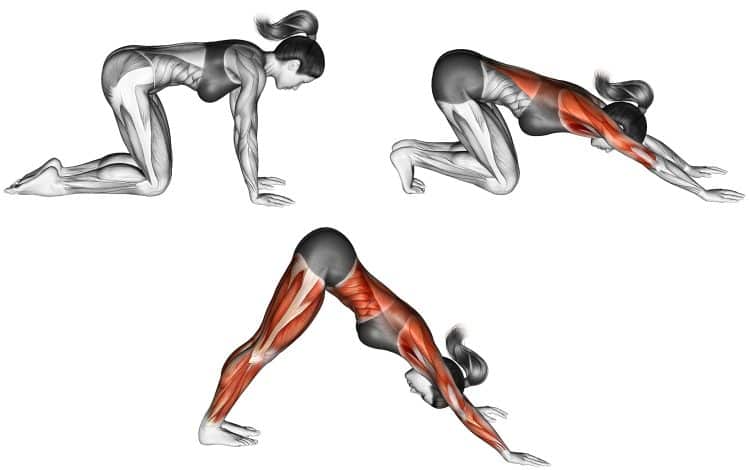
Downward Facing Dog (Adho Mukha Svanasana) – How-To, Muscles Worked, Benefits, and Variations
As the name implies, there is a similarity between the downward facing dog and a common habit of our favorite furry sidekicks. Also called Adho Mukha Svanasana in yoga words, this pose is akin to how a dog stretches itself by leaning back onto the legs and lengthening its spine (svana). And this full-body technique will benefit you just the same!
The downward dog is one of the most commonly practiced yoga techniques, cued often in vinyasa yoga, flowing into other poses, but also effective all on its own! But most importantly, the goal isn’t ultimately the downward dog pose, but how it makes us feel and progress in our yoga journey, or life in general.
It’s a tricky one, but follow along with the instructions and tips in this guide, and you’ll get it down pat!
Muscles Worked
A yoga-based pose, downward facing dog still requires various muscles to perform it correctly. Here are brief descriptions of the muscles you’ll use during this technique.
Arms and delts
Anytime your body is being supported by your arms, you’re recruiting the triceps and deltoid muscles. Both muscle groups have a combined three heads, one on the anterior, another laterally, and the third on the posterior or backside of the body.
With the arms extended, your triceps resist elbow flexion, allowing you to support your weight. The front deltoids are engaged when the arms move forward in front of the body.
Trapezius
Traps too have three components – upper, middle, and lower fibers. Individually, they lift the scapula, pull it back, and retract it. The upper fibers are most prominent during a downward facing dog when the arms are in an overhead position.
Core
Finding their role in every total body movement, your core and abdominal muscles stabilize your trunk, and help you to maintain balance, and force efficiency, to keep you in the inverted ‘V’ position.
Leg muscles
Don’t expect much physical gains but the quads, glutes, hamstrings, and calves do bear some of your weight. Not to mention, the calf raise component during a more advanced variation where the toes are dorisflexed which activates the rear lower leg muscles. Then you have the inner thighs or adductor muscles which should be used to keep the lower body in stable and strong position.
How To Do Downward Facing Dog
In this section, we break down the downward facing dog technique with step-by-step instructions. So be sure to follow along closely, and check out the video demonstration below to hear all the important form ques.
Steps
Note: The following instructions and demonstration are the quick and easy steps to get into a downward facing dog position. If you plan to progress in your yoga journey, we recommend learning additional pre-pose techniques. This will make your yoga practice more enjoyable, productive, and sustainable.
Get down on your hands and knees in a tabletop position. Your hands should be roughly shoulder width apart, shoulders slightly forward past the wrists, with arms fully extended, knees directly under the hips, and back neutral. Turn your hands slightly outward so your elbows are pointing straight behind you, not completely out to the sides.
While you’re in this position, you may feel the natural need to do a cat-cow pose, to stretch your back and abdomen. It’s a great choice before hopping into the downward dog. We’ve included a video example of cat-cow below.
From your hands and knees, squeeze your hands together, without physically moving them inward, to activate your chest.
Now curl your toes under and press your feet into the ground bringing your knees into full extension, while lifting your hips up and back. In this position, your arms should be aligned with your torso in a straight line from your hands to your butt. Bring your gaze down so you’re looking down at the floor, or at the back of the room through your legs.
Accentuate the extension through your spine by lifting up through the pelvis and pressing the full hands into the floor. Externally rotate your arms, to create space between the shoulder blades. Lift the heels, and pretend to squeeze the inner thighs together.
Congrats! You just did the downward facing dog!
Here’s a short video demonstration of cat-cow pose.
Tips
Take some time and find the right knee and foot position to ensure you are doing the downward facing dog with the correct technique.
One way people find the optimal feet to hands distance is to get into a plank.
You should be able to transition between a plank and downward facing dog without moving your hands and feet.
If you cannot keep your spine straight during the downward facing dog, do it with your knees bent until you gain more flexibility.
Your heels do not need to be touching the ground.
Do a few reps of a cat-cow pose to warm up the spine before the downward dog.
Consider easing into the downward dog by incorporating pre-movement techniques beforehand.
You need a comfortable and non-slip surface to do this technique safely and effectively.
Press down into the floor with the entire hands (palms and fingers) to get the most efficiency from the movement.
Benefits of Downward Facing Dog
The advantages of learning this technique surely outweigh any potential negatives. It does a whole lot of good for the body and mind, and it’s also challenging and a good transition pose to other yoga practices.
Get a lovely stretch!
If done right, the downward facing dog should stretch your back first and foremost, followed by everything from your wrists to your shoulders, abs, and leg muscles. However, the back should be the focal point. The goal should not be to force a stretch in your legs.
Stretching has many benefits including healthier muscles, increased range of motion and flexibility, more blood flow to the area, reduced muscle soreness, and even stress relief. During downward facing dog you’re also strengthening the aformentioned muscles.
Strengthen all your muscles
The downward dog involves your push muscles, back, abdominals and obliques, hips, legs, and feet. There’s literally no muscle sitting out. While there is some muscular strengthening from movement (isotonic), you also benefit from static strengthening, where the muscles are not contracting, but support your weight in a contracted state.
Learn about the differences and benefits of isotonic vs isometric training here.
Form of inversion
Most exercises don’t involve hanging the head down, somewhat upside down. But what this does is increase blood flow and circulation to the brain possibly enhancing mental performance, while decompressing the spine and creating more space between the vertebra which may allow better disk hydration and hence greater spine mobility and reduced risk of injury.
Many experts also believe that inversion supports the lymphatic system, which helps the body cleanse itself. And this is said to only be able to occur via the movement of muscles, and breathing. Some other supposed benefits include improving back pain, and increasing torso strength and mobility too.
It’s important to note, however, that studies are limited and not conclusive on the potential benefits of inversion.
Ease your mind
Yoga has long been practiced for its stress-relieving effects. Most of us live every day without releasing the tension that we build up in our muscles due to mental stress, physical stress, lack of activity, and high intensity exercise. Bringing flexibility, and stretch into our daily routines can have a great effect on us. Not to mention, yoga technique are therapeutic alone.
May support better digestion
For the same reason the brain and spine may benefit from downward facing dog, so too may your digestive system. In normal conditions, the belly has to work a little to digest food against gravitational forces. Well, the increased blood driven to the stomach could possibly stimulate a healthier process.
Burn calories
Moving your body and using your muscles to resist your body weight is one way to burn calories. During this process, your body uses energy from stored food for fuel, and if you expend more energy than you consume, you’ll lose fat. Yoga is one way to contribute to the weight loss process if you’re not eating too much every day.
Try our yoga calories burned calculator to see how much energy you’re using during your sessions.
This Exercise:
Target Muscle Group: Arms, delts, core, quads, glutes, hamstrings, calves
Type: Yoga
Mechanics: Compound
Equipment: Cushioned surface, exercise mat
Difficulty: Intermediate
Drawbacks of Downward Facing Dog
If you want to try the downward facing dog, you could experience some of these negatives.
Not as easy as it looks
If you’re not decently flexible or fit, you may be in for a nice surprise. It’s harder than it looks both on video, and in your head. But… if you use a suitable surface, wear the right clothing, and follow the form instructions, you’ll have the best chance at nailing this technique. The good news is, if you can’t yet, you’re totally allowed to bend your knees. So keep practicing and you’ll master this staple pose!
Bad form is common and good form ignored
Without a proper understanding of basic exercise technique mechanics, or yoga experience, it’s too easy to do this exercise wrong. Not that its the worst thing you could do, but people try to force their heels down when they shouldn’t, or they don’t realize they have bad form. The downward dog should be a beautiful exercise that feels good, and encourages you do it more.
Common Mistakes When Performing Downward Facing Dog
If you want to get the most out of the downward facing dog, try to keep these bad habits out of your checklist.
Tucking in the tailbone
You want to lift the tailbone, not tuck it in. The latter will move the pelvis rearward and round the back in a convex shape which you don’t want. Rather bend the knees to bring the back into a better and safer alignment.
Forcing the heels down
We’re not all physically constructed the same, hence different heights, proportions, movement, etc. If your heels don’t naturally touch the floor, don’t force them. As you stretch, you’ll learn if it’s tight calves and hamstrings. But it could also be a shorter achilles tendon, or someone’s bone structure, and that’s fine, there’s nothing to do there. After all, the goal is not to stretch the calves, it’s to target the back.
Bad shoulder position
Slouching over and letting your head into your shoulders is the wrong way. The delts and scapular area should be set properly with proper arm placement and involved to make the exercise most efficient.
Wrong hand positioning
When pushing your hands into the floor, you should focus on shifting the weight onto your thumbs, index and middle fingers, not the pinkies or palms only. This will create a better position for your shoulders and it’s more efficient.
Not bending the knees
While you will need to lengthen the legs to lift the tailbone and stretch the back, you are free to keep the knees slightly bent.
Internal shoulder rotation
Remember that these three words are something you seldom ever wanted to do during any exercise. Turning the shoulders inward toward the chest can cause impingement issues, and it doesn’t make for efficient technique. Instead, turn your biceps slightly out to open up the delts and create a safer position.
Feet too close or wide
Your feet should be roughly the same distance apart that they are in a plank. That’s why it’s good to start the movement from a plank, especially if you’re a beginner. But, you may find the need to adjust your footing slightly.
Variations of Downward Facing Dog
You can find so many different variations of the downward facing dog. Unfortunately, there are too many to list here, however, we picked some favorites for you to try!
Single leg downward facing dog
Also called Eka Pada Adho Mukha Svanasana, this single leg downward facing dog variation stretches the hamstrings, engages more core muscles, and trains your balance.
Steps
Assume the basic downward facing dog as shown in the primary example in this guide. Your feet should be fully planted on the mat.
Press down into the left foot, and lift the right heel as high as you can while keeping it fully extended. Point the toes straight down. You should feel a nice stretch in the left hamstring. Keep your gaze down toward the floor, or back toward your feet.
Hold then switch legs and repeat.
Tips
Inhale as you lift the leg and exhale as you drop it down.
Keep your shoulders and hips square, avoiding allowing the body to rotate in either direction.
For a more advanced technique, great for training balance, lift one leg, and the opposite arm.
Knee to elbow
If you want to take the previous variation a step further, hence increasing the benefits, you can introduce more movement.
Steps
From the three legged, or single leg downward facing dog with one leg extended in the air, bend the knee and bring it into the same side elbow. Keep your core tense and spine neutral.
Lift the same leg back up into extension or the three legged dog, now pull the knee into your opposite elbow.
Do several reps, then switch legs.
Twisted dog
Here’s a simple, but challenging variation you should also try. It will wake up your obliques, and give you a releasing stretching in the waist.
Steps
From the basic downward facing dog position, move your feet closer to your arms and simply reach one hand back and grab the opposite ankle. Rotate your upper body to face the same side as the leg you’re grabbing. Return to the starting position, then reach with the opposite hand to the other ankle.
Make sure to keep your spine lengthened.
Bent knee dog
From the inverted downward dog position, bend one knee so that your toes are pointed at the ceiling. Reset, and repeat with the other leg.
Downward facing dog on blocks
Prop your feet or hands up on some blocks to vary the angle and lessen the difficulty of the downward facing dog. Elevating the hands, for example, creates more space in the upper body like shoulders, back and neck. It also helps maximize space on the mat during vinyasa flow!
Steps
Prop your hands up on blocks and find your downward dog.
Keeping your toes on the mat, lift your heels high, and extend your spine by raising your hips up above your shoulders.
Now exhale, bend your knees, tighten your core, press into the blocks and hop your feet forward in between your hands. As you jump, keep the hips higher than the shoulders.
Inhale, stand halfway up keeping your hands on the blocks, exhale, fold your upper body into your lower body, then inhale, and stand all the way up reaching your arms overhead with hands together.
Finally, exhale and bring your hands to your heart.
FAQs
Below we included a few common questions and answers regarding the downward facing dog pose.
Who is the downward facing dog not good for? Due to the nature of this exercise, it’s best avoided by people with wrist problems such as carpal tunnel, or those with back issues, vertigo, high blood pressure, or eye conditions that affect vision. We also don’t recommend it for women who are pregnant.
What should be the primary goal of the downward facing dog?Stretching the back, activating the core, and really becoming more in tune with your body. There are many benefits of downward facing dog that can enhance your physical, mental, and yoga progression.
Wrapping Up
Congrats on mastering the downward facing dog pose! But if you haven’t yet, don’t worry you’re not alone, it’s by no means an easy exercise for most people. But this common yoga class pose should be learned as it’s a fundamental technique and you’ll probably be called to do it. The tips, tricks and variations in this guide are going to help you utilize the downward dog effectively, build more confidence in your yoga journey, and enhance your life!
Nick Walker Looks Massive, Thrashes Hamstrings with Kamal Elgargni
Nick Walker and Kamal Elgargni joined forces to thrash hamstrings.
Men’s Open contender Nick Walker recently teamed up with 2019 212 Olympia champion Kamal Elgargni for some intense hamstring training. Both Walker and Elgargni are looking in top form as they prepare for the 2022 Olympia.
Nick Walker teamed up with Kamal Elgargni for an intense hamstring training session. Both bodybuilders are looking to impress at the 2022 Olympia and the team up is only making their prospects stronger. Walker is looking absolutely at 290lbs but still has defined lines. Elgargni is looking equally impressive and is looking to stake a claim to once again be crowned 212 Olympia champion.
As for the training details Nick Walker and Kamal Elgargni both went through a series of exercises targeted the legs. Specifically the two thrashed their hamstrings. They utilized high reps throughout the workout.
“Nothing but high reps,” said Nick Walker. “20 reps was the magic number today. Overall, good workout. I enjoyed it. Worked hard, pushed each other and just getting better each and every workout.”
Full Hamstring Workout
Lying Hamstring Leg Curl Machine — 3 sets for 11 reps
Standing Leg Curl Machine — 4 sets for 15 -20 reps
Seated Leg Curl Machine — 3 sets for 10 reps
Stiff Leg Barbell Deadlift — 4 sets 5-7 reps
Machine Seated Hip Abduction — 4 sets for 12 reps, *supersetted with weighted sumo squats
Weighted Sumo Squat — 4 sets for 12 reps
Machine Seated Hip Adduction — 1 set for 10 reps
Standing Calf Raise — 3 sets for 12 reps
Seated Calf Raise on Machine — 2 sets for 10 reps
Perhaps the most remarkable development is the fact that Nick Walker is 290lbs. Despite that massive size he’s looking pretty shredded and well defined, showing lines during his bulk. Usually you’d expect that when he’s on his cut, but clearly all the hard work he’s been doing is showing dividends.
To see the full workout click here.
For more news and updates, follow Generation Iron on Facebook, Twitter, and Instagram.
News and Editorial Writer at Generation Iron, Jonathan Salmon is a writer, martial arts instructor, and geek culture enthusiast. Check out his YouTube, Instagram, Twitter, Facebook, and Sound Cloud for in-depth MMA analysis.
The Glute Ham Raise Alternatives To Constantly Change Your Workouts
Put these glute ham raise alternatives into your workout for better gains.
Focusing on certain exercises we love can prove to pay off in the long run, but when it comes to the glute ham raise as a singular exercise, looking to those glute ham raise alternatives can diversify your workouts for the better. We all want the best when it comes to seeing gains and often times we stick to the same old exercises we know and love because it’s what comfortable.
But eventually our muscles get used to them and our growth plateaus, clearly something we all don’t want or need. By adding in alternative exercises we give ourselves the best benefit to seeing similar growth while also adding different workouts to the larger training program.
The glute ham raise is a solid exercise to work your posterior chain, mainly your hamstrings and glutes, but with the top glute ham raise alternatives in your routine, the gains you want to see most are right around the corner. Working the same muscles, in a different way, but sticking to the idea of supporting the posterior chain, what you will find is your workouts become more engaging and fun with only the best gains to show for it.
Let’s take a look at both the glute ham raise exercise and the best glute ham raise alternatives so you can see huge gains and mix up your workout. With the right exercises in your training program, all of those you want to see can be achieved in no time.
What Is The Glute Ham Raise?
The glute ham raise is a great exercise working mainly your hamstrings and glutes. It is highly effective in developing strength and muscular endurance perfect for seeing posterior chain gains.
By working to bend the knee and extend the hips, this targets your hamstrings so they will grow, but also see better range of motion and aid in functional movements. Great for adding to your leg day routine, this exercise is certainly not one to neglect (1).
Benefits Of It
The benefits of the glute ham raise are hard to ignore and will make you want to put this into your routine. As a highly effective workout, it would be a disservice not to give this exercise a go.
Benefits of the glute ham raise include:
Glute and hamstring development: By increasing strength and size in your hamstrings and glutes, you build better development for sport specific and functional movements.
Better posture: With this overall development, you work to strengthen muscles necessary for posture, so no more slouching and unfortunate pain caused by poor posture.
Back support: Strengthening those lower body muscles work to support your hips, and with stronger hips, comes a more supported back to increase gains in sport specific and functional workouts.
More power and speed: Both power and speed stem from your leg strength and by working on this overall development, you will see those performance goals take off.
Plenty of alternative exercises: The nice part about alternative exercises (which we will get into) are that you can target the same muscles and get the same benefits, all while changing up your workout.
Best Glute Ham Raise Alternatives
Let’s take a look at some of these glute ham raise alternatives in order to set you and your training plan up for success. With the right exercises, you can tackle all of those goals and really give yourself the best benefits possible, all while targeting the exact same muscles. Give these glute ham raise alternatives a try and really see what these can do for all your muscle building goals today.
1. Good Mornings
Good mornings follow the idea of hinging at the hips and allowing for better movement in the waist. You can make these harder by adding resistance bands, dumbbells, or a barbell to the lift for that added time under tension and resistance (2).
2. Single Leg RDL
Great for focusing on your glutes and hammies, the single leg RDL is a nice alternative to work on muscle imbalances and improve single leg stability. Able to increase lower body strength and size, this is a real challenge to put into your workouts (3).
3. Stability Ball Leg Curls
Great for those hamstrings, this is also relies heavily on your core and forces you to really focus on form. Great for working on stability and enforcing mind-muscle connection, this will give your hamstrings a wild ride to growth.
4. Glute Bridge Walkouts
This workout is a real challenge and really works those core and hip stabilizers. As a result of the stretching that occurs, you not only give your glutes a great workout, but also those hamstrings, both vital for the completion of the exercise.
5. Kettlebell Swings
Kettlebell swings are a great exercise and one totally worth doing, for they not only work your glutes and hamstrings, but many other muscles as well. A real full body exercise, this is most certainly one to build muscle and increase your heart rate for a really nice alternative (4).
Why These Alternatives Are Great
These glute ham raise alternatives listed above are great for a number of reasons, most notably being the fact they work the same muscles and will target them in unique ways. By allowing your muscles to become confused, you will trick them into growing so they can’t get used to the same old exercises. For your posterior chain, having exercises that allow for similar development as the glute ham raise keep the benefits like posture and injury prevention intact.
Wrap Up
These top glute ham raise alternatives can help you see much better gains so you only continue to sculpt and shred. By sticking to the same exercises, we don’t allow ourselves the opportunity to truly thrive, thus inhibiting our ability to see the best growth possible. These glute ham raise alternatives are exactly what you need to see success and will only produce the best physique for you, and one others will definitely envy.
Let us know what you think in the comments below. Also, be sure to follow Generation Iron on Facebook, Twitter, and Instagram.
*Images courtesy of Envato
References
McAllister, M.; et al. (2014). “Muscle activation during various hamstring exercises”. (source)
Vigotsky, A.; et al. (2015). “Effects of load on good morning kinematics and EMG activity”. (source)
Martin-Fuentes, I.; et al. (2020). “Electromyographic activity in deadlift exercise and its variants. A systematic review”. (source)
Lake, J.; et al. (2012). “Kettlebell swing training improves maximal and explosive strength”. (source)
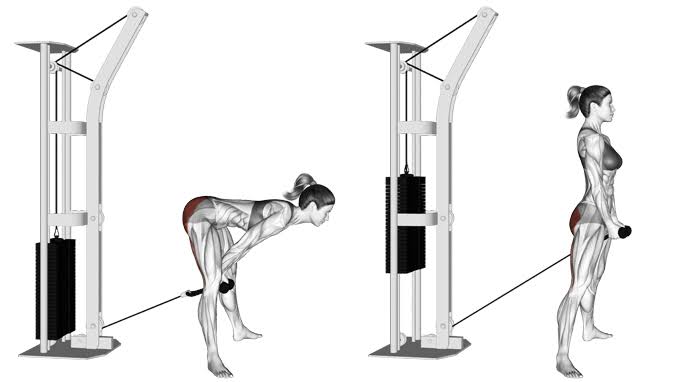
Cable Pull Through – Benefits, Muscles Worked, and Alternatives
There are many benefits and alternatives to cable pull-throughs!
Cable pull-through is one of the most underutilized exercises for posterior chain development. Not only does it help with your glute and ham development, but it also improves muscular endurance, hip flexion, and extension mechanics, helps with muscle imbalances, corrective routines, and can be a great warm-up exercise.
The cable pull-through (aka glute pull-through) is a compound exercise that primarily works your hamstrings, gluteus maximus, and lower-back muscles.
Cable-pull through is a hip-hinge functional movement and should be an indispensable part of your training routine. These movements help you perform essential activities such as picking things up off the ground. They also assist in keeping your hips mobile and strengthen muscles that can prevent lower back pain.
The exercise can be highly beneficial for a fitness rookie for balance in the frontal plane and posterior chain (hamstring, glute, calves) muscle recruitment.
Related: The Most Effective Compound Exercises For All Levels of Experience
Cable Pull Through Exercise Details
Target muscle: Hamstrings, Gluteus Maximus
Synergists: Erector Spinae, Hamstrings, Adductor Magnus, Soleus
Mechanics: Compound
Force: Pull
Benefits of Cable Pull Through
1. Reinforces the Hip Hinge
If you are a beginner, cable pull-through is a great exercise to learn and reinforce proper hip flexion and hinging patterning necessary for advanced lifts like the deadlift.
The added tension in the eccentric phase due to the use of a cable can provide neurological and motor patterning feedback to help increase a lifter’s understanding of what hamstring flexion and extension should feel like.
Check Out: How These Hinge Exercises Can Boost Hip Strength
2. Glute and Hamstring Hypertrophy
Since cable pull-through requires the use of a cable pulley, it increases time under tension, eccentric muscle damage, and overall muscular activation of your glutes and hamstrings.
3. Cable Pulley is a God-send
The cable pull-through can be a deadlift substitute. You might find the perfect resistance on a pulley machine faster than on a barbell while performing the deadlift since a pulley offers a wide range of resistance options.
On top of that, cable pull-through give you a better way to monitor your progress and isolate your working muscles.
4. Muscle Annihilation
While performing the cable pull-through, your target muscles are under constant tension. It aids with establishing a mind-muscle connection and muscular hypertrophy.
The degree of muscle fiber recruitment while performing the cable pulley pull-through can be altered by switching up the time under tension.
Related: The Importance of Mind-Muscle Connection To See Huge Gains
5. A Great Posterior Chain Exercise
Cable pull-through is one of the most reliable posterior chain exercises.
While exercises like the leg curl isolate your hams, cable pull-through helps train your butt, hamstrings, and lower back effectively and at the same time.
6. Cable Pull-Through is Lower Back-Friendly
While performing the exercise, the rope handles stay close to your center of gravity, which means you are less likely to round your back and end up putting unnecessary stress on your lower back.
Must Read: 4 Exercises to Alleviate Lower Back Pain
Muscles Worked While Performing Cable Pull Through
Cable pull-through works the posterior chain muscles, especially around your hips. These muscles are responsible for generating most of your lifting, running, and jumping power.
The cable pull-through target muscles consist of:
1. Gluteus Maximus
The gluteus maximus is the main extensor muscle of the hip. It is the largest and outermost of the three gluteal muscles and makes up a large part of the shape and appearance of each side of the hips. The gluteus maximus is the large muscle driving the powerful hip extension of cable pull through.
2. Hamstrings
Along with your glutes, your hamstrings play a vital role in hip extension and flexion. There are three muscles in the hamstring group; biceps femoris, semimembranosus, and semitendinosus. The hams are involved in explosive lower body movements such as sprinting and jumping.
3. Erector Spinae
The erector spinae run up both sides of your back and are responsible for extending your spine. It is formed of 3 muscles (spinalis, longissimus, and Iliocostalis muscles), and its fibers run more or less vertically throughout the lumbar, thoracic, and cervical regions. These muscles are also important for maintaining posture.
4. Core
The cable pull-through works the muscles of your midsection, including rectus abdominis, obliques, and transverse abdominis. These muscles stabilize your spine and prevent your lower back from rounding.
Next Read: Build a Rock-Solid Core With These Exercises
5. Iliopsoas
The iliopsoas is the primary hip flexor. It consists of major and minor psoas muscles and the iliacus muscle that forms the iliopsoas musculotendinous unit (IPMU). The muscles can function in isolation to stabilize the pelvis and lumbar spine during hip movement and support flexion of the trunk.
How To Perform A Cable Pull Through With Perfect Form
[embedded content]
Most people leave gains on the table by performing the exercise with an incorrect technique. Here is how to perform the cable pull-through:
1. Secure a cable attachment to the pulley and adjust it to the lowest height setting on the cable machine.
2. Face away from the cable machine and reach between your legs to grab the rope handles with a neutral grip (palms facing each other).
3. Take a step forward to engage the weight. Make sure you are far enough from the pulley so that the weight remains off the stack at the bottom of the movement while performing the exercise.
4. Stand with an upright torso, feet slightly wider than hip-width apart, and a slight bend in your knees.
5. Your shoulders should be directly over your feet with a neutral head and neck position.
6. Keep your chin tucked throughout the movement, as if you are trying to hold an egg under your chin.
7. Pre-tension your shoulders and hips, and engage your core.
8. Keep your arms straight and elbows locked out throughout the lift.
9. Without letting your toes lift off the floor, hinge at your hips until you feel a stretch in the back of your legs while maintaining a neutral spine. At the bottom of the movement, your lower arms should be between your thighs and hands behind your knees. At this point, your upper body should be at a 45-degree angle with the floor.
10. While maintaining a neutral spine, return to the starting position by driving your heels into the floor. As you rise, squeeze your glutes and thrust your hips forward.
11. Pause and contract your glutes and hams at the top of the movement.
12. Repeat for the recommended repetitions.
Cable Pull Through Tips
Avoid using your back and focus on pulling with your glutes and hamstrings.
Do not hyperextend your lower back upon standing. Your body should be in a straight line at the top of the movement.
Start with light to moderate weight and increase as you become more proficient with the exercise.
Who Should Perform the Cable Pull Through
The cable pull-through can be especially beneficial for:
1. Strenght and Power Athletes
The hip-hinge exercise can help in improving glute activation, muscle hypertrophy, and maintaining proper hip flexion and hamstring flexibility if performed with a full range of motion. All these benefits can add to a strength or power athlete’s performance matrix.
Related: Full Range Of Motion Vs Partials: Which Is The Way To Go?
2. Functional Fitness and Bodybuilding
The cable pull-through can help add glute training volume for increased muscle hypertrophy, endurance and improve muscle activation. The glutes are involved in almost every functional fitness movement and exercise (running, squatting, pulling, jumping, etc.), making this movement pattern a great one to reinforce and strengthen with the cable pull through.
Must Read: Top Exercises To Increase Hip Mobility To Improve Performance
3. General Fitness
The isolated range of motion of the exercise helps fitness rookies understand the proper position and muscle activation for advanced exercises like deadlifts and good mornings.
Ideal Sets, Reps, and Programming for Cable Pull Through
You are not making the most of the cable pull-through if you limit yourself to three sets of 10 reps while performing the lift. You should program the exercise depending on your goals. Here is a quick rundown on the sets and reps you should be performing based on different goals:
I) General Fitness
If your main objective is to build muscular strength, you should perform lower reps for more sets.
4-6 sets of 5-8 repetitions, resting 1-2 minutes between sets
II) Muscle Hypertrophy
Most bodybuilding enthusiasts would fair the best by targeting muscle hypertrophy while performing the cable pull-through. The set and rep range mentioned below will perform the best for glute development.
4-6 sets of 8-12 reps, resting 60-90 seconds between sets
Pro tip: Using tempos and isometric holds can increase time under tension (TuT) and muscle fiber recruitment.
Related: Struggling to Build Muscle? Here’s Why Your Muscle Fiber Type is Important
III) Muscle Endurance
Some lifters (especially athletes) might want to train for muscular endurance. In such cases, higher rep ranges and shorter rest periods between sets is the way to go.
2-3 sets of 15+ repetitions (at least 45-60 seconds under tension), resting 30-60 seconds between sets
Cable Pull Through Alternatives
Although cable pull-through is an incredibly effective exercise to improve your posterior chain muscles, you can always use a little variety in your workouts. Here are five alternatives and variations you can use to ensure you never hit a plateau:
1. Hyperextension
[embedded content]
Also known as the 45-degree back extensions, most people know this lift as a lower back exercise. Hyperextension is a complete posterior chain exercise. Contrary to popular opinion, the goal while performing this exercise should be to minimize lower back movement and maximize movement at the hip. In other words, the goal is a hip extension, and that’s probably what the exercise should be called.
Steps:
Adjust the pad so that it is right below your pelvic bone.
Turn your feet out 45-degrees as it winds the hips up into external rotation which makes your glutes work harder.
Cross your arms over your chest and lower your torso towards the floor until you feel a strain in your hamstrings.
Round your upper back and maintain this form throughout the exercise.
Raise your upper body explosively until you are almost parallel to the floor.
Slowly return to the starting position and repeat for reps.
2. Reverse Deficit Lunge
[embedded content]
Most people consider lunges to be a quadriceps exercise. But if you lunge backward, you will feel a higher degree of glute and hamstring muscle fiber recruitment. Want to take your glute and hams activation a step further? Use a 6″ box to perform the deficit variation.
Steps:
Stand on a 6″ platform with a shoulder-width stance while holding a dumbbell in each hand.
Take a giant step back.
Keep your front shin and torso upright, bend your legs, and lower your rear knee down to within an inch of the floor.
Using the ball of your back foot, push off your back leg and bring your feet back together on the platform.
Perform the recommended reps with the same leading leg before switching sides.
3. Kettlebell Swing
[embedded content]
The kettlebell swing is probably the closest cable pull-through alternative there is. The kettlebell swing is a more explosive exercise as compared to the cable pull-through and focuses on increasing muscle power. On the other hand, there is a constant tension on your posterior chain muscles while performing the cable pull-through which is not the case with the kettlebell swing.
Steps:
Stand upright with a shoulder-width stance.
Hold a kettlebell in front of your body with both hands, arms straight.
With a slight bend in your knees and a flat back, hinge at your hips and swing the kettlebell back through your legs.
Use that momentum to stand and swing the kettlebell out in front of your body until it is parallel to the floor.
Thrust your hips forward, and engage your glutes and core as you stand up straight.
When the kettlebell hits shoulder height, your knees should be straight and glutes contracted in a full hip extension.
Allow the kettlebell to swing back down through your legs.
Repeat for recommended reps.
4. Romanian Deadlift
[embedded content]
Romanian deadlifts are one of the purest hip-hinge movements and should be a part of every lifter’s exercise arsenal. This variation of the standard deadlift focuses primarily on your hamstrings, building flexibility, strength, and power.
Steps:
Stand with an upright torso with your feet placed under your shoulders.
Use an overhand grip to hold the bar at hip level.
Draw your shoulders back and keep your spine straight.
Push your hips back as you slowly lower the bar toward your feet.
Press your hips forward to come into a standing position with the barbell in front of your thighs.
5. Barbell Hip Thrust
[embedded content]
Oh, so you do not have a cable pulley machine at your gym? No problem!
The barbell hip thrust will get you a glute and ham pump, unlike anything you have ever experienced before.
Steps:
Place a loaded barbell parallel to a flat bench.
Sit on the floor with your back up against the bench. Roll the barbell over your hips until the barbell rests in the crease of your hips.
With your upper back against the bench, lift your hips slights off the floor.
Squeeze your glutes and push your feet into the ground as you begin the upward hip thrust.
Continue contracting your glutes as you push your hips toward the ceiling to achieve full hip extension.
Pause and squeeze the life out of your hams and glutes at the top of the movement.
Slowly return to the starting position and repeat for reps.
Conclusion
Whether you are a powerlifter, bodybuilder, or just want a better-looking rear-end, the cable pull-through should be a part of your lower body workout regimen.
Use the variations, alternatives, and different set and rep range combinations laid out in the article to keep your posterior chain muscles guessing and avoid hitting a plateau.
Which is your favorite hamstring exercise? Let us know in the comments below. Also, be sure to follow Generation Iron on Facebook, Twitter, and Instagram.
The Ultimate Workout for Building Shredded Hamstrings
Build Mass and Definition in Your Hamstrings
Most people have a love-hate relationship with training legs. They love to hate training their legs. Shredded legs are what separate the men from the boys. If you think building quads is hard, wait until you get serious about training your hamstrings.
Hamstrings are hard to develop since they are at the back of your legs. It’s hard to develop a mind-muscle connection with the hamstrings as you can’t see them in the mirror. Get ready to go through the most brutal hams workout of your life.
Exercise 1 – Wide Stance Squats – 3 Sets – 12, 10, 8 Reps
Squats are the king of all the leg exercises and we won’t miss utilizing it in our hams workout. Maintain a wider than shoulder width stance while performing the squats as it helps in recruiting hamstrings more than the quads.
Hip extensions help in activating the hamstrings, meaning your hams are most active as you straighten your legs and extend your hips. The wider the stance you take, the deeper your hips will flex resulting in exaggerating your hip extension and recruiting your hams.
Exercise 2 – Superset
– Leg Press – 3 Sets 30, 20, 10 Reps
– Good Mornings – 3 Sets 10, 20, 30 Reps
While performing the leg presses, place your feet at the top edge of the platform and keep the back support at a 60-degree angle. Keeping your feet at the top of the platform recruits your hams while placing them at the bottom activates your quads.
After performing 30 reps on the leg press, perform 10 reps on the good mornings. Keep your back arched and a slight bend in your knees while performing the good mornings. Don’t try to go too heavy on this exercise as it can lead to recruiting the lower back.
Exercise 3 – Lying Leg Curls – 6 Sets 30, 20, 10, 10, 20, 30 Reps
Lyings leg curls are for the legs what the preacher curls are for the biceps. Think of your hams as biceps and contract and squeeze them with every rep. By the end of the six sets, your hams should be filled with lactic acid and asking for mercy.
Change your feet placement on the pad with every set. Start the exercise with your feet placed wide apart on the pads. With every set, bring your feet closer and on the last set, your feet should be joined. The change in feet placement will work your hamstring from every angle.
Exercise 4 – Dumbbell Stiff Legged Deadlifts – 3 Sets 12, 10, 8 Reps
Dumbbell stiff legged deadlifts are a compound exercise and help in building muscle mass and strength. Keep your knees bent throughout the exercise and pause and squeeze your hams at the bottom of the movement.
Performing the Romanian deadlifts with dumbbells instead of a barbell gives you better leverage and can help with activating your hamstrings. Place your toes on a quarter plate to increase the leverage further by increasing the range of motion.
Exercise 5 – Superset
– Barbell Hip Thrusts – 3 Sets 20, 15, 10 Reps
– Glute Ham Hyperextensions – 3 Sets 10, 15, 20 Reps
The barbell hips thrusts and GHD target the hams and the glutes and can improve the separation between the muscles. Keep your feet shoulder width apart, maintain a full range of motion and pause at the top of the movement while performing the barbell hip thrusts.
Glute ham hyperextensions have been brought into the spotlight by CrossFit athletes. If you don’t have a GHD table at your gym, lie down on a flat bench and ask someone to sit on your calves. You could also perform this exercise on a lat pull-down machine by placing your knees on the seat and inserting your ankles between the seat and the pads.
Do you train your hamstrings and quads on the same day? Let us know in the comments below. Also, be sure to follow Generation Iron on Facebook and Twitter.
*Header image courtesy of Envato Elements.
The Ultimate Hamstrings Workout
Follow This Workout For Shredded Hamstrings
Hamstrings are one of the weakest muscle groups for most people. It is hard to establish a mind-muscle connection with your hamstrings since they are at the back of your legs and you can’t see them in the mirror while training.
Hamstrings are one of the most stubborn muscles groups. If you have genetically weak hamstrings or are lagging in the department, you need to show them some extra love. Muscular hamstrings can significantly add to the size of your legs.
Leg Curls – 3 Sets 15 Reps
Starting with an isolation exercise is a good idea as it pre-exhausts your muscles. By pre-exhausting your muscles you can achieve the same result while lifting relatively lighter weights.
Using a cable leg curl machine helps you in maintaining constant tension on your hamstrings throughout the movement. You don’t need to go super heavy while performing this exercise. Pause and squeeze your hams at the top of the movement.
2. Romanian Deadlifts – 3 Sets 10 Reps
Romanian deadlifts are a compound exercise and will help you in building strength and size in your hamstrings. This exercise is different from the orthodox deadlifts as these primarily target your hamstrings, while the normal deadlifts target your back.
Keep a slight bend in your knees while performing the Romanian deadlifts. Think of your hams as chains used for lowering and lifting your back. Push back your hips while lowering the weights so all the tension is placed on your hamstrings.
3. GHD Hyperextensions – 3 Sets 15 Reps
GHD hyperextensions are an exercise brought into the limelight by CrossFit. Maintaining a full range of motion is key to performing this exercise. If you find the bodyweight version of this exercise to be easy, use weights to add resistance.
If you don’t have an access to a GHD bench at your gym, you can use a flat bench for this exercise. Place your knees at the top of the bench and ask someone to sit on your calves while you perform the exercise.
4. Jefferson Squats – 3 Sets 12 Reps
[embedded content]
You have been missing out on a lot if you’ve never tried this exercise. Jefferson squats will set your hams and glutes on fire. The Jefferson squats might look a little awkward at first, but you will dig the results.
It is a wide-stance deadlift where you hold the barbell between your legs with one hand in front of your body and one hand behind it. The better you become at doing Jeffersons, the more proficient you will be at squatting.
5. Good Mornings – 3 Sets 12 Reps
Good mornings are an excellent finishing exercise for your hamstrings. Most people make the mistake of going too heavy on this exercise. Use weights you can handle while keeping constant tension on your hams.
Maintain a slight bend in your knees and an arch in your back. Push back your hips on the way down and squeeze your hams at the bottom of the movement. Don’t rest by standing upright. Maintain constant tension by stopping a couple of inches from the starting point.
Who do you think has the best hamstrings? Let us know in the comments below. Also, be sure to follow Generation Iron on Facebook and Twitter.
Kai Greene Leg Workout For Massive Wheels
Kai Greene Leg Workout Routine
Kai Greene is one of the most widely recognized bodybuilders of our time. His mind-blowing physique, inspirational words, incredible artwork, trademark hairdo (and infamous grapefruit video) have earned him fans all over the world.
Kai Greene Stats
Full Name: Kai Greene
Weight
Height
Year Of Birth
317 lbs.
5’8’’
1975
Arms
Chest
Thights
22″
58″
33″
Kai Greene made his Mr. Olympia debut in 2009 and competed in the world’s most prestigious bodybuilding contest until 2014. Kai Greene’s Mr. Olympia track record:
2009 – 4th place
2010 – 7th place
2011 – 3rd place
2012 – 2nd place
2013 – 2nd place
2014 – 2nd place
Related: Is Kai Greene Challenging Phil Heath In Recent Tweet?
For four years in a row (2011-14), Kai Greene came close (but not close enough) to conquering the throne. Some fans consider Greene a part of the “uncrowned Mr. Olympia” club accompanying bodybuilding legends like Flex Wheeler, Kevin Levrone, and Shaun Ray.
The Predator’s legs are one of the biggest reasons behind his success on stage. Greene’s vastus medialus (quad teardrop) striations are unmatched, hams in perfect symmetry with quads, and his calves have a life of their own.
But before we dive into Kai Greene’s leg workout, let’s get to know him a little better. Shall we?
Also Read: TOP 6 UNCROWNED BODYBUILDERS OF ALL TIME
The Kai Greene Story
Born and raised in Brooklyn, New York, Greene had a tough childhood. After being orphaned at 6-years-old, he spent most of his youth in foster homes.
Throughout his younger years, Kai struggled to find a place in the community. The ensuing feeling of being an outcast turned Greene into a trouble child. His regular misconducts put him at risk of being kicked out from both his school and foster home.
Finding The Anchor
Weight training came as Kai Greene’s saving grace. Greene started training at the age of 13 and used the gym as an escape from all his problems.
Kai’s 7th grade English teacher realized his bodybuilding potential and started encouraging him to compete in teen bodybuilding shows. This little push was all Kai needed to turn his life around.
It did not take Kai Greene too long to realize that he had great bodybuilding genetics. He was growing faster than others his age and was beating kids older than him at bodybuilding competitions.
Check Out: Decoding Genetics: Check If You Have Bodybuilding Genetics
The Predator Was Born
Over the next five years, Kai Greene competed in various unofficial teen bodybuilding shows. Since Greene was bigger and more jacked than other teenagers his age, he dominated every contest he entered.
By the time Mr. Getting It Done turned 19, he had earned his Pro card in a natural bodybuilding federation, the 1994 NGA American Nationals. The early and quick success made Kai realize that he could make it big in bodybuilding, and make it big, he did.
Kai Greene & His Haitus
Since 2014, Kai Greene fans have been complaining about his absence from the Olympia stage. But hardly do they know, this is not the first time Kai has taken a break from competing.
Kai’s first show as an IFBB Pro was the 1999 World Championships in Slovakia. Although Greene placed 4th, he was not satisfied with his performance.
Determined to work on his weaknesses and sculpt one of the greatest physiques of all time, Kai Greene went back to the drawing board and took four years away from the competitive circuit.
Related: Kai Greene Meets With Universal Execs During Olympia Week
Kai Greene Leg Workout
Because of his size and appearance, many people expect Kai Greene’s workouts to consist of lifting heavy, grunting, and cursing throughout the workout. But, the reality is different.
Kai Greene Workout Principles
It does not matter if Kai is training legs, arms, or back. He swears by the following training principles:
1. Form Is King
Let’s do an activity. It will be worth it, we promise.
Set a five-minute timer, log onto YouTube, and watch (at 2X speed) as many Kai Greene training videos as you can.
Now here is what you need to do – note down every time Kai compromises on his form in favor of lifting heavy. At the end of the five minutes, you will probably have – zero entries.
“The weight is a tool. Do you focus on the hammer or the nail? You better focus on the thing you’re trying to hit.”
2. Mind-Muscle Connection
If you see Kai Greene pose, you would know that he can move each fiber in his body at will. The control he has over his muscles is incredible. Kai’s movements are precise, contractions are hard, and each rep is harmonious with the next.
Bodybuilding is not about lifting as heavy as you can. To sculpt your dream body, you need to contract your muscles and visualize your goal physique with every rep to ensure maximum muscle fiber recruitment.
This technique was first made famous by Arnold Schwarzenegger. If you do not feel a muscle pump by the end of an exercise, you would be better off dropping the weight (and your ego) and trying again.
Next Read: The Importance of Mind-Muscle Connection To See Huge Gains
3. Warm-Up
Kai Greene spends 15-20 minutes warming up before every workout. Benefits of warming up include:
Improves flexibility.
Enhances performance.
Less muscle tension and pain.
Improved range of motion.
Increased blood flow and oxygen.
Lower risk of injury.
Mr. Getting It Done believes that his relatively long warm-up routine gets him in the right mindset to train and improves his focus. According to him, he gets more alert, aware, and his neurological connections get sharper.
Related: Follow This Insane Pro Warm-Up Routine For Ultimate Gains
4. Volume is Key
The Predator uses a lot of sets and reps in his workouts. He does not leave the gym unless he has annihilated his muscles. You will be doing up to four sets of eight different exercises and completing 12-20 reps in each, so get ready for the Kai Greene leg workout.
5. Take Your Time
Take your focus off the clock and put it where it should be – on your lower body. You are not in a race against time here. Take as long as you need between sets. Do not begin the next set until you are properly rested.
Kai Greene Leg Training Routine
Kai Greene’s monster truck wheels are a result of years of hard work and consistency. His leg workouts include a combination of advanced training principles and a variety of exercises to train his lower body from different angles.
The Predator’s legs are one of his strengths, but it was not always this way. He has been training for over 20 years with a focus on sculpting the perfect pair of wheels. Greene is presently working on adding more detail to his upper legs and making them rounder.
1. Superset
Glute Kick-Back: 4 sets 20 reps
Hip Abductor: 4 sets 20 reps
Kai Greene trains in a specific order that addresses body parts from weakest to strongest. He believes that it helps him build better muscular symmetry.
Greene starts his leg workouts with glutes and then transitions to training his calves, then hams because, according to him, that is the order of needed improvement. He trains his quads in the end because they are superior to other parts of his legs.
2. Superset
Standing Calf Raise: 4 sets 20 reps
Seated Calf Raise: 4 sets 20 reps
There are no accessory muscles on Mr. Getting It Done’s training program. Kai performs four sets each of standing and seated calf raises. While the standing variation trains the gastrocnemius, seated calf raises are optimal for training the soleus muscle.
Kai Greene uses the standing calf raise machine for the first leg of the superset. If you do not have access to a standing calf raise machine at your gym, you could use a smith machine with an aerobic stepper or a leg press machine for the exercise.
While performing calf exercises, you need to make sure you are following a full range of motion. Your heels should only be a couple of inches away from the floor at the bottom of the movement. On the other hand, at the top of the movement, you should look like a ballerina on her toes.
Related: 10 Reasons Why You’ll Never Have Big Calves
3. Superset
Jefferson Squat: 4 sets 20 reps
Hip Adductor: 4 sets 20 reps
Kai Greene played a big role in bringing back the Jefferson squat.
Named after circus strongman Charles Jefferson (1863-1911), the unique squat variation can help increase leg strength, size, core stability, and build power in multiple planes of movement.
How To Perform Jefferson Squat:
Stand over a barbell, facing one of the weighted ends with the bar between your legs. Your front foot should be facing forwards, and your rear foot rotated 90 degrees outwards.
Place your feet at a distance so that as you go down into your squat, your knees are directly above your ankles.
Squat down over the bar and grab it using a mixed grip with one hand behind you and one in front of you.
Drive down into the ground through your feet and stand tall, bringing the barbell straight up between your legs.
Return to the starting position with a slow and controlled motion.
Repeat for recommended reps.
4. Unilateral Standing Leg Curl: 4 sets 20 reps
Unilateral standing leg curl is an incredibly effective exercise to target your hams individually. It is especially beneficial for people whose hams are lagging their quads, glutes, and calves.
Standing leg curls can also limit the use of momentum and jerking motions. Keep your toes pointed throughout the exercise to ensure maximal hamstring muscle fiber recruitment.
5. Lying Leg Curl: 4 sets 20 reps
Kai Greene likes to think about his hams as piano wires throughout the entire range of motion. You do not want to be moving the weight primarily focusing on your shins or lower body. At the top of the movement, focus on squeezing your hams.
Lying leg curl can do for your hams what bicep curls do for your biceps. Perform the exercise with a slow and controlled movement, and you will feel every fiber of your hamstring working.
The Predator does not limit his workouts to a pre-defined number of sets. If he feels that he was not focused during the first couple of sets, he makes up for it by performing couple more sets of the exercise.
Remember – bodybuilding is not about going through the motions. Your goal should be muscle annihilation.
6. Barbell Stiff-Legged Deadlift: 4 sets failure
For the barbell stiff-legged deadlift, Kai Greene uses relatively lightweight. To put maximum tension on his hamstrings, he turns his toes in and points his heels outwards (forming an “A” with his feet) while performing the lift.
The Predator maintains a slight bend in his back throughout the exercise and uses his hamstrings and glutes to move the weight.
If you cannot perform the movement with a 2:1:2:1 rep tempo (two seconds on the way down, a second’s pause at the bottom, two seconds on the way up, and a second’s pause at the top), and have to jerk your body up and down to punch out the reps, you are probably going too heavy.
7. Squat: 5 sets 20 reps
No, this is not a typo. Kai Greene gets to the squat rack at the end of his leg workout. Since you will be fatigued at this point in your workout, you need to make sure you are not compromising on your form.
Mr. Getting It Done maintains total control for the entire set and length of each rep. Rather than dropping down and blasting up, Kai focuses on feeling every inch of the rep and tries to intensify the contraction on his legs.
8. Leg Press: 5 sets 20 reps
Unlike most lifters, Kai Greene does not like to go super heavy on the leg press machine. While fitness noobs focus on locking out their knees and squeezing their quads at the top of the movement, Greene tries to contract his legs throughout the entire rep.
If you can only move the weight a few inches while performing the leg press, it is a sign you have more weight on the machine than you can handle.
Wrapping Up
The next time you hear fitness gurus talking about why Kai Greene cannot make a comeback, remind yourself that the guy in question here has no qualms taking four years off if he believes he can bring a better package to the stage. Should you be doubting his commitment and ability? They don’t call him Mr. Getting It Done for nothing.
Who, according to you, has the best legs in the fitness industry? Let us know in the comments below. Also, be sure to follow Generation Iron on Facebook, Twitter, and Instagram.
Eight Best Dumbbell Exercises For Your Hamstrings
Check out some of the best dumbbell exercises to strengthen your hamstrings!
Generations of gym teachers and track coaches told kids to put one foot over the other, bend over and hold. Surely someone thought it made sense to limber up before a run by pushing against a tree.
Such stretch-and-hold moves are better than nothing, of course, and studies support the value of static stretching. But it takes more to loosen and strengthen the hamstrings, now more than ever in a world where we spend most of our time sitting, thus shortening our hamstrings, tightening our glutes, and rendering our bodies more susceptible to injuries.
Thankfully, there’s perhaps no body part that can be more effectively stretched and strengthened at the same time than the hamstrings. In this 30-minute dumbbell workout to build your hamstrings, we’ll work through four sets of these eight moves in a circuit fashion, resting only briefly between sets, to produce maximum results.
Pete Williams is a NASM certified personal trainer and the author or co-author of several books on performance and training.
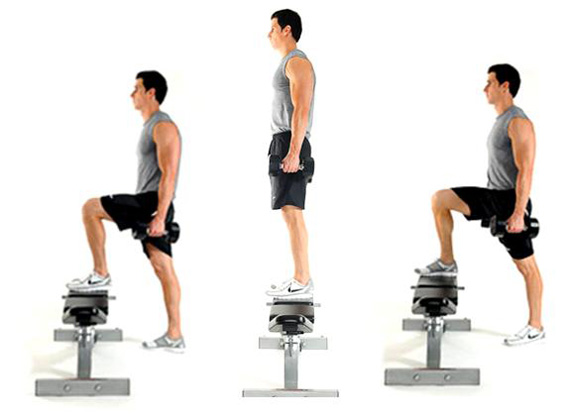
1. Dumbbell Step-Ups
What it does: It’s a simple but effective way to stretch the hamstrings while activating the glutes.
How to do it: Stand holding dumbbells with one foot on a box or step, leaning slightly forward. Squeeze your glute and stand tall, bringing your back foot to the step/box. Step back down and repeat.
How many? 4 sets of 10 reps per side.
2. Inverted Hamstring
What it does: This move forces you to fire (activate) your glutes and stretch your hamstrings. Practicing such movements becomes a habit in the gym and everyday life.
How to do it: Balance on your right foot, keeping tummy tight and shoulders back and down. Bend at the waist with both hands out to the sides and extend your left leg back as you fire the left glute. Your shoulder and heel should move together, forming a straight line. Return to starting position and switch legs, performing a set of 10 on each leg.
How many? 10 reps per side.
3. Dumbbell Squats
What it does: This simple but challenging weight room standby stretches and strengthens the hamstrings.
How to do it: Stand holding a pair of dumbbells on your shoulders with elbows pointing straight ahead. Squat until your thighs are parallel to the floor. Push through the hips to return to a standing position.
How many? 4 sets of 10 reps.
4. Bent-Over DB Row, One-Arm, One-Leg
What it does: Not only does this challenge you to work each side independently, as with a traditional one-arm row, but you work your hamstrings while inevitably lowering the dumbbell deeper.
How to do it: Stand on one leg, grasping a dumbbell rack or bench in front of you with one hand. Drop your chest and lift the leg opposite your free hand to create a “T” with your body. Grab a dumbbell with your free hand, pull it to the side of your waist and then lower it. Do 10 reps on one side and then repeat with the opposite arm and leg.
How many? 4 sets of 10 reps per side.
5. Romanian Deadlift
What it does: Start with a light set of dumbbells. Form is especially key to getting the full benefit from the RDL; don’t think of the exercise as bending forward but rather as sitting back with your torso moving forward instead of staying upright.
How to do it: Perhaps the most recognizable hamstring move, and for good reason; it’s effective in building the proper activation patterns in your hamstrings and glutes while also strengthening your back.
How many? 4 sets of 10 reps.
6. Lateral Lunges
What it does: Lateral movement is important to the motions of everyday life, but too often we ignore it in the gym. The lateral lunge hits the hamstrings, along with the glutes and quads.
How to do it: Stand holding a dumbbell in each hand at your sides. Step out to the right, keeping toes pointed straight ahead and feet flat. Squat down only your right leg, keeping the left leg straight. Squat as low as possible, keeping the left leg straight and holding for two seconds. Return to the starting position and repeat for a set of 10. Switch sides.
How many? 4 sets of 10 reps per side.
7. Split Squat – Back Foot Elevated
What it does: It requires a deep hamstring stretch to do properly while also working the glutes and quads.
How to do it: Holding dumbbells at your sides, place your back foot on a bench and step out into a split stance. Lower the hips by squatting back and down. Without letting your back knee touch the ground, push off the front leg to return to starting position. Complete set on one side before switching sides.
How many? 10 reps per side.
8. Romanian Deadlift – 2 Arm, 1 Leg
What it does: For all the reasons the traditional RDL is effective, along with the added challenge of instability.
How to do it: Stand on one foot holding dumbbells in each hand. Bend forward from the waist, lowering the weights as your non-supporting leg lifts behind you. Squeeze your glutes and contract your hamstrings to return to the starting position. Complete the reps on one side before switching sides.
How many? 4 sets of 10 reps per side.
5 Landmine Exercises For A Shredded Body
The Best Landmine Exercises
Landmines are one of the most underrated exercises. You could perform the landmines as a compound or unilateral lift to fix your strength or muscles imbalances. There is a variation of the landmines you can perform to train every muscle group.
The landmine exercises force you to use your muscle stabilizers which can help strengthen your core. In a landmine exercise, you place one end of a barbell in a corner where it doesn’t move or use a T-bar machine.
Landmine 180s
If you know about the landmine exercises, it’s probably because of the 180s. The 180s are arguably the most popular landmine exercise. 180s work your obliques and core and will set them on fire. Get in position by standing with a shoulder-width stance.
Extend your arms forward and grab the end of the barbell with both your hands. Your hands should be in front of your face at the starting position. Take a deep breath and rotate to the right side until the end of the barbell is at your waist level. Return to the starting position while breathing out and repeat on the left side.
Landmine Squats
If you’re someone who has back problems and can’t perform the orthodox squats with the barbell on your back, the landmines squats are a lifesaver for you. The landmine squats take off all the tension from your back and put them on your quads.
Stand with a shoulder-width stance and grab one end of the barbell with both your hands. Bend your arms at your elbows and place your hands in front of your chest. Inhale and perform a squat. Return to the starting position while breathing out. Repeat for recommended reps.
Single-Arm Bent Over Landmine Rows
Performing the bent-over rows on a landmine setup can turn the compound exercise into an isolation lift. You can perform the single-arm bent over landmine rows with your body parallel or perpendicular to the barbell.
Both the variations will give the barbell a different movement pattern and target your back uniquely. Make sure you’re not just going through the motions. Hold and contracts your muscles at the top of movement while performing each exercise.
Landmine Shoulder Press
Landmine presses are a killer shoulder exercise. You should make the exercise a part of your arsenal if you want to see some insane results. Most people make the mistake of using momentum by pushing through their legs while performing the landmine presses.
You need to keep a strict form to get the most out of this exercise. The jerking motions can reduce the tension on your shoulders and divert it to secondary muscles like your arms and legs.
Single-Leg Landmine Romanian Deadlifts
The single-leg landmine Romanian deadlifts might be one of the hardest compound exercises to perform. The main objective of the landmine RDLs is to put tension on your stationary leg while getting the maximum height with your back leg.
You don’t need to worry too much about touching the floor with the barbell. Stand perpendicular to the barbell (this will give you a similar feeling as the dumbbell RDLs) and place your feet right behind the end of the barbell. You should use your free arm to balance yourself without obsessing over which side your arm should point towards.
Have you ever tried one of these exercises? Let us know in the comments below. Also, be sure to follow Generation Iron on Facebook, Twitter, and Instagram.
Header image courtesy of Envato Elements
- 1
- 2