
SunsOut
Gold Member
How to incline bench press with perfect form, a free incline bench press workout, and more!
The post The Definitive Guide to the Incline Bench Press appeared first on Legion Athletics.
[h=2]Key Takeaways[/h]
Just want a quick rundown of how to incline bench press with proper form? Here’s the TL;DR:
Now, if you want the full eggs to apples explanation of how to incline bench press with perfect form, the six best incline bench press variations, and a free incline bench press workout, keep reading!
And if you found this article because you’re unhappy with your chest, I understand.
I used to be in the same boat. Here’s how I looked after my first year or so of weightlifting:

Not too impressive.
I kept at it, though, and here’s where my chest was six years later:

Better, but nothing to write home about, either, especially considering how long it had taken me to get there.
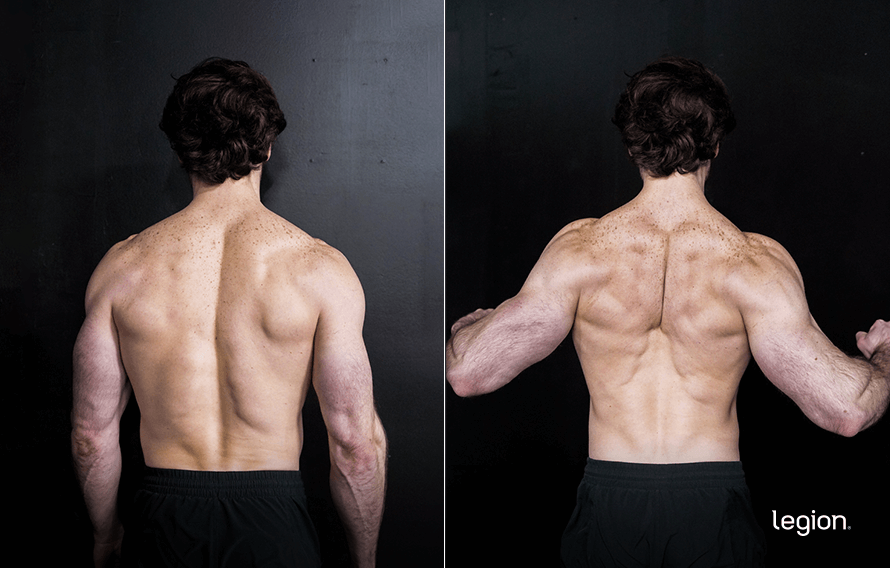
Soon after I took that picture, I got serious about learning the real science of strength training —including the principles you’ll learn in this article—and here’s where a couple of years of high-quality training (and dieting!) got me:
And while I don’t stay this shredded year round, my chest still looks big and defined even when I’m fatter:
And that’s without a pump, frando.
One of the biggest changes I made to my training was including more exercises for my upper chest, especially the incline bench press.
So, if you want to take your pecs from pitiable to praiseworthy, you want to get good at the incline bench press. And that’s what you’re going to learn how to do in this article.
Specifically, you’ll learn:
[h=2]What Is the Incline Bench Press?[/h]
The incline bench press (or incline barbell bench press) is a compound chest exercise that’s very similar to the flat barbell bench press. The main difference is it’s performed using an incline bench (hence the name) instead of a flat bench.
By changing the angle of the bench, you also change which muscle groups the exercise emphasizes. As a general rule, vertical pushing exercises like the military press primarily train your shoulders and arms, whereas horizontal pushing exercises like the flat bench press primarily train the chest and arms.
Thus, the incline bench press is somewhere in between.
For this reason, it’s often included in bodybuilding and strength training routines as a compound exercise on push (as part of a push pull legs split), chest, or upper body days, and in powerlifting routines as an accessory exercise to boost bench press strength.
Read: How to Find the Best Workout Split for You
It’s very effective for developing your upper body muscles and getting strong on the incline bench press can improve your flat barbell bench pressing, too. What’s more, it’s also an outstanding exercise for growing your shoulders, a notoriously stubborn muscle group.
It also helps develop your triceps, shoulders, and even your biceps to a certain degree.
Specifically, the incline bench press develops the . . .
The main muscle of the chest is the pectoralis major, or “pec major.”
Here’s what it looks like:
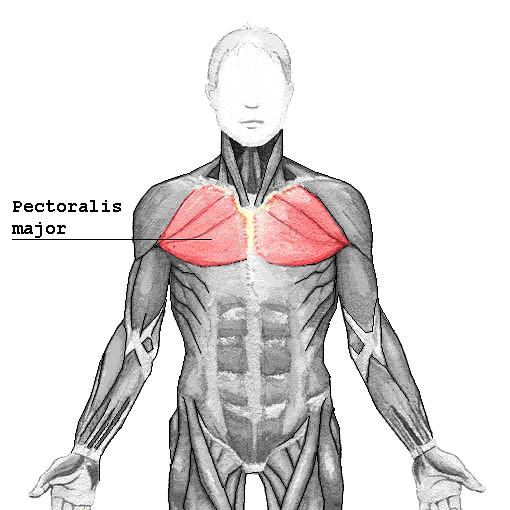
The chest muscle’s main function is to bring the upper arm across the body (towards the sternum).
As you can see in the image above, the pectoralis major has multiple “heads,” or places where the tendons attach to the skeleton.
There’s a sternocostal head, which attaches the breastbone and rib cage to your upper arm, and a clavicular head, which attaches your collarbone to your upper arm.
Why is this important?
How a muscle attaches to the skeleton influences how it responds to training.
For instance, certain exercises, like the flat and decline bench press, emphasize the larger sternocostal head of the pecs, while others, like the incline and reverse-grip bench press, emphasize the smaller clavicular head.
Notice that I said emphasize, not isolate, because all pressing exercises involve both heads of the pecs to some degree or another.
Research shows that the incline bench press is a fantastic exercise for emphasizing the “upper chest,” and therefore, should be a staple in your chest training (more on this in a moment).
This helps you prevent muscle imbalances, make sure your upper chest doesn’t fall behind in development, and ensure you wind up with a proportionate pair of pecs.
Let’s go through each of them in detail, starting with the setup.
[h=3]Step 1: The Setup[/h]Proper incline bench press setup comes down to getting a few things right:
[h=4]1. Position your body[/h]First, angle a bench to 30 to 45 degrees.
Here’s what different angles look like:
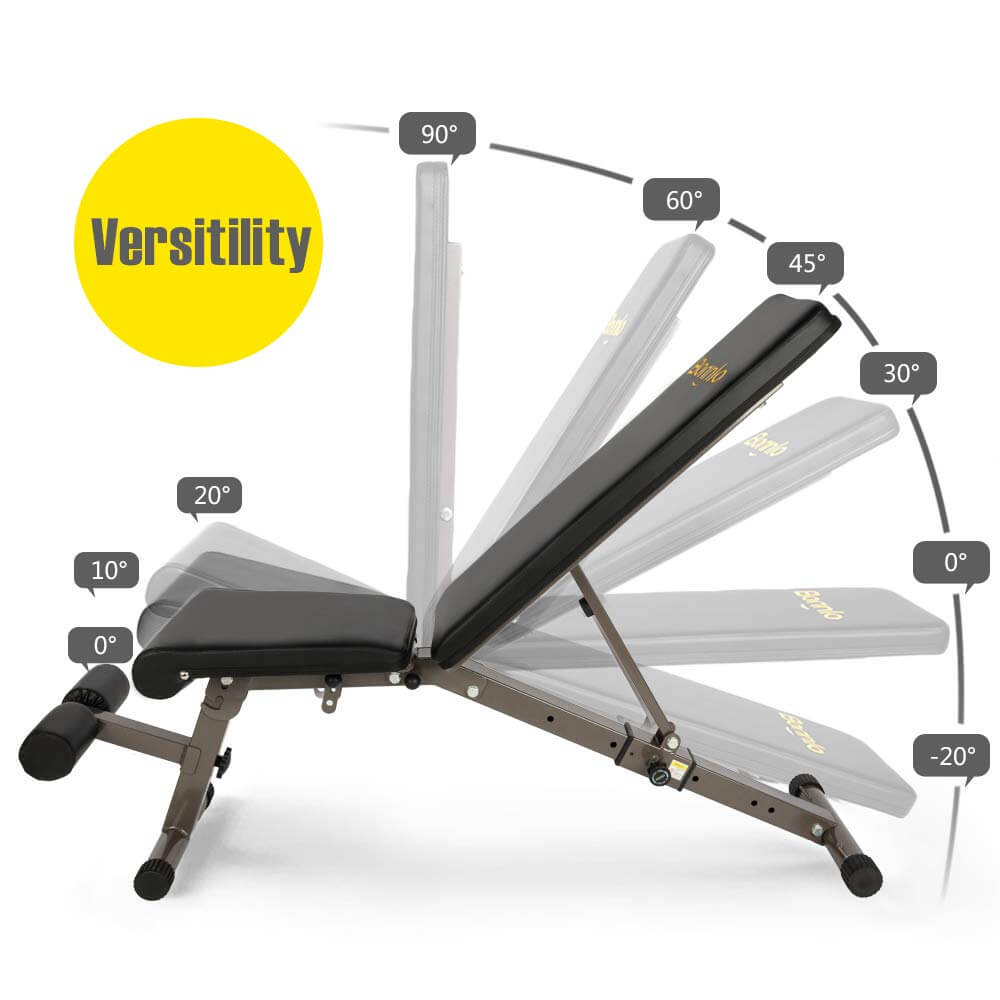
I prefer a 45-degree angle, but some people prefer slightly more or less than this. Play around with different angles within this range and see what you like most. Just make sure that once you settle on an angle you like, stick with that for several months before changing it again.
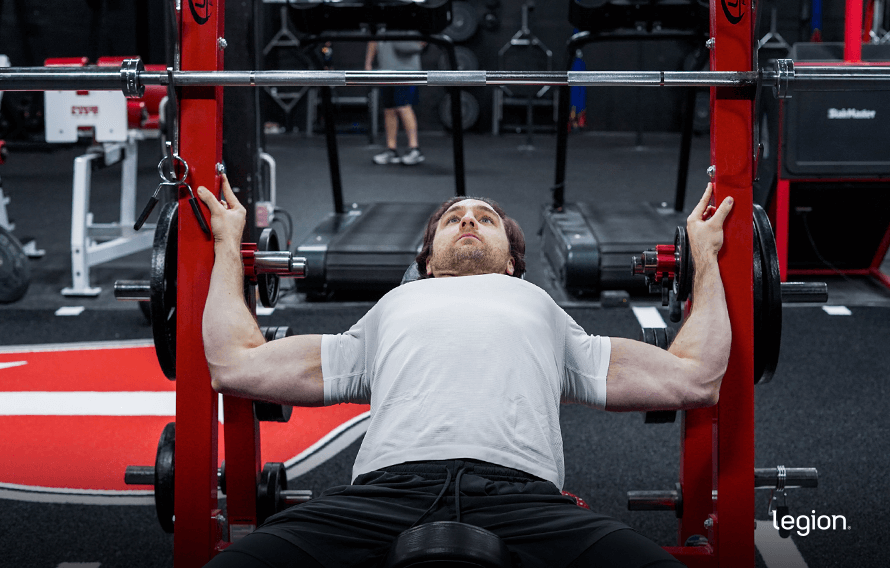
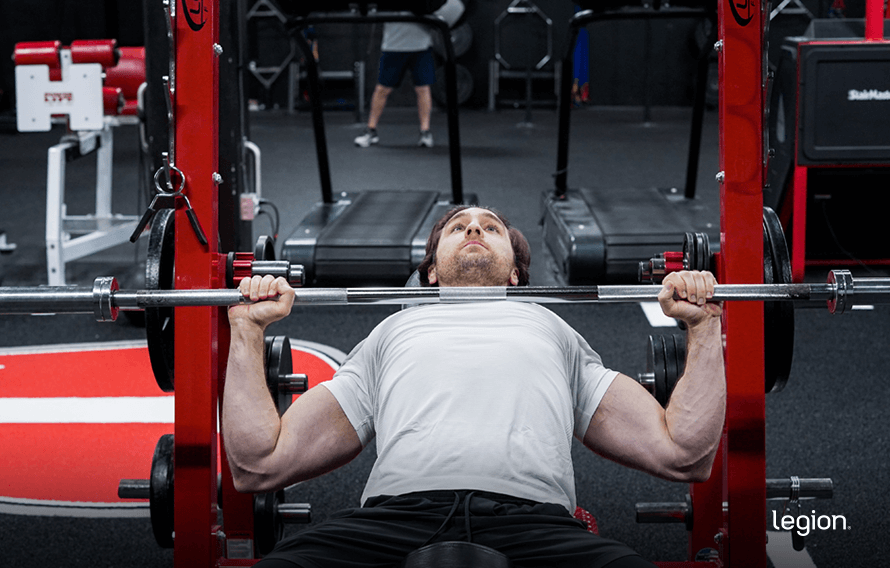
Next, adjust the seat height so your eyes are under the bar when you lie down, like this:
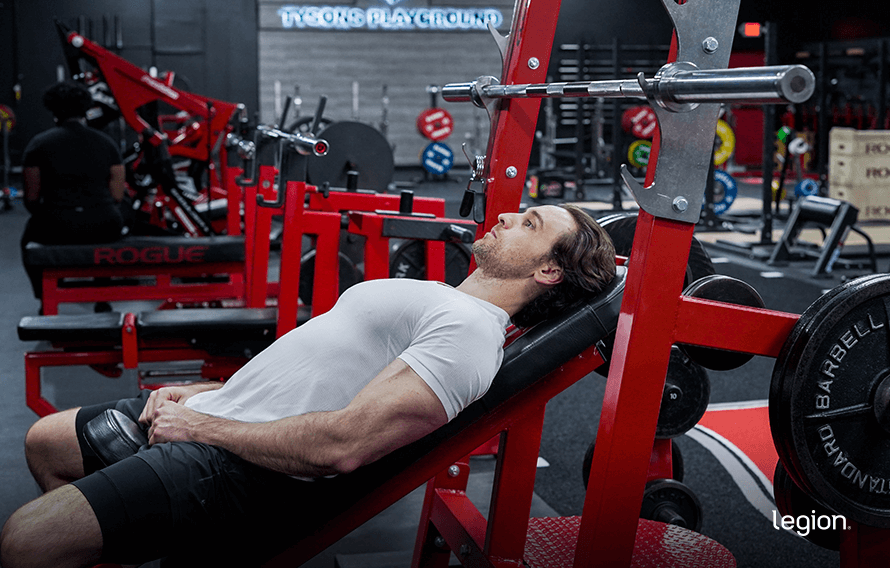
(You may need to adjust your body position slightly based on your anatomy—more on this in a moment).
While keeping your butt planted on the bench, raise your chest up toward the bar, pinch your shoulder blades together, and pull your shoulders down toward your waste. Your upper back and shoulders should feel tight, almost uncomfortably so. A good cue for this is to think of pulling your shoulder blades “into your back pockets.”
Here’s what this looks like:
Some people also like to grip the bar or even the bench to help push their shoulder blades into the right position. Here’s what this looks like:
You can play around with both approaches and see what works best for you.
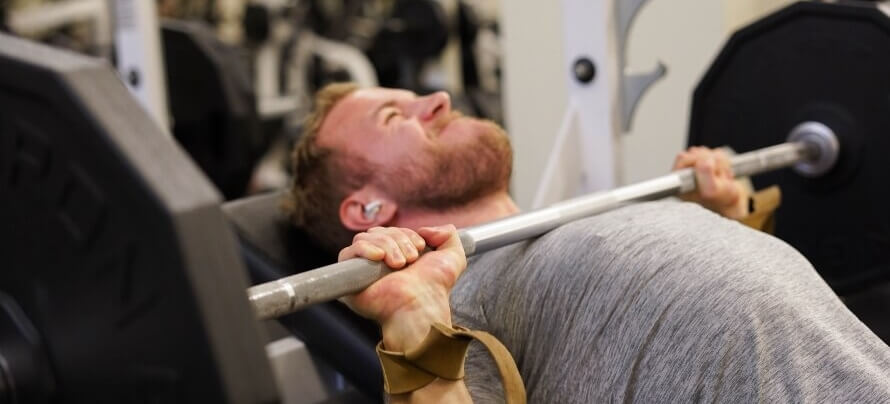
[h=4]2. Grip the bar[/h]Grip the bar with your hands slightly wider than shoulder-width apart, about 22 to 28 inches, depending on your build, like this:
If you go too narrow, you’ll shift the emphasis to the triceps as opposed to the pecs, and if you go too wide, you reduce the range of motion and effectiveness of the exercise and put more stress on your shoulders.
Hold the bar low in your hands, closer to your wrists than your knuckles, and squeeze it as hard as you can. Your wrists should be bent just enough to allow the bar to settle into the base of your palm, but not folded back at a 90-degree angle. This prevents wrist pain.
Here’s how this looks:
A good way to check your grip width is to have a friend get in front of you and check the position of your forearms at the bottom of the movement. You want your forearms to be as close to perpendicular to the ground as possible. That is, straight up-and-down vertical, like this:
Don’t use a “thumbless” or “suicide” grip (as it’s aptly called) where your thumbs lie next to your index fingers as opposed to wrapped around the bar. The reason for this is obvious: when you’re going heavy, it’s surprisingly easy for the barbell to slip out of your hands and crash down on your chest, or worse, your throat or face; and there’s no benefit to this style of grip.
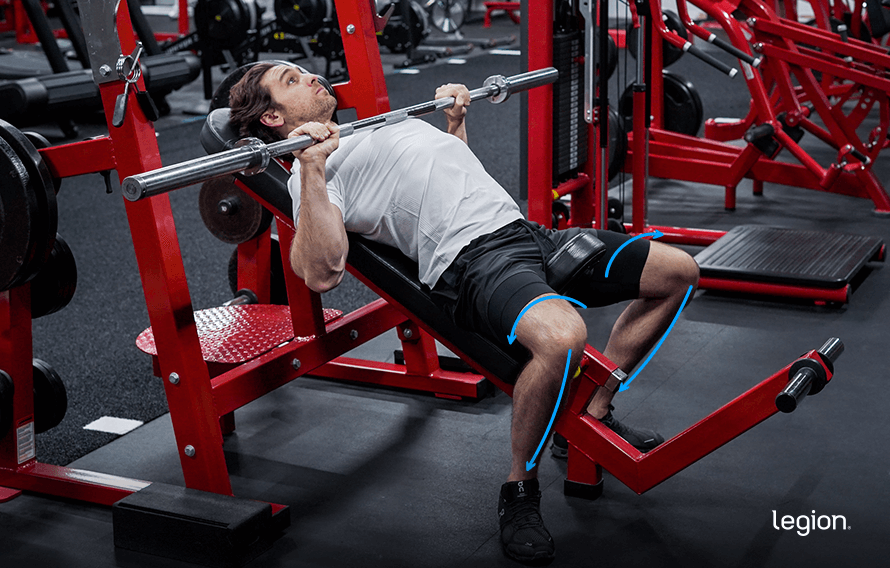
[h=4]3. Position your feet[/h]Plant your feet flat on the ground.
Start with your feet shoulder-width apart, and play around with different positions until you find one that feels most stable. Some people prefer to have their feet pulled back toward the bench, and others prefer to have them directly underneath their knees.
As you push your feet apart, you should feel tension in your glutes, groin, and hip flexors.
It’s important to get this right, because your legs help stabilize your upper body and keep your shoulder blades glued to the bench, which allows you to use heavier weights.
As you become more experienced over time, you’ll learn to push your feet into the ground just as you begin to push the bar off of your chest, which is known as “leg drive” in powerlifting circles.
Remember to keep your legs as tight as possible during every rep. An easy way to do this is to push your knees out to the sides and push your heels into the ground as you push the bar off your chest. A common mistake is to let your knees shoot inward during your last few reps, which reduces tension in your upper body and makes it harder to finish your set.
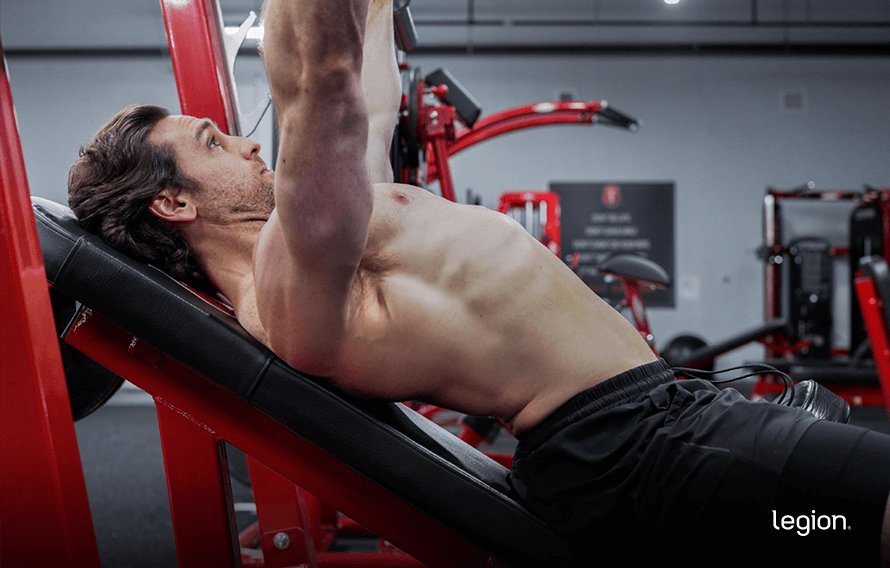
[h=4]4. Arch your back[/h]You don’t want your back flat on the bench and you don’t want it so arched that your butt is floating above it.
Instead, you want to maintain the natural arch that occurs when you push your chest out, your butt into the bench, and your feet apart, like this:
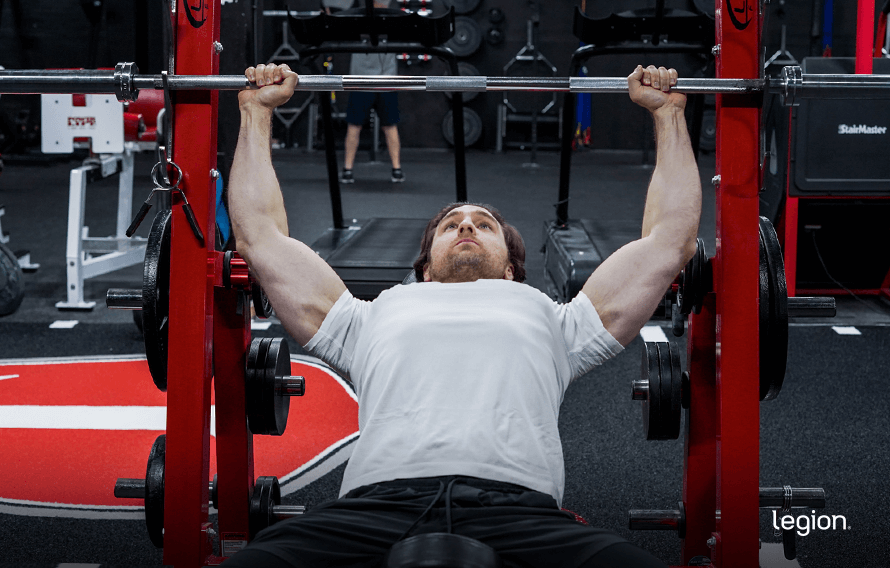
[h=4]5. Unrack the bar[/h]Unrack the bar by locking your elbows out to move the bar off the hooks.
While keeping your arms locked, move the bar horizontally until it’s directly over your shoulders. Don’t try to bring the weight directly from the hooks to your chest, and don’t drop your chest and loosen your shoulder blades when unracking.
Here are a few good pointers for dialing in your rack position:
Many people make the mistake of flaring them out too far to the sides (away from the body), which can cause shoulder pain. This alone is probably why variations of the bench press have a bad reputation as shoulder wreckers. A less common mistake is tucking your elbows too close to your torso, which robs you of stability and strength and can aggravate your elbows.
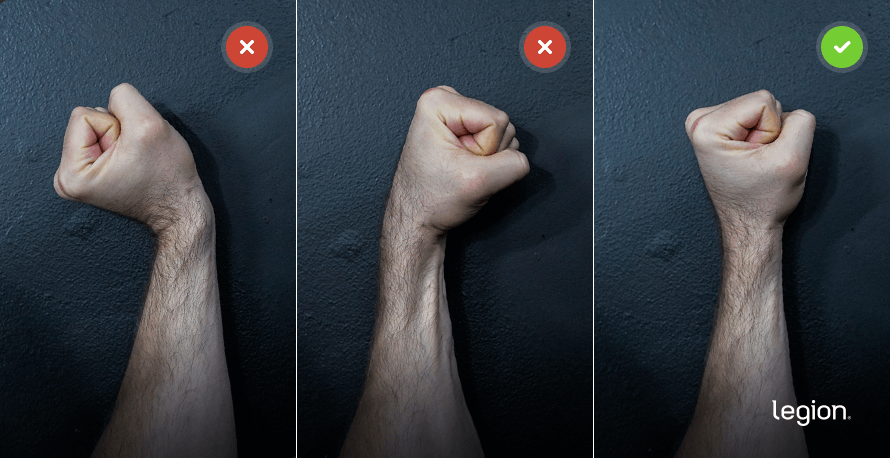
Instead, you want your elbows to remain at a 50- to 75-degree angle relative to your torso throughout the entire movement. This protects your shoulders from injury and is a stable, strong position to press from. Here’s a helpful visual:
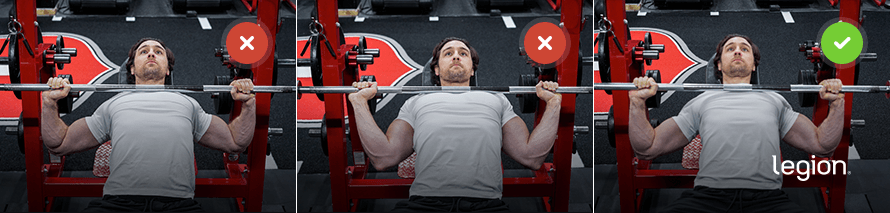
As you can see in the left image, the upper arms are at about a 90-degree angle relative to the torso, which is hard on the shoulders. In the middle image, the upper arms are at about a 20-degree angle, which is hard on the elbows and shoulders and reduces how much weight you can press. The right image shows the ideal position, with the upper arms about 60-degrees relative to the torso.
The exact angle you use will depend on your anatomy, but the point is this: don’t flare your arms out, and don’t keep them tucked in too close to your torso.
Keeping your elbows in place, lower the bar to the upper part of your chest just below your collarbones. The bar should move down in a straight line to your chest, not toward your face or belly button, like this:
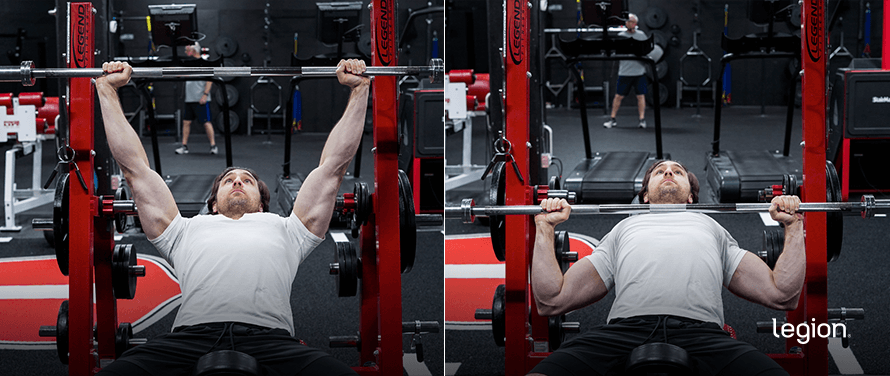
Once the bar has touched your chest (touched, not bounced off of), you’re ready to ascend.
[h=3]Step 3: The Ascent[/h]Although it’s called the incline bench press, it’s better to think of the ascent as pushing rather than pressing.
That is, picture that you’re pushing your torso away from the bar and into the bench instead of pressing the bar away from your body. This will help you maintain proper form and control of the bar and keep tension in your upper back.
Keeping your shoulder blades down and pinched, your elbows tucked, your lower back slightly arched, your butt on the bench, and your feet on the floor, push against the bar to get it off your chest.
You can also use the “leg drive” I mentioned earlier by pressing your heels into the floor. This transfers force up through the hips and back, which helps maintain proper form and increases the amount of upward force you can generate.
The bar should move up in a straight line, passing your chin, and ending where it began: with the bar directly over your shoulders.
Lock your elbows out at the top of the movement. Don’t keep them slightly bent as this needlessly reduces the range of motion.
You’re now ready for the next rep.
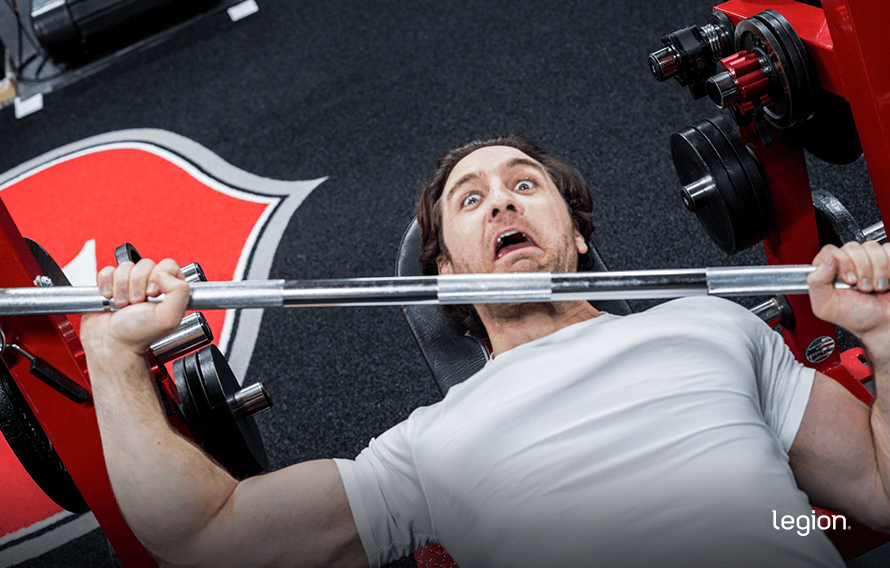
Once you’ve completed the final rep in your set, you’re ready to rack the bar. Don’t try to press the bar directly into the hooks because if you miss, it’s coming down on your face, like this:
Instead, finish your final rep with the bar directly over your shoulders and your elbows locked, and then slam the bar horizontally back into the rack.
That’s it!
[h=2]A Simple, Effective, and Challenging Incline Bench Press Workout[/h]When it comes to workout programming, you can treat the incline bench press more or less the same as the flat bench press. I often like to include them in the same workout, usually only changing the order of exercises so I can periodically reap the benefits of both (more upper chest development with incline, more weight with flat).
Since the incline bench press is a compound exercise, you usually want to do it at the beginning of your workouts when you’re feeling freshest (the first or second exercise), and it typically works best when performed for relatively low reps (eight or fewer).
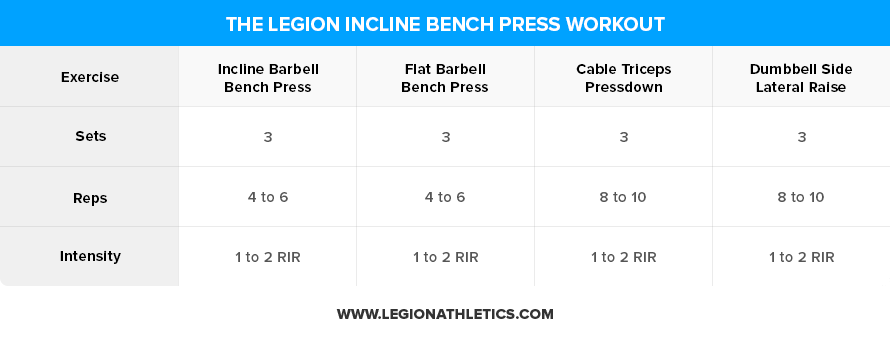
With that in mind, here’s an effective incline bench press workout that includes several other exercises for your chest, shoulders, and triceps.
And if you’d like more options and guidance on how to incorporate this workout into a workout routine, enter your email address in the form below.
[h=2]Get Your Free Incline Bench Press Training Program Now[/h] Enter your email address below to get 12 weeks’ worth of 3, 4, and 5-day per week incline bench press workouts, all expertly laid out in Google Sheets.
Sending...
Your free stuff is on the way!
Looks like you're already subscribed!
And now a few details on how to do this workout properly.
[h=3]Warm up before each workout.[/h]When you warm up for the incline bench press (or any other exercise), here’s the protocol you want to follow:
After your warm-up and hard sets for the incline bench press, you don’t need to warm up for the rest of the exercises in the workouts—your muscles will be plenty warm already.
If you want to learn more about the importance of a proper warm-up and how to warm up for different workouts, check out this article:
[h=3]Use Reps In Reserve (RIR) to control workout intensity.[/h]Reps in Reserve (RIR) is a method of controlling your workout intensity, and it works like this:
1 RIR = 1 rep shy of failure
2 RIR = 2 reps shy of failure
3 RIR = 3 reps shy of failure
. . . and so on.
For all of the exercises in this workout, I recommend you use an intensity of 1 to 2 RIR, which means you want to do as many reps as you can within the prescribed rep range until you feel you can only do 1 or 2 reps more and then stop.
For example, if you’re doing 3 sets of 4 to 6 reps of incline bench press, you want to pick a weight that allows you to finish each of your sets feeling like you could have pressed 1 or 2 more reps if you absolutely had to, while completing at least 4 reps and not more than 6.
Check out this article if you want to learn more about how to use Reps in Reserve to improve the effectiveness of your workouts:
[h=3]Once you hit the top of your rep range for one set, add weight.[/h]For instance, if you incline bench press 135 pounds for 6 reps on your first set, you then add 5 pounds to each side of the bar for your next set.
If, on the next set, you can get at least 4 reps with 145 pounds, that’s the new weight you work with until you can press it for 6 reps, move up, and so forth.
If you get 3 or fewer reps, though, reduce the weight added by 5 pounds (140 pounds) and see how the next set goes. If you still get 3 reps or fewer, reduce the weight to the original 6-rep load (135 pounds) and work with that until you can do two 6-rep sets with it, and then increase the weight on the bar.
This method is known as double progression, which you can learn about in this podcast:
[h=3]Don’t go to absolute muscle failure every set.[/h]Muscle failure is the point where you can no longer keep the weight moving or maintain proper form and have to end the set.
We should take most of our sets close (but not all the way) to muscle failure.
Research shows taking sets to failure isn’t any more beneficial for muscle growth than taking sets one to two reps shy of failure, and it can increase the risk of injury or burnout. This is particularly true on compound exercises like the squat, deadlift (trap-bar or barbell), bench press, and overhead press.
Thus, this is why I recommend you take all of your sets one to two reps shy of failure (1 to 2 RIR), but not all the way to failure (0 RIR).
You can learn more about how to take sets close (but not to) failure in this article:
[h=3]Rest 3 to 4 minutes in between each set.[/h]This gives your muscles enough time to fully recoup their strength so you can give maximum effort each set.
If you want to learn more about how long you should rest between sets, check out this article:
[h=2]The Bottom Line on the Incline Bench Press[/h]The incline bench press has been a go-to chest exercise for bodybuilders for decades, and for good reason. It’s one of the best chest builders you can do, and it’s especially effective for developing your upper chest.
What’s more, the incline bench press not only trains your pectorals (chest muscles), but your shoulders and triceps as well.
To get the most out of the incline bench press, however, you need to learn and practice proper form. Here’s what that looks like in a nutshell:
{feed:enclosure_href }
More...
The post The Definitive Guide to the Incline Bench Press appeared first on Legion Athletics.
[h=2]Key Takeaways[/h]
- The incline bench press trains your chest, shoulders, and triceps, and it’s one of the best exercises for developing your upper chest in particular.
- Proper incline bench press form involves pinching your shoulder blades back and down, lowering the barbell to your upper chest, and pushing the bar back up to the starting position.
- Keep reading to learn more about proper incline bench press form, how to program the incline bench press into your workouts, and more!
Just want a quick rundown of how to incline bench press with proper form? Here’s the TL;DR:
- Lie on an adjustable bench angled at 30- to 45-degrees.
- Pinch your shoulder blades together, pull your shoulders down, and plant your feet firmly on the ground.
- Grab the bar so your hands are slightly wider than shoulder-width apart. The bar should be resting in your palms rather than in your fingers.
- Unrack the bar and hold it over your upper chest.
- Lower the bar down in a straight line and touch it just below your collarbone. While lowering the bar, squeeze it hard, keep your butt in contact with the bench, and press your feet into the floor.
- Press the weight back up to the starting position.
- You’re now ready for the next rep (or to re-rack the bar if it’s the end of your set).
Now, if you want the full eggs to apples explanation of how to incline bench press with perfect form, the six best incline bench press variations, and a free incline bench press workout, keep reading!
And if you found this article because you’re unhappy with your chest, I understand.
I used to be in the same boat. Here’s how I looked after my first year or so of weightlifting:
Not too impressive.
I kept at it, though, and here’s where my chest was six years later:
Better, but nothing to write home about, either, especially considering how long it had taken me to get there.
Soon after I took that picture, I got serious about learning the real science of strength training —including the principles you’ll learn in this article—and here’s where a couple of years of high-quality training (and dieting!) got me:
And while I don’t stay this shredded year round, my chest still looks big and defined even when I’m fatter:
And that’s without a pump, frando.
One of the biggest changes I made to my training was including more exercises for my upper chest, especially the incline bench press.
So, if you want to take your pecs from pitiable to praiseworthy, you want to get good at the incline bench press. And that’s what you’re going to learn how to do in this article.
Specifically, you’ll learn:
- What the incline bench press is
- What muscles it trains (it’s not just your chest!)
- Why the incline bench press is so effective at building muscle
- How to incline bench press with picture perfect form
- The six best incline bench press variations
- [h=4]Table of Contents[/h]
- What Is the Incline Bench Press?
- What Muscles Does the Incline Bench Press Train?
- How to Incline Bench Press with Proper Form
- Step 1: The Setup
- Step 2: The Descent
- Step 3: The Ascent
- A Simple, Effective, and Challenging Incline Bench Press Workout
- Warm up before each workout.
- Use Reps In Reserve (RIR) to control workout intensity.
- Once you hit the top of your rep range for one set, add weight.
- Don’t go to absolute muscle failure every set.
- Rest 3 to 4 minutes in between each set.
- The Bottom Line on the Incline Bench Press
- What do you think of incline bench press? Have anything else you’d like to share? Let me know in the comments below!
[h=2]What Is the Incline Bench Press?[/h]
The incline bench press (or incline barbell bench press) is a compound chest exercise that’s very similar to the flat barbell bench press. The main difference is it’s performed using an incline bench (hence the name) instead of a flat bench.
By changing the angle of the bench, you also change which muscle groups the exercise emphasizes. As a general rule, vertical pushing exercises like the military press primarily train your shoulders and arms, whereas horizontal pushing exercises like the flat bench press primarily train the chest and arms.
Thus, the incline bench press is somewhere in between.
For this reason, it’s often included in bodybuilding and strength training routines as a compound exercise on push (as part of a push pull legs split), chest, or upper body days, and in powerlifting routines as an accessory exercise to boost bench press strength.
Read: How to Find the Best Workout Split for You
It’s very effective for developing your upper body muscles and getting strong on the incline bench press can improve your flat barbell bench pressing, too. What’s more, it’s also an outstanding exercise for growing your shoulders, a notoriously stubborn muscle group.
Summary: The incline bench press involves pressing a weighted barbell over your chest while lying on an incline bench.
[h=2]Get Your Free Incline Bench Press Training Program Now[/h] Enter your email address below to get 12 weeks’ worth of 3, 4, and 5-day per week incline bench press workouts, all expertly laid out in Google Sheets.
Sending...
Your free stuff is on the way!
Looks like you're already subscribed!
[h=2]What Muscles Does the Incline Bench Press Train?[/h]Most people think of the incline bench press as only a chest exercise, but it’s much more than that.Sending...
Your free stuff is on the way!
Looks like you're already subscribed!
It also helps develop your triceps, shoulders, and even your biceps to a certain degree.
Specifically, the incline bench press develops the . . .
- Pectoralis major and minor
- Triceps brachii (long, lateral, and medial heads)
- Front (anterior) and middle (lateral) deltoids
- Biceps brachii
The main muscle of the chest is the pectoralis major, or “pec major.”
Here’s what it looks like:
The chest muscle’s main function is to bring the upper arm across the body (towards the sternum).
As you can see in the image above, the pectoralis major has multiple “heads,” or places where the tendons attach to the skeleton.
There’s a sternocostal head, which attaches the breastbone and rib cage to your upper arm, and a clavicular head, which attaches your collarbone to your upper arm.
Why is this important?
How a muscle attaches to the skeleton influences how it responds to training.
For instance, certain exercises, like the flat and decline bench press, emphasize the larger sternocostal head of the pecs, while others, like the incline and reverse-grip bench press, emphasize the smaller clavicular head.
Notice that I said emphasize, not isolate, because all pressing exercises involve both heads of the pecs to some degree or another.
Research shows that the incline bench press is a fantastic exercise for emphasizing the “upper chest,” and therefore, should be a staple in your chest training (more on this in a moment).
This helps you prevent muscle imbalances, make sure your upper chest doesn’t fall behind in development, and ensure you wind up with a proportionate pair of pecs.
Summary: The incline bench press trains your chest, triceps, and shoulders, but what sets it apart from other exercises is its ability to train the clavicular head of your pecs—also referred to as your “upper chest.”
[h=2]How to Incline Bench Press with Proper Form[/h]There are three steps to proper incline bench press form:
- The setup, where you position your body and unrack the bar.
- The descent, where you lower the barbell to your upper chest in a controlled manner.
- The ascent, where you press the weight off your chest and back to the starting position, setting yourself up for the next rep.
Let’s go through each of them in detail, starting with the setup.
[h=3]Step 1: The Setup[/h]Proper incline bench press setup comes down to getting a few things right:
- Position your body
- Grip the bar
- Position your feet
- Arch your back
- Unrack the bar
[h=4]1. Position your body[/h]First, angle a bench to 30 to 45 degrees.
Here’s what different angles look like:
I prefer a 45-degree angle, but some people prefer slightly more or less than this. Play around with different angles within this range and see what you like most. Just make sure that once you settle on an angle you like, stick with that for several months before changing it again.
Next, adjust the seat height so your eyes are under the bar when you lie down, like this:
(You may need to adjust your body position slightly based on your anatomy—more on this in a moment).
While keeping your butt planted on the bench, raise your chest up toward the bar, pinch your shoulder blades together, and pull your shoulders down toward your waste. Your upper back and shoulders should feel tight, almost uncomfortably so. A good cue for this is to think of pulling your shoulder blades “into your back pockets.”
Here’s what this looks like:
Some people also like to grip the bar or even the bench to help push their shoulder blades into the right position. Here’s what this looks like:
You can play around with both approaches and see what works best for you.
[h=4]2. Grip the bar[/h]Grip the bar with your hands slightly wider than shoulder-width apart, about 22 to 28 inches, depending on your build, like this:
If you go too narrow, you’ll shift the emphasis to the triceps as opposed to the pecs, and if you go too wide, you reduce the range of motion and effectiveness of the exercise and put more stress on your shoulders.
Hold the bar low in your hands, closer to your wrists than your knuckles, and squeeze it as hard as you can. Your wrists should be bent just enough to allow the bar to settle into the base of your palm, but not folded back at a 90-degree angle. This prevents wrist pain.
Here’s how this looks:
A good way to check your grip width is to have a friend get in front of you and check the position of your forearms at the bottom of the movement. You want your forearms to be as close to perpendicular to the ground as possible. That is, straight up-and-down vertical, like this:
Don’t use a “thumbless” or “suicide” grip (as it’s aptly called) where your thumbs lie next to your index fingers as opposed to wrapped around the bar. The reason for this is obvious: when you’re going heavy, it’s surprisingly easy for the barbell to slip out of your hands and crash down on your chest, or worse, your throat or face; and there’s no benefit to this style of grip.
[h=4]3. Position your feet[/h]Plant your feet flat on the ground.
Start with your feet shoulder-width apart, and play around with different positions until you find one that feels most stable. Some people prefer to have their feet pulled back toward the bench, and others prefer to have them directly underneath their knees.
As you push your feet apart, you should feel tension in your glutes, groin, and hip flexors.
It’s important to get this right, because your legs help stabilize your upper body and keep your shoulder blades glued to the bench, which allows you to use heavier weights.
As you become more experienced over time, you’ll learn to push your feet into the ground just as you begin to push the bar off of your chest, which is known as “leg drive” in powerlifting circles.
Remember to keep your legs as tight as possible during every rep. An easy way to do this is to push your knees out to the sides and push your heels into the ground as you push the bar off your chest. A common mistake is to let your knees shoot inward during your last few reps, which reduces tension in your upper body and makes it harder to finish your set.
[h=4]4. Arch your back[/h]You don’t want your back flat on the bench and you don’t want it so arched that your butt is floating above it.
Instead, you want to maintain the natural arch that occurs when you push your chest out, your butt into the bench, and your feet apart, like this:
[h=4]5. Unrack the bar[/h]Unrack the bar by locking your elbows out to move the bar off the hooks.
While keeping your arms locked, move the bar horizontally until it’s directly over your shoulders. Don’t try to bring the weight directly from the hooks to your chest, and don’t drop your chest and loosen your shoulder blades when unracking.
Here are a few good pointers for dialing in your rack position:
- If you have to push the bar more than two or three inches higher than its starting position on the hooks, then you need to position the bar higher on the rack.
- If you have to pull your shoulders out of position to unrack the bar, then it’s too high and you need to position the bar lower on the rack.
- If you have to move the bar horizontally more than four or five inches away from the rack to press it without hitting the pins, then you should adjust your starting position so that the bar is directly over your nose or mouth instead of your eyes.
Many people make the mistake of flaring them out too far to the sides (away from the body), which can cause shoulder pain. This alone is probably why variations of the bench press have a bad reputation as shoulder wreckers. A less common mistake is tucking your elbows too close to your torso, which robs you of stability and strength and can aggravate your elbows.
Instead, you want your elbows to remain at a 50- to 75-degree angle relative to your torso throughout the entire movement. This protects your shoulders from injury and is a stable, strong position to press from. Here’s a helpful visual:
As you can see in the left image, the upper arms are at about a 90-degree angle relative to the torso, which is hard on the shoulders. In the middle image, the upper arms are at about a 20-degree angle, which is hard on the elbows and shoulders and reduces how much weight you can press. The right image shows the ideal position, with the upper arms about 60-degrees relative to the torso.
The exact angle you use will depend on your anatomy, but the point is this: don’t flare your arms out, and don’t keep them tucked in too close to your torso.
Keeping your elbows in place, lower the bar to the upper part of your chest just below your collarbones. The bar should move down in a straight line to your chest, not toward your face or belly button, like this:
Once the bar has touched your chest (touched, not bounced off of), you’re ready to ascend.
[h=3]Step 3: The Ascent[/h]Although it’s called the incline bench press, it’s better to think of the ascent as pushing rather than pressing.
That is, picture that you’re pushing your torso away from the bar and into the bench instead of pressing the bar away from your body. This will help you maintain proper form and control of the bar and keep tension in your upper back.
Keeping your shoulder blades down and pinched, your elbows tucked, your lower back slightly arched, your butt on the bench, and your feet on the floor, push against the bar to get it off your chest.
You can also use the “leg drive” I mentioned earlier by pressing your heels into the floor. This transfers force up through the hips and back, which helps maintain proper form and increases the amount of upward force you can generate.
The bar should move up in a straight line, passing your chin, and ending where it began: with the bar directly over your shoulders.
Lock your elbows out at the top of the movement. Don’t keep them slightly bent as this needlessly reduces the range of motion.
You’re now ready for the next rep.
Once you’ve completed the final rep in your set, you’re ready to rack the bar. Don’t try to press the bar directly into the hooks because if you miss, it’s coming down on your face, like this:
Instead, finish your final rep with the bar directly over your shoulders and your elbows locked, and then slam the bar horizontally back into the rack.
That’s it!
[h=2]A Simple, Effective, and Challenging Incline Bench Press Workout[/h]When it comes to workout programming, you can treat the incline bench press more or less the same as the flat bench press. I often like to include them in the same workout, usually only changing the order of exercises so I can periodically reap the benefits of both (more upper chest development with incline, more weight with flat).
Since the incline bench press is a compound exercise, you usually want to do it at the beginning of your workouts when you’re feeling freshest (the first or second exercise), and it typically works best when performed for relatively low reps (eight or fewer).
With that in mind, here’s an effective incline bench press workout that includes several other exercises for your chest, shoulders, and triceps.
And if you’d like more options and guidance on how to incorporate this workout into a workout routine, enter your email address in the form below.
[h=2]Get Your Free Incline Bench Press Training Program Now[/h] Enter your email address below to get 12 weeks’ worth of 3, 4, and 5-day per week incline bench press workouts, all expertly laid out in Google Sheets.
Sending...
Your free stuff is on the way!
Looks like you're already subscribed!
And now a few details on how to do this workout properly.
[h=3]Warm up before each workout.[/h]When you warm up for the incline bench press (or any other exercise), here’s the protocol you want to follow:
- Estimate roughly what weight you’re going to use for your three sets of incline bench press (this is your “hard set” weight).
- Do 10 reps with about 50% of your hard set weight, and rest for a minute or two.
- Do 10 reps with the same weight at a slightly faster pace, and rest for a minute or two.
- Do 4 reps with about 70% of your hard set weight, and rest for a minute or two.
After your warm-up and hard sets for the incline bench press, you don’t need to warm up for the rest of the exercises in the workouts—your muscles will be plenty warm already.
If you want to learn more about the importance of a proper warm-up and how to warm up for different workouts, check out this article:
[h=3]Use Reps In Reserve (RIR) to control workout intensity.[/h]Reps in Reserve (RIR) is a method of controlling your workout intensity, and it works like this:
1 RIR = 1 rep shy of failure
2 RIR = 2 reps shy of failure
3 RIR = 3 reps shy of failure
. . . and so on.
For all of the exercises in this workout, I recommend you use an intensity of 1 to 2 RIR, which means you want to do as many reps as you can within the prescribed rep range until you feel you can only do 1 or 2 reps more and then stop.
For example, if you’re doing 3 sets of 4 to 6 reps of incline bench press, you want to pick a weight that allows you to finish each of your sets feeling like you could have pressed 1 or 2 more reps if you absolutely had to, while completing at least 4 reps and not more than 6.
Check out this article if you want to learn more about how to use Reps in Reserve to improve the effectiveness of your workouts:
[h=3]Once you hit the top of your rep range for one set, add weight.[/h]For instance, if you incline bench press 135 pounds for 6 reps on your first set, you then add 5 pounds to each side of the bar for your next set.
If, on the next set, you can get at least 4 reps with 145 pounds, that’s the new weight you work with until you can press it for 6 reps, move up, and so forth.
If you get 3 or fewer reps, though, reduce the weight added by 5 pounds (140 pounds) and see how the next set goes. If you still get 3 reps or fewer, reduce the weight to the original 6-rep load (135 pounds) and work with that until you can do two 6-rep sets with it, and then increase the weight on the bar.
This method is known as double progression, which you can learn about in this podcast:
[h=3]Don’t go to absolute muscle failure every set.[/h]Muscle failure is the point where you can no longer keep the weight moving or maintain proper form and have to end the set.
We should take most of our sets close (but not all the way) to muscle failure.
Research shows taking sets to failure isn’t any more beneficial for muscle growth than taking sets one to two reps shy of failure, and it can increase the risk of injury or burnout. This is particularly true on compound exercises like the squat, deadlift (trap-bar or barbell), bench press, and overhead press.
Thus, this is why I recommend you take all of your sets one to two reps shy of failure (1 to 2 RIR), but not all the way to failure (0 RIR).
You can learn more about how to take sets close (but not to) failure in this article:
[h=3]Rest 3 to 4 minutes in between each set.[/h]This gives your muscles enough time to fully recoup their strength so you can give maximum effort each set.
If you want to learn more about how long you should rest between sets, check out this article:
[h=2]The Bottom Line on the Incline Bench Press[/h]The incline bench press has been a go-to chest exercise for bodybuilders for decades, and for good reason. It’s one of the best chest builders you can do, and it’s especially effective for developing your upper chest.
What’s more, the incline bench press not only trains your pectorals (chest muscles), but your shoulders and triceps as well.
To get the most out of the incline bench press, however, you need to learn and practice proper form. Here’s what that looks like in a nutshell:
- Lie on an adjustable bench angled at 30- to 45-degrees.
- Pinch your shoulder blades together, pull your shoulders down, and plant your feet firmly on the ground.
- Grab the bar so your hands are slightly wider than shoulder-width apart. The bar should be resting in your palms rather than in your fingers.
- Unrack the bar and hold it over your upper chest.
- Lower the bar down in a straight line and touch it just below your collarbone. While lowering the bar, squeeze it hard, keep your butt in contact with the bench, and press your feet into the floor.
- Press the weight back up to the starting position.
- You’re now ready for the next rep (or to re-rack the bar if it’s the end of your set).
If you liked this article, please share it on Facebook, Twitter, or wherever you like to hang out online!

[h=3]What do you think of incline bench press? Have anything else you’d like to share? Let me know in the comments below![/h]The post The Definitive Guide to the Incline Bench Press appeared first on Legion Athletics.
{feed:enclosure_href }
More...