
Pushtoday
MuscleChemistry Registered Member
by, Bret Contreras
In the gym, the deadlift is quite possibly the ultimate test of manhood and is often referred to as The King of all Exercises. The task is simple – see that really heavy barbell over there? Now go pick it up. Looking in from the outside, it would seem like a simple task that doesn’t require much thinking or technique. But nothing could be further from the truth. When broken down, the deadlift it a very technical lift, and is quite difficult to master. It might appear that the movement is simply a hip hinge which is present in many activities of daily living. However, it’s not so simple under heavy, heavy loading.
In the gym, the deadlift is quite possibly the ultimate test of manhood and is often referred to as The King of all Exercises. The task is simple – see that really heavy barbell over there? Now go pick it up. Looking in from the outside, it would seem like a simple task that doesn’t require much thinking or technique. But nothing could be further from the truth. When broken down, the deadlift it a very technical lift, and is quite difficult to master. It might appear that the movement is simply a hip hinge which is present in many activities of daily living. However, it’s not so simple under heavy, heavy loading.
The deadlift is a brutal movement and may be the trickiest of all in terms of programming due to its insanely high cost to the central nervous system (CNS).Heavy deadlifting is akin to bringing Everclear to a keg party; things can either end up going really well, or end up utterly disastrous. Some lifters will do best by pulling heavy every week, while others do better by pulling heavy every other week. Some prefer to mix in submaximal sessions throughout the week, while others prefer to avoid the movement altogether until it’s time to max. Finding the optimal frequency, intensity, and exercise selection that suits you best is the key to excelling in this lift. I created this guide to help point you in the right direction[h=1]Form[/h]The first topic to address in attempting to increase your deadlift is form. It is not uncommon for novices to increase their deadlift strength by 50 or more pounds in a single session just by working with a coach who is well-versed in deadlift mechanics.
Your ideal deadlifting form will revolve around a combination of factors. For example, your anatomy will play a large role in terms of how your form looks. It should be understood that the form that allows you to lift the heaviest may not be the form that allows you to train injury-free week in and week out. Therefore, you want to find a sweet spot between the form that allows you to demonstrate your strength with the form that minimizes joint stress and CNS fatigue. Finally, your goals will influence form as well; a competitive powerlifter will likely accept more risk during the deadlift compared to an 8-figure salary athlete (especially on the platform). Here are some general recommendations.
[h=3]Foot position (stance width and foot angle)[/h]The conventional deadlift is performed with the feet around shoulder width apart (sometimes closer, and sometimes further out), with the hands placed just outside of the legs. Most lifters prefer to keep the toes pointing straight ahead while others prefer to slightly externally rotate the feet in more of a duck stance. Foot flare is influenced by hip anatomy, so it is important to experiment in order to find what works best for you. If you are having trouble finding a comfortable foot position, first try this: take the same stance you would as if you were performing a vertical jump. This may help get your body into a more advantageous deadlift position. Tinker from there.
[h=3]Bar position relative to the shin[/h]Bar position in relation to the shin is highly dependent on the lifter. Some lifters prefer to line up directly up against the bar, some approximately 2 inches away, and others 4 inches away. In general, you want the bar lined up very close to the shins at the start of the movement. When looking down, the bar should be positioned over the middle of the feet. Anthropometry will play a large factor in terms of how far away you should line up from the bar, so experiment to find what works best for you. Lining up with the bar too close to the body can limit quadricep activity, while lining up with the bar too far away from the body can impair balance and lead to excessive spinal loading. It should be mentioned that during the sumo deadlift, the bar should be touching your shins.
[h=3]Grip Options[/h]The most common grip used in powerlifting in the over/under grip or ‘mixed’ grip. This is where the lifter holds the bar with one hand in a pronated position while the other hand is supinated. There is a slight risk of experiencing a distal biceps tendon tear with the supinated arm, so be sure to alternate arms from one set to the next.
Another option would be the hook grip. The hook grip is most commonly seen in Olympic weightlifting, but can be quite painful while getting used to it. The thumb is wrapped around the bar then the index and middle fingers are wrapped around the thumb to secure it into place. After 6 weeks or so, the pain diminishes and the body becomes accustomed to hook gripping.
The double overhand grip is an additional option, whereby the palms are facing the body. I recommend using a double over have grip as long as possible during your working sets to build grip strength. However, very few lifters can rely on the double overhand grip when the weight approaches maximum or the set approaches failure.
The last option would be to use lifting straps. For powerlifting and Olympic weightlifting, lifting straps are not allowed, but straps are commonly allowed in the deadlift in strongman. Training with straps diminishes the benefits of forearm and grip strengthening that can be achieved by training without them, so use them sparingly. Grip strength can indeed be a limiting factor with regards to maximal deadlifting. If this is the case, using chalk is highly recommended, as is performing specialized grip work.
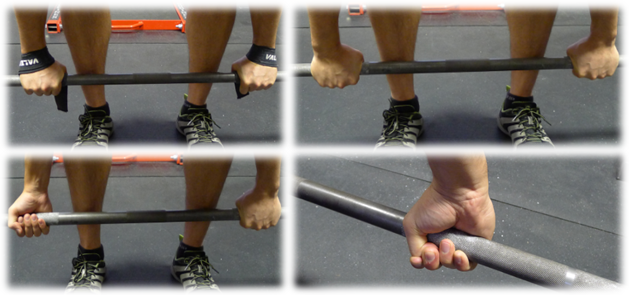
Top Left: Straps, Top Right: Double Overhand, Bottom Left: Mixed Grip, Bottom Right: Hook Grip
[h=3]Hip position/height[/h]A common mistake made by trainees newer to the deadlift is starting with the hips too low. This turns the movement into a squat-type movement which is not an advantageous position. Finding the optimal starting position will be highly dependent on your body and lever and limb lengths. The height of your hips at the time when you initiate your pull should be the same height when the bar leaves the floor. Many times you will see this position change with inexperienced lifters. Beginners will typically start with the hips low, and upon lift initiation, the hips rise considerably before the bar even breaks off the floor. This is wasted movement and should be minimized for an optimal deadlift. Find the optimal position and stick to it as the bar leaves the ground.In general, when looking from the side view, the hips will be right in between the shoulders and knees in terms of vertical height. Lifters with certain anatomical proportions such as short femurs or long arms will be more upright, whereas lifters with long femurs, short torsos, and short arms will be much more horizontal.
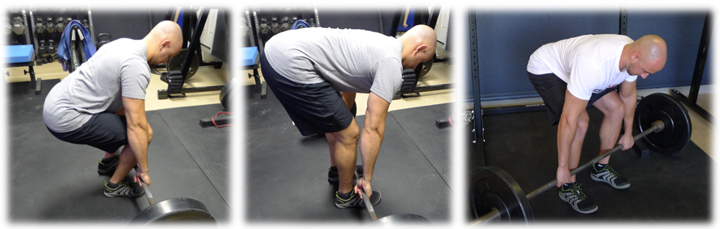
Left: Hips too low, Middle: Hips too high, Right: Hips just right!
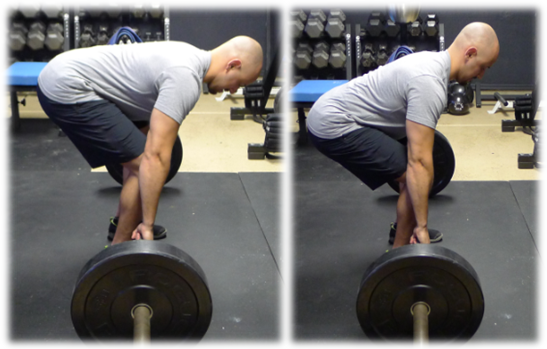
[h=3]Spinal Positioning[/h]The spine should be kept in a neutral position throughout the lift, with the abdominals braced throughout. Some lifters feel most comfortable pulling with an arch, some in neutral, and some in a slightly rounded position.For advanced lifters, some rounding of the upper back (thoracic spine) is usually beneficial in terms of performance for most lifters, but this is not something I would recommend for beginners. Over time, tolerance to roundback deadlifting may be something that can be trained and improved upon, as many of the top strongman competitors and powerlifters perform the movement in this manner. But there’s not good evidence to support this as of yet. According to biomechanical analysis and anecdotal feedback, the safest deadlift posture is neutral. There is certainly wiggle room, so make sure you’re keeping ROM in mid-ranges and avoiding end-ranges of motion as these ranges when combined with heavy loading can be damaging to ligaments, discs, and other spinal structures.
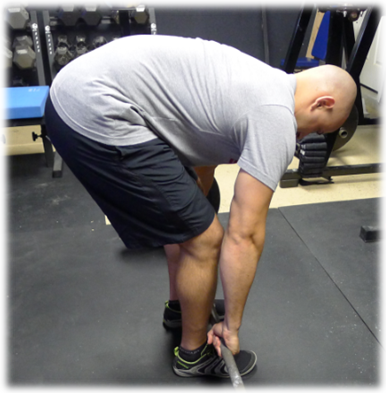
A rounded lumbar and thoracic spine is unacceptable deadlift form and a recipe for disaster
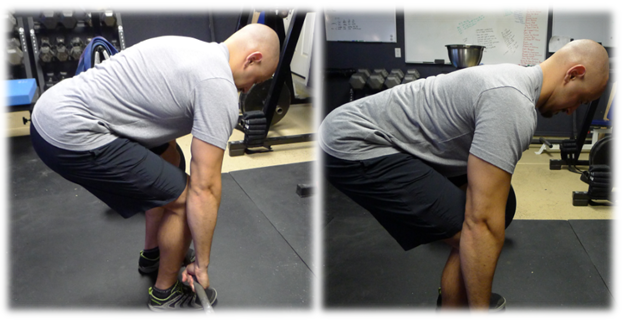
Left: Neutral Lumbar and Rounded Thoracic Right: Neutral Spine (Safest)
Some strength coaches feel that it is of great performance to keep the neck neutral, while others feel that neck packing (making a double chin) is the most optimal position. Personally, I feel that this debate is overrated; clips from the strongest deadlifters in the world shown HERE portray a variety of head and neck positions. However, my general recommendation would be to avoid any type of excessive overextension or flexion.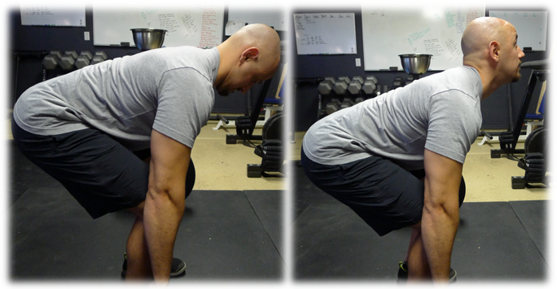
Left: Packed Neck = Good Right: Overextending Neck = Not so good
The lockout of the deadlift should be executed by extending the hips using the glutes. You don’t want the spine to be hyperextending to lock out the load; you want to push the hips forward with a strong glute contraction.[h=3]Shoulders[/h]At the start of the movement, the shoulders should either be in line with the bar, or slightly in front of it. Click HERE to see shoulder position with elite deadlifters. This allows the lifter to get his or her body in the most advantageous position for the lift. A common mistake involves retracting the shoulders when performing the deadlift. This actually increases the distance the bar has to travel to complete the lift. Keep tension in the lats and upper back, but do not retract the shoulders blades. When the bar leaves the ground, the scapula will usually be protracted when loads are heavy.
Many lifters feel that since increased lat involvement keeps the bar closer to the body, it will improve deadlift performance, but this might be specific to the lifter. Experiment with focused lat contraction to figure out if it works for you.
Left: Shoulders are positioned out in front of the barbell, Right: Shoulders are positioned over the barbell. Both are acceptable, so tinker around to figure out the sweet-spot for you
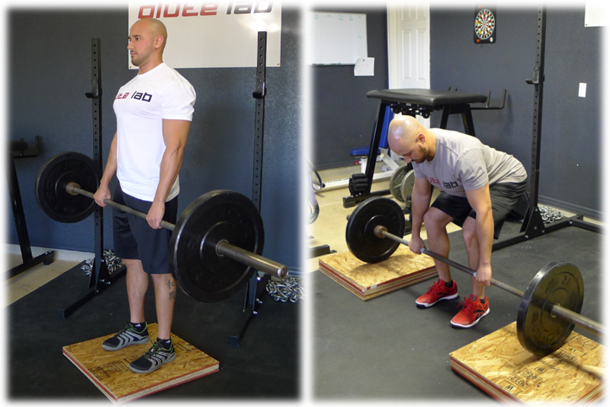
[h=1]Developing Maximum Strength [/h]Building maximum strength refers to increasing the total poundage a lifter can move. There are several ways to go about this, but going into the gym and maxing out week in and week out is not one of them. While this may work for a short period of time for those newer to lifting, you will soon plateau or even worse injure yourself. A more appropriate plan of action involves utilizing specialized set and rep schemes to help you achieve your goal. Here are some of the most effective methods:Tempo – I do not believe that you should be counting rep speed during deadlifts. However, I do feel that you should control the negative component rather than just dropping the bar to the ground (this is more common in gyms with lifting platforms and bumper plates). This topic has been hotly debated among coaches as the eccentric portion can be dangerous for those who aren’t well-versed in the deadlift, but the fact of the matter is, eccentrics build strength. Moreover, they can refine good technique – the lowering phase should be initiated by a strong “sitting back” action at the hips while dragging the bar down the thighs and keeping vertical shins. When the bar passes the knees, then the shins can angle forward. You don’t have to lower the bar slowly on each rep, but I feel that you should control the descent for greater strength gains.
Straight sets – For straight sets, you will perform the same number of reps with the same load for the prescribed number of sets. I’ve found 3 to 5 sets of 1 to 5 reps to be most effective when using this method. You want to lift heavy enough so that you approach failure, but there should always be a rep or two left in the tank. It is a common debate whether or not each rep should be started from a dead stop or whether touch-and-go reps should be used.
I recommend that you start each rep from a complete dead stop. In between each rep, reset to your starting hip positioning before starting any additional reps. This is especially important when training for powerlifting where the goal is to lift as much weight as possible in a single attempt. Touch-and-go reps should be used when training for a strongman event where endurance is and specificity is most crucial (assuming of course that this type of technique is allowed in competition).
Ascending sets – With this method you will be going up in weight each set. This is highly effective and useful when trying a new weight that you have never used before. Since you are going up in weight each set you will be less fatigued as opposed to using the same weight every set and burning yourself out. The approach in this method is the same as straight sets; the sets and reps say the same, with the only difference being an increase in load each set.
Pyramid sets (ascending with back off) – Pyramid sets involve performing several sets of increasing weight while decreasing reps, with a final back off set performed at the end. The back off set is a crucial component here. After building up in weight and fatiguing the muscles you will drop the weight and do a burn out set close to failure.
Pause reps – Pause reps are performed by initiating the pull and then pausing 2-4 inches off the floor for 3-5 seconds. Once the weight is held for the specified time, you will finish the movement as explosively as possible. This pause takes away the momentum gained from pulling off the floor and is great for learning how to stay tight and under control during the lift. This makes the lift much harder, and even though you will be handling less weight than a regular deadlift, it will ultimately build more strength and develops your technique.
Partial ROM – Partial range movements allow for an increase in the amount of weight that can be used when deadlifting. This is especially useful for those lifters who have trouble at the lockout rather than off the floor. The most commonly used example of this would be block pulls or rack pulls. To the untrained eye, these two partial variations may look the same, but they do not feel the same. Block pulls have a similar feel to an actual deadlift since the plates are resting on the blocks similar to the position from the floor. With rack pulls, the bar is resting on the safety pins, and in this position the “slack’ is taken out of the bar.
Rack pulls can be performed from a variety of positions, but the most common is just below the knee caps. Blcok pulls are usually performed off of 3-5 inch blocks. Going above this will allow the lifter to use heavier weight, but anecdotally it doesn’t transfer as well to performance. Make sure to sit back and have fairly vertical shins with partials to ensure for maximal dynamic transfer to the regular deadlift; many lifters allow the knees to migrate forward and “quad” the weight up, which isn’t representative of deadlift from from that ROM.
Extending ROM – Extended range of motion movements increase the difficulty of the movement by putting your body in a disadvantageous position prior to pulling (however, some lifters actually find that their position improves with extended ROM) and requiring more work to be performed. The most commonly used example of this would be deficit deadlifts. Deficit deadlifts can be performed on a platform ranging anywhere from 1-4 inches. The movement is performed in a similar fashion to a conventional deadlift off the floor, except the hips will either start in a lower position or a higher position depending on the lifter.
Speed Work – One of the most common methods of training for increasing maximal strength and power is speed work, also knows as the dynamic effort method. Lighter loads are used to move the bar with as much acceleration as possible while maintaining perfect technique. An example for deadlifts would be using ~70% of 1RM and performing 6 sets of 2 repetitions as explosively as possible with around 60 seconds rest between sets.
Variable Resistance – bands/chains – When pulling for a maximum attempt, lifters tend to round a bit, in which case the lift-off is easier but the lockout is harder. In this case, end-range glute strength is needed. This is where variable resistance training can be a huge help (as well as speed work, partial ROM and pause deadlifts). These tools offer an increase in load as the weight is lifted off the floor, where the movement gets easier the weight is the highest. When coupled with speed work, it increases the time spent accelerating the bar and the muscle activation throughout the lift.
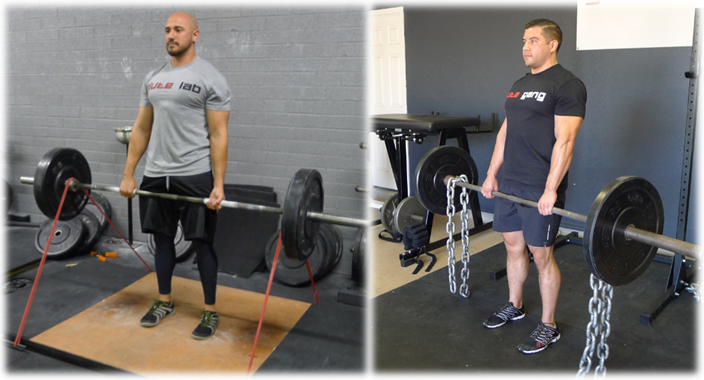
Left: Deadlift against Bands, Right: Deadlift against chains
Clusters – Cluster sets are characterized by performing heavy singles or doubles performed several times in succession but resting around ten seconds or so in between. Although this short break doesn’t allow for full recovery between the mini sets, it does allow the lifter to use a weight that he or she would normally not be able to complete the desired reps without stopping. An example of a cluster set with a 500lb deadlifter follows: 425lbs for 1 rep, rest 10 seconds and then repeat three more times. That is equal to one total cluster set. This will be repeated for 3-4 sets.[h=3]Other Factors to Consider[/h]While the deadlift is primarily considered a lower body exercise, it strengthens a large majority of the musculature of the upper body as well. Training these secondary muscles involved is critical to improving your deadlift performance and physique and is commonly referred to as “support work.” Support work differs from lifter to lifter dependent on strengths and weaknesses and can be used to strengthen the particular region where you begin to slow down and fail (known as ‘sticking point’).

Just doin’ some hip thrustin’
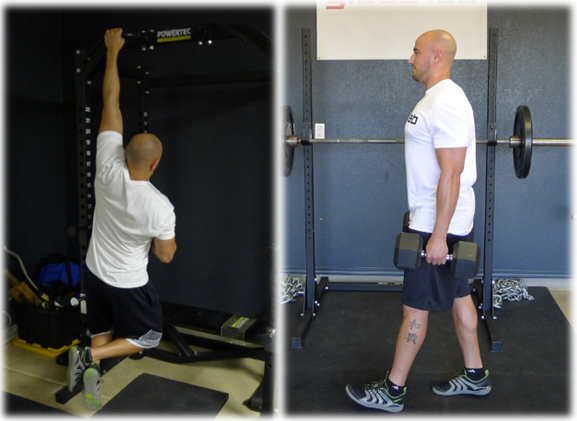
Volume of support work will differ depending on strength levels and general physical preparedness. A common mistake for beginners is to go overboard with support work, which impairs ability to recover, thus taking away from their ability to deadlift. Do not make this mistake!Grip strength – When the weights start to get heavy, grip strength becomes a large limited factor for a majority of lifters. Many lifters will need to incorporate some type of grip training into their programming to counteract this. While many exericses will strengthen the grip, such as simply performing deadlift warm-up sets with double overhand grip, bent over rows, shrugs, chins, rows, and lugging dumbbells around, my favorite targeted exercises for grip strengthening include: farmers walks, bench squeezes,1-arm static hangs, and the gripper

Left: Gripper, Right: Bench Squeezes
Left: 1-arm hangs, Right: Farmers Walks
Assistance exercises for the lower body – Assistance exercises for the lower body are used to help develop weaknesses whether it is muscle size or muscle strength. My favorite lower body accessory movements for increasing the deadlift include: squats, front squats, block pulls, deficit pulls, hip thrusts, leg presses, and heavy kb swings.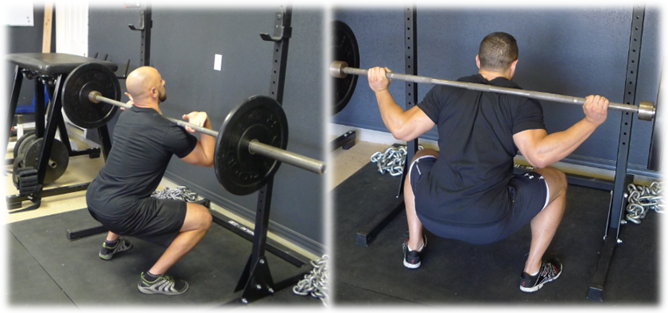
Left: Front Squat, Right: Back Squat
Left: Deficit Deadlifts, Right: Block Pulls
[h=1]Methods[/h]All the methods listed above will work for any experience level, and I recommend rotating them through and seeing what works best for you. However, there are certain methods you should focus on depending on your experience in training the deadlift, along with other factors such as your training age, anatomy and current level of fitness.Beginners/novice – For less experienced deadlifters it is a good idea to use methods that focus on perfecting technique and building strength. Exhausting sets taken to failure is a recipe for disaster for beginner lifters.
Straight sets – i.e. 225 for 4 sets of 3
Ascending sets – i.e 185×3, 205×3, 255×3, 275×3
Pyramid sets – i.e. 205×6, 255×4, 275×2, 185×8
Intermediate – The techniques suggested for intermediate and advanced lifters can be mixed and matched. These techniques can all be of benefit depending on a lifter’s strengths and weaknesses.
Partials – i.e block pulls or rack pulls
Extended ROM – i.e. Deficit deadlifts
Advanced
Pause reps – i.e. 365 for 4 sets of 3 reps, counting “one-one thousand, two-one thousand, three-one thousand” 3-4 inches off of the ground
Clusters – i.e. 1 cluster = 405 for 1 rep, then 10 seconds rest, repeated 4 times
Speed Work – i.e. 70% of 1RM for 6 sets of 2 with 60 seconds rest
Variable resistance – i.e. bar plus band deadlift, bar plus chain, combinations of both, combinations with extended or partial range of motion
[h=1]Conclusion[/h]Some of these methods many be new to you and some may not. In the world of strength training, it is important to remember that the journey is a marathon, not a sprint. Take your time to find out which of these techniques works best for you, and always be honing your technique.
Not only is a strong deadlift beneficial for sports performance and building an impressive physique, it also transfers to everyday activities and can prevent you from injuring yourself when moving furniture or doing heavy labor. If you’ve shrugged off the deadlift, it’s time you gave it a try. Form comes first, then load.