
[h=1]Beginners Guide to Squatting Proper. Barbell Squat Technique.
Should a novice weight lifter Squat? Yes![/h]
If there is one constant across almost any sport, its that squatting is a must for core development. It not only is a back and legs developer, but rather it works your entire body! No other exercise can boast such claims, just as no other exercise can claim to burn the most fat, and build the most overall muscle!
Back Squatting is the “KING” and regardless of your sport, or most any sport anyhow, you’ll find a wide variety of professional athletes doing back squats! The downside to squatting and this hold especially true for novices, is that when done incorrectly, the back squat can be harmful if not dare I say dangerous!
My goal in writing this is simple, and thats to help our members here at MuscleChemistry learn how to perform the barbell back squat properly , as the proper from the improper could be the difference between having a fantastic physique or a herniated disc....or three! lol.
[h=2]Barbell Back Squat: The Setup[/h][h=3]1) Approaching the Bar[/h]An important thing to note is that you want to make sure the bar is low enough for you to take out off the pegs. It is always better for the bar to be a little low than for you to have to get up on your toes to unhook the bar. Mid chest always seems to work well.
Next, before you even get under the bar, you must [FONT=Proxima_Nova_Bold]find your hand position. If you are a smaller lifter and/or have great shoulder and spine mobility you want your hands in relatively close. For a larger lifter or someone who lacks stellar mobility a wider grip may be necessary.
[h=3]2) Bar Position[/h]
There is a lot of debate as to whether the high-bar or low-bar position is better but as in any exercise it depends on the person and their goals. Many beginners tend to favor the high bar position while competitive powerlifters learn to utilize the low bar position more to their advantage. I will discuss the different mechanics of each later in this article but first I want to show you where to set the bar.
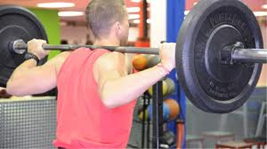
The high-bar position is set up right at the base of the neck across the top of your traps. It is important to first squeeze your shoulder blades together to create a pillow for the bar to sit on to make it feel more comfortable. Make sure you do this before you set the bar across your back and stay tight the whole time.

The difference with the low-bar position is the bar will sit lower on your back, just under the spine of your scapula (shoulder blade). Again, get tight by squeezing your shoulder blades together. There are differences in the mechanics of each while squatting which I will get into in a little bit but first we must discuss un-racking the bar and the setup.
[FONT=Proxima_Nova_Bold]Note:[/FONT] Although bar pads may seem like a good idea, they are not – so ditch them. They will ‘disconnect’ you from the bar and you will not be able to get as tight. This will prevent you from having a solid squat.
[h=3]3) Unracking the Bar[/h]This can either make or break your squat since it is easy to lose your tightness or bar position if you are sloppy taking the bar off the rack.
[h=3]4) Foot Position[/h]

Foot position is key as it will not only give you a stable base but will allow proper joint mechanics from your ankles all the way up to your hips and back. A good squat (or a bad one) always starts from the ground up.
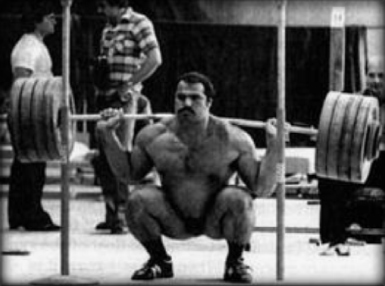
Squat stance will vary slightly from person to person but to ensure proper mobility and hip drive, I recommend starting out with your heels directly under your shoulders with your feet slightly toed out. You should be able to test by doing a bodyweight squat in this position and get your butt as low to the ground as comfortable. Again, everyone will be slightly different so you will have to play around with your own stance.
[h=3]5) Neck and Eye Position[/h]I have these grouped together because invariably where your eyes go, your neck will follow. Remember that your neck is still part of your spine and it is [FONT=Proxima_Nova_Bold]very[/FONT] important to keep it safe.
Starting with your gaze, you should keep your stare at a fixed point on the horizon NOT the ceiling. I have heard many coaches say to look up when you are squatting. Looking up might sound like a good idea since you will be moving in that direction but is harmful to proper squat mechanics and hip drive. 9 times out of 10 it causes you to hyperextend your cervical spine (neck) and in turn will cause you to lose tightness.
What you want to do is pick a point either on the rack or about 5-10ft in front of you on the floor and stare at it. Looking straight is ok here to as long as there is no mirror.
Keeping your eyes on a fixed point will also allow you to ‘pack’ your neck or keep it in cervical alignment. The easiest way to visualize this is to stand tall and drive the back of your head back and up as if to make a ‘double chin’ or ‘no neck’ face. It ain’t pretty but this will teach you proper spinal alignment.
[/FONT]
Should a novice weight lifter Squat? Yes![/h]
If there is one constant across almost any sport, its that squatting is a must for core development. It not only is a back and legs developer, but rather it works your entire body! No other exercise can boast such claims, just as no other exercise can claim to burn the most fat, and build the most overall muscle!
Back Squatting is the “KING” and regardless of your sport, or most any sport anyhow, you’ll find a wide variety of professional athletes doing back squats! The downside to squatting and this hold especially true for novices, is that when done incorrectly, the back squat can be harmful if not dare I say dangerous!
My goal in writing this is simple, and thats to help our members here at MuscleChemistry learn how to perform the barbell back squat properly , as the proper from the improper could be the difference between having a fantastic physique or a herniated disc....or three! lol.
[h=2]Barbell Back Squat: The Setup[/h][h=3]1) Approaching the Bar[/h]An important thing to note is that you want to make sure the bar is low enough for you to take out off the pegs. It is always better for the bar to be a little low than for you to have to get up on your toes to unhook the bar. Mid chest always seems to work well.
Next, before you even get under the bar, you must [FONT=Proxima_Nova_Bold]find your hand position. If you are a smaller lifter and/or have great shoulder and spine mobility you want your hands in relatively close. For a larger lifter or someone who lacks stellar mobility a wider grip may be necessary.
[h=3]2) Bar Position[/h]
There is a lot of debate as to whether the high-bar or low-bar position is better but as in any exercise it depends on the person and their goals. Many beginners tend to favor the high bar position while competitive powerlifters learn to utilize the low bar position more to their advantage. I will discuss the different mechanics of each later in this article but first I want to show you where to set the bar.
The high-bar position is set up right at the base of the neck across the top of your traps. It is important to first squeeze your shoulder blades together to create a pillow for the bar to sit on to make it feel more comfortable. Make sure you do this before you set the bar across your back and stay tight the whole time.
The difference with the low-bar position is the bar will sit lower on your back, just under the spine of your scapula (shoulder blade). Again, get tight by squeezing your shoulder blades together. There are differences in the mechanics of each while squatting which I will get into in a little bit but first we must discuss un-racking the bar and the setup.
[FONT=Proxima_Nova_Bold]Note:[/FONT] Although bar pads may seem like a good idea, they are not – so ditch them. They will ‘disconnect’ you from the bar and you will not be able to get as tight. This will prevent you from having a solid squat.
[h=3]3) Unracking the Bar[/h]This can either make or break your squat since it is easy to lose your tightness or bar position if you are sloppy taking the bar off the rack.
- Start with your feet under the bar and your hands in position. Remember, you will have to determine what grip distance is best for you but tighter is usually better.
- Get under the bar and into the high-bar or low-bar position.
- Adjust your grip if necessary but [FONT=Proxima_Nova_Bold]stay tight[/FONT].
- Keep your chest up and elbows down.
- Take a big diaphragmatic breath in and hold.
- Squat up to unrack the bar. Take a second to make sure the weight is comfortable and keep holding that breath!
- Take one step back with one leg and then the other. Stay tight. Now you can release your breath.
- From here you can wiggle your feet into the proper position.
[h=3]4) Foot Position[/h]
Foot position is key as it will not only give you a stable base but will allow proper joint mechanics from your ankles all the way up to your hips and back. A good squat (or a bad one) always starts from the ground up.
Squat stance will vary slightly from person to person but to ensure proper mobility and hip drive, I recommend starting out with your heels directly under your shoulders with your feet slightly toed out. You should be able to test by doing a bodyweight squat in this position and get your butt as low to the ground as comfortable. Again, everyone will be slightly different so you will have to play around with your own stance.
[h=3]5) Neck and Eye Position[/h]I have these grouped together because invariably where your eyes go, your neck will follow. Remember that your neck is still part of your spine and it is [FONT=Proxima_Nova_Bold]very[/FONT] important to keep it safe.
Starting with your gaze, you should keep your stare at a fixed point on the horizon NOT the ceiling. I have heard many coaches say to look up when you are squatting. Looking up might sound like a good idea since you will be moving in that direction but is harmful to proper squat mechanics and hip drive. 9 times out of 10 it causes you to hyperextend your cervical spine (neck) and in turn will cause you to lose tightness.
What you want to do is pick a point either on the rack or about 5-10ft in front of you on the floor and stare at it. Looking straight is ok here to as long as there is no mirror.
Keeping your eyes on a fixed point will also allow you to ‘pack’ your neck or keep it in cervical alignment. The easiest way to visualize this is to stand tall and drive the back of your head back and up as if to make a ‘double chin’ or ‘no neck’ face. It ain’t pretty but this will teach you proper spinal alignment.
[/FONT]