
Muscle Insider
New member
One of the fun parts about learning yoga poses is that you can imagine how the name correlates to what the movement looks like. Fish pose is a rear bending, counterasana (to the shoulder stand) technique, where you prop up on the elbows, lift the heart toward the sky, draw the head back, and gently settle the crown of the head on the floor.
The term matsyasana, its sangskrit name, is also used to identify this pose, matsya or “fish”, and asana, “posture”.
The benefits of this pose extend (pun intended) from the head down to the hips, relieving tension in the neck and throat, lengthening the back and spine, strengthening the arms and delts, and refreshing the abdomen and midsection.
Fish pose is a good counter to keyboard neck, while targeting the throat energy center, chest, and abdomen where we hold lots of anxious tension from stressful habits.
In this guide, you’ll find the best fish pose techniques, while learning about the benefits, beginner variations, and how to make Matsyasana more challenging and advanced.
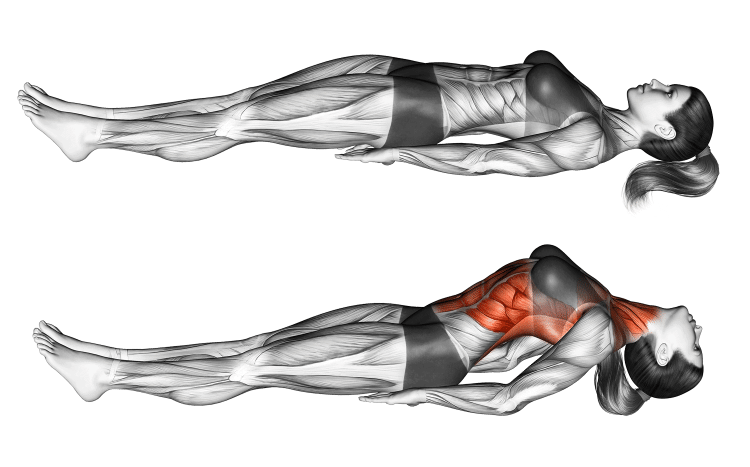
Muscles Worked During Fish Pose Matsyasana
The fish pose is an opportunity to stretch and strengthen your upper body muscles. The following section is for those who’d like to better understand how these muscles work, their location, and benefits.
Back
The fish pose is a type of backbend pose where the elbows help support the upper body. It’s similar to a bodyweight variation that works the back muscles. However, in a yoga pose, you’ll strengthen the back via an isometric hold, rather than performing actual repetitions with a positive and negative component.
Having several muscles in the back, each has a special role, moving the shoulder blades and arms.
Arms
The arms have an important role in supporting your bodyweight as you tilt your head back onto the floor. Without them it’s not happening. Try the pose and notice that it requires strong arms and shoulders. The tree heads on the ear upper arm, aka triceps are great for stabilizing the arm while the back delts keep the arms behind you.
Deltoids
Fish pose also creates resistance for the shoulders to support, stabilize and decelerate the body when dropping the head back. The anterior delt stretches out when reclining on the elbows, while the back delts decelerate the drop, and keep you up.
Core muscles
No one every thinks about stretching the core muscles and midsection. Yoga techniques like fish pose give us an excuse to do so. Made of the abdominal muscles both deep and superificial, obliques, and spinal column muscles, the torso has many muscles that stabilize our trunk and help us bend in various directions.
How To Do Fish Pose Matsyasana
Not too difficult, most reasonable fit people have the ability to get into a fish pose. Use the following step by step instructions and video demonstration to guide your technique. Then, once you’ve mastered it, or if you need a regression, scroll down for some awesome variations.
Steps
Come onto your back with your knees bent and feet flat on the floor. You also want to keep your lower back flat on the ground so there’s no space underneath.
Slide your hands under your butt, tucking your elbows under your back as close to together as possible, then straighten your legs.
Inhale deeply, then sit up halfway, look down at your feet, and place your elbows and forearms under your back in a reverse plank to hold yourself up.
Now lift your chest, roll your shoulders back, and slowly drop the top of your head onto the floor. Balance gently on your elbows and head. Hold this position for 10-15 seconds.
Slowly undo the pose by lying flat on your back, bending your knees, and moving your arms out from underneath your back.
Spread your legs a few feet apart, and move your arms slightly out away from your body in what’s called a corpse or Shavasana pose. Stretch your neck by moving it to the left and right. Remember to breathe in and out.
Now bring your feet together, reach your arms back overhead, and inhale. Then bring your arms back to a resting position next to your body and exhale.
Then slowly sit up.
Here’s a beautifully done tutorial on the fish pose Matsvasana.
Tips
Ideally, you should not be an absolute beginner before performing this exercise. Fish pose places the neck in extension and loads the spine, therefore, you should be somewhat fit, and aware of your body before attempting this technique.
We highly recommend using a yoga mat or soft surface for this pose for comfort, support, and to avoid hitting your head hard on the floor.
If you’re an absolute beginner, we recommend having something to support your back like a junior bolster, or some yoga blankets to prop you up roughly five to six inches high.
It’s important to not place too much weight on the head, the hips and shoulders be supporting most of your weight.
It’s crucial that your head is aligned with an even spine, not allowing your head to just fall back at a sharp angle.
This Exercise
Target Muscle Group: Back, abdomen, neck
Type: Yoga
Mechanics: Isolation
Equipment: Cushioned surface, exercise mat, junior bolster (Optional), yoga blankets (Optional), yoga blocks (Optional)
Difficulty: Intermediate
Benefits of Fish Pose Matsyasana
Fish pose incorporated a backbend which has many benefits in itself. Here are the highlights of this yoga technique.
Stretch your neck, chest, shoulders, back and throat muscles
Stretching is a healthy habit for healthy, flexible, mobile, and strong muscles. Functional joints that bend and move can only do so when a muscle contracts and expands. If they’re tight, you’ll have limited range of motion, and open yourself up for injuries.
The fish pose is a type of backbend technique that places the body in a position to lengthen the abdominal muscles in the core, the spine, back, neck, and even the front deltoids. It’s so useful that you could do it everyday.
Interrupts negative affects of declining posture
Let’s face it, our postural muscles take lots of abuse especially nowadays, due to being so immersed in the dopamine that comes out of our electronic devices. Forward head posture is a pose itself, although not a good one.
Fish pose does the opposite, helping to improve and reverse this common modern problem. Your chest, spine, shoulders, and neck are all affected from bad stance, and doing the opposite is part of the solution.
Counter stretch tech neck
Forward head posture, turtle neck, or whatever you’d like to call it… a common modern body posture where the neck is far in front of the head. This can cause pressure, sore muscles, a weak neck, more stress, and it’s bad news. The fish pose counters this posture by pulling the head back and stretching the muscles in the neck.
Target the stress centers
Fish pose is a triple whammy for relaxing and shedding off some stress. It targets the throat chakras (associated with expression, and confidence), the stomach muscles, and opens up the chest which are key areas we feel noticeable discomfort when anxious and stressed.
Opening up the chest is also good because we lean forward so much looking at our phones. This can cause thoracic outlet syndrome where the nerves, veins, and arteries become compressed in the neck and chest, causing numbness and the tingles in the arms, shoulders, and neck.
Common Mistakes While Performing Fish Pose
In a pose like this one, you want to be sure to avoid mistakes that could place you in a dangerous position.
Too much weight on the head
What you don’t want to do is focus on leaning your weight back on your head. Although it’s tempting! Instead, use your legs, core, back, arms and shoulders to control the movement, then gently tip the crown of your head on the floor into the fish pose.
A helpful trick is to try and distribute 80 percent of your weight through the legs, core and back, while only allowing 20 percent of your weight to shift onto the head.
Steep drop off at the head
If you’re in the correct position from toe to head, then you should be in the proper alignment to safely tilt your head back and rest it on the floor. The mistake is letting your head snap back, steeply bending at the neck. Think of arcing your torso in a semi rainbow shape, actively engaging your back muscles and shoulders to help you get in an accurate and safe pose.
Too much uneven (Lower) back arch
There does need to be some lower back arch to effectively complete the fish pose. But you don’t want to overdo it. You see, the lower back is more mobile compared to the upper back. And if you don’t have a proper hold on your positional abilities it’s easy to overcompensate and overarch your lower back. While that’s not reciprocated for the upper back.
This can cause issues in the disc fluids in your spine and hence, result in pain while making you more susceptible injuries.
The solution: Focus on lengthening your spine, lifting the chest toward the sky, and pulling the shoulders back to create more arch in the upper back, and torso as a whole.
Variations of Fish Pose Matsyasana
These variations can make the fish pose easier, more challenging, or touch an area that the basic fish pose doesn’t. See some common variations below.
Fish block with yoga block under the back
If the basic fish pose is too hard, yoga blocks are much appreciated. It’ll support your back so that you can rest in the arched position, and focus on your breathing with less muscular effort.
Steps
Place the block on the mat standing on its long end.
Lie back on the block so it’s across both shoulder blades, then straight your legs, and relax your arms by your sides after you’ve found a comfortable position.
Drop your head back until its resting on the floor. You may need to adjust the block under your back, then continue the technique. Bring our feet together and relax your body.
When you’re ready, lift up on your elbows, remove the block, and then lie flat on your back in the corpse pose. Rest here, then slowly get up.
For more support, use a block or junior bolster under your head and neck too.
Fish pose in lotus or with legs crossed
You can do a more basic or advanced version of fish pose with legs crossed. You can cross your legs under your bottom, or if you have good flexibility, you can cross them over your your upper thighs. The former is good for beginners, while the former will take more time.
Both will stretch the hips and groin, supporting healthy movement in the hip flexors and lower body.
Steps
While lying on your back with your arms under your body, cross your legs under your butt.
Proceed to lift up onto your forearms, and pull your head back to the floor.
Camel pose
More of a preparatory technique, the camel pose is a modified exercise that includes a backbend while sitting upright. It still carries all the same benefits, but is just performed a little differently to the fish pose.
Steps
The following instructions and video tutorial demonstrate two phases of the camel pose. One to prepare you for the backbend, and then the actual technique.
Begin in a vajrasana position sitting on the floor with your knees bent and calves under your bottom.
Stand on your knees, so that your shins and the top of your feet are in contact with the mat, and your torso is tall and upright. Widen your legs into a comfortably balanced position.
Now place your hands on your lower back, with the fingers pointed down.
Inhale, then slowly push your hips forward, while slowly arcing your upper body, leaning back, exhaling, and shifting your gaze up.
Repeat this a few more times.
Inhale, slowly push your hips forward while exhaling, slowly lean back and bring your arms down to your ankles. Arch your torso and drop your head back toward the floor, so the crown of the head is pointing straight down.
Inhale, then transition to the child’s pose where you lean forward into the floor while outstretching your arms forward.
Flying fish pose
You’ll engage more core, hips, and anterior deltoids, while the flying fish pose includes muscle strengthening components involving the legs and arms. Consequently, it’s more advanced but also more risky because now there’s more weight on the head and neck. So you need to be proficient in the regular fish pose, and you need to understand how to safely focus your weight through your body.
Steps
Note: For the flying fish variation, start with your arms by your sides, not underneath your back and butt.
From the fish pose position with your head back and resting on the floor, lift your legs until they’re roughly 45 degrees to the floor.
Now extend your arms in the same direction as your legs, so they’re roughly parallel.
Hold for about 10 seconds.
To undo the pose, bring your elbows to the supporting position, then slowly drop your legs down to the floor.
Reverse plank
While it’s not technically a type of fish pose, you’re already in a similar position. The reverse plank is arguably more challenging than basic plank where you’re facing the floor, and it will help to strengthen the muscles that we use in a fish pose.
FAQs
Who should not do the fish pose?The people who should avoid fish pose are those suffer from blood pressure issues, migraines, vertigo or injuries in the neck, back, and spine.
How long should I hold the fish pose position? Try to maintain the fish pose for 10-15 seconds which is approximately 3-5 breaths.
We recommend using props like yoga blocks or blankets if you want to hold the pose for longer and up to a minute or more.
Wrapping Up
Fish pose is a technique that’ll get you excited to get down on the mat, because it tackles elements that we’re not typically used too. Stimulating the throat chakras, expanding the pecs, stretching the abdominals, and unraveling bottled up tension and stress is an easy sell.
This guide has everything you need to simulate matsyasana, and if you’re not ready or a novice, there are beginner techniques, as well as a bigger challenge in more advanced versions. We strongly recommend checking out the fish pose tips section and don’t skimp over the common mistakes as this meditation includes neck and spine extension. But it can be performed perfectly safe with attention to proper technique!
One of the fun parts about learning yoga poses is that you can imagine how the name correlates to what the movement looks like. Fish pose is a rear bending, counterasana (to the shoulder stand) technique, where you prop up on the elbows, lift the heart toward the sky, draw the head back, and gently settle the crown of the head on the floor.
The term matsyasana, its sangskrit name, is also used to identify this pose, matsya or “fish”, and asana, “posture”.
The benefits of this pose extend (pun intended) from the head down to the hips, relieving tension in the neck and throat, lengthening the back and spine, strengthening the arms and delts, and refreshing the abdomen and midsection.
Fish pose is a good counter to keyboard neck, while targeting the throat energy center, chest, and abdomen where we hold lots of anxious tension from stressful habits.
In this guide, you’ll find the best fish pose techniques, while learning about the benefits, beginner variations, and how to make Matsyasana more challenging and advanced.
Muscles Worked During Fish Pose Matsyasana
The fish pose is an opportunity to stretch and strengthen your upper body muscles. The following section is for those who’d like to better understand how these muscles work, their location, and benefits.
Back
The fish pose is a type of backbend pose where the elbows help support the upper body. It’s similar to a bodyweight variation that works the back muscles. However, in a yoga pose, you’ll strengthen the back via an isometric hold, rather than performing actual repetitions with a positive and negative component.
Having several muscles in the back, each has a special role, moving the shoulder blades and arms.
Arms
The arms have an important role in supporting your bodyweight as you tilt your head back onto the floor. Without them it’s not happening. Try the pose and notice that it requires strong arms and shoulders. The tree heads on the ear upper arm, aka triceps are great for stabilizing the arm while the back delts keep the arms behind you.
Deltoids
Fish pose also creates resistance for the shoulders to support, stabilize and decelerate the body when dropping the head back. The anterior delt stretches out when reclining on the elbows, while the back delts decelerate the drop, and keep you up.
Core muscles
No one every thinks about stretching the core muscles and midsection. Yoga techniques like fish pose give us an excuse to do so. Made of the abdominal muscles both deep and superificial, obliques, and spinal column muscles, the torso has many muscles that stabilize our trunk and help us bend in various directions.
How To Do Fish Pose Matsyasana
Not too difficult, most reasonable fit people have the ability to get into a fish pose. Use the following step by step instructions and video demonstration to guide your technique. Then, once you’ve mastered it, or if you need a regression, scroll down for some awesome variations.
Steps
[*]Come onto your back with your knees bent and feet flat on the floor. You also want to keep your lower back flat on the ground so there’s no space underneath.
[*]Slide your hands under your butt, tucking your elbows under your back as close to together as possible, then straighten your legs.
[*]Inhale deeply, then sit up halfway, look down at your feet, and place your elbows and forearms under your back in a reverse plank to hold yourself up.
[*]Now lift your chest, roll your shoulders back, and slowly drop the top of your head onto the floor. Balance gently on your elbows and head. Hold this position for 10-15 seconds.
[*]Slowly undo the pose by lying flat on your back, bending your knees, and moving your arms out from underneath your back.
[*]Spread your legs a few feet apart, and move your arms slightly out away from your body in what’s called a corpse or Shavasana pose. Stretch your neck by moving it to the left and right. Remember to breathe in and out.
[*]Now bring your feet together, reach your arms back overhead, and inhale. Then bring your arms back to a resting position next to your body and exhale.
[*]Then slowly sit up.
Here’s a beautifully done tutorial on the fish pose Matsvasana.
Tips
Fish pose incorporated a backbend which has many benefits in itself. Here are the highlights of this yoga technique.
Stretch your neck, chest, shoulders, back and throat muscles
Stretching is a healthy habit for healthy, flexible, mobile, and strong muscles. Functional joints that bend and move can only do so when a muscle contracts and expands. If they’re tight, you’ll have limited range of motion, and open yourself up for injuries.
The fish pose is a type of backbend technique that places the body in a position to lengthen the abdominal muscles in the core, the spine, back, neck, and even the front deltoids. It’s so useful that you could do it everyday.
Interrupts negative affects of declining posture
Let’s face it, our postural muscles take lots of abuse especially nowadays, due to being so immersed in the dopamine that comes out of our electronic devices. Forward head posture is a pose itself, although not a good one.
Fish pose does the opposite, helping to improve and reverse this common modern problem. Your chest, spine, shoulders, and neck are all affected from bad stance, and doing the opposite is part of the solution.
Counter stretch tech neck
Forward head posture, turtle neck, or whatever you’d like to call it… a common modern body posture where the neck is far in front of the head. This can cause pressure, sore muscles, a weak neck, more stress, and it’s bad news. The fish pose counters this posture by pulling the head back and stretching the muscles in the neck.
Target the stress centers
Fish pose is a triple whammy for relaxing and shedding off some stress. It targets the throat chakras (associated with expression, and confidence), the stomach muscles, and opens up the chest which are key areas we feel noticeable discomfort when anxious and stressed.
Opening up the chest is also good because we lean forward so much looking at our phones. This can cause thoracic outlet syndrome where the nerves, veins, and arteries become compressed in the neck and chest, causing numbness and the tingles in the arms, shoulders, and neck.
Common Mistakes While Performing Fish Pose
In a pose like this one, you want to be sure to avoid mistakes that could place you in a dangerous position.
Too much weight on the head
What you don’t want to do is focus on leaning your weight back on your head. Although it’s tempting! Instead, use your legs, core, back, arms and shoulders to control the movement, then gently tip the crown of your head on the floor into the fish pose.
A helpful trick is to try and distribute 80 percent of your weight through the legs, core and back, while only allowing 20 percent of your weight to shift onto the head.
Steep drop off at the head
If you’re in the correct position from toe to head, then you should be in the proper alignment to safely tilt your head back and rest it on the floor. The mistake is letting your head snap back, steeply bending at the neck. Think of arcing your torso in a semi rainbow shape, actively engaging your back muscles and shoulders to help you get in an accurate and safe pose.
Too much uneven (Lower) back arch
There does need to be some lower back arch to effectively complete the fish pose. But you don’t want to overdo it. You see, the lower back is more mobile compared to the upper back. And if you don’t have a proper hold on your positional abilities it’s easy to overcompensate and overarch your lower back. While that’s not reciprocated for the upper back.
This can cause issues in the disc fluids in your spine and hence, result in pain while making you more susceptible injuries.
The solution: Focus on lengthening your spine, lifting the chest toward the sky, and pulling the shoulders back to create more arch in the upper back, and torso as a whole.
Variations of Fish Pose Matsyasana
These variations can make the fish pose easier, more challenging, or touch an area that the basic fish pose doesn’t. See some common variations below.
Fish block with yoga block under the back
If the basic fish pose is too hard, yoga blocks are much appreciated. It’ll support your back so that you can rest in the arched position, and focus on your breathing with less muscular effort.
Steps
[*]Place the block on the mat standing on its long end.
[*]Lie back on the block so it’s across both shoulder blades, then straight your legs, and relax your arms by your sides after you’ve found a comfortable position.
[*]Drop your head back until its resting on the floor. You may need to adjust the block under your back, then continue the technique. Bring our feet together and relax your body.
[*]When you’re ready, lift up on your elbows, remove the block, and then lie flat on your back in the corpse pose. Rest here, then slowly get up.
For more support, use a block or junior bolster under your head and neck too.
Fish pose in lotus or with legs crossed
You can do a more basic or advanced version of fish pose with legs crossed. You can cross your legs under your bottom, or if you have good flexibility, you can cross them over your your upper thighs. The former is good for beginners, while the former will take more time.
Both will stretch the hips and groin, supporting healthy movement in the hip flexors and lower body.
Steps
[*]While lying on your back with your arms under your body, cross your legs under your butt.
[*]Proceed to lift up onto your forearms, and pull your head back to the floor.
Camel pose
More of a preparatory technique, the camel pose is a modified exercise that includes a backbend while sitting upright. It still carries all the same benefits, but is just performed a little differently to the fish pose.
Steps
The following instructions and video tutorial demonstrate two phases of the camel pose. One to prepare you for the backbend, and then the actual technique.
[*]Begin in a vajrasana position sitting on the floor with your knees bent and calves under your bottom.
[*]Stand on your knees, so that your shins and the top of your feet are in contact with the mat, and your torso is tall and upright. Widen your legs into a comfortably balanced position.
[*]Now place your hands on your lower back, with the fingers pointed down.
[*]Inhale, then slowly push your hips forward, while slowly arcing your upper body, leaning back, exhaling, and shifting your gaze up.
[*]Repeat this a few more times.
[*]Inhale, slowly push your hips forward while exhaling, slowly lean back and bring your arms down to your ankles. Arch your torso and drop your head back toward the floor, so the crown of the head is pointing straight down.
[*]Inhale, then transition to the child’s pose where you lean forward into the floor while outstretching your arms forward.
Flying fish pose
You’ll engage more core, hips, and anterior deltoids, while the flying fish pose includes muscle strengthening components involving the legs and arms. Consequently, it’s more advanced but also more risky because now there’s more weight on the head and neck. So you need to be proficient in the regular fish pose, and you need to understand how to safely focus your weight through your body.
Steps
Note: For the flying fish variation, start with your arms by your sides, not underneath your back and butt.
[*]From the fish pose position with your head back and resting on the floor, lift your legs until they’re roughly 45 degrees to the floor.
[*]Now extend your arms in the same direction as your legs, so they’re roughly parallel.
[*]Hold for about 10 seconds.
[*]To undo the pose, bring your elbows to the supporting position, then slowly drop your legs down to the floor.
Reverse plank
While it’s not technically a type of fish pose, you’re already in a similar position. The reverse plank is arguably more challenging than basic plank where you’re facing the floor, and it will help to strengthen the muscles that we use in a fish pose.
FAQs
Who should not do the fish pose?The people who should avoid fish pose are those suffer from blood pressure issues, migraines, vertigo or injuries in the neck, back, and spine.
How long should I hold the fish pose position? Try to maintain the fish pose for 10-15 seconds which is approximately 3-5 breaths.
We recommend using props like yoga blocks or blankets if you want to hold the pose for longer and up to a minute or more.
Wrapping Up
Fish pose is a technique that’ll get you excited to get down on the mat, because it tackles elements that we’re not typically used too. Stimulating the throat chakras, expanding the pecs, stretching the abdominals, and unraveling bottled up tension and stress is an easy sell.
This guide has everything you need to simulate matsyasana, and if you’re not ready or a novice, there are beginner techniques, as well as a bigger challenge in more advanced versions. We strongly recommend checking out the fish pose tips section and don’t skimp over the common mistakes as this meditation includes neck and spine extension. But it can be performed perfectly safe with attention to proper technique!
Click here to view the article.
The term matsyasana, its sangskrit name, is also used to identify this pose, matsya or “fish”, and asana, “posture”.
The benefits of this pose extend (pun intended) from the head down to the hips, relieving tension in the neck and throat, lengthening the back and spine, strengthening the arms and delts, and refreshing the abdomen and midsection.
Fish pose is a good counter to keyboard neck, while targeting the throat energy center, chest, and abdomen where we hold lots of anxious tension from stressful habits.
In this guide, you’ll find the best fish pose techniques, while learning about the benefits, beginner variations, and how to make Matsyasana more challenging and advanced.
Muscles Worked During Fish Pose Matsyasana
The fish pose is an opportunity to stretch and strengthen your upper body muscles. The following section is for those who’d like to better understand how these muscles work, their location, and benefits.
Back
The fish pose is a type of backbend pose where the elbows help support the upper body. It’s similar to a bodyweight variation that works the back muscles. However, in a yoga pose, you’ll strengthen the back via an isometric hold, rather than performing actual repetitions with a positive and negative component.
Having several muscles in the back, each has a special role, moving the shoulder blades and arms.
Arms
The arms have an important role in supporting your bodyweight as you tilt your head back onto the floor. Without them it’s not happening. Try the pose and notice that it requires strong arms and shoulders. The tree heads on the ear upper arm, aka triceps are great for stabilizing the arm while the back delts keep the arms behind you.
Deltoids
Fish pose also creates resistance for the shoulders to support, stabilize and decelerate the body when dropping the head back. The anterior delt stretches out when reclining on the elbows, while the back delts decelerate the drop, and keep you up.
Core muscles
No one every thinks about stretching the core muscles and midsection. Yoga techniques like fish pose give us an excuse to do so. Made of the abdominal muscles both deep and superificial, obliques, and spinal column muscles, the torso has many muscles that stabilize our trunk and help us bend in various directions.
How To Do Fish Pose Matsyasana
Not too difficult, most reasonable fit people have the ability to get into a fish pose. Use the following step by step instructions and video demonstration to guide your technique. Then, once you’ve mastered it, or if you need a regression, scroll down for some awesome variations.
Steps
Come onto your back with your knees bent and feet flat on the floor. You also want to keep your lower back flat on the ground so there’s no space underneath.
Slide your hands under your butt, tucking your elbows under your back as close to together as possible, then straighten your legs.
Inhale deeply, then sit up halfway, look down at your feet, and place your elbows and forearms under your back in a reverse plank to hold yourself up.
Now lift your chest, roll your shoulders back, and slowly drop the top of your head onto the floor. Balance gently on your elbows and head. Hold this position for 10-15 seconds.
Slowly undo the pose by lying flat on your back, bending your knees, and moving your arms out from underneath your back.
Spread your legs a few feet apart, and move your arms slightly out away from your body in what’s called a corpse or Shavasana pose. Stretch your neck by moving it to the left and right. Remember to breathe in and out.
Now bring your feet together, reach your arms back overhead, and inhale. Then bring your arms back to a resting position next to your body and exhale.
Then slowly sit up.
Here’s a beautifully done tutorial on the fish pose Matsvasana.
Tips
Ideally, you should not be an absolute beginner before performing this exercise. Fish pose places the neck in extension and loads the spine, therefore, you should be somewhat fit, and aware of your body before attempting this technique.
We highly recommend using a yoga mat or soft surface for this pose for comfort, support, and to avoid hitting your head hard on the floor.
If you’re an absolute beginner, we recommend having something to support your back like a junior bolster, or some yoga blankets to prop you up roughly five to six inches high.
It’s important to not place too much weight on the head, the hips and shoulders be supporting most of your weight.
It’s crucial that your head is aligned with an even spine, not allowing your head to just fall back at a sharp angle.
This Exercise
Target Muscle Group: Back, abdomen, neck
Type: Yoga
Mechanics: Isolation
Equipment: Cushioned surface, exercise mat, junior bolster (Optional), yoga blankets (Optional), yoga blocks (Optional)
Difficulty: Intermediate
Benefits of Fish Pose Matsyasana
Fish pose incorporated a backbend which has many benefits in itself. Here are the highlights of this yoga technique.
Stretch your neck, chest, shoulders, back and throat muscles
Stretching is a healthy habit for healthy, flexible, mobile, and strong muscles. Functional joints that bend and move can only do so when a muscle contracts and expands. If they’re tight, you’ll have limited range of motion, and open yourself up for injuries.
The fish pose is a type of backbend technique that places the body in a position to lengthen the abdominal muscles in the core, the spine, back, neck, and even the front deltoids. It’s so useful that you could do it everyday.
Interrupts negative affects of declining posture
Let’s face it, our postural muscles take lots of abuse especially nowadays, due to being so immersed in the dopamine that comes out of our electronic devices. Forward head posture is a pose itself, although not a good one.
Fish pose does the opposite, helping to improve and reverse this common modern problem. Your chest, spine, shoulders, and neck are all affected from bad stance, and doing the opposite is part of the solution.
Counter stretch tech neck
Forward head posture, turtle neck, or whatever you’d like to call it… a common modern body posture where the neck is far in front of the head. This can cause pressure, sore muscles, a weak neck, more stress, and it’s bad news. The fish pose counters this posture by pulling the head back and stretching the muscles in the neck.
Target the stress centers
Fish pose is a triple whammy for relaxing and shedding off some stress. It targets the throat chakras (associated with expression, and confidence), the stomach muscles, and opens up the chest which are key areas we feel noticeable discomfort when anxious and stressed.
Opening up the chest is also good because we lean forward so much looking at our phones. This can cause thoracic outlet syndrome where the nerves, veins, and arteries become compressed in the neck and chest, causing numbness and the tingles in the arms, shoulders, and neck.
Common Mistakes While Performing Fish Pose
In a pose like this one, you want to be sure to avoid mistakes that could place you in a dangerous position.
Too much weight on the head
What you don’t want to do is focus on leaning your weight back on your head. Although it’s tempting! Instead, use your legs, core, back, arms and shoulders to control the movement, then gently tip the crown of your head on the floor into the fish pose.
A helpful trick is to try and distribute 80 percent of your weight through the legs, core and back, while only allowing 20 percent of your weight to shift onto the head.
Steep drop off at the head
If you’re in the correct position from toe to head, then you should be in the proper alignment to safely tilt your head back and rest it on the floor. The mistake is letting your head snap back, steeply bending at the neck. Think of arcing your torso in a semi rainbow shape, actively engaging your back muscles and shoulders to help you get in an accurate and safe pose.
Too much uneven (Lower) back arch
There does need to be some lower back arch to effectively complete the fish pose. But you don’t want to overdo it. You see, the lower back is more mobile compared to the upper back. And if you don’t have a proper hold on your positional abilities it’s easy to overcompensate and overarch your lower back. While that’s not reciprocated for the upper back.
This can cause issues in the disc fluids in your spine and hence, result in pain while making you more susceptible injuries.
The solution: Focus on lengthening your spine, lifting the chest toward the sky, and pulling the shoulders back to create more arch in the upper back, and torso as a whole.
Variations of Fish Pose Matsyasana
These variations can make the fish pose easier, more challenging, or touch an area that the basic fish pose doesn’t. See some common variations below.
Fish block with yoga block under the back
If the basic fish pose is too hard, yoga blocks are much appreciated. It’ll support your back so that you can rest in the arched position, and focus on your breathing with less muscular effort.
Steps
Place the block on the mat standing on its long end.
Lie back on the block so it’s across both shoulder blades, then straight your legs, and relax your arms by your sides after you’ve found a comfortable position.
Drop your head back until its resting on the floor. You may need to adjust the block under your back, then continue the technique. Bring our feet together and relax your body.
When you’re ready, lift up on your elbows, remove the block, and then lie flat on your back in the corpse pose. Rest here, then slowly get up.
For more support, use a block or junior bolster under your head and neck too.
Fish pose in lotus or with legs crossed
You can do a more basic or advanced version of fish pose with legs crossed. You can cross your legs under your bottom, or if you have good flexibility, you can cross them over your your upper thighs. The former is good for beginners, while the former will take more time.
Both will stretch the hips and groin, supporting healthy movement in the hip flexors and lower body.
Steps
While lying on your back with your arms under your body, cross your legs under your butt.
Proceed to lift up onto your forearms, and pull your head back to the floor.
Camel pose
More of a preparatory technique, the camel pose is a modified exercise that includes a backbend while sitting upright. It still carries all the same benefits, but is just performed a little differently to the fish pose.
Steps
The following instructions and video tutorial demonstrate two phases of the camel pose. One to prepare you for the backbend, and then the actual technique.
Begin in a vajrasana position sitting on the floor with your knees bent and calves under your bottom.
Stand on your knees, so that your shins and the top of your feet are in contact with the mat, and your torso is tall and upright. Widen your legs into a comfortably balanced position.
Now place your hands on your lower back, with the fingers pointed down.
Inhale, then slowly push your hips forward, while slowly arcing your upper body, leaning back, exhaling, and shifting your gaze up.
Repeat this a few more times.
Inhale, slowly push your hips forward while exhaling, slowly lean back and bring your arms down to your ankles. Arch your torso and drop your head back toward the floor, so the crown of the head is pointing straight down.
Inhale, then transition to the child’s pose where you lean forward into the floor while outstretching your arms forward.
Flying fish pose
You’ll engage more core, hips, and anterior deltoids, while the flying fish pose includes muscle strengthening components involving the legs and arms. Consequently, it’s more advanced but also more risky because now there’s more weight on the head and neck. So you need to be proficient in the regular fish pose, and you need to understand how to safely focus your weight through your body.
Steps
Note: For the flying fish variation, start with your arms by your sides, not underneath your back and butt.
From the fish pose position with your head back and resting on the floor, lift your legs until they’re roughly 45 degrees to the floor.
Now extend your arms in the same direction as your legs, so they’re roughly parallel.
Hold for about 10 seconds.
To undo the pose, bring your elbows to the supporting position, then slowly drop your legs down to the floor.
Reverse plank
While it’s not technically a type of fish pose, you’re already in a similar position. The reverse plank is arguably more challenging than basic plank where you’re facing the floor, and it will help to strengthen the muscles that we use in a fish pose.
FAQs
Who should not do the fish pose?The people who should avoid fish pose are those suffer from blood pressure issues, migraines, vertigo or injuries in the neck, back, and spine.
How long should I hold the fish pose position? Try to maintain the fish pose for 10-15 seconds which is approximately 3-5 breaths.
We recommend using props like yoga blocks or blankets if you want to hold the pose for longer and up to a minute or more.
Wrapping Up
Fish pose is a technique that’ll get you excited to get down on the mat, because it tackles elements that we’re not typically used too. Stimulating the throat chakras, expanding the pecs, stretching the abdominals, and unraveling bottled up tension and stress is an easy sell.
This guide has everything you need to simulate matsyasana, and if you’re not ready or a novice, there are beginner techniques, as well as a bigger challenge in more advanced versions. We strongly recommend checking out the fish pose tips section and don’t skimp over the common mistakes as this meditation includes neck and spine extension. But it can be performed perfectly safe with attention to proper technique!
One of the fun parts about learning yoga poses is that you can imagine how the name correlates to what the movement looks like. Fish pose is a rear bending, counterasana (to the shoulder stand) technique, where you prop up on the elbows, lift the heart toward the sky, draw the head back, and gently settle the crown of the head on the floor.
The term matsyasana, its sangskrit name, is also used to identify this pose, matsya or “fish”, and asana, “posture”.
The benefits of this pose extend (pun intended) from the head down to the hips, relieving tension in the neck and throat, lengthening the back and spine, strengthening the arms and delts, and refreshing the abdomen and midsection.
Fish pose is a good counter to keyboard neck, while targeting the throat energy center, chest, and abdomen where we hold lots of anxious tension from stressful habits.
In this guide, you’ll find the best fish pose techniques, while learning about the benefits, beginner variations, and how to make Matsyasana more challenging and advanced.
Muscles Worked During Fish Pose Matsyasana
The fish pose is an opportunity to stretch and strengthen your upper body muscles. The following section is for those who’d like to better understand how these muscles work, their location, and benefits.
Back
The fish pose is a type of backbend pose where the elbows help support the upper body. It’s similar to a bodyweight variation that works the back muscles. However, in a yoga pose, you’ll strengthen the back via an isometric hold, rather than performing actual repetitions with a positive and negative component.
Having several muscles in the back, each has a special role, moving the shoulder blades and arms.
Arms
The arms have an important role in supporting your bodyweight as you tilt your head back onto the floor. Without them it’s not happening. Try the pose and notice that it requires strong arms and shoulders. The tree heads on the ear upper arm, aka triceps are great for stabilizing the arm while the back delts keep the arms behind you.
Deltoids
Fish pose also creates resistance for the shoulders to support, stabilize and decelerate the body when dropping the head back. The anterior delt stretches out when reclining on the elbows, while the back delts decelerate the drop, and keep you up.
Core muscles
No one every thinks about stretching the core muscles and midsection. Yoga techniques like fish pose give us an excuse to do so. Made of the abdominal muscles both deep and superificial, obliques, and spinal column muscles, the torso has many muscles that stabilize our trunk and help us bend in various directions.
How To Do Fish Pose Matsyasana
Not too difficult, most reasonable fit people have the ability to get into a fish pose. Use the following step by step instructions and video demonstration to guide your technique. Then, once you’ve mastered it, or if you need a regression, scroll down for some awesome variations.
Steps
[*]Come onto your back with your knees bent and feet flat on the floor. You also want to keep your lower back flat on the ground so there’s no space underneath.
[*]Slide your hands under your butt, tucking your elbows under your back as close to together as possible, then straighten your legs.
[*]Inhale deeply, then sit up halfway, look down at your feet, and place your elbows and forearms under your back in a reverse plank to hold yourself up.
[*]Now lift your chest, roll your shoulders back, and slowly drop the top of your head onto the floor. Balance gently on your elbows and head. Hold this position for 10-15 seconds.
[*]Slowly undo the pose by lying flat on your back, bending your knees, and moving your arms out from underneath your back.
[*]Spread your legs a few feet apart, and move your arms slightly out away from your body in what’s called a corpse or Shavasana pose. Stretch your neck by moving it to the left and right. Remember to breathe in and out.
[*]Now bring your feet together, reach your arms back overhead, and inhale. Then bring your arms back to a resting position next to your body and exhale.
[*]Then slowly sit up.
Here’s a beautifully done tutorial on the fish pose Matsvasana.
Tips
- Ideally, you should not be an absolute beginner before performing this exercise. Fish pose places the neck in extension and loads the spine, therefore, you should be somewhat fit, and aware of your body before attempting this technique.
- We highly recommend using a yoga mat or soft surface for this pose for comfort, support, and to avoid hitting your head hard on the floor.
- If you’re an absolute beginner, we recommend having something to support your back like a junior bolster, or some yoga blankets to prop you up roughly five to six inches high.
- It’s important to not place too much weight on the head, the hips and shoulders be supporting most of your weight.
- It’s crucial that your head is aligned with an even spine, not allowing your head to just fall back at a sharp angle.
- Target Muscle Group: Back, abdomen, neck
- Type: Yoga
- Mechanics: Isolation
- Equipment: Cushioned surface, exercise mat, junior bolster (Optional), yoga blankets (Optional), yoga blocks (Optional)
- Difficulty: Intermediate
Fish pose incorporated a backbend which has many benefits in itself. Here are the highlights of this yoga technique.
Stretch your neck, chest, shoulders, back and throat muscles
Stretching is a healthy habit for healthy, flexible, mobile, and strong muscles. Functional joints that bend and move can only do so when a muscle contracts and expands. If they’re tight, you’ll have limited range of motion, and open yourself up for injuries.
The fish pose is a type of backbend technique that places the body in a position to lengthen the abdominal muscles in the core, the spine, back, neck, and even the front deltoids. It’s so useful that you could do it everyday.
Interrupts negative affects of declining posture
Let’s face it, our postural muscles take lots of abuse especially nowadays, due to being so immersed in the dopamine that comes out of our electronic devices. Forward head posture is a pose itself, although not a good one.
Fish pose does the opposite, helping to improve and reverse this common modern problem. Your chest, spine, shoulders, and neck are all affected from bad stance, and doing the opposite is part of the solution.
Counter stretch tech neck
Forward head posture, turtle neck, or whatever you’d like to call it… a common modern body posture where the neck is far in front of the head. This can cause pressure, sore muscles, a weak neck, more stress, and it’s bad news. The fish pose counters this posture by pulling the head back and stretching the muscles in the neck.
Target the stress centers
Fish pose is a triple whammy for relaxing and shedding off some stress. It targets the throat chakras (associated with expression, and confidence), the stomach muscles, and opens up the chest which are key areas we feel noticeable discomfort when anxious and stressed.
Opening up the chest is also good because we lean forward so much looking at our phones. This can cause thoracic outlet syndrome where the nerves, veins, and arteries become compressed in the neck and chest, causing numbness and the tingles in the arms, shoulders, and neck.
Common Mistakes While Performing Fish Pose
In a pose like this one, you want to be sure to avoid mistakes that could place you in a dangerous position.
Too much weight on the head
What you don’t want to do is focus on leaning your weight back on your head. Although it’s tempting! Instead, use your legs, core, back, arms and shoulders to control the movement, then gently tip the crown of your head on the floor into the fish pose.
A helpful trick is to try and distribute 80 percent of your weight through the legs, core and back, while only allowing 20 percent of your weight to shift onto the head.
Steep drop off at the head
If you’re in the correct position from toe to head, then you should be in the proper alignment to safely tilt your head back and rest it on the floor. The mistake is letting your head snap back, steeply bending at the neck. Think of arcing your torso in a semi rainbow shape, actively engaging your back muscles and shoulders to help you get in an accurate and safe pose.
Too much uneven (Lower) back arch
There does need to be some lower back arch to effectively complete the fish pose. But you don’t want to overdo it. You see, the lower back is more mobile compared to the upper back. And if you don’t have a proper hold on your positional abilities it’s easy to overcompensate and overarch your lower back. While that’s not reciprocated for the upper back.
This can cause issues in the disc fluids in your spine and hence, result in pain while making you more susceptible injuries.
The solution: Focus on lengthening your spine, lifting the chest toward the sky, and pulling the shoulders back to create more arch in the upper back, and torso as a whole.
Variations of Fish Pose Matsyasana
These variations can make the fish pose easier, more challenging, or touch an area that the basic fish pose doesn’t. See some common variations below.
Fish block with yoga block under the back
If the basic fish pose is too hard, yoga blocks are much appreciated. It’ll support your back so that you can rest in the arched position, and focus on your breathing with less muscular effort.
Steps
[*]Place the block on the mat standing on its long end.
[*]Lie back on the block so it’s across both shoulder blades, then straight your legs, and relax your arms by your sides after you’ve found a comfortable position.
[*]Drop your head back until its resting on the floor. You may need to adjust the block under your back, then continue the technique. Bring our feet together and relax your body.
[*]When you’re ready, lift up on your elbows, remove the block, and then lie flat on your back in the corpse pose. Rest here, then slowly get up.
For more support, use a block or junior bolster under your head and neck too.
Fish pose in lotus or with legs crossed
You can do a more basic or advanced version of fish pose with legs crossed. You can cross your legs under your bottom, or if you have good flexibility, you can cross them over your your upper thighs. The former is good for beginners, while the former will take more time.
Both will stretch the hips and groin, supporting healthy movement in the hip flexors and lower body.
Steps
[*]While lying on your back with your arms under your body, cross your legs under your butt.
[*]Proceed to lift up onto your forearms, and pull your head back to the floor.
Camel pose
More of a preparatory technique, the camel pose is a modified exercise that includes a backbend while sitting upright. It still carries all the same benefits, but is just performed a little differently to the fish pose.
Steps
The following instructions and video tutorial demonstrate two phases of the camel pose. One to prepare you for the backbend, and then the actual technique.
[*]Begin in a vajrasana position sitting on the floor with your knees bent and calves under your bottom.
[*]Stand on your knees, so that your shins and the top of your feet are in contact with the mat, and your torso is tall and upright. Widen your legs into a comfortably balanced position.
[*]Now place your hands on your lower back, with the fingers pointed down.
[*]Inhale, then slowly push your hips forward, while slowly arcing your upper body, leaning back, exhaling, and shifting your gaze up.
[*]Repeat this a few more times.
[*]Inhale, slowly push your hips forward while exhaling, slowly lean back and bring your arms down to your ankles. Arch your torso and drop your head back toward the floor, so the crown of the head is pointing straight down.
[*]Inhale, then transition to the child’s pose where you lean forward into the floor while outstretching your arms forward.
Flying fish pose
You’ll engage more core, hips, and anterior deltoids, while the flying fish pose includes muscle strengthening components involving the legs and arms. Consequently, it’s more advanced but also more risky because now there’s more weight on the head and neck. So you need to be proficient in the regular fish pose, and you need to understand how to safely focus your weight through your body.
Steps
Note: For the flying fish variation, start with your arms by your sides, not underneath your back and butt.
[*]From the fish pose position with your head back and resting on the floor, lift your legs until they’re roughly 45 degrees to the floor.
[*]Now extend your arms in the same direction as your legs, so they’re roughly parallel.
[*]Hold for about 10 seconds.
[*]To undo the pose, bring your elbows to the supporting position, then slowly drop your legs down to the floor.
Reverse plank
While it’s not technically a type of fish pose, you’re already in a similar position. The reverse plank is arguably more challenging than basic plank where you’re facing the floor, and it will help to strengthen the muscles that we use in a fish pose.
FAQs
Who should not do the fish pose?The people who should avoid fish pose are those suffer from blood pressure issues, migraines, vertigo or injuries in the neck, back, and spine.
How long should I hold the fish pose position? Try to maintain the fish pose for 10-15 seconds which is approximately 3-5 breaths.
We recommend using props like yoga blocks or blankets if you want to hold the pose for longer and up to a minute or more.
Wrapping Up
Fish pose is a technique that’ll get you excited to get down on the mat, because it tackles elements that we’re not typically used too. Stimulating the throat chakras, expanding the pecs, stretching the abdominals, and unraveling bottled up tension and stress is an easy sell.
This guide has everything you need to simulate matsyasana, and if you’re not ready or a novice, there are beginner techniques, as well as a bigger challenge in more advanced versions. We strongly recommend checking out the fish pose tips section and don’t skimp over the common mistakes as this meditation includes neck and spine extension. But it can be performed perfectly safe with attention to proper technique!
Click here to view the article.