


Muscle Insider
New member
The dead bug exercise may be bleakly named, but its prowess as a core-builder is nearly unmatched. It’s a fantastic tool to teach core engagement and coordination, though it sadly mimics the wriggling ... Read more
The post How to Do the Dead Bug Exercise for More Core Strength and Control appeared first on BarBend.
The dead bug exercise may be bleakly named, but its prowess as a core-builder is nearly unmatched. It’s a fantastic tool to teach core engagement and coordination, though it sadly mimics the wriggling nature of a dying bug — hence the name.
Much like a flailing creature, the dead bug exercise keeps you flat on the ground during your set. This provides as much stability as possible. As you begin to grasp the movement, your midsection is exposed to a level of resistance that marks it as one of the best core exercises for building foundational core strength, improving coordination, or helping you return from injury.
Although it might seem entry-level, the dead bug is also part of a long line of core progressions. Indeed, you’ll find the dead bug suited for beginners to high-level athletes aiming to up their core game. From programming to execution and troubleshooting, here’s everything you’ll need to know about the dead bug.
How to Do the Dead Bug
The traditional dead bug is a calisthenic exercise. This means you won’t need any form of external resistance to perform one — just your body weight (and perhaps an exercise mat). Here is a step-by-step walkthrough to execute the dead bug.
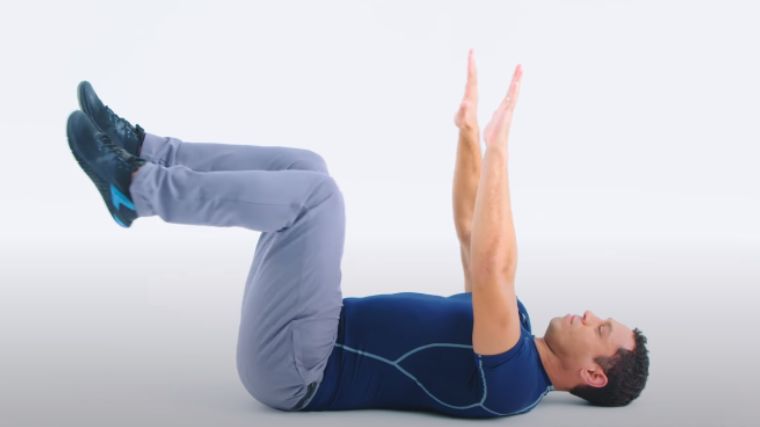
Step 1 – The Set-Up
 Credit: ExperienceLifeMag / Youtube
The dead bug is performed on the floor, so grab a yoga mat or a clear space. While lying on your back, flex your hips to 90 degrees and keep your shins perpendicular to your thighs. Next, straighten your arms directly above your body, reaching your hands toward the ceiling. This is your starting position.
Coach’s Tip: Try setting up near a mirror to get the angles correct the first time you attempt the dead bug.
Step 2 – Brace
 Credit: ExperienceLifeMag / Youtube
Create a cylindrical brace of your midsection. Do this by bearing down on your core, tightening your legs and glutes, and locking in your lats. This should place you in a stable isometric full-body brace.
Coach’s Tip: Think of how you would brace for a squat or deadlift, or if you were going to get punched in the gut. Engage your core from all angles, including your obliques and lower back. This is the “braced” core you are shooting for.
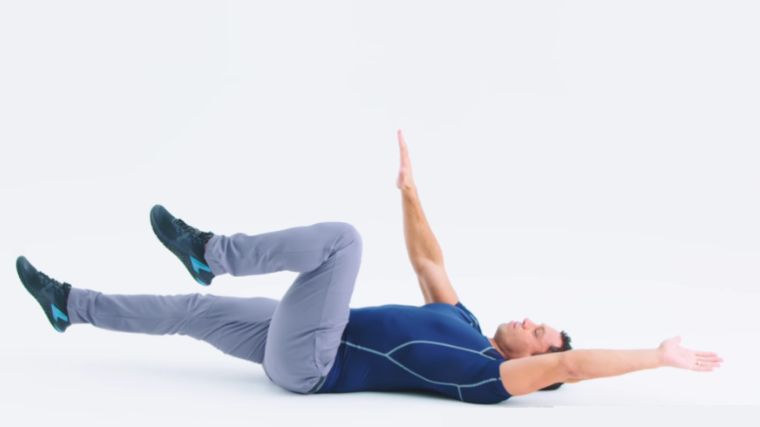
Step 3 – Start Squirming
 Credit: ExperienceLifeMag / Youtube
Straighten your right leg, extending it away from your body. At the same time, lower your left arm back and away from your body, reaching behind you over your head. Aim for both limbs to hover a couple of inches off the ground when they’re fully extended. Once each limb reaches full extension, draw them back to the starting position simultaneously.
Slowly and with control, engage your abs and breathe deeply as you alternate limbs, moving your left leg at the same time as your right arm when your other limbs come back to the starting position. Completing one rotation for each side of your body is considered one repetition.
Coach’s Tip: Maintain your brace and resist your body’s tendency to create an arch in your back. Press your lower back into the ground to help keep your core safe and engaged. Stay locked in position and control the movement of each limb.
Dead Bug Variations
The dead bug is a very beginner-friendly exercise, but it also scales for athletes with years of training experience. Some useful variations to weave into your training, regardless of your level of fitness finesse, are the half dead bug, banded dead bug, and exercise ball passes.
Half Dead Bug
https://youtube.com/watch?v=6tiXz1vRfhoVideo can’t be loaded because JavaScript is disabled: How to perform a Half Dead Bug | Core Exercise (https://youtube.com/watch?v=6tiXz1vRfho)
[Read More: Build a Titanic Torso with These Bodybuilding Chest & Back Workouts]
[*]Lie flat on your back and assume the standard dead bug starting position.
[*]Brace your core and keep your legs locked in their starting position.
[*]Alternate each arm towards the ground and draw them back to the starting position. Maintain the same leg position throughout the set.
Banded Dead Bug
https://youtube.com/watch?v=wCwn7-Z-XjEVideo can’t be loaded because JavaScript is disabled: Banded Deadbug (https://youtube.com/watch?v=wCwn7-Z-XjE)
[Read More: 5 At-Home Workouts for Strength, Muscle Growth, Power, and More]
[*]Lie down in the usual dead bug starting position with a band in your hands and anchored to a nearby stability point.
[*]The resistance band should be taut enough to encourage lat and core engagement.
[*]Perform the dead bug using the lower body alternating movements while maintaining a locked, unmoving upper body.
Exercise Ball Passes
https://youtube.com/watch?v=-70Mv20jx7oVideo can’t be loaded because JavaScript is disabled: How to do a Stability Ball Feet-Hand Pass Off (https://youtube.com/watch?v=-70Mv20jx7o)
[Read More: The Best Online Workout Programs For Coaching, Cardio, Value, And More]
[*]Assume your standard dead bug starting position while holding an exercise ball in your hands.
[*]Send your arms and legs toward the ground, maintaining control of the exercise ball the entire time.
[*]Draw your limbs back towards the starting position, passing the exercise ball to the legs and performing for repetitions.
Dead Bug Alternatives
Once you’ve spent some time with the dead bug, you might be looking for a few different moves to swap between. The bird dog, bird dog row, and split squat pendulum hold are excellent choices.
Bird Dog
https://youtube.com/watch?v=wiFNA3sqjCAVideo can’t be loaded because JavaScript is disabled: How to Do the Bird Dog Exercise | Abs Workout (https://youtube.com/watch?v=wiFNA3sqjCA)
[Read More: The Best Back Workout for Men, Women, Strength, and More]
[*]Get onto the floor, supporting yourself on your knees and locked out arms in a tabletop position.
[*]Brace your core and raise one arm straight ahead, extending the opposite leg directly backward (similar to a glute kickback)
[*]Draw your limbs back to their starting position, alternating the working arm and leg each time. Perform for repetitions.
Bird Dog Row
https://youtube.com/watch?v=IrMVMZoQum4Video can’t be loaded because JavaScript is disabled: Bird Dog Row (https://youtube.com/watch?v=IrMVMZoQum4)
[Read More: The 15 Best Shoulder Exercises For Building Muscle]
[*]Grab a dumbbell and a weight bench. Support your body on the bench with one knee and the opposite side arm.
[*]The free leg should be kicked back and locked out for the duration of the exercise.
[*]Brace your core and perform a single-arm dumbbell row using the free arm.
Split Squat Pendulum Hold
https://www.instagram.com/reel/CtodIxJgws2/?utm_source=ig_web_copy_link&igshid=MzRlODBiNWFlZA==
[Read More: How to Do the Lat Pulldown for a Wider Back and Better Pull-Ups]
[*]Attach a medium-strength band to the leg attachment of a reverse hyperextension machine.
[*]Stand perpendicular to the machine and perform a Pallof press hold with the band.
[*]Drop into an isometric split squat stance. Perform a wood chopper motion to begin the pendulum swing and resist the band tension for time.
Benefits of the Dead Bug
The dead bug is a great tool for lifters of all levels. It helps to teach and reinforce your brace and coordination for compound lifting while building significant anti-rotational core strength.
Learn to Brace
The dead bug is a perfect tool to ingrain a strong core brace technique. The ground is there to significantly support your body, making the dead bug a very stable exercise. This inherent stability means you’ll be less focused on outright losing position, and more focused on your core itself.
Start by locking in your initial position, then move slowly through each range of motion. This control generates a ton of sensation around your abdominal region, which is a fantastic cue that you’re doing it right. Feeling your core work reinforces the sensation that should be present in all other exercises that require your brace — think, back squats and the deadlift.
Improve Coordination
Once the dead bug becomes second nature, you’ll have a firm grasp on how to organize and control your torso during complex movement. Each exercise presents a unique challenge to your ability to stay tight.
The core’s role is to resist where the load or gravity is trying to pull you during any given strength training exercise. With the dead bug, you’ll be increasing your body awareness and ability to resist those movements. This will pay strong dividends in exercises that require a lot of coordination, like the thruster, front squat, and clean & jerk.
Build Anti-Rotational Core Strength
When many athletes think of core training, they think of flexion and extension (and sometimes anti-extension). But the best core exercises integrate anti-rotational strength, as well.
Your core works to neutralize your torso position against any challenge that would dislodge you — for example, a heavily loaded barbell. Many of the most popular ab exercises are oriented front to back, like planks or crunches. While these are super beneficial, overlooking rotational challenges leaves a ton of benefits on the table.
https://youtube.com/watch?v=jbWmbhElf3QVideo can’t be loaded because JavaScript is disabled: The Core-Training Workout: Dead Bug (https://youtube.com/watch?v=jbWmbhElf3Q)
[Read More: Use the Bent-Over Row to Make Big Gains With Big Weights]
The dead bug is the first step towards numerous improvements that help you throughout your fitness routine. Anti-rotational strength will serve you well during everything from farmer’s carries and snatches to any sport that has you moving in multiple directions.
Muscle Worked by the Dead Bug
The primary muscles worked by the dead bug are in the core itself. However, the shoulders and hip flexors also get some love.
Core
The real main event of your dead bug exercise is the core. The core is more than just the “six-pack muscles.” From an abdominal perspective, the core includes the rectus abdominis, internal and external oblique muscles, and the transverse abdominis. Your lower back, too, is a part of your core.
Since the dead bug is an isometric exercise that challenges you with rotation, all four major abdominal core muscles (and your lower back) are heavily involved. With that in mind, there is a particular emphasis on your transverse abdominis for a deep spinal brace and your external obliques for controlling rotation.
Hip Flexors
Your hip flexors get a light workout from moving your limbs during the dead bug. As you extend your legs towards the ground on each repetition, your hip flexors also control their descent with an eccentric contraction.
 Credit: fizkes / Shutterstock
[Read More: What Are Workout Splits and Which Is the Best One?]
To draw them back up, your hip flexors contract once more. Although you are only using body weight, this demand on your hip flexors helps reinforce integrated torso and limb coordination.
Shoulders
Similar to your hip flexors, your shoulders get a bit of a workout during the dead bug. As you send your arms back towards the ground, your shoulders and all accompanying stabilizers (think the traps, lats, and serratus here) are in high demand.
The same is true as you reverse course. Altogether, your shoulders and surrounding tissues light up as they make sure gravity doesn’t simply flop your arms to the floor.
Who Should Do the Dead Bug
The dead bug is one of the best tools to teach a beginner about core control and coordination, but it doesn’t need to end there. Powerlifters frequently involve the dead bug in warm-ups, and it serves as a tremendous post-rehabilitation exercise.
Beginners
When you’re starting to figure out how to core brace, the dead bug is one of your strongest assets. As a beginner, you might not have been exposed to a lot of core demanding training just yet. Learning to conceptualize how to brace is a challenge in this phase of training.
To get it right, using the dead bug is a fantastic way to remove a ton of barriers. The ground acts to balance and stabilize your position, making it easier to perform properly. The anti-rotation challenge is difficult, but it also doesn’t require a load to get the job done.
Altogether, the dead bug is a highly accessible exercise that has a strong skill transfer as you learn more.
Powerlifters and Weightlifters
Strength athletes rely on a core brace to secure their spine in a neutral position and to support a whole lot of weight plates on a barbell. Although you’ll get a ton of experience with bracing and positioning while practicing these lifts, throwing in the dead bug as a part of your dynamic warm-up is a great technique enforcer.
 Credit: Nomad_Soul / Shutterstock
Try using the dead bug during your initial warm-up. Before you touch the barbell or even during your ramp-up sets, a quick round or two of dead bugs help jog your muscle memory, prime your mind, and lock in your brace skill.
Post-Rehab
The rehabilitation process from numerous hip, back, or shoulder injuries is often complex and laborious. Once you have completed any recommended treatment plans from a qualified professional and get the all-clear, the dead bug can be a great starting place.
When you’re returning to strength training after time off, you might use this move as a low-impact, high-return-on-investment exercise to get you back where you need to be.
Common Dead Bug Mistakes
Every exercise comes with some hitches. Some of the most common errors you’ll come across with the dead bug include arching too hard, using momentum, and an overall lack of coordination.
Too Much Arch
Arching too much during the dead bug loosens your core brace and greatly diminishes the benefits of the exercise. Keeping your ribcage and pelvis aligned during all core bracing techniques helps to ensure the muscle is strong and active. Arching too hard stretches them out and makes it harder for them to maintain a good position.
For the best results, line up your core, brace hard, and resist any undue arch. Use excessive arching as a sign that your set has come to an end or that you’ve exceeded your intended range of motion.
Too Much Momentum
Similar to too much arching, using momentum or simply flailing your limbs also greatly increases your risk of losing position. The motion of your limb movement should serve as a challenge to maintain your brace, but if you’re too lax with how you do it, you’re going to dislodge your brace.
The best practice here is to be methodical. Try using tempo training to do slow and controlled repetitions. This will help maintain as much proper positioning and muscle engagement as possible. Move slowly and deliberately to reap the maximum benefits for your core.
Lack of Coordination
One of the main goals of the dead bug is to challenge your core through anti-rotation. You accomplish this by coordinating one arm and one leg on the opposite sides of your body moving at the same time. This diagonal style of movement is what introduces the rotational challenge to your core. If you are unable to coordinate this movement, chances are you may overbalance.
 Credit: Goami / Shutterstock
Tempo is the perfect solution here as well. Stay under control as you learn to move two limbs at the same time while not losing your brace.
Wriggle Your Way to Gains
The dead bug may not look like much, but it is a fierce competitor for a slot in your ab workouts. There aren’t many other core exercises that carry over to such a broad range of applications while being so accessible to many beginners.
With the ground there to support you, learning to brace becomes a cinch. From beginners to powerlifters or even athletes returning from rehab, the dead bug exercise delivers in just the way you need. Test out the dead bug during your next workout to see just how coordinated and brace-savvy you really are.
FAQs
Although the dead bug has widespread benefits and utility, you may not have come across it in your training. Here are some frequently asked questions about this move.
How should I program the dead bug?Since the dead bug is a calisthenic exercise, you’ll likely be looking to use higher sets and repetition counts to make your gains. Start with moderate repetitions to nail the form and progress from there. Two to four sets of eight to 15 slow repetitions per side is a solid starting place.
How often should I perform the dead bug?One option is to use the dead bug as a high-frequency tool to tune up your bracing skills just before major lifts. As a stand-alone exercise, you’re likely going to want to train it the same as many others. Allow for proper recovery of your core and abdominal muscles between each session. If you’re hitting it hard, take a day or two off between dead bug training sessions.
How should I progress the dead bug?Progress the dead bug by using loaded variations (for example, banded dead bugs) or by increasing volume and slowing down your speed. First focus on perfect technique, then slowly add one to two repetitions on each set per side.
Once you’re performing two to four sets of 12 to 15 controlled repetitions with pristine form, look to some of the loaded variations for further progress.
{"@context":"https://schema.org","@type":"FAQPage","mainEntity":[{"@type":"Question","name":"How should I program the dead bug?","acceptedAnswer":{"@type":"Answer","text":"Since the dead bug is a calisthenic exercise, youu2019ll likely be looking to use higher sets and repetition counts to make your gains. Start with moderate repetitions to nail the form and progress from there. Two to four sets of eight to 15 slow repetitions per side is a solid starting place.
n"}},{"@type":"Question","name":"How often should I perform the dead bug?","acceptedAnswer":{"@type":"Answer","text":"One option is to use the dead bug as a high-frequency tool to tune up your bracing skills just before major lifts. As a stand-alone exercise, youu2019re likely going to want to train it the same as many others. Allow for proper recovery of your core and abdominal muscles between each session. If youu2019re hitting it hard, take a day or two off between dead bug training sessions.
n"}},{"@type":"Question","name":"How should I progress the dead bug?","acceptedAnswer":{"@type":"Answer","text":"Progress the dead bug by using loaded variations (for example, banded dead bugs) or by increasing volume and slowing down your speed. First focus on perfect technique, then slowly add one to two repetitions on each set per side.
nOnce youu2019re performing two to four sets of 12 to 15 controlled repetitions with pristine form, look to some of the loaded variations for further progress.
n"}}]}
Featured Image: Goami / Shutterstock
The post How to Do the Dead Bug Exercise for More Core Strength and Control appeared first on BarBend.
Click here to view the article.
The post How to Do the Dead Bug Exercise for More Core Strength and Control appeared first on BarBend.
The dead bug exercise may be bleakly named, but its prowess as a core-builder is nearly unmatched. It’s a fantastic tool to teach core engagement and coordination, though it sadly mimics the wriggling nature of a dying bug — hence the name.
Much like a flailing creature, the dead bug exercise keeps you flat on the ground during your set. This provides as much stability as possible. As you begin to grasp the movement, your midsection is exposed to a level of resistance that marks it as one of the best core exercises for building foundational core strength, improving coordination, or helping you return from injury.
Although it might seem entry-level, the dead bug is also part of a long line of core progressions. Indeed, you’ll find the dead bug suited for beginners to high-level athletes aiming to up their core game. From programming to execution and troubleshooting, here’s everything you’ll need to know about the dead bug.
- How to Do the Dead Bug
- Dead Bug Variations
- Dead Bug Alternatives
- Benefits of the Dead Bug
- Muscles Worked by the Dead Bug
- Who Should Do the Dead Bug
- Common Dead Bug Mistakes
- Frequently Asked Questions
How to Do the Dead Bug
The traditional dead bug is a calisthenic exercise. This means you won’t need any form of external resistance to perform one — just your body weight (and perhaps an exercise mat). Here is a step-by-step walkthrough to execute the dead bug.
Step 1 – The Set-Up
Credit: ExperienceLifeMag / YoutubeThe dead bug is performed on the floor, so grab a yoga mat or a clear space. While lying on your back, flex your hips to 90 degrees and keep your shins perpendicular to your thighs. Next, straighten your arms directly above your body, reaching your hands toward the ceiling. This is your starting position.
Coach’s Tip: Try setting up near a mirror to get the angles correct the first time you attempt the dead bug.
Step 2 – Brace
Credit: ExperienceLifeMag / YoutubeCreate a cylindrical brace of your midsection. Do this by bearing down on your core, tightening your legs and glutes, and locking in your lats. This should place you in a stable isometric full-body brace.
Coach’s Tip: Think of how you would brace for a squat or deadlift, or if you were going to get punched in the gut. Engage your core from all angles, including your obliques and lower back. This is the “braced” core you are shooting for.
Step 3 – Start Squirming
Credit: ExperienceLifeMag / YoutubeStraighten your right leg, extending it away from your body. At the same time, lower your left arm back and away from your body, reaching behind you over your head. Aim for both limbs to hover a couple of inches off the ground when they’re fully extended. Once each limb reaches full extension, draw them back to the starting position simultaneously.
Slowly and with control, engage your abs and breathe deeply as you alternate limbs, moving your left leg at the same time as your right arm when your other limbs come back to the starting position. Completing one rotation for each side of your body is considered one repetition.
Coach’s Tip: Maintain your brace and resist your body’s tendency to create an arch in your back. Press your lower back into the ground to help keep your core safe and engaged. Stay locked in position and control the movement of each limb.
Dead Bug Variations
The dead bug is a very beginner-friendly exercise, but it also scales for athletes with years of training experience. Some useful variations to weave into your training, regardless of your level of fitness finesse, are the half dead bug, banded dead bug, and exercise ball passes.
Half Dead Bug
https://youtube.com/watch?v=6tiXz1vRfhoVideo can’t be loaded because JavaScript is disabled: How to perform a Half Dead Bug | Core Exercise (https://youtube.com/watch?v=6tiXz1vRfho)
[Read More: Build a Titanic Torso with These Bodybuilding Chest & Back Workouts]
[*]Lie flat on your back and assume the standard dead bug starting position.
[*]Brace your core and keep your legs locked in their starting position.
[*]Alternate each arm towards the ground and draw them back to the starting position. Maintain the same leg position throughout the set.
Banded Dead Bug
https://youtube.com/watch?v=wCwn7-Z-XjEVideo can’t be loaded because JavaScript is disabled: Banded Deadbug (https://youtube.com/watch?v=wCwn7-Z-XjE)
[Read More: 5 At-Home Workouts for Strength, Muscle Growth, Power, and More]
[*]Lie down in the usual dead bug starting position with a band in your hands and anchored to a nearby stability point.
[*]The resistance band should be taut enough to encourage lat and core engagement.
[*]Perform the dead bug using the lower body alternating movements while maintaining a locked, unmoving upper body.
Exercise Ball Passes
https://youtube.com/watch?v=-70Mv20jx7oVideo can’t be loaded because JavaScript is disabled: How to do a Stability Ball Feet-Hand Pass Off (https://youtube.com/watch?v=-70Mv20jx7o)
[Read More: The Best Online Workout Programs For Coaching, Cardio, Value, And More]
[*]Assume your standard dead bug starting position while holding an exercise ball in your hands.
[*]Send your arms and legs toward the ground, maintaining control of the exercise ball the entire time.
[*]Draw your limbs back towards the starting position, passing the exercise ball to the legs and performing for repetitions.
Dead Bug Alternatives
Once you’ve spent some time with the dead bug, you might be looking for a few different moves to swap between. The bird dog, bird dog row, and split squat pendulum hold are excellent choices.
Bird Dog
https://youtube.com/watch?v=wiFNA3sqjCAVideo can’t be loaded because JavaScript is disabled: How to Do the Bird Dog Exercise | Abs Workout (https://youtube.com/watch?v=wiFNA3sqjCA)
[Read More: The Best Back Workout for Men, Women, Strength, and More]
[*]Get onto the floor, supporting yourself on your knees and locked out arms in a tabletop position.
[*]Brace your core and raise one arm straight ahead, extending the opposite leg directly backward (similar to a glute kickback)
[*]Draw your limbs back to their starting position, alternating the working arm and leg each time. Perform for repetitions.
Bird Dog Row
https://youtube.com/watch?v=IrMVMZoQum4Video can’t be loaded because JavaScript is disabled: Bird Dog Row (https://youtube.com/watch?v=IrMVMZoQum4)
[Read More: The 15 Best Shoulder Exercises For Building Muscle]
[*]Grab a dumbbell and a weight bench. Support your body on the bench with one knee and the opposite side arm.
[*]The free leg should be kicked back and locked out for the duration of the exercise.
[*]Brace your core and perform a single-arm dumbbell row using the free arm.
Split Squat Pendulum Hold
https://www.instagram.com/reel/CtodIxJgws2/?utm_source=ig_web_copy_link&igshid=MzRlODBiNWFlZA==
[Read More: How to Do the Lat Pulldown for a Wider Back and Better Pull-Ups]
[*]Attach a medium-strength band to the leg attachment of a reverse hyperextension machine.
[*]Stand perpendicular to the machine and perform a Pallof press hold with the band.
[*]Drop into an isometric split squat stance. Perform a wood chopper motion to begin the pendulum swing and resist the band tension for time.
Benefits of the Dead Bug
The dead bug is a great tool for lifters of all levels. It helps to teach and reinforce your brace and coordination for compound lifting while building significant anti-rotational core strength.
Learn to Brace
The dead bug is a perfect tool to ingrain a strong core brace technique. The ground is there to significantly support your body, making the dead bug a very stable exercise. This inherent stability means you’ll be less focused on outright losing position, and more focused on your core itself.
Start by locking in your initial position, then move slowly through each range of motion. This control generates a ton of sensation around your abdominal region, which is a fantastic cue that you’re doing it right. Feeling your core work reinforces the sensation that should be present in all other exercises that require your brace — think, back squats and the deadlift.
Improve Coordination
Once the dead bug becomes second nature, you’ll have a firm grasp on how to organize and control your torso during complex movement. Each exercise presents a unique challenge to your ability to stay tight.
The core’s role is to resist where the load or gravity is trying to pull you during any given strength training exercise. With the dead bug, you’ll be increasing your body awareness and ability to resist those movements. This will pay strong dividends in exercises that require a lot of coordination, like the thruster, front squat, and clean & jerk.
Build Anti-Rotational Core Strength
When many athletes think of core training, they think of flexion and extension (and sometimes anti-extension). But the best core exercises integrate anti-rotational strength, as well.
Your core works to neutralize your torso position against any challenge that would dislodge you — for example, a heavily loaded barbell. Many of the most popular ab exercises are oriented front to back, like planks or crunches. While these are super beneficial, overlooking rotational challenges leaves a ton of benefits on the table.
https://youtube.com/watch?v=jbWmbhElf3QVideo can’t be loaded because JavaScript is disabled: The Core-Training Workout: Dead Bug (https://youtube.com/watch?v=jbWmbhElf3Q)
[Read More: Use the Bent-Over Row to Make Big Gains With Big Weights]
The dead bug is the first step towards numerous improvements that help you throughout your fitness routine. Anti-rotational strength will serve you well during everything from farmer’s carries and snatches to any sport that has you moving in multiple directions.
Muscle Worked by the Dead Bug
The primary muscles worked by the dead bug are in the core itself. However, the shoulders and hip flexors also get some love.
Core
The real main event of your dead bug exercise is the core. The core is more than just the “six-pack muscles.” From an abdominal perspective, the core includes the rectus abdominis, internal and external oblique muscles, and the transverse abdominis. Your lower back, too, is a part of your core.
Since the dead bug is an isometric exercise that challenges you with rotation, all four major abdominal core muscles (and your lower back) are heavily involved. With that in mind, there is a particular emphasis on your transverse abdominis for a deep spinal brace and your external obliques for controlling rotation.
Hip Flexors
Your hip flexors get a light workout from moving your limbs during the dead bug. As you extend your legs towards the ground on each repetition, your hip flexors also control their descent with an eccentric contraction.
Credit: fizkes / Shutterstock[Read More: What Are Workout Splits and Which Is the Best One?]
To draw them back up, your hip flexors contract once more. Although you are only using body weight, this demand on your hip flexors helps reinforce integrated torso and limb coordination.
Shoulders
Similar to your hip flexors, your shoulders get a bit of a workout during the dead bug. As you send your arms back towards the ground, your shoulders and all accompanying stabilizers (think the traps, lats, and serratus here) are in high demand.
The same is true as you reverse course. Altogether, your shoulders and surrounding tissues light up as they make sure gravity doesn’t simply flop your arms to the floor.
Who Should Do the Dead Bug
The dead bug is one of the best tools to teach a beginner about core control and coordination, but it doesn’t need to end there. Powerlifters frequently involve the dead bug in warm-ups, and it serves as a tremendous post-rehabilitation exercise.
Beginners
When you’re starting to figure out how to core brace, the dead bug is one of your strongest assets. As a beginner, you might not have been exposed to a lot of core demanding training just yet. Learning to conceptualize how to brace is a challenge in this phase of training.
To get it right, using the dead bug is a fantastic way to remove a ton of barriers. The ground acts to balance and stabilize your position, making it easier to perform properly. The anti-rotation challenge is difficult, but it also doesn’t require a load to get the job done.
Altogether, the dead bug is a highly accessible exercise that has a strong skill transfer as you learn more.
Powerlifters and Weightlifters
Strength athletes rely on a core brace to secure their spine in a neutral position and to support a whole lot of weight plates on a barbell. Although you’ll get a ton of experience with bracing and positioning while practicing these lifts, throwing in the dead bug as a part of your dynamic warm-up is a great technique enforcer.
Credit: Nomad_Soul / ShutterstockTry using the dead bug during your initial warm-up. Before you touch the barbell or even during your ramp-up sets, a quick round or two of dead bugs help jog your muscle memory, prime your mind, and lock in your brace skill.
Post-Rehab
The rehabilitation process from numerous hip, back, or shoulder injuries is often complex and laborious. Once you have completed any recommended treatment plans from a qualified professional and get the all-clear, the dead bug can be a great starting place.
When you’re returning to strength training after time off, you might use this move as a low-impact, high-return-on-investment exercise to get you back where you need to be.
Common Dead Bug Mistakes
Every exercise comes with some hitches. Some of the most common errors you’ll come across with the dead bug include arching too hard, using momentum, and an overall lack of coordination.
Too Much Arch
Arching too much during the dead bug loosens your core brace and greatly diminishes the benefits of the exercise. Keeping your ribcage and pelvis aligned during all core bracing techniques helps to ensure the muscle is strong and active. Arching too hard stretches them out and makes it harder for them to maintain a good position.
For the best results, line up your core, brace hard, and resist any undue arch. Use excessive arching as a sign that your set has come to an end or that you’ve exceeded your intended range of motion.
Too Much Momentum
Similar to too much arching, using momentum or simply flailing your limbs also greatly increases your risk of losing position. The motion of your limb movement should serve as a challenge to maintain your brace, but if you’re too lax with how you do it, you’re going to dislodge your brace.
The best practice here is to be methodical. Try using tempo training to do slow and controlled repetitions. This will help maintain as much proper positioning and muscle engagement as possible. Move slowly and deliberately to reap the maximum benefits for your core.
Lack of Coordination
One of the main goals of the dead bug is to challenge your core through anti-rotation. You accomplish this by coordinating one arm and one leg on the opposite sides of your body moving at the same time. This diagonal style of movement is what introduces the rotational challenge to your core. If you are unable to coordinate this movement, chances are you may overbalance.
Credit: Goami / ShutterstockTempo is the perfect solution here as well. Stay under control as you learn to move two limbs at the same time while not losing your brace.
Wriggle Your Way to Gains
The dead bug may not look like much, but it is a fierce competitor for a slot in your ab workouts. There aren’t many other core exercises that carry over to such a broad range of applications while being so accessible to many beginners.
With the ground there to support you, learning to brace becomes a cinch. From beginners to powerlifters or even athletes returning from rehab, the dead bug exercise delivers in just the way you need. Test out the dead bug during your next workout to see just how coordinated and brace-savvy you really are.
FAQs
Although the dead bug has widespread benefits and utility, you may not have come across it in your training. Here are some frequently asked questions about this move.
How should I program the dead bug?Since the dead bug is a calisthenic exercise, you’ll likely be looking to use higher sets and repetition counts to make your gains. Start with moderate repetitions to nail the form and progress from there. Two to four sets of eight to 15 slow repetitions per side is a solid starting place.
How often should I perform the dead bug?One option is to use the dead bug as a high-frequency tool to tune up your bracing skills just before major lifts. As a stand-alone exercise, you’re likely going to want to train it the same as many others. Allow for proper recovery of your core and abdominal muscles between each session. If you’re hitting it hard, take a day or two off between dead bug training sessions.
How should I progress the dead bug?Progress the dead bug by using loaded variations (for example, banded dead bugs) or by increasing volume and slowing down your speed. First focus on perfect technique, then slowly add one to two repetitions on each set per side.
Once you’re performing two to four sets of 12 to 15 controlled repetitions with pristine form, look to some of the loaded variations for further progress.
{"@context":"https://schema.org","@type":"FAQPage","mainEntity":[{"@type":"Question","name":"How should I program the dead bug?","acceptedAnswer":{"@type":"Answer","text":"Since the dead bug is a calisthenic exercise, youu2019ll likely be looking to use higher sets and repetition counts to make your gains. Start with moderate repetitions to nail the form and progress from there. Two to four sets of eight to 15 slow repetitions per side is a solid starting place.
n"}},{"@type":"Question","name":"How often should I perform the dead bug?","acceptedAnswer":{"@type":"Answer","text":"One option is to use the dead bug as a high-frequency tool to tune up your bracing skills just before major lifts. As a stand-alone exercise, youu2019re likely going to want to train it the same as many others. Allow for proper recovery of your core and abdominal muscles between each session. If youu2019re hitting it hard, take a day or two off between dead bug training sessions.
n"}},{"@type":"Question","name":"How should I progress the dead bug?","acceptedAnswer":{"@type":"Answer","text":"Progress the dead bug by using loaded variations (for example, banded dead bugs) or by increasing volume and slowing down your speed. First focus on perfect technique, then slowly add one to two repetitions on each set per side.
nOnce youu2019re performing two to four sets of 12 to 15 controlled repetitions with pristine form, look to some of the loaded variations for further progress.
n"}}]}
Featured Image: Goami / Shutterstock
The post How to Do the Dead Bug Exercise for More Core Strength and Control appeared first on BarBend.
Click here to view the article.