
Muscle Insider
New member
Building a strong core goes beyond your six-pack — you’ve got to train your side abs, too. To sculpt and strengthen your oblique muscles, you’ll want to incorporate the best oblique exercises that teach you to resist and initiate movement. We’ve compiled everything you need to know into oblique workouts for beginners, intermediates, and advanced athletes. Let’s twist...
The post The Best Oblique Workouts for Every Experience Level (+ Personal Trainer Tips on Ab Exercises) appeared first on BarBend.
Building a strong core goes beyond your six-pack — you’ve got to train your side abs, too. To sculpt and strengthen your oblique muscles, you’ll want to incorporate the best oblique exercises that teach you to resist and initiate movement. We’ve compiled everything you need to know into oblique workouts for beginners, intermediates, and advanced athletes. Let’s twist it out.
Editor’s Note: The content on BarBend is meant to be informative in nature, but it should not be taken as medical advice. When starting a new training regimen and/or diet, it is always a good idea to consult with a trusted medical professional. We are not a medical resource. The opinions and articles on this site are not intended for use as diagnosis, prevention, and/or treatment of health problems. They are not substitutes for consulting a qualified medical professional.
Best Oblique Workouts
Beginner Oblique Workout
When you’re new to training, you probably start learning traditional ab exercises like sit-ups. Nothing wrong with those — but we’re here to focus on targeting your oblique muscles by teaching you to resist the two movements they’re responsible for: lateral flexion (or side bending) and rotation (or twisting). Then, you’ll actively do those movements.
This can function as a full-body bodybuilding workout for newbies. You’ll be doing unilateral lower-body work to increase stability as you bend and twist.
Perform the first four exercises in succession and repeat for three to four rounds. Rest for one minute in between. Then, finish with bicycle crunches.
Equipment Needed: You’ll need a resistance band or cable machine for the Pallof press; the rest can be done with no equipment.
How Often to Do This Workout: Perform this workout two to three times per week.
Coach’s Tip: Focus on how it feels to resist and then initiate movement as you move from side plank to side bends, and then from Pallof press to the lunge with rotation.
Side Plank
[Read More: 7 Beginner-Friendly Core and Oblique Exercises]
The side plank is an anti-lateral flexion isometric exercise, meaning you resist letting your bottom half sink toward the floor as you hold still. The side plank strengthens your internal obliques and builds single-arm strength and stability as you work one side at a time. It’s a unilateral exercise, so it highlights and helps correct imbalances when you switch sides.
Equipment Needed: The side plank is a bodyweight exercise — no equipment is needed, except a mat or towel.
How to Do It:
[*]Lie down on the right side of your body. Place your right forearm on the ground. Stack your left foot on top of your right foot. Place your left hand on your left hip or reach your left arm to the ceiling. Keep your feet, hips, and shoulders in a straight line.
[*]Inhale and brace your core. Exhale and lift your right hip away from the floor. Push into your right forearm and foot. Squeeze your glutes. Hold for 15 to 30 seconds.
[*]Lower down slowly and repeat on your left side.
Modifications
Coach’s Tip: Keep all of your core muscles engaged, but zero in on your bottom oblique muscles.
Standing Side Crunch
https://www.youtube.com/watch?v=awiXjK_PC3EVideo can’t be loaded because JavaScript is disabled: The Best Way to do a Standing Side Crunch (https://www.youtube.com/watch?v=awiXjK_PC3E)
[Read More: Standing Russian Twists – Muscles Worked, Benefits, and Exercise Demo]
In the standing side crunch, you’ll be balancing on one leg and actively performing lateral flexion on one side at a time. The side crunch targets your internal obliques while working your upper body. It builds core strength and stability, and the full-body nature of it has a cardio element.
Equipment Needed: This is a bodyweight exercise, and you can do it barefoot to feel your foot on the floor.
How to Do It:
[*]Stand upright with your feet shoulder-width apart. Place your hands behind your head with your elbows wide. Push your feet into the floor, squeeze your glutes, and engage your abdominal muscles to create tension.
[*]Inhale, then exhale to lift your right leg. Bring your right elbow towards your right knee, crunching through your right obliques.
[*]Inhale and lower the right foot down. Repeat on the left side.
[*]Alternate sides for 20 reps, 10 per side.
Modifications
Coach’s Tip: Keep your bottom leg engaged.
Pallof Press
The Pallof press is an anti-rotation exercise that strengthens your obliques as you resist twisting toward one side at a time. You can add a press for more of a challenge, but in this workout, you’ll do it as an isometric exercise and hold still. The Pallof press is a full-body exercise that also engages your upper body.
Equipment Needed: You’ll need a resistance band and a stable object or cable machine.
How to Do It:
[*]Loop a resistance band around a stable object or set a cable at chest height. Grab the handle or band and take a few lateral steps away from the machine until you feel it pulling you toward it.
[*]Press your feet into the ground. Tuck your hips and squeeze your glutes. Inhale to brace your core, then exhale to press the band or cable away from you.
[*]Feel your obliques on the side closest to the machine as you resist rotating toward it. Hold for 20 to 30 seconds.
[*]Return to the starting position with control. Turn around to repeat on the opposite side.
Modifications
Coach’s Tip: You’ll feel this in all of your abdominal muscles; breathe deeply throughout.
Reverse Lunge with Twist
https://www.youtube.com/watch?v=LrIE5onzj68Video can’t be loaded because JavaScript is disabled: Reverse Lunge with Twist (https://www.youtube.com/watch?v=LrIE5onzj68)
The reverse lunge with twist adds an active rotation movement, with the challenge of stabilizing your lower body in a lunge. It’s a full-body exercise that targets multiple muscle groups. You’ll work one side of your obliques at a time as you build single-leg strength and balance. Working your obliques by performing twists also helps you get stronger in the transverse plane.
Equipment Needed: You can perform this as a bodyweight exercise or hold a dumbbell, kettlebell, weight plates, or medicine ball at your chest.
How to Do It:
[*]Stand upright with your feet shoulder-width apart. Hold your weight or clasp your hands at your chest.
[*]Step your left foot back and lower your left knee toward the floor as you inhale. Hold the bottom of the lunge and twist your torso toward your right side as you exhale. Feel your right obliques.
[*]Inhale to twist back forward. Push off your left foot to step your left leg forward.
[*]Continue for six to eight reps. Repeat on the right side.
Modifications
Coach’s Tip: Remember to twist toward the front leg.
Bicycle Crunch
The bicycle crunch is a classic core exercise that targets your obliques and is a bit less intense than a sit-up. You’ll build coordination and core strength. The bicycle crunch also works your rectus abdominis as you contract your ab muscles while twisting through your sides. You’ll also get some upper body work to keep your shoulders lifted.
Equipment Needed: You’ll need an exercise mat to lie on.
How to Do It:
[*]Lie on your back with your shins parallel to the ceiling and legs bent at 90 degrees. Place your hands behind your head and keep your elbows wide.
[*]Lift your shoulders, neck, and head off the ground. Engage your back muscles to stay lifted. Inhale then exhale and twist to bring your left elbow toward your right knee. Straighten your left leg toward the ground as you do this.
[*]Inhale and return to the starting position. Repeat on the opposite side. Continue alternating for 20 total bicycle crunches.
Modifications
Coach’s Tip: Avoid using your hands to pull on your neck. Instead, actively feel your obliques through the twist.
Intermediate Oblique Workout
This intermediate oblique workout has more challenging oblique exercises where you’ll work with resisting and initiating lateral flexion and rotation. It’s a quick core workout you can add to the end of a lifting session.
You’ll start with a challenging side plank variation that adds upper body work with push-ups and then move into loaded side bends and Russian twists for active lateral flexion and rotation. Finish strong with cross-body mountain climbers. It’s a full-body exercise that increases your heart rate and is great for post-lifting cardio conditioning.
Equipment Needed: You’ll need weight plates, dumbbells or kettlebells, for the side bends. You can do Russian twists with a medicine ball or dumbbell.
How Often to Do This Workout: Try this workout twice a week.
Coach’s Tip: Maintain control and stability as you change positions.
Push-Up to Side Plank
https://www.youtube.com/watch?v=pJUY83BsReYVideo can’t be loaded because JavaScript is disabled: How to do Push-Up To Side Plank | Joanna Soh (https://www.youtube.com/watch?v=pJUY83BsReY)
In a standard plank, your obliques work to resist rotation through your torso. In a side plank, they work to resist lateral flexion. This exercise puts it all together with the added upper body work of a push-up. You’ll also build upper body strength and single-arm stability as you flow from push-up to side plank and back again.
Equipment Needed: This is a bodyweight exercise, but you may want a mat for your hands.
How to Do It:
[*]Lower down into a push-up.
[*]As you push yourself up, lift your right hand and turn your torso to the right, landing in a side-plank position. Reach your right arm to the ceiling and stack your left foot on top of your right foot.
[*]Place your right hand down as you return to a plank. Lower into another push-up. At the top, lift your left hand and turn to the left, landing in a side plank position.
[*]Continue on alternating sides for 10 reps total.
Modifications
Coach’s Tip: Although you may flow quickly through this, make each part of the movement sharp so each push-up and side plank has tension and great form.
Side Bends
Side bends are simple and straight to the point — lateral flexion with the added bonus that you can load them. They’ll target your internal obliques on the working side, and you’ll feel a nice stretch through the opposite side.
Equipment Needed: You can use dumbbells, kettlebells, or weight plates for a grip challenge.
How to Do It:
[*]Stand upright with your feet hip-width apart. Hold your weight of choice in each hand.
[*]Press your feet into the floor, tuck your hips, and squeeze your glutes. Brace your core. Inhale and side bend to the right. Exhale to stand back up and return to the starting position.
[*]Inhale and side bend to the left. Exhale to return to the starting position.
[*]Continue for 10 per side.
Modifications
Coach’s Tip: Focus on feeling your obliques contract with each side bend.
Cross-Body Mountain Climber
https://www.youtube.com/watch?v=1cwZ8VZvRjcVideo can’t be loaded because JavaScript is disabled: How to Do a Cross-Body Mountain Climber (https://www.youtube.com/watch?v=1cwZ8VZvRjc)
[Read More: The 20 Best Ab Exercises to Strengthen Your Core]
The cross-body mountain climber is an excellent bodyweight exercise that works all your core muscles to stabilize your trunk and resist spinal rotation. At the same time, you’ll be engaging your external obliques to do a cross-twisting movement with your knees. It works your upper body to stabilize your shoulders as you balance on your hands. There’s also a cardio element, especially if you pick up the pace.
Equipment Needed: You’ll just need a mat for this one.
How to Do It:
[*]Begin in a plank position with your hands shoulder-width apart. Engage your abdominal muscles to brace your core and build tension.
[*]Inhale and lift your left foot. Exhale to tap your left knee to your right elbow. Inhale to step the left foot back. Exhale to tap your right knee to your left elbow.
[*]Continue alternating sides for 30 to 45 seconds.
Modifications
Coach’s Tip: Don’t let your lower back sink towards the floor — keep your ab muscles engaged.
Russian Twist
https://www.youtube.com/watch?v=VfWoNC-NMIIVideo can’t be loaded because JavaScript is disabled: Russian Twist (https://www.youtube.com/watch?v=VfWoNC-NMII)
[Read More: The 9 Best Russian Twist Alternatives You Need for Your Next Ab Workout]
The Russian twist is a great core exercise that works your upper body and has you resist and initiate rotation through your internal and external obliques. It will also challenge your balance and increase core stability.
Equipment Needed: You can do the Russian twist with just your body weight or add a medicine ball or dumbbell for more of a challenge.
How to Do It:
[*]Sit upright with your feet on the floor and knees pointing to the ceiling. Engage your abs and lean your torso back to a 45-degree angle. Hold a dumbbell or medicine ball if you’re using a weight.
[*]Inhale to brace your core and exhale to twist your torso to the right side. Touch the floor with your hands, or keep holding your weight.
[*]Inhale to return to the starting position. Exhale to twist to the left side.
[*]Continue alternating sides for 30 to 45 seconds.
Modifications
Coach’s Tip: Tuck your chin and retract your head so you don’t initiate the move from your neck.
Advanced Oblique Workout
We’ll need to up the ante for advanced athletes with these challenging oblique exercises that still keep the same spirit — resisting and engaging in lateral flexion and rotation. You’ll do a tough side plank variation, an oblique-focused hanging leg raise, a push-up variation, and finish with some explosive medicine ball work. This oblique workout will challenge your upper body, core strength and stability, and cardio conditioning.
Equipment Needed: You’ll need a bench or box for the Copenhagen plank, a pull-up bar or handles for the hanging leg raises, a medicine ball, and a wall or partner.
How Often to Do This Workout: Try this workout two to three times per week.
Coach’s Tip: Maintain proper technique throughout the workout.
Copenhagen Plank
https://www.youtube.com/watch?v=HFu3D0kGsJsVideo can’t be loaded because JavaScript is disabled: COPENHAGEN PLANK GUIDE | Form, Benefits, and Mistakes to Avoid (https://www.youtube.com/watch?v=HFu3D0kGsJs)
[Read More: The 7 Best Serratus Exercises for Chiseled Abs and Shoulder Stability]
The Copenhagen plank is a challenging side plank variation where your top foot is elevated on a bench, and you lift your bottom leg off the floor. In addition to the oblique work of resisting lateral flexion on the bottom side, it’s a major burn for your adductors. The Copenhagen plank is also a great single-arm exercise — without your feet on the floor, it’s all on that one arm.
Equipment Needed: You’ll need a weight bench or low box to elevate your top foot.
How to Do It:
[*]Lie on your right side near a bench or box close enough to place your top foot on it.
[*]Place your right forearm on the ground. Place your left foot on the bench or a plyo box. Inhale to brace your core. Exhale to lift into a side plank position.
[*]Float your right leg, lifting it off the floor and bringing it closer to the bench. Hold as long as you can, working up to 30 seconds. Squeeze your glutes.
[*]Lower down with control. Turn around and repeat on the opposite side.
Modifications
Coach’s Tip: Don’t let your bottom hip sink toward the floor.
Hanging Oblique Raise
https://www.youtube.com/watch?v=sqDdHFC1KYkVideo can’t be loaded because JavaScript is disabled: Hanging Oblique Raises (https://www.youtube.com/watch?v=sqDdHFC1KYk)
[Read More: The Best Bodybuilding Ab Workout for Your Experience Level]
The hanging oblique raise is a variation of a hanging knee raise. It’s an advanced oblique exercise that will hit your internal and external obliques as you twist your legs to your opposite side. It also taxes your upper body and grip strength to hang on long enough.
Equipment Needed: You’ll need a pull-up bar or something to hang from, like handles at the top of a cable machine.
How to Do It:
[*]Hang from a pull-up bar with an overhand grip and your hands shoulder-width apart.
[*]Inhale to brace your core. Exhale and bring your knees up towards your right ribs.
[*]Inhale and return to the starting position. Exhale and bring your knees toward your left ribs.
[*]Return to starting position. Continue for eight reps per side.
Modifications
Coach’s Tip: Squeeze your glutes and engage your hip flexors to help you lift your knees, but don’t let them take over.
Spider Push-Up
https://www.youtube.com/watch?v=O4ykWemt47kVideo can’t be loaded because JavaScript is disabled: How To Do A Spiderman Push Up (https://www.youtube.com/watch?v=O4ykWemt47k)
[Read More: The Best 10-Minute Ab Workouts to Strengthen Your Lifts and Your Six Pack]
The spider push-up is a single-leg push-up variation with an oblique crunch. It challenges your upper body and core strength and stability. As you resist rotation through your torso, you’ll initiate some lateral flexion at the same time. This will target your internal obliques and crank up your heart rate.
Equipment Needed: No equipment needed — just a mat or flat surface.
How to Do It:
[*]Begin in a plank position with your hands shoulder-width apart. Engage all your core muscles to keep your body in a straight line.
[*]Lower into a push-up. At the bottom, lift your left foot and bring your left knee to tap your left elbow. Push back up and return your left foot to your plank.
[*]Lower into a push-up. At the bottom, lift your right foot and bring your right knee to tap your right elbow. Push back up and step your right foot back to your plank.
[*]Continue for 10 to 12 push-ups.
Modifications
Coach’s Tip: Resist rotation through your hips, squeeze your glutes, and don’t let your lower back sag.
Rotational Medicine Ball Throw
https://www.youtube.com/watch?v=hO2tKuMMoFUVideo can’t be loaded because JavaScript is disabled: Medicine Ball Rotation Throw | Nuffield Health (https://www.youtube.com/watch?v=hO2tKuMMoFU)
The rotational medicine ball throw is an explosive movement that builds upper body power as you stabilize your lower body. Oblique-ly speaking, you’ll actively rotate as you toss the ball and resist rotation when you catch it. These target your external obliques, but all your core muscles will be working and they’ll feel like cardio.
Equipment Needed: You’ll need a medicine ball and a wall, or grab a workout buddy and do them as a partner exercise.
How to Do It:
[*]Take a few lateral steps away from a wall so you’re far enough away to get a good throw.
[*]Stand with a medicine ball at your chest. Plant your feet, squeeze your glutes, and engage your core muscles.
[*]Throw the ball at the wall as you twist through your torso and rotate your farther-away foot with the motion. Catch the ball as it bounces back or when your partner throws it back. Return to the starting position.
[*]After 10 throws, turn around to face the opposite side and perform 10 more.
Modifications
Coach’s Tip: The powerful throw is part one; catching the ball is equally important — engage your oblique muscles to resist rotation.
How to Target the Obliques
Here’s how to strengthen and sculpt your side abs.
[*]“Anti” movements increase core stability. Perform anti-rotation exercises like the Pallof press and anti-lateral flexion exercises like side plank variations. Resisting these movements helps strengthen and stabilize your obliques and protect your spine.
[*]“Active” movements increase oblique strength and size. The function of your oblique muscles is to side bend (laterally flex) and twist (rotate). Exercises that use these movements will target your obliques.
[*]Lateral flexion exercises include crunch variations and side bends.
[*]Rotation exercises cover the lunge with a twist, Russian twist, and rotational medicine ball throw.
[*]It’s not black and white. Many of these oblique exercises do multiple things at the same time.
[*]Including all of these anti and active movements will target your internal and external obliques.
[*]Proper form matters. Actively engage your obliques through all the exercises to get the most out of them.
[*]Add oblique exercises to core workouts. You can target your obliques by adding some of these exercises into a larger core workout that works multiple muscle groups.
[*]Do unilateral training. Your oblique muscles work during other exercises, too. Include single-arm and single-leg work in your training and focus on feeling your obliques engage.
[/list]
Twist and Shout
Don’t forget your side abs. Whether you’re a beginner, intermediate, or advanced athlete, you’ll want to resist and perform lateral flexion and rotation to strengthen, stabilize, and build your oblique muscles. Strengthening your obliques will also carry over to your other lifts and athletic performance.
FAQs
Let’s wrap up with some frequent questions on the oblique muscles and oblique workouts.
What is the best exercise for your obliques? [/b] If we can only choose one, we’ll go with the side plank. It’s a classic — you can keep making it more difficult for advanced athletes or add movement to it to make it more “active” and less “anti.”
Do oblique exercises thicken your waist? [/b] No, oblique exercises alone should not thicken your waist. The size of your waist may come down to nutrition and genetics.
How do you build your obliques?[/b] Perform these oblique workouts, progress them over time, and eat enough calories and protein to build muscle.
The post The Best Oblique Workouts for Every Experience Level (+ Personal Trainer Tips on Ab Exercises) appeared first on BarBend.
Click here to view the article.
The post The Best Oblique Workouts for Every Experience Level (+ Personal Trainer Tips on Ab Exercises) appeared first on BarBend.
Building a strong core goes beyond your six-pack — you’ve got to train your side abs, too. To sculpt and strengthen your oblique muscles, you’ll want to incorporate the best oblique exercises that teach you to resist and initiate movement. We’ve compiled everything you need to know into oblique workouts for beginners, intermediates, and advanced athletes. Let’s twist it out.
Editor’s Note: The content on BarBend is meant to be informative in nature, but it should not be taken as medical advice. When starting a new training regimen and/or diet, it is always a good idea to consult with a trusted medical professional. We are not a medical resource. The opinions and articles on this site are not intended for use as diagnosis, prevention, and/or treatment of health problems. They are not substitutes for consulting a qualified medical professional.
Best Oblique Workouts
- Beginner Oblique Workout
- Intermediate Oblique Workout
- Advanced Oblique Workout
Beginner Oblique Workout
When you’re new to training, you probably start learning traditional ab exercises like sit-ups. Nothing wrong with those — but we’re here to focus on targeting your oblique muscles by teaching you to resist the two movements they’re responsible for: lateral flexion (or side bending) and rotation (or twisting). Then, you’ll actively do those movements.
This can function as a full-body bodybuilding workout for newbies. You’ll be doing unilateral lower-body work to increase stability as you bend and twist.
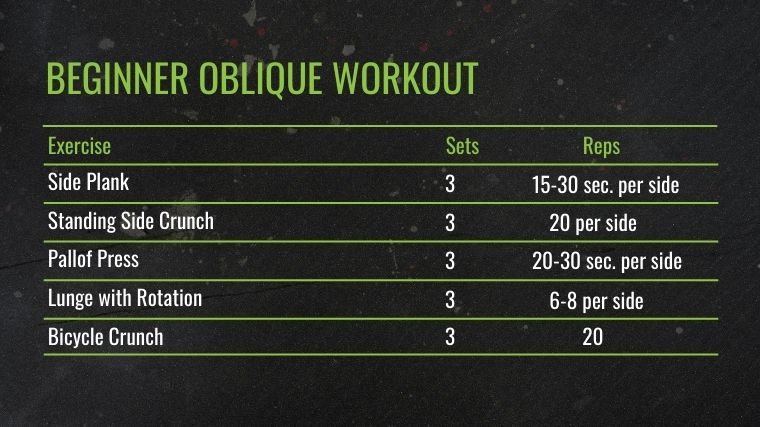
Perform the first four exercises in succession and repeat for three to four rounds. Rest for one minute in between. Then, finish with bicycle crunches.
- Side Plank: 3 x 15-30 seconds per side
- Standing Side Crunch: 3 x 20 per side
- Pallof Press: 3 x 20-30 seconds per side
- Lunge with Rotation: 3 x 6-8 per side
- Bicycle Crunch: 3 x 20
Equipment Needed: You’ll need a resistance band or cable machine for the Pallof press; the rest can be done with no equipment.
How Often to Do This Workout: Perform this workout two to three times per week.
Coach’s Tip: Focus on how it feels to resist and then initiate movement as you move from side plank to side bends, and then from Pallof press to the lunge with rotation.
Side Plank
[Read More: 7 Beginner-Friendly Core and Oblique Exercises]
The side plank is an anti-lateral flexion isometric exercise, meaning you resist letting your bottom half sink toward the floor as you hold still. The side plank strengthens your internal obliques and builds single-arm strength and stability as you work one side at a time. It’s a unilateral exercise, so it highlights and helps correct imbalances when you switch sides.
Equipment Needed: The side plank is a bodyweight exercise — no equipment is needed, except a mat or towel.
How to Do It:
[*]Lie down on the right side of your body. Place your right forearm on the ground. Stack your left foot on top of your right foot. Place your left hand on your left hip or reach your left arm to the ceiling. Keep your feet, hips, and shoulders in a straight line.
[*]Inhale and brace your core. Exhale and lift your right hip away from the floor. Push into your right forearm and foot. Squeeze your glutes. Hold for 15 to 30 seconds.
[*]Lower down slowly and repeat on your left side.
Modifications
- Make it Easier: Place your bottom knee on the floor to help support your weight.
- Make it Harder: Lower your hip to the floor slowly and lift it back up repeatedly throughout your side plank hold.
Coach’s Tip: Keep all of your core muscles engaged, but zero in on your bottom oblique muscles.
Standing Side Crunch
https://www.youtube.com/watch?v=awiXjK_PC3EVideo can’t be loaded because JavaScript is disabled: The Best Way to do a Standing Side Crunch (https://www.youtube.com/watch?v=awiXjK_PC3E)
[Read More: Standing Russian Twists – Muscles Worked, Benefits, and Exercise Demo]
In the standing side crunch, you’ll be balancing on one leg and actively performing lateral flexion on one side at a time. The side crunch targets your internal obliques while working your upper body. It builds core strength and stability, and the full-body nature of it has a cardio element.
Equipment Needed: This is a bodyweight exercise, and you can do it barefoot to feel your foot on the floor.
How to Do It:
[*]Stand upright with your feet shoulder-width apart. Place your hands behind your head with your elbows wide. Push your feet into the floor, squeeze your glutes, and engage your abdominal muscles to create tension.
[*]Inhale, then exhale to lift your right leg. Bring your right elbow towards your right knee, crunching through your right obliques.
[*]Inhale and lower the right foot down. Repeat on the left side.
[*]Alternate sides for 20 reps, 10 per side.
Modifications
- Make it Easier: Shorten the distance between your elbow and knee.
- Make it Harder: Increase your speed, but maintain stability and balance.
Coach’s Tip: Keep your bottom leg engaged.
Pallof Press
The Pallof press is an anti-rotation exercise that strengthens your obliques as you resist twisting toward one side at a time. You can add a press for more of a challenge, but in this workout, you’ll do it as an isometric exercise and hold still. The Pallof press is a full-body exercise that also engages your upper body.
Equipment Needed: You’ll need a resistance band and a stable object or cable machine.
How to Do It:
[*]Loop a resistance band around a stable object or set a cable at chest height. Grab the handle or band and take a few lateral steps away from the machine until you feel it pulling you toward it.
[*]Press your feet into the ground. Tuck your hips and squeeze your glutes. Inhale to brace your core, then exhale to press the band or cable away from you.
[*]Feel your obliques on the side closest to the machine as you resist rotating toward it. Hold for 20 to 30 seconds.
[*]Return to the starting position with control. Turn around to repeat on the opposite side.
Modifications
- Make it Easier: Perform this from a seated position to take the lower body stability work out of it.
- Make it Harder: Increase the weight of your resistance band or cable machine or add presses.
Coach’s Tip: You’ll feel this in all of your abdominal muscles; breathe deeply throughout.
Reverse Lunge with Twist
https://www.youtube.com/watch?v=LrIE5onzj68Video can’t be loaded because JavaScript is disabled: Reverse Lunge with Twist (https://www.youtube.com/watch?v=LrIE5onzj68)
The reverse lunge with twist adds an active rotation movement, with the challenge of stabilizing your lower body in a lunge. It’s a full-body exercise that targets multiple muscle groups. You’ll work one side of your obliques at a time as you build single-leg strength and balance. Working your obliques by performing twists also helps you get stronger in the transverse plane.
Equipment Needed: You can perform this as a bodyweight exercise or hold a dumbbell, kettlebell, weight plates, or medicine ball at your chest.
How to Do It:
[*]Stand upright with your feet shoulder-width apart. Hold your weight or clasp your hands at your chest.
[*]Step your left foot back and lower your left knee toward the floor as you inhale. Hold the bottom of the lunge and twist your torso toward your right side as you exhale. Feel your right obliques.
[*]Inhale to twist back forward. Push off your left foot to step your left leg forward.
[*]Continue for six to eight reps. Repeat on the right side.
Modifications
- Make it Easier: Perform fewer reps or step one foot back and twist, taking the lunge out until you’re ready for it.
- Make it Harder: You can do walking lunges or add a dumbbell, kettlebell, or medicine ball. Return to this exercise as an advanced athlete and add a barbell on your back.
Coach’s Tip: Remember to twist toward the front leg.
Bicycle Crunch
The bicycle crunch is a classic core exercise that targets your obliques and is a bit less intense than a sit-up. You’ll build coordination and core strength. The bicycle crunch also works your rectus abdominis as you contract your ab muscles while twisting through your sides. You’ll also get some upper body work to keep your shoulders lifted.
Equipment Needed: You’ll need an exercise mat to lie on.
How to Do It:
[*]Lie on your back with your shins parallel to the ceiling and legs bent at 90 degrees. Place your hands behind your head and keep your elbows wide.
[*]Lift your shoulders, neck, and head off the ground. Engage your back muscles to stay lifted. Inhale then exhale and twist to bring your left elbow toward your right knee. Straighten your left leg toward the ground as you do this.
[*]Inhale and return to the starting position. Repeat on the opposite side. Continue alternating for 20 total bicycle crunches.
Modifications
- Make it Easier: Place your non-working leg on the ground between reps.
- Make it Harder: Keep both shoulder blades off the ground throughout the exercise.
Coach’s Tip: Avoid using your hands to pull on your neck. Instead, actively feel your obliques through the twist.
Intermediate Oblique Workout
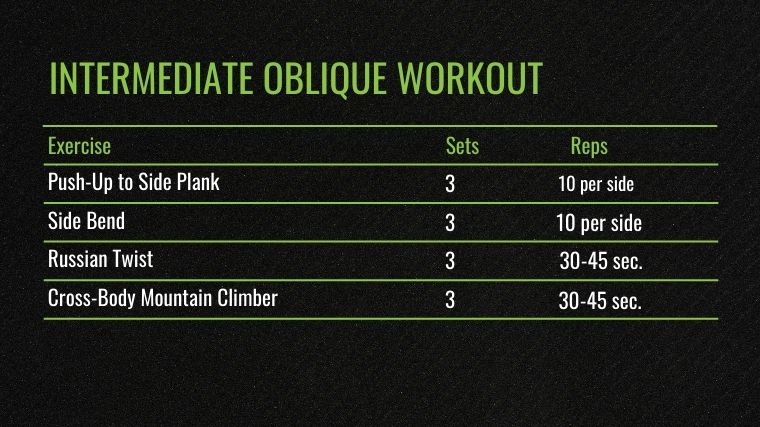
This intermediate oblique workout has more challenging oblique exercises where you’ll work with resisting and initiating lateral flexion and rotation. It’s a quick core workout you can add to the end of a lifting session.
You’ll start with a challenging side plank variation that adds upper body work with push-ups and then move into loaded side bends and Russian twists for active lateral flexion and rotation. Finish strong with cross-body mountain climbers. It’s a full-body exercise that increases your heart rate and is great for post-lifting cardio conditioning.
- Push-Up to Side Plank: 3 x 10 per side
- Side Bend: 3 x 10 per side
- Russian Twist: 3 x 30-45 seconds
- Cross-Body Mountain Climber: 3 x 30-45 seconds
Equipment Needed: You’ll need weight plates, dumbbells or kettlebells, for the side bends. You can do Russian twists with a medicine ball or dumbbell.
How Often to Do This Workout: Try this workout twice a week.
Coach’s Tip: Maintain control and stability as you change positions.
Push-Up to Side Plank
https://www.youtube.com/watch?v=pJUY83BsReYVideo can’t be loaded because JavaScript is disabled: How to do Push-Up To Side Plank | Joanna Soh (https://www.youtube.com/watch?v=pJUY83BsReY)
In a standard plank, your obliques work to resist rotation through your torso. In a side plank, they work to resist lateral flexion. This exercise puts it all together with the added upper body work of a push-up. You’ll also build upper body strength and single-arm stability as you flow from push-up to side plank and back again.
Equipment Needed: This is a bodyweight exercise, but you may want a mat for your hands.
How to Do It:
[*]Lower down into a push-up.
[*]As you push yourself up, lift your right hand and turn your torso to the right, landing in a side-plank position. Reach your right arm to the ceiling and stack your left foot on top of your right foot.
[*]Place your right hand down as you return to a plank. Lower into another push-up. At the top, lift your left hand and turn to the left, landing in a side plank position.
[*]Continue on alternating sides for 10 reps total.
Modifications
- Make it Easier: Take out the push-up and flow from plank to side plank, alternating sides.
- Make it Harder: Lift your top leg in your side planks.
Coach’s Tip: Although you may flow quickly through this, make each part of the movement sharp so each push-up and side plank has tension and great form.
Side Bends
Side bends are simple and straight to the point — lateral flexion with the added bonus that you can load them. They’ll target your internal obliques on the working side, and you’ll feel a nice stretch through the opposite side.
Equipment Needed: You can use dumbbells, kettlebells, or weight plates for a grip challenge.
How to Do It:
[*]Stand upright with your feet hip-width apart. Hold your weight of choice in each hand.
[*]Press your feet into the floor, tuck your hips, and squeeze your glutes. Brace your core. Inhale and side bend to the right. Exhale to stand back up and return to the starting position.
[*]Inhale and side bend to the left. Exhale to return to the starting position.
[*]Continue for 10 per side.
Modifications
- Make it Easier: You can do this as a bodyweight exercise or use light dumbbells.
- Make it Harder: Increase your weights or bring your feet closer together.
Coach’s Tip: Focus on feeling your obliques contract with each side bend.
Cross-Body Mountain Climber
https://www.youtube.com/watch?v=1cwZ8VZvRjcVideo can’t be loaded because JavaScript is disabled: How to Do a Cross-Body Mountain Climber (https://www.youtube.com/watch?v=1cwZ8VZvRjc)
[Read More: The 20 Best Ab Exercises to Strengthen Your Core]
The cross-body mountain climber is an excellent bodyweight exercise that works all your core muscles to stabilize your trunk and resist spinal rotation. At the same time, you’ll be engaging your external obliques to do a cross-twisting movement with your knees. It works your upper body to stabilize your shoulders as you balance on your hands. There’s also a cardio element, especially if you pick up the pace.
Equipment Needed: You’ll just need a mat for this one.
How to Do It:
[*]Begin in a plank position with your hands shoulder-width apart. Engage your abdominal muscles to brace your core and build tension.
[*]Inhale and lift your left foot. Exhale to tap your left knee to your right elbow. Inhale to step the left foot back. Exhale to tap your right knee to your left elbow.
[*]Continue alternating sides for 30 to 45 seconds.
Modifications
- Make it Easier: Take out the cross-body element and tap your knee to the same side’s elbow — you’ll still be crunching through your oblique muscles.
- Make it Harder: Add a little hop so it’s more of a jog than a step.
Coach’s Tip: Don’t let your lower back sink towards the floor — keep your ab muscles engaged.
Russian Twist
https://www.youtube.com/watch?v=VfWoNC-NMIIVideo can’t be loaded because JavaScript is disabled: Russian Twist (https://www.youtube.com/watch?v=VfWoNC-NMII)
[Read More: The 9 Best Russian Twist Alternatives You Need for Your Next Ab Workout]
The Russian twist is a great core exercise that works your upper body and has you resist and initiate rotation through your internal and external obliques. It will also challenge your balance and increase core stability.
Equipment Needed: You can do the Russian twist with just your body weight or add a medicine ball or dumbbell for more of a challenge.
How to Do It:
[*]Sit upright with your feet on the floor and knees pointing to the ceiling. Engage your abs and lean your torso back to a 45-degree angle. Hold a dumbbell or medicine ball if you’re using a weight.
[*]Inhale to brace your core and exhale to twist your torso to the right side. Touch the floor with your hands, or keep holding your weight.
[*]Inhale to return to the starting position. Exhale to twist to the left side.
[*]Continue alternating sides for 30 to 45 seconds.
Modifications
- Make it Easier: Do this with no equipment and your feet on the floor.
- Make it Harder: Hold a heavier dumbbell or medicine ball and/or lift your feet off the floor.
Coach’s Tip: Tuck your chin and retract your head so you don’t initiate the move from your neck.
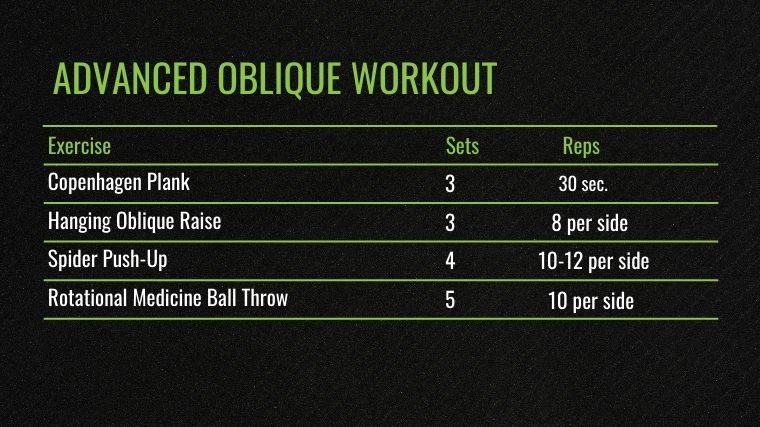
Advanced Oblique Workout
We’ll need to up the ante for advanced athletes with these challenging oblique exercises that still keep the same spirit — resisting and engaging in lateral flexion and rotation. You’ll do a tough side plank variation, an oblique-focused hanging leg raise, a push-up variation, and finish with some explosive medicine ball work. This oblique workout will challenge your upper body, core strength and stability, and cardio conditioning.
- Copenhagen Plank: 3 x 30 seconds
- Hanging Oblique Raise: 3 x 8 per side
- Spider Push-Up: 4 x 10-12 per side
- Rotational Medicine Ball Throw: 5 x 10 per side
Equipment Needed: You’ll need a bench or box for the Copenhagen plank, a pull-up bar or handles for the hanging leg raises, a medicine ball, and a wall or partner.
How Often to Do This Workout: Try this workout two to three times per week.
Coach’s Tip: Maintain proper technique throughout the workout.
Copenhagen Plank
https://www.youtube.com/watch?v=HFu3D0kGsJsVideo can’t be loaded because JavaScript is disabled: COPENHAGEN PLANK GUIDE | Form, Benefits, and Mistakes to Avoid (https://www.youtube.com/watch?v=HFu3D0kGsJs)
[Read More: The 7 Best Serratus Exercises for Chiseled Abs and Shoulder Stability]
The Copenhagen plank is a challenging side plank variation where your top foot is elevated on a bench, and you lift your bottom leg off the floor. In addition to the oblique work of resisting lateral flexion on the bottom side, it’s a major burn for your adductors. The Copenhagen plank is also a great single-arm exercise — without your feet on the floor, it’s all on that one arm.
Equipment Needed: You’ll need a weight bench or low box to elevate your top foot.
How to Do It:
[*]Lie on your right side near a bench or box close enough to place your top foot on it.
[*]Place your right forearm on the ground. Place your left foot on the bench or a plyo box. Inhale to brace your core. Exhale to lift into a side plank position.
[*]Float your right leg, lifting it off the floor and bringing it closer to the bench. Hold as long as you can, working up to 30 seconds. Squeeze your glutes.
[*]Lower down with control. Turn around and repeat on the opposite side.
Modifications
- Make it Easier: Bend your bottom knee or hold for a shorter time.
- Make it Harder: Lift the bottom leg as high as possible, hold for longer, or try balancing on your hand instead of your forearm.
Coach’s Tip: Don’t let your bottom hip sink toward the floor.
Hanging Oblique Raise
https://www.youtube.com/watch?v=sqDdHFC1KYkVideo can’t be loaded because JavaScript is disabled: Hanging Oblique Raises (https://www.youtube.com/watch?v=sqDdHFC1KYk)
[Read More: The Best Bodybuilding Ab Workout for Your Experience Level]
The hanging oblique raise is a variation of a hanging knee raise. It’s an advanced oblique exercise that will hit your internal and external obliques as you twist your legs to your opposite side. It also taxes your upper body and grip strength to hang on long enough.
Equipment Needed: You’ll need a pull-up bar or something to hang from, like handles at the top of a cable machine.
How to Do It:
[*]Hang from a pull-up bar with an overhand grip and your hands shoulder-width apart.
[*]Inhale to brace your core. Exhale and bring your knees up towards your right ribs.
[*]Inhale and return to the starting position. Exhale and bring your knees toward your left ribs.
[*]Return to starting position. Continue for eight reps per side.
Modifications
- Make it Easier: You can do fewer reps or not lift your knees as high.
- Make it Harder: Try straightening your legs like a variation of a toes-to-bar but with an oblique twist.
Coach’s Tip: Squeeze your glutes and engage your hip flexors to help you lift your knees, but don’t let them take over.
Spider Push-Up
https://www.youtube.com/watch?v=O4ykWemt47kVideo can’t be loaded because JavaScript is disabled: How To Do A Spiderman Push Up (https://www.youtube.com/watch?v=O4ykWemt47k)
[Read More: The Best 10-Minute Ab Workouts to Strengthen Your Lifts and Your Six Pack]
The spider push-up is a single-leg push-up variation with an oblique crunch. It challenges your upper body and core strength and stability. As you resist rotation through your torso, you’ll initiate some lateral flexion at the same time. This will target your internal obliques and crank up your heart rate.
Equipment Needed: No equipment needed — just a mat or flat surface.
How to Do It:
[*]Begin in a plank position with your hands shoulder-width apart. Engage all your core muscles to keep your body in a straight line.
[*]Lower into a push-up. At the bottom, lift your left foot and bring your left knee to tap your left elbow. Push back up and return your left foot to your plank.
[*]Lower into a push-up. At the bottom, lift your right foot and bring your right knee to tap your right elbow. Push back up and step your right foot back to your plank.
[*]Continue for 10 to 12 push-ups.
Modifications
- Make it Easier: Elevate your hands on a box.
- Make it Harder: Elevate your feet on a box.
Coach’s Tip: Resist rotation through your hips, squeeze your glutes, and don’t let your lower back sag.
Rotational Medicine Ball Throw
https://www.youtube.com/watch?v=hO2tKuMMoFUVideo can’t be loaded because JavaScript is disabled: Medicine Ball Rotation Throw | Nuffield Health (https://www.youtube.com/watch?v=hO2tKuMMoFU)
The rotational medicine ball throw is an explosive movement that builds upper body power as you stabilize your lower body. Oblique-ly speaking, you’ll actively rotate as you toss the ball and resist rotation when you catch it. These target your external obliques, but all your core muscles will be working and they’ll feel like cardio.
Equipment Needed: You’ll need a medicine ball and a wall, or grab a workout buddy and do them as a partner exercise.
How to Do It:
[*]Take a few lateral steps away from a wall so you’re far enough away to get a good throw.
[*]Stand with a medicine ball at your chest. Plant your feet, squeeze your glutes, and engage your core muscles.
[*]Throw the ball at the wall as you twist through your torso and rotate your farther-away foot with the motion. Catch the ball as it bounces back or when your partner throws it back. Return to the starting position.
[*]After 10 throws, turn around to face the opposite side and perform 10 more.
Modifications
- Make it Easier: Use a lighter medicine ball or stand closer to the wall.
- Make it Harder: Go heavier with your medicine ball or increase your distance from the wall.
Coach’s Tip: The powerful throw is part one; catching the ball is equally important — engage your oblique muscles to resist rotation.
How to Target the Obliques
Here’s how to strengthen and sculpt your side abs.
[*]“Anti” movements increase core stability. Perform anti-rotation exercises like the Pallof press and anti-lateral flexion exercises like side plank variations. Resisting these movements helps strengthen and stabilize your obliques and protect your spine.
[*]“Active” movements increase oblique strength and size. The function of your oblique muscles is to side bend (laterally flex) and twist (rotate). Exercises that use these movements will target your obliques.
[*]Lateral flexion exercises include crunch variations and side bends.
[*]Rotation exercises cover the lunge with a twist, Russian twist, and rotational medicine ball throw.
[*]It’s not black and white. Many of these oblique exercises do multiple things at the same time.
[*]Including all of these anti and active movements will target your internal and external obliques.
[*]Proper form matters. Actively engage your obliques through all the exercises to get the most out of them.
[*]Add oblique exercises to core workouts. You can target your obliques by adding some of these exercises into a larger core workout that works multiple muscle groups.
[*]Do unilateral training. Your oblique muscles work during other exercises, too. Include single-arm and single-leg work in your training and focus on feeling your obliques engage.
[/list]
Twist and Shout
Don’t forget your side abs. Whether you’re a beginner, intermediate, or advanced athlete, you’ll want to resist and perform lateral flexion and rotation to strengthen, stabilize, and build your oblique muscles. Strengthening your obliques will also carry over to your other lifts and athletic performance.
FAQs
Let’s wrap up with some frequent questions on the oblique muscles and oblique workouts.
What is the best exercise for your obliques? [/b] If we can only choose one, we’ll go with the side plank. It’s a classic — you can keep making it more difficult for advanced athletes or add movement to it to make it more “active” and less “anti.”
Do oblique exercises thicken your waist? [/b] No, oblique exercises alone should not thicken your waist. The size of your waist may come down to nutrition and genetics.
How do you build your obliques?[/b] Perform these oblique workouts, progress them over time, and eat enough calories and protein to build muscle.
The post The Best Oblique Workouts for Every Experience Level (+ Personal Trainer Tips on Ab Exercises) appeared first on BarBend.
Click here to view the article.