
Muscle Insider
New member
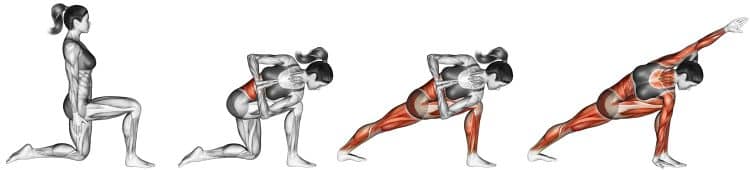
Revolved side angle pose parivrtta parsvakonasana displays a multiple-phase technique that combines a static lunge, core strength, hip hinge, and upper body rotation. Nearly a fully functional pose, it also requires lots of stability, a powerful center and pelvic floor, patience, and awareness, rooting down through the ground, and redirecting energy towards the sky.
Don’t be intimidated as a block, and form modifications are allowed if you don’t yet have the capabilities to perform a full-on revolved side angle pose. It’s a pre-requisite position for more advanced versions such as bound, which is demonstrated below.
In this guide, you’ll learn the benefits, common mistakes, and variations of revolved side angle pose parivrtta parsvakonasana.
Muscles Involved Parivrtta Parsvakonasana
The revolves side angle pose is a multi-muscle pose, requiring contribution from the entire body. While we can’t name every small muscle in the human anatomy, you can have an idea of the primary muscles that make this pose possible.
Legs – First and foremost we can see that the legs take much of the load, statically contracting in a lunge position at the commencement of the technique, although they’re less tensed during the heart of the pose.
Core – Made for bending movements, you’ll need a flexible torso, as well as functional obliques to perform the twisting component of the revolved side angle pose.
Arms and delts – The triceps, delts, and even the chest muscles, to a lesser degree help form a stable, unmovable base to support proper alignment, and upper body performance. A strong foundation is everything!
Pelvic floor muscles – Found between the tailbone and pelvis, these muscles support healthy functioning of the bladder, and bowels, as well as the vagina and uterus. Preventing incontinence, and playing a much appreciated role in sexual function, many can benefit from doing exercises that strengthens these muscles.
Back – The back is a major area containing several muscles that contribute to unique functions involving the rear torso, head, neck, shoulders, arms, and even legs. Each phase of revolved side angle pose requires performance from the upper posterior chain.
How to Do Revolved Side Angle Pose Parivrtta Parsvakonasana
Target muscles: Pelvic floor, legs, core, shoulders
Type: Yoga
Equipment: Yoga mat, block
Difficulty: Intermediate
While it’s tempting to replicate without prior knowledge, there are several connecting parts, and cues that go into perfecting the revolved side angle pose. As a result, we included chronological steps, and a master level video demonstration if you prefer to see the process.
Note: The provided video tutorial is short and sweet, getting right to the pose, however, we recommend easing into it by going through a proper warmup routine, rather than jumping right in. Therefore, it’s not the ideal beginner pose for someone without much experience in similar postures.
Steps
Assume a wide split leg stance with the left heel near the back of the mat and the right foot roughly four feet in front of the left foot near the front of the mat. Keep both feet pointed forward in the same direction.
Raise the left arm vertical overhead with the fingers pointed at the ceiling and rotate the shoulder inward to create length.
Exhale, bend the front (right) leg and slowly lower into a lunge, then bend the back knee and bring it down to the ground.
Tuck and pull the tailbone in to round the lower back, then bring the left shoulder onto the outside of the right leg, with the rear deltoid pressing onto the front of the knee.
If you can, place your left hand on the floor to the outside of your right foot with fingers facing the same direction as your toes.
Then straighten the back leg out, and bring your left foot flat on the floor for stability. Press the right knee and left arm together.
Twist from the floor, and turn your upper body clockwise, while moving the head with it.
Now extend the right arm back behind your head, exposing your right armpit, with your hand open and palm facing down to the floor, and the outer hand angled slightly down. Keep the tailbone tucked.
Breath in, feeling length in the spine, and exhale, deepening the twist. Stay for roughly five breaths and maintain a strong technique, keeping the right leg and left shoulder solidly pressed together.
To repeat on the opposite side, fix your gaze on the floor for balance, stabilize the hips and pelvis, and press up from the legs.
Then in a fluid movement, turn your feet in the opposite direction, while moving the arms in a windmill motion until the left arm is down by your left side, and the right arm is extended overhead.
The you’ll repeat all of the prior steps to do the same thing on this side.
While it’s possible to perform an exercise via following written instructions, we also included the video demonstration for visual learners.
Tips
We recommend using a yoga mat to protect your knees and prevent slipping.
If it’s too difficult to place your hand on the floor, use a yoga block to shorten the distance.
While revolved side angle pose is usually performed with the back foot flat on the floor, you can stay on your toes is the former is too challenging.
Take your time, and feel each step of the pose, making sense of the movements and muscles that take you from one position to the next.
Make sure to deep breathe in and out.
It’s acceptable to get some rounding in the back.
If you’d like a more detailed demonstration of revolved side angle pose, including a more extensive warmup process (Recommended), we included one for you courtesy of Yoga With Adriene.
6 Benefits of Revolved Side Angle Pose Parivrtta Parsvakonasana
Learning about the potential benefits of a pose can be as exciting as learning the technique itself. Especially postures that help to strengthen the sexual pelvic floor muscles! These are our favorite benefits of the revolved side angle pose.
Strengthen your joints
Weight bearing exercises strengthen muscles as well as the joints, and the revolved side angle pose asks a lot from the knees and ankles as your weight shifts onto the front leg, both during the initial lunge, and the remaining phases. But it’s best left to those with healthy and strong joints.
Reinforces your pelvic floor and get sexual benefits
We know we caught your attention with this one… and yes, you’ll be happy to know that there could be sexual benefits from performing the side angle pose. In this stance, you’ll double down on the (sphincter) muscles that help control your urinal flow, bowel movements, and the pleasurable feelings during sex (1). But don’t worry, you can still do your kegals…
A functional pose
We can say for a fact that side angle pose strengthens balance, flexibility, stability, mobility, coordination, and mental strength. You need to be patient, aware, and focused to get down into this posture, maintain proper alignment, and then come out of it, and smoothly transition to the same technique on the opposite side.
Opens chest and shoulders
An added benefit is that we get to stretch out the chest and shoulders. Many of us spend a lot of time sitting, hunched over which can cause problems in our anterior torso, like thoracic outlet syndrome. We can’t stress how imperative it is to routinely stretch and open up the chest, and shoulder muscles.
Reduce stress and improve digestion
Without a doubt, stress reduction supports a healthy digestive system. Yoga is one method of meditative practice that’s as good for the mind as it is the body. Both due to the belly breathing which stimulates the parasympathetic nervous system, and doing a routine that requires, patience, focus, and diverts attention away from common daily stressors.
Build stamina
It takes stamina and endurance to remain in a lunge, and then incorporate a strong twist and overhead arm action. You can burn a few additional calories in the process, which could contribute to your weight loss journey.
Common Mistakes
Try to avoid these habits that make for a less productive technique.
Bending the front knee
The front knee should remain over the ankle, and not moved forward past the toes. Once you’re setup in a lunge, fortify that position, ground down, stabilize your pelvis, and establish a strong base.
Compressing your torso
Upon establishing the shoulder into the knee, you can have roundness in the back. But the twist should create length in the spine and open up the chest and shoulders. Think of stacking the shoulders, and creating a straight line through both arms.
Variations of Revolved Side Angle Pose Parivrtta Parsvakonasana
Try these crazy good variations, including several assisted versions and more challenging techniques to help you wring (pun intended) out more benefits with the revolved side angle poses.
Knee down
While the front foot is planted for support, you have the option to keep the rear knee on the ground or extend the leg. The latter is more difficult especially combining the twist, and it’s a real challenge for the pelvis. Leave the knee down to help assist you, train the twist there, then when you’re ready try to do it with a straight back leg.
Heel lifted
Placing less pressure on the knee, and also making the exercise is a little easier, like the knee down variation, stay on your toes, rather than dropping your back foot flat on the floor.
With a yoga block
We always recommend having a yoga block handy, because it’s light weight, soft, and so useful in training range of motion. It’s perfectly reasonable to use a block to help you progress and gently stretch deeper into poses.
Revolved triangle pose
The revolved triangle pose is similar in many ways to the revolved side angle technique, except the leg are straight and hips open, whereas the latter is closed hip.
Steps
Assume a similar stance to trikonasana poses with the right lead foot pointed to the back of the mat, and the back foot facing left, and slightly inward at a 45-degree angle.
Reach the left arm up to the sky, then square the hips toward the right foot.
Stretch your left arm forward while turning toward the right foot, and bring the left hand down on the floor to the right side of your right foot. Tip: Use a yoga block if you cannot reach all the way down to the floor.
Now shift your weight onto the back foot, and drop the left side of the hip down as you reach the right arm to the sky, and pull the shoulders back. Draw your gaze up to the right thumb. Tip: Use the left hand on the floor to help pull the left shoulder underneath for more rotation.
Stay for five deep breaths.
To come out, rotate your chest toward the floor.
Now from here, lift the left arm up while bringing the right arm down in a sort of windmill motion. Try to transition into an opposite side stance by changing the direction of your feet.
Then perform the same steps but now for the opposite side.
To leave the pose, inhale, come up with the arms held straight out to your sides, then exhale, and finish by turning to the top of the mat and bring the feet together.
Bound revolved side angle pose (baddha parivrtta parsvakonasana)
Bound variation hits you with a very difficult trio of movement that includes lunging, twisting, and binding. But it’s possible if you’re familiar with revolved techniques, and forward folding poses.
To do it:
Come into a front lunge, and bring the opposite shoulder onto the lead knee. Wrap that arm under the leg, then reach behind your back with the other arm and grab the bottom hand. If you’re very flexible you can grab the wrist of your other arm.
You can follow the full video for preparatory poses or fast forward to 3:20 minute mark for the bound variation.
FAQS
Are there potential risks when performing revolved side angle pose? Before practicing yoga poses, you should understand the risks involved with weight bearing activities, and first assess your physical condition to ensure your safety. Prior or current injuries should be considered before attempting the revolved side angle pose.
Wrapping Up
That’s a wrap, lunge, twist, and bound (variation) … the revolved side angle Parivrtta Parsvakonasana is a sweet posture that should absolutely be included in your posing. Incorporating various elements of movement, with the body grounded but challenged, it’s foundational in branching out to other techniques.
You can also use it as a patience-building technique and stress relieving exercise that could improve your digestive health, while increasing blood flow, and providing several health benefits too.
Use this guide to form your revolved side angle, and make sure to try the awesome variations too!
Revolved side angle pose parivrtta parsvakonasana displays a multiple-phase technique that combines a static lunge, core strength, hip hinge, and upper body rotation. Nearly a fully functional pose, it also requires lots of stability, a powerful center and pelvic floor, patience, and awareness, rooting down through the ground, and redirecting energy towards the sky.
Don’t be intimidated as a block, and form modifications are allowed if you don’t yet have the capabilities to perform a full-on revolved side angle pose. It’s a pre-requisite position for more advanced versions such as bound, which is demonstrated below.
In this guide, you’ll learn the benefits, common mistakes, and variations of revolved side angle pose parivrtta parsvakonasana.
Muscles Involved Parivrtta Parsvakonasana
The revolves side angle pose is a multi-muscle pose, requiring contribution from the entire body. While we can’t name every small muscle in the human anatomy, you can have an idea of the primary muscles that make this pose possible.
Note: The provided video tutorial is short and sweet, getting right to the pose, however, we recommend easing into it by going through a proper warmup routine, rather than jumping right in. Therefore, it’s not the ideal beginner pose for someone without much experience in similar postures.
Steps
[*]Assume a wide split leg stance with the left heel near the back of the mat and the right foot roughly four feet in front of the left foot near the front of the mat. Keep both feet pointed forward in the same direction.
[*]Raise the left arm vertical overhead with the fingers pointed at the ceiling and rotate the shoulder inward to create length.
[*]Exhale, bend the front (right) leg and slowly lower into a lunge, then bend the back knee and bring it down to the ground.
[*]Tuck and pull the tailbone in to round the lower back, then bring the left shoulder onto the outside of the right leg, with the rear deltoid pressing onto the front of the knee.
[*]If you can, place your left hand on the floor to the outside of your right foot with fingers facing the same direction as your toes.
[*]Then straighten the back leg out, and bring your left foot flat on the floor for stability. Press the right knee and left arm together.
[*]Twist from the floor, and turn your upper body clockwise, while moving the head with it.
[*]Now extend the right arm back behind your head, exposing your right armpit, with your hand open and palm facing down to the floor, and the outer hand angled slightly down. Keep the tailbone tucked.
[*]Breath in, feeling length in the spine, and exhale, deepening the twist. Stay for roughly five breaths and maintain a strong technique, keeping the right leg and left shoulder solidly pressed together.
[*]To repeat on the opposite side, fix your gaze on the floor for balance, stabilize the hips and pelvis, and press up from the legs.
[*]Then in a fluid movement, turn your feet in the opposite direction, while moving the arms in a windmill motion until the left arm is down by your left side, and the right arm is extended overhead.
[*]The you’ll repeat all of the prior steps to do the same thing on this side.
While it’s possible to perform an exercise via following written instructions, we also included the video demonstration for visual learners.
Tips
6 Benefits of Revolved Side Angle Pose Parivrtta Parsvakonasana
Learning about the potential benefits of a pose can be as exciting as learning the technique itself. Especially postures that help to strengthen the sexual pelvic floor muscles! These are our favorite benefits of the revolved side angle pose.
Strengthen your joints
Weight bearing exercises strengthen muscles as well as the joints, and the revolved side angle pose asks a lot from the knees and ankles as your weight shifts onto the front leg, both during the initial lunge, and the remaining phases. But it’s best left to those with healthy and strong joints.
Reinforces your pelvic floor and get sexual benefits
We know we caught your attention with this one… and yes, you’ll be happy to know that there could be sexual benefits from performing the side angle pose. In this stance, you’ll double down on the (sphincter) muscles that help control your urinal flow, bowel movements, and the pleasurable feelings during sex (1). But don’t worry, you can still do your kegals…
A functional pose
We can say for a fact that side angle pose strengthens balance, flexibility, stability, mobility, coordination, and mental strength. You need to be patient, aware, and focused to get down into this posture, maintain proper alignment, and then come out of it, and smoothly transition to the same technique on the opposite side.
Opens chest and shoulders
An added benefit is that we get to stretch out the chest and shoulders. Many of us spend a lot of time sitting, hunched over which can cause problems in our anterior torso, like thoracic outlet syndrome. We can’t stress how imperative it is to routinely stretch and open up the chest, and shoulder muscles.
Reduce stress and improve digestion
Without a doubt, stress reduction supports a healthy digestive system. Yoga is one method of meditative practice that’s as good for the mind as it is the body. Both due to the belly breathing which stimulates the parasympathetic nervous system, and doing a routine that requires, patience, focus, and diverts attention away from common daily stressors.
Build stamina
It takes stamina and endurance to remain in a lunge, and then incorporate a strong twist and overhead arm action. You can burn a few additional calories in the process, which could contribute to your weight loss journey.
Common Mistakes
Try to avoid these habits that make for a less productive technique.
Bending the front knee
The front knee should remain over the ankle, and not moved forward past the toes. Once you’re setup in a lunge, fortify that position, ground down, stabilize your pelvis, and establish a strong base.
Compressing your torso
Upon establishing the shoulder into the knee, you can have roundness in the back. But the twist should create length in the spine and open up the chest and shoulders. Think of stacking the shoulders, and creating a straight line through both arms.
Variations of Revolved Side Angle Pose Parivrtta Parsvakonasana
Try these crazy good variations, including several assisted versions and more challenging techniques to help you wring (pun intended) out more benefits with the revolved side angle poses.
Knee down
While the front foot is planted for support, you have the option to keep the rear knee on the ground or extend the leg. The latter is more difficult especially combining the twist, and it’s a real challenge for the pelvis. Leave the knee down to help assist you, train the twist there, then when you’re ready try to do it with a straight back leg.
Heel lifted
Placing less pressure on the knee, and also making the exercise is a little easier, like the knee down variation, stay on your toes, rather than dropping your back foot flat on the floor.
With a yoga block
We always recommend having a yoga block handy, because it’s light weight, soft, and so useful in training range of motion. It’s perfectly reasonable to use a block to help you progress and gently stretch deeper into poses.
Revolved triangle pose
The revolved triangle pose is similar in many ways to the revolved side angle technique, except the leg are straight and hips open, whereas the latter is closed hip.
Steps
[*]Assume a similar stance to trikonasana poses with the right lead foot pointed to the back of the mat, and the back foot facing left, and slightly inward at a 45-degree angle.
[*]Reach the left arm up to the sky, then square the hips toward the right foot.
[*]Stretch your left arm forward while turning toward the right foot, and bring the left hand down on the floor to the right side of your right foot. Tip: Use a yoga block if you cannot reach all the way down to the floor.
[*]Now shift your weight onto the back foot, and drop the left side of the hip down as you reach the right arm to the sky, and pull the shoulders back. Draw your gaze up to the right thumb. Tip: Use the left hand on the floor to help pull the left shoulder underneath for more rotation.
[*]Stay for five deep breaths.
[*]To come out, rotate your chest toward the floor.
[*]Now from here, lift the left arm up while bringing the right arm down in a sort of windmill motion. Try to transition into an opposite side stance by changing the direction of your feet.
[*]Then perform the same steps but now for the opposite side.
[*]To leave the pose, inhale, come up with the arms held straight out to your sides, then exhale, and finish by turning to the top of the mat and bring the feet together.
Bound revolved side angle pose (baddha parivrtta parsvakonasana)
Bound variation hits you with a very difficult trio of movement that includes lunging, twisting, and binding. But it’s possible if you’re familiar with revolved techniques, and forward folding poses.
To do it:
FAQS
Are there potential risks when performing revolved side angle pose? Before practicing yoga poses, you should understand the risks involved with weight bearing activities, and first assess your physical condition to ensure your safety. Prior or current injuries should be considered before attempting the revolved side angle pose.
Wrapping Up
That’s a wrap, lunge, twist, and bound (variation) … the revolved side angle Parivrtta Parsvakonasana is a sweet posture that should absolutely be included in your posing. Incorporating various elements of movement, with the body grounded but challenged, it’s foundational in branching out to other techniques.
You can also use it as a patience-building technique and stress relieving exercise that could improve your digestive health, while increasing blood flow, and providing several health benefits too.
Use this guide to form your revolved side angle, and make sure to try the awesome variations too!
Click here to view the article.
Don’t be intimidated as a block, and form modifications are allowed if you don’t yet have the capabilities to perform a full-on revolved side angle pose. It’s a pre-requisite position for more advanced versions such as bound, which is demonstrated below.
In this guide, you’ll learn the benefits, common mistakes, and variations of revolved side angle pose parivrtta parsvakonasana.
Muscles Involved Parivrtta Parsvakonasana
The revolves side angle pose is a multi-muscle pose, requiring contribution from the entire body. While we can’t name every small muscle in the human anatomy, you can have an idea of the primary muscles that make this pose possible.
Legs – First and foremost we can see that the legs take much of the load, statically contracting in a lunge position at the commencement of the technique, although they’re less tensed during the heart of the pose.
Core – Made for bending movements, you’ll need a flexible torso, as well as functional obliques to perform the twisting component of the revolved side angle pose.
Arms and delts – The triceps, delts, and even the chest muscles, to a lesser degree help form a stable, unmovable base to support proper alignment, and upper body performance. A strong foundation is everything!
Pelvic floor muscles – Found between the tailbone and pelvis, these muscles support healthy functioning of the bladder, and bowels, as well as the vagina and uterus. Preventing incontinence, and playing a much appreciated role in sexual function, many can benefit from doing exercises that strengthens these muscles.
Back – The back is a major area containing several muscles that contribute to unique functions involving the rear torso, head, neck, shoulders, arms, and even legs. Each phase of revolved side angle pose requires performance from the upper posterior chain.
How to Do Revolved Side Angle Pose Parivrtta Parsvakonasana
Target muscles: Pelvic floor, legs, core, shoulders
Type: Yoga
Equipment: Yoga mat, block
Difficulty: Intermediate
While it’s tempting to replicate without prior knowledge, there are several connecting parts, and cues that go into perfecting the revolved side angle pose. As a result, we included chronological steps, and a master level video demonstration if you prefer to see the process.
Note: The provided video tutorial is short and sweet, getting right to the pose, however, we recommend easing into it by going through a proper warmup routine, rather than jumping right in. Therefore, it’s not the ideal beginner pose for someone without much experience in similar postures.
Steps
Assume a wide split leg stance with the left heel near the back of the mat and the right foot roughly four feet in front of the left foot near the front of the mat. Keep both feet pointed forward in the same direction.
Raise the left arm vertical overhead with the fingers pointed at the ceiling and rotate the shoulder inward to create length.
Exhale, bend the front (right) leg and slowly lower into a lunge, then bend the back knee and bring it down to the ground.
Tuck and pull the tailbone in to round the lower back, then bring the left shoulder onto the outside of the right leg, with the rear deltoid pressing onto the front of the knee.
If you can, place your left hand on the floor to the outside of your right foot with fingers facing the same direction as your toes.
Then straighten the back leg out, and bring your left foot flat on the floor for stability. Press the right knee and left arm together.
Twist from the floor, and turn your upper body clockwise, while moving the head with it.
Now extend the right arm back behind your head, exposing your right armpit, with your hand open and palm facing down to the floor, and the outer hand angled slightly down. Keep the tailbone tucked.
Breath in, feeling length in the spine, and exhale, deepening the twist. Stay for roughly five breaths and maintain a strong technique, keeping the right leg and left shoulder solidly pressed together.
To repeat on the opposite side, fix your gaze on the floor for balance, stabilize the hips and pelvis, and press up from the legs.
Then in a fluid movement, turn your feet in the opposite direction, while moving the arms in a windmill motion until the left arm is down by your left side, and the right arm is extended overhead.
The you’ll repeat all of the prior steps to do the same thing on this side.
While it’s possible to perform an exercise via following written instructions, we also included the video demonstration for visual learners.
Tips
We recommend using a yoga mat to protect your knees and prevent slipping.
If it’s too difficult to place your hand on the floor, use a yoga block to shorten the distance.
While revolved side angle pose is usually performed with the back foot flat on the floor, you can stay on your toes is the former is too challenging.
Take your time, and feel each step of the pose, making sense of the movements and muscles that take you from one position to the next.
Make sure to deep breathe in and out.
It’s acceptable to get some rounding in the back.
If you’d like a more detailed demonstration of revolved side angle pose, including a more extensive warmup process (Recommended), we included one for you courtesy of Yoga With Adriene.
6 Benefits of Revolved Side Angle Pose Parivrtta Parsvakonasana
Learning about the potential benefits of a pose can be as exciting as learning the technique itself. Especially postures that help to strengthen the sexual pelvic floor muscles! These are our favorite benefits of the revolved side angle pose.
Strengthen your joints
Weight bearing exercises strengthen muscles as well as the joints, and the revolved side angle pose asks a lot from the knees and ankles as your weight shifts onto the front leg, both during the initial lunge, and the remaining phases. But it’s best left to those with healthy and strong joints.
Reinforces your pelvic floor and get sexual benefits
We know we caught your attention with this one… and yes, you’ll be happy to know that there could be sexual benefits from performing the side angle pose. In this stance, you’ll double down on the (sphincter) muscles that help control your urinal flow, bowel movements, and the pleasurable feelings during sex (1). But don’t worry, you can still do your kegals…
A functional pose
We can say for a fact that side angle pose strengthens balance, flexibility, stability, mobility, coordination, and mental strength. You need to be patient, aware, and focused to get down into this posture, maintain proper alignment, and then come out of it, and smoothly transition to the same technique on the opposite side.
Opens chest and shoulders
An added benefit is that we get to stretch out the chest and shoulders. Many of us spend a lot of time sitting, hunched over which can cause problems in our anterior torso, like thoracic outlet syndrome. We can’t stress how imperative it is to routinely stretch and open up the chest, and shoulder muscles.
Reduce stress and improve digestion
Without a doubt, stress reduction supports a healthy digestive system. Yoga is one method of meditative practice that’s as good for the mind as it is the body. Both due to the belly breathing which stimulates the parasympathetic nervous system, and doing a routine that requires, patience, focus, and diverts attention away from common daily stressors.
Build stamina
It takes stamina and endurance to remain in a lunge, and then incorporate a strong twist and overhead arm action. You can burn a few additional calories in the process, which could contribute to your weight loss journey.
Common Mistakes
Try to avoid these habits that make for a less productive technique.
Bending the front knee
The front knee should remain over the ankle, and not moved forward past the toes. Once you’re setup in a lunge, fortify that position, ground down, stabilize your pelvis, and establish a strong base.
Compressing your torso
Upon establishing the shoulder into the knee, you can have roundness in the back. But the twist should create length in the spine and open up the chest and shoulders. Think of stacking the shoulders, and creating a straight line through both arms.
Variations of Revolved Side Angle Pose Parivrtta Parsvakonasana
Try these crazy good variations, including several assisted versions and more challenging techniques to help you wring (pun intended) out more benefits with the revolved side angle poses.
Knee down
While the front foot is planted for support, you have the option to keep the rear knee on the ground or extend the leg. The latter is more difficult especially combining the twist, and it’s a real challenge for the pelvis. Leave the knee down to help assist you, train the twist there, then when you’re ready try to do it with a straight back leg.
Heel lifted
Placing less pressure on the knee, and also making the exercise is a little easier, like the knee down variation, stay on your toes, rather than dropping your back foot flat on the floor.
With a yoga block
We always recommend having a yoga block handy, because it’s light weight, soft, and so useful in training range of motion. It’s perfectly reasonable to use a block to help you progress and gently stretch deeper into poses.
Revolved triangle pose
The revolved triangle pose is similar in many ways to the revolved side angle technique, except the leg are straight and hips open, whereas the latter is closed hip.
Steps
Assume a similar stance to trikonasana poses with the right lead foot pointed to the back of the mat, and the back foot facing left, and slightly inward at a 45-degree angle.
Reach the left arm up to the sky, then square the hips toward the right foot.
Stretch your left arm forward while turning toward the right foot, and bring the left hand down on the floor to the right side of your right foot. Tip: Use a yoga block if you cannot reach all the way down to the floor.
Now shift your weight onto the back foot, and drop the left side of the hip down as you reach the right arm to the sky, and pull the shoulders back. Draw your gaze up to the right thumb. Tip: Use the left hand on the floor to help pull the left shoulder underneath for more rotation.
Stay for five deep breaths.
To come out, rotate your chest toward the floor.
Now from here, lift the left arm up while bringing the right arm down in a sort of windmill motion. Try to transition into an opposite side stance by changing the direction of your feet.
Then perform the same steps but now for the opposite side.
To leave the pose, inhale, come up with the arms held straight out to your sides, then exhale, and finish by turning to the top of the mat and bring the feet together.
Bound revolved side angle pose (baddha parivrtta parsvakonasana)
Bound variation hits you with a very difficult trio of movement that includes lunging, twisting, and binding. But it’s possible if you’re familiar with revolved techniques, and forward folding poses.
To do it:
Come into a front lunge, and bring the opposite shoulder onto the lead knee. Wrap that arm under the leg, then reach behind your back with the other arm and grab the bottom hand. If you’re very flexible you can grab the wrist of your other arm.
You can follow the full video for preparatory poses or fast forward to 3:20 minute mark for the bound variation.
FAQS
Are there potential risks when performing revolved side angle pose? Before practicing yoga poses, you should understand the risks involved with weight bearing activities, and first assess your physical condition to ensure your safety. Prior or current injuries should be considered before attempting the revolved side angle pose.
Wrapping Up
That’s a wrap, lunge, twist, and bound (variation) … the revolved side angle Parivrtta Parsvakonasana is a sweet posture that should absolutely be included in your posing. Incorporating various elements of movement, with the body grounded but challenged, it’s foundational in branching out to other techniques.
You can also use it as a patience-building technique and stress relieving exercise that could improve your digestive health, while increasing blood flow, and providing several health benefits too.
Use this guide to form your revolved side angle, and make sure to try the awesome variations too!
Revolved side angle pose parivrtta parsvakonasana displays a multiple-phase technique that combines a static lunge, core strength, hip hinge, and upper body rotation. Nearly a fully functional pose, it also requires lots of stability, a powerful center and pelvic floor, patience, and awareness, rooting down through the ground, and redirecting energy towards the sky.
Don’t be intimidated as a block, and form modifications are allowed if you don’t yet have the capabilities to perform a full-on revolved side angle pose. It’s a pre-requisite position for more advanced versions such as bound, which is demonstrated below.
In this guide, you’ll learn the benefits, common mistakes, and variations of revolved side angle pose parivrtta parsvakonasana.
Muscles Involved Parivrtta Parsvakonasana
The revolves side angle pose is a multi-muscle pose, requiring contribution from the entire body. While we can’t name every small muscle in the human anatomy, you can have an idea of the primary muscles that make this pose possible.
- Legs – First and foremost we can see that the legs take much of the load, statically contracting in a lunge position at the commencement of the technique, although they’re less tensed during the heart of the pose.
- Core – Made for bending movements, you’ll need a flexible torso, as well as functional obliques to perform the twisting component of the revolved side angle pose.
- Arms and delts – The triceps, delts, and even the chest muscles, to a lesser degree help form a stable, unmovable base to support proper alignment, and upper body performance. A strong foundation is everything!
- Pelvic floor muscles – Found between the tailbone and pelvis, these muscles support healthy functioning of the bladder, and bowels, as well as the vagina and uterus. Preventing incontinence, and playing a much appreciated role in sexual function, many can benefit from doing exercises that strengthens these muscles.
- Back – The back is a major area containing several muscles that contribute to unique functions involving the rear torso, head, neck, shoulders, arms, and even legs. Each phase of revolved side angle pose requires performance from the upper posterior chain.
- Target muscles: Pelvic floor, legs, core, shoulders
- Type: Yoga
- Equipment: Yoga mat, block
- Difficulty: Intermediate
Note: The provided video tutorial is short and sweet, getting right to the pose, however, we recommend easing into it by going through a proper warmup routine, rather than jumping right in. Therefore, it’s not the ideal beginner pose for someone without much experience in similar postures.
Steps
[*]Assume a wide split leg stance with the left heel near the back of the mat and the right foot roughly four feet in front of the left foot near the front of the mat. Keep both feet pointed forward in the same direction.
[*]Raise the left arm vertical overhead with the fingers pointed at the ceiling and rotate the shoulder inward to create length.
[*]Exhale, bend the front (right) leg and slowly lower into a lunge, then bend the back knee and bring it down to the ground.
[*]Tuck and pull the tailbone in to round the lower back, then bring the left shoulder onto the outside of the right leg, with the rear deltoid pressing onto the front of the knee.
[*]If you can, place your left hand on the floor to the outside of your right foot with fingers facing the same direction as your toes.
[*]Then straighten the back leg out, and bring your left foot flat on the floor for stability. Press the right knee and left arm together.
[*]Twist from the floor, and turn your upper body clockwise, while moving the head with it.
[*]Now extend the right arm back behind your head, exposing your right armpit, with your hand open and palm facing down to the floor, and the outer hand angled slightly down. Keep the tailbone tucked.
[*]Breath in, feeling length in the spine, and exhale, deepening the twist. Stay for roughly five breaths and maintain a strong technique, keeping the right leg and left shoulder solidly pressed together.
[*]To repeat on the opposite side, fix your gaze on the floor for balance, stabilize the hips and pelvis, and press up from the legs.
[*]Then in a fluid movement, turn your feet in the opposite direction, while moving the arms in a windmill motion until the left arm is down by your left side, and the right arm is extended overhead.
[*]The you’ll repeat all of the prior steps to do the same thing on this side.
While it’s possible to perform an exercise via following written instructions, we also included the video demonstration for visual learners.
Tips
- We recommend using a yoga mat to protect your knees and prevent slipping.
- If it’s too difficult to place your hand on the floor, use a yoga block to shorten the distance.
- While revolved side angle pose is usually performed with the back foot flat on the floor, you can stay on your toes is the former is too challenging.
- Take your time, and feel each step of the pose, making sense of the movements and muscles that take you from one position to the next.
- Make sure to deep breathe in and out.
- It’s acceptable to get some rounding in the back.
6 Benefits of Revolved Side Angle Pose Parivrtta Parsvakonasana
Learning about the potential benefits of a pose can be as exciting as learning the technique itself. Especially postures that help to strengthen the sexual pelvic floor muscles! These are our favorite benefits of the revolved side angle pose.
Strengthen your joints
Weight bearing exercises strengthen muscles as well as the joints, and the revolved side angle pose asks a lot from the knees and ankles as your weight shifts onto the front leg, both during the initial lunge, and the remaining phases. But it’s best left to those with healthy and strong joints.
Reinforces your pelvic floor and get sexual benefits
We know we caught your attention with this one… and yes, you’ll be happy to know that there could be sexual benefits from performing the side angle pose. In this stance, you’ll double down on the (sphincter) muscles that help control your urinal flow, bowel movements, and the pleasurable feelings during sex (1). But don’t worry, you can still do your kegals…
A functional pose
We can say for a fact that side angle pose strengthens balance, flexibility, stability, mobility, coordination, and mental strength. You need to be patient, aware, and focused to get down into this posture, maintain proper alignment, and then come out of it, and smoothly transition to the same technique on the opposite side.
Opens chest and shoulders
An added benefit is that we get to stretch out the chest and shoulders. Many of us spend a lot of time sitting, hunched over which can cause problems in our anterior torso, like thoracic outlet syndrome. We can’t stress how imperative it is to routinely stretch and open up the chest, and shoulder muscles.
Reduce stress and improve digestion
Without a doubt, stress reduction supports a healthy digestive system. Yoga is one method of meditative practice that’s as good for the mind as it is the body. Both due to the belly breathing which stimulates the parasympathetic nervous system, and doing a routine that requires, patience, focus, and diverts attention away from common daily stressors.
Build stamina
It takes stamina and endurance to remain in a lunge, and then incorporate a strong twist and overhead arm action. You can burn a few additional calories in the process, which could contribute to your weight loss journey.
Common Mistakes
Try to avoid these habits that make for a less productive technique.
Bending the front knee
The front knee should remain over the ankle, and not moved forward past the toes. Once you’re setup in a lunge, fortify that position, ground down, stabilize your pelvis, and establish a strong base.
Compressing your torso
Upon establishing the shoulder into the knee, you can have roundness in the back. But the twist should create length in the spine and open up the chest and shoulders. Think of stacking the shoulders, and creating a straight line through both arms.
Variations of Revolved Side Angle Pose Parivrtta Parsvakonasana
Try these crazy good variations, including several assisted versions and more challenging techniques to help you wring (pun intended) out more benefits with the revolved side angle poses.
Knee down
While the front foot is planted for support, you have the option to keep the rear knee on the ground or extend the leg. The latter is more difficult especially combining the twist, and it’s a real challenge for the pelvis. Leave the knee down to help assist you, train the twist there, then when you’re ready try to do it with a straight back leg.
Heel lifted
Placing less pressure on the knee, and also making the exercise is a little easier, like the knee down variation, stay on your toes, rather than dropping your back foot flat on the floor.
With a yoga block
We always recommend having a yoga block handy, because it’s light weight, soft, and so useful in training range of motion. It’s perfectly reasonable to use a block to help you progress and gently stretch deeper into poses.
Revolved triangle pose
The revolved triangle pose is similar in many ways to the revolved side angle technique, except the leg are straight and hips open, whereas the latter is closed hip.
Steps
[*]Assume a similar stance to trikonasana poses with the right lead foot pointed to the back of the mat, and the back foot facing left, and slightly inward at a 45-degree angle.
[*]Reach the left arm up to the sky, then square the hips toward the right foot.
[*]Stretch your left arm forward while turning toward the right foot, and bring the left hand down on the floor to the right side of your right foot. Tip: Use a yoga block if you cannot reach all the way down to the floor.
[*]Now shift your weight onto the back foot, and drop the left side of the hip down as you reach the right arm to the sky, and pull the shoulders back. Draw your gaze up to the right thumb. Tip: Use the left hand on the floor to help pull the left shoulder underneath for more rotation.
[*]Stay for five deep breaths.
[*]To come out, rotate your chest toward the floor.
[*]Now from here, lift the left arm up while bringing the right arm down in a sort of windmill motion. Try to transition into an opposite side stance by changing the direction of your feet.
[*]Then perform the same steps but now for the opposite side.
[*]To leave the pose, inhale, come up with the arms held straight out to your sides, then exhale, and finish by turning to the top of the mat and bring the feet together.
Bound revolved side angle pose (baddha parivrtta parsvakonasana)
Bound variation hits you with a very difficult trio of movement that includes lunging, twisting, and binding. But it’s possible if you’re familiar with revolved techniques, and forward folding poses.
To do it:
- Come into a front lunge, and bring the opposite shoulder onto the lead knee. Wrap that arm under the leg, then reach behind your back with the other arm and grab the bottom hand. If you’re very flexible you can grab the wrist of your other arm.
FAQS
Are there potential risks when performing revolved side angle pose? Before practicing yoga poses, you should understand the risks involved with weight bearing activities, and first assess your physical condition to ensure your safety. Prior or current injuries should be considered before attempting the revolved side angle pose.
Wrapping Up
That’s a wrap, lunge, twist, and bound (variation) … the revolved side angle Parivrtta Parsvakonasana is a sweet posture that should absolutely be included in your posing. Incorporating various elements of movement, with the body grounded but challenged, it’s foundational in branching out to other techniques.
You can also use it as a patience-building technique and stress relieving exercise that could improve your digestive health, while increasing blood flow, and providing several health benefits too.
Use this guide to form your revolved side angle, and make sure to try the awesome variations too!
Click here to view the article.