


Muscle Insider
New member
A statuesque-like pose resembling that of Warrior I (But without the mythical backstory and a little more detailed), crescent moon pose is a half-kneeling, low lunge backbend that exposes the front side of the body. The pros to this type of pose? Counteract the stressful effects of bad postural habits, free up the posterior thigh muscles, and produce isometric strength gains in the lower body.
Let’s take a more in-depth look at this novice posture that punches above its weight class in terms of the benefits you can expect.
Muscles Worked During Crescent Moon Pose
It’s true that many yoga postures including the crescent moon pose stretch and strengthen muscles that you’ve probably never seen or heard of. Although you’ll certainly feel it working the larger more obvious body parts too.
Quads, hamstrings, glutes, and calves
Both a lower body strengthening and stretching exercise, the crescent moon pose is based on a stationary lunge and depends on static muscle tension in the thighs, butt, calves, and even the feet. When we bend and extend the hips, knees, and ankles, it’s these leg muscles that make it possible. Inversely, your joints and hip muscles benefit when you train the lower body.
Hip flexors
Crescent moon pose is similar to specific hip flexor stretch techniques. These muscles help bend the thigh at the hip, such as lifting the knee toward the chest. Psoas major and iliacus are the superstar hip flexors that everyone hears about because they play the biggest role in hip flexion along with rectus femoris thigh muscle.
Tight flexors can cause problems with your movement and can be caused by too much sitting or overuse during activities.
Core
Good luck trying to perform any meaningful activity without a solid core…. consisting of abs, obliques, back, hips, and pelvic floor, these muscles are like bodyguards for your spine and pelvis. Protecting and stabilizing these delicate yet crucial areas, your spine is guarded against excessive load, while your body can more efficiently transfer force from the upper and lower body.
How To Do Crescent Moon Pose
If you can nail the crescent moon pose technique you’ll see many of the benefits talked about in a later section in this guide. Make sure to follow along carefully and pay attention to the details as this posture is a weight bearing exercise. Therefore, we want you to maintain healthy joints while building strength and conditioning your body from head to toe.
Check out the step by step instructions and video example we provided below.
Steps
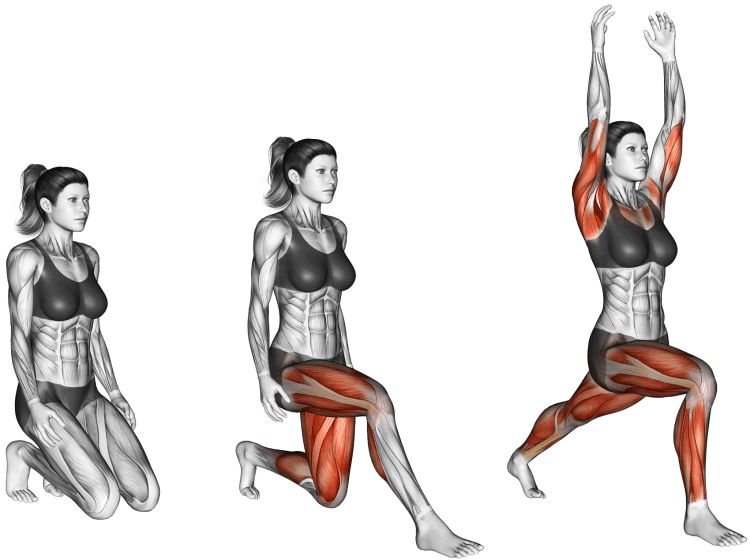
Stand at the top of the mat in mountain pose.
Inhale, then bring your left foot back and come into a deep split, or lunge stance. The front shin should be vertical, with the knee over the ankle. The heel should be directly above the ball of your foot.
Slowly drop the left knee to the floor in a half kneeling position.
Lean forward, place your hands or finger tips on the floor on either side of the lead foot, then straighten the back leg.
Find your balance, square the hips to the floor, and drop the left knee back down on the mat. Flatten the top of your foot on the floor by untucking the toes, to stretch the front of the ankle and foot.
From here, shift the pelvis down and forward, and lengthen the core for a nice full body stretch. Keep your gaze forward.
Then bring your hands up on the right thigh, and gently reverse the the head, neck and shoulders back away from the front knee, to stretch and open up the front of the body.
Next, bring your hands behind your back, interlock your fingers, and move deeper into the stretch.
Finish the pose by reaching both arms up toward the sky angled slightly back with the head, neck and shoulders. If you can, lift the knee up and straighten the leg. Focus on lengthening the spine, and inhale.
To come out, exhale, and bring the arms back down.
Switch your legs to the opposite stance, this time with the left foot forward, and repeat all the steps.
Tips
In a standard lunge, it’s generally recommended to keep the front shin vertical, not allowing it to move forward over the toes, for the safety of the knee joint. However, keeping the back knee down in crescent moon pose diverts the weight load, allowing you to more carefully control and deepen the stretch by letting the knee move forward.
Use a folded blanket or something to cushion your knees if needed.
Place two yoga blocks on either side of the lead foot to elevate your hands if you find it difficult to reach your palms down to the floor. Although, you only need to bring your fingertips down.
Bring both on the inside of the front foot rather than on either side for a slight modification.
Avoid leaning your weight onto your knee. Instead let the pelvis and thigh bear most of the weight load. This will also help you to stay in the pose longer, which means faster benefits.
You could also begin the pose from a tall kneeling position and then step the right foot forward, rather than starting in mountain pose and stepping the left foot back into a lunge stance.
Bring awareness to lengthening the torso by drawing the tailbone down as you stretch upwards.
Close your eyes to challenge your balance
7 Benefits of Crescent Moon Pose
The best part of doing any exercise are the potential benefits that you can get from them. Otherwise, why would we do them? There are many worthwhile advantages of crescent moon pose including enhancing your performing under the sheets too!
Exposes the frontside
Modern technology/lifestyle habits are bad news for our bodies. Many people are minimally active and couple that with burying our heads in the latest entertainment everyday, and things start hurting!
You can help counter the negative effects of tech neck, and poor posture by stretching your body in the opposite direction. Aside from opening up the shoulders and chest, crescent moon stretches the stomach which is a source of stress and anxiety. Having a slouched posture also increases fatigue, so we want to avoid and undo this as much as possible.
Stretches the groin and hamstrings
The goal as with most poses is to find the best way to stretch certain muscles. Crescent moon pose does this from a low lunge stance, separating the legs and using the pelvis to intensify lengthening the under leg fibers and groin area. The obvious side effect of focused stretching is enabling full range of motion in the joints, and preventing injuries.
Strengthens the joints
Athletic activity and overall well-being are highly dependent on the health and mobility of your ankles, knees, and hips. Because if you sustain an injury to any of these joints, it could affect your ability to be on your feet. Unlike when a minor trauma occurs to the wrist elbow, or shoulder (You can still walk). So it’s important to train not just the muscles, but to strengthen our joints too with safe techniques.
May reinforce bedroom performance
While we’ll refrain from too many mischievous references here, you may have heard of “doing kegals” to help you last longer in the bedroom. Well, the idea is to strengthen the canopy-like muscles that form a “floor” at the lower pelvis. These muscles and tissues keep the reproductive organs in place, while also supporting their natural functions. A weak pelvic floor can disrupt your body’s natural ability to control bowels and bladder.
Conditions the body
When you perform intentional weight bearing exercises or poses like crescent moon, you’re maintaining the integrity of your muscles and joints, while also strengthening the bones too. Its a form of isometric resistance activity which is going to benefit people of all ages, especially the elderly population who are at greater risk of bone loss, and subsequent life threatening injuries.
Burns calories
Challenging your balance on the feet, recruiting the major leg muscles, and testing your flexibility seems like a decent recipe for burning calories. Which is what need to happen so you can start peeling off layers of body fat. Of course, you’ll need to combine crescent moon pose with higher intensity activities and adhere to calories in vs calories out model. But getting up and moving is a good way to combat weight gain, stress, and mobility issues.
Need a fat loss checklist? Here are the top 20 weight loss tips to achieve your ideal body.
Retains important skills
As our bodies age, we start to notice things that we didn’t in our youth, like pains, tightness in areas, involuntary cracking, and you get the point. It’s even more imperative to get more involved with healthy exercise routines to ensure everything stays up to maintenance. We can keep those fine movement skills, while giving the body the movement it needs.
Common Mistakes During Crescent Moon Pose
We can spot bad form right off the bad. Check to see if you’re making these form mistakes that will reduce the potency of crescent moon pose.
Not using a mat or cushion
A simple yoga mat may not be enough and anything less will certainly not suffice. If you’re trying to do this pose with minimal knee protection it’s going to be painful and less effective. So, we strongly encourage using a folded blanket or cushion of some type.
Keeping the rear thigh vertical
You won’t achieve much in the way of stretching (important part of crescent moon pose) if your back thigh is vertical, with the hip directly over the knee. You need to move the back knee away from the front foot so that you can achieve the best stretch.
Variations of Crescent Moon Pose
Try these similarly performed crescent moon pose variation to unlock some additional benefits.
Crescent moon hands to knee
As a progression, and to just simply stretch the hip flexors, and groin, stay in a tall half kneeling pose with your hands interlocked on the front thigh.
Crescent moon with yoga blocks
As mentioned in the tips section under the primary crescent moon video demonstration, set up two blocks on either side of the front foot to help you flatten your palms against a surface.
Crescent moon deep hamstring stretch
You’re only going to do one thing different for this variation. While you’re in a forward lunge with your hands on the floor and rear near to the floor, simply extend the front leg in front of you. This will place you in a better position to stretch the length of hamstrings.
Warrior I (Virabhadrasana I)
Warrior I represents the first of three poses based on the tale of a mythical warrior Virabhadra, sent to seek revenge for a family offense. It’s not complex like more advanced postures, but still carries many benefits on its shoulders!
Steps
Standing at the front of your mat in mountain pose, step the left foot behind you in a lunge stance.
Turn the back (left) foot slightly counterclockwise at a 45-degree angle to the lead foot.
Straighten your legs then try to make your hips parallel to the edge of the mat in front of you. You’ll need to push the left hip slight forward and bring the right hip slightly back. Grab your hips for support and guidance. Note: The hips won’t be perfectly square or parallel to the top of the mat and that’s perfectly normal.
Inhale, then as you breathe out, bend the front (right) knee and descend into a partial lunge. Lead with the hips. If you don’t feel much of a stretch, you may need to move the lead foot slightly forward.
Keep the back leg straight.
Lift the arms overhead, and focus on squeezing the legs toward each other, but don’t move the feet. Bring your gaze up. Take several deep breaths and hold for at least 20 seconds.
Bring the feet back together in the original starting stance. Then, switch the position of your legs, bringing the right foot back and leaving the left foot near the top of the mat.
Repeat steps 2-5!
Revolved side angle pose parivrtta parsvakonasana
Possessing many of the same benefits as crescent moon pose, parivrtta parsvakonasana puts a topspin on the lunge pose to activate the lateral muscles, and train you in an uncommon plane of movement. Give it a try with the provided instructions below!
Steps
Come into a wide lunge stance with the right foot forward, and left foot behind.
Extend the left arm and fingers toward the sky.
Spin the left shoulder inward toward to create length.
Bend the front (right) leg and slowly dip into a lunge, then bend the back knee and lower it down to the ground.
Tuck the tailbone in to round the lower back, then bring the left shoulder onto the outside of the right leg so the rear deltoid is against the front of the knee.
If possible, place your left hand on the floor to the outside of your right foot with fingers facing the same direction as your toes.
Straighten the back leg, and bring your left foot flat on the floor for stability. Press the right knee and left arm together.
Twist from the floor, and turn your upper body clockwise, while moving the head with it.
Now extend the right arm back behind your head, exposing your right armpit, with your hand open and palm facing down to the floor, and the outer hand angled slightly down. Keep the tailbone tucked.
Breath in, feeling length in the spine, and exhale, deepening the twist. Stay for roughly five breaths and maintain a strong technique, keeping the right leg and left shoulder solidly pressed together.
To repeat on the opposite side, fix your gaze on the floor for balance, stabilize the hips and pelvis, and press up from the legs.
Then in a fluid movement, turn your feet in the opposite direction, while moving the arms in a windmill motion until the left arm is down by your left side, and the right arm is extended overhead.
The you’ll repeat all of the prior steps to do the same thing on this side.
Wrapping Up
If you’re on the yoga journey make sure to get yourself involved with the crescent moon pose. For a novice pose it yields a high return of daily benefits that cannot be overstated. Besides the more obvious benefits, crescent moon teaches you to be detailed in your movements, and helps retain essential motor skills. Then when you’re ready for more, take it up a notch with more difficult variations.
A statuesque-like pose resembling that of Warrior I (But without the mythical backstory and a little more detailed), crescent moon pose is a half-kneeling, low lunge backbend that exposes the front side of the body. The pros to this type of pose? Counteract the stressful effects of bad postural habits, free up the posterior thigh muscles, and produce isometric strength gains in the lower body.
Let’s take a more in-depth look at this novice posture that punches above its weight class in terms of the benefits you can expect.
Muscles Worked During Crescent Moon Pose
It’s true that many yoga postures including the crescent moon pose stretch and strengthen muscles that you’ve probably never seen or heard of. Although you’ll certainly feel it working the larger more obvious body parts too.
Quads, hamstrings, glutes, and calves
Both a lower body strengthening and stretching exercise, the crescent moon pose is based on a stationary lunge and depends on static muscle tension in the thighs, butt, calves, and even the feet. When we bend and extend the hips, knees, and ankles, it’s these leg muscles that make it possible. Inversely, your joints and hip muscles benefit when you train the lower body.
Hip flexors
Crescent moon pose is similar to specific hip flexor stretch techniques. These muscles help bend the thigh at the hip, such as lifting the knee toward the chest. Psoas major and iliacus are the superstar hip flexors that everyone hears about because they play the biggest role in hip flexion along with rectus femoris thigh muscle.
Tight flexors can cause problems with your movement and can be caused by too much sitting or overuse during activities.
Core
Good luck trying to perform any meaningful activity without a solid core…. consisting of abs, obliques, back, hips, and pelvic floor, these muscles are like bodyguards for your spine and pelvis. Protecting and stabilizing these delicate yet crucial areas, your spine is guarded against excessive load, while your body can more efficiently transfer force from the upper and lower body.
How To Do Crescent Moon Pose
If you can nail the crescent moon pose technique you’ll see many of the benefits talked about in a later section in this guide. Make sure to follow along carefully and pay attention to the details as this posture is a weight bearing exercise. Therefore, we want you to maintain healthy joints while building strength and conditioning your body from head to toe.
Check out the step by step instructions and video example we provided below.
Steps
[*]Stand at the top of the mat in mountain pose.
[*]Inhale, then bring your left foot back and come into a deep split, or lunge stance. The front shin should be vertical, with the knee over the ankle. The heel should be directly above the ball of your foot.
[*]Slowly drop the left knee to the floor in a half kneeling position.
[*]Lean forward, place your hands or finger tips on the floor on either side of the lead foot, then straighten the back leg.
[*]Find your balance, square the hips to the floor, and drop the left knee back down on the mat. Flatten the top of your foot on the floor by untucking the toes, to stretch the front of the ankle and foot.
[*]From here, shift the pelvis down and forward, and lengthen the core for a nice full body stretch. Keep your gaze forward.
[*]Then bring your hands up on the right thigh, and gently reverse the the head, neck and shoulders back away from the front knee, to stretch and open up the front of the body.
[*]Next, bring your hands behind your back, interlock your fingers, and move deeper into the stretch.
[*]Finish the pose by reaching both arms up toward the sky angled slightly back with the head, neck and shoulders. If you can, lift the knee up and straighten the leg. Focus on lengthening the spine, and inhale.
[*]To come out, exhale, and bring the arms back down.
[*]Switch your legs to the opposite stance, this time with the left foot forward, and repeat all the steps.
Tips
The best part of doing any exercise are the potential benefits that you can get from them. Otherwise, why would we do them? There are many worthwhile advantages of crescent moon pose including enhancing your performing under the sheets too!
Exposes the frontside
Modern technology/lifestyle habits are bad news for our bodies. Many people are minimally active and couple that with burying our heads in the latest entertainment everyday, and things start hurting!
You can help counter the negative effects of tech neck, and poor posture by stretching your body in the opposite direction. Aside from opening up the shoulders and chest, crescent moon stretches the stomach which is a source of stress and anxiety. Having a slouched posture also increases fatigue, so we want to avoid and undo this as much as possible.
Stretches the groin and hamstrings
The goal as with most poses is to find the best way to stretch certain muscles. Crescent moon pose does this from a low lunge stance, separating the legs and using the pelvis to intensify lengthening the under leg fibers and groin area. The obvious side effect of focused stretching is enabling full range of motion in the joints, and preventing injuries.
Strengthens the joints
Athletic activity and overall well-being are highly dependent on the health and mobility of your ankles, knees, and hips. Because if you sustain an injury to any of these joints, it could affect your ability to be on your feet. Unlike when a minor trauma occurs to the wrist elbow, or shoulder (You can still walk). So it’s important to train not just the muscles, but to strengthen our joints too with safe techniques.
May reinforce bedroom performance
While we’ll refrain from too many mischievous references here, you may have heard of “doing kegals” to help you last longer in the bedroom. Well, the idea is to strengthen the canopy-like muscles that form a “floor” at the lower pelvis. These muscles and tissues keep the reproductive organs in place, while also supporting their natural functions. A weak pelvic floor can disrupt your body’s natural ability to control bowels and bladder.
Conditions the body
When you perform intentional weight bearing exercises or poses like crescent moon, you’re maintaining the integrity of your muscles and joints, while also strengthening the bones too. Its a form of isometric resistance activity which is going to benefit people of all ages, especially the elderly population who are at greater risk of bone loss, and subsequent life threatening injuries.
Burns calories
Challenging your balance on the feet, recruiting the major leg muscles, and testing your flexibility seems like a decent recipe for burning calories. Which is what need to happen so you can start peeling off layers of body fat. Of course, you’ll need to combine crescent moon pose with higher intensity activities and adhere to calories in vs calories out model. But getting up and moving is a good way to combat weight gain, stress, and mobility issues.
Need a fat loss checklist? Here are the top 20 weight loss tips to achieve your ideal body.
Retains important skills
As our bodies age, we start to notice things that we didn’t in our youth, like pains, tightness in areas, involuntary cracking, and you get the point. It’s even more imperative to get more involved with healthy exercise routines to ensure everything stays up to maintenance. We can keep those fine movement skills, while giving the body the movement it needs.
Common Mistakes During Crescent Moon Pose
We can spot bad form right off the bad. Check to see if you’re making these form mistakes that will reduce the potency of crescent moon pose.
Not using a mat or cushion
A simple yoga mat may not be enough and anything less will certainly not suffice. If you’re trying to do this pose with minimal knee protection it’s going to be painful and less effective. So, we strongly encourage using a folded blanket or cushion of some type.
Keeping the rear thigh vertical
You won’t achieve much in the way of stretching (important part of crescent moon pose) if your back thigh is vertical, with the hip directly over the knee. You need to move the back knee away from the front foot so that you can achieve the best stretch.
Variations of Crescent Moon Pose
Try these similarly performed crescent moon pose variation to unlock some additional benefits.
Crescent moon hands to knee
As a progression, and to just simply stretch the hip flexors, and groin, stay in a tall half kneeling pose with your hands interlocked on the front thigh.
Crescent moon with yoga blocks
As mentioned in the tips section under the primary crescent moon video demonstration, set up two blocks on either side of the front foot to help you flatten your palms against a surface.
Crescent moon deep hamstring stretch
You’re only going to do one thing different for this variation. While you’re in a forward lunge with your hands on the floor and rear near to the floor, simply extend the front leg in front of you. This will place you in a better position to stretch the length of hamstrings.
Warrior I (Virabhadrasana I)
Warrior I represents the first of three poses based on the tale of a mythical warrior Virabhadra, sent to seek revenge for a family offense. It’s not complex like more advanced postures, but still carries many benefits on its shoulders!
Steps
[*]Standing at the front of your mat in mountain pose, step the left foot behind you in a lunge stance.
[*]Turn the back (left) foot slightly counterclockwise at a 45-degree angle to the lead foot.
[*]Straighten your legs then try to make your hips parallel to the edge of the mat in front of you. You’ll need to push the left hip slight forward and bring the right hip slightly back. Grab your hips for support and guidance. Note: The hips won’t be perfectly square or parallel to the top of the mat and that’s perfectly normal.
[*]Inhale, then as you breathe out, bend the front (right) knee and descend into a partial lunge. Lead with the hips. If you don’t feel much of a stretch, you may need to move the lead foot slightly forward.
[*]Keep the back leg straight.
[*]Lift the arms overhead, and focus on squeezing the legs toward each other, but don’t move the feet. Bring your gaze up. Take several deep breaths and hold for at least 20 seconds.
[*]Bring the feet back together in the original starting stance. Then, switch the position of your legs, bringing the right foot back and leaving the left foot near the top of the mat.
[*]Repeat steps 2-5!
Revolved side angle pose parivrtta parsvakonasana
Possessing many of the same benefits as crescent moon pose, parivrtta parsvakonasana puts a topspin on the lunge pose to activate the lateral muscles, and train you in an uncommon plane of movement. Give it a try with the provided instructions below!
Steps
[*]Come into a wide lunge stance with the right foot forward, and left foot behind.
[*]Extend the left arm and fingers toward the sky.
[*]Spin the left shoulder inward toward to create length.
[*]Bend the front (right) leg and slowly dip into a lunge, then bend the back knee and lower it down to the ground.
[*]Tuck the tailbone in to round the lower back, then bring the left shoulder onto the outside of the right leg so the rear deltoid is against the front of the knee.
[*]If possible, place your left hand on the floor to the outside of your right foot with fingers facing the same direction as your toes.
[*]Straighten the back leg, and bring your left foot flat on the floor for stability. Press the right knee and left arm together.
[*]Twist from the floor, and turn your upper body clockwise, while moving the head with it.
[*]Now extend the right arm back behind your head, exposing your right armpit, with your hand open and palm facing down to the floor, and the outer hand angled slightly down. Keep the tailbone tucked.
[*]Breath in, feeling length in the spine, and exhale, deepening the twist. Stay for roughly five breaths and maintain a strong technique, keeping the right leg and left shoulder solidly pressed together.
[*]To repeat on the opposite side, fix your gaze on the floor for balance, stabilize the hips and pelvis, and press up from the legs.
[*]Then in a fluid movement, turn your feet in the opposite direction, while moving the arms in a windmill motion until the left arm is down by your left side, and the right arm is extended overhead.
[*]The you’ll repeat all of the prior steps to do the same thing on this side.
Wrapping Up
If you’re on the yoga journey make sure to get yourself involved with the crescent moon pose. For a novice pose it yields a high return of daily benefits that cannot be overstated. Besides the more obvious benefits, crescent moon teaches you to be detailed in your movements, and helps retain essential motor skills. Then when you’re ready for more, take it up a notch with more difficult variations.
Click here to view the article.
Let’s take a more in-depth look at this novice posture that punches above its weight class in terms of the benefits you can expect.
Muscles Worked During Crescent Moon Pose
It’s true that many yoga postures including the crescent moon pose stretch and strengthen muscles that you’ve probably never seen or heard of. Although you’ll certainly feel it working the larger more obvious body parts too.
Quads, hamstrings, glutes, and calves
Both a lower body strengthening and stretching exercise, the crescent moon pose is based on a stationary lunge and depends on static muscle tension in the thighs, butt, calves, and even the feet. When we bend and extend the hips, knees, and ankles, it’s these leg muscles that make it possible. Inversely, your joints and hip muscles benefit when you train the lower body.
Hip flexors
Crescent moon pose is similar to specific hip flexor stretch techniques. These muscles help bend the thigh at the hip, such as lifting the knee toward the chest. Psoas major and iliacus are the superstar hip flexors that everyone hears about because they play the biggest role in hip flexion along with rectus femoris thigh muscle.
Tight flexors can cause problems with your movement and can be caused by too much sitting or overuse during activities.
Core
Good luck trying to perform any meaningful activity without a solid core…. consisting of abs, obliques, back, hips, and pelvic floor, these muscles are like bodyguards for your spine and pelvis. Protecting and stabilizing these delicate yet crucial areas, your spine is guarded against excessive load, while your body can more efficiently transfer force from the upper and lower body.
How To Do Crescent Moon Pose
If you can nail the crescent moon pose technique you’ll see many of the benefits talked about in a later section in this guide. Make sure to follow along carefully and pay attention to the details as this posture is a weight bearing exercise. Therefore, we want you to maintain healthy joints while building strength and conditioning your body from head to toe.
Check out the step by step instructions and video example we provided below.
Steps
Stand at the top of the mat in mountain pose.
Inhale, then bring your left foot back and come into a deep split, or lunge stance. The front shin should be vertical, with the knee over the ankle. The heel should be directly above the ball of your foot.
Slowly drop the left knee to the floor in a half kneeling position.
Lean forward, place your hands or finger tips on the floor on either side of the lead foot, then straighten the back leg.
Find your balance, square the hips to the floor, and drop the left knee back down on the mat. Flatten the top of your foot on the floor by untucking the toes, to stretch the front of the ankle and foot.
From here, shift the pelvis down and forward, and lengthen the core for a nice full body stretch. Keep your gaze forward.
Then bring your hands up on the right thigh, and gently reverse the the head, neck and shoulders back away from the front knee, to stretch and open up the front of the body.
Next, bring your hands behind your back, interlock your fingers, and move deeper into the stretch.
Finish the pose by reaching both arms up toward the sky angled slightly back with the head, neck and shoulders. If you can, lift the knee up and straighten the leg. Focus on lengthening the spine, and inhale.
To come out, exhale, and bring the arms back down.
Switch your legs to the opposite stance, this time with the left foot forward, and repeat all the steps.
Tips
In a standard lunge, it’s generally recommended to keep the front shin vertical, not allowing it to move forward over the toes, for the safety of the knee joint. However, keeping the back knee down in crescent moon pose diverts the weight load, allowing you to more carefully control and deepen the stretch by letting the knee move forward.
Use a folded blanket or something to cushion your knees if needed.
Place two yoga blocks on either side of the lead foot to elevate your hands if you find it difficult to reach your palms down to the floor. Although, you only need to bring your fingertips down.
Bring both on the inside of the front foot rather than on either side for a slight modification.
Avoid leaning your weight onto your knee. Instead let the pelvis and thigh bear most of the weight load. This will also help you to stay in the pose longer, which means faster benefits.
You could also begin the pose from a tall kneeling position and then step the right foot forward, rather than starting in mountain pose and stepping the left foot back into a lunge stance.
Bring awareness to lengthening the torso by drawing the tailbone down as you stretch upwards.
Close your eyes to challenge your balance
7 Benefits of Crescent Moon Pose
The best part of doing any exercise are the potential benefits that you can get from them. Otherwise, why would we do them? There are many worthwhile advantages of crescent moon pose including enhancing your performing under the sheets too!
Exposes the frontside
Modern technology/lifestyle habits are bad news for our bodies. Many people are minimally active and couple that with burying our heads in the latest entertainment everyday, and things start hurting!
You can help counter the negative effects of tech neck, and poor posture by stretching your body in the opposite direction. Aside from opening up the shoulders and chest, crescent moon stretches the stomach which is a source of stress and anxiety. Having a slouched posture also increases fatigue, so we want to avoid and undo this as much as possible.
Stretches the groin and hamstrings
The goal as with most poses is to find the best way to stretch certain muscles. Crescent moon pose does this from a low lunge stance, separating the legs and using the pelvis to intensify lengthening the under leg fibers and groin area. The obvious side effect of focused stretching is enabling full range of motion in the joints, and preventing injuries.
Strengthens the joints
Athletic activity and overall well-being are highly dependent on the health and mobility of your ankles, knees, and hips. Because if you sustain an injury to any of these joints, it could affect your ability to be on your feet. Unlike when a minor trauma occurs to the wrist elbow, or shoulder (You can still walk). So it’s important to train not just the muscles, but to strengthen our joints too with safe techniques.
May reinforce bedroom performance
While we’ll refrain from too many mischievous references here, you may have heard of “doing kegals” to help you last longer in the bedroom. Well, the idea is to strengthen the canopy-like muscles that form a “floor” at the lower pelvis. These muscles and tissues keep the reproductive organs in place, while also supporting their natural functions. A weak pelvic floor can disrupt your body’s natural ability to control bowels and bladder.
Conditions the body
When you perform intentional weight bearing exercises or poses like crescent moon, you’re maintaining the integrity of your muscles and joints, while also strengthening the bones too. Its a form of isometric resistance activity which is going to benefit people of all ages, especially the elderly population who are at greater risk of bone loss, and subsequent life threatening injuries.
Burns calories
Challenging your balance on the feet, recruiting the major leg muscles, and testing your flexibility seems like a decent recipe for burning calories. Which is what need to happen so you can start peeling off layers of body fat. Of course, you’ll need to combine crescent moon pose with higher intensity activities and adhere to calories in vs calories out model. But getting up and moving is a good way to combat weight gain, stress, and mobility issues.
Need a fat loss checklist? Here are the top 20 weight loss tips to achieve your ideal body.
Retains important skills
As our bodies age, we start to notice things that we didn’t in our youth, like pains, tightness in areas, involuntary cracking, and you get the point. It’s even more imperative to get more involved with healthy exercise routines to ensure everything stays up to maintenance. We can keep those fine movement skills, while giving the body the movement it needs.
Common Mistakes During Crescent Moon Pose
We can spot bad form right off the bad. Check to see if you’re making these form mistakes that will reduce the potency of crescent moon pose.
Not using a mat or cushion
A simple yoga mat may not be enough and anything less will certainly not suffice. If you’re trying to do this pose with minimal knee protection it’s going to be painful and less effective. So, we strongly encourage using a folded blanket or cushion of some type.
Keeping the rear thigh vertical
You won’t achieve much in the way of stretching (important part of crescent moon pose) if your back thigh is vertical, with the hip directly over the knee. You need to move the back knee away from the front foot so that you can achieve the best stretch.
Variations of Crescent Moon Pose
Try these similarly performed crescent moon pose variation to unlock some additional benefits.
Crescent moon hands to knee
As a progression, and to just simply stretch the hip flexors, and groin, stay in a tall half kneeling pose with your hands interlocked on the front thigh.
Crescent moon with yoga blocks
As mentioned in the tips section under the primary crescent moon video demonstration, set up two blocks on either side of the front foot to help you flatten your palms against a surface.
Crescent moon deep hamstring stretch
You’re only going to do one thing different for this variation. While you’re in a forward lunge with your hands on the floor and rear near to the floor, simply extend the front leg in front of you. This will place you in a better position to stretch the length of hamstrings.
Warrior I (Virabhadrasana I)
Warrior I represents the first of three poses based on the tale of a mythical warrior Virabhadra, sent to seek revenge for a family offense. It’s not complex like more advanced postures, but still carries many benefits on its shoulders!
Steps
Standing at the front of your mat in mountain pose, step the left foot behind you in a lunge stance.
Turn the back (left) foot slightly counterclockwise at a 45-degree angle to the lead foot.
Straighten your legs then try to make your hips parallel to the edge of the mat in front of you. You’ll need to push the left hip slight forward and bring the right hip slightly back. Grab your hips for support and guidance. Note: The hips won’t be perfectly square or parallel to the top of the mat and that’s perfectly normal.
Inhale, then as you breathe out, bend the front (right) knee and descend into a partial lunge. Lead with the hips. If you don’t feel much of a stretch, you may need to move the lead foot slightly forward.
Keep the back leg straight.
Lift the arms overhead, and focus on squeezing the legs toward each other, but don’t move the feet. Bring your gaze up. Take several deep breaths and hold for at least 20 seconds.
Bring the feet back together in the original starting stance. Then, switch the position of your legs, bringing the right foot back and leaving the left foot near the top of the mat.
Repeat steps 2-5!
Revolved side angle pose parivrtta parsvakonasana
Possessing many of the same benefits as crescent moon pose, parivrtta parsvakonasana puts a topspin on the lunge pose to activate the lateral muscles, and train you in an uncommon plane of movement. Give it a try with the provided instructions below!
Steps
Come into a wide lunge stance with the right foot forward, and left foot behind.
Extend the left arm and fingers toward the sky.
Spin the left shoulder inward toward to create length.
Bend the front (right) leg and slowly dip into a lunge, then bend the back knee and lower it down to the ground.
Tuck the tailbone in to round the lower back, then bring the left shoulder onto the outside of the right leg so the rear deltoid is against the front of the knee.
If possible, place your left hand on the floor to the outside of your right foot with fingers facing the same direction as your toes.
Straighten the back leg, and bring your left foot flat on the floor for stability. Press the right knee and left arm together.
Twist from the floor, and turn your upper body clockwise, while moving the head with it.
Now extend the right arm back behind your head, exposing your right armpit, with your hand open and palm facing down to the floor, and the outer hand angled slightly down. Keep the tailbone tucked.
Breath in, feeling length in the spine, and exhale, deepening the twist. Stay for roughly five breaths and maintain a strong technique, keeping the right leg and left shoulder solidly pressed together.
To repeat on the opposite side, fix your gaze on the floor for balance, stabilize the hips and pelvis, and press up from the legs.
Then in a fluid movement, turn your feet in the opposite direction, while moving the arms in a windmill motion until the left arm is down by your left side, and the right arm is extended overhead.
The you’ll repeat all of the prior steps to do the same thing on this side.
Wrapping Up
If you’re on the yoga journey make sure to get yourself involved with the crescent moon pose. For a novice pose it yields a high return of daily benefits that cannot be overstated. Besides the more obvious benefits, crescent moon teaches you to be detailed in your movements, and helps retain essential motor skills. Then when you’re ready for more, take it up a notch with more difficult variations.
A statuesque-like pose resembling that of Warrior I (But without the mythical backstory and a little more detailed), crescent moon pose is a half-kneeling, low lunge backbend that exposes the front side of the body. The pros to this type of pose? Counteract the stressful effects of bad postural habits, free up the posterior thigh muscles, and produce isometric strength gains in the lower body.
Let’s take a more in-depth look at this novice posture that punches above its weight class in terms of the benefits you can expect.
Muscles Worked During Crescent Moon Pose
It’s true that many yoga postures including the crescent moon pose stretch and strengthen muscles that you’ve probably never seen or heard of. Although you’ll certainly feel it working the larger more obvious body parts too.
Quads, hamstrings, glutes, and calves
Both a lower body strengthening and stretching exercise, the crescent moon pose is based on a stationary lunge and depends on static muscle tension in the thighs, butt, calves, and even the feet. When we bend and extend the hips, knees, and ankles, it’s these leg muscles that make it possible. Inversely, your joints and hip muscles benefit when you train the lower body.
Hip flexors
Crescent moon pose is similar to specific hip flexor stretch techniques. These muscles help bend the thigh at the hip, such as lifting the knee toward the chest. Psoas major and iliacus are the superstar hip flexors that everyone hears about because they play the biggest role in hip flexion along with rectus femoris thigh muscle.
Tight flexors can cause problems with your movement and can be caused by too much sitting or overuse during activities.
Core
Good luck trying to perform any meaningful activity without a solid core…. consisting of abs, obliques, back, hips, and pelvic floor, these muscles are like bodyguards for your spine and pelvis. Protecting and stabilizing these delicate yet crucial areas, your spine is guarded against excessive load, while your body can more efficiently transfer force from the upper and lower body.
How To Do Crescent Moon Pose
If you can nail the crescent moon pose technique you’ll see many of the benefits talked about in a later section in this guide. Make sure to follow along carefully and pay attention to the details as this posture is a weight bearing exercise. Therefore, we want you to maintain healthy joints while building strength and conditioning your body from head to toe.
Check out the step by step instructions and video example we provided below.
Steps
[*]Stand at the top of the mat in mountain pose.
[*]Inhale, then bring your left foot back and come into a deep split, or lunge stance. The front shin should be vertical, with the knee over the ankle. The heel should be directly above the ball of your foot.
[*]Slowly drop the left knee to the floor in a half kneeling position.
[*]Lean forward, place your hands or finger tips on the floor on either side of the lead foot, then straighten the back leg.
[*]Find your balance, square the hips to the floor, and drop the left knee back down on the mat. Flatten the top of your foot on the floor by untucking the toes, to stretch the front of the ankle and foot.
[*]From here, shift the pelvis down and forward, and lengthen the core for a nice full body stretch. Keep your gaze forward.
[*]Then bring your hands up on the right thigh, and gently reverse the the head, neck and shoulders back away from the front knee, to stretch and open up the front of the body.
[*]Next, bring your hands behind your back, interlock your fingers, and move deeper into the stretch.
[*]Finish the pose by reaching both arms up toward the sky angled slightly back with the head, neck and shoulders. If you can, lift the knee up and straighten the leg. Focus on lengthening the spine, and inhale.
[*]To come out, exhale, and bring the arms back down.
[*]Switch your legs to the opposite stance, this time with the left foot forward, and repeat all the steps.
Tips
- In a standard lunge, it’s generally recommended to keep the front shin vertical, not allowing it to move forward over the toes, for the safety of the knee joint. However, keeping the back knee down in crescent moon pose diverts the weight load, allowing you to more carefully control and deepen the stretch by letting the knee move forward.
- Use a folded blanket or something to cushion your knees if needed.
- Place two yoga blocks on either side of the lead foot to elevate your hands if you find it difficult to reach your palms down to the floor. Although, you only need to bring your fingertips down.
- Bring both on the inside of the front foot rather than on either side for a slight modification.
- Avoid leaning your weight onto your knee. Instead let the pelvis and thigh bear most of the weight load. This will also help you to stay in the pose longer, which means faster benefits.
- You could also begin the pose from a tall kneeling position and then step the right foot forward, rather than starting in mountain pose and stepping the left foot back into a lunge stance.
- Bring awareness to lengthening the torso by drawing the tailbone down as you stretch upwards.
- Close your eyes to challenge your balance
The best part of doing any exercise are the potential benefits that you can get from them. Otherwise, why would we do them? There are many worthwhile advantages of crescent moon pose including enhancing your performing under the sheets too!
Exposes the frontside
Modern technology/lifestyle habits are bad news for our bodies. Many people are minimally active and couple that with burying our heads in the latest entertainment everyday, and things start hurting!
You can help counter the negative effects of tech neck, and poor posture by stretching your body in the opposite direction. Aside from opening up the shoulders and chest, crescent moon stretches the stomach which is a source of stress and anxiety. Having a slouched posture also increases fatigue, so we want to avoid and undo this as much as possible.
Stretches the groin and hamstrings
The goal as with most poses is to find the best way to stretch certain muscles. Crescent moon pose does this from a low lunge stance, separating the legs and using the pelvis to intensify lengthening the under leg fibers and groin area. The obvious side effect of focused stretching is enabling full range of motion in the joints, and preventing injuries.
Strengthens the joints
Athletic activity and overall well-being are highly dependent on the health and mobility of your ankles, knees, and hips. Because if you sustain an injury to any of these joints, it could affect your ability to be on your feet. Unlike when a minor trauma occurs to the wrist elbow, or shoulder (You can still walk). So it’s important to train not just the muscles, but to strengthen our joints too with safe techniques.
May reinforce bedroom performance
While we’ll refrain from too many mischievous references here, you may have heard of “doing kegals” to help you last longer in the bedroom. Well, the idea is to strengthen the canopy-like muscles that form a “floor” at the lower pelvis. These muscles and tissues keep the reproductive organs in place, while also supporting their natural functions. A weak pelvic floor can disrupt your body’s natural ability to control bowels and bladder.
Conditions the body
When you perform intentional weight bearing exercises or poses like crescent moon, you’re maintaining the integrity of your muscles and joints, while also strengthening the bones too. Its a form of isometric resistance activity which is going to benefit people of all ages, especially the elderly population who are at greater risk of bone loss, and subsequent life threatening injuries.
Burns calories
Challenging your balance on the feet, recruiting the major leg muscles, and testing your flexibility seems like a decent recipe for burning calories. Which is what need to happen so you can start peeling off layers of body fat. Of course, you’ll need to combine crescent moon pose with higher intensity activities and adhere to calories in vs calories out model. But getting up and moving is a good way to combat weight gain, stress, and mobility issues.
Need a fat loss checklist? Here are the top 20 weight loss tips to achieve your ideal body.
Retains important skills
As our bodies age, we start to notice things that we didn’t in our youth, like pains, tightness in areas, involuntary cracking, and you get the point. It’s even more imperative to get more involved with healthy exercise routines to ensure everything stays up to maintenance. We can keep those fine movement skills, while giving the body the movement it needs.
Common Mistakes During Crescent Moon Pose
We can spot bad form right off the bad. Check to see if you’re making these form mistakes that will reduce the potency of crescent moon pose.
Not using a mat or cushion
A simple yoga mat may not be enough and anything less will certainly not suffice. If you’re trying to do this pose with minimal knee protection it’s going to be painful and less effective. So, we strongly encourage using a folded blanket or cushion of some type.
Keeping the rear thigh vertical
You won’t achieve much in the way of stretching (important part of crescent moon pose) if your back thigh is vertical, with the hip directly over the knee. You need to move the back knee away from the front foot so that you can achieve the best stretch.
Variations of Crescent Moon Pose
Try these similarly performed crescent moon pose variation to unlock some additional benefits.
Crescent moon hands to knee
As a progression, and to just simply stretch the hip flexors, and groin, stay in a tall half kneeling pose with your hands interlocked on the front thigh.
Crescent moon with yoga blocks
As mentioned in the tips section under the primary crescent moon video demonstration, set up two blocks on either side of the front foot to help you flatten your palms against a surface.
Crescent moon deep hamstring stretch
You’re only going to do one thing different for this variation. While you’re in a forward lunge with your hands on the floor and rear near to the floor, simply extend the front leg in front of you. This will place you in a better position to stretch the length of hamstrings.
Warrior I (Virabhadrasana I)
Warrior I represents the first of three poses based on the tale of a mythical warrior Virabhadra, sent to seek revenge for a family offense. It’s not complex like more advanced postures, but still carries many benefits on its shoulders!
Steps
[*]Standing at the front of your mat in mountain pose, step the left foot behind you in a lunge stance.
[*]Turn the back (left) foot slightly counterclockwise at a 45-degree angle to the lead foot.
[*]Straighten your legs then try to make your hips parallel to the edge of the mat in front of you. You’ll need to push the left hip slight forward and bring the right hip slightly back. Grab your hips for support and guidance. Note: The hips won’t be perfectly square or parallel to the top of the mat and that’s perfectly normal.
[*]Inhale, then as you breathe out, bend the front (right) knee and descend into a partial lunge. Lead with the hips. If you don’t feel much of a stretch, you may need to move the lead foot slightly forward.
[*]Keep the back leg straight.
[*]Lift the arms overhead, and focus on squeezing the legs toward each other, but don’t move the feet. Bring your gaze up. Take several deep breaths and hold for at least 20 seconds.
[*]Bring the feet back together in the original starting stance. Then, switch the position of your legs, bringing the right foot back and leaving the left foot near the top of the mat.
[*]Repeat steps 2-5!
Revolved side angle pose parivrtta parsvakonasana
Possessing many of the same benefits as crescent moon pose, parivrtta parsvakonasana puts a topspin on the lunge pose to activate the lateral muscles, and train you in an uncommon plane of movement. Give it a try with the provided instructions below!
Steps
[*]Come into a wide lunge stance with the right foot forward, and left foot behind.
[*]Extend the left arm and fingers toward the sky.
[*]Spin the left shoulder inward toward to create length.
[*]Bend the front (right) leg and slowly dip into a lunge, then bend the back knee and lower it down to the ground.
[*]Tuck the tailbone in to round the lower back, then bring the left shoulder onto the outside of the right leg so the rear deltoid is against the front of the knee.
[*]If possible, place your left hand on the floor to the outside of your right foot with fingers facing the same direction as your toes.
[*]Straighten the back leg, and bring your left foot flat on the floor for stability. Press the right knee and left arm together.
[*]Twist from the floor, and turn your upper body clockwise, while moving the head with it.
[*]Now extend the right arm back behind your head, exposing your right armpit, with your hand open and palm facing down to the floor, and the outer hand angled slightly down. Keep the tailbone tucked.
[*]Breath in, feeling length in the spine, and exhale, deepening the twist. Stay for roughly five breaths and maintain a strong technique, keeping the right leg and left shoulder solidly pressed together.
[*]To repeat on the opposite side, fix your gaze on the floor for balance, stabilize the hips and pelvis, and press up from the legs.
[*]Then in a fluid movement, turn your feet in the opposite direction, while moving the arms in a windmill motion until the left arm is down by your left side, and the right arm is extended overhead.
[*]The you’ll repeat all of the prior steps to do the same thing on this side.
Wrapping Up
If you’re on the yoga journey make sure to get yourself involved with the crescent moon pose. For a novice pose it yields a high return of daily benefits that cannot be overstated. Besides the more obvious benefits, crescent moon teaches you to be detailed in your movements, and helps retain essential motor skills. Then when you’re ready for more, take it up a notch with more difficult variations.
Click here to view the article.