


Muscle Insider
New member
While the names of some yoga poses are not as straightforward, triangle pose trikonasana is quite obvious. In the final stage of this closed hip posture, you can see how the body forms three triangular shapes. What you see is a product of the sanskrit meaning of “trikona”, meaning triangle.
Intended to stretch, strengthen, energize, and balance the body, triangle pose is a must-have posture, and one of the first that you’ll be introduced to in your yoga journey. Also being a lateral posture, you’re going to learn and experience movement in a plane of motion that most people neglect.
Triangle pose is both challenging, but a good learning posture, as you need to focus on keeping the hips still as the torso flexes to the side. If you’re ready to practice the triangle, grab and yoga block, and use this guide to master the execution of this staple posture.
Muscles Worked During Triangle Pose Trikonasana
Triangle pose is a total body exercise that starts from the feet and moves all the way up to the finger tips, involving so many muscles groups. Here are short descriptions of the muscles you can expect to improve during this stance.
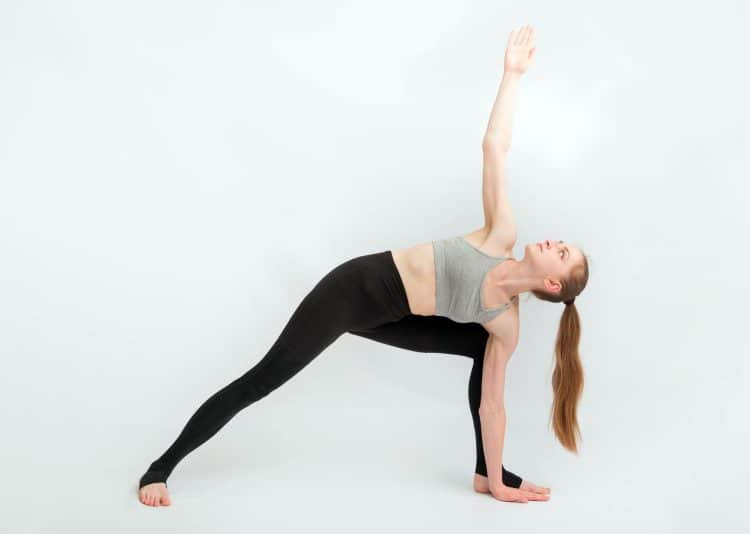
Triangle Pose
Thighs and glutes
From stretching and activating the three rear-facing hamstring heads on the thighs to isometrically engaging the quads and recruiting the butt muscles, the triangle pose, is a lengthening and strengthening pose.
Core
The muscles in your middle body like the abdominals (sexy six pack muscles), the deeper abdominals, and obliques allow the bending, torso control, and twisting or rotational movement. Then you have the muscles that accompany the spine which play a big role in movement of your trunk in various directions.
You may look at the rotation involved in a triangle pose and imagine it so be easy, and it is when you don’t have to combine it with the specific position of the rest of your body. So you definitely need trunk mobility to do this exercise.
Shoulders
Requiring shoulder mobility to both support your weight with the bottom arm, and hold the top arm extended toward the sky, your deltoids, or shoulders benefit too.
How To Do The Triangle Pose
In the video demonstration below you’ll how to perform triangle pose, but also what not to do. We’ve also included a common mistakes section below for more detailed descriptions of bad habits to avoid in this pose.
Steps
Come into a wide stance, with your right foot pointing forward to the top of the mat, and the back foot turned inward to the left at a roughly 45-degree angle as shown in the video.
Keeping your legs straight, reach your right arm down and place your hand on the floor just outside the ankle. If you cannot, use a yoga block to rest your hand on.
Now rotate your chest to the left and extend your left arm straight up toward the sky. If done correctly, the both arms and wrists should form a straight line. Then just focus on enhancing the trunk rotation as you lift the chest. Actively engage the inner thighs by pulling them up and inward toward each other.
Come out of the pose by shifting back onto the rear foot, and lift up, changing the position of the arms, and transitioning to the same pose in the opposite direction.
Pro tip: A yoga block is a handy and very useful yoga training tool, especially during standing bend variations.
Watch the short video tutorial below to see the triangle pose.
Tip: Adjust your feet according to comfort, however, still keep the feet in opposite direction to keep the hips open.
Tips and more detailed instructions
Triangle pose may seem as though there’s not much too it. But there are many little intricacies or steps involved in the technique. If you need more detailed tips, tricks and instruction, check out the following written steps, and a short 3-minute video example below!
Start in a wide stance with the feet forward, and place your hands on your hips.
Squeeze your leg muscles, tense the core, and imagine pulling the spine straight up, not leaning back or forward.
Lift and externally rotate the right foot 90 degrees from the back foot without shifting your hips to the side.
Slide the hands up tp the ribs and inhale, feeling the midsection expand. Then exhale, focusing on moving the breath and torso upward.
Lean over sideways to the right foot, using your hands to help guide you in proper alignment. As you come down, it will likely feel more challenging to bring your hand to the floor. In this case, set up a yoga block to decrease the distance, and place your hand on it.
Push down into the block, with the other hand resting on your ribcage, arch your spine up in a rainbow shape, and keep your head and neck relaxed.
Move the hand from the ribcage and place the palm flat against the chest.
Rotate the head, neck, and collarbone up and draw your gaze in the same direction.
Then bring the hand from the chest into fully extended toward the ceiling.
To come out bring the arm to the hip, look down at the floor, bend the front knee slightly and push down as you stand up.
Hold your arms out like a bird, make your feet parallel, overlap one hand on the other, bend your knees, and either step or lightly hop the feet together.
Don’t forget to repeat for the opposite side.
This Exercise
Target muscle groups: Legs, glutes, hips, core, shoulders
Type: Yoga
Equipment: Mat, block
Difficulty: Beginner/Intermediate
Benefits of Triangle Pose
Incorporating various aspects of movement, the reward of these great poses is always more than the time and effort required. Here are the benefits of the triangle pose.
Train your functional abilities
Regardless of your age, it’s always good to maintain your physical abilities (e.g., balance, coordination, body awareness, multi-plane movement) but especially as you get older when these skills begin to decline, increasing risk of injuries, and decreasing quality of life. The body needs regular maintenance like anything that you expect to be there when you need it to.
We like that triangle pose forces you to consciously be aware of your body’s alignment, while having to focus on engaging your lower and upper body.
Stretching has numerous benefits
In grade school your gym class instructors probably didn’t explain the full benefits of stretching. However, it goes beyond just increasing flexibility.
In fact, it’s so beneficial, that people who stretch often experience immediate stress relief, due to undoing tension from tight muscles caused by under or overuse, injuries, or even mental stress, which makes us tense up without realizing it. This, in turn, could mean better sleep as you’ll feel more relaxed, as well as due to increased blood flow and circulation.
And, of course, if you want to perform your best in sports, training, etc, and avoid injuries during your favorite activities, then you need to stretch so your joints can move properly and your muscles can contract and lengthen to give you optimal strength, and ability.
Can relax your mind
Putting your electronics away and consciously focusing your efforts on doing something good for your body is a must in this day and age. With all the pressures, stresses, and artificial exposure, we really need to be thinking more about our health.
Getting in these beneficial poses that get us up off our butts (also wakes up our sleepy butt muscles) keeps our engines (body and mind) active and our juices flowing to support mental productivity, and physical longevity.
Common Mistakes During Triangle Pose
Here are the things to avoid in the triangle pose technique.
Your feet should be the same as half moon, and not like warrior, with the lead foot pointing to the top end of the mat, while the rear toes should face the left if you’re facing left, or the right, if your body is turned toward the right side of the mat.
The reason being is triangle pose is an open hip posture, and turning the feet inward closes the hip, like you’d do for warrior pose.
“Hip bumping”
The common hip bump cue doesn’t seem allow for the most efficiency when performing triangle pose. It places a lot of pressure on the hamstrings, and pinches the hips. Instead, follow the second video instructional provided under the “How to do triangle pose” section.
Not forming triangles
Too often will people attempt a pose with no technique, slopping over, placing their hands anywhere, bending the elbows, collapsing, and yeah, you get the point. Well, you won’t get the benefits this way, and you could actually do more harm by twisting the body in dangerous angles, and putting a lot of pressure on certain areas. Instead, keep everything strong, and follow the video demonstration above.
Variations Of Triangle Pose
The following poses are the most common triangle pose variations that vary in difficulty.
Extended triangle pose (utthita trikonasana)
The extended triangle pose keeps you here for a longer duration to really stretch and loosen the muscle fibers so essential in many yoga postures.
Steps
With your feet together, turn the right foot to the right side of the mat, and rotate the left foot only slightly to the right.
Inhale, then breath out, and bend toward the right foot from the hips and grab your right big toe with your right hand. Reach the left arm up vertical. Slowly gaze up at the left hand, and stay there as you take 4-6 slow and deep breaths.
Inhale, press the back heel into the floor, and come back into a standing position.
Now repeat to the left side, changing foot position to the opposite of the right side.
Bound triangle pose (baddha trikonasana)
You’ll surely get wrapped up in this pose, putting your flexibility to the test. It’s harder than the extended triangle stance, and a good way to challenge yourself. You should feel a strong link and connection, as one arm ties into the other, creating a solid lock.
Steps
Stand with your about shoulder width and half distance apart.
Turn the right foot so the toes point to the top of the mat, and keep the back foot at a 45-degree angle toward your left side.
Extend the arms out sideways like a bird, then breath in, exhale, and bend down laterally at the hips. Bring the right fingers to the inner middle part of the right foot. Keep the left arm straight up toward the ceiling.
Now move the left arm behind your back and place your left hand on the top of your right thigh. Lift the chest up toward the ceiling, and keep your gaze upward.
Inhale, then as you exhale, move deeper into the pose, and bring the right arm underneath and behind the right leg.
Clasp your right and left fingers together, turn the chest up, and gaze over the left shoulder.
Revolved triangle pose (parivrtta trikonasana)
A big benefit of these rotational poses is that they really open up the body to help improve mobility, flexibility, and circulation to areas that may not normally benefit from deep stretches.
Steps
Assume a similar stance to trikonasana poses with the right lead foot pointed to the back of the mat, and the back foot facing left, and slightly inward at a 45-degree angle.
Reach the left arm up to the sky, then square the hips toward the right foot.
Stretch your left arm forward while turning toward the right foot, and bring the left hand down on the floor to the right side of your right foot. Tip: Use a yoga block if you cannot reach all the way down to the floor.
Now shift your weight onto the back foot, and drop the left side of the hip down as you reach the right arm to the sky, and pull the shoulders back. Draw your gaze up to the right thumb. Tip: Use the left hand on the floor to help pull the left shoulder underneath for more rotation.
Stay for five deep breaths.
To come out, rotate your chest toward the floor.
Now from here, lift the left arm up while bringing the right arm down in a sort of windmill motion. Try to transition into an opposite side stance by changing the direction of your feet.
Then perform the same steps but now for the opposite side.
To leave the pose, inhale, come up with the arms held straight out to your sides, then exhale, and finish by turning to the top of the mat and bring the feet together.
Follow the video tutorial below to see this pose in action!
Half Moon Pose
Now that you’re cool with the triangle pose, we think you should give the half moon a try! Also called chandrasana, this posture adds more glute medius, and throws in the element of balance, as you have to lift the back leg.
Steps
Come into a front forward leaning lunge with the right foot in front, pointing straight forward, and back foot turned outward to the left.
Reach the left arm behind you and grab the back of the left leg/hip.
Reach the right arm to the floor and lean onto your finger tips, with the hand directly under the shoulder.
Rise up onto the front leg, and lift the rear leg up parallel to the floor. The lifted foot should be pointed to the left with the feet flexed by pulling the toes up toward the shin.
Root down into the floor with the standing leg by pressing with the four corners of your feet, and extend the bottom leg.
While looking down at the floor, extend the top arm vertical with the fingers pointing straight up toward the sky.
Now you can adjust your gaze to the side or look up at the top hand to challenge your balance further.
You’ll then perform the same technique but on the opposite leg.
FAQs
Is triangle pose safe? The triangle pose is safe for people who actively practice yoga, and are free from major or bothersome bodily injuries or limitations. We advise against practicing trikonasana if you have back or hips issues especially.
Wrapping Up
This yoga training guide should arm you with all the tips and tricks for performing an efficient triangle pose. The key to a good trikonasana technique is getting that lateral flexion without bumping the hips out to get down. Rather, utilize a yoga block, and do it the right way, developing patience as you learn proper movement mechanics and body posture to achieve a variety of poses.
While the names of some yoga poses are not as straightforward, triangle pose trikonasana is quite obvious. In the final stage of this closed hip posture, you can see how the body forms three triangular shapes. What you see is a product of the sanskrit meaning of “trikona”, meaning triangle.
Intended to stretch, strengthen, energize, and balance the body, triangle pose is a must-have posture, and one of the first that you’ll be introduced to in your yoga journey. Also being a lateral posture, you’re going to learn and experience movement in a plane of motion that most people neglect.
Triangle pose is both challenging, but a good learning posture, as you need to focus on keeping the hips still as the torso flexes to the side. If you’re ready to practice the triangle, grab and yoga block, and use this guide to master the execution of this staple posture.
Muscles Worked During Triangle Pose Trikonasana
Triangle pose is a total body exercise that starts from the feet and moves all the way up to the finger tips, involving so many muscles groups. Here are short descriptions of the muscles you can expect to improve during this stance.
 Triangle Pose
Thighs and glutes
From stretching and activating the three rear-facing hamstring heads on the thighs to isometrically engaging the quads and recruiting the butt muscles, the triangle pose, is a lengthening and strengthening pose.
Core
The muscles in your middle body like the abdominals (sexy six pack muscles), the deeper abdominals, and obliques allow the bending, torso control, and twisting or rotational movement. Then you have the muscles that accompany the spine which play a big role in movement of your trunk in various directions.
You may look at the rotation involved in a triangle pose and imagine it so be easy, and it is when you don’t have to combine it with the specific position of the rest of your body. So you definitely need trunk mobility to do this exercise.
Shoulders
Requiring shoulder mobility to both support your weight with the bottom arm, and hold the top arm extended toward the sky, your deltoids, or shoulders benefit too.
How To Do The Triangle Pose
In the video demonstration below you’ll how to perform triangle pose, but also what not to do. We’ve also included a common mistakes section below for more detailed descriptions of bad habits to avoid in this pose.
Steps
[*]Come into a wide stance, with your right foot pointing forward to the top of the mat, and the back foot turned inward to the left at a roughly 45-degree angle as shown in the video.
[*]Keeping your legs straight, reach your right arm down and place your hand on the floor just outside the ankle. If you cannot, use a yoga block to rest your hand on.
[*]Now rotate your chest to the left and extend your left arm straight up toward the sky. If done correctly, the both arms and wrists should form a straight line. Then just focus on enhancing the trunk rotation as you lift the chest. Actively engage the inner thighs by pulling them up and inward toward each other.
[*]Come out of the pose by shifting back onto the rear foot, and lift up, changing the position of the arms, and transitioning to the same pose in the opposite direction.
Pro tip: A yoga block is a handy and very useful yoga training tool, especially during standing bend variations.
Watch the short video tutorial below to see the triangle pose.
Tip: Adjust your feet according to comfort, however, still keep the feet in opposite direction to keep the hips open.
Tips and more detailed instructions
Triangle pose may seem as though there’s not much too it. But there are many little intricacies or steps involved in the technique. If you need more detailed tips, tricks and instruction, check out the following written steps, and a short 3-minute video example below!
[*]Start in a wide stance with the feet forward, and place your hands on your hips.
[*]Squeeze your leg muscles, tense the core, and imagine pulling the spine straight up, not leaning back or forward.
[*]Lift and externally rotate the right foot 90 degrees from the back foot without shifting your hips to the side.
[*]Slide the hands up tp the ribs and inhale, feeling the midsection expand. Then exhale, focusing on moving the breath and torso upward.
[*]Lean over sideways to the right foot, using your hands to help guide you in proper alignment. As you come down, it will likely feel more challenging to bring your hand to the floor. In this case, set up a yoga block to decrease the distance, and place your hand on it.
[*]Push down into the block, with the other hand resting on your ribcage, arch your spine up in a rainbow shape, and keep your head and neck relaxed.
[*]Move the hand from the ribcage and place the palm flat against the chest.
[*]Rotate the head, neck, and collarbone up and draw your gaze in the same direction.
[*]Then bring the hand from the chest into fully extended toward the ceiling.
[*]To come out bring the arm to the hip, look down at the floor, bend the front knee slightly and push down as you stand up.
[*]Hold your arms out like a bird, make your feet parallel, overlap one hand on the other, bend your knees, and either step or lightly hop the feet together.
[*]Don’t forget to repeat for the opposite side.
This Exercise
Incorporating various aspects of movement, the reward of these great poses is always more than the time and effort required. Here are the benefits of the triangle pose.
Train your functional abilities
Regardless of your age, it’s always good to maintain your physical abilities (e.g., balance, coordination, body awareness, multi-plane movement) but especially as you get older when these skills begin to decline, increasing risk of injuries, and decreasing quality of life. The body needs regular maintenance like anything that you expect to be there when you need it to.
We like that triangle pose forces you to consciously be aware of your body’s alignment, while having to focus on engaging your lower and upper body.
Stretching has numerous benefits
In grade school your gym class instructors probably didn’t explain the full benefits of stretching. However, it goes beyond just increasing flexibility.
In fact, it’s so beneficial, that people who stretch often experience immediate stress relief, due to undoing tension from tight muscles caused by under or overuse, injuries, or even mental stress, which makes us tense up without realizing it. This, in turn, could mean better sleep as you’ll feel more relaxed, as well as due to increased blood flow and circulation.
And, of course, if you want to perform your best in sports, training, etc, and avoid injuries during your favorite activities, then you need to stretch so your joints can move properly and your muscles can contract and lengthen to give you optimal strength, and ability.
Can relax your mind
Putting your electronics away and consciously focusing your efforts on doing something good for your body is a must in this day and age. With all the pressures, stresses, and artificial exposure, we really need to be thinking more about our health.
Getting in these beneficial poses that get us up off our butts (also wakes up our sleepy butt muscles) keeps our engines (body and mind) active and our juices flowing to support mental productivity, and physical longevity.
Common Mistakes During Triangle Pose
Here are the things to avoid in the triangle pose technique.
Your feet should be the same as half moon, and not like warrior, with the lead foot pointing to the top end of the mat, while the rear toes should face the left if you’re facing left, or the right, if your body is turned toward the right side of the mat.
The reason being is triangle pose is an open hip posture, and turning the feet inward closes the hip, like you’d do for warrior pose.
“Hip bumping”
The common hip bump cue doesn’t seem allow for the most efficiency when performing triangle pose. It places a lot of pressure on the hamstrings, and pinches the hips. Instead, follow the second video instructional provided under the “How to do triangle pose” section.
Not forming triangles
Too often will people attempt a pose with no technique, slopping over, placing their hands anywhere, bending the elbows, collapsing, and yeah, you get the point. Well, you won’t get the benefits this way, and you could actually do more harm by twisting the body in dangerous angles, and putting a lot of pressure on certain areas. Instead, keep everything strong, and follow the video demonstration above.
Variations Of Triangle Pose
The following poses are the most common triangle pose variations that vary in difficulty.
Extended triangle pose (utthita trikonasana)
The extended triangle pose keeps you here for a longer duration to really stretch and loosen the muscle fibers so essential in many yoga postures.
Steps
[*]With your feet together, turn the right foot to the right side of the mat, and rotate the left foot only slightly to the right.
[*]Inhale, then breath out, and bend toward the right foot from the hips and grab your right big toe with your right hand. Reach the left arm up vertical. Slowly gaze up at the left hand, and stay there as you take 4-6 slow and deep breaths.
[*]Inhale, press the back heel into the floor, and come back into a standing position.
[*]Now repeat to the left side, changing foot position to the opposite of the right side.
Bound triangle pose (baddha trikonasana)
You’ll surely get wrapped up in this pose, putting your flexibility to the test. It’s harder than the extended triangle stance, and a good way to challenge yourself. You should feel a strong link and connection, as one arm ties into the other, creating a solid lock.
Steps
[*]Stand with your about shoulder width and half distance apart.
[*]Turn the right foot so the toes point to the top of the mat, and keep the back foot at a 45-degree angle toward your left side.
[*]Extend the arms out sideways like a bird, then breath in, exhale, and bend down laterally at the hips. Bring the right fingers to the inner middle part of the right foot. Keep the left arm straight up toward the ceiling.
[*]Now move the left arm behind your back and place your left hand on the top of your right thigh. Lift the chest up toward the ceiling, and keep your gaze upward.
[*]Inhale, then as you exhale, move deeper into the pose, and bring the right arm underneath and behind the right leg.
[*]Clasp your right and left fingers together, turn the chest up, and gaze over the left shoulder.
Revolved triangle pose (parivrtta trikonasana)
A big benefit of these rotational poses is that they really open up the body to help improve mobility, flexibility, and circulation to areas that may not normally benefit from deep stretches.
Steps
[*]Assume a similar stance to trikonasana poses with the right lead foot pointed to the back of the mat, and the back foot facing left, and slightly inward at a 45-degree angle.
[*]Reach the left arm up to the sky, then square the hips toward the right foot.
[*]Stretch your left arm forward while turning toward the right foot, and bring the left hand down on the floor to the right side of your right foot. Tip: Use a yoga block if you cannot reach all the way down to the floor.
[*]Now shift your weight onto the back foot, and drop the left side of the hip down as you reach the right arm to the sky, and pull the shoulders back. Draw your gaze up to the right thumb. Tip: Use the left hand on the floor to help pull the left shoulder underneath for more rotation.
[*]Stay for five deep breaths.
[*]To come out, rotate your chest toward the floor.
[*]Now from here, lift the left arm up while bringing the right arm down in a sort of windmill motion. Try to transition into an opposite side stance by changing the direction of your feet.
[*]Then perform the same steps but now for the opposite side.
[*]To leave the pose, inhale, come up with the arms held straight out to your sides, then exhale, and finish by turning to the top of the mat and bring the feet together.
Follow the video tutorial below to see this pose in action!
Half Moon Pose
Now that you’re cool with the triangle pose, we think you should give the half moon a try! Also called chandrasana, this posture adds more glute medius, and throws in the element of balance, as you have to lift the back leg.
Steps
[*]Come into a front forward leaning lunge with the right foot in front, pointing straight forward, and back foot turned outward to the left.
[*]Reach the left arm behind you and grab the back of the left leg/hip.
[*]Reach the right arm to the floor and lean onto your finger tips, with the hand directly under the shoulder.
[*]Rise up onto the front leg, and lift the rear leg up parallel to the floor. The lifted foot should be pointed to the left with the feet flexed by pulling the toes up toward the shin.
[*]Root down into the floor with the standing leg by pressing with the four corners of your feet, and extend the bottom leg.
[*]While looking down at the floor, extend the top arm vertical with the fingers pointing straight up toward the sky.
[*]Now you can adjust your gaze to the side or look up at the top hand to challenge your balance further.
[*]You’ll then perform the same technique but on the opposite leg.
FAQs
Is triangle pose safe? The triangle pose is safe for people who actively practice yoga, and are free from major or bothersome bodily injuries or limitations. We advise against practicing trikonasana if you have back or hips issues especially.
Wrapping Up
This yoga training guide should arm you with all the tips and tricks for performing an efficient triangle pose. The key to a good trikonasana technique is getting that lateral flexion without bumping the hips out to get down. Rather, utilize a yoga block, and do it the right way, developing patience as you learn proper movement mechanics and body posture to achieve a variety of poses.
Click here to view the article.
Intended to stretch, strengthen, energize, and balance the body, triangle pose is a must-have posture, and one of the first that you’ll be introduced to in your yoga journey. Also being a lateral posture, you’re going to learn and experience movement in a plane of motion that most people neglect.
Triangle pose is both challenging, but a good learning posture, as you need to focus on keeping the hips still as the torso flexes to the side. If you’re ready to practice the triangle, grab and yoga block, and use this guide to master the execution of this staple posture.
Muscles Worked During Triangle Pose Trikonasana
Triangle pose is a total body exercise that starts from the feet and moves all the way up to the finger tips, involving so many muscles groups. Here are short descriptions of the muscles you can expect to improve during this stance.
Triangle Pose
Thighs and glutes
From stretching and activating the three rear-facing hamstring heads on the thighs to isometrically engaging the quads and recruiting the butt muscles, the triangle pose, is a lengthening and strengthening pose.
Core
The muscles in your middle body like the abdominals (sexy six pack muscles), the deeper abdominals, and obliques allow the bending, torso control, and twisting or rotational movement. Then you have the muscles that accompany the spine which play a big role in movement of your trunk in various directions.
You may look at the rotation involved in a triangle pose and imagine it so be easy, and it is when you don’t have to combine it with the specific position of the rest of your body. So you definitely need trunk mobility to do this exercise.
Shoulders
Requiring shoulder mobility to both support your weight with the bottom arm, and hold the top arm extended toward the sky, your deltoids, or shoulders benefit too.
How To Do The Triangle Pose
In the video demonstration below you’ll how to perform triangle pose, but also what not to do. We’ve also included a common mistakes section below for more detailed descriptions of bad habits to avoid in this pose.
Steps
Come into a wide stance, with your right foot pointing forward to the top of the mat, and the back foot turned inward to the left at a roughly 45-degree angle as shown in the video.
Keeping your legs straight, reach your right arm down and place your hand on the floor just outside the ankle. If you cannot, use a yoga block to rest your hand on.
Now rotate your chest to the left and extend your left arm straight up toward the sky. If done correctly, the both arms and wrists should form a straight line. Then just focus on enhancing the trunk rotation as you lift the chest. Actively engage the inner thighs by pulling them up and inward toward each other.
Come out of the pose by shifting back onto the rear foot, and lift up, changing the position of the arms, and transitioning to the same pose in the opposite direction.
Pro tip: A yoga block is a handy and very useful yoga training tool, especially during standing bend variations.
Watch the short video tutorial below to see the triangle pose.
Tip: Adjust your feet according to comfort, however, still keep the feet in opposite direction to keep the hips open.
Tips and more detailed instructions
Triangle pose may seem as though there’s not much too it. But there are many little intricacies or steps involved in the technique. If you need more detailed tips, tricks and instruction, check out the following written steps, and a short 3-minute video example below!
Start in a wide stance with the feet forward, and place your hands on your hips.
Squeeze your leg muscles, tense the core, and imagine pulling the spine straight up, not leaning back or forward.
Lift and externally rotate the right foot 90 degrees from the back foot without shifting your hips to the side.
Slide the hands up tp the ribs and inhale, feeling the midsection expand. Then exhale, focusing on moving the breath and torso upward.
Lean over sideways to the right foot, using your hands to help guide you in proper alignment. As you come down, it will likely feel more challenging to bring your hand to the floor. In this case, set up a yoga block to decrease the distance, and place your hand on it.
Push down into the block, with the other hand resting on your ribcage, arch your spine up in a rainbow shape, and keep your head and neck relaxed.
Move the hand from the ribcage and place the palm flat against the chest.
Rotate the head, neck, and collarbone up and draw your gaze in the same direction.
Then bring the hand from the chest into fully extended toward the ceiling.
To come out bring the arm to the hip, look down at the floor, bend the front knee slightly and push down as you stand up.
Hold your arms out like a bird, make your feet parallel, overlap one hand on the other, bend your knees, and either step or lightly hop the feet together.
Don’t forget to repeat for the opposite side.
This Exercise
Target muscle groups: Legs, glutes, hips, core, shoulders
Type: Yoga
Equipment: Mat, block
Difficulty: Beginner/Intermediate
Benefits of Triangle Pose
Incorporating various aspects of movement, the reward of these great poses is always more than the time and effort required. Here are the benefits of the triangle pose.
Train your functional abilities
Regardless of your age, it’s always good to maintain your physical abilities (e.g., balance, coordination, body awareness, multi-plane movement) but especially as you get older when these skills begin to decline, increasing risk of injuries, and decreasing quality of life. The body needs regular maintenance like anything that you expect to be there when you need it to.
We like that triangle pose forces you to consciously be aware of your body’s alignment, while having to focus on engaging your lower and upper body.
Stretching has numerous benefits
In grade school your gym class instructors probably didn’t explain the full benefits of stretching. However, it goes beyond just increasing flexibility.
In fact, it’s so beneficial, that people who stretch often experience immediate stress relief, due to undoing tension from tight muscles caused by under or overuse, injuries, or even mental stress, which makes us tense up without realizing it. This, in turn, could mean better sleep as you’ll feel more relaxed, as well as due to increased blood flow and circulation.
And, of course, if you want to perform your best in sports, training, etc, and avoid injuries during your favorite activities, then you need to stretch so your joints can move properly and your muscles can contract and lengthen to give you optimal strength, and ability.
Can relax your mind
Putting your electronics away and consciously focusing your efforts on doing something good for your body is a must in this day and age. With all the pressures, stresses, and artificial exposure, we really need to be thinking more about our health.
Getting in these beneficial poses that get us up off our butts (also wakes up our sleepy butt muscles) keeps our engines (body and mind) active and our juices flowing to support mental productivity, and physical longevity.
Common Mistakes During Triangle Pose
Here are the things to avoid in the triangle pose technique.
Your feet should be the same as half moon, and not like warrior, with the lead foot pointing to the top end of the mat, while the rear toes should face the left if you’re facing left, or the right, if your body is turned toward the right side of the mat.
The reason being is triangle pose is an open hip posture, and turning the feet inward closes the hip, like you’d do for warrior pose.
“Hip bumping”
The common hip bump cue doesn’t seem allow for the most efficiency when performing triangle pose. It places a lot of pressure on the hamstrings, and pinches the hips. Instead, follow the second video instructional provided under the “How to do triangle pose” section.
Not forming triangles
Too often will people attempt a pose with no technique, slopping over, placing their hands anywhere, bending the elbows, collapsing, and yeah, you get the point. Well, you won’t get the benefits this way, and you could actually do more harm by twisting the body in dangerous angles, and putting a lot of pressure on certain areas. Instead, keep everything strong, and follow the video demonstration above.
Variations Of Triangle Pose
The following poses are the most common triangle pose variations that vary in difficulty.
Extended triangle pose (utthita trikonasana)
The extended triangle pose keeps you here for a longer duration to really stretch and loosen the muscle fibers so essential in many yoga postures.
Steps
With your feet together, turn the right foot to the right side of the mat, and rotate the left foot only slightly to the right.
Inhale, then breath out, and bend toward the right foot from the hips and grab your right big toe with your right hand. Reach the left arm up vertical. Slowly gaze up at the left hand, and stay there as you take 4-6 slow and deep breaths.
Inhale, press the back heel into the floor, and come back into a standing position.
Now repeat to the left side, changing foot position to the opposite of the right side.
Bound triangle pose (baddha trikonasana)
You’ll surely get wrapped up in this pose, putting your flexibility to the test. It’s harder than the extended triangle stance, and a good way to challenge yourself. You should feel a strong link and connection, as one arm ties into the other, creating a solid lock.
Steps
Stand with your about shoulder width and half distance apart.
Turn the right foot so the toes point to the top of the mat, and keep the back foot at a 45-degree angle toward your left side.
Extend the arms out sideways like a bird, then breath in, exhale, and bend down laterally at the hips. Bring the right fingers to the inner middle part of the right foot. Keep the left arm straight up toward the ceiling.
Now move the left arm behind your back and place your left hand on the top of your right thigh. Lift the chest up toward the ceiling, and keep your gaze upward.
Inhale, then as you exhale, move deeper into the pose, and bring the right arm underneath and behind the right leg.
Clasp your right and left fingers together, turn the chest up, and gaze over the left shoulder.
Revolved triangle pose (parivrtta trikonasana)
A big benefit of these rotational poses is that they really open up the body to help improve mobility, flexibility, and circulation to areas that may not normally benefit from deep stretches.
Steps
Assume a similar stance to trikonasana poses with the right lead foot pointed to the back of the mat, and the back foot facing left, and slightly inward at a 45-degree angle.
Reach the left arm up to the sky, then square the hips toward the right foot.
Stretch your left arm forward while turning toward the right foot, and bring the left hand down on the floor to the right side of your right foot. Tip: Use a yoga block if you cannot reach all the way down to the floor.
Now shift your weight onto the back foot, and drop the left side of the hip down as you reach the right arm to the sky, and pull the shoulders back. Draw your gaze up to the right thumb. Tip: Use the left hand on the floor to help pull the left shoulder underneath for more rotation.
Stay for five deep breaths.
To come out, rotate your chest toward the floor.
Now from here, lift the left arm up while bringing the right arm down in a sort of windmill motion. Try to transition into an opposite side stance by changing the direction of your feet.
Then perform the same steps but now for the opposite side.
To leave the pose, inhale, come up with the arms held straight out to your sides, then exhale, and finish by turning to the top of the mat and bring the feet together.
Follow the video tutorial below to see this pose in action!
Half Moon Pose
Now that you’re cool with the triangle pose, we think you should give the half moon a try! Also called chandrasana, this posture adds more glute medius, and throws in the element of balance, as you have to lift the back leg.
Steps
Come into a front forward leaning lunge with the right foot in front, pointing straight forward, and back foot turned outward to the left.
Reach the left arm behind you and grab the back of the left leg/hip.
Reach the right arm to the floor and lean onto your finger tips, with the hand directly under the shoulder.
Rise up onto the front leg, and lift the rear leg up parallel to the floor. The lifted foot should be pointed to the left with the feet flexed by pulling the toes up toward the shin.
Root down into the floor with the standing leg by pressing with the four corners of your feet, and extend the bottom leg.
While looking down at the floor, extend the top arm vertical with the fingers pointing straight up toward the sky.
Now you can adjust your gaze to the side or look up at the top hand to challenge your balance further.
You’ll then perform the same technique but on the opposite leg.
FAQs
Is triangle pose safe? The triangle pose is safe for people who actively practice yoga, and are free from major or bothersome bodily injuries or limitations. We advise against practicing trikonasana if you have back or hips issues especially.
Wrapping Up
This yoga training guide should arm you with all the tips and tricks for performing an efficient triangle pose. The key to a good trikonasana technique is getting that lateral flexion without bumping the hips out to get down. Rather, utilize a yoga block, and do it the right way, developing patience as you learn proper movement mechanics and body posture to achieve a variety of poses.
While the names of some yoga poses are not as straightforward, triangle pose trikonasana is quite obvious. In the final stage of this closed hip posture, you can see how the body forms three triangular shapes. What you see is a product of the sanskrit meaning of “trikona”, meaning triangle.
Intended to stretch, strengthen, energize, and balance the body, triangle pose is a must-have posture, and one of the first that you’ll be introduced to in your yoga journey. Also being a lateral posture, you’re going to learn and experience movement in a plane of motion that most people neglect.
Triangle pose is both challenging, but a good learning posture, as you need to focus on keeping the hips still as the torso flexes to the side. If you’re ready to practice the triangle, grab and yoga block, and use this guide to master the execution of this staple posture.
Muscles Worked During Triangle Pose Trikonasana
Triangle pose is a total body exercise that starts from the feet and moves all the way up to the finger tips, involving so many muscles groups. Here are short descriptions of the muscles you can expect to improve during this stance.
Thighs and glutes
From stretching and activating the three rear-facing hamstring heads on the thighs to isometrically engaging the quads and recruiting the butt muscles, the triangle pose, is a lengthening and strengthening pose.
Core
The muscles in your middle body like the abdominals (sexy six pack muscles), the deeper abdominals, and obliques allow the bending, torso control, and twisting or rotational movement. Then you have the muscles that accompany the spine which play a big role in movement of your trunk in various directions.
You may look at the rotation involved in a triangle pose and imagine it so be easy, and it is when you don’t have to combine it with the specific position of the rest of your body. So you definitely need trunk mobility to do this exercise.
Shoulders
Requiring shoulder mobility to both support your weight with the bottom arm, and hold the top arm extended toward the sky, your deltoids, or shoulders benefit too.
How To Do The Triangle Pose
In the video demonstration below you’ll how to perform triangle pose, but also what not to do. We’ve also included a common mistakes section below for more detailed descriptions of bad habits to avoid in this pose.
Steps
[*]Come into a wide stance, with your right foot pointing forward to the top of the mat, and the back foot turned inward to the left at a roughly 45-degree angle as shown in the video.
[*]Keeping your legs straight, reach your right arm down and place your hand on the floor just outside the ankle. If you cannot, use a yoga block to rest your hand on.
[*]Now rotate your chest to the left and extend your left arm straight up toward the sky. If done correctly, the both arms and wrists should form a straight line. Then just focus on enhancing the trunk rotation as you lift the chest. Actively engage the inner thighs by pulling them up and inward toward each other.
[*]Come out of the pose by shifting back onto the rear foot, and lift up, changing the position of the arms, and transitioning to the same pose in the opposite direction.
Pro tip: A yoga block is a handy and very useful yoga training tool, especially during standing bend variations.
Watch the short video tutorial below to see the triangle pose.
Tip: Adjust your feet according to comfort, however, still keep the feet in opposite direction to keep the hips open.
Tips and more detailed instructions
Triangle pose may seem as though there’s not much too it. But there are many little intricacies or steps involved in the technique. If you need more detailed tips, tricks and instruction, check out the following written steps, and a short 3-minute video example below!
[*]Start in a wide stance with the feet forward, and place your hands on your hips.
[*]Squeeze your leg muscles, tense the core, and imagine pulling the spine straight up, not leaning back or forward.
[*]Lift and externally rotate the right foot 90 degrees from the back foot without shifting your hips to the side.
[*]Slide the hands up tp the ribs and inhale, feeling the midsection expand. Then exhale, focusing on moving the breath and torso upward.
[*]Lean over sideways to the right foot, using your hands to help guide you in proper alignment. As you come down, it will likely feel more challenging to bring your hand to the floor. In this case, set up a yoga block to decrease the distance, and place your hand on it.
[*]Push down into the block, with the other hand resting on your ribcage, arch your spine up in a rainbow shape, and keep your head and neck relaxed.
[*]Move the hand from the ribcage and place the palm flat against the chest.
[*]Rotate the head, neck, and collarbone up and draw your gaze in the same direction.
[*]Then bring the hand from the chest into fully extended toward the ceiling.
[*]To come out bring the arm to the hip, look down at the floor, bend the front knee slightly and push down as you stand up.
[*]Hold your arms out like a bird, make your feet parallel, overlap one hand on the other, bend your knees, and either step or lightly hop the feet together.
[*]Don’t forget to repeat for the opposite side.
This Exercise
- Target muscle groups: Legs, glutes, hips, core, shoulders
- Type: Yoga
- Equipment: Mat, block
- Difficulty: Beginner/Intermediate
Incorporating various aspects of movement, the reward of these great poses is always more than the time and effort required. Here are the benefits of the triangle pose.
Train your functional abilities
Regardless of your age, it’s always good to maintain your physical abilities (e.g., balance, coordination, body awareness, multi-plane movement) but especially as you get older when these skills begin to decline, increasing risk of injuries, and decreasing quality of life. The body needs regular maintenance like anything that you expect to be there when you need it to.
We like that triangle pose forces you to consciously be aware of your body’s alignment, while having to focus on engaging your lower and upper body.
Stretching has numerous benefits
In grade school your gym class instructors probably didn’t explain the full benefits of stretching. However, it goes beyond just increasing flexibility.
In fact, it’s so beneficial, that people who stretch often experience immediate stress relief, due to undoing tension from tight muscles caused by under or overuse, injuries, or even mental stress, which makes us tense up without realizing it. This, in turn, could mean better sleep as you’ll feel more relaxed, as well as due to increased blood flow and circulation.
And, of course, if you want to perform your best in sports, training, etc, and avoid injuries during your favorite activities, then you need to stretch so your joints can move properly and your muscles can contract and lengthen to give you optimal strength, and ability.
Can relax your mind
Putting your electronics away and consciously focusing your efforts on doing something good for your body is a must in this day and age. With all the pressures, stresses, and artificial exposure, we really need to be thinking more about our health.
Getting in these beneficial poses that get us up off our butts (also wakes up our sleepy butt muscles) keeps our engines (body and mind) active and our juices flowing to support mental productivity, and physical longevity.
Common Mistakes During Triangle Pose
Here are the things to avoid in the triangle pose technique.
Your feet should be the same as half moon, and not like warrior, with the lead foot pointing to the top end of the mat, while the rear toes should face the left if you’re facing left, or the right, if your body is turned toward the right side of the mat.
The reason being is triangle pose is an open hip posture, and turning the feet inward closes the hip, like you’d do for warrior pose.
“Hip bumping”
The common hip bump cue doesn’t seem allow for the most efficiency when performing triangle pose. It places a lot of pressure on the hamstrings, and pinches the hips. Instead, follow the second video instructional provided under the “How to do triangle pose” section.
Not forming triangles
Too often will people attempt a pose with no technique, slopping over, placing their hands anywhere, bending the elbows, collapsing, and yeah, you get the point. Well, you won’t get the benefits this way, and you could actually do more harm by twisting the body in dangerous angles, and putting a lot of pressure on certain areas. Instead, keep everything strong, and follow the video demonstration above.
Variations Of Triangle Pose
The following poses are the most common triangle pose variations that vary in difficulty.
Extended triangle pose (utthita trikonasana)
The extended triangle pose keeps you here for a longer duration to really stretch and loosen the muscle fibers so essential in many yoga postures.
Steps
[*]With your feet together, turn the right foot to the right side of the mat, and rotate the left foot only slightly to the right.
[*]Inhale, then breath out, and bend toward the right foot from the hips and grab your right big toe with your right hand. Reach the left arm up vertical. Slowly gaze up at the left hand, and stay there as you take 4-6 slow and deep breaths.
[*]Inhale, press the back heel into the floor, and come back into a standing position.
[*]Now repeat to the left side, changing foot position to the opposite of the right side.
Bound triangle pose (baddha trikonasana)
You’ll surely get wrapped up in this pose, putting your flexibility to the test. It’s harder than the extended triangle stance, and a good way to challenge yourself. You should feel a strong link and connection, as one arm ties into the other, creating a solid lock.
Steps
[*]Stand with your about shoulder width and half distance apart.
[*]Turn the right foot so the toes point to the top of the mat, and keep the back foot at a 45-degree angle toward your left side.
[*]Extend the arms out sideways like a bird, then breath in, exhale, and bend down laterally at the hips. Bring the right fingers to the inner middle part of the right foot. Keep the left arm straight up toward the ceiling.
[*]Now move the left arm behind your back and place your left hand on the top of your right thigh. Lift the chest up toward the ceiling, and keep your gaze upward.
[*]Inhale, then as you exhale, move deeper into the pose, and bring the right arm underneath and behind the right leg.
[*]Clasp your right and left fingers together, turn the chest up, and gaze over the left shoulder.
Revolved triangle pose (parivrtta trikonasana)
A big benefit of these rotational poses is that they really open up the body to help improve mobility, flexibility, and circulation to areas that may not normally benefit from deep stretches.
Steps
[*]Assume a similar stance to trikonasana poses with the right lead foot pointed to the back of the mat, and the back foot facing left, and slightly inward at a 45-degree angle.
[*]Reach the left arm up to the sky, then square the hips toward the right foot.
[*]Stretch your left arm forward while turning toward the right foot, and bring the left hand down on the floor to the right side of your right foot. Tip: Use a yoga block if you cannot reach all the way down to the floor.
[*]Now shift your weight onto the back foot, and drop the left side of the hip down as you reach the right arm to the sky, and pull the shoulders back. Draw your gaze up to the right thumb. Tip: Use the left hand on the floor to help pull the left shoulder underneath for more rotation.
[*]Stay for five deep breaths.
[*]To come out, rotate your chest toward the floor.
[*]Now from here, lift the left arm up while bringing the right arm down in a sort of windmill motion. Try to transition into an opposite side stance by changing the direction of your feet.
[*]Then perform the same steps but now for the opposite side.
[*]To leave the pose, inhale, come up with the arms held straight out to your sides, then exhale, and finish by turning to the top of the mat and bring the feet together.
Follow the video tutorial below to see this pose in action!
Half Moon Pose
Now that you’re cool with the triangle pose, we think you should give the half moon a try! Also called chandrasana, this posture adds more glute medius, and throws in the element of balance, as you have to lift the back leg.
Steps
[*]Come into a front forward leaning lunge with the right foot in front, pointing straight forward, and back foot turned outward to the left.
[*]Reach the left arm behind you and grab the back of the left leg/hip.
[*]Reach the right arm to the floor and lean onto your finger tips, with the hand directly under the shoulder.
[*]Rise up onto the front leg, and lift the rear leg up parallel to the floor. The lifted foot should be pointed to the left with the feet flexed by pulling the toes up toward the shin.
[*]Root down into the floor with the standing leg by pressing with the four corners of your feet, and extend the bottom leg.
[*]While looking down at the floor, extend the top arm vertical with the fingers pointing straight up toward the sky.
[*]Now you can adjust your gaze to the side or look up at the top hand to challenge your balance further.
[*]You’ll then perform the same technique but on the opposite leg.
FAQs
Is triangle pose safe? The triangle pose is safe for people who actively practice yoga, and are free from major or bothersome bodily injuries or limitations. We advise against practicing trikonasana if you have back or hips issues especially.
Wrapping Up
This yoga training guide should arm you with all the tips and tricks for performing an efficient triangle pose. The key to a good trikonasana technique is getting that lateral flexion without bumping the hips out to get down. Rather, utilize a yoga block, and do it the right way, developing patience as you learn proper movement mechanics and body posture to achieve a variety of poses.
Click here to view the article.
