


Muscle Insider
New member
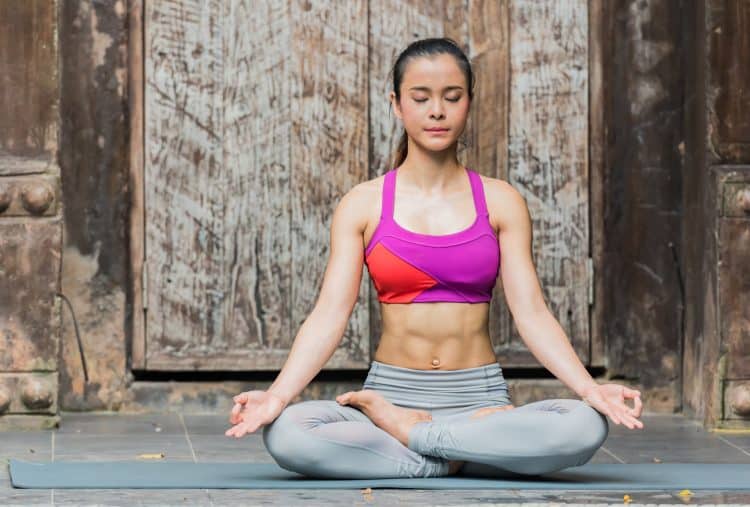
Easily the most iconic meditation posture, recognized in film and TV, and part of rich ancient Asian tradition, just about everyone has tried some form or variation of lotus pose, whether making a joke out of it or genuine relaxation practice. But, laughing aside, most people would get a slice of humble pie after an honest attempt at the true lotus pose padmasana!
There are said to be many advantages of lotus pose like increasing flexibility, improving posture, easing menstrual symptoms, and migraines, mental relaxation, and awakening kundalini energy. But beneath the surface (pun surface) hides a beautiful representation of the lotus flower.
Let’s deep dive into the origins of padmasana, how it works, common mistakes to avoid, variations, and more.
What is The Lotus Pose?
We observe and practice for the benefits, but do we know about the history behind many classic poses, especially one as famous as the lotus pose? Padmasana, in Sanskrit, is derived from two parts, padma (meaning lotus), and sana (seat or throne meaning).
You may know of the lotus flower, or would recognize this sacred aquatic plant and powerful religious symbol from Buddhist and Hindu culture, where it’s commonly used as a pedestal for divine deities. But it makes more sense once you understand the angelic daily life cycle of a lotus. Deep rooted in mud, the lotus submerges in river water nightly, only to resurrect into a beautiful bloom the next morning. Hence its popular symbolic associations with rebirth and spiritual enlightenment.
But resilience is another word that comes to mind, considering the seemingly unfavorable environmental conditions, yet the strong will to revive each day, with each petal appearing as beautiful and strong as the day prior.
It’s no wonder the lotus is a foundational pose, that is believed to have many physical and mental benefits.
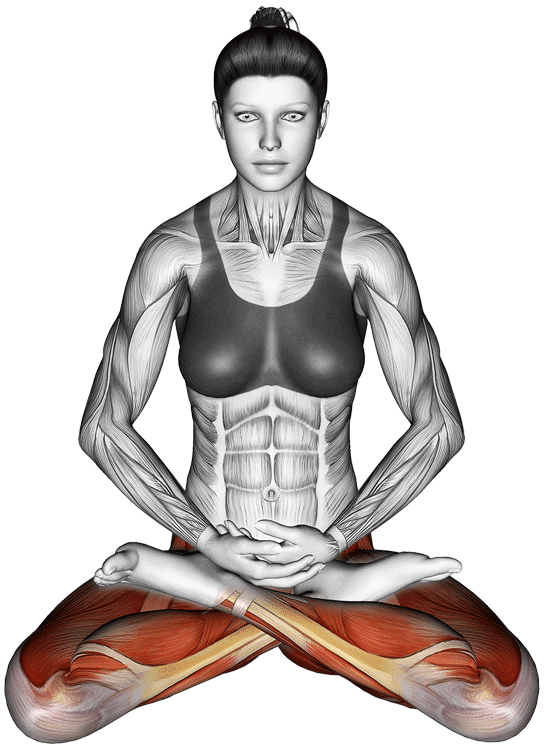
Anatomy of The Lotus Pose/Muscles Worked
(Proper) Lotus pose is a combination of sufficient hip flexion, external thigh rotation, and horizontal abduction. In other words, the thigh needs to be elevated high enough, with adequate outward rotation to safely and comfortably place the legs and feet in the lotus position.
Normally, the hips externally rotate about 60 degrees. In the lotus pose, more rotation is required. When mobility is less than what’s needed, people compensate by rotating and placing dangerous pressure on this knee joint.
So there needs to be a strong ability in the hips, with flexible quadriceps. This can be achieved with enough time, and consistency.
How To Do Lotus Pose (Ardha Padmasana)
Now we’ll get to the good stuff… find a yoga mat and go through a few practice steps before crossing over to the more advanced lotus pose variation. We’ll do this part in sections, starting with a basic legs crossed position, moving to a half lotus, and finally the lotus of all lotuses!
Below you’ll find written step-by-step instructions, with a video tutorial afterward. Also, check out the common mistakes section to avoid crucial technique dont’s.
Note: Before attempting lotus pose, ensure that you have sufficient lower body flexibility, healthy knees and ankles, and recent experience practicing similar techniques regularly. Padmasana is an intermediate to advanced posture, and bad technique can be costly for the knee joint.
It’s also important to note that there are slight variations of lotus pose, however, the general technique should remain the same for the safety of the joints.
Steps
Before attempting the full lotus pose, see if you can first perform the basic crossed legs and half lotus variations without pain or discomfort. If you can, then proceed to carefully try the full lotus, but only if you have sufficient hip mobility to comfortably slide your feet onto the hips without forcing or pulling the shins up.
Basic crossed legs posture
Start from seated on your mat with both legs straightened in front of you.
Then, come into a basic crossed legs pose, or sukhasana with your palms on your knees and eyes closed. Keep your spine tall.
Stay here then switch the position of your legs and repeat.
If you are comfortable in this position, you’re ready for the half lotus or Ardha padmasana. Straighten your legs in front of you and continue with step 4.
Half lotus
Grab the right leg, and cradle it in your arms close to your chest. Gently swing the leg from side to side which will help open up the hips before going full lotus.
From here, place your right heel on your left pelvic bone.
Sit in this pose with your hands on your knees and eyes closed for a few moments. Switch legs, bringing the opposite leg to the pelvis first. Do you feel okay to proceed with a more intense technique aka, full lotus? If so, you can proceed to the next steps.
Full lotus padmasana pose technique
Restart by extending your legs in front of you.
Then, bend your right leg, and cradle it in your arms, gently swaying it from side to side.
Place the right foot into the left hip bone.
Now bend your left leg, then use your hands to pull your left foot over your right leg, and tuck it into the right side of your hip.
Let your knees drop to the mat, rest your hands palms up on your knees while touching the thumbs and pointer fingers together, and gently close your eyes. Focus on your breath and maintain a tall spine.
Reset your legs by extending them forward, then repeat the same steps but switch the position of your legs. For example, this time you’ll bend and cradle the left leg first. Then you’ll bring the right foot over the left leg to finish the lotus pose.
Here’s another way to perform lotus pose that involves deeper preparation.
Tips
The full lotus is very challenging if you don’t have very good flexibility. Do not expect to get it in day, one week, one month, or in some cases, one year or more.
Remember the role of the two major joints involved in the lotus pose. The hips are capable of rotation while the knees only flex and extend. The knees are at greater risk of injury in this pose if improper form is used.
Close the knee joint by fully bending your leg so that the calf is flat against the hamstrings. This will help protect the knees by keeping it more stable, while ensuring only the hips rotate.
Gently scoop the heels from underneath and set them in position on the hips.
If your knees cannot naturally drop to the floor, do not force them down. Be patient and allow the tissue in your lower body to loosen up and stretch.
Never use jerky or rough movements when performing the lotus pose. Be very gentle and patient as you’re assisting your feet to the hips.
As gently as you came into the pose, should you while coming out of it too.
Benefits of Lotus Pose Padmasana
Let’s take a look at why an ancient, pre hatha yoga posture would still be relevant today. Of course, it’s also important to remember that lotus is a form of meditation, which has many science proven benefits in itself.
Stretch multiple points
In the lotus posture, many points receive a deep stretch from the muscles in your feet, to the ankles, knees, quadriceps muscles, hips, groin, and the torso, with good posture. Stretching increases flexibility, and hence elasticity in the muscles which helps with healthy joint movement, and prevents injuries (1).
Calm your thoughts
Some stress is healthy but when it becomes chronic, so often does our mental and physical suffering. Meditation, and redirecting our focus is a crucial part of reducing the harmful effects of negative associations, reducing emotional fluctuation, and we all need it in some form. Especially with the pressures of modern lifestyles and culture (2).
Helps reduce and prevent disease risk
To extend on the previous benefit, yoga and exercise has been shown to improve disease or health risk factors. Studies published by National Library of Medicine conclude that there’s no doubt yoga improves stress, anxiety, and depression, while being a suitable complementary medicine (3, 4). But the advantages are two fold, as mental techniques contribute to the physical and mental improvements (5).
Reinforce discipline to live a healthier, more aware lifestyle
It’s easy to become overwhelmed with distractions that should take us less time in our daily lives. Yoga practice can make us more mindful and help us to be more in tune with our thoughts, bodies, and decisions (6). And chances are, if you have the discipline to follow a routine, it will carry over into other things that will help you to become better all around.
Many fun and challenging variations
The exciting thing about the lotus pose is that it doesn’t stop there… in fact, for someone who cannot get into the pose, the progressions can be a rewarding journey in themselves. But then you have more advanced variations like the ones included later on in this guide. As you progress, it’s also normal to build more strength and mental fitness as well.
Common Mistakes During Lotus Pose
When it comes to exercise, some bad habits are easily fixable and not likely to cause harm. But when it comes to flexing your body in more difficult positions, you must be especially careful to do it right Here are some things you must avoid during lotus pose.
Forcing the leg and foot into position
A proper lotus pose is only possible with sufficient hip mobility and ignoring this fact is a crucial mistake. When movement in the thigh is limited during the lotus pose, two ways that people try to fix it is pulling the foot up or pushing the knee down. The problem here is the knees are not made for such a degree of external rotation beyond 40 degrees.
The hips are a ball and socket joint with greater movement capability, while the knee bends and straightens. Don’t mess that up!
Bad form causes shearing forces on the knee which can damage the meniscus (soft cartilage in the knee that act as shock absorbers, and help stabilize the knee joint) and ligaments.
Solution: Practice gradual techniques to free up tension in the hips, and improve movement in the horizontal plane. You should also focus on closing the knee joint, making it less vulnerable to potentially damaging forces.
Variations of Lotus Pose Padmasana
There are plenty of lotus pose variations to keep you busy, including the preparatory and more advanced postures. Here are some of the more popular alternatives to the lotus pose padmasana.
Reclining lotus pose (supta padmasana)
The opposite of your hidden lotus, supta padmasana is performed on your back. And most people will want to try this variation before covering up their pose.
Steps
Sit at the front of your mat in padmasana.
Place your hands on the mat behind your hips, then bend your elbows and gently drop down on your forearms like in a reverse plank. Sit in this position for a few moments to ensure you’re comfortable.
Then slowly walk your hands toward your knees, and lie flat on your back with your arms by your sides and palms on the floor.
Now reach your arms overhead, and rest the top of the forearms and knuckles on the ground, but keep your elbows slightly bent.
Relax here and consciously breathe in and out.
To come out, bring your arms back down by your sides with the palms next to your hips. Tuck your chin into your chest, lift back up onto your forearms, then sit up in padmasana.
Now change your legs position and repeat.
Hidden lotus pose (gupta padmasana)
Try this concealed lotus pose variation that’ll force your hips to stay opened up. Many people also learn that changing the position of the same position suits them better. In this case, a prone position may enhance how the stretch feels in your entire back.
Steps
Begin in padmasana pose at the back end of your yoga mat.
Then place your hands on the mat and use your arms to lift up onto your knees. Walk your hands forward until your palms are directly under your shoulders like in a push-up on your knees position.
Now walk your hands forward and gently lower your chest, stomach, and hips to the floor. Then reach your arms overhead and rest your palms on the floor. Try to consciously press your pelvis down into the mat.
Stay here for a few conscious, relaxed breaths.
To leave the pose, bend your arms and place your palms on the floor next to your chest like the bottom of a push-up.
Push yourself up, then walk your hands back, and gently return to the sitting padmasana.
Now do it again but change the position of your legs.
Tip: You can also place your hands behind your back as shown in the video example.
Fish pose with lotus legs
If done correctly, the fish pose will give you an amazing stretch through the upper body and neck, while offering potential benefits of inversion (hanging your head upside down) like improved blood flow to the brain, and enhanced cognitive functioning. But the basic fish pose doesn’t stretch out the hips and groin like adding a lotus pose.
Steps
Start on your back with your body fully lengthened.
Bring your legs into lotus, then drop them to the floor.
Now lift your chest, arch your back, tilt your head back, and gently rest the top of your head on the floor. You can grab onto your hips as shown in the video example below.
Reverse the process by lying flat, raising your knees up, taking your feet off the hips one at a time, and straightening your legs out in front of you.
Lay there for a moment, then bring the legs back into lotus, switching legs this time, and repeat the previous steps.
Check out our full write up on fish pose matsyasana.
Floating lotus pose (Utplutih)
If you have good upper body strength, then you should absolutely try the floating variation. What it will do over the other variations is activate your chest, shoulders, and triceps, while calling on your core to produce more strength and stability. But there are mental benefits too, as you’ll have to trust yourself, have confidence in your abilities, and develop patience.
Note: Utplutih is a more advanced pose, and it can be very challenging. The video provided below shows a few progressions before attempting the full lotus pose. You can also find some technique tips following the written instructions.
Steps
Start in the sitting lotus position on your mat, with an upright posture.
Squeeze and activate your legs and flex your feet for better control.
Then straighten your arms and place your hands on the mat beside your upper thighs. Spread your fingers out, and feel where you will be most balanced. Emphasize pressing with the thumbs and pointer fingers.
Activate your delts, and the prominent muscles of your lateral torso like the lats and serratus anterior.
Now round your back slightly, then draw your abdomen in and up.
Inhale, then lift your body up off the ground. Press your hands down into the floor, maintain a solid position, look down at the tip of your nose, and take 10 big breaths.
Exhale, and slowly lower your butt to the floor in padmasana.
You can then swap the position of your legs and repeat the pose.
Tips
Mental focus is just as important here. Remain calm, breathe, take your time, and feel connected to the pose.
Remember most of this pose is a result of your core muscle engagement.
If the utplutih is too advanced for you, cross your legs normally (not lotus), and practice the floating pose while keeping your feet in contact with the floor, akin to an assisted version.
The half lotus pose, keeping only one foot on the floor, is another progression before the full floating variation.
FAQs
When is lotus pose best avoided? We do not recommend lotus pose for people with knee and ankle injuries or issues, or who are pregnant.
Can beginners try the lotus pose? It depends on your level of flexibility. Lotus pose is a more advanced posture that requires a great degree of hip mobility. Most beginners should start with a basic crossed leg sitting position, then progress to a half lotus, and finally the full lotus.
Wrapping Up
Through adversity and resilience sprouts a beautiful result, of which the lotus plant exemplifies that authenticity. Both a symbol and physical manifestation of grounding, expansion, death, re-emergence, resilience and beauty, so too is what the lotus pose represents.
While a more advanced position, you’ll also learn patience and persistence, but don’t forget to also enjoy the process as you learn one of the most foundational poses.
Resources
Amin DJ, Goodman M. The effects of selected asanas in Iyengar yoga on flexibility: pilot study. J Bodyw Mov Ther. 2014 Jul;18(3):399-404. doi: 10.1016/j.jbmt.2013.11.008. Epub 2013 Nov 8. PMID: 25042310.
Woodyard C. Exploring the therapeutic effects of yoga and its ability to increase quality of life. Int J Yoga. 2011 Jul;4(2):49-54. doi: 10.4103/0973-6131.85485. PMID: 22022122; PMCID: PMC3193654.
Shohani M, Badfar G, Nasirkandy MP, Kaikhavani S, Rahmati S, Modmeli Y, Soleymani A, Azami M. The Effect of Yoga on Stress, Anxiety, and Depression in Women. Int J Prev Med. 2018 Feb 21;9:21. doi: 10.4103/ijpvm.IJPVM_242_16. PMID: 29541436; PMCID: PMC5843960.
Bridges L, Sharma M. The Efficacy of Yoga as a Form of Treatment for Depression. J Evid Based Complementary Altern Med. 2017 Oct;22(4):1017-1028. doi: 10.1177/2156587217715927. Epub 2017 Jun 30. PMID: 28664775; PMCID: PMC5871291.
Goldsby TL, Goldsby ME, McWalters M, Mills PJ. Effects of Singing Bowl Sound Meditation on Mood, Tension, and Well-being: An Observational Study. J Evid Based Complementary Altern Med. 2017 Jul;22(3):401-406. doi: 10.1177/2156587216668109. Epub 2016 Sep 30. PMID: 27694559; PMCID: PMC5871151.
Yoga – benefits beyond the mat. Harvard Health. (2021, September 8).
Easily the most iconic meditation posture, recognized in film and TV, and part of rich ancient Asian tradition, just about everyone has tried some form or variation of lotus pose, whether making a joke out of it or genuine relaxation practice. But, laughing aside, most people would get a slice of humble pie after an honest attempt at the true lotus pose padmasana!
There are said to be many advantages of lotus pose like increasing flexibility, improving posture, easing menstrual symptoms, and migraines, mental relaxation, and awakening kundalini energy. But beneath the surface (pun surface) hides a beautiful representation of the lotus flower.
Let’s deep dive into the origins of padmasana, how it works, common mistakes to avoid, variations, and more.
What is The Lotus Pose?
We observe and practice for the benefits, but do we know about the history behind many classic poses, especially one as famous as the lotus pose? Padmasana, in Sanskrit, is derived from two parts, padma (meaning lotus), and sana (seat or throne meaning).
You may know of the lotus flower, or would recognize this sacred aquatic plant and powerful religious symbol from Buddhist and Hindu culture, where it’s commonly used as a pedestal for divine deities. But it makes more sense once you understand the angelic daily life cycle of a lotus. Deep rooted in mud, the lotus submerges in river water nightly, only to resurrect into a beautiful bloom the next morning. Hence its popular symbolic associations with rebirth and spiritual enlightenment.
But resilience is another word that comes to mind, considering the seemingly unfavorable environmental conditions, yet the strong will to revive each day, with each petal appearing as beautiful and strong as the day prior.
It’s no wonder the lotus is a foundational pose, that is believed to have many physical and mental benefits.
Anatomy of The Lotus Pose/Muscles Worked

(Proper) Lotus pose is a combination of sufficient hip flexion, external thigh rotation, and horizontal abduction. In other words, the thigh needs to be elevated high enough, with adequate outward rotation to safely and comfortably place the legs and feet in the lotus position.
Normally, the hips externally rotate about 60 degrees. In the lotus pose, more rotation is required. When mobility is less than what’s needed, people compensate by rotating and placing dangerous pressure on this knee joint.
So there needs to be a strong ability in the hips, with flexible quadriceps. This can be achieved with enough time, and consistency.
How To Do Lotus Pose (Ardha Padmasana)
Now we’ll get to the good stuff… find a yoga mat and go through a few practice steps before crossing over to the more advanced lotus pose variation. We’ll do this part in sections, starting with a basic legs crossed position, moving to a half lotus, and finally the lotus of all lotuses!
Below you’ll find written step-by-step instructions, with a video tutorial afterward. Also, check out the common mistakes section to avoid crucial technique dont’s.
Note: Before attempting lotus pose, ensure that you have sufficient lower body flexibility, healthy knees and ankles, and recent experience practicing similar techniques regularly. Padmasana is an intermediate to advanced posture, and bad technique can be costly for the knee joint.
It’s also important to note that there are slight variations of lotus pose, however, the general technique should remain the same for the safety of the joints.
Steps
Before attempting the full lotus pose, see if you can first perform the basic crossed legs and half lotus variations without pain or discomfort. If you can, then proceed to carefully try the full lotus, but only if you have sufficient hip mobility to comfortably slide your feet onto the hips without forcing or pulling the shins up.
Basic crossed legs posture
[*]Start from seated on your mat with both legs straightened in front of you.
[*]Then, come into a basic crossed legs pose, or sukhasana with your palms on your knees and eyes closed. Keep your spine tall.
[*]Stay here then switch the position of your legs and repeat.
[*]If you are comfortable in this position, you’re ready for the half lotus or Ardha padmasana. Straighten your legs in front of you and continue with step 4.
Half lotus
[*]Grab the right leg, and cradle it in your arms close to your chest. Gently swing the leg from side to side which will help open up the hips before going full lotus.
[*]From here, place your right heel on your left pelvic bone.
[*]Sit in this pose with your hands on your knees and eyes closed for a few moments. Switch legs, bringing the opposite leg to the pelvis first. Do you feel okay to proceed with a more intense technique aka, full lotus? If so, you can proceed to the next steps.
Full lotus padmasana pose technique
[*]Restart by extending your legs in front of you.
[*]Then, bend your right leg, and cradle it in your arms, gently swaying it from side to side.
[*]Place the right foot into the left hip bone.
[*]Now bend your left leg, then use your hands to pull your left foot over your right leg, and tuck it into the right side of your hip.
[*]Let your knees drop to the mat, rest your hands palms up on your knees while touching the thumbs and pointer fingers together, and gently close your eyes. Focus on your breath and maintain a tall spine.
[*]Reset your legs by extending them forward, then repeat the same steps but switch the position of your legs. For example, this time you’ll bend and cradle the left leg first. Then you’ll bring the right foot over the left leg to finish the lotus pose.
Here’s another way to perform lotus pose that involves deeper preparation.
Tips
Benefits of Lotus Pose Padmasana
Let’s take a look at why an ancient, pre hatha yoga posture would still be relevant today. Of course, it’s also important to remember that lotus is a form of meditation, which has many science proven benefits in itself.
Stretch multiple points
In the lotus posture, many points receive a deep stretch from the muscles in your feet, to the ankles, knees, quadriceps muscles, hips, groin, and the torso, with good posture. Stretching increases flexibility, and hence elasticity in the muscles which helps with healthy joint movement, and prevents injuries (1).
Calm your thoughts
Some stress is healthy but when it becomes chronic, so often does our mental and physical suffering. Meditation, and redirecting our focus is a crucial part of reducing the harmful effects of negative associations, reducing emotional fluctuation, and we all need it in some form. Especially with the pressures of modern lifestyles and culture (2).
Helps reduce and prevent disease risk
To extend on the previous benefit, yoga and exercise has been shown to improve disease or health risk factors. Studies published by National Library of Medicine conclude that there’s no doubt yoga improves stress, anxiety, and depression, while being a suitable complementary medicine (3, 4). But the advantages are two fold, as mental techniques contribute to the physical and mental improvements (5).
Reinforce discipline to live a healthier, more aware lifestyle
It’s easy to become overwhelmed with distractions that should take us less time in our daily lives. Yoga practice can make us more mindful and help us to be more in tune with our thoughts, bodies, and decisions (6). And chances are, if you have the discipline to follow a routine, it will carry over into other things that will help you to become better all around.
Many fun and challenging variations
The exciting thing about the lotus pose is that it doesn’t stop there… in fact, for someone who cannot get into the pose, the progressions can be a rewarding journey in themselves. But then you have more advanced variations like the ones included later on in this guide. As you progress, it’s also normal to build more strength and mental fitness as well.
Common Mistakes During Lotus Pose
When it comes to exercise, some bad habits are easily fixable and not likely to cause harm. But when it comes to flexing your body in more difficult positions, you must be especially careful to do it right Here are some things you must avoid during lotus pose.
Forcing the leg and foot into position
A proper lotus pose is only possible with sufficient hip mobility and ignoring this fact is a crucial mistake. When movement in the thigh is limited during the lotus pose, two ways that people try to fix it is pulling the foot up or pushing the knee down. The problem here is the knees are not made for such a degree of external rotation beyond 40 degrees.
The hips are a ball and socket joint with greater movement capability, while the knee bends and straightens. Don’t mess that up!
Bad form causes shearing forces on the knee which can damage the meniscus (soft cartilage in the knee that act as shock absorbers, and help stabilize the knee joint) and ligaments.
Solution: Practice gradual techniques to free up tension in the hips, and improve movement in the horizontal plane. You should also focus on closing the knee joint, making it less vulnerable to potentially damaging forces.
Variations of Lotus Pose Padmasana
There are plenty of lotus pose variations to keep you busy, including the preparatory and more advanced postures. Here are some of the more popular alternatives to the lotus pose padmasana.
Reclining lotus pose (supta padmasana)
The opposite of your hidden lotus, supta padmasana is performed on your back. And most people will want to try this variation before covering up their pose.
Steps
[*]Sit at the front of your mat in padmasana.
[*]Place your hands on the mat behind your hips, then bend your elbows and gently drop down on your forearms like in a reverse plank. Sit in this position for a few moments to ensure you’re comfortable.
[*]Then slowly walk your hands toward your knees, and lie flat on your back with your arms by your sides and palms on the floor.
[*]Now reach your arms overhead, and rest the top of the forearms and knuckles on the ground, but keep your elbows slightly bent.
[*]Relax here and consciously breathe in and out.
[*]To come out, bring your arms back down by your sides with the palms next to your hips. Tuck your chin into your chest, lift back up onto your forearms, then sit up in padmasana.
[*]Now change your legs position and repeat.
Hidden lotus pose (gupta padmasana)
Try this concealed lotus pose variation that’ll force your hips to stay opened up. Many people also learn that changing the position of the same position suits them better. In this case, a prone position may enhance how the stretch feels in your entire back.
Steps
[*]Begin in padmasana pose at the back end of your yoga mat.
[*]Then place your hands on the mat and use your arms to lift up onto your knees. Walk your hands forward until your palms are directly under your shoulders like in a push-up on your knees position.
[*]Now walk your hands forward and gently lower your chest, stomach, and hips to the floor. Then reach your arms overhead and rest your palms on the floor. Try to consciously press your pelvis down into the mat.
[*]Stay here for a few conscious, relaxed breaths.
[*]To leave the pose, bend your arms and place your palms on the floor next to your chest like the bottom of a push-up.
[*]Push yourself up, then walk your hands back, and gently return to the sitting padmasana.
[*]Now do it again but change the position of your legs.
Tip: You can also place your hands behind your back as shown in the video example.
Fish pose with lotus legs
If done correctly, the fish pose will give you an amazing stretch through the upper body and neck, while offering potential benefits of inversion (hanging your head upside down) like improved blood flow to the brain, and enhanced cognitive functioning. But the basic fish pose doesn’t stretch out the hips and groin like adding a lotus pose.
Steps
[*]Start on your back with your body fully lengthened.
[*]Bring your legs into lotus, then drop them to the floor.
[*]Now lift your chest, arch your back, tilt your head back, and gently rest the top of your head on the floor. You can grab onto your hips as shown in the video example below.
[*]Reverse the process by lying flat, raising your knees up, taking your feet off the hips one at a time, and straightening your legs out in front of you.
[*]Lay there for a moment, then bring the legs back into lotus, switching legs this time, and repeat the previous steps.
Check out our full write up on fish pose matsyasana.
Floating lotus pose (Utplutih)
If you have good upper body strength, then you should absolutely try the floating variation. What it will do over the other variations is activate your chest, shoulders, and triceps, while calling on your core to produce more strength and stability. But there are mental benefits too, as you’ll have to trust yourself, have confidence in your abilities, and develop patience.
Note: Utplutih is a more advanced pose, and it can be very challenging. The video provided below shows a few progressions before attempting the full lotus pose. You can also find some technique tips following the written instructions.
Steps
[*]Start in the sitting lotus position on your mat, with an upright posture.
[*]Squeeze and activate your legs and flex your feet for better control.
[*]Then straighten your arms and place your hands on the mat beside your upper thighs. Spread your fingers out, and feel where you will be most balanced. Emphasize pressing with the thumbs and pointer fingers.
[*]Activate your delts, and the prominent muscles of your lateral torso like the lats and serratus anterior.
[*]Now round your back slightly, then draw your abdomen in and up.
[*]Inhale, then lift your body up off the ground. Press your hands down into the floor, maintain a solid position, look down at the tip of your nose, and take 10 big breaths.
[*]Exhale, and slowly lower your butt to the floor in padmasana.
[*]You can then swap the position of your legs and repeat the pose.
Tips
FAQs
When is lotus pose best avoided? We do not recommend lotus pose for people with knee and ankle injuries or issues, or who are pregnant.
Can beginners try the lotus pose? It depends on your level of flexibility. Lotus pose is a more advanced posture that requires a great degree of hip mobility. Most beginners should start with a basic crossed leg sitting position, then progress to a half lotus, and finally the full lotus.
Wrapping Up
Through adversity and resilience sprouts a beautiful result, of which the lotus plant exemplifies that authenticity. Both a symbol and physical manifestation of grounding, expansion, death, re-emergence, resilience and beauty, so too is what the lotus pose represents.
While a more advanced position, you’ll also learn patience and persistence, but don’t forget to also enjoy the process as you learn one of the most foundational poses.
Resources
[*]Amin DJ, Goodman M. The effects of selected asanas in Iyengar yoga on flexibility: pilot study. J Bodyw Mov Ther. 2014 Jul;18(3):399-404. doi: 10.1016/j.jbmt.2013.11.008. Epub 2013 Nov 8. PMID: 25042310.
[*]Woodyard C. Exploring the therapeutic effects of yoga and its ability to increase quality of life. Int J Yoga. 2011 Jul;4(2):49-54. doi: 10.4103/0973-6131.85485. PMID: 22022122; PMCID: PMC3193654.
[*]Shohani M, Badfar G, Nasirkandy MP, Kaikhavani S, Rahmati S, Modmeli Y, Soleymani A, Azami M. The Effect of Yoga on Stress, Anxiety, and Depression in Women. Int J Prev Med. 2018 Feb 21;9:21. doi: 10.4103/ijpvm.IJPVM_242_16. PMID: 29541436; PMCID: PMC5843960.
[*]Bridges L, Sharma M. The Efficacy of Yoga as a Form of Treatment for Depression. J Evid Based Complementary Altern Med. 2017 Oct;22(4):1017-1028. doi: 10.1177/2156587217715927. Epub 2017 Jun 30. PMID: 28664775; PMCID: PMC5871291.
[*]Goldsby TL, Goldsby ME, McWalters M, Mills PJ. Effects of Singing Bowl Sound Meditation on Mood, Tension, and Well-being: An Observational Study. J Evid Based Complementary Altern Med. 2017 Jul;22(3):401-406. doi: 10.1177/2156587216668109. Epub 2016 Sep 30. PMID: 27694559; PMCID: PMC5871151.
[*]Yoga – benefits beyond the mat. Harvard Health. (2021, September 8).
Click here to view the article.
There are said to be many advantages of lotus pose like increasing flexibility, improving posture, easing menstrual symptoms, and migraines, mental relaxation, and awakening kundalini energy. But beneath the surface (pun surface) hides a beautiful representation of the lotus flower.
Let’s deep dive into the origins of padmasana, how it works, common mistakes to avoid, variations, and more.
What is The Lotus Pose?
We observe and practice for the benefits, but do we know about the history behind many classic poses, especially one as famous as the lotus pose? Padmasana, in Sanskrit, is derived from two parts, padma (meaning lotus), and sana (seat or throne meaning).
You may know of the lotus flower, or would recognize this sacred aquatic plant and powerful religious symbol from Buddhist and Hindu culture, where it’s commonly used as a pedestal for divine deities. But it makes more sense once you understand the angelic daily life cycle of a lotus. Deep rooted in mud, the lotus submerges in river water nightly, only to resurrect into a beautiful bloom the next morning. Hence its popular symbolic associations with rebirth and spiritual enlightenment.
But resilience is another word that comes to mind, considering the seemingly unfavorable environmental conditions, yet the strong will to revive each day, with each petal appearing as beautiful and strong as the day prior.
It’s no wonder the lotus is a foundational pose, that is believed to have many physical and mental benefits.
Anatomy of The Lotus Pose/Muscles Worked
(Proper) Lotus pose is a combination of sufficient hip flexion, external thigh rotation, and horizontal abduction. In other words, the thigh needs to be elevated high enough, with adequate outward rotation to safely and comfortably place the legs and feet in the lotus position.
Normally, the hips externally rotate about 60 degrees. In the lotus pose, more rotation is required. When mobility is less than what’s needed, people compensate by rotating and placing dangerous pressure on this knee joint.
So there needs to be a strong ability in the hips, with flexible quadriceps. This can be achieved with enough time, and consistency.
How To Do Lotus Pose (Ardha Padmasana)
Now we’ll get to the good stuff… find a yoga mat and go through a few practice steps before crossing over to the more advanced lotus pose variation. We’ll do this part in sections, starting with a basic legs crossed position, moving to a half lotus, and finally the lotus of all lotuses!
Below you’ll find written step-by-step instructions, with a video tutorial afterward. Also, check out the common mistakes section to avoid crucial technique dont’s.
Note: Before attempting lotus pose, ensure that you have sufficient lower body flexibility, healthy knees and ankles, and recent experience practicing similar techniques regularly. Padmasana is an intermediate to advanced posture, and bad technique can be costly for the knee joint.
It’s also important to note that there are slight variations of lotus pose, however, the general technique should remain the same for the safety of the joints.
Steps
Before attempting the full lotus pose, see if you can first perform the basic crossed legs and half lotus variations without pain or discomfort. If you can, then proceed to carefully try the full lotus, but only if you have sufficient hip mobility to comfortably slide your feet onto the hips without forcing or pulling the shins up.
Basic crossed legs posture
Start from seated on your mat with both legs straightened in front of you.
Then, come into a basic crossed legs pose, or sukhasana with your palms on your knees and eyes closed. Keep your spine tall.
Stay here then switch the position of your legs and repeat.
If you are comfortable in this position, you’re ready for the half lotus or Ardha padmasana. Straighten your legs in front of you and continue with step 4.
Half lotus
Grab the right leg, and cradle it in your arms close to your chest. Gently swing the leg from side to side which will help open up the hips before going full lotus.
From here, place your right heel on your left pelvic bone.
Sit in this pose with your hands on your knees and eyes closed for a few moments. Switch legs, bringing the opposite leg to the pelvis first. Do you feel okay to proceed with a more intense technique aka, full lotus? If so, you can proceed to the next steps.
Full lotus padmasana pose technique
Restart by extending your legs in front of you.
Then, bend your right leg, and cradle it in your arms, gently swaying it from side to side.
Place the right foot into the left hip bone.
Now bend your left leg, then use your hands to pull your left foot over your right leg, and tuck it into the right side of your hip.
Let your knees drop to the mat, rest your hands palms up on your knees while touching the thumbs and pointer fingers together, and gently close your eyes. Focus on your breath and maintain a tall spine.
Reset your legs by extending them forward, then repeat the same steps but switch the position of your legs. For example, this time you’ll bend and cradle the left leg first. Then you’ll bring the right foot over the left leg to finish the lotus pose.
Here’s another way to perform lotus pose that involves deeper preparation.
Tips
The full lotus is very challenging if you don’t have very good flexibility. Do not expect to get it in day, one week, one month, or in some cases, one year or more.
Remember the role of the two major joints involved in the lotus pose. The hips are capable of rotation while the knees only flex and extend. The knees are at greater risk of injury in this pose if improper form is used.
Close the knee joint by fully bending your leg so that the calf is flat against the hamstrings. This will help protect the knees by keeping it more stable, while ensuring only the hips rotate.
Gently scoop the heels from underneath and set them in position on the hips.
If your knees cannot naturally drop to the floor, do not force them down. Be patient and allow the tissue in your lower body to loosen up and stretch.
Never use jerky or rough movements when performing the lotus pose. Be very gentle and patient as you’re assisting your feet to the hips.
As gently as you came into the pose, should you while coming out of it too.
Benefits of Lotus Pose Padmasana
Let’s take a look at why an ancient, pre hatha yoga posture would still be relevant today. Of course, it’s also important to remember that lotus is a form of meditation, which has many science proven benefits in itself.
Stretch multiple points
In the lotus posture, many points receive a deep stretch from the muscles in your feet, to the ankles, knees, quadriceps muscles, hips, groin, and the torso, with good posture. Stretching increases flexibility, and hence elasticity in the muscles which helps with healthy joint movement, and prevents injuries (1).
Calm your thoughts
Some stress is healthy but when it becomes chronic, so often does our mental and physical suffering. Meditation, and redirecting our focus is a crucial part of reducing the harmful effects of negative associations, reducing emotional fluctuation, and we all need it in some form. Especially with the pressures of modern lifestyles and culture (2).
Helps reduce and prevent disease risk
To extend on the previous benefit, yoga and exercise has been shown to improve disease or health risk factors. Studies published by National Library of Medicine conclude that there’s no doubt yoga improves stress, anxiety, and depression, while being a suitable complementary medicine (3, 4). But the advantages are two fold, as mental techniques contribute to the physical and mental improvements (5).
Reinforce discipline to live a healthier, more aware lifestyle
It’s easy to become overwhelmed with distractions that should take us less time in our daily lives. Yoga practice can make us more mindful and help us to be more in tune with our thoughts, bodies, and decisions (6). And chances are, if you have the discipline to follow a routine, it will carry over into other things that will help you to become better all around.
Many fun and challenging variations
The exciting thing about the lotus pose is that it doesn’t stop there… in fact, for someone who cannot get into the pose, the progressions can be a rewarding journey in themselves. But then you have more advanced variations like the ones included later on in this guide. As you progress, it’s also normal to build more strength and mental fitness as well.
Common Mistakes During Lotus Pose
When it comes to exercise, some bad habits are easily fixable and not likely to cause harm. But when it comes to flexing your body in more difficult positions, you must be especially careful to do it right Here are some things you must avoid during lotus pose.
Forcing the leg and foot into position
A proper lotus pose is only possible with sufficient hip mobility and ignoring this fact is a crucial mistake. When movement in the thigh is limited during the lotus pose, two ways that people try to fix it is pulling the foot up or pushing the knee down. The problem here is the knees are not made for such a degree of external rotation beyond 40 degrees.
The hips are a ball and socket joint with greater movement capability, while the knee bends and straightens. Don’t mess that up!
Bad form causes shearing forces on the knee which can damage the meniscus (soft cartilage in the knee that act as shock absorbers, and help stabilize the knee joint) and ligaments.
Solution: Practice gradual techniques to free up tension in the hips, and improve movement in the horizontal plane. You should also focus on closing the knee joint, making it less vulnerable to potentially damaging forces.
Variations of Lotus Pose Padmasana
There are plenty of lotus pose variations to keep you busy, including the preparatory and more advanced postures. Here are some of the more popular alternatives to the lotus pose padmasana.
Reclining lotus pose (supta padmasana)
The opposite of your hidden lotus, supta padmasana is performed on your back. And most people will want to try this variation before covering up their pose.
Steps
Sit at the front of your mat in padmasana.
Place your hands on the mat behind your hips, then bend your elbows and gently drop down on your forearms like in a reverse plank. Sit in this position for a few moments to ensure you’re comfortable.
Then slowly walk your hands toward your knees, and lie flat on your back with your arms by your sides and palms on the floor.
Now reach your arms overhead, and rest the top of the forearms and knuckles on the ground, but keep your elbows slightly bent.
Relax here and consciously breathe in and out.
To come out, bring your arms back down by your sides with the palms next to your hips. Tuck your chin into your chest, lift back up onto your forearms, then sit up in padmasana.
Now change your legs position and repeat.
Hidden lotus pose (gupta padmasana)
Try this concealed lotus pose variation that’ll force your hips to stay opened up. Many people also learn that changing the position of the same position suits them better. In this case, a prone position may enhance how the stretch feels in your entire back.
Steps
Begin in padmasana pose at the back end of your yoga mat.
Then place your hands on the mat and use your arms to lift up onto your knees. Walk your hands forward until your palms are directly under your shoulders like in a push-up on your knees position.
Now walk your hands forward and gently lower your chest, stomach, and hips to the floor. Then reach your arms overhead and rest your palms on the floor. Try to consciously press your pelvis down into the mat.
Stay here for a few conscious, relaxed breaths.
To leave the pose, bend your arms and place your palms on the floor next to your chest like the bottom of a push-up.
Push yourself up, then walk your hands back, and gently return to the sitting padmasana.
Now do it again but change the position of your legs.
Tip: You can also place your hands behind your back as shown in the video example.
Fish pose with lotus legs
If done correctly, the fish pose will give you an amazing stretch through the upper body and neck, while offering potential benefits of inversion (hanging your head upside down) like improved blood flow to the brain, and enhanced cognitive functioning. But the basic fish pose doesn’t stretch out the hips and groin like adding a lotus pose.
Steps
Start on your back with your body fully lengthened.
Bring your legs into lotus, then drop them to the floor.
Now lift your chest, arch your back, tilt your head back, and gently rest the top of your head on the floor. You can grab onto your hips as shown in the video example below.
Reverse the process by lying flat, raising your knees up, taking your feet off the hips one at a time, and straightening your legs out in front of you.
Lay there for a moment, then bring the legs back into lotus, switching legs this time, and repeat the previous steps.
Check out our full write up on fish pose matsyasana.
Floating lotus pose (Utplutih)
If you have good upper body strength, then you should absolutely try the floating variation. What it will do over the other variations is activate your chest, shoulders, and triceps, while calling on your core to produce more strength and stability. But there are mental benefits too, as you’ll have to trust yourself, have confidence in your abilities, and develop patience.
Note: Utplutih is a more advanced pose, and it can be very challenging. The video provided below shows a few progressions before attempting the full lotus pose. You can also find some technique tips following the written instructions.
Steps
Start in the sitting lotus position on your mat, with an upright posture.
Squeeze and activate your legs and flex your feet for better control.
Then straighten your arms and place your hands on the mat beside your upper thighs. Spread your fingers out, and feel where you will be most balanced. Emphasize pressing with the thumbs and pointer fingers.
Activate your delts, and the prominent muscles of your lateral torso like the lats and serratus anterior.
Now round your back slightly, then draw your abdomen in and up.
Inhale, then lift your body up off the ground. Press your hands down into the floor, maintain a solid position, look down at the tip of your nose, and take 10 big breaths.
Exhale, and slowly lower your butt to the floor in padmasana.
You can then swap the position of your legs and repeat the pose.
Tips
Mental focus is just as important here. Remain calm, breathe, take your time, and feel connected to the pose.
Remember most of this pose is a result of your core muscle engagement.
If the utplutih is too advanced for you, cross your legs normally (not lotus), and practice the floating pose while keeping your feet in contact with the floor, akin to an assisted version.
The half lotus pose, keeping only one foot on the floor, is another progression before the full floating variation.
FAQs
When is lotus pose best avoided? We do not recommend lotus pose for people with knee and ankle injuries or issues, or who are pregnant.
Can beginners try the lotus pose? It depends on your level of flexibility. Lotus pose is a more advanced posture that requires a great degree of hip mobility. Most beginners should start with a basic crossed leg sitting position, then progress to a half lotus, and finally the full lotus.
Wrapping Up
Through adversity and resilience sprouts a beautiful result, of which the lotus plant exemplifies that authenticity. Both a symbol and physical manifestation of grounding, expansion, death, re-emergence, resilience and beauty, so too is what the lotus pose represents.
While a more advanced position, you’ll also learn patience and persistence, but don’t forget to also enjoy the process as you learn one of the most foundational poses.
Resources
Amin DJ, Goodman M. The effects of selected asanas in Iyengar yoga on flexibility: pilot study. J Bodyw Mov Ther. 2014 Jul;18(3):399-404. doi: 10.1016/j.jbmt.2013.11.008. Epub 2013 Nov 8. PMID: 25042310.
Woodyard C. Exploring the therapeutic effects of yoga and its ability to increase quality of life. Int J Yoga. 2011 Jul;4(2):49-54. doi: 10.4103/0973-6131.85485. PMID: 22022122; PMCID: PMC3193654.
Shohani M, Badfar G, Nasirkandy MP, Kaikhavani S, Rahmati S, Modmeli Y, Soleymani A, Azami M. The Effect of Yoga on Stress, Anxiety, and Depression in Women. Int J Prev Med. 2018 Feb 21;9:21. doi: 10.4103/ijpvm.IJPVM_242_16. PMID: 29541436; PMCID: PMC5843960.
Bridges L, Sharma M. The Efficacy of Yoga as a Form of Treatment for Depression. J Evid Based Complementary Altern Med. 2017 Oct;22(4):1017-1028. doi: 10.1177/2156587217715927. Epub 2017 Jun 30. PMID: 28664775; PMCID: PMC5871291.
Goldsby TL, Goldsby ME, McWalters M, Mills PJ. Effects of Singing Bowl Sound Meditation on Mood, Tension, and Well-being: An Observational Study. J Evid Based Complementary Altern Med. 2017 Jul;22(3):401-406. doi: 10.1177/2156587216668109. Epub 2016 Sep 30. PMID: 27694559; PMCID: PMC5871151.
Yoga – benefits beyond the mat. Harvard Health. (2021, September 8).
Easily the most iconic meditation posture, recognized in film and TV, and part of rich ancient Asian tradition, just about everyone has tried some form or variation of lotus pose, whether making a joke out of it or genuine relaxation practice. But, laughing aside, most people would get a slice of humble pie after an honest attempt at the true lotus pose padmasana!
There are said to be many advantages of lotus pose like increasing flexibility, improving posture, easing menstrual symptoms, and migraines, mental relaxation, and awakening kundalini energy. But beneath the surface (pun surface) hides a beautiful representation of the lotus flower.
Let’s deep dive into the origins of padmasana, how it works, common mistakes to avoid, variations, and more.
What is The Lotus Pose?
We observe and practice for the benefits, but do we know about the history behind many classic poses, especially one as famous as the lotus pose? Padmasana, in Sanskrit, is derived from two parts, padma (meaning lotus), and sana (seat or throne meaning).
You may know of the lotus flower, or would recognize this sacred aquatic plant and powerful religious symbol from Buddhist and Hindu culture, where it’s commonly used as a pedestal for divine deities. But it makes more sense once you understand the angelic daily life cycle of a lotus. Deep rooted in mud, the lotus submerges in river water nightly, only to resurrect into a beautiful bloom the next morning. Hence its popular symbolic associations with rebirth and spiritual enlightenment.
But resilience is another word that comes to mind, considering the seemingly unfavorable environmental conditions, yet the strong will to revive each day, with each petal appearing as beautiful and strong as the day prior.
It’s no wonder the lotus is a foundational pose, that is believed to have many physical and mental benefits.
Anatomy of The Lotus Pose/Muscles Worked
(Proper) Lotus pose is a combination of sufficient hip flexion, external thigh rotation, and horizontal abduction. In other words, the thigh needs to be elevated high enough, with adequate outward rotation to safely and comfortably place the legs and feet in the lotus position.
Normally, the hips externally rotate about 60 degrees. In the lotus pose, more rotation is required. When mobility is less than what’s needed, people compensate by rotating and placing dangerous pressure on this knee joint.
So there needs to be a strong ability in the hips, with flexible quadriceps. This can be achieved with enough time, and consistency.
How To Do Lotus Pose (Ardha Padmasana)
Now we’ll get to the good stuff… find a yoga mat and go through a few practice steps before crossing over to the more advanced lotus pose variation. We’ll do this part in sections, starting with a basic legs crossed position, moving to a half lotus, and finally the lotus of all lotuses!
Below you’ll find written step-by-step instructions, with a video tutorial afterward. Also, check out the common mistakes section to avoid crucial technique dont’s.
Note: Before attempting lotus pose, ensure that you have sufficient lower body flexibility, healthy knees and ankles, and recent experience practicing similar techniques regularly. Padmasana is an intermediate to advanced posture, and bad technique can be costly for the knee joint.
It’s also important to note that there are slight variations of lotus pose, however, the general technique should remain the same for the safety of the joints.
Steps
Before attempting the full lotus pose, see if you can first perform the basic crossed legs and half lotus variations without pain or discomfort. If you can, then proceed to carefully try the full lotus, but only if you have sufficient hip mobility to comfortably slide your feet onto the hips without forcing or pulling the shins up.
Basic crossed legs posture
[*]Start from seated on your mat with both legs straightened in front of you.
[*]Then, come into a basic crossed legs pose, or sukhasana with your palms on your knees and eyes closed. Keep your spine tall.
[*]Stay here then switch the position of your legs and repeat.
[*]If you are comfortable in this position, you’re ready for the half lotus or Ardha padmasana. Straighten your legs in front of you and continue with step 4.
Half lotus
[*]Grab the right leg, and cradle it in your arms close to your chest. Gently swing the leg from side to side which will help open up the hips before going full lotus.
[*]From here, place your right heel on your left pelvic bone.
[*]Sit in this pose with your hands on your knees and eyes closed for a few moments. Switch legs, bringing the opposite leg to the pelvis first. Do you feel okay to proceed with a more intense technique aka, full lotus? If so, you can proceed to the next steps.
Full lotus padmasana pose technique
[*]Restart by extending your legs in front of you.
[*]Then, bend your right leg, and cradle it in your arms, gently swaying it from side to side.
[*]Place the right foot into the left hip bone.
[*]Now bend your left leg, then use your hands to pull your left foot over your right leg, and tuck it into the right side of your hip.
[*]Let your knees drop to the mat, rest your hands palms up on your knees while touching the thumbs and pointer fingers together, and gently close your eyes. Focus on your breath and maintain a tall spine.
[*]Reset your legs by extending them forward, then repeat the same steps but switch the position of your legs. For example, this time you’ll bend and cradle the left leg first. Then you’ll bring the right foot over the left leg to finish the lotus pose.
Here’s another way to perform lotus pose that involves deeper preparation.
Tips
- The full lotus is very challenging if you don’t have very good flexibility. Do not expect to get it in day, one week, one month, or in some cases, one year or more.
- Remember the role of the two major joints involved in the lotus pose. The hips are capable of rotation while the knees only flex and extend. The knees are at greater risk of injury in this pose if improper form is used.
- Close the knee joint by fully bending your leg so that the calf is flat against the hamstrings. This will help protect the knees by keeping it more stable, while ensuring only the hips rotate.
- Gently scoop the heels from underneath and set them in position on the hips.
- If your knees cannot naturally drop to the floor, do not force them down. Be patient and allow the tissue in your lower body to loosen up and stretch.
- Never use jerky or rough movements when performing the lotus pose. Be very gentle and patient as you’re assisting your feet to the hips.
- As gently as you came into the pose, should you while coming out of it too.
Benefits of Lotus Pose Padmasana
Let’s take a look at why an ancient, pre hatha yoga posture would still be relevant today. Of course, it’s also important to remember that lotus is a form of meditation, which has many science proven benefits in itself.
Stretch multiple points
In the lotus posture, many points receive a deep stretch from the muscles in your feet, to the ankles, knees, quadriceps muscles, hips, groin, and the torso, with good posture. Stretching increases flexibility, and hence elasticity in the muscles which helps with healthy joint movement, and prevents injuries (1).
Calm your thoughts
Some stress is healthy but when it becomes chronic, so often does our mental and physical suffering. Meditation, and redirecting our focus is a crucial part of reducing the harmful effects of negative associations, reducing emotional fluctuation, and we all need it in some form. Especially with the pressures of modern lifestyles and culture (2).
Helps reduce and prevent disease risk
To extend on the previous benefit, yoga and exercise has been shown to improve disease or health risk factors. Studies published by National Library of Medicine conclude that there’s no doubt yoga improves stress, anxiety, and depression, while being a suitable complementary medicine (3, 4). But the advantages are two fold, as mental techniques contribute to the physical and mental improvements (5).
Reinforce discipline to live a healthier, more aware lifestyle
It’s easy to become overwhelmed with distractions that should take us less time in our daily lives. Yoga practice can make us more mindful and help us to be more in tune with our thoughts, bodies, and decisions (6). And chances are, if you have the discipline to follow a routine, it will carry over into other things that will help you to become better all around.
Many fun and challenging variations
The exciting thing about the lotus pose is that it doesn’t stop there… in fact, for someone who cannot get into the pose, the progressions can be a rewarding journey in themselves. But then you have more advanced variations like the ones included later on in this guide. As you progress, it’s also normal to build more strength and mental fitness as well.
Common Mistakes During Lotus Pose
When it comes to exercise, some bad habits are easily fixable and not likely to cause harm. But when it comes to flexing your body in more difficult positions, you must be especially careful to do it right Here are some things you must avoid during lotus pose.
Forcing the leg and foot into position
A proper lotus pose is only possible with sufficient hip mobility and ignoring this fact is a crucial mistake. When movement in the thigh is limited during the lotus pose, two ways that people try to fix it is pulling the foot up or pushing the knee down. The problem here is the knees are not made for such a degree of external rotation beyond 40 degrees.
The hips are a ball and socket joint with greater movement capability, while the knee bends and straightens. Don’t mess that up!
Bad form causes shearing forces on the knee which can damage the meniscus (soft cartilage in the knee that act as shock absorbers, and help stabilize the knee joint) and ligaments.
Solution: Practice gradual techniques to free up tension in the hips, and improve movement in the horizontal plane. You should also focus on closing the knee joint, making it less vulnerable to potentially damaging forces.
Variations of Lotus Pose Padmasana
There are plenty of lotus pose variations to keep you busy, including the preparatory and more advanced postures. Here are some of the more popular alternatives to the lotus pose padmasana.
Reclining lotus pose (supta padmasana)
The opposite of your hidden lotus, supta padmasana is performed on your back. And most people will want to try this variation before covering up their pose.
Steps
[*]Sit at the front of your mat in padmasana.
[*]Place your hands on the mat behind your hips, then bend your elbows and gently drop down on your forearms like in a reverse plank. Sit in this position for a few moments to ensure you’re comfortable.
[*]Then slowly walk your hands toward your knees, and lie flat on your back with your arms by your sides and palms on the floor.
[*]Now reach your arms overhead, and rest the top of the forearms and knuckles on the ground, but keep your elbows slightly bent.
[*]Relax here and consciously breathe in and out.
[*]To come out, bring your arms back down by your sides with the palms next to your hips. Tuck your chin into your chest, lift back up onto your forearms, then sit up in padmasana.
[*]Now change your legs position and repeat.
Hidden lotus pose (gupta padmasana)
Try this concealed lotus pose variation that’ll force your hips to stay opened up. Many people also learn that changing the position of the same position suits them better. In this case, a prone position may enhance how the stretch feels in your entire back.
Steps
[*]Begin in padmasana pose at the back end of your yoga mat.
[*]Then place your hands on the mat and use your arms to lift up onto your knees. Walk your hands forward until your palms are directly under your shoulders like in a push-up on your knees position.
[*]Now walk your hands forward and gently lower your chest, stomach, and hips to the floor. Then reach your arms overhead and rest your palms on the floor. Try to consciously press your pelvis down into the mat.
[*]Stay here for a few conscious, relaxed breaths.
[*]To leave the pose, bend your arms and place your palms on the floor next to your chest like the bottom of a push-up.
[*]Push yourself up, then walk your hands back, and gently return to the sitting padmasana.
[*]Now do it again but change the position of your legs.
Tip: You can also place your hands behind your back as shown in the video example.
Fish pose with lotus legs
If done correctly, the fish pose will give you an amazing stretch through the upper body and neck, while offering potential benefits of inversion (hanging your head upside down) like improved blood flow to the brain, and enhanced cognitive functioning. But the basic fish pose doesn’t stretch out the hips and groin like adding a lotus pose.
Steps
[*]Start on your back with your body fully lengthened.
[*]Bring your legs into lotus, then drop them to the floor.
[*]Now lift your chest, arch your back, tilt your head back, and gently rest the top of your head on the floor. You can grab onto your hips as shown in the video example below.
[*]Reverse the process by lying flat, raising your knees up, taking your feet off the hips one at a time, and straightening your legs out in front of you.
[*]Lay there for a moment, then bring the legs back into lotus, switching legs this time, and repeat the previous steps.
Check out our full write up on fish pose matsyasana.
Floating lotus pose (Utplutih)
If you have good upper body strength, then you should absolutely try the floating variation. What it will do over the other variations is activate your chest, shoulders, and triceps, while calling on your core to produce more strength and stability. But there are mental benefits too, as you’ll have to trust yourself, have confidence in your abilities, and develop patience.
Note: Utplutih is a more advanced pose, and it can be very challenging. The video provided below shows a few progressions before attempting the full lotus pose. You can also find some technique tips following the written instructions.
Steps
[*]Start in the sitting lotus position on your mat, with an upright posture.
[*]Squeeze and activate your legs and flex your feet for better control.
[*]Then straighten your arms and place your hands on the mat beside your upper thighs. Spread your fingers out, and feel where you will be most balanced. Emphasize pressing with the thumbs and pointer fingers.
[*]Activate your delts, and the prominent muscles of your lateral torso like the lats and serratus anterior.
[*]Now round your back slightly, then draw your abdomen in and up.
[*]Inhale, then lift your body up off the ground. Press your hands down into the floor, maintain a solid position, look down at the tip of your nose, and take 10 big breaths.
[*]Exhale, and slowly lower your butt to the floor in padmasana.
[*]You can then swap the position of your legs and repeat the pose.
Tips
- Mental focus is just as important here. Remain calm, breathe, take your time, and feel connected to the pose.
- Remember most of this pose is a result of your core muscle engagement.
- If the utplutih is too advanced for you, cross your legs normally (not lotus), and practice the floating pose while keeping your feet in contact with the floor, akin to an assisted version.
- The half lotus pose, keeping only one foot on the floor, is another progression before the full floating variation.
FAQs
When is lotus pose best avoided? We do not recommend lotus pose for people with knee and ankle injuries or issues, or who are pregnant.
Can beginners try the lotus pose? It depends on your level of flexibility. Lotus pose is a more advanced posture that requires a great degree of hip mobility. Most beginners should start with a basic crossed leg sitting position, then progress to a half lotus, and finally the full lotus.
Wrapping Up
Through adversity and resilience sprouts a beautiful result, of which the lotus plant exemplifies that authenticity. Both a symbol and physical manifestation of grounding, expansion, death, re-emergence, resilience and beauty, so too is what the lotus pose represents.
While a more advanced position, you’ll also learn patience and persistence, but don’t forget to also enjoy the process as you learn one of the most foundational poses.
Resources
[*]Amin DJ, Goodman M. The effects of selected asanas in Iyengar yoga on flexibility: pilot study. J Bodyw Mov Ther. 2014 Jul;18(3):399-404. doi: 10.1016/j.jbmt.2013.11.008. Epub 2013 Nov 8. PMID: 25042310.
[*]Woodyard C. Exploring the therapeutic effects of yoga and its ability to increase quality of life. Int J Yoga. 2011 Jul;4(2):49-54. doi: 10.4103/0973-6131.85485. PMID: 22022122; PMCID: PMC3193654.
[*]Shohani M, Badfar G, Nasirkandy MP, Kaikhavani S, Rahmati S, Modmeli Y, Soleymani A, Azami M. The Effect of Yoga on Stress, Anxiety, and Depression in Women. Int J Prev Med. 2018 Feb 21;9:21. doi: 10.4103/ijpvm.IJPVM_242_16. PMID: 29541436; PMCID: PMC5843960.
[*]Bridges L, Sharma M. The Efficacy of Yoga as a Form of Treatment for Depression. J Evid Based Complementary Altern Med. 2017 Oct;22(4):1017-1028. doi: 10.1177/2156587217715927. Epub 2017 Jun 30. PMID: 28664775; PMCID: PMC5871291.
[*]Goldsby TL, Goldsby ME, McWalters M, Mills PJ. Effects of Singing Bowl Sound Meditation on Mood, Tension, and Well-being: An Observational Study. J Evid Based Complementary Altern Med. 2017 Jul;22(3):401-406. doi: 10.1177/2156587216668109. Epub 2016 Sep 30. PMID: 27694559; PMCID: PMC5871151.
[*]Yoga – benefits beyond the mat. Harvard Health. (2021, September 8).
Click here to view the article.