
Muscle Insider
New member
Some exercises look super easy, but when you try them, you fail to get even in the correct position; the L-sit is one of them.
The L-sit is a classic gymnastic movement that will set your core on fire. On the outside, the L-sit looks very easy. You sit on the floor, plant your hands next to your hips, and lift your hips and legs off the ground. However, this is easier said than done.
Beginners that do not have a gymnastics background will most likely find themselves grinding their teeth while they fail to lift themselves off the floor. I have had newbie exercisers tell me they are anatomically unfit to do the L-sit because they have a long torso and short arms. You might experience the same thing.
However, most people falter at doing the L-sit not because of their body mechanics but because of an incorrect form or a lack of core strength.
Since the L-sit is a bodyweight exercise, most people think that they should be able to do it from the get-go. This, however, is not the case. Like most gymnastic exercises, you will be better off starting with an L-sit progression plan.
In this article, we dive deep into the L-sit and cover its fundamentals, an effective progression plan; the muscles worked during an L-sit, its benefits, proper form, the most common mistakes, and the best variations and alternatives.
What is a L-Sit?
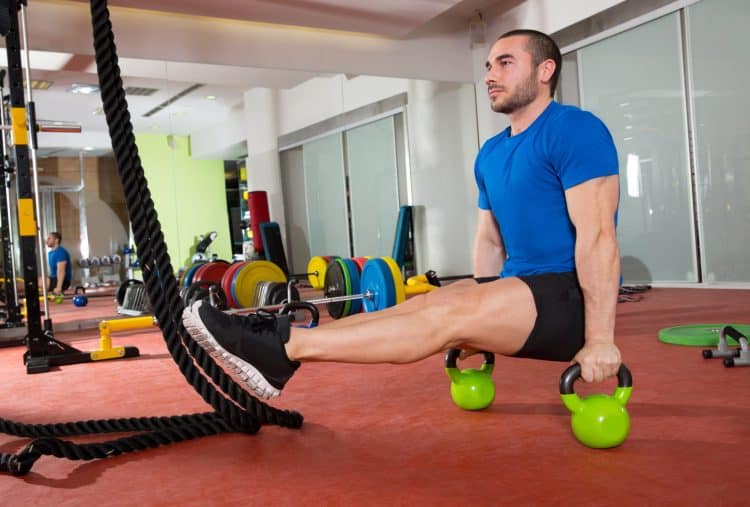
L Sit With Kettlebells
The L-sit is an isometric exercise that improves your core strength and balance. Isometric exercises involve static muscle contraction without visible movement in the joint’s angle. The L-sit is a fundamental gymnastic exercise that grew popular thanks to CrossFit. This exercise is also very popular in the calisthenics circuit.
Besides the conventional L-sit, CrossFit WODs (workout of the day) include several variations of this exercise, including L-sit bar pull-ups and L-sit ring pull-ups. The conventional L-sit demands decent core and hip flexor strength. On the other hand, the pull-up variations also engage most of your upper body, including the biceps, lats, traps, rhomboids, and teres major and minor.
Beginners should start practicing this exercise by placing their hands on an elevated object, such as yoga blocks, or perform this exercise on parallettes or parallel bars. If you still cannot perform this exercise, use the progression exercises listed in this article to build the required core strength.
Muscles Worked During L-Sit
The L-sit works the following muscles:
Abs: The core is the primary target muscle of the L-sit. This exercise requires you to keep your core contracted, resulting in a rectus and transverse abdominal recruitment.
Hip Flexors: These muscles run along the front of your upper thigh. You must engage your hip flexors to keep your legs parallel to the floor throughout the exercise.
Glutes and Quads: This exercise involves keeping your glutes and quads contracted to maintain a stable position.
Triceps: You’ll experience triceps stimulation as soon as you lock out your elbows and lift yourself off the floor. Furthermore, pointing your fingers behind you will engage your biceps.
Shoulders: The L-sit involves actively pushing into the floor, which will result in a sick deltoid pump. You will also experience trapezius muscle stimulation as this exercise requires pushing your shoulders back and down.
Benefits of L-Sit
Adding the L-sit to your training regimen entails the following benefits:
Build a Solid Core and Six-Pack
L-sits can help you build abs of steel. Holding your legs parallel to the floor while extended in the air will work muscles in your core that you didn’t know existed. A strong core can also improve your performance in compound exercise and daily functioning.
Enhance Stability and Balance
A strong core translates to robust stabilizer muscles, which can significantly improve your stability. The L-sit also improves your balance and performance in handstands, push-ups, toes-to-bar, deadlifts, and barbell squats.
Improve Posture
The L-sit strengthens the muscles responsible for maintaining an upright and stable spine, which can help improve your posture. This is an excellent exercise for people that spend most of their day sitting.
Boost Hip Flexor Strength
The hip flexors help bring the knee closer to the chest, meaning they are used in activities such as walking, running, jumping, and kicking. Since the L-sit involves holding your legs parallel to the floor, it engages and strengthens your hip flexors.
How To Do L-Sit
This is how to perform the L-sit with the correct form:
Steps:
Sit upright on the floor with your legs extended in front of you.
Place your hands on the floor next to your hips. Spread your hands and curl your fingers slightly so that your fingertips are pushing into the floor.
Straighten your arms and lock out your elbows. Simultaneously engage your lats and push your shoulders back and down.
Push your palms into the floor, engage your core, and lift your hips and legs off the floor. Your legs should be parallel to the floor throughout the exercise.
Your body should resemble an “L” at the top of the exercise.
Hold the position for as long as possible or a specific time.
Return to the starting position.
Repeat for the desired number of sets.
L-Sit Tips:
Keep your quads and glutes contracted and your toes pointed throughout the exercise.
Place your hands on yoga blocks if you have trouble pushing yourself off the floor.
Spreading your hands and pushing your fingertips and palms into the floor will help you maintain your balance.
Maintain an upright torso while pushing yourself off the floor. Bending forward will make lifting your legs off the floor more difficult.
Advanced exercises can wear a weighted vest to make this exercise harder.
In This Exercise:
Target Muscle Group: Abs
Type: Strength
Mechanics: Isometric
Equipment: Bodyweight
Difficulty: Intermediate
Best Rep Range: 30-60 seconds
L-Sit Progression Exercises
Use the following L-Sit progression exercises if you lack the strength to perform the conventional variation of the exercise:
Step 1: Boat Hold
The boat hold is an excellent core exercise that is suitable for trainers of all experience levels. It will help you build the foundational strength for L-sits.
Steps:
Sit upright on the floor and extend your legs in front of you.
Cross your arms in front of your chest.
Engage your core and tilt your torso backward. Anything between 1 to 2 o’clock will work.
Lift your legs off the floor while keeping your knees locked out.
Hold this position for as long as possible.
Pro Tip: If you have trouble maintaining your torso in position, place your hands next to your hips on the floor.
Step 2: Elevation
This L-sit progression exercise involves using an elevated platform, such as yoga blocks or parallettes. Furthermore, you will focus on lifting your hips off the floor while keeping your heels grounded.
Steps:
Sit on the floor with your legs extended and place parallettes on each side of your hips.
Grab the bars with an overhand grip. Your elbows will be bent at this position.
Extend your elbows while pushing your shoulders back and down. You must lock out your elbows at the top, and your hips should be off the floor.
Your heels should be the only point of contact with the floor.
Slowly return to the starting position.
Repeat for 15-20 reps.
Pro Tip: Avoid using your legs to push yourself into a lockout position. Conversely, beginners can bend their knees slightly and push their heels into the floor to generate force.
Step 3: Alternating Leg Lift
In this L-sit progression exercise, you’ll focus on the lockout and lifting one leg at a time.
Steps:
Sit upright on the floor and extend your legs in front of you.
Place your hands on your hip side.
Push your shoulders down and back, and extend your elbows. Your hips should be off the floor at this point. Your heels should be the only point of contact with the floor.
Contract your abs and lift your left leg off the floor until it is parallel to the floor.
Return your left leg to the floor and repeat with the right leg.
Alternate between sides for the recommended reps.
Pro Tip: As you get better at this exercise, lift your legs as high as possible without bending your knees. Hold for a five-second count before lowering your legs to the floor.
Step 4: Tuck Sits (on an elevated platform)
Tuck sits can be incredibly effective in building the required core strength and confidence to perform the L-sit. This is also the first exercise where we bring together most of what we’ve learned up to this point.
Steps:
Sit upright on the floor and extend your legs in front of you.
Bend your knees and plant your heels on the floor as close to your hips as possible.
Place your hands on the sides of your hips.
Push your shoulders back and down and extend your elbows to lift your hips off the floor.
Pull your quads to your chest as you lift your hips off the floor.
Hold for as long as possible.
Pro Tip: Holding your legs close to your chest is easier than maintaining straight legs. You can also use an elevated platform for this exercise if you have difficulty doing it on the ground.
Step 5: Tuck-Sit to L-Sit (on an elevated platform)
We push into the next gear with this L-sit progression exercise. This exercise begins in the tuck sit position and requires you to work into a full L-sit.
Steps:
Follow the steps mentioned above to get into a tuck-sit position.
While keeping your back straight, extend your legs until they are parallel to the floor.
You might lose balance as you extend your legs. In this case, pull your legs back to your chest.
Hold the L-sit position for as long as possible.
Pro Tip: Use elevated platforms for this exercise if you cannot do it on the floor. Performing this exercise on an elevated platform will ensure you have enough space to pull your legs into your chest without having your feet touch the floor.
Step 6: L-Sit
After you have spent enough time practicing the tuck-sit (step four) and tuck-sit to L-sit (step five), the conventional L-sit will be the natural next step. Use the steps mentioned in the “How To Do L-Sit” section to perform the L-sit.
Common Mistakes While Performing L-Sit
Avoid making the following mistakes while performing the L-sit to get the best bang for your buck:
Rounding Back
This is one of the most common mistakes exercisers commit while performing the L-sit. You must avoid hunching your back as you extend your elbows to lift your hips off the floor. Rounding your back makes it harder to lift your legs off the floor.
Skipping Warm-Up
Since the L-sit is a bodyweight exercise, many people skip warming up their bodies, which can hamper their performance. Before doing this exercise, you must spend 5-10 minutes warming up your wrists, arms, shoulders, abs, glutes, hamstrings, and legs to ensure you’re primed to hold this position for as long as possible.
Not Locking Out Your Elbows and Pushing Your Shoulder Back and Down
Maintaining soft elbows while performing the L-sit is a rookie mistake. You must lock out your elbows to ensure optimal stability and balance. Soft elbows usually lead to the rounding of the back. Also, you must push your shoulders back and down to gain an optimal height to lift your legs off the floor comfortably.
Variations and Alternatives of L-Sit
Add the following L-sit variations and alternatives to your training regimen to build a shredded midsection:
L-Sit Pull-Up
After mastering the L-sit, you can progress to the L-sit pull-up for an additional challenge. Most people tend to use their legs to perform a pull-up; however, since you’ll be holding your legs in front of you in this variation, this exercise is much more difficult than the conventional pull-up.
Steps:
Stand under a pull-up bar.
Grab the pull-up bar with a shoulder-wide grip.
Lift your legs until they are parallel to the floor.
Perform a pull-up while holding this position until your chin is over the bar.
Return to the starting position.
Repeat for recommended reps.
Pro Tip: Beginners can perform hanging L-sit until they develop the core strength to perform a pull-up.
L-Sit Pull-Up on Rings
Since you can pull your head between the rings, this exercise is a little easier than the L-sit pull-up on a pull-up bar, where you must pull your body at an angle. However, performing it on the rings requires more core stability.
Steps:
Jump and grab the gymnastic rings with a neutral (palms facing each other) grip.
Lift your legs until they are parallel to the floor.
While keeping your core contracted, perform a pull-up.
Return to the start position.
Repeat for reps.
Pro Tip: Keep your shoulders pulled back and down while performing pull-ups.
Plank
You need a strong core to perform the L-sit. Planks are an incredibly effective beginner-friendly exercise to build the requisite core strength.
Steps:
Get on all fours on the floor.
Place your elbows under your shoulders and plant your forearms on the floor. Your forearms should be parallel to each other.
Extend your legs behind you.
Your body should be in a straight line from head to toe.
Hold this position for as long as possible.
Pro Tip: As you get more experienced, make this exercise more difficult by wearing a weighted vest or placing a weight plate on your back.
Check out our complete plank guide!
Hollow Body Hold
Hollow body hold is an excellent exercise to build core strength. It is used widely in CrossFit gyms to improve your kipping pull-up mechanics.
Steps:
Lie supine on the floor. Extend your arms over your head.
Contract your abs and lift your legs off the floor. Simultaneously lift your shoulders and arms toward the ceiling.
Your hips and lower body should be the only point of contact with the floor.
Hold the position for as long as possible.
Pro Tip: Focus on actively pushing your arms and legs toward the ceiling throughout the exercise.
Check out our complete hollow hold guide!
Toes-To-Bar
Performing toes-to-bar requires significant core strength. You must keep your core engaged throughout the exercise to avoid swinging between reps.
Steps:
Grab a pull-up bar with an overhand shoulder-wide grip.
Lock out your elbows.
Press on the bar using your lats; this will pull your torso behind the bar.
Simultaneously lean back slightly and raise your legs toward the pull-up bar.
Touch your toes to the bar.
Lower your legs to the starting position.
Repeat for recommended reps.
Pro Tip: Perform a kip to stabilize your body and generate momentum to raise your toes to the bar.
Wrapping Up
The L-sit is an isometric exercise that will help you build a strong core, strengthen your stabilizers, improve your balance and posture, and boost hip flexor strength. Mastering this exercise is a must if you are into gymnastics or CrossFit.
The five beginner-friendly progression exercises listed in this article are excellent movements to work toward an L-sit. Perform the variations thrice weekly, and you should be able to perform a picture-perfect L-sit by the end of six weeks. Best of luck!
Some exercises look super easy, but when you try them, you fail to get even in the correct position; the L-sit is one of them.
The L-sit is a classic gymnastic movement that will set your core on fire. On the outside, the L-sit looks very easy. You sit on the floor, plant your hands next to your hips, and lift your hips and legs off the ground. However, this is easier said than done.
Beginners that do not have a gymnastics background will most likely find themselves grinding their teeth while they fail to lift themselves off the floor. I have had newbie exercisers tell me they are anatomically unfit to do the L-sit because they have a long torso and short arms. You might experience the same thing.
However, most people falter at doing the L-sit not because of their body mechanics but because of an incorrect form or a lack of core strength.
Since the L-sit is a bodyweight exercise, most people think that they should be able to do it from the get-go. This, however, is not the case. Like most gymnastic exercises, you will be better off starting with an L-sit progression plan.
In this article, we dive deep into the L-sit and cover its fundamentals, an effective progression plan; the muscles worked during an L-sit, its benefits, proper form, the most common mistakes, and the best variations and alternatives.
What is a L-Sit?
 L Sit With Kettlebells
The L-sit is an isometric exercise that improves your core strength and balance. Isometric exercises involve static muscle contraction without visible movement in the joint’s angle. The L-sit is a fundamental gymnastic exercise that grew popular thanks to CrossFit. This exercise is also very popular in the calisthenics circuit.
Besides the conventional L-sit, CrossFit WODs (workout of the day) include several variations of this exercise, including L-sit bar pull-ups and L-sit ring pull-ups. The conventional L-sit demands decent core and hip flexor strength. On the other hand, the pull-up variations also engage most of your upper body, including the biceps, lats, traps, rhomboids, and teres major and minor.
Beginners should start practicing this exercise by placing their hands on an elevated object, such as yoga blocks, or perform this exercise on parallettes or parallel bars. If you still cannot perform this exercise, use the progression exercises listed in this article to build the required core strength.
Muscles Worked During L-Sit
The L-sit works the following muscles:
Adding the L-sit to your training regimen entails the following benefits:
Build a Solid Core and Six-Pack
L-sits can help you build abs of steel. Holding your legs parallel to the floor while extended in the air will work muscles in your core that you didn’t know existed. A strong core can also improve your performance in compound exercise and daily functioning.
Enhance Stability and Balance
A strong core translates to robust stabilizer muscles, which can significantly improve your stability. The L-sit also improves your balance and performance in handstands, push-ups, toes-to-bar, deadlifts, and barbell squats.
Improve Posture
The L-sit strengthens the muscles responsible for maintaining an upright and stable spine, which can help improve your posture. This is an excellent exercise for people that spend most of their day sitting.
Boost Hip Flexor Strength
The hip flexors help bring the knee closer to the chest, meaning they are used in activities such as walking, running, jumping, and kicking. Since the L-sit involves holding your legs parallel to the floor, it engages and strengthens your hip flexors.
How To Do L-Sit
This is how to perform the L-sit with the correct form:
Steps:
[*]Sit upright on the floor with your legs extended in front of you.
[*]Place your hands on the floor next to your hips. Spread your hands and curl your fingers slightly so that your fingertips are pushing into the floor.
[*]Straighten your arms and lock out your elbows. Simultaneously engage your lats and push your shoulders back and down.
[*]Push your palms into the floor, engage your core, and lift your hips and legs off the floor. Your legs should be parallel to the floor throughout the exercise.
[*]Your body should resemble an “L” at the top of the exercise.
[*]Hold the position for as long as possible or a specific time.
[*]Return to the starting position.
[*]Repeat for the desired number of sets.
L-Sit Tips:
[*]Keep your quads and glutes contracted and your toes pointed throughout the exercise.
[*]Place your hands on yoga blocks if you have trouble pushing yourself off the floor.
[*]Spreading your hands and pushing your fingertips and palms into the floor will help you maintain your balance.
[*]Maintain an upright torso while pushing yourself off the floor. Bending forward will make lifting your legs off the floor more difficult.
[*]Advanced exercises can wear a weighted vest to make this exercise harder.
In This Exercise:
L-Sit Progression Exercises
Use the following L-Sit progression exercises if you lack the strength to perform the conventional variation of the exercise:
Step 1: Boat Hold
The boat hold is an excellent core exercise that is suitable for trainers of all experience levels. It will help you build the foundational strength for L-sits.
Steps:
[*]Sit upright on the floor and extend your legs in front of you.
[*]Cross your arms in front of your chest.
[*]Engage your core and tilt your torso backward. Anything between 1 to 2 o’clock will work.
[*]Lift your legs off the floor while keeping your knees locked out.
[*]Hold this position for as long as possible.
Pro Tip: If you have trouble maintaining your torso in position, place your hands next to your hips on the floor.
Step 2: Elevation
This L-sit progression exercise involves using an elevated platform, such as yoga blocks or parallettes. Furthermore, you will focus on lifting your hips off the floor while keeping your heels grounded.
Steps:
[*]Sit on the floor with your legs extended and place parallettes on each side of your hips.
[*]Grab the bars with an overhand grip. Your elbows will be bent at this position.
[*]Extend your elbows while pushing your shoulders back and down. You must lock out your elbows at the top, and your hips should be off the floor.
[*]Your heels should be the only point of contact with the floor.
[*]Slowly return to the starting position.
[*]Repeat for 15-20 reps.
Pro Tip: Avoid using your legs to push yourself into a lockout position. Conversely, beginners can bend their knees slightly and push their heels into the floor to generate force.
Step 3: Alternating Leg Lift
In this L-sit progression exercise, you’ll focus on the lockout and lifting one leg at a time.
Steps:
[*]Sit upright on the floor and extend your legs in front of you.
[*]Place your hands on your hip side.
[*]Push your shoulders down and back, and extend your elbows. Your hips should be off the floor at this point. Your heels should be the only point of contact with the floor.
[*]Contract your abs and lift your left leg off the floor until it is parallel to the floor.
[*]Return your left leg to the floor and repeat with the right leg.
[*]Alternate between sides for the recommended reps.
Pro Tip: As you get better at this exercise, lift your legs as high as possible without bending your knees. Hold for a five-second count before lowering your legs to the floor.
Step 4: Tuck Sits (on an elevated platform)
Tuck sits can be incredibly effective in building the required core strength and confidence to perform the L-sit. This is also the first exercise where we bring together most of what we’ve learned up to this point.
Steps:
[*]Sit upright on the floor and extend your legs in front of you.
[*]Bend your knees and plant your heels on the floor as close to your hips as possible.
[*]Place your hands on the sides of your hips.
[*]Push your shoulders back and down and extend your elbows to lift your hips off the floor.
[*]Pull your quads to your chest as you lift your hips off the floor.
[*]Hold for as long as possible.
Pro Tip: Holding your legs close to your chest is easier than maintaining straight legs. You can also use an elevated platform for this exercise if you have difficulty doing it on the ground.
Step 5: Tuck-Sit to L-Sit (on an elevated platform)
We push into the next gear with this L-sit progression exercise. This exercise begins in the tuck sit position and requires you to work into a full L-sit.
Steps:
[*]Follow the steps mentioned above to get into a tuck-sit position.
[*]While keeping your back straight, extend your legs until they are parallel to the floor.
[*]You might lose balance as you extend your legs. In this case, pull your legs back to your chest.
[*]Hold the L-sit position for as long as possible.
Pro Tip: Use elevated platforms for this exercise if you cannot do it on the floor. Performing this exercise on an elevated platform will ensure you have enough space to pull your legs into your chest without having your feet touch the floor.
Step 6: L-Sit
After you have spent enough time practicing the tuck-sit (step four) and tuck-sit to L-sit (step five), the conventional L-sit will be the natural next step. Use the steps mentioned in the “How To Do L-Sit” section to perform the L-sit.
Common Mistakes While Performing L-Sit
Avoid making the following mistakes while performing the L-sit to get the best bang for your buck:
Rounding Back
This is one of the most common mistakes exercisers commit while performing the L-sit. You must avoid hunching your back as you extend your elbows to lift your hips off the floor. Rounding your back makes it harder to lift your legs off the floor.
Skipping Warm-Up
Since the L-sit is a bodyweight exercise, many people skip warming up their bodies, which can hamper their performance. Before doing this exercise, you must spend 5-10 minutes warming up your wrists, arms, shoulders, abs, glutes, hamstrings, and legs to ensure you’re primed to hold this position for as long as possible.
Not Locking Out Your Elbows and Pushing Your Shoulder Back and Down
Maintaining soft elbows while performing the L-sit is a rookie mistake. You must lock out your elbows to ensure optimal stability and balance. Soft elbows usually lead to the rounding of the back. Also, you must push your shoulders back and down to gain an optimal height to lift your legs off the floor comfortably.
Variations and Alternatives of L-Sit
Add the following L-sit variations and alternatives to your training regimen to build a shredded midsection:
L-Sit Pull-Up
After mastering the L-sit, you can progress to the L-sit pull-up for an additional challenge. Most people tend to use their legs to perform a pull-up; however, since you’ll be holding your legs in front of you in this variation, this exercise is much more difficult than the conventional pull-up.
Steps:
[*]Stand under a pull-up bar.
[*]Grab the pull-up bar with a shoulder-wide grip.
[*]Lift your legs until they are parallel to the floor.
[*]Perform a pull-up while holding this position until your chin is over the bar.
[*]Return to the starting position.
[*]Repeat for recommended reps.
Pro Tip: Beginners can perform hanging L-sit until they develop the core strength to perform a pull-up.
L-Sit Pull-Up on Rings
Since you can pull your head between the rings, this exercise is a little easier than the L-sit pull-up on a pull-up bar, where you must pull your body at an angle. However, performing it on the rings requires more core stability.
Steps:
[*]Jump and grab the gymnastic rings with a neutral (palms facing each other) grip.
[*]Lift your legs until they are parallel to the floor.
[*]While keeping your core contracted, perform a pull-up.
[*]Return to the start position.
[*]Repeat for reps.
Pro Tip: Keep your shoulders pulled back and down while performing pull-ups.
Plank
You need a strong core to perform the L-sit. Planks are an incredibly effective beginner-friendly exercise to build the requisite core strength.
Steps:
[*]Get on all fours on the floor.
[*]Place your elbows under your shoulders and plant your forearms on the floor. Your forearms should be parallel to each other.
[*]Extend your legs behind you.
[*]Your body should be in a straight line from head to toe.
[*]Hold this position for as long as possible.
Pro Tip: As you get more experienced, make this exercise more difficult by wearing a weighted vest or placing a weight plate on your back.
Check out our complete plank guide!
Hollow Body Hold
Hollow body hold is an excellent exercise to build core strength. It is used widely in CrossFit gyms to improve your kipping pull-up mechanics.
Steps:
[*]Lie supine on the floor. Extend your arms over your head.
[*]Contract your abs and lift your legs off the floor. Simultaneously lift your shoulders and arms toward the ceiling.
[*]Your hips and lower body should be the only point of contact with the floor.
[*]Hold the position for as long as possible.
Pro Tip: Focus on actively pushing your arms and legs toward the ceiling throughout the exercise.
Check out our complete hollow hold guide!
Toes-To-Bar
Performing toes-to-bar requires significant core strength. You must keep your core engaged throughout the exercise to avoid swinging between reps.
Steps:
[*]Grab a pull-up bar with an overhand shoulder-wide grip.
[*]Lock out your elbows.
[*]Press on the bar using your lats; this will pull your torso behind the bar.
[*]Simultaneously lean back slightly and raise your legs toward the pull-up bar.
[*]Touch your toes to the bar.
[*]Lower your legs to the starting position.
[*]Repeat for recommended reps.
Pro Tip: Perform a kip to stabilize your body and generate momentum to raise your toes to the bar.
Wrapping Up
The L-sit is an isometric exercise that will help you build a strong core, strengthen your stabilizers, improve your balance and posture, and boost hip flexor strength. Mastering this exercise is a must if you are into gymnastics or CrossFit.
The five beginner-friendly progression exercises listed in this article are excellent movements to work toward an L-sit. Perform the variations thrice weekly, and you should be able to perform a picture-perfect L-sit by the end of six weeks. Best of luck!
Click here to view the article.
The L-sit is a classic gymnastic movement that will set your core on fire. On the outside, the L-sit looks very easy. You sit on the floor, plant your hands next to your hips, and lift your hips and legs off the ground. However, this is easier said than done.
Beginners that do not have a gymnastics background will most likely find themselves grinding their teeth while they fail to lift themselves off the floor. I have had newbie exercisers tell me they are anatomically unfit to do the L-sit because they have a long torso and short arms. You might experience the same thing.
However, most people falter at doing the L-sit not because of their body mechanics but because of an incorrect form or a lack of core strength.
Since the L-sit is a bodyweight exercise, most people think that they should be able to do it from the get-go. This, however, is not the case. Like most gymnastic exercises, you will be better off starting with an L-sit progression plan.
In this article, we dive deep into the L-sit and cover its fundamentals, an effective progression plan; the muscles worked during an L-sit, its benefits, proper form, the most common mistakes, and the best variations and alternatives.
What is a L-Sit?
L Sit With Kettlebells
The L-sit is an isometric exercise that improves your core strength and balance. Isometric exercises involve static muscle contraction without visible movement in the joint’s angle. The L-sit is a fundamental gymnastic exercise that grew popular thanks to CrossFit. This exercise is also very popular in the calisthenics circuit.
Besides the conventional L-sit, CrossFit WODs (workout of the day) include several variations of this exercise, including L-sit bar pull-ups and L-sit ring pull-ups. The conventional L-sit demands decent core and hip flexor strength. On the other hand, the pull-up variations also engage most of your upper body, including the biceps, lats, traps, rhomboids, and teres major and minor.
Beginners should start practicing this exercise by placing their hands on an elevated object, such as yoga blocks, or perform this exercise on parallettes or parallel bars. If you still cannot perform this exercise, use the progression exercises listed in this article to build the required core strength.
Muscles Worked During L-Sit
The L-sit works the following muscles:
Abs: The core is the primary target muscle of the L-sit. This exercise requires you to keep your core contracted, resulting in a rectus and transverse abdominal recruitment.
Hip Flexors: These muscles run along the front of your upper thigh. You must engage your hip flexors to keep your legs parallel to the floor throughout the exercise.
Glutes and Quads: This exercise involves keeping your glutes and quads contracted to maintain a stable position.
Triceps: You’ll experience triceps stimulation as soon as you lock out your elbows and lift yourself off the floor. Furthermore, pointing your fingers behind you will engage your biceps.
Shoulders: The L-sit involves actively pushing into the floor, which will result in a sick deltoid pump. You will also experience trapezius muscle stimulation as this exercise requires pushing your shoulders back and down.
Benefits of L-Sit
Adding the L-sit to your training regimen entails the following benefits:
Build a Solid Core and Six-Pack
L-sits can help you build abs of steel. Holding your legs parallel to the floor while extended in the air will work muscles in your core that you didn’t know existed. A strong core can also improve your performance in compound exercise and daily functioning.
Enhance Stability and Balance
A strong core translates to robust stabilizer muscles, which can significantly improve your stability. The L-sit also improves your balance and performance in handstands, push-ups, toes-to-bar, deadlifts, and barbell squats.
Improve Posture
The L-sit strengthens the muscles responsible for maintaining an upright and stable spine, which can help improve your posture. This is an excellent exercise for people that spend most of their day sitting.
Boost Hip Flexor Strength
The hip flexors help bring the knee closer to the chest, meaning they are used in activities such as walking, running, jumping, and kicking. Since the L-sit involves holding your legs parallel to the floor, it engages and strengthens your hip flexors.
How To Do L-Sit
This is how to perform the L-sit with the correct form:
Steps:
Sit upright on the floor with your legs extended in front of you.
Place your hands on the floor next to your hips. Spread your hands and curl your fingers slightly so that your fingertips are pushing into the floor.
Straighten your arms and lock out your elbows. Simultaneously engage your lats and push your shoulders back and down.
Push your palms into the floor, engage your core, and lift your hips and legs off the floor. Your legs should be parallel to the floor throughout the exercise.
Your body should resemble an “L” at the top of the exercise.
Hold the position for as long as possible or a specific time.
Return to the starting position.
Repeat for the desired number of sets.
L-Sit Tips:
Keep your quads and glutes contracted and your toes pointed throughout the exercise.
Place your hands on yoga blocks if you have trouble pushing yourself off the floor.
Spreading your hands and pushing your fingertips and palms into the floor will help you maintain your balance.
Maintain an upright torso while pushing yourself off the floor. Bending forward will make lifting your legs off the floor more difficult.
Advanced exercises can wear a weighted vest to make this exercise harder.
In This Exercise:
Target Muscle Group: Abs
Type: Strength
Mechanics: Isometric
Equipment: Bodyweight
Difficulty: Intermediate
Best Rep Range: 30-60 seconds
L-Sit Progression Exercises
Use the following L-Sit progression exercises if you lack the strength to perform the conventional variation of the exercise:
Step 1: Boat Hold
The boat hold is an excellent core exercise that is suitable for trainers of all experience levels. It will help you build the foundational strength for L-sits.
Steps:
Sit upright on the floor and extend your legs in front of you.
Cross your arms in front of your chest.
Engage your core and tilt your torso backward. Anything between 1 to 2 o’clock will work.
Lift your legs off the floor while keeping your knees locked out.
Hold this position for as long as possible.
Pro Tip: If you have trouble maintaining your torso in position, place your hands next to your hips on the floor.
Step 2: Elevation
This L-sit progression exercise involves using an elevated platform, such as yoga blocks or parallettes. Furthermore, you will focus on lifting your hips off the floor while keeping your heels grounded.
Steps:
Sit on the floor with your legs extended and place parallettes on each side of your hips.
Grab the bars with an overhand grip. Your elbows will be bent at this position.
Extend your elbows while pushing your shoulders back and down. You must lock out your elbows at the top, and your hips should be off the floor.
Your heels should be the only point of contact with the floor.
Slowly return to the starting position.
Repeat for 15-20 reps.
Pro Tip: Avoid using your legs to push yourself into a lockout position. Conversely, beginners can bend their knees slightly and push their heels into the floor to generate force.
Step 3: Alternating Leg Lift
In this L-sit progression exercise, you’ll focus on the lockout and lifting one leg at a time.
Steps:
Sit upright on the floor and extend your legs in front of you.
Place your hands on your hip side.
Push your shoulders down and back, and extend your elbows. Your hips should be off the floor at this point. Your heels should be the only point of contact with the floor.
Contract your abs and lift your left leg off the floor until it is parallel to the floor.
Return your left leg to the floor and repeat with the right leg.
Alternate between sides for the recommended reps.
Pro Tip: As you get better at this exercise, lift your legs as high as possible without bending your knees. Hold for a five-second count before lowering your legs to the floor.
Step 4: Tuck Sits (on an elevated platform)
Tuck sits can be incredibly effective in building the required core strength and confidence to perform the L-sit. This is also the first exercise where we bring together most of what we’ve learned up to this point.
Steps:
Sit upright on the floor and extend your legs in front of you.
Bend your knees and plant your heels on the floor as close to your hips as possible.
Place your hands on the sides of your hips.
Push your shoulders back and down and extend your elbows to lift your hips off the floor.
Pull your quads to your chest as you lift your hips off the floor.
Hold for as long as possible.
Pro Tip: Holding your legs close to your chest is easier than maintaining straight legs. You can also use an elevated platform for this exercise if you have difficulty doing it on the ground.
Step 5: Tuck-Sit to L-Sit (on an elevated platform)
We push into the next gear with this L-sit progression exercise. This exercise begins in the tuck sit position and requires you to work into a full L-sit.
Steps:
Follow the steps mentioned above to get into a tuck-sit position.
While keeping your back straight, extend your legs until they are parallel to the floor.
You might lose balance as you extend your legs. In this case, pull your legs back to your chest.
Hold the L-sit position for as long as possible.
Pro Tip: Use elevated platforms for this exercise if you cannot do it on the floor. Performing this exercise on an elevated platform will ensure you have enough space to pull your legs into your chest without having your feet touch the floor.
Step 6: L-Sit
After you have spent enough time practicing the tuck-sit (step four) and tuck-sit to L-sit (step five), the conventional L-sit will be the natural next step. Use the steps mentioned in the “How To Do L-Sit” section to perform the L-sit.
Common Mistakes While Performing L-Sit
Avoid making the following mistakes while performing the L-sit to get the best bang for your buck:
Rounding Back
This is one of the most common mistakes exercisers commit while performing the L-sit. You must avoid hunching your back as you extend your elbows to lift your hips off the floor. Rounding your back makes it harder to lift your legs off the floor.
Skipping Warm-Up
Since the L-sit is a bodyweight exercise, many people skip warming up their bodies, which can hamper their performance. Before doing this exercise, you must spend 5-10 minutes warming up your wrists, arms, shoulders, abs, glutes, hamstrings, and legs to ensure you’re primed to hold this position for as long as possible.
Not Locking Out Your Elbows and Pushing Your Shoulder Back and Down
Maintaining soft elbows while performing the L-sit is a rookie mistake. You must lock out your elbows to ensure optimal stability and balance. Soft elbows usually lead to the rounding of the back. Also, you must push your shoulders back and down to gain an optimal height to lift your legs off the floor comfortably.
Variations and Alternatives of L-Sit
Add the following L-sit variations and alternatives to your training regimen to build a shredded midsection:
L-Sit Pull-Up
After mastering the L-sit, you can progress to the L-sit pull-up for an additional challenge. Most people tend to use their legs to perform a pull-up; however, since you’ll be holding your legs in front of you in this variation, this exercise is much more difficult than the conventional pull-up.
Steps:
Stand under a pull-up bar.
Grab the pull-up bar with a shoulder-wide grip.
Lift your legs until they are parallel to the floor.
Perform a pull-up while holding this position until your chin is over the bar.
Return to the starting position.
Repeat for recommended reps.
Pro Tip: Beginners can perform hanging L-sit until they develop the core strength to perform a pull-up.
L-Sit Pull-Up on Rings
Since you can pull your head between the rings, this exercise is a little easier than the L-sit pull-up on a pull-up bar, where you must pull your body at an angle. However, performing it on the rings requires more core stability.
Steps:
Jump and grab the gymnastic rings with a neutral (palms facing each other) grip.
Lift your legs until they are parallel to the floor.
While keeping your core contracted, perform a pull-up.
Return to the start position.
Repeat for reps.
Pro Tip: Keep your shoulders pulled back and down while performing pull-ups.
Plank
You need a strong core to perform the L-sit. Planks are an incredibly effective beginner-friendly exercise to build the requisite core strength.
Steps:
Get on all fours on the floor.
Place your elbows under your shoulders and plant your forearms on the floor. Your forearms should be parallel to each other.
Extend your legs behind you.
Your body should be in a straight line from head to toe.
Hold this position for as long as possible.
Pro Tip: As you get more experienced, make this exercise more difficult by wearing a weighted vest or placing a weight plate on your back.
Check out our complete plank guide!
Hollow Body Hold
Hollow body hold is an excellent exercise to build core strength. It is used widely in CrossFit gyms to improve your kipping pull-up mechanics.
Steps:
Lie supine on the floor. Extend your arms over your head.
Contract your abs and lift your legs off the floor. Simultaneously lift your shoulders and arms toward the ceiling.
Your hips and lower body should be the only point of contact with the floor.
Hold the position for as long as possible.
Pro Tip: Focus on actively pushing your arms and legs toward the ceiling throughout the exercise.
Check out our complete hollow hold guide!
Toes-To-Bar
Performing toes-to-bar requires significant core strength. You must keep your core engaged throughout the exercise to avoid swinging between reps.
Steps:
Grab a pull-up bar with an overhand shoulder-wide grip.
Lock out your elbows.
Press on the bar using your lats; this will pull your torso behind the bar.
Simultaneously lean back slightly and raise your legs toward the pull-up bar.
Touch your toes to the bar.
Lower your legs to the starting position.
Repeat for recommended reps.
Pro Tip: Perform a kip to stabilize your body and generate momentum to raise your toes to the bar.
Wrapping Up
The L-sit is an isometric exercise that will help you build a strong core, strengthen your stabilizers, improve your balance and posture, and boost hip flexor strength. Mastering this exercise is a must if you are into gymnastics or CrossFit.
The five beginner-friendly progression exercises listed in this article are excellent movements to work toward an L-sit. Perform the variations thrice weekly, and you should be able to perform a picture-perfect L-sit by the end of six weeks. Best of luck!
Some exercises look super easy, but when you try them, you fail to get even in the correct position; the L-sit is one of them.
The L-sit is a classic gymnastic movement that will set your core on fire. On the outside, the L-sit looks very easy. You sit on the floor, plant your hands next to your hips, and lift your hips and legs off the ground. However, this is easier said than done.
Beginners that do not have a gymnastics background will most likely find themselves grinding their teeth while they fail to lift themselves off the floor. I have had newbie exercisers tell me they are anatomically unfit to do the L-sit because they have a long torso and short arms. You might experience the same thing.
However, most people falter at doing the L-sit not because of their body mechanics but because of an incorrect form or a lack of core strength.
Since the L-sit is a bodyweight exercise, most people think that they should be able to do it from the get-go. This, however, is not the case. Like most gymnastic exercises, you will be better off starting with an L-sit progression plan.
In this article, we dive deep into the L-sit and cover its fundamentals, an effective progression plan; the muscles worked during an L-sit, its benefits, proper form, the most common mistakes, and the best variations and alternatives.
What is a L-Sit?
The L-sit is an isometric exercise that improves your core strength and balance. Isometric exercises involve static muscle contraction without visible movement in the joint’s angle. The L-sit is a fundamental gymnastic exercise that grew popular thanks to CrossFit. This exercise is also very popular in the calisthenics circuit.
Besides the conventional L-sit, CrossFit WODs (workout of the day) include several variations of this exercise, including L-sit bar pull-ups and L-sit ring pull-ups. The conventional L-sit demands decent core and hip flexor strength. On the other hand, the pull-up variations also engage most of your upper body, including the biceps, lats, traps, rhomboids, and teres major and minor.
Beginners should start practicing this exercise by placing their hands on an elevated object, such as yoga blocks, or perform this exercise on parallettes or parallel bars. If you still cannot perform this exercise, use the progression exercises listed in this article to build the required core strength.
Muscles Worked During L-Sit
The L-sit works the following muscles:
- Abs: The core is the primary target muscle of the L-sit. This exercise requires you to keep your core contracted, resulting in a rectus and transverse abdominal recruitment.
- Hip Flexors: These muscles run along the front of your upper thigh. You must engage your hip flexors to keep your legs parallel to the floor throughout the exercise.
- Glutes and Quads: This exercise involves keeping your glutes and quads contracted to maintain a stable position.
- Triceps: You’ll experience triceps stimulation as soon as you lock out your elbows and lift yourself off the floor. Furthermore, pointing your fingers behind you will engage your biceps.
- Shoulders: The L-sit involves actively pushing into the floor, which will result in a sick deltoid pump. You will also experience trapezius muscle stimulation as this exercise requires pushing your shoulders back and down.
Adding the L-sit to your training regimen entails the following benefits:
Build a Solid Core and Six-Pack
L-sits can help you build abs of steel. Holding your legs parallel to the floor while extended in the air will work muscles in your core that you didn’t know existed. A strong core can also improve your performance in compound exercise and daily functioning.
Enhance Stability and Balance
A strong core translates to robust stabilizer muscles, which can significantly improve your stability. The L-sit also improves your balance and performance in handstands, push-ups, toes-to-bar, deadlifts, and barbell squats.
Improve Posture
The L-sit strengthens the muscles responsible for maintaining an upright and stable spine, which can help improve your posture. This is an excellent exercise for people that spend most of their day sitting.
Boost Hip Flexor Strength
The hip flexors help bring the knee closer to the chest, meaning they are used in activities such as walking, running, jumping, and kicking. Since the L-sit involves holding your legs parallel to the floor, it engages and strengthens your hip flexors.
How To Do L-Sit
This is how to perform the L-sit with the correct form:
Steps:
[*]Sit upright on the floor with your legs extended in front of you.
[*]Place your hands on the floor next to your hips. Spread your hands and curl your fingers slightly so that your fingertips are pushing into the floor.
[*]Straighten your arms and lock out your elbows. Simultaneously engage your lats and push your shoulders back and down.
[*]Push your palms into the floor, engage your core, and lift your hips and legs off the floor. Your legs should be parallel to the floor throughout the exercise.
[*]Your body should resemble an “L” at the top of the exercise.
[*]Hold the position for as long as possible or a specific time.
[*]Return to the starting position.
[*]Repeat for the desired number of sets.
L-Sit Tips:
[*]Keep your quads and glutes contracted and your toes pointed throughout the exercise.
[*]Place your hands on yoga blocks if you have trouble pushing yourself off the floor.
[*]Spreading your hands and pushing your fingertips and palms into the floor will help you maintain your balance.
[*]Maintain an upright torso while pushing yourself off the floor. Bending forward will make lifting your legs off the floor more difficult.
[*]Advanced exercises can wear a weighted vest to make this exercise harder.
In This Exercise:
- Target Muscle Group: Abs
- Type: Strength
- Mechanics: Isometric
- Equipment: Bodyweight
- Difficulty: Intermediate
- Best Rep Range: 30-60 seconds
L-Sit Progression Exercises
Use the following L-Sit progression exercises if you lack the strength to perform the conventional variation of the exercise:
Step 1: Boat Hold
The boat hold is an excellent core exercise that is suitable for trainers of all experience levels. It will help you build the foundational strength for L-sits.
Steps:
[*]Sit upright on the floor and extend your legs in front of you.
[*]Cross your arms in front of your chest.
[*]Engage your core and tilt your torso backward. Anything between 1 to 2 o’clock will work.
[*]Lift your legs off the floor while keeping your knees locked out.
[*]Hold this position for as long as possible.
Pro Tip: If you have trouble maintaining your torso in position, place your hands next to your hips on the floor.
Step 2: Elevation
This L-sit progression exercise involves using an elevated platform, such as yoga blocks or parallettes. Furthermore, you will focus on lifting your hips off the floor while keeping your heels grounded.
Steps:
[*]Sit on the floor with your legs extended and place parallettes on each side of your hips.
[*]Grab the bars with an overhand grip. Your elbows will be bent at this position.
[*]Extend your elbows while pushing your shoulders back and down. You must lock out your elbows at the top, and your hips should be off the floor.
[*]Your heels should be the only point of contact with the floor.
[*]Slowly return to the starting position.
[*]Repeat for 15-20 reps.
Pro Tip: Avoid using your legs to push yourself into a lockout position. Conversely, beginners can bend their knees slightly and push their heels into the floor to generate force.
Step 3: Alternating Leg Lift
In this L-sit progression exercise, you’ll focus on the lockout and lifting one leg at a time.
Steps:
[*]Sit upright on the floor and extend your legs in front of you.
[*]Place your hands on your hip side.
[*]Push your shoulders down and back, and extend your elbows. Your hips should be off the floor at this point. Your heels should be the only point of contact with the floor.
[*]Contract your abs and lift your left leg off the floor until it is parallel to the floor.
[*]Return your left leg to the floor and repeat with the right leg.
[*]Alternate between sides for the recommended reps.
Pro Tip: As you get better at this exercise, lift your legs as high as possible without bending your knees. Hold for a five-second count before lowering your legs to the floor.
Step 4: Tuck Sits (on an elevated platform)
Tuck sits can be incredibly effective in building the required core strength and confidence to perform the L-sit. This is also the first exercise where we bring together most of what we’ve learned up to this point.
Steps:
[*]Sit upright on the floor and extend your legs in front of you.
[*]Bend your knees and plant your heels on the floor as close to your hips as possible.
[*]Place your hands on the sides of your hips.
[*]Push your shoulders back and down and extend your elbows to lift your hips off the floor.
[*]Pull your quads to your chest as you lift your hips off the floor.
[*]Hold for as long as possible.
Pro Tip: Holding your legs close to your chest is easier than maintaining straight legs. You can also use an elevated platform for this exercise if you have difficulty doing it on the ground.
Step 5: Tuck-Sit to L-Sit (on an elevated platform)
We push into the next gear with this L-sit progression exercise. This exercise begins in the tuck sit position and requires you to work into a full L-sit.
Steps:
[*]Follow the steps mentioned above to get into a tuck-sit position.
[*]While keeping your back straight, extend your legs until they are parallel to the floor.
[*]You might lose balance as you extend your legs. In this case, pull your legs back to your chest.
[*]Hold the L-sit position for as long as possible.
Pro Tip: Use elevated platforms for this exercise if you cannot do it on the floor. Performing this exercise on an elevated platform will ensure you have enough space to pull your legs into your chest without having your feet touch the floor.
Step 6: L-Sit
After you have spent enough time practicing the tuck-sit (step four) and tuck-sit to L-sit (step five), the conventional L-sit will be the natural next step. Use the steps mentioned in the “How To Do L-Sit” section to perform the L-sit.
Common Mistakes While Performing L-Sit
Avoid making the following mistakes while performing the L-sit to get the best bang for your buck:
Rounding Back
This is one of the most common mistakes exercisers commit while performing the L-sit. You must avoid hunching your back as you extend your elbows to lift your hips off the floor. Rounding your back makes it harder to lift your legs off the floor.
Skipping Warm-Up
Since the L-sit is a bodyweight exercise, many people skip warming up their bodies, which can hamper their performance. Before doing this exercise, you must spend 5-10 minutes warming up your wrists, arms, shoulders, abs, glutes, hamstrings, and legs to ensure you’re primed to hold this position for as long as possible.
Not Locking Out Your Elbows and Pushing Your Shoulder Back and Down
Maintaining soft elbows while performing the L-sit is a rookie mistake. You must lock out your elbows to ensure optimal stability and balance. Soft elbows usually lead to the rounding of the back. Also, you must push your shoulders back and down to gain an optimal height to lift your legs off the floor comfortably.
Variations and Alternatives of L-Sit
Add the following L-sit variations and alternatives to your training regimen to build a shredded midsection:
L-Sit Pull-Up
After mastering the L-sit, you can progress to the L-sit pull-up for an additional challenge. Most people tend to use their legs to perform a pull-up; however, since you’ll be holding your legs in front of you in this variation, this exercise is much more difficult than the conventional pull-up.
Steps:
[*]Stand under a pull-up bar.
[*]Grab the pull-up bar with a shoulder-wide grip.
[*]Lift your legs until they are parallel to the floor.
[*]Perform a pull-up while holding this position until your chin is over the bar.
[*]Return to the starting position.
[*]Repeat for recommended reps.
Pro Tip: Beginners can perform hanging L-sit until they develop the core strength to perform a pull-up.
L-Sit Pull-Up on Rings
Since you can pull your head between the rings, this exercise is a little easier than the L-sit pull-up on a pull-up bar, where you must pull your body at an angle. However, performing it on the rings requires more core stability.
Steps:
[*]Jump and grab the gymnastic rings with a neutral (palms facing each other) grip.
[*]Lift your legs until they are parallel to the floor.
[*]While keeping your core contracted, perform a pull-up.
[*]Return to the start position.
[*]Repeat for reps.
Pro Tip: Keep your shoulders pulled back and down while performing pull-ups.
Plank
You need a strong core to perform the L-sit. Planks are an incredibly effective beginner-friendly exercise to build the requisite core strength.
Steps:
[*]Get on all fours on the floor.
[*]Place your elbows under your shoulders and plant your forearms on the floor. Your forearms should be parallel to each other.
[*]Extend your legs behind you.
[*]Your body should be in a straight line from head to toe.
[*]Hold this position for as long as possible.
Pro Tip: As you get more experienced, make this exercise more difficult by wearing a weighted vest or placing a weight plate on your back.
Check out our complete plank guide!
Hollow Body Hold
Hollow body hold is an excellent exercise to build core strength. It is used widely in CrossFit gyms to improve your kipping pull-up mechanics.
Steps:
[*]Lie supine on the floor. Extend your arms over your head.
[*]Contract your abs and lift your legs off the floor. Simultaneously lift your shoulders and arms toward the ceiling.
[*]Your hips and lower body should be the only point of contact with the floor.
[*]Hold the position for as long as possible.
Pro Tip: Focus on actively pushing your arms and legs toward the ceiling throughout the exercise.
Check out our complete hollow hold guide!
Toes-To-Bar
Performing toes-to-bar requires significant core strength. You must keep your core engaged throughout the exercise to avoid swinging between reps.
Steps:
[*]Grab a pull-up bar with an overhand shoulder-wide grip.
[*]Lock out your elbows.
[*]Press on the bar using your lats; this will pull your torso behind the bar.
[*]Simultaneously lean back slightly and raise your legs toward the pull-up bar.
[*]Touch your toes to the bar.
[*]Lower your legs to the starting position.
[*]Repeat for recommended reps.
Pro Tip: Perform a kip to stabilize your body and generate momentum to raise your toes to the bar.
Wrapping Up
The L-sit is an isometric exercise that will help you build a strong core, strengthen your stabilizers, improve your balance and posture, and boost hip flexor strength. Mastering this exercise is a must if you are into gymnastics or CrossFit.
The five beginner-friendly progression exercises listed in this article are excellent movements to work toward an L-sit. Perform the variations thrice weekly, and you should be able to perform a picture-perfect L-sit by the end of six weeks. Best of luck!
Click here to view the article.