Tag: Body Mechanics

The Best Daily Mobility Exercises for Men
Speaking as a typical man, I can honestly say I’d rather be lifting weights or doing push-ups than stretching. Heck, I’d even prefer to do cardio!
However, not stretching can have an adverse effect on flexibility, mobility, exercise performance, posture, and joint health. You might not notice the consequences yet, but as you get older, the effects of not stretching become more noticeable.
The good news is that, like your biceps and quads, your flexibility and mobility are highly trainable. And it doesn’t take a lot of time or energy to improve them.
In this article, we reveal the best daily mobility exercises for men.
Why You NEED to Do These Exercises Daily
Your body was designed to move. Muscles, joints, ligaments, tendons, cartilage, intervertebral discs – all of these structures get healthier and stronger when you move your body.
However, unless you have a manual labor job, the chances are you don’t move enough to be healthy. Prolonged sitting can do a real number on your musculoskeletal system, leaving you sore, stiff, and immobile.
Regular workouts can help but aren’t enough to offset the effects of an otherwise sedentary lifestyle. For example, even if you hit the gym for five hours a week, that still leaves 163 hours during which you can be inactive.
Prolonged sitting causes your muscles to shorten and stiffen up. This will adversely affect your flexibility and mobility. Your posture can also take a hit.
Like a machine allowed to rust, this will make your joints more prone to wear and tear and could even stop you from performing movements that should be smooth and painless, such as reaching overhead or touching your toes.
Animals don’t need to be told to stretch and move. It’s something they do instinctively. Watch a cat, dog, lion, or tiger, and invariably, they’ll stretch briefly but regularly throughout the day. That way, they’re always ready for action; you don’t see big cats warming up before a hunt!
Humans would do well to take a page from the animal fitness guidebook and stretch little and often to break up periods of inactivity. This would alleviate many of the detrimental effects of prolonged sitting and sedentarism.
But which stretches should you do? After all, fitness experts often recommend dozens of different and often convoluted exercises, which is one of the things that makes stretching so unattractive.
It doesn’t matter that most men know they need to stretch more; the moment it becomes inconvenient or seems more trouble than it’s worth, they quit doing it.
So, we’ve boiled things down to a short list of six simple movements most men should do daily. These big-bang-for-your-buck exercises focus on the areas most likely to be tight, i.e., the hips, back, and shoulders.
Sure, you could do more if you want, but that may mean you get bogged down and, due to lack of time, don’t stretch and mobilize at all.
Like most animals, who only do a couple of different stretches, it’s better to do less but do it well than try to do more and fail to do it at all. So, we’re aiming to be good and consistent rather than perfect but inconsistent.
By keeping things simple, you can work on your mobility in less than ten minutes a day.
The Best Daily Mobility Exercises for Men
Do the following exercises daily or more often if you have time. You can combine them to make a morning routine, do them before or after your workout, during your lunch break, after dinner, or before going to bed.
Spend longer on the exercises that feel the most difficult. Invariably, these are the ones that you need the most.
Cat/cow
Standing spine twist
Waiter’s bow
Kneeling hip flexor stretch
Yoga push-up
Yoga squat
1. Cat/cow
Target areas: Lower back, upper back, neck, erector spinae, rectus abdominis.
Cat/cow is a pose from yoga, so people have been doing this exercise for centuries. This move effectively mobilizes your entire spine, from your lumbar or lower vertebrae to your cervical vertebrae or neck. It also “flosses” your spinal cord, which can help alleviate issues like sciatica. Your spine will feel fabulous after this exercise, especially if you’ve been stuck in a chair or car for a few hours.
Steps:
Kneel on all fours with your shoulders directly over your hands and your hips over your knees.
Exhale and lift the middle of your back up toward the ceiling. Lower your head and tilt your pelvis under to create a large C-shape with your spine.
Next, inhale and lower your abdomen down toward the floor. Lift your head and your butt to extend your spine.
Smoothly alternate between these two positions for 6-12 reps, timing your movements with your breaths.
2. Standing spine twist
Target areas: Lower back, upper back, obliques, shoulders, hips, knees.
Twisting is a very uncommon movement pattern in modern life. As such, a lot of people are rotationally restricted. So if you find turning your head and shoulders to look behind you difficult, e.g., when reversing your car, this exercise will help. It’s also a great stress reliever and general warm-up movement.
Steps:
Stand with your feet about shoulder-width apart, knees slightly bent. Relax your shoulders, arms, and neck.
Start by rotating your head and shoulders to the left and right. Allow your arms to trail behind, reaching around to touch your hips.
Then, allow your hips and knees to turn with your shoulders. Add a slight lateral weight shift if you wish.
Increase your momentum as your muscles start to loosen and warm up. However, never force the movement or fling your arms. Make “soft and supple” your movement mantra.
Continue for 15-30 reps per side.
3. Waiter’s bow
Target areas: Lower back, hips, hamstrings.
The waiter’s bow is a great way to ease tension from your lower back and stretch your hamstrings, commonly one of the tightest muscles in the body. Tight hammies can cause numerous postural and functional problems and are also prone to injury. Do this exercise anytime you’ve been sitting for a long time, which invariably causes the hamstrings to tighten up even more.
Steps:
Stand with your feet about hip-width apart, knees slightly bent, and arms by your sides.
Push your butt backward, hinge forward from your hips, and extend your arms in front of you so your entire upper body is roughly parallel to the floor. Do not round your lower back.
Lower your arms and return to the starting position.
Repeat 10-15 times.
4. Kneeling hip flexor stretch
Target areas: Hip joints, hip flexors, quadriceps, rectus abdominis.
Prolonged sitting can leave you with very tight hip flexors, which are the muscles located on the fronts of your thighs and pelvis. Tight hip flexors are a leading cause of low back pain and poor posture. Hip flexor problems can also cause your lower abdomen to protrude, making your belly bulge even if you are very lean. This exercise is critical for anyone who spends long periods sitting – so everyone, really!
Steps:
Step forward and bend your legs. Lower your rear knee to the floor. Adjust your feet so your front shin should be vertical.
Gently push your hips forward to stretch the hip flexor on your back leg.
Take care not to hyperextend your spine. Instead, keep your lumbar spine and pelvis neutral. Do not rest your hands on your front leg; let your arms hang relaxed by your sides.
Hold for 30-60 seconds, and then switch sides.
For added credit, reach up into the air with one arm to stretch your obliques and lats; this stretch feels so good!
5. Yoga push-up
Target areas: Lower back, hips, hamstrings, shoulders, upper back, calves.
While push-ups are usually viewed as a strength and conditioning exercise, the yoga push-up is also a top-drawer mobility exercise. Yoga push-ups will stretch and mobilize your ankles, hips, lower back, and shoulders. In fact, if you only have time for one mobility exercise, the yoga push-up is probably your best choice.
Steps:
Adopt the push-up position with your hands shoulder-width apart, arms extended, and body straight. Brace your core and pull your shoulders back and down.
Bend your arms and lower your chest down to within an inch of the floor.
Next, push up and back, lifting your hips up toward the ceiling.
Gently push your head between your arms to extend your shoulders, open your chest, and stretch your lats. Keep your legs as straight as possible, and press your heels down toward the floor. Your body should now resemble an inverted V. Hold this position (but not your breath) for several seconds.
Return to the starting position, bend your arms, and repeat for 4-6 smooth reps.
6. Yoga squat
Target areas: Lower back, hips, inner thighs, calves.
This exercise is a variation of the famous Asian squat but with more emphasis on opening the hips and stretching your inner thighs. While this exercise might feel awkward at first, in time, it will become a relaxing resting posture. Practice it often to mobilize your hips, knees, and lower back. Look for opportunities to drop into a squat throughout your day.
Steps:
Stand with your feet about shoulder-width apart, toes turned slightly outward.
Raise your heels and descend into a deep squat.
Next, lower your heels to the floor and press your elbows against your inner thighs to open your hips and knees.
Sit in this position for 60-90 seconds.
Rest your heels on one-inch blocks if you are unable to keep them flat on the floor. Lower the height of the blocks as your flexibility improves.
Mobility Exercises – FAQs
Do you have a question about these daily mobility exercises for men? No problem, because we’ve got the answers!
1. Do I need to warm up before doing these exercises?
While you could warm up before these exercises with some light cardio, it shouldn’t be necessary. Instead, start each movement slow and easy, and only increase your range of motion as you feel your muscles start to relax and your joints begin to loosen. Use the first few reps as your warm-up.
Also, the exercises are listed in approximate order of difficulty, so each one will prepare your muscles and joints for what comes next.
Finally, if you do the exercises several times a day, especially to break up long periods of sitting, you should find they get more manageable as your day progresses.
2. Some exercises are more difficult than others. Is this normal?
Most people have some muscle groups tighter than others. For example, you may have overly tight hamstrings while the rest of your muscles are relaxed and supple. This is completely normal.
Mobilizing your entire body is an excellent way to identify localized areas of tightness. If you find any such places, just spend a few extra minutes on them. With this extra attention, they’ll soon catch up with the rest of your muscle groups and cease being the tight link in your kinetic chain.
3. When is the best time to do mobility exercises?
There is no single best time to stretch and mobilize. It’ll do you good almost any time of day. That said, there are times when it might be marginally more beneficial or convenient, such as:
Shortly after waking as part of your morning routine.
Before or after exercise.
Before bed.
To break up long periods of sitting.
After long journeys.
During TV ad breaks.
To reduce stress or promote relaxation.
Anytime you need to wake up and energize.
Try to set a mobility schedule to ensure you do these exercises regularly. Doing them at the same time each day is a great way to make mobility training more habitual so you’re less likely to forget to do it.
4. Do I have to stick to the prescribed number of reps for each exercise?
The prescribed number of reps is merely a suggestion. If you feel like you would benefit from doing more, then please do so. Continue doing each exercise until you feel it’s done its job, i.e., stretched your muscles and mobilized your joints.
However, remember these are not conditioning exercises and, as such, should not be fatiguing. Rather, you should feel energized but relaxed after completing them.
5. Do I need to do all the exercises in sequence?
While these mobility exercises are presented in a sequence, you don’t have to perform them that way. If you only have time to do a couple of the exercises, that’s what you should do. Any mobility training is better than none.
Choose the exercises that target known areas of tightness. This is usually the hips and shoulders for most men but can vary from person to person.
6. Can I do these exercises more than once a day?
You can stretch and mobilize as many times a day as you want or need to. In fact, the more often you do these exercises, the better you’ll feel, and the longer-lasting their effects will be.
The entire sequence of exercises should take no more than ten minutes, so you should have no problem doing it 3-5 times per day.
That said, even once per day will be beneficial if you do them consistently, i.e., daily for several months. However, do your best not to skip a day. Daily mobility training is a must.
Closing Thoughts
Modern living means that many people are tight and stiff, unable to perform everyday movements comfortably or efficiently. Prolonged sitting and other sedentary activities are primarily to blame. The less you move, the more difficult moving becomes.
Working out can help, but a few hours of gym time cannot make up for an otherwise sedentary, inactive lifestyle. Your body is the master adapter, and muscles soon shorten with lack of use.
Thankfully, in the same way you can develop your aerobic fitness or build bigger biceps, you can improve mobility and win back lost flexibility. All you need to do is move more.
Use the exercises in this article to restore lost mobility. Do them at least once a day and more often if you can. They might be difficult at first, but that’s precisely why you need to do them! Focus on the exercises that feel most challenging.
Just a few minutes a day is all you need to regain your mobility. You don’t have to be sore and stiff and remember that even old big cats are still supremely supple. Why? because they stretch every day!

How Sitting Is Bad for You and What to Do About It
Sitting is part and parcel of modern life. Many people earn a living while seated, travel while seated, and then spend their leisure time seated. And, if you go to a gym, your workout will probably include seated exercises, too.
As a result, the average American spends as much as 60% of their day sitting or otherwise sedentary – about 15 hours. In contrast, people living in less developed, more rural places spend as little as three hours a day sitting (1, 2). Unfortunately, while sitting is often commonplace and hard to avoid, it may also be bad for your health. Even regular exercisers are not immune to the damaging effects of sitting too much. It’s also possible to be an ardent exerciser and too sedentary to be healthy.
In this article, we reveal the dangers of too much sitting and what you can do to minimize its harmful effects.
The Effects of Sitting Too Much
While it may be hard to believe that sitting is bad for your health, numerous studies have linked sitting and other sedentary behaviors to various adverse effects and health risks. These include:
Weight Gain
Weight Gain
With a large and growing percentage of adults and kids overweight or obese, it’s clear that weight gain is a big problem in almost every developed country. While dietary changes are partly to blame, i.e., the easy availability of highly calorific junk food, lack of physical activity is also a factor.
Sitting is a very passive activity. Your chair supports your weight, so you don’t have to use your muscles to maintain your position. This passivity reduces your caloric expenditure significantly.
To put this in perspective, office workers burn an average of 1,000 fewer calories than manual laborers and agricultural workers. Such a low daily caloric expenditure increases the likelihood of weight gain and makes it much harder to lose weight. Statistics show that obese people tend to sit an average of two more hours than those of a healthy weight (3).
Related: See how many calories you burn while sitting here.
Poor Posture
Posture is the alignment of your joints, and it can be good or bad. Good posture requires minimal muscle tension and tends to stress your joints in an even, balanced way. While it is possible to sit in good posture, prolonged sitting still causes some muscles to tighten while stretching and weakening others, pulling joints out of optimal alignment. This causes tension and pain, and joints are loaded unevenly, increasing structural wear and tear, and is a leading cause of low back pain.
It’s no coincidence that office workers often suffer from back and neck pain. Many even look like they’re sitting even when they’re standing, i.e., a rounded upper and lower back and forward head position.
Linked to Disease and an Early Death
The less active you are, the more likely you are to die early. Studies show that sedentary people have a 22–49% greater risk of early death (4). However, given that sitting is one of the most common sedentary behaviors, it’s clear there is a link between sitting more and dying sooner.
Diseases commonly associated with sedentarism that can also shorten your life include:
Abnormal cholesterol levels
Cancer
Coronary heart disease
Diabetes
Heart attack
Increased blood pressure
Metabolic syndrome
Obesity
Osteoporosis
Stroke
There are also strong links between sedentarism and mental/brain health, e.g., an increased risk of dementia, Alzheimer’s disease, anxiety, depression, etc.
Lost Mobility and Lower Quality of Life
The less physically active you are now, the less physically capable you’re likely to be when you’re older. This can significantly reduce mobility, strength, and quality of life in your later years.
Sitting involves very little muscular work, and, as such, your muscles will weaken through lack of use. Exercise can help, but a couple of workouts a week won’t offset spending the rest of your time sitting in a chair.
Age-related muscle loss, called sarcopenia, is unavoidable. However, it can be delayed and slowed to a crawl by leading an active lifestyle, i.e., sitting less and moving more.
Related: Sitting vs. Standing Calories Burned Calculator
Strategies for Sitting Less
Exercise is good for everybody’s body. However, some research suggests that even regular exercise may not offer much protection from the damaging effects of prolonged sitting (5). Rather, the best solution is to try and spend less time sitting.
While this might sound difficult, especially if you have an office or driving job, there are actually several effective strategies you can use to get yourself up and moving more.
These include:
1. Take Microbreaks From Sitting
Sitting for long periods is very easy, especially when you are engaged in whatever you are doing, e.g., working or watching TV. Before you know it, you’ve been sitting in the same position for several hours without moving.
One way to avoid this is to break up long periods of sitting with microbreaks. These breaks are small enough that they won’t disrupt your productivity or relaxation but long enough to get your body moving and offset some of the negative effects of sedentarism.
One way to do this is with the pomodoro method. Named after the famous tomato-shaped kitchen timer, this system for increasing productivity involves taking a five-minute break every 25 minutes, and a 15-minute break every two hours, so:
Work/sit for 25 minutes
Move for 5 minutes
Work/sit for 25 minutes
Move for 5 minutes
Work/sit for 25 minutes
Move 5 minutes
Work/sit for 25 minutes
Move for 15 minutes
Work/sit for 25 minutes
Move 5 minutes, etc.
You can do whatever you want during your five and 15-minute breaks, so long as it doesn’t involve more sitting. Good options include:
If such frequent microbreaks are inconvenient, try taking a five-minute break every hour.
However, don’t rely on your time-keeping skills to remind you to get up and move. Instead, use a timer on your watch or phone or download one of the many pomodoro apps now available. Some smartwatches also have movement alarms to remind you to stand up and shake off the effects of prolonged sitting.
2. Look for More Walking Opportunities
If sitting is one of the worst things you can do for your health, walking is arguably one of the best. In fact, walking is the perfect antidote to prolonged sitting.
It’s very easy to fall into the trap of barely walking at all. Mechanized transport, elevators and escalators, drive-throughs, food delivery services, etc., means that walking is almost optional. Needless to say, the less walking you do, the more time you’ll probably spend sitting.
So, look for opportunities to walk more. By default, this will invariably mean you spend a lot less time sitting. Good options include:
Walk any journey of less than a mile/20 minutes
Go for a walk during your lunch break
Walk to another floor to use the bathroom/water dispenser
Walk to see colleagues instead of calling or emailing them
Take the stairs instead of riding in an elevator
Park further away from work or the store and walk the rest of the way
Walk to the coffee shop or takeout instead of ordering in
Walk your kids to school instead of driving them
Have walking meetings instead of meeting in the boardroom
Try a treadmill desk
Walk around the gym rather than resting passively between sets
Do fewer seated exercises at the gym
Even the most office-bound person should be able to find numerous opportunities to walk more and sit less. Track your steps and try to clock up at least 10,000 each day.
3. Try a Standing Desk
Standing desks are pretty trendy, but that doesn’t mean they aren’t effective. Standing engages more muscles than sitting, and you are more likely to shift your weight and fidget, breaking you out of that fixed posture.
Of course, it’s as easy to stand in bad posture as it is to sit in it, so you’ll need to set your desk up properly to avoid hunching and slouching. However, used correctly, a standing desk can be a real lower back saver and will get you up off your butt so you spend less time sitting.
Adjustable desks that allow you to alternate between sitting and standing are ideal as they’re more versatile and will allow you to ease into going chairless.
4. Seek Out More Active Leisure Activities
Despite sitting so much at work, many people spend most of their leisure time seated, too. After a hard day at the office, who doesn’t want to just crash on the sofa binge-watching Netflix?
Unfortunately, while this is undoubtedly relaxing, more time spent sitting won’t do much to break you out of your sedentarism rut.
So, at least a few times a week, try to engage in more active leisure activities. This doesn’t have to be sport or exercise but should involve physical movement and time on your feet.
Good options include:
Nature walks
Casual games of basketball, baseball, soccer, touch football, Ultimate Frisbee, etc.
Play with your kids
Explore your neighborhood
Go to the gym
Do some gardening or chores
Go for a walk with friends instead of hanging out at home
Walk your dog
Go for a walk after dinner
Walk to a nearby restaurant to eat
Walk rather than drive to your local coffee shop
Walk to visit friends
That’s not to say you have to give up watching TV or you can’t enjoy going to the movies from time to time. However, these passive activities should be balanced with more energetic leisure activities.
5. Follow a Corrective Exercise Program
As discussed, sitting can do a lot of damage to your muscles and skeletal system. It causes some muscles to tighten up while others are stretched and weakened. While sitting less and moving more will help partially alleviate this problem, you’ll probably benefit from a more prescriptive corrective program.
Because of the effects of sitting, most people need to stretch their:
Calves
Hamstrings
Adductors
Hip flexors
Rectus abdominis
Neck flexors
Pectoralis major
Anterior deltoids
Conversely, the following muscles usually need strengthening:
Gluteus maximus
Abductors
Core
Middle trapezius
Rhomboids
Posterior deltoids
Neck extensors
A few weeks of corrective training will do wonders for your posture and help alleviate much of the pain caused by prolonged sitting.
Related: Exercises to Fix Your Nerd Neck and Desk Slouch
6. Set up an Ergonomic Workstation
Sitting, especially at work, is largely unavoidable, so it’s worth trying to make it as safe and comfortable as possible. This means setting up your desk in the most ergonomic way you can.
There are lots of theories on what desk setup is best, but some general guidelines include the following:
Adjust the height of your chair so your feet are flat on the floor
Knees bent to around 90 degrees and level with your hips
A supportive, comfortable chair
Monitor about an arm’s length away and straight in front of you
Elbows bent to about 90 degrees, shoulders relaxed
Wrists flat on your desk
Mouse within easy reach
Good lighting
Your desk and chair can affect your productivity, and the more comfortable you are, the better you’ll be able to concentrate and the more work you’ll be able to do. So, if your chair or desk is causing you problems, let your boss know and explain how you’ll be able to do a better job if they spring for an ergonomic workstation.
Of course, if you work for yourself, you’ll need to buy these things, but they’re probably a tax-deductible expense.
7. Drink More Water
Drinking more water can act as an indirect reminder to get up and walk more. Increasing your water intake means you’ll need more bathroom breaks, forcing you to leave the confines of your chair and take a quick walk.
So, if you keep forgetting to move around, drink more water and let your bladder be your alarm clock. Plus, being more hydrated is good for many aspects of your health and can even help you lose weight by making you feel full, so you eat less.
Talk about a win-win situation!
Frequently Asked Questions
Do you have a question about the damaging effects of sitting? No problem, because we’ve got the answers!
1. In terms of calorie burning, how does sitting compare to walking?
Sitting is a very passive activity using much less muscle tension. As such, sitting burns fewer calories per hour than walking. That said, the number of calories used during these activities will depend on several factors, including your weight, muscle mass, age, and gender. So, any calculation of calories burned will be an approximation.
Using online calculators, we estimate that a 180-pound male will burn approximately 110 calories by sitting for an hour but 300 while walking at a moderate pace. Standing falls roughly halfway between these two extremes.
2. Could too much sitting be why I struggle to lose weight?
Spending prolonged periods sitting makes it very hard to create a big enough calorie deficit to lose weight. In contrast, more physical activity, e.g., walking, exercising, or doing chores, can significantly increase your daily calorie expenditure, which, depending on your diet, will probably make it easier to lose weight.
As little as five minutes of movement, most waking hours, can add a considerable amount to your daily energy expenditure, so look for ways to sit less and move more.
3. What does sedentary mean, and why is it so bad?
Sitting or lying down when you are awake are examples of sedentary behaviors.
Most people are sedentary when watching TV, using a computer or other screens, driving, or studying.
Sedentary behaviors are associated with weight gain and poor health, even if you are a regular exerciser. For example, being sedentary increases the risk of obesity, some cancers, coronary heart disease, and type 2 diabetes and can shorten your life.
While it’s almost impossible to avoid sitting completely, we can minimize the total time we spend sitting each day and break up long periods of sitting with short bursts of physical activity.
Related: The Best 5 To 10-Minute Workouts for Time-Pressed Exercisers
4. Is exercise enough to offset the dangers of prolonged sitting?
While exercise will do you nothing but good, even regular workouts aren’t enough to completely outweigh the negative effects of prolonged sitting or an otherwise sedentary lifestyle. When you take a moment to run the numbers, the reasons for this quickly become clear.
There are 168 hours in a week – 24 hours x 7 days. So, even if you clock up five hours of gym time a week, that still leaves 163 hours of inactivity. And, the reality is that many folks struggle to do even a couple of workouts a week, so actual exercise levels may be far lower than this.
That’s why non-exercise physical activity, or NEPA for short, is so critical for offsetting inactivity. You can do lots of it, it’s not overly tiring, and you can slot it in anywhere you have a few spare minutes.
Examples include:
Walking for transport or pleasure
Household chores
Gardening
Washing your car by hand
Taking out the trash
Recreational games and sports
Playing with your kids
Interactive/VR video games
Suppose you rely solely on workouts to offset an otherwise sedentary lifestyle. In that case, you’ll have to commit to several hours of exercise each day, which will probably be impractical for anyone except professional ultra-marathon runners!
5. How much physical activity do I need to do to be healthy?
While scientists know that too much sitting and sedentarism is bad for your health, they don’t know how much physical activity you need to do to be healthy. This is because, like many health and fitness characteristics, your risk of developing diseases associated with sedentarism is influenced by other factors, including genetics, stress, family history, and diet.
However, the take-home message is to sit less and move more. Get up and move briefly every 30-60 minutes every hour, and avoid sitting for more extended periods whenever possible. Even very short bursts of movement, e.g., 1-2 minutes, may help reduce the harmful effect of prolonged sitting.
Closing Thoughts
According to the media, sitting is the new smoking. And while such dramatic headlines are often nothing but hyperbole, when it comes to sitting and its effect on your health, it’s no exaggeration.
People are sitting more than ever, and rates of being overweight and obese are climbing at a similar rate. Diseases associated with sedentarism are also on the rise, which suggests a strong correlation between prolonged sitting, weight gain, and poor health.
Interestingly, in less developed countries where agricultural and manual labor is more common, incidences of many common “Western” diseases are lower, despite poorer medical care (2).
The good news is that the antidote to the harmful effects of sitting is available to all – walking. It’s easy, free, and you can do it anywhere and anytime; in terms of bang for your buck, walking is hard to beat.
So, try to avoid sitting for long periods without taking a break. Even a couple of minutes of movement per hour could be enough to protect you from the dangers of prolonged sitting.
References:
Dunstan DW, Howard B, Healy GN, Owen N. Too much sitting–a health hazard. Diabetes Res Clin Pract. 2012 Sep;97(3):368-76. doi: 10.1016/j.diabres.2012.05.020. Epub 2012 Jun 9. PMID: 22682948. https://pubmed.ncbi.nlm.nih.gov/22682948/
Levine JA, McCrady SK, Boyne S, Smith J, Cargill K, Forrester T. Non-exercise physical activity in agricultural and urban people. Urban Stud. 2011;48(11):2417-27. doi: 10.1177/0042098010379273. PMID: 22073428. https://pubmed.ncbi.nlm.nih.gov/22073428/
Levine JA, Lanningham-Foster LM, McCrady SK, Krizan AC, Olson LR, Kane PH, Jensen MD, Clark MM. Interindividual variation in posture allocation: possible role in human obesity. Science. 2005 Jan 28;307(5709):584-6. doi: 10.1126/science.1106561. PMID: 15681386. https://pubmed.ncbi.nlm.nih.gov/15681386/
Wilmot EG, Edwardson CL, Achana FA, Davies MJ, Gorely T, Gray LJ, Khunti K, Yates T, Biddle SJ. Sedentary time in adults and the association with diabetes, cardiovascular disease, and death: systematic review and meta-analysis. Diabetologia. 2012 Nov;55(11):2895-905. doi: 10.1007/s00125-012-2677-z. Epub 2012 Aug 14. Erratum in: Diabetologia. 2013 Apr;56(4):942-3. PMID: 22890825. https://pubmed.ncbi.nlm.nih.gov/22890825/
Biswas A, Oh PI, Faulkner GE, Bajaj RR, Silver MA, Mitchell MS, Alter DA. Sedentary time and its association with risk for disease incidence, mortality, and hospitalization in adults: a systematic review and meta-analysis. Ann Intern Med. 2015 Jan 20;162(2):123-32. doi: 10.7326/M14-1651. Erratum in: Ann Intern Med. 2015 Sep 1;163(5):400. PMID: 25599350. https://pubmed.ncbi.nlm.nih.gov/25599350/
The Best Anti-Core Exercises for Increased Lumbar Stability
When most people talk about core training or working out in general, they tend to mean exercises that involve movement. For the core, that means things like crunches, sit-ups, hanging leg raises, Russian twists, side bends, etc.
These exercises usually feature a concentric or shortening phase followed by an eccentric or lengthening phase. After all, what goes up, must come down, right?
However, in many instances, the core muscles work isometrically, generating force without changing length. They contract to prevent unwanted movement, which is what the term core stability means.
Training to prevent movement might seem kinda odd. Still, it’s actually critical for various sports and activities in and out of the gym. For example, squats and deadlifts require incredible levels of static core stability, as do overhead barbell presses, push-ups, and barbell curls.
Fitness experts call these static core strengtheners anti-core exercises. The anti refers to how the core muscles work to prevent movement rather than cause it.
Whether you are training for improved aesthetics, better performance, weight loss, or health, anti-core exercises deserve a place in your workouts. If nothing else, preventing unwanted movement of your lumbar spine could help stop lower back injuries.
In this article, we reveal the best anti-core exercises.
Core Anatomy Basics
Core is the collective term for the muscles that encircle your midsection. Some fitness folk also like to include other muscles in the core, such as the glutes and lats, but that just confuses matters. So, for the purposes of this article, the core is the muscles in and around the abdominal region.
The primary muscles that make up the core are:
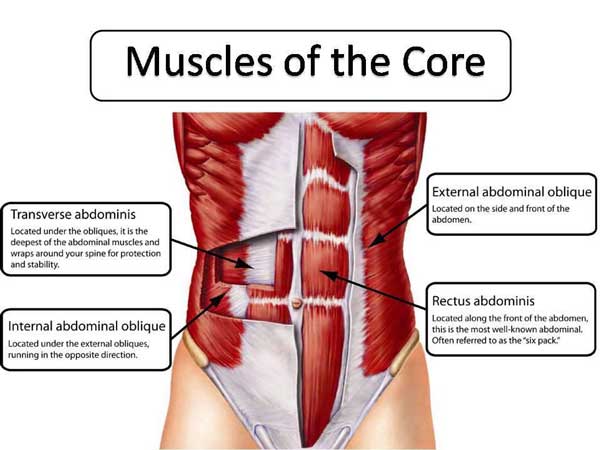
Rectus abdominis
Located on the front of your abdomen, the rectus abdominis is the large, flat muscle that, when you are lean, has that unique six-pack appearance. The rectus abdominis is responsible for the flexion of your spine and also contributes to lateral flexion.
In anti-core terms, the rectus abdominus prevents extension and lateral flexion of the spine.
Obliques
The obliques are essentially your waist muscles. There are two sets of obliques on each side of your abdomen – internal and external. They work together to rotate and laterally flex your spine.
In anti-core terms, the obliques prevent rotation as well as initiating it.
Transverse abdominis
Known as the TVA for short, this muscle surrounds your abdominal contents like a corset or weightlifting belt. It contracts inward to increase intra-abdominal pressure, stabilizing your spine from within.
If prizes were being given for the most critical anti-core muscle, the TVA would be a shoo-in for the gold medal!
Erector spinae
Erector spinae is a group of muscles that run up either side of your spine, including the
iliocostalis, longissimus, and spinalis, each of which can be subdivided into three further sections. The erector spinae are responsible for extending your spine as well as lateral flexion.
In anti-core terms, the erector spinae prevents flexion and lateral flexion.
Movements of the spine
The spine is a column of 33 individual bones called vertebrae. It’s divided into five sections:
Cervical spine – your neck – made up of 7 vertebrae
Thoracic spine – your upper back – made up of 12 vertebrae
Lumbar spine – your lower back – made up of 5 vertebrae
Sacrum – part of your pelvis – made up of 5 immovable/fused vertebrae
Coccyx – your “tailbone” – made up of 4 immovable/fused vertebrae
The cervical, thoracic, and lumbar vertebrae are separated by intervertebral discs, which are sections of tough fibrous cartilage. These discs absorb shock and compress to allow movement.
Speaking of which, the spine is capable of four main movements:
Flexion, i.e., bending forward
Extension, i.e., bending backward
Lateral flexion, i.e., bending sideways
Rotation, i.e., twisting
Movements can also be combined, e.g., flexion with rotation during a twisting crunch.
As such, there are four groups of anti-core exercises, each one designed to prevent one (or more) of these movements. For example, anti-extension exercises emphasize the rectus abdominis, while anti-rotation exercises emphasize the obliques. However, all anti-core exercises involve the transverse abdominis.
Benefits and Drawbacks of Anti-Core Exercises
Not sure if you need to include anti-core exercises in your workouts? Consider these benefits and then decide!
Very functional
Functional training is a very misused term. Many people confuse functional training with technically demanding exercises involving a lot of balance, e.g., squats on a stability ball or curls while slacklining. While these are impressive feats, they’re not examples of real functional training.
In contrast, functional training means doing exercises that have a carry-over to your life outside of the gym, i.e., they improve how you function.
Anti-core exercises train your midsection in a very functional way. People often have to use their core muscles this way during their daily lives, in the gym, or on the sports field. Anti-core exercises will have a significant carry-over to your everyday life.
Spine-friendly
Like any joint, the spine is prone to wear and tear. If you do a lot of crunches, sit-ups, Russian twists, etc., you can cause stress to both the vertebrae and intervertebral discs, and these structures can become worn and damaged.
By their very nature, anti-core exercises involve no movement, so there will much less stress on your vertebrae, spinous ligaments, or discs. In fact, anti-core exercises should not cause lower back stress or pain of any sort – done correctly, of course!
Easy to learn
With no movements to think about, most anti-core exercises are very straightforward and easy to learn. You just have to keep still and prevent movement. That’s not to say these exercises are easy – far from it. However, from a technical performance perspective, the learning curve for most anti-core exercises is pretty short.
While anti-core exercises are mostly beneficial and safe, there are also a few drawbacks to consider:
Usually done for time instead of reps
Many anti-core exercises are held for a predetermined time, e.g., 30 seconds. This means you’ll need to use a timer or be able to see a clock with a second hand. Also, some people prefer to pump out reps, and keeping still may be less appealing.
Elevated blood pressure
Isometric anti-core exercises can cause a short-term increase in blood pressure (1). This is because the muscles are contracted, which reduces blood flow. This should be no issue for people with healthy blood pressure but could be problematic for anyone with hypertension.
This problem can be reduced by never holding your breath during anti-core exercises. Breath-holding can have a significant effect on blood pressure.
Speak to your doctor if you have high blood pressure before doing any of the exercises in this article.
Five Best Anti-Flexion Core Exercises
Anti-flexion exercises emphasize your erector spinae muscles. These exercises are good for improving your posture and protecting your lower back from pain and injuries.
1. Back extension hold
Anti-flexion exercises don’t come much simpler than the back extension hold. Done for time, this exercise teaches you to use your back muscles to resist the pull of gravity. Back extension holds are an excellent stepping stone onto more demanding exercises and is ideal for beginners.
Steps:
Mount your back extension machine (45-degree or horizontal) and get into the mid-point of the exercise so your body is straight. Brace your core and engage your glutes and hamstrings.
Without holding your breath, maintain your position for as long as possible.
Yes, all that shaking is perfectly normal.
Relax, rest a moment, and repeat.
Muscles targeted:
Erector spinae, core, gluteus maximus, hamstrings.
Benefits:
Very easy to learn.
Very accessible as most gyms have a back-extension machine.
Easy to progress/regress by altering the time of each hold.
Tips:
Work up to holding for 2-3 minutes per rep.
Make this exercise harder by holding a weight to your chest or using resistance bands.
Keep your knees slightly bent throughout for comfort and safety.
2. Cobra Superman hold
No back-extension machine? No problem! You can work on your anti-flexion strength with this straightforward floor exercise. On the downside, it can be a little uncomfortable, so make sure you use a mat to avoid any unnecessary pain.
Steps:
Lie on the floor on your front and place your hands on your temples.
Lift your head, chest, arms, legs, and feet a few inches off the floor so you’re balancing on your abdomen and hips only.
Hold this position for as long as possible.
Muscles targeted:
Erector spinae, gluteus maximus, hamstrings, core, trapezius, rhomboids, deltoids.
Benefits:
An ideal exercise for home workouts.
No equipment required.
Good for improving spine mobility.
Tips:
Place a folded mat under your hips for comfort.
Take care not to hyperextend your spine.
Do not hold your breath.
3. Dual kettlebell front rack carry
While stationary exercises like back extension and Superman/cobra holds are effective, they don’t teach you to stabilize your spine during movement. As such, they’re good preparatory exercises but also need to be progressed. Dual kettlebell front rack carries train you to resist flexion while moving your legs, so they’re much more functional.
Steps:
Rack and hold two kettlebells on your shoulders. Pull your shoulders down and back, and brace your core. Look straight ahead.
Keeping your torso upright, walk around your training area until you start to tire.
Lower the weights to the floor, rest, and repeat.
Muscles targeted:
Erector spinae, gluteus maximus, hamstrings, core, trapezius, rhomboids, deltoids.
Benefits:
A highly functional exercise.
Good for integrating your core with your upper and lower body.
An excellent general strength and conditioning exercise.
Tips:
Use dumbbells instead of kettlebells if preferred.
Use gym chalk to stop your hands from slipping.
Use one weight only to add anti-lateral flexion to this exercise.
4. Romanian deadlift
While most people do RDLs to strengthen their glutes and hamstrings, it’s actually a very effective anti-flexion exercise. However, you need to be able to resist flexion in isolation first, e.g., with back extension holds, before attempting this exercise.
Steps:
Hold a barbell with an overhand, shoulder-width grip. Stand with your feet between shoulder and hip-width apart, knees slightly bent.
Brace your core and pull your shoulders down and back.
Hinging from your hips, lean forward and lower the bar down the fronts of your legs. Do NOT round your lower back.
Drive your hips forward, stand up straight, and repeat.
Muscles targeted:
Erector spinae, gluteus maximus, hamstrings, core, trapezius, rhomboids, deltoids, forearms.
Benefits:
An excellent exercise for your entire posterior chain.
Easy to scale by adding or subtracting weight.
A proven way to learn how to hip hinge, which is a prerequisite for many more demanding exercises, such as kettlebell swings and power cleans.
Tips:
Remove your shoes to keep your heels on the floor and your weight toward the back of your feet.
Use chalk or lifting straps to reinforce your grip.
Keep your chest up and your lower back slightly but tightly arched throughout.
Related: Romanian Deadlifts (RDLs) Guide
5. Deadlift
The barbell deadlift is one of the best bang-for-your-buck exercises you can do. Working a large percentage of the muscles in your body, deadlifts have the potential to build muscle size and strength like no other. However, the key to a good deadlift is keeping your spine extended, which is what also makes them an excellent anti-flexion exercise.
Steps:
Place a loaded barbell on the floor. Ideally, the bar should be about mid-shin height.
Stand with your toes under the bar, feet between shoulder and hip-width apart.
Bend down and hold the barbell with an overhand or mixed shoulder-width grip.
Straighten your arms, drop your hips, and lift your chest. Brace your core and pull your shoulders back and down.
Drive your feet into the floor and stand up, ensuring your hips don’t rise faster than the bar.
Push your hips back, bend your legs, and lower the weight back to the floor.
Allow it to settle for a couple of seconds, reset your core and grip, and repeat.
Muscles targeted:
Erector spinae, gluteus maximus, hamstrings, quadriceps, core, trapezius, rhomboids, deltoids, forearms.
Benefits:
One of the most productive barbell exercises you can do.
Teaches you how to lift heavy objects off the floor safely.
A very time-efficient exercise that trains multiple muscle groups at the same time.
Tips:
Place your barbell on blocks or in a power rack if you tend to round your back when deadlifting from the floor.
Do NOT bounce the bar off the floor. Instead, allow the weight to “go dead” between reps for safety and best results.
Experiment with an overhand and mixed grip to see which you prefer.
Related: 9 Weeks to a Bigger Deadlift Program
Five Best Anti-Extension Core Exercises
Anti-extension exercises target your rectus abdominis. Working on your anti-extension strength will lessen the likelihood of hyperextending your spine during athletic and everyday activities.
1. Plank
The plank is the original anti-extension core exercise. With roots in yoga and Pilates, this exercise has been around for centuries. However, despite being so common, many people do this exercise incorrectly. Don’t be one of them!
Steps:
Kneel down and rest your forearms on the floor. Your elbows should be under your shoulders, lower arms parallel. Brace your core and pull your shoulders back and down.
Walk your feet out and back to form a straight line with your shoulders and hips.
Hold this position for the required duration. However, do not hold your breath.
Muscles targeted:
Rectus abdominus, core, hip flexors.
Benefits:
No equipment required.
An excellent preparatory exercise for more advanced movements.
An easy exercise to progress or regress.
Tips:
Try to increase muscle tension instead of holding for excessively long durations.
Bend your legs and rest on your knees to make this exercise easier.
Rest your forearms on a stability ball to make this exercise more challenging.
Related: Plank Progressions and Variations for Stronger Abs
2. Dead bug
Dead bugs teach you to resist extension while moving your arms and legs, which is how your core muscles often have to work in nature. This is a highly functional anti-core move that’s suitable for all levels of exerciser.
Steps:
Lie on your back with your legs bent and arms extended up toward the ceiling. Brace your core and press your lower back into the floor.
Extend your left arm and right leg and lower them to the floor. Keep your lower back pressed down.
Return to the starting position and repeat on the opposite side.
Continue alternating arms/legs for the duration of your set.
Muscles targeted:
Rectus abdominus, core, hip flexors.
Benefits:
A very lower back-friendly exercise.
A very functional anti-extension core exercise.
No equipment required, so ideal for home workouts.
Tips:
Make this exercise easier by only lowering your arms OR legs.
Make it more challenging by lowering both arms and legs together.
Increase the intensity of this exercise by holding dumbbells or a medicine ball.
3. Overhead Pallof press
The Pallof press was invented by Bostonian physical therapist John Pallof. Unlike many anti-core exercises, this one uses weights to overload your muscles. As such, it can be progressed just like any other strength-training exercise, i.e., by increasing the load. Unlike the traditional anti-rotation Pallof press, this is an anti-extension exercise.
Steps:
Attach a rope handle to a high pulley. Grab the handle and then turn your back to the cable machine. Hold your hands at shoulder height. Brace your core and adopt a split stance for balance.
Without leaning forward or backward, raise your arms above your head. Note how the tension on your core increases as you extend your arms.
Lower your hands back to your shoulders and repeat.
Muscles targeted:
Rectus abdominis, core, pectoralis major, latissimus dorsi, deltoids.
Benefits:
Can be made as easy or as challenging as required by adjusting the weight.
Teaches you how to integrate your upper and lower body with your core.
A good exercise for improving shoulder mobility and stability.
Tips:
The narrower/closer your feet are, the more challenging this exercise becomes.
You can also do this exercise with a resistance band.
Experiment with different height cables to see what works best for you.
4. Rollout
Rollouts are like a moving plank. As you extend your arms, the tension on your core increases dramatically, and you’ll have to work harder to prevent lumbar spine extension. Rollouts also provide an intense lat workout. An ab roller is an excellent investment!
Steps:
Kneel down and hold your roller with an overhand grip. Place the roller on the floor in front of your knees. Brace your core and pull your shoulders back and down.
Push the roller out in front of you and lower your chest and abdomen down to the floor. Do not allow your lower back to extend.
Using your abs and lats, pull the roller back up to your legs.
That’s one rep – keep going!
Muscles targeted:
Rectus abdominus, core, latissimus dorsi, triceps.
Benefits:
A low-tech exercise that’s ideal for home workouts.
Can be modified to suit most levels of exerciser.
A challenging, effective anti-extension core exercise.
Tips:
Do this exercise from standing for a more intense workout.
Don’t extend your arms so far to make this exercise less challenging.
No ab roller? No problem! You can also do this exercise with a barbell.
Related: Rollouts: Benefits, Technique, And Alternatives
5. Extended plank
Planks are an excellent exercise. However, if you can do them for over a minute or two, they probably aren’t challenging enough to increase core strength. This variation takes your hands and feet further apart to make them much more demanding.
Steps:
Firstly, lie on your back with your arms stretched out to the side. Make marks on the floor with your fingertips to determine your “wingspan.”
Next, place your feet on one mark and your hands on the other. This is your extended plank position.
Brace your core and hold the extended plank position for as long as possible, taking care not to hyperextend your lumber spine or hold your breath.
Muscles targeted:
Rectus abdominus, core, hip flexors.
Benefits:
No equipment required.
A much more challenging way to do planks.
An excellent anti-extension move for advanced exercisers.
Tips:
Shorten the distance between markers if you cannot do this exercise correctly, or you can feel it in your lower back.
Ensure your hands are dry and won’t slip to avoid accidentally face-planting the floor.
This is a very challenging core exercise, so proceed with caution.
Five Best Anti-Lateral Flexion Core Exercises
Anti-lateral flexion exercises strengthen your obliques, rectus abdominis, and erector spinae muscles, albeit one side at a time. Improving your ability to resist lateral flexion will ensure you can keep your torso upright when dealing with unilateral or unbalanced loads.
1. Side plank
The side plank is an excellent introduction to anti-lateral flexion exercises. It’s a little harder than front planks but just as simple to learn. This exercise is popular in group workout classes for a reason!
Steps:
Lie on your side and rest on your forearm. Your body and legs should be straight. Brace your core.
Lift your hips off the floor and hold them up for the required duration.
Lower your hips back to the floor, roll over, and repeat on the opposite side.
Muscles targeted:
Obliques, rectus abdominus, erector spinae, deltoids.
Benefits:
No equipment required, so ideal for home workouts.
Easy to learn and master, so perfect for novice exercisers.
An excellent preparatory exercise for more demanding anti-lateral flexion movements.
Tips:
Rest your elbow on a folded exercise mat or foam pad for comfort.
Bend your legs to make this exercise easier.
You can also do this exercise with your supporting arm extended:
2. Single-arm farmer’s walk
Exercises don’t come much more functional than the single-arm farmer’s walk. However, despite its simplicity, this exercise can be extremely challenging. All you need is a single dumbbell, kettlebell, or heavy bag, so this exercise is ideal for home workouts.
Steps:
Hold a heavy weight in one hand, arm by your side. Brace your core and make sure your hips and shoulders are level.
Without leaning sideways, go for a walk around your training area.
On completion, lower the weight to the floor, swap hands, and repeat.
Muscles targeted:
Obliques, rectus abdominus, erector spinae, forearms.
Benefits:
A highly functional core.
Can be modified for all levels of strength by increasing or reducing the weight.
An excellent way to develop a stronger, more enduring grip.
Tips:
Chalk your hands or use lifting straps to reinforce your grip if necessary.
Walk in zigzags to destabilize the weight and make this exercise more demanding.
Take care not to lean sideways or shrug your shoulders during this exercise.
3. Single-arm waiter’s walk
The single-arm waiter’s walk is similar to the farmer’s walk, but the weight is held overhead and not down by your side. This increases the stability demand of this exercise. Take care not to go too heavy too soon with this exercise; it’s harder than it looks!
Steps:
Lift and hold a single dumbbell or kettlebell overhead. Brace your core and engage your shoulders and upper back to stabilize the load.
Without leaning sideways, go for a walk around your training area.
On completion, lower the weight to the floor, swap sides, and repeat.
Muscles targeted:
Obliques, rectus abdominus, erector spinae, deltoids.
Benefits:
A challenging and effective anti-lateral flexion exercise.
Builds stronger, more stable shoulders.
Can be modified for all levels of strength by increasing or reducing the weight.
Tips:
Chalk your hands or use lifting straps to reinforce your grip if necessary.
Walk in zigzags to destabilize the weight and make this exercise more demanding.
Take care not to lean sideways or shrug your shoulders during this exercise.
4. Single-arm overhead press
Overhead presses are great for building bigger shoulders and triceps. However, when you switch from using both arms to just one, they become an excellent ant-lateral flexion exercise. Requiring just one weight, this anti-core move is ideal for home workouts.
Steps:
Hold a dumbbell or kettlebell in one hand at shoulder height. Stand with your feet shoulder-width apart and brace your core. Make sure your hips and shoulders are level.
Without leaning sideways, press your weight up and overhead to arm’s length.
Lower the weight back to your shoulder and repeat.
Switch hands and do the same number of reps with your other arm.
Muscles targeted:
Obliques, rectus abdominus, erector spinae, deltoids.
Benefits:
A very functional upper-body and core exercise.
An excellent way to identify and fix left-to-right strength imbalances.
A very accessible, practical exercise.
Tips:
Do this exercise in front of a mirror to ensure you’re keeping your shoulders level.
Use less weight than you would for a two-handed overhead press.
You can also do this exercise with a barbell, which is an exercise called the javelin press:
5. Suitcase deadlift
The suitcase deadlift is so-called because it’s the same technique you’d use to pick up a single bag at the airport. This awesome exercise teaches you how to maintain a neutral and stable spine while generating force with your legs.
Steps:
Place a kettlebell or dumbbell on the floor and then stand sideways on to it. The handle should run parallel to your feet.
Squat down and grab the handle with a neutral or palms-in grip.
Pull your shoulders down and back, brace your core, and look straight ahead.
Drive your feet into the floor and stand up straight, taking care not to lean sideways.
Lower the weight back to the flood and repeat.
Turn around and do the same number of reps on the opposite side.
Muscles targeted:
Obliques, rectus abdominus, erector spinae, gluteus maximus, hamstrings, forearms.
Benefits:
A high degree of crossover with activities outside of the gym.
An effective and functional anti-lateral flexion exercise.
An excellent deadlift assistance exercise.
Tips:
Use gym chalk or lifting straps to stop your hands from slipping.
Do this exercise in front of a mirror to ensure your torso, hips, and shoulders are straight.
Experiment with your stance width to see what works best for you.
Five Best Anti-Rotation Core Exercises
Anti-rotation exercises target your obliques. Having stronger obliques will help you prevent unwanted twisting during activities like running, kicking, and throwing. Anti-rotation is especially important during contralateral activities where you use one arm and the opposite leg, e.g., running.
1. Bird-dogs
Bird-dogs are one of the most basic anti-rotation exercises around. Ideal for beginners, this exercise teaches you how to stabilize your core as you move your arms and legs. Bird-dogs are also an excellent muscle activation exercise and are perfect for warm-ups.
Steps:
Kneel on all fours with your shoulders over your hands and your hips over your knees.
Brace your core and set your shoulders down and back.
Keeping your hips and shoulders level, extend your right arm and left leg.
Lower them back to the floor and repeat.
On completion of your set, swap sides and do the same number of reps with the opposite arm and leg. Or, if preferred, you can use an alternating arm and leg action.
Muscles targeted:
Obliques, rectus abdominis, gluteus maximus, hamstrings, deltoids, erector spinae.
Benefits:
An excellent exercise for lower back pain sufferers.
A great movement for beginners.
No equipment required, so ideal for home workouts.
Tips:
Kneel on a folded exercise mat for comfort.
Use ankle/wrist weights to make this exercise more challenging.
You can also do this exercise in a high plank position like this:
2. Pallof press
The Pallof press is one of the most widely-performed anti-rotation core exercises. Popular with almost every type of exerciser, it’s safe to say that this move delivers. If you’ve never done Pallof presses before, you are in for a treat, but if you’re already doing them, you should definitely continue!
Steps:
Attach a D-shaped handle to a cable machine set to mid-chest height.
Stand side-on to the pulley and hold the handle on both hands. Your feet should be about shoulder-width apart, with your knees slightly bent. Brace your core.
Pull your hands into your chest and step away from the machine to load the cable.
Without moving your hips or shoulders, extend your arms out in front of you. Feel how the tension on your muscles increases as you straighten your arms.
Bend your arms and return your hands to your chest.
Repeat for the required number of reps and then switch sides.
Muscles targeted:
Obliques, rectus abdominis, erector spinae, pectoralis major, deltoids, triceps,
Benefits:
An ideal exercise for beginners.
A very spine-friendly anti-core exercise.
Very scalable – just adjust the load to reflect your current strength.
Tips:
You can also do this exercise with a resistance band.
Vary the height of your arms to work your core from different angles.
Try doing Pallof presses in a half-kneeling position for variety, like this:
3. Single-leg Romanian deadlift
While regular Romanian deadlifts are an excellent anti-flexion exercise, switching to one leg/one arm means you’ll also have to work hard to prevent twisting. This exercise is also great for improving balance and stability and is ideal for runners and other athletes.
Steps:
Stand with your feet together and a dumbbell or kettlebell in your left hand. Shift your weight over onto your right foot. Brace your core and pull your shoulders back and down.
Hinge forward from your hips and lower the weight down the front of your leg. Extend your left leg out behind you for balance.
Stand back up and repeat.
Rest a moment and then do the same number of reps on the opposite leg, remembering to switch hands, too.
Muscles targeted:
Obliques, hamstrings, gluteus maximus, rectus abdominis, erector spinae.
Benefits:
A time-efficient way to train your core and lower body simultaneously.
An excellent exercise for better balance and coordination.
Easier on your lower back than two-legged Romanian deadlifts.
Tips:
Rest your non-working foot lightly on the floor for balance if needed, i.e., B-stance or kickstand RDLs.
Try holding the weight in the same hand rather than the opposite hand. This is considerably more demanding.
Do this exercise next to a wall or handrail for balance if required.
Related: Why the Single Leg Romanian Deadlift Deserves to Be the Hero of Your Workout
4. Renegade row
Renegade rows are among the most challenging anti-rotation exercises, even with light to moderate weights. However, if you’ve mastered Pallof presses and can do bird-dogs in your sleep, this is the exercise you’ve been waiting for!
Steps:
With a dumbbell in each hand, squat down, and place them on the floor.
Walk your feet out into the push-up position. Brace your core and tense your legs.
Bend one arm and row your dumbbell up and into your lower ribs.
Lower the weight back to the floor, switch arms, and repeat.
Alternate arms for the required number of reps.
Muscles targeted:
Obliques, rectus abdominus, latissimus dorsi, biceps, triceps, deltoids, erector spinae.
Benefits:
A total core exercise that teaches you to stabilize your core as you move your arms and legs.
A time-efficient conditioning exercise that burns lots of calories.
A challenging movement that’s ideal for intermediate and advanced exercisers.
Tips:
Wear a weighted vest to make this exercise even harder.
Use hexagonal dumbbells for increased stability and safety.
Combine renegade rows with push-ups for a complete upper-body and core workout:
Related: Renegade Rows Guide
5. Single-arm cable chest press
While the single-arm chest press is not an especially good exercise for your pecs, it is an excellent anti-rotation core exercise. It teaches you how to integrate your core with your upper and lower body.
Steps:
Attach a D-shaped handle to a chest-high cable machine. Hold the handle and turn your back on the machine so the cable runs outside your arm. Adopt a split stance for balance. Brace your core.
Keeping your hips and shoulders stationary, push your arm forward and out to full extension.
Bend your arm, bring the handle back to your chest, and repeat.
Switch sides and do the same number of reps with the other arm.
Muscles targeted:
Obliques, rectus abdominus, pectoralis major, deltoids, triceps, erector spinae.
Benefits:
A very lower back-friendly anti-rotation exercise.
Infinitely scalable by increasing or reducing the weight.
Suitable for beginner, intermediate, and advanced exercisers.
Tips:
Press up at an incline to change the feel of this exercise.
Do this exercise with your feet together to challenge your core and balance more.
Do this exercise with a resistance band or in a half-kneeling position:
Anti-Core Exercises – FAQs
Do you have a question about anti-core exercises? No problem, because we’ve got the answers!
1. How many reps and sets should I do?
There is no magic number of reps you should use to train your core. You will make progress whether you do 10 or 30 reps per set. That said, lower reps are generally more time-efficient, so it’s worth choosing exercises that are demanding enough to fatigue your muscles relatively quickly, e.g., between 12-20. Wherever possible, avoid very high-rep sets, e.g., 50.
In terms of sets, 3-5 should be sufficient for most people. If you can do more, the chances are that you a) aren’t getting close enough to failure or b) are resting too long between efforts.
2. How often should I do anti-core exercises?
It’s generally accepted that it takes 48-72 hours for a muscle or muscle group to recover from a workout. As such, you should aim to do anti-core exercises 2-3 times per week on non-consecutive days, e.g., Monday and Thursday, or Monday, Wednesday, and Friday. This provides a good balance between work and recovery.
Training your core more often, i.e., daily, won’t necessarily produce better results, and could even lead to overtraining.
3. Will anti-core exercises give me a six-pack?
While doing anti-core exercises will develop your six-pack muscle (the rectus abdominis) and other critical core muscles, you won’t be able to see them until your body fat percentage is low enough. This usually means under ten percent for men and 15 percent for women.
It’s true what they say – six-pack abs are made in the kitchen, and your diet will determine if your abs and core muscles are visible.
4. Are anti-core exercises safe?
Because they involve minimal movement, most anti-core exercises are very safe. As long as you brace and stabilize your spine correctly, there should be very little stress on your intervertebral discs or spinous ligaments, so many are even okay for folk who suffer from back pain.
That said, exercises that involve additional movements, e.g., suitcase deadlifts and single-arm overhead presses, are somewhat riskier than static exercises like planks and side planks.
However, if performed correctly and with appropriate loads, there is a very low risk of injury with most anti-core exercises.
5. Do I have to do anti-core exercises – aren’t regular core exercises enough?
While all core exercises are beneficial, anti-core exercises are often more functional. That’s because you often need to use these muscles to prevent unwanted movement of your lumbar spine, e.g., during deadlifts, push-ups, and overhead presses.
If your core is strong, you may not need to do a lot of anti-core training. However, if your lumbar spine lacks the stability it needs, then anti-core exercises are a must.
Wrapping Up
Whether you’re training for performance, aesthetics, or health, your workouts should include anti-core exercises. Anti-core exercises teach you how to stabilize your lumbar spine, which will protect you from lower back injury.
A more stable spine will also let you do more reps with heavier loads, making the rest of your workout more effective.
With 20 anti-core exercises to choose from, you have more than enough options to keep you busy and progressing for years to come. Include anti-core exercises in all your midsection workouts for best results.
References:
Hanson P, Nagle F. Isometric Exercise: Cardiovascular Responses in Normal and Cardiac Populations. Cardiol Clin. 1987 May;5(2):157-70. PMID: 2884033. https://pubmed.ncbi.nlm.nih.gov/2884033

How To Increase Vascularity: 15 Effective Strategies to Get Diced
Let’s be honest; prominent veins on a muscular physique look badass. Vascularity is considered a symbol of leanness, muscle mass, strength, dedication, hard work, and, as we said — badassery. Not only that, but a vascular dude is also a nurse’s dream.
Although most lifters want to get more diced and vascular, it is easier said than done. Multiple factors, including your diet, training, and body fat percentage, affect the visibility of veins in your body, and you must do everything right to maintain them throughout the year.
Vascularity is a highly sought-after attribute in fitness and bodybuilding, as it can improve your aesthetics. If you’ve ever noticed, most professional bodybuilders get super vascular close to a show; however, they lose their sharpness as soon as they start refeeding after the contest. Your vascularity can change daily, depending on your food intake and body fat percentage.
Contrary to what most people think, crisp conditioning and monster vascularity are not reserved for bodybuilders. Anyone can improve the visibility of their veins and blood vessels by controlling a few factors.
In this article, we go over the basics of vascularity and everything you need to know about improving the appearance and prominence of your veins, including the factors that affect your vascularity and the 15 most effective ways of improving it.
Understanding Vascularity
Vascularity is defined as the visibility and prominence of veins and blood vessels beneath the skin. There is no special exercise or diet to improve your vascularity. You must control several factors to enhance the visibility of veins and blood vessels under your skin.
Vascularity is chased by folks striving to achieve a shredded and muscular physique. Your vascularity mainly improves when your blood flow increases, causing the vessels to expand and become more prominent. A vascular individual’s veins will generally be thicker, wider, and denser than an average person’s.
Besides people that train, individuals with a physically intensive job and a low body fat percentage usually have insane vascularity. Manual labor keeps their blood flow high throughout the day, which expands their veins.
Bodybuilders chase vascularity as it can boost their aesthetics by enhancing their muscle definition and making them look bigger and stronger.
When veins and blood vessels become more visible as a result of a low body fat percentage, it gives the appearance of tightly wrapped skin around your muscles, helping you achieve a 3D physique, which is a jargon in the bodybuilding world for well-defined, full, chiseled, popping, and separated muscles.
Now that you are well-versed with the basics of vascularity check out the factors that affect your vascularity and the best ways to improve it.
Factors Affecting Vascularity
Although many people want to improve their vascularity, only a few understand the role of veins in the body and how it affects their overall health and well-being.
Blood vessels, including arteries, veins, and capillaries, transport oxygen, nutrients, hormones, and immune cells throughout the body. Arteries deliver oxygen-rich blood from the heart to various tissues and organs, while veins bring the oxygen-depleted blood back to the heart.
During a pump-inducing workout, your veins get dilated and move closer to the skin’s surface to make more space for the blood to return to your heart, so oxygen and nutrient-rich blood can be circulated again.
Multiple factors influence vascularity and impact the visibility and prominence of veins and blood vessels. Understanding the factors that affect your vascularity will help you fine-tune your fitness regimen. All the 15 methods mentioned in this article (and your vascularity) will come down to these factors and how you manage them.
Genetics
Like most things in bodybuilding, this is where it starts. Some people naturally have more visible veins due to their genetic makeup. Others have to slog away to achieve their vascularity and conditioning goals. Plus, some people have thicker and wider veins than others, making their vascularity stand out.
Furthermore, different people will respond uniquely to the same diet and exercise program. Your training partner might achieve crisp vascularity much faster than you, or vice versa.
Body Fat Percentage
Vascularity is a sign of low body fat as an individual must have a low amount of subcutaneous fat to unveil his muscle definition and veins. Achieving a lower body fat percentage should be your primary objective if you want to improve your vascularity.
Related: Body Fat US Navy Calculator
Muscle Mass
Your vein visibility and prominence improve as you build muscle mass. As you build muscle, your veins come closer to the skin surface, which improves their visibility. Conversely, you will lose some vascularity with a decline in your muscle mass.
Improvement in vascularity boosts your physique aesthetics as it boosts your muscle separation and definition. Most lifters report the development of lines and striations as they shed body fat and build muscle mass.
Hydration
Hydration is a complicated and often misunderstood subject when it comes to improving vascularity. Contrary to what most people believe, you must be adequately hydrated to improve your vascularity.
Many people make the mistake of cutting their water while trying to lose weight. However, it can lead to health issues. On the flip side, not managing your water and food intake can lead you to hold onto water weight.
Diet
You must follow a nutrient-dense whole-food diet and count your calories if you want to improve your vascularity. Plus, your diet should be rich in antioxidants and nitric oxide boosters. These will help dilate your blood vessels, improve blood flow, and make your veins more visible and prominent.
Blood Flow
Efficient blood flow and vasodilation are essential for pronounced vascularity. Cardiovascular exercise, nitric oxide production, and certain supplements can influence blood vessel dilation.
Hormonal Balance
Your hormones play a crucial role in influencing your vascularity. Testosterone can boost vascularity by helping improve muscle development and blood flow. Men are usually more vascular than ladies as they produce more testosterone. On the flip side, estrogen is the female sex hormone, and higher estrogen stores lead to bigger fat stores.
Bodybuilders that take synthetic testosterone often experience a boost in vascularity as their bodies are primed to shed excess fat and build muscle mass.
Age
There is a decline in vascularity with age as your skin loses elasticity and blood vessels become less prominent. Testosterone production in men also declines with age, which is another reason for muscle mass and vascularity loss.
Medications
Certain medications, such as beta-blockers, can affect blood flow by reducing vasodilation. Such types of medicines can lead to a fall in vascularity. You must consult your healthcare professional before starting a workout, diet, or supplement program if you are on any medication.
15 Best Ways To Improve Your Vascularity
Here are the 15 most effective ways of boosting your vascularity:
Target Muscle Groups Where You Want to Improve Your Vascularity
You cannot spot-improve your vascularity in a certain muscle group, as you must focus on losing body fat and building muscle by following a balanced diet and training program. Vascularity tends to be generalized to the entire body. However, you must target specific muscle groups during your workouts to improve your musculature and conditioning.
When someone says they want to improve their vascularity, they are usually referring to their arms. You’ll hardly ever find someone looking for ways to increase the vascular density in their glutes (it would be borderline gross if they did).
If you want a thick and gnarly cephalic vein and your forearm veins to look like a roadmap, you must focus on training your upper and lower arms effectively. Train your target muscle groups two to three times per week to improve your vascularity. However, you must take into account your experience level and training intensity. Advanced lifters that follow a high-volume and high-intensity training program should limit training each muscle group to twice weekly.
Follow a Balanced Exercise Regimen
Many people go all-in on isolation and machine exercises while trying to increase their vascularity. However, they leave significant gains on the table by following this approach. Your workout program should have a balance of compound and isolation exercises.
Compound movements help build muscle mass, which pushes your veins closer to the skin layer. On the other hand, isolation exercises help improve your conditioning and muscle definition.
Furthermore, since you must prioritize losing body fat (and weight) to improve your vascularity and conditioning, you should favor compound exercises that involve multiple muscle groups, as they will result in higher caloric expenditure.
Your workout programs should also maintain a balance between strength training and cardiovascular training sessions since you cannot enhance your vascularity while gaining body weight or fat.
Incorporate HIIT Exercises into Your Training Regimen
High-intensity interval training (HIIT) involves alternating between several minutes of high-intensity movements to significantly increase your heart rate to at least 80% of your maximum heart rate, followed by short periods of lower-intensity movements or rest.
HIIT exercises boost blood flow to the target muscles, improving vasodilation and the visibility of your veins. You must incorporate HIIT strength training and cardiovascular sessions into your training regimen for optimal improvements in your vascularity.
Remember, you don’t have to turn every workout in your training program into a HIIT workout. Use a training protocol that promotes cardiovascular adaptations, including improved heart health, increased blood volume, and enhanced vasodilation, and you’ll be on your way to achieving road-map-like veins.
Capitalize on Advanced Training Principles
Incorporating advanced training principles such as super sets, drop sets, and intraset stretching can significantly increase blood flow to the target muscles, which can help induce hypertrophy and enhance your vascularity.
Furthermore, the blood flow restriction (BFR) training technique can help boost your vascularity. BFR or occlusion training combines low-intensity exercise with blood flow occlusion, producing similar results to high-intensity training.
BFR training involves performing an exercise while wearing a BFR cuff around the top of the target muscle group. Notably, BFR should be restricted to one exercise per workout. Overdoing it can lead to limb numbness and other vascular issues. Although BFR was initially used in gyms for achieving a muscle-ripping pump, this technique is now gaining popularity in the clinical setting. [1]
Cut Your Calories
Most people need to shed excess body weight to increase their vascularity. You must enter a caloric deficit to lose weight, meaning you must expend more calories daily than you consume.
Your current body weight, objective body weight, and body fat percentage will determine your daily calorie intake goal. You can use our convenient online calculator to determine your ideal calorie intake target.
Break down your daily calorie intake goal into a suitable macronutrient split to work toward your dream physique. Follow a high-protein and low-fat diet to expedite your weight loss progress. Eat a decent amount of carbohydrates before a workout to ensure you have enough energy to get you through a HIIT workout.
Include Blood Flow-Boosting Foods in Your Diet
A vascularity-boosting diet must consist of nutrient-dense whole foods, such as nitrate-rich vegetables, citrus fruits, and garlic. These foods can promote vasodilation, improve blood circulation, and support overall vascular health.
Nitrate-rich vegetables such as spinach, arugula, kale, and beetroot are packed with dietary nitrates. Nitrates convert to nitric oxide in the body, which relaxes blood vessels and boosts blood flow.
Citrus fruits like oranges, grapefruits, and lemons are rich in vitamin C and bioflavonoids that support blood vessel health and improve elasticity. Garlic has been shown to improve blood flow and lower blood pressure. [2]
Contrast Showers
Contrast showers, also known as contrast hydrotherapy, involve alternating between hot and cold water during a shower. Many athletes use contrast showers for their potential benefits on circulation, recovery, and overall vascular health. [3]
Hot water showers promote vasodilation, resulting in the widening of blood vessels. On the other hand, cold water showers induce vasoconstriction, which leads to the narrowing of blood vessels. Alternating between hot and cold water during your shower can improve vascular health, blood circulation, and recovery after workouts.
In a contrast shower, you shower in hot water for three to five minutes, switch to cold water for one minute, and repeat this cycle three to five times. You must, however, always finish your contrast shower with cold water.
Make Peace with Cardio
Cardio exercises can make entering a calorie deficit easier, helping you reach your vascularity goal faster. You should ideally do two cardio sessions daily to shed excess body fat. The first should be a 30-45 minute low-intensity steady state (LISS) session done first in the morning on an empty stomach.
The second cardio session of the day should be a 15-minute high-intensity interval training workout (HIIT) done after your resistance training session. You can use a different cardio machine each time to keep your workouts interesting.
Massage
Although massages and self-myofascial release tools such as a foam roller might not directly impact your vein visibility, these practices can optimize muscle function and overall vascular health, which can enhance vascularity.
The mechanical pressure applied during these massage techniques can result in vasodilation, the widening of blood vessels. Since massage techniques can boost blood flow, they can improve your vascularity.
Sauna
Sauna sessions involve exposure to high temperatures, which can improve your overall vascular health and boost your vascularity. The rise in body temperature during these sessions leads to vasodilation, which improves blood flow and can improve your vascularity in the long run.
Regular sauna sessions can also improve your cardiovascular function. It can strengthen the heart and improve its efficiency in pumping blood through the body. Sauna sessions may boost nitric oxide release and improve endothelial function, which is the inner lining of blood vessels and plays a crucial role in vascular health.
Manage Stress
Fitness and bodybuilding aren’t something that you do for an hour a day in the gym. It is a lifestyle. You must stick to it 24X7, 365 days a year. (366 days if it is a leap year — but you get the point.)
Chronic stress is one of the most common reasons behind deteriorating health. The stress hormones cortisol and adrenaline can cause vasoconstriction, which reduces blood flow. These stress hormones can hamper your vascularity by making veins and blood vessels less visible.
Chronic stress leads to poor blood circulation, which limits the flow of nutrients and oxygen to your muscles. It can also cause water retention, leading to bloating and puffiness, which can negatively affect your vascularity.
Sleep Well
As you’ve probably noticed, improving your vascularity involves juggling multiple things, which can be exhausting. You must sleep seven to eight hours each night to allow your body enough time to recover from your day.
Getting a good night’s sleep regulates your blood pressure, helps balance your hormones, improves endothelium function, and reduces inflammation, which can all lead to better vascularity.
Avoid Alcohol and Smoking
Not only do alcohol and smoking hamper your vascularity, but they can also negatively affect your vascular health. Smoking can lead to vasoconstriction and result in increased blood pressure and reduced blood flow.
Excessive alcohol consumption and smoking increase your risk of developing atherosclerosis, a condition characterized by the buildup of plaque inside arteries, which can limit your blood flow and restrict your ability to achieve muscle pumps.
Use Supplements
We don’t mean that you must use supplements to improve your vascularity, but they can significantly improve your conditioning. Many pre-workout supplements come with nitric oxide boosters, which can deliver insane pumps in the gym through vasodilation, which also leads to better vascularity.
You can also get standalone nitric oxide booster supplements, such as L-arginine, L-citrulline, or beetroot extract, which can promote vasodilation and boost vascularity. Omega-3 fatty acids, vitamin C, vitamin K, and antioxidants are other compounds that can increase your vascularity.
Cut Water [Only When Close To a Special Event]
Many models and professional bodybuilders cut water significantly before a photo shoot or stepping on stage, as it helps them eliminate water weight and the related bloating and puffiness. Cutting water helps improve their aesthetics by enhancing muscle separation and definition.
Furthermore, some compounds, such as diuretics, can help eliminate water. However, they are extremely dangerous. You must consult your healthcare provider before undertaking water manipulation or water depletion.
Note: The content on Fitness Volt is for informative purposes only and should not be taken as medical advice to diagnose, prevent, or treat health problems. If you’re suffering from a health issue, are pregnant, or are under 18 years old, you should consult your physician before starting any new supplement, nutrition, or fitness routine.
Wrapping Up
Vascularity serves as a visual marker of fitness and a testament to an individual’s dedication and hard work. Since multiple factors affect your vascularity, figuring out the right formula might require some trial and error.
Although this article lists 15 ways to increase your vascularity, you don’t have to do them all at once. Start by making 3-5 adjustments and fine-tune your routine after every few weeks. Depending on your experience level, improving your vascularity can be a slow process. Beginners might need to drop their body fat levels considerably to reveal their veins. It can take you 12-24 weeks to achieve noticeable progress.
Now that you know the ins and outs of how to increase your vascularity, what are you waiting for? Grab that blood flow restriction band, and head out to the gym. Best of luck!
References
Wilson JM, Lowery RP, Joy JM, Loenneke JP, Naimo MA. Practical blood flow restriction training increases acute determinants of hypertrophy without increasing indices of muscle damage. J Strength Cond Res. 2013 Nov;27(11):3068-75. doi: 10.1519/JSC.0b013e31828a1ffa. PMID: 23446173.
Ried K. Garlic lowers blood pressure in hypertensive subjects, improves arterial stiffness and gut microbiota: A review and meta-analysis. Exp Ther Med. 2020 Feb;19(2):1472-1478. doi: 10.3892/etm.2019.8374. Epub 2019 Dec 27. PMID: 32010325; PMCID: PMC6966103.
Juliff LE, Halson SL, Bonetti DL, Versey NG, Driller MW, Peiffer JJ. Influence of contrast shower and water immersion on recovery in elite netballers. J Strength Cond Res. 2014 Aug;28(8):2353-8. doi: 10.1519/JSC.0000000000000417. PMID: 24531433.
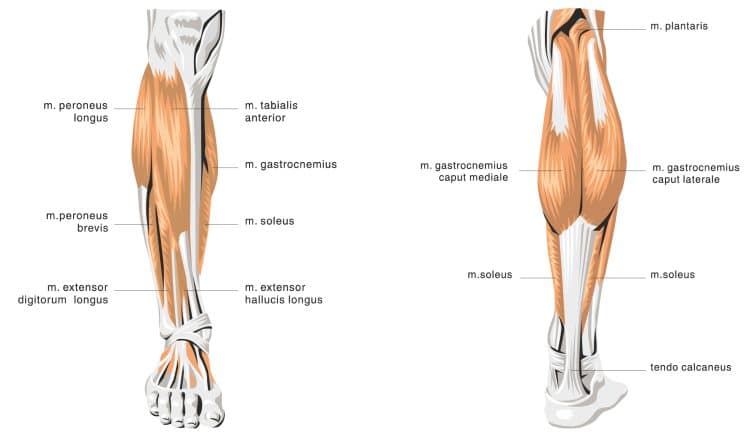
Are Calves Genetic? Unlocking The Mystery of Lower Leg Growth
“Are calves genetic?”
If you’ve ever seen someone who clearly has never stepped foot in a gym with full, rounded calves, the question has probably crossed your mind; especially if you’ve been hitting your lower legs with calf raises for years with little result. You’ve probably also noticed that some pro bodybuilders, with massive development in every other muscle group, just can’t seem to bring up their calves.
If calf development is genetic, it means those of us who have lucked out in the genetic lottery will never turn our calves into bulls. However, if that’s not true, we’ve still got hope. Let’s dig into the facts to find out.
Calf Anatomy
The calves are generally understood to comprise two separate muscles: the gastrocnemius and the soleus. However, some people contend that they are actually two parts of the same muscle. That’s because they both converge at the Achilles tendon and produce the same action; plantar flexion (ankle extension).
The meaty part of the muscle that we generally consider as the calf is the gastrocnemius or gastro. The soleus is a flat muscle that lies under the gastro and has minimal growth potential.
The gastro comprises two parts; the inner and outer head. Both heads originate at the base of the femur, on the medial and lateral condyles (the rounded structure at the end of the bone). These origin points are just above the knee joint.
The soleus originates just below the knee. The gastro and the soleus then converge into the Achilles tendon, which then connects to the heel bone.
Role of Genetics on Calf Development
Genetics does, indeed, have a part to play in your ability to build your calves. Three key genetic factors contribute to the size potential of your lower legs:
Muscle Fiber Type
Muscle Fiber Density
Muscle Belly/Tendon Length
Muscle Fiber Type
There are two types of muscle fiber; slow twitch (Type I) and fast twitch (Type II). Slow twitch fibers are created for endurance work required for repetitive movements like walking and running. The soleus comprises more fast twitch fibers, while the gastro, though it still has more slow twitch fibers, has a higher percentage of fast twitch fibers. Fast twitch fibers are designed more for explosive, strength-type work, as is required when doing calf raises. These fibers have greater growth potential than slow twitch fibers.
A study by Gollnick et al., published in the European Journal of Physiology, analyzed the muscle fiber make-up of the soleus and gastro and other lower body muscles. They found that, on average, the soleus contained 80% of slow twitch fibers, while the gastro averaged just 57% of fast twitch fibers. [1]
This study also revealed that there is quite a variance in the percentage of fast twitch and slow twitch fibers among the study subjects. The range of fast twitch fibers in the soleus was between 64% and 100%. Regarding the gastro, the range was between 34% and 82%. These differences are the result of the genetic lottery.
So, a person whose gastro comprises 34% fast twitch fibers (and therefore 66% slow twitch fibers) will have a genetic advantage regarding muscle-building potential compared to a person with 82% fast twitch and only 18% slow twitch.
This leads to whether changing your muscle fiber type with training is possible. In other words, could a guy with 82% fast twitch fibers in his calves train a certain way to reduce that down to 50% to have more slow twitch fibers?
The short answer is that researchers don’t know. There is debate among scientists on this question, with some believing that you’re stuck with what you were born with, while others contend that, by doing more of a specific type of training, you may be able to make up to a 10% change. So, you may have a 10% window to develop more slow twitch muscle fibers by doing a calf raise exercises. You would engage in running, cycling, and other endurance work to develop more fast twitch fibers for endurance.
Related: The Average Calf Size for Men and Women
Muscle Fiber Density
Your muscle fiber density refers to the number of muscle fibers per unit of muscle volume. Your genetics determines this. Some people will be born with more muscle fibers in their calves than others. As a result, they will have more muscle-building material to work with. Their muscles will be able to grow bigger and stronger than a person who is born with fewer muscle fibers in the calves.
There is scientific debate about whether it is possible to grow more muscle fibers. This is known as hyperplasia (contrasted with hypertrophy, which refers to making your existing muscles bigger). The current consensus is that if hyperplasia does occur, it would only be possible to a small degree. [2]
Muscle Belly/Tendon Length
Genetics determines the length of a person’s calf muscle belly. A long muscle belly runs down from the back of the knee at least halfway to the ankle. A short muscle belly sits much higher on the lower leg. The ideal for muscle development is having a long belly and a short Achilles tendon. However, the length of your muscle bellies and tendons is entirely a matter of genetics.
High calf bellies are better suited for endurance exercise. In fact, you will notice that many high-level sprinters, basketball players, and endurance athletes have noticeably high calves. It is believed that their longer Achilles tendon provides for more force production in the way that a longer rubber band would.
It is important to remember that, for most people, their genetic predisposition to building calves will be about the same as for the rest of their bodies. So, you’ll probably have the same proportion of slow-twitch to fast-twitch muscle fibers in all your muscles. The length of your muscle bellies will likely also be proportionate throughout your body.
Sometimes, what appears to be a genetic predisposition to weak calves is actually the result of training style and focus. A classic example is when Arnold Schwarzenegger came to America in 1968. Back in Europe, the bodybuilding focus was on the upper body. As a result, Arnold did very little calf work in the gym. Looking at him onstage at the 1968 IFBB Mr. Universe (in which he came second to Frank Zane), you may have concluded that he had terrible calf genetics.
Arnold Schwarzenegger / Instagram
Yet, when Arnold came to appreciate that he needed to seriously focus on his lower legs to start winning competitions, he undertook an amazing transformation. Rather than hiding his weakness, he actually cut all of his training pants off at the knee so that he could be reminded every day of what he needed to focus on. He performed 500-pound sets of standing calf raises, along with seated and donkey calf raises six times per week. Within a few years, during which he once said he invested 5,000 hours on calf training, he was able to turn his biggest weakness into one of his greatest strengths.
Factors Beyond Genetics That Impact Calf Development
So far, we’ve seen that genetic factors affect your calf-building potential. The length, muscle fiber type, and density of your calves will not change much over the course of your life. So, if you’ve got high muscle bellies and long Achilles tendons, there’s nothing you can do about that.
You can’t, for example, alter your calves’ shape by modifying how you do your calf exercises. You may have heard that you can better target the inner or outer head of the gastro by angling your toes in or out when doing calf raises. This is not the case. That’s because the inner and outer heads pull on a single Achilles tendon. This causes the ankle to extend in just one direction. If it were possible for the ‘inner’ calf to work differently from the ‘outer’ calf, each head would require its own separate tendon and separate attachment to the heel bone. That would allow each one to act separately based on toe angling.
So, while you can’t change your calf muscle shape, what you can do is maximize what you’ve been given. Let’s now consider the best way to train to maximize your genetic calf-building potential.
The most commonly seen calf training exercise in the gym is the standing calf raise. This involves placing your shoulders under a pad that is connected to a weight stack. You then place your feet on a block that allows you to lower your heels below your toes level.
I often see people doing this exercise with just their toes on the block. However, this is a limiting foot position that would be akin to doing barbell curls by gripping the bar with only your fingertips.
The best foot position when doing calf raises will provide the most support for the movement to follow. When it’s just your toes on the block, you’ll find those toes slipping off as you progress through your reps, probably resulting in a shortened set.
So, rather than just your toes, you should place the balls of your feet on the block. This is the large, bony pad just below your big toe. Each toe has its own sesamoid bone, running on a diagonal rather than horizontally across the foot. So, to give your foot the most support, you should place the ball of your foot on a slight diagonal from the big toe down to the little toe. This will result in a ‘toes in’ position.
By the way, if you feel your feet slipping off the block while doing a set, you should pause and reset your position. If you don’t, you will compromise your ability to get a full extension and contraction on every rep.
Ideal Range of Motion on Calf Raises
You will never achieve your genetic muscle-building potential unless you move your calves through their full range of motion. Yet, it’s common to see people using an extremely abbreviated range of motion that often equates to a short ‘bouncing’ movement. This usually happens when the person uses more weight than they can properly handle.
The whole reason that you have a block to stand on when doing calf raises is to allow you to get a contraction in the bottom part of the rep. So, if you’re doing reps where your heels don’t even come down to the level of your toes, you’re defeating the purpose of having a block!
It is far better to reduce the weight to achieve a full range of motion.
Knees Straight or Bent During Calf Raises?
If you have completely straight legs (with no knee bend) during the standing calf raise, you might experience some knee discomfort. To avoid this, you should slightly bend your knees throughout the exercise, especially when you start to go heavy. Make sure, though, that you keep your legs locked in this slight knee position to avoid bringing your quads into the movement.
How Much Weight for Calf Raises?
To maximize your calf muscle growth potential, you need to achieve maximum effort on your lower leg workouts. There are two ways you can do this:
Muscle fatigue that results from performing high reps in the 20 to 50 range.
Using a weight that limits you to 80-90% of one rep max, with low reps in the 4-10 range.
The weight you choose for the calf raise, along with every other exercise, should be based on the following parameters:
How many reps do you plan to do
Using a full range of motion
Eliminating momentum
Using proper technique
Maximum effort
Don’t let your ego get in the way when selecting your training resistance. It doesn’t matter what weight your training partner is using; if you cannot tick off each of the criteria listed above, the weight is not right for you.
When it comes to the rep range, the calves require more than the conventional 8-12 rep range for hypertrophy. That’s because of the high slow-twitch fiber makeup of the calves. Slow-twitch fibers are highly resistant to fatigue. As a result, they respond better to higher reps. On the other hand, your fast-twitch fibers require lower reps with heavier weight.
Here is a suggested rep scheme over six sets of calf raises, with the weight increasing on each set:
Set One (Warm-up): 50 reps
Set Two: 30 reps
Set Three: 20 reps
Set Four: 15 reps
Set Five: 10 reps
Set Six: 8 reps
6 Best Calf Exercises
Your gym-based calf training options are quite limited. After all, the calves only do one thing; flex the ankle. So every move must be a variation of the calf raise. These resistance-based exercises will primarily work your fast-twitch muscle fibers. However, there are other things you can do to also work your slow-twitch fibers. By including each exercise in your weekly routine, you will cover all bases:
1. Standing Calf Raise
Steps:
After loading the weight stack, slide under the shoulder pads and grab the handles.
Place your feet on the block, with the balls of your feet and toes pointed slightly inward.
Bend your knees slightly, and then keep your legs locked in that position.
Rise on your toes to complete calf extension.
Now lower your heels to below the level of your toes, going down as far as possible. Perform your reps in a smooth, fluid manner.
2. 45-Degree Leg Press Calf Raise
Steps:
Load the weight stack and then position yourself in the leg press machine with your lower back firmly against the back pad.
Place the balls of your feet on the base of the footplate.
Fully extend your calves by pushing your toes away from you. Keep your knees supple (slightly bent). Hold for a second.
Now lower your heels to below the level of your toes, going down as far as possible.
3. Seated Calf Raise
Steps:
Sit on a seated calf raise machine with your thighs tucked under the pads. Set the weights on the machine. Adjust the pad for your height. Place the balls of your feet on the footplate.
Fully extend your calves by raising your heels. Hold for a second.
Now lower your heels to below the level of your toes, going down as far as possible.
4. Jump Rope
Steps:
Stand with a jump rope in hand; feet shoulder together.
Rotate the wrists to bring the rope overhead.
Jump slightly to allow the rope to travel under your feet.
5. Toe Farmer’s Walk
Steps:
Grab a pair of dumbbells or other heavy objects in your home gym.
Walk up and down your gym floor on your toes until you have walked for 30 seconds.
6. Explosive Box Jumps
Steps:
Stand before a 24-inch high plyometric box. Hinge your hips and swing your arms to load the jump.
Jump both legs onto the box.
Immediately jump down on the other side.
Change direction and repeat.
Wrap-Up
While there is a genetic component to calf training, that doesn’t mean you can’t make the most of what you were blessed with. You can’t change the shape of your calf muscles and can only make minor changes to your muscle fiber type and density. However, you can increase the size of your calf muscle fibers by following a variable resistance workout program across a wide rep range. Besides the conventional gym moves like the standing leg press and seated calf raise, add jumping rope, plyometrics, and the toe farmer’s walk to transform your calves into bulls.
References
Gollnick PD, Sjödin B, Karlsson J, Jansson E, Saltin B. Human soleus muscle: a comparison of fiber composition and enzyme activities with other leg muscles. Pflugers Arch. 1974 Apr 22;348(3):247-55. doi: 10.1007/BF00587415. PMID: 4275915.
MacDougall JD, Sale DG, Alway SE, Sutton JR. Muscle fiber number in biceps brachii in bodybuilders and control subjects. J Appl Physiol Respir Environ Exerc Physiol. 1984 Nov;57(5):1399-403. doi: 10.1152/jappl.1984.57.5.1399. PMID: 6520032.
Nine Signs You Need a Rest Day
Of all the things you need to build muscle, get stronger, burn fat, or get fit, consistency is arguably the most important.
It doesn’t matter how carefully you plan your training or how balanced your diet is; if you don’t keep punching the clock and doing what needs to be done, your progress will be slow or even non-existent.
Ultimately, your body only responds to what you ask it to do. This is the fitness law of specificity. If you train hard and often, your body will adapt by getting fitter, stronger, and more muscular.
But, if you skip more workouts than you complete, your body has less reason to adapt and grow.
The bottom line is that consistency is often more important than finding the perfect workout or diet. Even the “wrong” program can produce great results if you do it often enough and with sufficient intensity.
That said, consistency can be a double-edged sword, and sometimes taking an unplanned day off may actually do you good. However, you need to be able to differentiate between feeling lazy and actually needing an extra rest day or two.
We reveal the top nine signs that you need a rest day.
The Top Nine Signs You Need a Rest Day
While sticking to your training schedule is usually a good thing, there are several signs that suggest the last thing you need is another punishing workout.
Intense exercise takes a lot out of your body, and it needs time to repair, recover and adapt after your workouts. There is a fine line between training hard enough to maximize gains and working so hard that you cannot recover.
Plowing on despite needing more rest can lead to overtraining syndrome, which is a chronic condition that can take many weeks or even months to overcome.
However, taking an unplanned rest day can help you avoid the overtraining trap and keep your training and gaining for the foreseeable future.
The following signs may indicate you need to skip training and take an extra rest day.
1. Reduced grip strength
It can be hard to know you are still tired from your last workout before you start your next one. After all, it’s only when you start training that you realize you aren’t feeling as strong or energetic as you should.
While you could abort your workout and go home, most people will push on regardless, making the problem worse.
Testing your grip strength before a workout could save you an unnecessary trip to the gym. Your grip force is an excellent indicator of the condition of the rest of your body.
You can test your grip strength with a cheap, readily available hand grip dynamometer. Take readings every day for a week to establish your average grip strength. Then, if you notice your score is more than ten percent lower than average, this suggests an extra day off will probably do you good.
2. Increased resting heart rate
Fit, healthy individuals usually have a lower resting heart rate (RHR) than their non-exercising compatriots. It’s not uncommon for well-conditioned people to have an RHR of 60, 50, or even 40 beats per minute (BPM), compared to the population average of 72 BPM.
However, if your RHR is 5-10 beats or ten percent higher than usual, it could indicate you are overtired and should take a rest day. A higher-than-usual RHR can also be an indicator that your body is fighting off the early stages of an illness, e.g., a cold.
Either way, if your RHR is higher than usual, take it as a sign that you may need an extra rest day.
The best time to take your resting heart rate is shortly after you wake up but before you get out of bed. Alternatively, you can use your smartwatch or fitness tracker to show trends in resting heart rate variance.
Related: Calculate Your Target Heart Rate
3. Even your warm-up feels hard
Warming up helps prepare your muscles and joints for what you are about to do. It may also lower your risk of injury. However, another lesser-known warm-up function is it allows you to assess your current condition and decide whether you are okay to train.
Typically, before doing their first heavy set, most lifters ramp up the weight over several warm-up sets, e.g.:
20kg/45lbs x 10 (empty bar)
40kg/90lbs x 8
60kg/135lbs x 6
80kg/175lbs x 3
100kg/220lbs x 5 (first heavy work set)
Warming up in this fashion helps fire up your nervous system so that the first heavy set is less of a shock. While it probably won’t feel light, your first work set should feel manageable.
However, if even your warm-up sets feel heavy, you should take this as a sign that you are tired and probably need a rest day. Pushing yourself through your workout will only increase your fatigue and could even lead to injury.
4. Familiar exercises or skills feel awkward
Fatigue doesn’t only affect your muscles; it also affects your central nervous system, or CNS for short. Your CNS comprises your brain and spinal cord and controls your peripheral nervous system (PNS), which in turn controls your muscles.
CNS fatigue will not only lower your potential for force production, making you weaker, but will also affect neurological fitness components such as balance and coordination.
So, if familiar movements feel awkward or more challenging than usual, e.g., standing on one leg, it’s a good indicator you need more rest and not a workout.
5. You are dreading your next workout
We all have days when we’d rather drink coffee and watch TV than sweat it out in the gym. But, once you’re actually there, you’ll be glad you went and feel terrific afterward. Giving in to your impulse to skip training would be an act of laziness.
However, if you are physically dreading your workout, you are probably suffering from fatigue and need a rest day. Not wanting to work out is a strong indicator that you are tired, and pushing yourself to train will potentially do more harm than good.
That said, you must be able to differentiate between laziness and really needing a rest day. Laziness is almost entirely psychological, whereas needing a rest day is more physical.
6. You’re craving high-energy foods
Your body is incredibly intuitive and is constantly sending you signals about what’s going on inside. Thirst tells you that you could be dehydrated and need more water while yawning lets you know you could probably do with a nap!
Uncharacteristic cravings for high-energy foods could be an indicator that your body is feeling low on energy and is after a fast-acting boost. However, simply eating something sugary probably won’t be enough to offset fatigue, so you should skip the candy bar and have an extra rest day instead.
7. You are sleepier than normal
Most adults need between 7-9 hours of sleep per night. This should leave you feeling refreshed, energized, and ready to face the day, including your workouts. However, despite sleeping well, if you wake up feeling tired or find yourself craving a nap, it could suggest that you need a day off more than you need a workout.
Disrupted sleep is also a common symptom of overtraining, so if you’re tired but still unable to sleep, you definitely need to back-off your workouts.
8. Your joints are achy
Muscle soreness is NOT a good indicator of fatigue. Muscles can feel sore just because you’ve done a new exercise or used an unfamiliar training method. Most lifters experience muscle soreness on a regular basis, and while it’s not an indicator of a successful workout, nor does it mean you’ve overdone it and need extra rest.
In contrast, achy joints are a better indicator that you need some extra rest. We’re talking non-specific joint pain here and not the pain you get from injury.
Non-specific joint pain is often caused by systemic inflammation and made worse by fatigue. So, if your knees, hips, lower back, shoulders, or elbows are uncharacteristically achy or stiff, you will probably benefit from an unplanned day off.
9. You feel unwell
Training while ill may win you a bravery medal from the gym bros, but it’s often a sign you need to take a day off.
When you are unwell, your body must divert vital resources to your immune system to help you get better. But, if you also exercise, those resources will be more thinly spread, and you could end up being ill for longer.
Also, training while sick means your body will have less energy for recovery and repair, making your workout less productive.
This makes training when you’re sick a lose-lose scenario.
In most cases, it’s better to rest when you feel unwell so you recover faster and avoid unproductive workouts. Return to the gym when you feel better, and your body can cope with the demands of your training.
Related: The Hierarchy of Successful Hypertrophy Training
How to Avoid Needing Unplanned Rest Days
Unplanned and extra rest days are sometimes unavoidable. We all have days where, for inexplicable reasons, our energy levels are low, and a workout will only make things worse. Taking a day off is sometimes the smart thing to do!
However, if you often feel the need to skip training, something in your workout schedule, diet, or lifestyle is probably out of whack. Fixing any problems could mean needing fewer unplanned rest days, making your training more productive in the process.
Reduce your need to take extra rest days with the following tips and strategies:
1. Include planned rest days in your program
You can’t expect to work out every day and not become fatigued. And yet, many people can be found in the gym seven days a week. Training every day is NOT a sign of commitment or toughness. Instead, it’s an indicator that you don’t understand how exercise affects your body, and how it needs to rest and recover to adapt.
Avoid this problem by programming rest days into your schedule. Two or three rest days per week should suffice.
You don’t have to be sedentary on your rest days; light physical movement, e.g., easy walking or stretching, can be very restorative. However, you should avoid doing tiring activities.
2. Periodize your training
The best workouts build up to a performance/volume/intensity peak and then ease off for a while before building back up again. This is called periodization. In contrast, many exercisers train with 100% intensity all the time and then wonder why they burn out!
Plan your workouts in blocks, called macrocycles in periodization. Each block builds on the one that preceded it. Then, after a few weeks of very intense training, enjoy a brief deload (detailed below) and then ramp up again.
This three-steps-forward-one-step-back approach to training can help ward off overtraining and minimize the need for unplanned days off.
3. Deload from time to time
Deloads are planned periods of low-intensity or low-duration training. They typically follow a training peak, where intensity and volume were very high.
A deload allows you to rest and recover while maintaining your current fitness and strength. In fact, you may even see improvements in performance during a deload as any residual fatigue disappears.
Structured strength training programs often include deloads, such as one easy week in four. The main concept behind deloading is to take time off voluntarily before you are forced to. In almost every case, regular short deloads are better than training without a break and being forced to take a long time off because of overtraining or overuse injuries.
4. Make sleep a priority
While recovery starts the moment your workout finishes, things really speed up when you are asleep. With nothing much else to do, your body can put more energy into tissue repair and muscle growth while you’re pushing out the zzzs.
While you can survive on less than 7-9 hours of sleep per night, chronic under sleeping can significantly impact your energy and motivation for exercise.
Getting the optimal amount of sleep means your mental and physical batteries will always be fully charged. Prioritize getting enough sleep, and you won’t need to take so many unplanned rest days.
Related: 10 Best Natural Aids for Better Sleep
5. Consume more nutritious food
Food contains energy, which is measured in calories. However, your body needs more than calories to function at its best; it also needs vitamins, minerals, and a host of other nutrients that are only present in clean, natural foods, such as fruits, vegetables, and whole grains.
Many lifters like the If It Fits Your Macros (IIFYM) or flexible diet, which means they can eat almost anything provided it helps them hit their calorie, protein, carbs, and fat targets for the day.
However, eating a lot of junk food means your diet will be nutritionally poor, which can affect energy and your ability to recover between workouts.
Reduce your need for extra days off by building your meals and snacks around nutritious whole foods. You can still enjoy nutritionally-poor treats from time to time, but consuming more healthy foods will, in turn, make you healthier. After all, you are what you eat!
6. Understand the impact of psychological stress on your energy levels
It’s not only physical exercise that can drain your energy levels – psychological stress does, too. Arguments with your boss, an unpleasant working environment, financial worries, and familial conflicts can all leave you feeling frazzled.
Piling a long or intense workout onto all this stress can make things worse, driving you ever closer to needing to take unplanned days off training.
If you feel emotionally burnt out, dial back on your workouts to give yourself more chance to recover. Exercise IS an excellent stress buster, but too much can make matters worse.
Respect the effect of psychological stress on your energy levels and make allowances in your workouts.
FAQs
Do you have a question about rest days or recovery in general? That’s okay because we’ve got the answers!
1. If I’m tired, can’t I just take a pre-workout or an espresso to rev myself up for training?
Caffeine and the energizing ingredients in pre-workouts do a great job of increasing your short-term energy and focus. However, they don’t address the cause of fatigue, which is usually too much training and too little recovery. In fact, they can make things worse by allowing you to train when you should probably be resting, thus deepening your “energy debt.”
The occasional use of caffeine and pre-workouts is seldom harmful. But, if you use them to power you through a workout when your body is telling you to take a day off, they could cause more harm than good. In many cases, a rest day will do more for your progress than a workout.
2. How can I tell if I really need a day off or if I’m being lazy?
Just because you don’t feel like training doesn’t mean you should take a rest day. Taking time off when you really should be in the gym is a sign of laziness.
If you feel you need a day off, don’t just rely on your emotions. Instead, consider things that you can see or measure.
For example, biomarkers like your resting heart rate and grip strength provide quantifiable indicators that you may benefit from a rest day. They are directly influenced by your condition and level of fatigue. Or, you could start your workout and see how you feel. Poor performance early on is a good indicator that you should take it easy or take the day off.
We all have days when we don’t feel like training, but, in some cases, this has nothing to do with our physical state and is purely mental. In these cases, you’ll probably feel better after a workout.
3. What can I do at the gym if I’m having an off day?
One of the downsides of using your warm-up or workout to determine if you need a rest day is they involve going to the gym and training! So, what should you do if you realize that you’re having an off day?
Here are a few ideas:
Stretch instead of lift.
Do some easy (zone two) cardio.
Use less weight, and do fewer sets and reps.
Learn some new exercises.
Have a sauna or steam bath.
Go for an easy swim.
Pack up and go home!
4. Can you cure overtraining with more food and sleep?
While sleep and good nutrition can go a long way to preventing overtraining, it is still possible to outpace your ability to recover and end up plateauing or regressing.
Advancing age, training too hard and too often, emotional stress, activities outside of the gym, your job, and numerous other factors can make it harder to fully recover from exercise, even if you sleep and eat well.
Sleep and food will go a long way toward preventing overtraining, but they are just two factors you need to consider.
5. What’s the best way to measure my resting heart rate?
There are several ways to measure your resting heart rate or RHR. Arguably the easiest is to use a smartwatch with an infrared sensor. Next easiest would be to use a chest strap heart rate monitor. Both of these give you a live heart rate reading.
However, if you don’t have access to these tools, you can just take your pulse.
There are several pulse sites throughout the body, but two of the most accessible are the radial pulse on the outside/underside of your wrist, just below your thumb, and your carotid pulse on the side of your neck, just below your jaw.
Place your first two fingers on either of these points and press gently. Then, when you can feel your pulse, count the number of beats in 60 seconds. Relax and breathe normally to get the most accurate reading.
Compare your result to your average RHR. If it is 5-10 beats or 10% higher than your usual resting heart rate, you may benefit from a rest day.
Closing Thoughts
Needing an unplanned rest day is not a sign of laziness. In fact, you might need an extra rest day because you’ve been very un-lazy lately and have trained harder or longer than usual. Training through fatigue invariably makes matters worse and could even lead to overtraining. In many cases, you can nip problems in the bud by taking an unscheduled rest day.
However, this doesn’t give you a license to take days off whenever you want. Missing more workouts than you complete will severely hamper your progress. Remember, the most important factor for training success is and always will be consistency. Consistency IS king!
That said, sometimes, the best way to win a war is by retreating and regrouping so you can come back stronger. Use the information in this article to determine if you really need a rest day or if you are just being lazy.
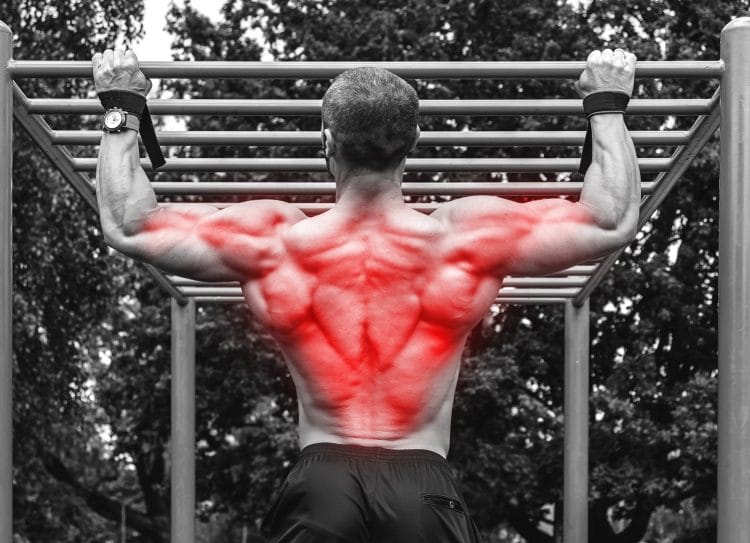
Forearm Pull-Up Pain – Causes, Treatment, and How to Avoid
Pull-ups are one of the best exercises you can do for your upper body. Doing pull-ups will widen your lats, build your biceps, strengthen your lower traps, and develop your grip. Pull-ups also let you know if you are getting a little too chunky, as excess body fat always makes them feel harder!
Unfortunately, even good exercises go bad, and pull-ups can sometimes cause forearm pain.
While this could be nothing more than a mild annoyance, pain often worsens and can become debilitating. As the forearms are involved in almost every upper and many lower body exercises, pain in your lower arms could even stop you from training.
In this article, we explain why pull-ups can cause forearm pain, how to treat it, and how to stop it from returning.
Please Note: This article is for educational and informational purposes only. It should not be used for diagnosing or treating health problems or diseases. Those seeking medical advice should consult with a licensed physician.
Why Pull-Ups Cause Forearm Pain
So, why do your forearms hurt when you do pull-ups? While we can’t diagnose the precise cause of your forearm pain, there are several reasons that pull-ups can cause lower arm discomfort.
These include:
Forearm overload
Compared to the other muscles involved in pull-ups, the forearms are the smallest and weakest link in the kinetic chain. As such, it’s not surprising that pull-ups sometimes cause forearm pain.
Think about it; those slender muscles must produce enough force to support your entire body weight. This is no mean feat. Overloading the forearms could cause a lot of localized discomfort.
Forearm muscle weakness
In addition, unless you actually train your forearms, they’re probably not as well-developed as the other muscles in your arms. Apart from dedicated bodybuilders and powerlifters, exercisers tend not to do additional training for their forearms.
Stronger muscles tend to be more resilient and enduring. If pull-ups hurt your forearms, they could be telling you that they need some extra work to make them stronger.
Forearm overuse
The forearms are a hard-working group of muscles, and they’re involved in almost all upper-body and some lower-body exercises. As such, doing pull-ups could be “the straw that broke the camel’s back” that causes pain in this overused body part.
Overuse is often accompanied by inflammation and swelling. But, because you keep on training, this never gets a chance to subside. Instead, your forearm pain worsens, affecting your ability to perform all your upper-body exercises.
Depending on what tissues have become inflamed, your pain may have a specific name, such as carpal tunnel syndrome, radial tunnel syndrome, or tennis elbow. However, such conditions require a medical diagnosis to confirm.
Prevent Forearm Pain
Forearm muscle stains
Muscle strains are tears that disrupt the integrity of your muscle fibers. Muscle strains usually occur when you stretch a muscle too fast or too far or lift more weight than you are used to. For example, if you are new to pull-ups, have weak forearms, or have started doing weighted pull-ups, you may have strained your forearm muscles.
Muscle strains are graded according to their severity and depth. Grade one strains are mild and involve minimal amounts of muscle fiber damage. In contrast, grade three muscle strains are much more severe and involve complete muscle or tendon ruptures which usually require surgery to repair.
Forearm tendonitis
Tendons attach muscles to bones. They’re made of tough, inelastic connective tissue, and they transmit the forces produced by your muscles into the joints you want to move.
While tendons are very robust, they also have a poor blood supply, which means they take a long time to heal when damaged. Tendons are also prone to overuse and inflammation, which is called tendonitis.
If you have recently started doing more pull-ups than usual or just doing more grip or forearms training, your forearm tendons may be inflamed and painful, which you feel when doing pull-ups.
Forearm splints
Forearm splints are an injury where overuse leads to inflammation of the connective tissue in the forearm region. This could be the fascia surrounding the forearm muscles, the periosteum that covers the bones, the muscles, or the tendons and ligaments.
Forearm splints are usually caused by overuse and increasing training volume and intensity too quickly. Shock loading and high-impact movements, e.g., plyometric pull-ups, can also cause forearm splints, as can doing heavy negatives.
General forearm pain is often referred to as forearm splints. The lower body equivalent of forearm splints is shin splints, which is a common lower leg injury in runners.
Forearm compartment syndrome
Muscles are enclosed in a layer of connective tissue called fascia. Fascia is tough, relatively inflexible, and surrounds, separates, and connects all the muscles and organs in your body.
If your forearms get too big for the fascia surrounding them, pain can be the result. This is called compartment syndrome. This condition makes your forearms feel tight and restricted, and the muscles may burn and throb. The pain tends to be worse when you’re training but lessens soon afterward. This is because getting pumped makes the muscles expand within their fascial sheath.
Compartment syndrome is more common in the calves but can also affect the forearms.
Delayed onset muscle soreness
Doing more exercise than usual often causes delayed onset muscle soreness or DOMS for short. This is thought to be caused by localized inflammation and the accumulation of metabolic waste products, such as lactate. DOMS typically comes on 12-24 hours after training and can last several days.
The good news is that DOMS tends to decrease as you get used to your new workout, which is called the repeated but effect.
Tight forearm muscles
Muscle tightness is a common source of pain. Tight muscles usually have a reduced blood flow which leads to an accumulation of irritating waste products. They may also have localized tenderness, called trigger points.
While most exercisers know to stretch their hamstrings, quadriceps, and even their pecs, fewer spend time stretching their forearms. As such, there is a high probability that your forearms are tight and are causing your forearm pull-up pain.
Improper grip/technique
There is more to a safe, effective set of pull-ups than simply grabbing the bar and heaving your chin up to meet it. Your grip needs to be firm but not so tight your hands go into spasm, and you need to avoid jerking the bar. Shock-loading your forearms increases the risk of pain and injury.
The bar itself is also important. If it’s too thin or too thick, it’ll put undue stress on your fingers, hands, and forearms. A very narrow grip is also harder on your wrists and forearms.
So, make sure you grip the bar correctly – not too tight or too wide – and do your reps smoothly and without swinging or jerking. These techniques will make pull-ups harder, but they’ll also be safer.
How to Treat Pull-Up Forearm Pain
Most pull-up forearm pain originates in your soft tissues, i.e., muscles, tendons, and ligaments. Soft tissue injuries are generally treated the same way – with PRICE.
No, PRICE is not a miracle drug or special taping method. Instead, it is an acronym for the steps you need to take to promote healing.
Please note: This information is not meant to replace advice from a trained medical professional.
P – Protection: Protect your forearms from further injury. Invariably, this means dropping pull-ups from your workouts until the pain subsides. After all, if pull-ups hurt your forearms, it doesn’t make a lot of sense to keep doing them, as you’ll probably make the problem worse.
Find exercises that don’t cause pain and do them instead. For example, lighter lat pulldowns may allow you to continue training without aggravating the affected area.
R – Rest: Depending on the severity of your injury, you may need to take a break from training. Or, at least, you may need to stop doing exercises that directly challenge your forearms, such as most back and biceps exercises.
You may be able to continue doing upper body pressing exercises, provided you don’t grip the bar/dumbbells/handles too tightly.
Avoid testing your injury to see if it still hurts. This can lead to reinjury and a longer recovery period. Rest a little longer than you think you need to allow the tissues to fully heal.
I – Ice: Ice reduces inflammation and also provides natural pain relief. Apply ice to the affected area for 15-20 minutes, 3-5 times per day. Reduce the duration and frequency of your icing sessions as the injury heals.
Avoid painful ice burns by never applying ice directly to your skin. Instead, use an ice pack or washcloth as a barrier between the ice and your forearm.
C – Compression: Like ice, compression helps reduce inflammation and swelling. Wrap the affected area with an elastic bandage or use a forearm sleeve to apply medium, even pressure to the affected area. However, make sure you unwrap your forearm from time to time to ensure there is good blood flow into the affected area. If your fingers are cold or numb, you have probably cut off the blood supply.
E – Elevation: Raising your forearm above head height will help reduce swelling and inflammation. There is no need to keep your arm raised all the time, but you may get some pain relief if you elevate your arm when seated for long periods, e.g., at night when relaxing in front of your TV.
Other strategies that may enhance recovery and reduce forearm pain include:
NSAIDs and OTC painkillers
If your forearm pain is severe, you may want to dull it by using over-the-counter (OTC) anti-inflammatory drugs like ibuprofen or aspirin. You can also use painkillers like paracetamol.
In addition, there are pain-relieving and anti-inflammatory gels that you can apply directly to your injured forearm. This is useful for people who find taking pills upset their stomachs.
However, do not use medicines to mask the pain so you can continue training. That will just make things worse.
Massage
Massage can help speed up the healing of chronic injuries. It’s also valuable for the latter stages of injury repair, i.e., 5-7 days after it happened. Massage improves blood flow and speeds up the removal of waste products from the injured area. It also provides natural pain relief and can help restore range of motion.
The forearms are very easy to self-massage, so you don’t need to hire a therapist to do it for you.
Apply even pressure with your non-injured hand and work up the forearm toward your heart. Use oil to lubricate your skin and make the massage go more smoothly. Start with light pressure and increase gradually as the area warms up.
You can also use a massage gun to help speed up your recovery. Still, good massage guns can be expensive and offer little additional benefit compared to a hands-on massage. That said, they allow you to get a good massage without using oil or even rolling up your sleeves, so some people may find them more convenient.
Stretch
Gentle stretching can help ease the tension in your forearms, increase blood flow, and promotes proper soft tissue remodeling. There are several ways to stretch your forearms, but the most convenient is probably the prayer stretch:
Place the palms of your hands together in front of your chest.
Gently press your hands downward to extend your wrists and stretch your forearms.
Hold for 30-60 seconds, increasing the depth of the stretch as you feel your muscles relax.
Take care not to force this movement, and ease off if you feel burning or shaking in your muscles.
Be a patient patient!
No one likes being injured, and it can be tempting to try and rush the recovery process so you can get back in the gym sooner. However, returning to training before you are ready could result in reinjury and an even longer layoff.
So, be patient and let nature run its course. It’s better to rest a little longer than return to training too soon, hurt yourself again, and then have to restart the recovery process.
For most people, being patient is the hardest thing to cope with when injury strikes.
Use this time to work on other aspects of your fitness, such as training your legs and core or doing more cardio and stretching. There is no need to be completely inactive.
How To Avoid Forearm Pain In The First Place
As the old saying goes, an ounce of prevention is worth a pound of cure. In other words, it usually takes less effort to avoid injuries than it does to treat and heal them. Use the following tips to reduce your risk of developing forearm pain in the first place.
Warm up properly
While we can’t guarantee that warming up will prevent all injuries, it should reduce your risk. Warmer muscles stretch and contract more efficiently, so they’re less likely to be damaged when you start working hard.
Most people focus on their warm-ups on big joints and muscle groups, such as the hips and shoulders, hamstrings, and pecs. However, if you are doing a very forearm or grip-centric exercise like pull-ups, you should warm up your lower arms, too.
So, in addition to your usual warm-up, make sure you include some wrist rotations, forearm flexions and extensions, and some light stretches to ensure this area of your body is as ready as possible for what you’re about to do.
Take care when using overly thin and thick pull-up bars
Very thin or thick pull-up bars put a lot of stress on your forearm muscles, increasing your risk of injury. Skinny bars force you to close your hand tighter than usual, putting your fingers in a mechanically disadvantageous position. Thicker grips force you to keep your hands more open, which makes it harder to maintain your grip.
Avoid forearm pain by introducing thick bar pull-ups gradually into your program and avoiding thin bars whenever possible. You can make a thin bar less stressful to grip by wrapping it in tape, wearing gloves, or using clip-on handles.
Don’t grip the bar too tightly
Pull-ups are a very grip-centric exercise. However, a lot of people make the mistake of gripping the bar too tightly. This “death grip” could be the reason for your forearm pain. Avoid this by only holding the bar hard enough to support your weight. There is no need to try and crush the bar. Use no more and no less hand pressure than you need.
Use lifting straps
Lifting straps provide more friction between your hands and the bar, so you don’t have to grip it as tightly. This takes the stress away from your forearms. While many people avoid using straps so they can develop a firmer grip, if you experience forearm pain during pull-ups, reducing lower arm engagement may help cure the problem.
Learn how to use lifting straps here.
Use gym chalk
Sweaty hands mean you’ll need to grip the bar tighter during pull-ups. This increases the stress on your forearms. Like lifting straps, lifting chalk increases the friction between your hands and the bar, so you won’t need to hold on so tightly.
Keep a bag of powdered chalk or a bottle of liquid chalk in your gym bag so you can use it before every set of pull-ups. Chalk is a real forearm and grip saver!
Stretch your forearms between workouts
A lot of strength training exercises involve your forearms. Your forearms are also often flexed during everyday activities, such as driving and using a computer keyboard. As such, tight forearms are common. Despite this, relatively few people spend much, if any, time stretching their lower arm muscles.
Avoid tight forearms and the pain they can cause by stretching them between workouts. This kneeling forearm stretch is one of the best ways to do it:
Kneel down and place your hands on the floor, fingers facing your knees. Your arms should be straight and your palms flat.
Gently lean back and press the heels of your hands into the floor.
Hold for 30-60 seconds, and then relax.
You can also stretch the muscles that extend your wrists by turning your hands over and pressing the backs of your hands into the floor.
Train your finger extensors
Muscles are generally arranged in opposing pairs. For example, the biceps oppose the triceps, and the quadriceps oppose the hamstrings. These paired muscles affect the same joint, with one flexing and the other extending it.
If one muscle in the pair gets much stronger than the other, an imbalance will occur. Muscular imbalances can cause pain and dysfunction.
As such, you need to work on your finger extension strength as well as your grip. While your finger extensors will never be as strong as the finger flexors, they still need to be trained so they are not weak.
One easy way to do this is to include rubber band finger extensions in your grip workouts. Just a few sets a couple of times per week will be sufficient for most people.
With your fingers straight and together, take a large rubber band and loop it around your fingertips and thumb. A standard stationary-type band should suffice.
Open your hand and spread your fingers and thumb apart as far as possible.
Slowly close your hand and repeat.
Try some different grips
There is more than one way to position your hands during pull-ups. You may find that some feel more comfortable and are less stressful for your forearms than others. For example, if overhand medium-width pull-ups with a full grip around the bar bother your forearms, you could try a thumbless narrow grip instead.
You may also find that underhand and neutral grip pull-ups are more comfortable than the overhand version.
Experiment to see which feels best. You could change hand positions workout-by-workout to spread the stress to different forearm muscles and avoid overloading the same ones repeatedly.
Read more about your grip options here.
Strengthen your forearms
Weak forearms are more prone to injury than stronger forearms. If you know your grip and lower arms are weak, it’s time to start training them. There are lots of exercises you can do to strengthen your forearms and grip, including wrist and reverse wrist curls, hammer curls, and dead hangs. Add a forearm exercise or two to your upper arm workouts or train your grip on separate days as preferred.
However, take care not to train your grip and forearms too hard or too often, as doing so could result in more forearm pain.
Forearm Pull-Up Pain – FAQs
Do you have a question about treating or preventing forearm pain? No problem, because we’ve got the answers!
1. How do I know what type of forearm pain I have?
There are several different conditions that cause forearm pain, including compartment syndrome, tendonitis, and muscle strains. However, they can sometimes present similar symptoms, so you may not be able to determine which one you’ve got.
For this reason, it’s always best to seek qualified medical advice and get an accurate diagnosis.
This is important because the treatment for one condition could actually make another problem worse.
So, use the PRICE protocol, but if the pain is severe or persists, get it checked out by a sports injury doctor.
2. Can I train around forearm pain?
Forearm pain doesn’t always mean you can’t train. So, while you should avoid exercises like pull-ups, pulldowns, deadlifts, rows, and curls, you still do leg presses, leg extensions, leg curls, and may even be okay doing squats, bench presses, overhead presses, etc.
In simple terms, exercises that involve a tight grip are out while you let your injuries heal. However, activities involving minimal forearm engagement should be fine, provided they don’t cause pain.
Learn more about how to safely train around injuries here.
3. How long does it take for forearm pain to subside?
Sadly, this question is unanswerable as it depends on the cause of your pain and the nature of your injury. Other factors affecting the healing process include how much you rest the painful area and what other treatments you use.
The one thing you must avoid doing is trying to rush the healing process; it will take as long as it takes. Returning to training before you’ve healed could result in reinjury and more time off.
4. If pull-ups hurt my forearms, can I do lat pulldowns instead?
Overhand lat pulldowns and pull-ups work many of the same muscles. The main difference between these exercises is the amount of weight used.
You can scale pulldowns to match your current level of strength, but doing pull-ups means lifting your entire body weight with just your arms. Pull-ups are much more strenuous than pulldowns.
As such, you can do pulldowns instead of pull-ups if you wish, providing they don’t also hurt your forearms.
5. Are hand grippers a good way to strengthen my forearms and grip?
Hand grippers are a convenient, time-efficient, and cost-effective way to train your forearms and grip. You can use them at home while relaxing in front of the TV, at work between meetings or phone calls, or even while on your morning commute.
There are lots of different strengths and styles of hand grippers to choose from, so shop around to find one you like. Also, don’t use your hand gripper too often, i.e., every day; otherwise, you could end up with an overuse injury, negating the benefits of forearm and grip training.
Read More on Forearm Pain:
Forearm Splints — All You Need to Know
How To Prevent Forearm Pain When Curling
Closing Thoughts
Like all types of pain, forearm pain tells you something is wrong and you should stop what you are doing. Ignoring pain could make the problem worse.
The good news is that most types of forearm pain are due to soft tissue injuries, which usually heal fully in a relatively short time. Resting and controlling the inflammation will have you back in the gym in no time.
However, if the pain is severe or persists despite resting and icing the area, you should get your forearm pain checked by a medical professional. While serious forearm injuries are rare, it’s always better to be safe than sorry.
How to Avoid Fatigue: Tips for Post-Exercise Recovery!
Are you tired of being tired after a workout and dread that feeling of exhaustion that hits you like a ton of weights after hitting the gym? You’ve come to the right place.
Many people start exercising because they want to feel energetic and invigorated. However, working out has the exact opposite effect on some. They feel fatigued and drained after a workout and end up dragging their feet through the rest of the day. People that train late in the evening don’t have it any better, either. Exercise fatigue can make it hard to fall asleep.
Furthermore, training fatigue and exhaustion don’t discriminate between beginners and advanced lifters. It can plague the training experience of lifters across all experience levels. Depending on several factors, a lifter might experience fatigue immediately after a workout or the following day.
Chronic fatigue can hamper your ability to recover after a workout, which can impede your strength and muscle gain journey, inhibit your performance in upcoming workouts, and increase your risk of injury.
Contrary to what most lifters have come to believe, post-workout fatigue doesn’t have to be the norm. Making a few changes to your pre-training and post-workout regimen can reduce or even eliminate the feeling of exhaustion and help your body recover more efficiently.
In this article, we cover how to avoid fatigue, the most common reasons for fatigue after a workout, and what you can do to maximize your workout performance while powering up your post-workout recovery. So, put down that Red Bull, and listen up.
Reasons for Fatigue After a Workout
In contrast to the prevailing view held by most lifters, what you do immediately after a workout session is not the only factor responsible for a post-training crash. Multiple factors could be at play if you feel tired and exhausted after a training session. You must analyze your entire lifestyle to check where you are lacking. Here are the factors to consider while troubleshooting your post-exercise fatigue:
Training Intensity
Your training intensity has a significant impact on your post-workout experience. You’re more likely to experience fatigue after a high-intensity training regimen than after a low to moderate-intensity workout. HIIT (high-intensity interval training) workouts involve short bursts of high-intensity exercise followed by brief periods of rest or lower-intensity exercise.
Although the popularity of HIIT workouts is on the rise, only a few trainers know how to program HIIT sessions correctly to maximize results and limit post-training fatigue.
Additionally, lifters that are bumping up their training intensity are at higher odds of experiencing prolonged training fatigue. Trying new exercise programs, lifts, training methods, and advanced training principles can also lead to post-workout exhaustion.
How to avoid exercise fatigue due to high training intensity:
You must gradually increase your training intensity and limit your HIIT workouts to less than 45 minutes to restrict the risk of post-training fatigue. Furthermore, you must cut back your training frequency if you still experience fatigue after lowering your training intensity.
Caffeine
Caffeine, due to its energy, focus, and alertness-boosting capabilities, is the darling of the fitness community. Pre-workout supplements are loaded with caffeine to give you a solid punch of energy. Recently, the sports supplement market has witnessed a flood of energy drinks. Bros that don’t have the budget for a pre-workout supp or energy drinks usually throw down espresso shots to fire up for their training sessions.
However, caffeine is also notorious for causing post-workout crashes. The potency of a caffeine-loaded pre-workout supplement is directly proportional to the harshness of its post-workout crashes.
Plus, caffeine is a diuretic and can cause dehydration if consumed in large quantities, leading to fatigue and decreased athletic performance. It doesn’t end here; consuming too much caffeine can interfere with your sleep cycle, which can add to the feeling of exhaustion and fatigue.
How to avoid exercise fatigue due to caffeine:
If you cannot hit the gym without caffeine, you must regulate your dosage to avoid post-workout crashes. Furthermore, you could use a stim-free pre-workout supplement to get all the benefits of a pre-training sup, minus the crashes.
Dehydration
Proper hydration is crucial for optimal training performance and recovery. During a workout, your body sweats to regulate your body temperature. Dehydration strikes if you don’t drink enough fluids to replace the lost sweat, leading to a decrease in blood volume and blood pressure, which makes it harder for your heart to pump oxygen and nutrients to your muscles.
You’ll fatigue more quickly and often if your muscles don’t get enough oxygen and nutrients during a workout. Muscle cramps and stiffness are a couple of signs of dehydration, which can further lead to chronic fatigue. [1]
Furthermore, dehydration during a workout can cause your core body temperature to rise, which can lead to heat exhaustion or even heat stroke in severe cases.
How to avoid exercise fatigue due to dehydration:
You must keep yourself hydrated before, during, and after a workout. Plus, if you are an endurance athlete or sweat a lot during your training sesh, you must ensure you consume an appropriate amount of sodium and electrolytes to avoid dehydration. Sports drinks such as Gatorade are excellent for keeping you hydrated throughout an intense workout.
You must drink at least a gallon of water each day to keep yourself hydrated and limit the risk of dehydration. The American Council on Exercise recommends drinking 17-20 ounces of water 2-3 hours before exercise, 7-10 ounces every 10-20 minutes during exercise, and at least eight ounces of water within 30 minutes of exercise.
Low Blood Sugar
Your body uses stored glycogen as an energy source during your workouts. People following a calorie-restrictive diet are at a higher risk of exhausting their glycogen reserves during moderate to high-intensity workouts, which can cause low blood sugar and fatigue.
If your blood sugar levels drop too low, your body becomes incapable of producing enough glucose to fuel your muscles properly, leading to fatigue. Plus, low blood sugar can lower your insulin levels, reducing your ability to store glycogen. It leads to your muscles tiring more quickly during exercise, leading to fatigue.
How to avoid exercise fatigue due to low blood sugar:
Eat balanced meals before and after a workout to limit the risk of low blood sugar levels. The meals should contain high-quality complex carbohydrates to replenish your glycogen reserves and avoid fatigue. Additionally, you must eat a carbohydrate-rich snack during longer workouts to prevent low blood sugar.
Lack of Sleep
A lack of sleep can make you feel tired and lethargic, especially after a high-intensity workout. Many people get grumpy after a bad night’s sleep, which can hamper the quality of their workouts.
You must sleep seven to eight hours each night to ensure optimal time to recuperate between workouts. Sleep deprivation can cause overexertion, which can lead to chronic fatigue.
How to avoid exercise fatigue due to lack of sleep:
Sleeping in a cold room can help you doze off quickly and increase the time you spend in deep sleep, which can improve your recovery. You should avoid screens before bedtime and meditate to improve your sleep cycle. Using melatonin and magnesium supplements can also improve your sleep quality.
Poor Nutrition
A poor diet is one of the leading reasons for prolonged fatigue. For optimal functioning, your body requires multiple nutrients, including carbohydrates, proteins, fats, vitamins, and minerals. Not meeting your daily macro and micronutrient goals can lead to fatigue after exercise.
While a lack of carbohydrates can cause fatigue due to glycogen store depletion, protein deficiency can impair muscle growth and recovery. Improper fat intake can cause joint health issues.
How to avoid exercise fatigue due to poor nutrition:
Ensure that you meet your daily caloric needs and follow a macro and micronutrient-balanced diet to promote muscle and strength gain and limit fatigue. Seek expert help if you don’t know how to design a diet program, as it can significantly improve your energy levels.
Overtraining
Pushing too hard in the gym can lead to overtraining. It beats up your central nervous system, which limits your body’s ability to recover from your workouts. Prolonged workouts, using too many advanced training techniques, or increasing your workout volume and intensity disproportionality can lead to overtraining. [2]
Skipping rest days or not allowing your body enough rest between workouts is also a common cause of overtraining. Not only does overtraining cause chronic fatigue, but it also increases your risk of injury.
How to avoid exercise fatigue due to overtraining:
Diet and recovery are just as important as training, if not more. You must back up your workout regimen with a balanced diet and give your muscles enough time to recover between workouts. Lifters following an advanced training program should limit their workouts to five days a week and rest for the remaining two days.
Read also: Overtraining: How Much Exercise Is Too Much?
Medical Conditions
Medical conditions such as anemia, thyroid disorders, and chronic fatigue syndrome can lead to persistent fatigue and weakness, even with mild exercise. Furthermore, asthma, or chronic obstructive pulmonary disease (COPD), can cause shortness of breath and fatigue during exercise due to impaired lung function.
On the other hand, certain medications can also cause fatigue and weakness as a side effect. For example, beta-blockers, used to treat hypertension and heart conditions, can cause prolonged fatigue.
How to avoid exercise fatigue due to medical conditions:
You must get a doctor’s clearance before starting training if you are dealing with any medical conditions. Plus, you must also seek medical advice before bumping up your training intensity while on medication.
Tips To Reduce Post-Workout Fatigue
Here are some tips on how to avoid fatigue and exhaustion:
Active Recovery
Most hobbyist exercisers overlook the importance of active recovery in their training regimen. Active recovery after a workout can improve blood flow to your muscles, which can help deliver the necessary nutrients for recovery and limits the chances of fatigue. It also reduces muscle stiffness, lower the chances of delayed onset muscle soreness (DOMS), and lowers stress levels. [3]
Active recovery exercises like light jogging, cycling, rowing, and foam rolling are a must after high-intensity workouts. Your active recovery sessions should last between 20-30 minutes. You could also do stretching, mobility drills, or yoga at this time.
Rehydrate and Refuel
You must supply your muscles with the required nutrients to speed up your recovery process. However, rehydration and refueling should not be limited to post-workout. You must follow a balanced diet program to avoid chronic fatigue.
Reduce Stress
Stress reduction techniques can help reduce post-workout fatigue by calming the nervous system. These techniques can vary depending on an individual’s preferences and lifestyle. Some people might prefer playing video games to lower stress, whereas others might prefer listening to their favorite music.
Other popular stress-reducing techniques include deep breathing exercises, meditation, yoga, massage, or taking a warm bath. These techniques help lower cortisol levels, improve sleep quality, increase mental clarity, and reduce muscle tension. [4]
Listen To Your Body
Every individual is built differently, meaning we react to the same stimulus uniquely. An exerciser can have a higher stress appetite than their training partner. Hence, you must not try to copy other people around you. Follow a personalized diet and training program to achieve your objectives. Furthermore, constantly assess your health markers to ensure optimal recovery and reduce your risk of chronic fatigue.
Wrapping Up
Fatigue is a common occurrence among trainers that hampers performance and results in the gym. Dehydration, poor diet, sleep, low blood sugar levels, and overtraining are some of the common factors behind chronic fatigue.
You can uproot fatigue, improve your recovery, and reduce your risk of injury by using the tips mentioned in this article, including implementing active recovery, rehydrating and refueling, reducing stress, and modifying your training intensity according to your needs. Make sure that you seek medical clearance before starting to exercise if you are dealing with a medical condition. Best of luck!
References
Edwards AM, Noakes TD. Dehydration: cause of fatigue or sign of pacing in elite soccer? Sports Med. 2009;39(1):1-13. doi: 10.2165/00007256-200939010-00001. PMID: 19093692.
Kreher JB, Schwartz JB. Overtraining syndrome: a practical guide. Sports Health. 2012 Mar;4(2):128-38. doi: 10.1177/1941738111434406. PMID: 23016079; PMCID: PMC3435910.
Ortiz RO Jr, Sinclair Elder AJ, Elder CL, Dawes JJ. A Systematic Review on the Effectiveness of Active Recovery Interventions on Athletic Performance of Professional-, Collegiate-, and Competitive-Level Adult Athletes. J Strength Cond Res. 2019 Aug;33(8):2275-2287. doi: 10.1519/JSC.0000000000002589. PMID: 29742750.
Nag N, Yang X, Jelinek G, Neate S, Simpson-Yap S. Undertaking specific stress-reducing activities are associated with reduced fatigue and depression, and increased mastery, in people with multiple sclerosis. Mult Scler Relat Disord. 2022 Jun;62:103804. doi: 10.1016/j.msard.2022.103804. Epub 2022 Apr 12. PMID: 35461058.

Shoulder Pain When Doing Overhead Triceps Extensions? Possible Causes and Solutions
The overhead triceps extension, also known as the French press, is one of the best ways to target the long head of your triceps. Hitting this triceps head means putting your arms into flexion, and the best way to do this is to raise them overhead.
Overhead triceps extensions take the target muscles through a large range of motion and provide the triceps with a deep stretch at the bottom of each rep. If you are serious about developing horseshoe triceps, overhead extensions are an excellent option.
However, this exercise has a downside: it can also cause shoulder pain. Pain in the stabilizing muscles is only to be expected and nothing to worry about. In contrast, joint pain could indicate that something more serious is wrong and needs fixing.
In this article, we reveal the possible causes of shoulder pain while doing overhead triceps extensions and how to prevent it.
Causes of Shoulder Pain During Overhead Triceps Extensions
There are several reasons that overhead triceps extensions can cause shoulder pain. Some are easy to fix, while others are less so. Some causes of shoulder pain may require rest or medical attention.
Seated Dumbbell Overhead Triceps Extensions
Use the following information to determine why overhead triceps extensions hurt your shoulders.
Poor mobility
Overhead triceps extensions involve raising your arms so your biceps are next to your ears. This requires above-average shoulder joint mobility, and your lats, pecs, and delts must also be flexible.
Tight muscles or immobile joints mean you’ll have to strain to get your arms into the correct position for overhead triceps extensions. Needless to say, if this is difficult for you to do, shoulder pain may be the result.
Related: Five-Minute Mobility Workout for Lifters
Improper technique
Many lifters turn overhead triceps extensions into a bastardized behind-the-neck overhead press. This may be because they lack the mobility necessary to get into the right position, are using too much weight, or simply don’t know any better.
There are two ways to perform most exercises – the right and the wrong way. The right way is generally safe, comfortable, and keeps the tension on the target muscles. The wrong way compromises your joints, takes stress off the target muscles, and is more likely to cause injuries.
Overhead triceps extensions are quite an unforgiving exercise, and even small technical errors can cause pain in all the wrong places.
Poor posture
Posture is the alignment of your joints, and it can be good or bad. Bad posture, such as rounded shoulders or slouching, makes it much harder to get into the correct position to do overhead triceps extensions safely.
This poor posture means you’ll need to change your technique to perform the exercise. Invariably, this puts more stress on your shoulders than it does your triceps.
Using too much weight
Overhead triceps extensions are an isolation or single-joint exercise. Once your upper arms are next to your head, only your elbows should move. Such a strict movement means you won’t be able to lift a lot of weight. As a result, overhead triceps extensions work best with light to moderate loads and medium to high reps.
However, despite this, some exercisers try to use very heavy weights with overhead triceps extensions, which puts a lot of stress on all the muscles and joints involved, including the shoulders.
An underlying shoulder problem
Shoulder problems are common among bodybuilders and weightlifters. The shoulder is a very hard-working joint and is involved in virtually every upper-body exercise you perform. As such, many lifters have chronic shoulder problems, such as bursitis, tendonitis, strains, and sprains.
While you might be able to do some exercises without pain, the overhead triceps extension involves an awkward arm position. Because of this, they may aggravate any existing shoulder injuries.
Not warming up properly
Warming up is crucial as it prepares your body for the workout and exercises you are about to perform. Overhead triceps extensions need a thorough warm-up because of the position of your arms. Not warming up could mean your shoulders feel stiff and immobile, which could cause pain if you force your upper arms up and next to your ears.
Poor shoulder stability and strength
While overhead triceps extensions are undoubtedly an arm exercise, you need strong, stable shoulders to keep your biceps next to your ears. Weak deltoids or unstable joints could cause shoulder pain, despite not targeting them directly.
Lack of shoulder muscle endurance could also mean your deltoids fatigue before your arms, and you’ll feel them burning painfully toward the end of your set.
Overhead triceps extensions don’t suit your body type
Exercise is good for everybody’s body. However, because of biomechanical differences such as shoulder width and arm length, not all exercises suit all lifters. Despite warming up, using good form, and lifting a sensible weight, overhead triceps extensions may still hurt your shoulders.
It’s not the exercise’s fault, but your genetics. Don’t worry, though; there are other ways to train your triceps long head.
How to Prevent Pain When Doing Overhead Triceps Extensions
Now that you know the possible causes of shoulder pain when doing overhead triceps extensions, here are some strategies to avoid it.
Warm up properly
Warming up increases tissue temperature, blood flow, joint mobility, and muscle flexibility. These things make getting your upper arms into the correct position to do overhead triceps extensions easier, reducing the risk of shoulder pain.
Focus on your shoulders, upper back, and elbows when preparing for overhead triceps extensions.
A warm-up for strength training should include the following:
Pulse raiser (light cardio)
Joint mobility
Dynamic flexibility
Movement prep/practice reps
Read more about warming up for strength training here.
Stretch your lats and pecs
It’s generally best to avoid statically stretching muscles before training them. Static stretches can reduce force production and make you weaker. However, with overhead triceps extensions, stretching your pectoralis major and latissimus dorsi should make achieving and maintaining the correct arm position easier.
Don’t worry about losing strength for your workout, as these muscles are not directly involved in overhead triceps extensions.
Check out this article to learn more about stretching your pecs and this article to discover the best exercises for stretching your lats.
Practice and perfect your technique
While overhead triceps aren’t the most technical bodybuilding exercise, they’re not the simplest, either. If you are new to this movement or have picked up some bad habits and don’t do them as cleanly as you should, it’s time to start practicing and mastering your form.
Do this exercise with a light dumbbell to ensure you are performing it correctly. Use a mirror or training partner for feedback. Also, consider videoing yourself for a post-set analysis. Do practice sets before your main workout and a few more before or after your other workouts so you can work on your form.
Fix whatever technical errors you spot to reduce your risk of shoulder pain.
Try using different training implements
There is more than one way to do overhead triceps extensions. Dumbbells might be the most common, but you may find cable or barbell overhead triceps extensions more common. You can also use an EZ bar or a “triceps bomber” bar, which has parallel grips.
All these options put your hands and upper arms in a slightly different position, which may be more comfortable for your shoulders.
Cable Overhead Triceps Extensions
Use lighter weights and a slower tempo
If heavy weights hurt your shoulders, but light weights don’t challenge your triceps enough, try doing your reps more slowly. So, instead of the usual one-second up/one-second down tempo most lifters use, try a 2:2 or 3:3 tempo.
Lifting and lowering more slowly makes light weights feel heavier while taking stress off your joints.
You don’t have to lift heavy weights to fatigue your muscles; a slower tempo and light weights can be just as challenging.
Strengthen your rotator cuff
Overhead triceps extensions require strong rotator cuff muscles to stabilize your shoulder joint. The rotator cuff is the collective name for the small muscles beneath your deltoids.
The muscles that make up your rotator cuff are:
These muscles are often weak and the cause of many shoulder problems. Strengthen your rotator cuff by performing cable or resistance band internal and external rotations.
Fix your posture
Poor posture, especially a slouched upper back and rounded shoulders, makes it impossible to get your arms into the correct position to do overhead triceps extensions. Trying to do this exercise when you’ve got bad posture puts a lot of stress on the shoulders.
Pronged sitting and too much time using screens mean that many people have poor posture.
It’s beyond the scope of this article to tell you how to fix your posture, but stretching your chest and strengthening your upper back with face pulls and band pull-aparts will help. Mobilizing your thoracic spine will also be beneficial.
Get any underlying shoulder problems diagnosed
If your shoulders hurt despite using these tips, you may have an underlying joint, tendon, or muscle problem that needs diagnosing and fixing. While muscle pain in the areas you are training is normal, pain in nearby muscles and joints is not.
Pain is your body’s way of saying something is wrong, and it’s best not to ignore it. Training through pain is a great way to make minor injuries worse.
If overhead triceps extensions hurt your shoulders, stop doing them and find out the source of your pain.
Use alternative exercises
While overhead triceps extensions are an effective exercise, they aren’t the only way to target the triceps long head. There are other exercises that are just as effective but put much less stress on your shoulders.
Good options include:
Take overhead triceps extensions out of your workouts and do any of these shoulder-friendly arm exercises instead.
Frequently Asked Questions
Do you have a question about shoulder pain and overhead triceps extensions? That’s okay because we’ve got the answers!
1. I had sudden shoulder pain during overhead triceps extensions. What should I do?
Sudden onset or acute pain suggests you may have strained a muscle or sprained a ligament. In either case, you should stop what you’re doing to avoid making your injury worse.
Depending on the severity of the damage, you may also need to use RICE (Rest, Ice, Compression, and Elevation) to promote recovery.
Do not return to training until the pain has subsided. If the pain is severe, get it checked out by a medical professional. You can still work out, but you must avoid aggravating the injured area. Train around the injury and not through it!
2. Are overhead triceps extensions safe?
Overhead triceps are not the riskiest triceps exercise, but nor are they the safest. They tend to place a lot of stress on the shoulder joint and can be uncomfortable. However, providing you have stable, mobile shoulders, and perform them with good form, it would be an exaggeration to say that overhead triceps extensions are dangerous.
3. Do I even need to train my long triceps head separately?
While isolating any of the three triceps heads is impossible, you can emphasize each one by altering the position of your upper arm. Bodybuilders often do this to create the perfect horseshoe-shaped triceps.
However, suppose you are a recreational lifter who doesn’t care about developing a championship-ready physique. In that case, you probably don’t need to train the long head separately. General triceps training will most likely give you the results you want.
4. Can I do overhead triceps extensions even though they hurt my shoulders?
Just because you can do something doesn’t mean you should! Pain is your body’s way of telling you to stop and that something is wrong. Training through pain is a good way to turn a minor injury into something more significant.
If overhead triceps extensions hurt your shoulders, try to determine the cause of the problem and then apply the solutions outlined in this article. And remember, the overhead triceps extension is NOT compulsory, and there are plenty of other exercises you can do that are far more shoulder-friendly.
5. Are single-arm triceps extensions safer or better than the two-armed version?
We all respond to exercises differently, and you may find that single-arm overhead triceps extensions are more comfortable than the regular version. Try them and see! They involve a very similar movement, but using one arm at a time means you may be able to position your shoulder at a more forgiving angle. You can also use your free arm for stability and support.
Closing Thoughts
Just because overhead triceps extensions are effective for building muscle doesn’t mean you have to do them. If they bother your shoulders, you should seek alternatives. After all, there are plenty of similarly effective exercises that target the long head of your triceps.
However, if overhead triceps extensions hurt your shoulders, it may not be the fault of the exercise. For example, your shoulder pain could be the result of poor posture, inadequate mobility, a weak rotator cuff, or using too much weight.
Fix these problems, and you may find that overhead triceps extensions no longer cause discomfort.
Remember, though, you should avoid training through pain. Don’t ignore it, as it could be an indicator that something is wrong. The pain could get worse if you fail to do something about it.
Read also: