Tag: core exercises

Two Best Love Handle Workouts For Building a Shredded Midriff
Love handles poking through your shirt can be the first sign of trouble. Most people are in denial at first when they start accumulating body fat. They blame their ‘ill-fitting’ shirts for their love handles or consistently tug on their shirts throughout the day to conceal them. Since you’re reading this article, I assume you are guilty of doing at least one of these at some point.
Ignoring these signs can worsen your spare tire situation, and it will require more work in the future to fix. Love handles can be notoriously difficult to lose. These are among the last fat stores to disappear during a fat loss program.
Before we get into the nitty gritty of love handle workouts, let’s get to the basics. Do you know how love handles got their name? I thought so.
Love handles is a colloquial expression that refers to excess fat deposits around the waistline, specifically on the sides of the abdomen and lower back. They got their name as an individual’s partner or loved ones often embrace them around the hips. Furthermore, it is often the body part your partner holds onto during a love-making session. The term ‘love handles’ will never be the same for you from this moment. You’re welcome!
In this article, we go over everything you need to know about love handles, including their causes, the associated risks, the holy grail of losing love handles, the best workouts and exercises, and the best lifestyle tips to see quick results.
What are Love Handles?
Love handles are protruding fat stores that sit above your hip bones and cover your external obliques. They are among the most stubborn areas to lose fat from. “Muffin tops” are a sign of poor physical fitness. Plus, they can hamper your physique aesthetics. The V-taper, characterized by broad shoulders and a narrow waist, is widely regarded as the epitome of aesthetic perfection. Love handles, on the other hand, hamper your shoulder-to-waist ratio.
Genetics, hormonal changes, poor diet, sedentary lifestyle, and overall body composition can influence love handle development. Besides their impact on your overall fitness and aesthetics, love handles can also lead to health conditions, such as cardiovascular disease and diabetes.
Contrary to what most people think, performing a few exercises in the transverse (axial) plane isn’t enough to shed the spare tire. Additionally, you cannot spot-reduce your love handles. You must follow a balanced diet and exercise regimen to achieve overall fat loss.
The love handles can be a tricky area to target with exercises. Performing the exercises with a picture-perfect form is crucial to achieving the desired results. You must also make mindful lifestyle choices to lose the love handles and keep them off.
Causes of Love Handles
Love handles develop as a consequence of weight gain. You gain weight when you are in a calorie surplus for a prolonged period, which includes consuming more calories daily than you expend. Your body converts the food into glycogen to use as fuel. However, your body stores excess glycogen as fat. Love handles tend to be the primary area where surplus fat accumulates in the body.
Besides a calorie surplus, here are the other factors that can cause weight gain — and love handles:
Genetical predisposition
Sedentary lifestyle
Hormonal changes
Age
Gender
Stress
Lack of sleep
Medication
Certain health conditions
Risks of Love Handles
While some may perceive muffin tops as endearing and dismiss them, it is important to acknowledge that love handles can have significant health implications. Here are some potential risks associated with love handles: [1]
Obesity
Increased risk of chronic diseases
Higher chances of contracting cardiovascular diseases
Insulin resistance and diabetes
Metabolic syndrome
Body image and psychological well-being
Kidney disease
The Secret To Losing Love Handles
If eating more calories daily than you can burn leads to excess fat accumulation and love handle development, guess how you can lose the spare tire? Right, by burning more calories in a day than you consume. It is known as a calorie deficit.
Many people believe they can trim their belly fat by doing abdominal exercises and do not need to change their diet. Unsurprisingly, most of these folks never achieve their weight loss goals and end up shopping for new pants and loose-fitting shirts to hide their body fat.
Weight loss ultimately comes down to calories in versus calories out. You can enter a calorie deficit by cutting your calorie intake or burning more calories through exercise. Using a combination of the two will get you the fastest results.
Two Best Workouts To Lose Love Handles
There are two popular ways of training your core. You could do it after a strength training workout to tone your midsection and develop a six-pack. The other method involves performing a high-intensity full-body workout to burn calories and increase fat loss. The HIIT workout is more prevalent among people that want to focus on losing weight, whereas the first type of core workout is favored by lifters that want to build muscle mass and strength.
Core-Strengthening Workout To Lose Love Handles
This type of workout consists of three to four exercises and is done after a resistance training session. Focus on your breathing pattern and contracting your target muscle group with each rep to get the best bang for your buck.
Here is how to perform each exercise in this workout:
Russian Twist
Sit on the floor with an upright torso, your knees bent, and heels on the ground. Lean back until your torso is at a 45-degree angle with the floor. Lift your feet off the floor and extend your arms so they are parallel to the floor and over your knees. Turn to your right side while breathing out. Contract your abs and obliques at the isometric contraction point. Return to the starting point and repeat on the other side. Alternate between sides for recommended reps. Advanced exercisers can hold onto a weight plate to make this exercise more challenging.
Woodchopper
Stand upright with a hip-width stance while holding a dumbbell with both hands in front of your hips. Interlace your fingers around the dumbbell’s handle for a firm grip. Lift the dumbbell across your body and over your right shoulder. Twist your left foot slightly during the upward motion and fix your eyes on the dumbbell. Bring down the dumbbell diagonally across your body so it is at the side of your left knee. Pause and contract your core during the downward motion. Repeat for recommended reps before switching sides.
Bicycle Crunch
Lie on your back on the floor. Hold your hands next to your ears and lift your legs so your thighs are perpendicular to the floor. Bring your left knee toward your chest while reaching across with your right elbow. Pause and contract your core. Return to the starting position and repeat on the other side.
Side Plank
Lie on your side on the floor. Place your elbow under your shoulder and stack your hips and legs. Plant your forearm on the floor so it is perpendicular to your body. Lift your hips off the floor; your body should be in a straight line from head to toe. Place your top hand on your hip. Hold this position for a minute. Without stopping for rest, repeat on the other side.
HIIT Workout To Burn Calories, Boost Fat Loss, and Get Rid of Love Handles
Given below is a full-body high-intensity interval training (HIIT) workout that will spike your heart and metabolic rate. This 17-minute HIIT workout will help you shed excess fat and build a shredded core. Perform two rounds of these exercises and limit rest duration between exercises to 30 seconds. You are allowed a two-minute breathing time after completing the first circuit. Also, do not stop for rest while changing sides in the side plank pulse.
Given below are step-by-step guides to performing these exercises:
High Knees
Stand upright with a shoulder-wide stance and place your hands on your hips. Brace your core, bend one leg, and lift your knee until your thigh is roughly level with the floor. Return the leg to the ground and repeat on the other side. Establish a steady rhythm.
Mountain Climber
Assume the push-up position; your hands should be under your shoulders and legs extended behind you. Your body should be in a straight line from head to toe. Lift one foot off the floor, bend at the knee, and bring it toward your chest. Return it to the start position and repeat on the other side. Alternate between sides in a rhythm.
Plank Jack
Get into the high plank position. Place your hands on the floor under your shoulders. Extend your legs behind you and place your feet together. Maintaining the high plank, jump and place your feet wider than shoulder-width apart. Jump and return to the starting position. Repeat in a rhythm.
Side Plank Pulses
Get into the side plank position so your body is in a straight line from head to toe. Lower your hips to the floor and return to the starting position. Repeat for the recommended reps before switching sides.
Sledgehammer Overhead Strikes
Grab a sledgehammer in front of your body with your left hand at the bottom of the handle and your right hand just above it. Swing the hammer around your right side and behind and over your head. Smash the tire in the center with full force. Switch hands and return the hammer to the overhead position while swinging the hammer around your left side. Repeat for recommended reps.
Cross-Body Mountain Climber
Get into the high plank position. Maintaining your body in a straight line from head to toe, lift one foot off the floor, bend your knee, and bring it toward the opposite shoulder. Contract your core at the top. Return to the start position and repeat on the other side. Perform this exercise using a steady rhythm.
Sit-Up Twist
Lie on your back on the floor, bend your knees, and plant your feet on the ground. Hold your hands next to your ears. Contract your abs and lift your torso off the floor. Turn to your side and bring your left elbow to your right knee during the upward motion. Return to the start position and repeat on the other side.
Most Effective Love Handle Exercises
Sticking to the same exercises can get really boring, really fast. If you dread doing the same movements in every workout, we have got you covered. Below is an exhaustive list of additional exercises that will help tone your love handles. Add these movements to your exercise arsenal to keep your workouts exciting.
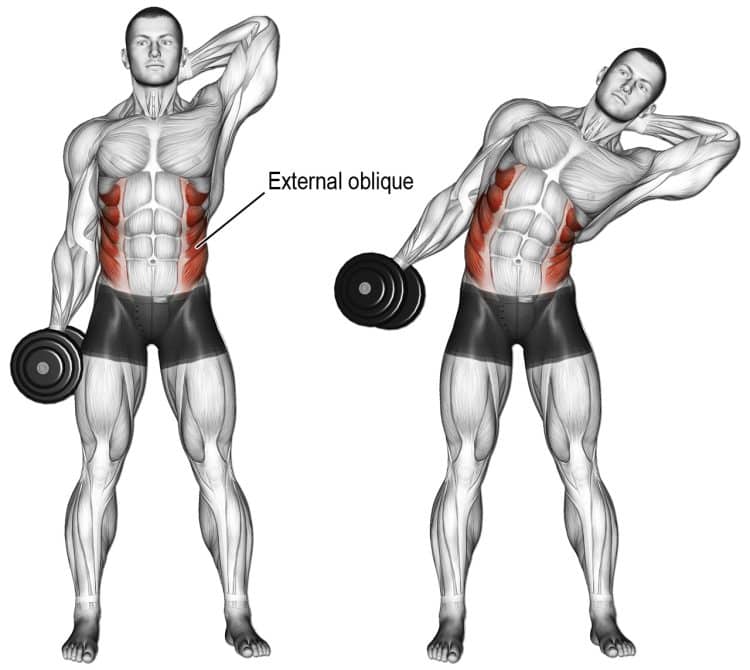
Standing Dumbbell Side Bend
Stand upright with a hip-width stance while holding a dumbbell in each hand at your sides. Keeping your elbows locked, brace your core, and slowly lower the right dumbbell as low toward the floor as possible. It should at least be at your knee level at the bottom. Return to the start position. Complete the recommended reps on one side before switching to the other side. Read more about standing dumbbell side bend here.
Oblique V-Ups
Lie on your right side on the floor. Stack your legs while maintaining a slight bend in your knees. Place your right arm on the floor so it is perpendicular to your torso. Hold your left hand behind your head. Lower your head and left arm to the floor behind you; this will be your starting position. In a single motion, lift your legs off the floor and raise your knees toward the ceiling while bringing your left elbow to your knees.
Cable Side Crunch
Set a cable pulley at the highest setting and attach a D-handle bar. Grab the handle with a neutral (palm facing inward) grip and take a big step away from the pulley. Place your other hand on your hip. Holding the handle to your ear, perform a side crunch. Contract your core at the bottom of the movement. Repeat for reps before switching sides.
Read more about cable side crunch.
Side Jackknives
Lie on your left side on the floor; your hips and legs should be stacked. Place your left upper arm on the floor in front of your body so it is perpendicular to your torso. Keep your right hand on your right hip. Lift your right foot toward the ceiling while performing a side crunch. Pause and contract your obliques at the top. Rinse and repeat.
Read more about side jackknives.
Side Plank Twist
Get into the side plank position. Place your top hand behind your head. Your top elbow should be in line with your shoulders at the starting position. Bring your top elbow to the floor under your shoulders while keeping your legs stacked. Contract your core during the lowering movement and hold for a two-count at the bottom. Repeat for recommended reps before switching sides.
Standing Torso Twist
Stand upright with a hip-width stance. Extend your arms in front of your body so they are parallel to the floor. Interlace your fingers and turn to your right side as far as possible without bending your elbows. Twist your left leg during the turn for optimal range of motion and contract your abs and obliques. Return to the starting position and repeat on the other side. Experienced exercisers can hold onto a dumbbell or kettlebell to make this exercise more challenging.
Flutter Kicks
Lie supine on the floor with your legs extended. Place your hands under your hips for leverage. Brace your core and lift your feet a few inches off the floor. Raise your head off the floor. Without bending your knee, lift your right leg toward the ceiling while keeping your left leg in place. Return the right leg to the starting position while lifting the left leg toward the roof. Maintain a steady tempo for recommended reps. More on flutter kicks here.
Side Plank Knee Tucks
Get into the side plank position. Place your top hand next to your ear. Simultaneously, elevate your upper leg towards your chest while bringing your elbow to your knee, all in one fluid motion. Breathe out and contract your abs throughout the range of motion. Return to the start position and repeat for recommended reps before switching sides.
Standing Side Leg Lifts
Stand with your left side facing a sturdy elevated surface like a cable pulley machine. Hold on to the pulley machine with your hand. Hold your right leg slightly in front of your body. Bring the right leg toward the pulley while keeping your knee locked. Raise the leg out to your side as high as possible. Return to the starting position and repeat for recommended reps. You could also perform an oblique crunch during the concentric motion for better muscle contraction.
Side-to-Side Medicine Ball Slams
Place a medicine ball on the floor. Stand upright with a shoulder-width stance so the medicine ball is at your left foot’s side. Bend over and lift the ball off the floor. In a sweeping motion, lift the ball over your head. Raise onto the balls of your feet and slam the ball on your right side as hard as possible. Bend over and lift the ball. Alternate between sides for reps. Learn more about side-to-side medicine ball slams here.
Lateral Band Walk
Wear a loop resistance band around the bottom of your thighs. Take a wide stance so that band is engaged. Bend your knees slightly and hinge at your hips. Hold your hands in front of your chest. Take a wide step to your right side. Walk 10 steps to your right side and return to the starting position. Start with the opposite leg on the subsequent set.
Side Plank with Leg Lift
Get into the side plank position. Raise your top leg as high toward the ceiling as possible. Exhale and contract your core during the upward motion. Hold the position for a two-count. Slowly lower the leg to the starting. Repeat for recommended reps before switching sides. Experienced exercisers can wear ankle weights while performing this exercise for optimal oblique engagement. Also, perform a side crunch to target your love handles.
Side Plank Reach-Throughs
Assume the side plank position. Raise the top arm toward the ceiling so it is perpendicular to the floor; this will be your starting position. Lower your arm toward the floor and thread it between your body and the floor. Breathe out and contract your abs during this lowering motion. Repeat for reps and switch sides.
Clamshell
Lie on the floor on your side. Bend your knees while keeping your hips and legs tacked. Place your bottom arm under your head for support. Place the hand of your top arm on the floor for support. Keeping your ankles stacked, lift your top leg toward the ceiling as high as possible. Hold the contraction for two seconds. Tie a resistance band around your knees for better glute engagement.
Seated Side Bend with Dumbbell
Sit upright on an elevated surface, such as a flat bench, while holding a dumbbell in each hand. Place your feet on the floor wider than shoulder-width apart for better stability. While breathing out, lower the right dumbbell to the floor. Explode back to the starting position. Repeat for recommended reps before switching sides.
More Love Handle Exercises
Here are a few more love handle exercises that will help burn off the spare tire and give you the coveted sex lines:
Cable Woodchoppers
Stability Ball Side Bend
Side Lunge with Twist
Plank with Knee Tucks
Side Plank with Arm Reach
Crunch and Twist on Stability Ball
Side Plank Clamshells
Side Plank with Dumbbell Row
Kettlebell Windmill
Standing Side Bend with Resistance Bands
Heavy Farmer Walk
Single-Arm Dumbbell Row
Box Jump
Floor Wipers
Hanging Windshield Wiper
Tips For Losing Love Handles
Here are a few tips to speed up your fat loss and build a shredded six-pack:
Follow a Balanced and Healthy Diet
Folks serious about losing the spare tire must avoid following a cookie-cutter diet plan. You must follow a personalized diet plan that helps you lose 1-2 pounds weekly. According to the CDC, you must maintain a daily 500-1,000 calorie deficit to achieve this goal. [2]
Use this total daily calorie expenditure (TDEE) calculator to determine your goal daily calorie intake. Then, break it down into a suitable macronutrient split to lose fat and build muscle mass simultaneously.
Exercise
Although training is not mandatory on a weight loss program, it can help speed up your progress. Perform two daily cardio training sessions for optimal results — one HIIT and another low-intensity steady state (LISS).
Seeking professional help can help beginners save time and effort. A personal trainer can give you a customized training program and will teach you the correct exercise form. On the other hand, a registered nutritionist will ensure you are hitting your daily macro and micronutrient goals.
Make Healthy Lifestyle Choices
Losing weight and love handles and keeping them off might require a complete lifestyle change. Folks with desk jobs must add more physical activity to their days. You must choose the stairs over the elevator and bike to work when possible.
Start with a goal of walking 5,000 steps daily and slowly make your way up until you are logging 10,000 daily steps. Staying physically active will help burn calories throughout the day and keep your metabolic rate high.
Stay Hydrated
Drinking water at regular intervals can keep you satiated. Furthermore, it can help curb cravings. Drink at least a gallon of water daily to ensure optimal body functioning and overall well-being. Switch calorie-laden sugary drinks and sodas with plain water to speed up your weight loss.
Adequate hydration can also boost your metabolism. Your body is more effective at metabolizing stored fat and converting it into energy when you are hydrated. It can help improve your fat-burning process. Staying hydrated also enhances digestion and nutrient absorption, supporting your overall weight loss efforts.
Rest
Many people tend to overexert themselves while trying to lose weight and love handles, which can be counterproductive. Remember, you lose weight while you are asleep, and you must give your body enough to recover. Sleep at least seven to eight hours each night for optimal results.
Also, learn to listen to your body. If you are very sore after a workout, it is best to skip a training session and allow your body time to recuperate. Pushing too hard in the gym can lead to overtraining, which can negatively impact your central nervous system.
Avoid Stress
Your cortisol levels rise when you are under stress, which can increase your appetite, slow down your metabolism, and increase fat storage. Chronic stress can lead to greater inflammation, emotional eating, and impaired sleep.
Elevated cortisol levels can make it more challenging to lose weight, even when you are following a balanced diet and training program. Meditation, yoga, and journaling can help deal with chronic stress. However, you must consult a healthcare professional if these three methods don’t work for you.
Set a Goal and Track Your Progress
Starting your transformation journey with a specific, measurable, attainable, relevant, and time-bound goal can increase your chances of success. Having a deadline will also motivate you to stick to your fitness regimen.
You must have long-term and weekly goals. Track your progress every week to ensure you are on the right path. Stick to your regimen if the progress is favorable. Conversely, make necessary adjustments if the needle is not budging in the right direction.
Stay Consistent and Dedicated
Love handles can be a stubborn muscle group. Depending on your current and goal physique, it might take you weeks, if not months, to achieve your objective. Nonetheless, you must stick to your fitness regimen with military discipline and ensure you never miss a training session or meal.
You must also consistently challenge yourself by increasing your training intensity and volume to avoid hitting a plateau. Establishing healthy habits will reduce the friction in your training regimen and help you stick to the fit lifestyle for the long term.
FAQs
Can I lose love handles without exercise?Yes. The love handles vanish when there is a reduction in your overall body fat, which requires you to be in a calorie deficit. You can lose your love handles by limiting your calorie intake. That said, adding exercise to your fitness regime can help speed up your results.
Is it possible to have a flat stomach and love handles simultaneously?Some skinny individuals can also develop love handles, known as skinny fat. Skinny fat can result from several factors, including genetics, sedentary lifestyles, medication, or certain health conditions.
How much time will it take for me to lose my love handles?It will depend on your starting physique and ultimate objective. You cannot spot-reduce your love handles and must work toward overall body fat loss. A 500-1,000 daily calorie deficit can help you lose 1-2 pounds weekly.
Note: The content on Fitness Volt is for informative purposes only. Do not take it as medical advice to diagnose, prevent, or treat health problems. If you’re suffering from a health issue, are pregnant, or are under 18 years old, you should consult your physician before starting any new supplement, nutrition, or fitness routine.
Wrapping Up
Love handles can be stubborn, requiring dedication, determination, and consistency to burn them off. Avoid falling into the spot-reduction trap and focus on reducing your overall body fat to see quick, favorable results.
This article has two highly effective workout routines specifically designed for strength trainers and those engaged in full-body HIIT exercises to effectively target and eliminate love handles. So, what are you waiting for? Lace-up your shoes and get moving. Best of luck!
References
Patel P, Abate N. Body fat distribution and insulin resistance. Nutrients. 2013 Jun 5;5(6):2019-27. doi: 10.3390/nu5062019. PMID: 23739143; PMCID: PMC3725490.
Centers for Disease Control and Prevention. (2021). Losing Weight. Retrieved from https://www.cdc.gov/healthyweight/losing_weight/index.html
The Best Anti-Core Exercises for Increased Lumbar Stability
When most people talk about core training or working out in general, they tend to mean exercises that involve movement. For the core, that means things like crunches, sit-ups, hanging leg raises, Russian twists, side bends, etc.
These exercises usually feature a concentric or shortening phase followed by an eccentric or lengthening phase. After all, what goes up, must come down, right?
However, in many instances, the core muscles work isometrically, generating force without changing length. They contract to prevent unwanted movement, which is what the term core stability means.
Training to prevent movement might seem kinda odd. Still, it’s actually critical for various sports and activities in and out of the gym. For example, squats and deadlifts require incredible levels of static core stability, as do overhead barbell presses, push-ups, and barbell curls.
Fitness experts call these static core strengtheners anti-core exercises. The anti refers to how the core muscles work to prevent movement rather than cause it.
Whether you are training for improved aesthetics, better performance, weight loss, or health, anti-core exercises deserve a place in your workouts. If nothing else, preventing unwanted movement of your lumbar spine could help stop lower back injuries.
In this article, we reveal the best anti-core exercises.
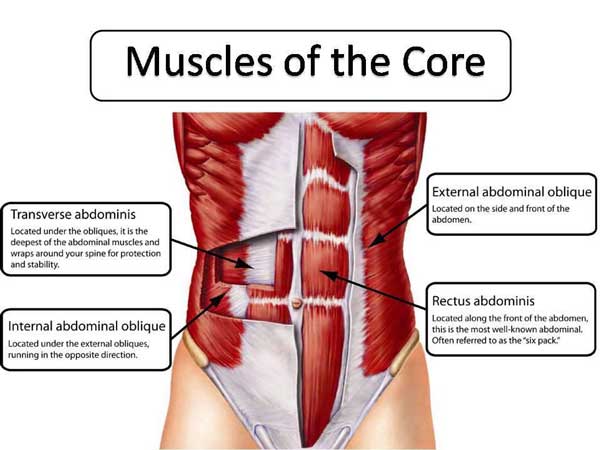
Core Anatomy Basics
Core is the collective term for the muscles that encircle your midsection. Some fitness folk also like to include other muscles in the core, such as the glutes and lats, but that just confuses matters. So, for the purposes of this article, the core is the muscles in and around the abdominal region.
The primary muscles that make up the core are:
Rectus abdominis
Located on the front of your abdomen, the rectus abdominis is the large, flat muscle that, when you are lean, has that unique six-pack appearance. The rectus abdominis is responsible for the flexion of your spine and also contributes to lateral flexion.
In anti-core terms, the rectus abdominus prevents extension and lateral flexion of the spine.
Obliques
The obliques are essentially your waist muscles. There are two sets of obliques on each side of your abdomen – internal and external. They work together to rotate and laterally flex your spine.
In anti-core terms, the obliques prevent rotation as well as initiating it.
Transverse abdominis
Known as the TVA for short, this muscle surrounds your abdominal contents like a corset or weightlifting belt. It contracts inward to increase intra-abdominal pressure, stabilizing your spine from within.
If prizes were being given for the most critical anti-core muscle, the TVA would be a shoo-in for the gold medal!
Erector spinae
Erector spinae is a group of muscles that run up either side of your spine, including the
iliocostalis, longissimus, and spinalis, each of which can be subdivided into three further sections. The erector spinae are responsible for extending your spine as well as lateral flexion.
In anti-core terms, the erector spinae prevents flexion and lateral flexion.
Movements of the spine
The spine is a column of 33 individual bones called vertebrae. It’s divided into five sections:
Cervical spine – your neck – made up of 7 vertebrae
Thoracic spine – your upper back – made up of 12 vertebrae
Lumbar spine – your lower back – made up of 5 vertebrae
Sacrum – part of your pelvis – made up of 5 immovable/fused vertebrae
Coccyx – your “tailbone” – made up of 4 immovable/fused vertebrae
The cervical, thoracic, and lumbar vertebrae are separated by intervertebral discs, which are sections of tough fibrous cartilage. These discs absorb shock and compress to allow movement.
Speaking of which, the spine is capable of four main movements:
Flexion, i.e., bending forward
Extension, i.e., bending backward
Lateral flexion, i.e., bending sideways
Rotation, i.e., twisting
Movements can also be combined, e.g., flexion with rotation during a twisting crunch.
As such, there are four groups of anti-core exercises, each one designed to prevent one (or more) of these movements. For example, anti-extension exercises emphasize the rectus abdominis, while anti-rotation exercises emphasize the obliques. However, all anti-core exercises involve the transverse abdominis.
Benefits and Drawbacks of Anti-Core Exercises
Not sure if you need to include anti-core exercises in your workouts? Consider these benefits and then decide!
Very functional
Functional training is a very misused term. Many people confuse functional training with technically demanding exercises involving a lot of balance, e.g., squats on a stability ball or curls while slacklining. While these are impressive feats, they’re not examples of real functional training.
In contrast, functional training means doing exercises that have a carry-over to your life outside of the gym, i.e., they improve how you function.
Anti-core exercises train your midsection in a very functional way. People often have to use their core muscles this way during their daily lives, in the gym, or on the sports field. Anti-core exercises will have a significant carry-over to your everyday life.
Spine-friendly
Like any joint, the spine is prone to wear and tear. If you do a lot of crunches, sit-ups, Russian twists, etc., you can cause stress to both the vertebrae and intervertebral discs, and these structures can become worn and damaged.
By their very nature, anti-core exercises involve no movement, so there will much less stress on your vertebrae, spinous ligaments, or discs. In fact, anti-core exercises should not cause lower back stress or pain of any sort – done correctly, of course!
Easy to learn
With no movements to think about, most anti-core exercises are very straightforward and easy to learn. You just have to keep still and prevent movement. That’s not to say these exercises are easy – far from it. However, from a technical performance perspective, the learning curve for most anti-core exercises is pretty short.
While anti-core exercises are mostly beneficial and safe, there are also a few drawbacks to consider:
Usually done for time instead of reps
Many anti-core exercises are held for a predetermined time, e.g., 30 seconds. This means you’ll need to use a timer or be able to see a clock with a second hand. Also, some people prefer to pump out reps, and keeping still may be less appealing.
Elevated blood pressure
Isometric anti-core exercises can cause a short-term increase in blood pressure (1). This is because the muscles are contracted, which reduces blood flow. This should be no issue for people with healthy blood pressure but could be problematic for anyone with hypertension.
This problem can be reduced by never holding your breath during anti-core exercises. Breath-holding can have a significant effect on blood pressure.
Speak to your doctor if you have high blood pressure before doing any of the exercises in this article.
Five Best Anti-Flexion Core Exercises
Anti-flexion exercises emphasize your erector spinae muscles. These exercises are good for improving your posture and protecting your lower back from pain and injuries.
1. Back extension hold
Anti-flexion exercises don’t come much simpler than the back extension hold. Done for time, this exercise teaches you to use your back muscles to resist the pull of gravity. Back extension holds are an excellent stepping stone onto more demanding exercises and is ideal for beginners.
Steps:
Mount your back extension machine (45-degree or horizontal) and get into the mid-point of the exercise so your body is straight. Brace your core and engage your glutes and hamstrings.
Without holding your breath, maintain your position for as long as possible.
Yes, all that shaking is perfectly normal.
Relax, rest a moment, and repeat.
Muscles targeted:
Erector spinae, core, gluteus maximus, hamstrings.
Benefits:
Very easy to learn.
Very accessible as most gyms have a back-extension machine.
Easy to progress/regress by altering the time of each hold.
Tips:
Work up to holding for 2-3 minutes per rep.
Make this exercise harder by holding a weight to your chest or using resistance bands.
Keep your knees slightly bent throughout for comfort and safety.
2. Cobra Superman hold
No back-extension machine? No problem! You can work on your anti-flexion strength with this straightforward floor exercise. On the downside, it can be a little uncomfortable, so make sure you use a mat to avoid any unnecessary pain.
Steps:
Lie on the floor on your front and place your hands on your temples.
Lift your head, chest, arms, legs, and feet a few inches off the floor so you’re balancing on your abdomen and hips only.
Hold this position for as long as possible.
Muscles targeted:
Erector spinae, gluteus maximus, hamstrings, core, trapezius, rhomboids, deltoids.
Benefits:
An ideal exercise for home workouts.
No equipment required.
Good for improving spine mobility.
Tips:
Place a folded mat under your hips for comfort.
Take care not to hyperextend your spine.
Do not hold your breath.
3. Dual kettlebell front rack carry
While stationary exercises like back extension and Superman/cobra holds are effective, they don’t teach you to stabilize your spine during movement. As such, they’re good preparatory exercises but also need to be progressed. Dual kettlebell front rack carries train you to resist flexion while moving your legs, so they’re much more functional.
Steps:
Rack and hold two kettlebells on your shoulders. Pull your shoulders down and back, and brace your core. Look straight ahead.
Keeping your torso upright, walk around your training area until you start to tire.
Lower the weights to the floor, rest, and repeat.
Muscles targeted:
Erector spinae, gluteus maximus, hamstrings, core, trapezius, rhomboids, deltoids.
Benefits:
A highly functional exercise.
Good for integrating your core with your upper and lower body.
An excellent general strength and conditioning exercise.
Tips:
Use dumbbells instead of kettlebells if preferred.
Use gym chalk to stop your hands from slipping.
Use one weight only to add anti-lateral flexion to this exercise.
4. Romanian deadlift
While most people do RDLs to strengthen their glutes and hamstrings, it’s actually a very effective anti-flexion exercise. However, you need to be able to resist flexion in isolation first, e.g., with back extension holds, before attempting this exercise.
Steps:
Hold a barbell with an overhand, shoulder-width grip. Stand with your feet between shoulder and hip-width apart, knees slightly bent.
Brace your core and pull your shoulders down and back.
Hinging from your hips, lean forward and lower the bar down the fronts of your legs. Do NOT round your lower back.
Drive your hips forward, stand up straight, and repeat.
Muscles targeted:
Erector spinae, gluteus maximus, hamstrings, core, trapezius, rhomboids, deltoids, forearms.
Benefits:
An excellent exercise for your entire posterior chain.
Easy to scale by adding or subtracting weight.
A proven way to learn how to hip hinge, which is a prerequisite for many more demanding exercises, such as kettlebell swings and power cleans.
Tips:
Remove your shoes to keep your heels on the floor and your weight toward the back of your feet.
Use chalk or lifting straps to reinforce your grip.
Keep your chest up and your lower back slightly but tightly arched throughout.
Related: Romanian Deadlifts (RDLs) Guide
5. Deadlift
The barbell deadlift is one of the best bang-for-your-buck exercises you can do. Working a large percentage of the muscles in your body, deadlifts have the potential to build muscle size and strength like no other. However, the key to a good deadlift is keeping your spine extended, which is what also makes them an excellent anti-flexion exercise.
Steps:
Place a loaded barbell on the floor. Ideally, the bar should be about mid-shin height.
Stand with your toes under the bar, feet between shoulder and hip-width apart.
Bend down and hold the barbell with an overhand or mixed shoulder-width grip.
Straighten your arms, drop your hips, and lift your chest. Brace your core and pull your shoulders back and down.
Drive your feet into the floor and stand up, ensuring your hips don’t rise faster than the bar.
Push your hips back, bend your legs, and lower the weight back to the floor.
Allow it to settle for a couple of seconds, reset your core and grip, and repeat.
Muscles targeted:
Erector spinae, gluteus maximus, hamstrings, quadriceps, core, trapezius, rhomboids, deltoids, forearms.
Benefits:
One of the most productive barbell exercises you can do.
Teaches you how to lift heavy objects off the floor safely.
A very time-efficient exercise that trains multiple muscle groups at the same time.
Tips:
Place your barbell on blocks or in a power rack if you tend to round your back when deadlifting from the floor.
Do NOT bounce the bar off the floor. Instead, allow the weight to “go dead” between reps for safety and best results.
Experiment with an overhand and mixed grip to see which you prefer.
Related: 9 Weeks to a Bigger Deadlift Program
Five Best Anti-Extension Core Exercises
Anti-extension exercises target your rectus abdominis. Working on your anti-extension strength will lessen the likelihood of hyperextending your spine during athletic and everyday activities.
1. Plank
The plank is the original anti-extension core exercise. With roots in yoga and Pilates, this exercise has been around for centuries. However, despite being so common, many people do this exercise incorrectly. Don’t be one of them!
Steps:
Kneel down and rest your forearms on the floor. Your elbows should be under your shoulders, lower arms parallel. Brace your core and pull your shoulders back and down.
Walk your feet out and back to form a straight line with your shoulders and hips.
Hold this position for the required duration. However, do not hold your breath.
Muscles targeted:
Rectus abdominus, core, hip flexors.
Benefits:
No equipment required.
An excellent preparatory exercise for more advanced movements.
An easy exercise to progress or regress.
Tips:
Try to increase muscle tension instead of holding for excessively long durations.
Bend your legs and rest on your knees to make this exercise easier.
Rest your forearms on a stability ball to make this exercise more challenging.
Related: Plank Progressions and Variations for Stronger Abs
2. Dead bug
Dead bugs teach you to resist extension while moving your arms and legs, which is how your core muscles often have to work in nature. This is a highly functional anti-core move that’s suitable for all levels of exerciser.
Steps:
Lie on your back with your legs bent and arms extended up toward the ceiling. Brace your core and press your lower back into the floor.
Extend your left arm and right leg and lower them to the floor. Keep your lower back pressed down.
Return to the starting position and repeat on the opposite side.
Continue alternating arms/legs for the duration of your set.
Muscles targeted:
Rectus abdominus, core, hip flexors.
Benefits:
A very lower back-friendly exercise.
A very functional anti-extension core exercise.
No equipment required, so ideal for home workouts.
Tips:
Make this exercise easier by only lowering your arms OR legs.
Make it more challenging by lowering both arms and legs together.
Increase the intensity of this exercise by holding dumbbells or a medicine ball.
3. Overhead Pallof press
The Pallof press was invented by Bostonian physical therapist John Pallof. Unlike many anti-core exercises, this one uses weights to overload your muscles. As such, it can be progressed just like any other strength-training exercise, i.e., by increasing the load. Unlike the traditional anti-rotation Pallof press, this is an anti-extension exercise.
Steps:
Attach a rope handle to a high pulley. Grab the handle and then turn your back to the cable machine. Hold your hands at shoulder height. Brace your core and adopt a split stance for balance.
Without leaning forward or backward, raise your arms above your head. Note how the tension on your core increases as you extend your arms.
Lower your hands back to your shoulders and repeat.
Muscles targeted:
Rectus abdominis, core, pectoralis major, latissimus dorsi, deltoids.
Benefits:
Can be made as easy or as challenging as required by adjusting the weight.
Teaches you how to integrate your upper and lower body with your core.
A good exercise for improving shoulder mobility and stability.
Tips:
The narrower/closer your feet are, the more challenging this exercise becomes.
You can also do this exercise with a resistance band.
Experiment with different height cables to see what works best for you.
4. Rollout
Rollouts are like a moving plank. As you extend your arms, the tension on your core increases dramatically, and you’ll have to work harder to prevent lumbar spine extension. Rollouts also provide an intense lat workout. An ab roller is an excellent investment!
Steps:
Kneel down and hold your roller with an overhand grip. Place the roller on the floor in front of your knees. Brace your core and pull your shoulders back and down.
Push the roller out in front of you and lower your chest and abdomen down to the floor. Do not allow your lower back to extend.
Using your abs and lats, pull the roller back up to your legs.
That’s one rep – keep going!
Muscles targeted:
Rectus abdominus, core, latissimus dorsi, triceps.
Benefits:
A low-tech exercise that’s ideal for home workouts.
Can be modified to suit most levels of exerciser.
A challenging, effective anti-extension core exercise.
Tips:
Do this exercise from standing for a more intense workout.
Don’t extend your arms so far to make this exercise less challenging.
No ab roller? No problem! You can also do this exercise with a barbell.
Related: Rollouts: Benefits, Technique, And Alternatives
5. Extended plank
Planks are an excellent exercise. However, if you can do them for over a minute or two, they probably aren’t challenging enough to increase core strength. This variation takes your hands and feet further apart to make them much more demanding.
Steps:
Firstly, lie on your back with your arms stretched out to the side. Make marks on the floor with your fingertips to determine your “wingspan.”
Next, place your feet on one mark and your hands on the other. This is your extended plank position.
Brace your core and hold the extended plank position for as long as possible, taking care not to hyperextend your lumber spine or hold your breath.
Muscles targeted:
Rectus abdominus, core, hip flexors.
Benefits:
No equipment required.
A much more challenging way to do planks.
An excellent anti-extension move for advanced exercisers.
Tips:
Shorten the distance between markers if you cannot do this exercise correctly, or you can feel it in your lower back.
Ensure your hands are dry and won’t slip to avoid accidentally face-planting the floor.
This is a very challenging core exercise, so proceed with caution.
Five Best Anti-Lateral Flexion Core Exercises
Anti-lateral flexion exercises strengthen your obliques, rectus abdominis, and erector spinae muscles, albeit one side at a time. Improving your ability to resist lateral flexion will ensure you can keep your torso upright when dealing with unilateral or unbalanced loads.
1. Side plank
The side plank is an excellent introduction to anti-lateral flexion exercises. It’s a little harder than front planks but just as simple to learn. This exercise is popular in group workout classes for a reason!
Steps:
Lie on your side and rest on your forearm. Your body and legs should be straight. Brace your core.
Lift your hips off the floor and hold them up for the required duration.
Lower your hips back to the floor, roll over, and repeat on the opposite side.
Muscles targeted:
Obliques, rectus abdominus, erector spinae, deltoids.
Benefits:
No equipment required, so ideal for home workouts.
Easy to learn and master, so perfect for novice exercisers.
An excellent preparatory exercise for more demanding anti-lateral flexion movements.
Tips:
Rest your elbow on a folded exercise mat or foam pad for comfort.
Bend your legs to make this exercise easier.
You can also do this exercise with your supporting arm extended:
2. Single-arm farmer’s walk
Exercises don’t come much more functional than the single-arm farmer’s walk. However, despite its simplicity, this exercise can be extremely challenging. All you need is a single dumbbell, kettlebell, or heavy bag, so this exercise is ideal for home workouts.
Steps:
Hold a heavy weight in one hand, arm by your side. Brace your core and make sure your hips and shoulders are level.
Without leaning sideways, go for a walk around your training area.
On completion, lower the weight to the floor, swap hands, and repeat.
Muscles targeted:
Obliques, rectus abdominus, erector spinae, forearms.
Benefits:
A highly functional core.
Can be modified for all levels of strength by increasing or reducing the weight.
An excellent way to develop a stronger, more enduring grip.
Tips:
Chalk your hands or use lifting straps to reinforce your grip if necessary.
Walk in zigzags to destabilize the weight and make this exercise more demanding.
Take care not to lean sideways or shrug your shoulders during this exercise.
3. Single-arm waiter’s walk
The single-arm waiter’s walk is similar to the farmer’s walk, but the weight is held overhead and not down by your side. This increases the stability demand of this exercise. Take care not to go too heavy too soon with this exercise; it’s harder than it looks!
Steps:
Lift and hold a single dumbbell or kettlebell overhead. Brace your core and engage your shoulders and upper back to stabilize the load.
Without leaning sideways, go for a walk around your training area.
On completion, lower the weight to the floor, swap sides, and repeat.
Muscles targeted:
Obliques, rectus abdominus, erector spinae, deltoids.
Benefits:
A challenging and effective anti-lateral flexion exercise.
Builds stronger, more stable shoulders.
Can be modified for all levels of strength by increasing or reducing the weight.
Tips:
Chalk your hands or use lifting straps to reinforce your grip if necessary.
Walk in zigzags to destabilize the weight and make this exercise more demanding.
Take care not to lean sideways or shrug your shoulders during this exercise.
4. Single-arm overhead press
Overhead presses are great for building bigger shoulders and triceps. However, when you switch from using both arms to just one, they become an excellent ant-lateral flexion exercise. Requiring just one weight, this anti-core move is ideal for home workouts.
Steps:
Hold a dumbbell or kettlebell in one hand at shoulder height. Stand with your feet shoulder-width apart and brace your core. Make sure your hips and shoulders are level.
Without leaning sideways, press your weight up and overhead to arm’s length.
Lower the weight back to your shoulder and repeat.
Switch hands and do the same number of reps with your other arm.
Muscles targeted:
Obliques, rectus abdominus, erector spinae, deltoids.
Benefits:
A very functional upper-body and core exercise.
An excellent way to identify and fix left-to-right strength imbalances.
A very accessible, practical exercise.
Tips:
Do this exercise in front of a mirror to ensure you’re keeping your shoulders level.
Use less weight than you would for a two-handed overhead press.
You can also do this exercise with a barbell, which is an exercise called the javelin press:
5. Suitcase deadlift
The suitcase deadlift is so-called because it’s the same technique you’d use to pick up a single bag at the airport. This awesome exercise teaches you how to maintain a neutral and stable spine while generating force with your legs.
Steps:
Place a kettlebell or dumbbell on the floor and then stand sideways on to it. The handle should run parallel to your feet.
Squat down and grab the handle with a neutral or palms-in grip.
Pull your shoulders down and back, brace your core, and look straight ahead.
Drive your feet into the floor and stand up straight, taking care not to lean sideways.
Lower the weight back to the flood and repeat.
Turn around and do the same number of reps on the opposite side.
Muscles targeted:
Obliques, rectus abdominus, erector spinae, gluteus maximus, hamstrings, forearms.
Benefits:
A high degree of crossover with activities outside of the gym.
An effective and functional anti-lateral flexion exercise.
An excellent deadlift assistance exercise.
Tips:
Use gym chalk or lifting straps to stop your hands from slipping.
Do this exercise in front of a mirror to ensure your torso, hips, and shoulders are straight.
Experiment with your stance width to see what works best for you.
Five Best Anti-Rotation Core Exercises
Anti-rotation exercises target your obliques. Having stronger obliques will help you prevent unwanted twisting during activities like running, kicking, and throwing. Anti-rotation is especially important during contralateral activities where you use one arm and the opposite leg, e.g., running.
1. Bird-dogs
Bird-dogs are one of the most basic anti-rotation exercises around. Ideal for beginners, this exercise teaches you how to stabilize your core as you move your arms and legs. Bird-dogs are also an excellent muscle activation exercise and are perfect for warm-ups.
Steps:
Kneel on all fours with your shoulders over your hands and your hips over your knees.
Brace your core and set your shoulders down and back.
Keeping your hips and shoulders level, extend your right arm and left leg.
Lower them back to the floor and repeat.
On completion of your set, swap sides and do the same number of reps with the opposite arm and leg. Or, if preferred, you can use an alternating arm and leg action.
Muscles targeted:
Obliques, rectus abdominis, gluteus maximus, hamstrings, deltoids, erector spinae.
Benefits:
An excellent exercise for lower back pain sufferers.
A great movement for beginners.
No equipment required, so ideal for home workouts.
Tips:
Kneel on a folded exercise mat for comfort.
Use ankle/wrist weights to make this exercise more challenging.
You can also do this exercise in a high plank position like this:
2. Pallof press
The Pallof press is one of the most widely-performed anti-rotation core exercises. Popular with almost every type of exerciser, it’s safe to say that this move delivers. If you’ve never done Pallof presses before, you are in for a treat, but if you’re already doing them, you should definitely continue!
Steps:
Attach a D-shaped handle to a cable machine set to mid-chest height.
Stand side-on to the pulley and hold the handle on both hands. Your feet should be about shoulder-width apart, with your knees slightly bent. Brace your core.
Pull your hands into your chest and step away from the machine to load the cable.
Without moving your hips or shoulders, extend your arms out in front of you. Feel how the tension on your muscles increases as you straighten your arms.
Bend your arms and return your hands to your chest.
Repeat for the required number of reps and then switch sides.
Muscles targeted:
Obliques, rectus abdominis, erector spinae, pectoralis major, deltoids, triceps,
Benefits:
An ideal exercise for beginners.
A very spine-friendly anti-core exercise.
Very scalable – just adjust the load to reflect your current strength.
Tips:
You can also do this exercise with a resistance band.
Vary the height of your arms to work your core from different angles.
Try doing Pallof presses in a half-kneeling position for variety, like this:
3. Single-leg Romanian deadlift
While regular Romanian deadlifts are an excellent anti-flexion exercise, switching to one leg/one arm means you’ll also have to work hard to prevent twisting. This exercise is also great for improving balance and stability and is ideal for runners and other athletes.
Steps:
Stand with your feet together and a dumbbell or kettlebell in your left hand. Shift your weight over onto your right foot. Brace your core and pull your shoulders back and down.
Hinge forward from your hips and lower the weight down the front of your leg. Extend your left leg out behind you for balance.
Stand back up and repeat.
Rest a moment and then do the same number of reps on the opposite leg, remembering to switch hands, too.
Muscles targeted:
Obliques, hamstrings, gluteus maximus, rectus abdominis, erector spinae.
Benefits:
A time-efficient way to train your core and lower body simultaneously.
An excellent exercise for better balance and coordination.
Easier on your lower back than two-legged Romanian deadlifts.
Tips:
Rest your non-working foot lightly on the floor for balance if needed, i.e., B-stance or kickstand RDLs.
Try holding the weight in the same hand rather than the opposite hand. This is considerably more demanding.
Do this exercise next to a wall or handrail for balance if required.
Related: Why the Single Leg Romanian Deadlift Deserves to Be the Hero of Your Workout
4. Renegade row
Renegade rows are among the most challenging anti-rotation exercises, even with light to moderate weights. However, if you’ve mastered Pallof presses and can do bird-dogs in your sleep, this is the exercise you’ve been waiting for!
Steps:
With a dumbbell in each hand, squat down, and place them on the floor.
Walk your feet out into the push-up position. Brace your core and tense your legs.
Bend one arm and row your dumbbell up and into your lower ribs.
Lower the weight back to the floor, switch arms, and repeat.
Alternate arms for the required number of reps.
Muscles targeted:
Obliques, rectus abdominus, latissimus dorsi, biceps, triceps, deltoids, erector spinae.
Benefits:
A total core exercise that teaches you to stabilize your core as you move your arms and legs.
A time-efficient conditioning exercise that burns lots of calories.
A challenging movement that’s ideal for intermediate and advanced exercisers.
Tips:
Wear a weighted vest to make this exercise even harder.
Use hexagonal dumbbells for increased stability and safety.
Combine renegade rows with push-ups for a complete upper-body and core workout:
Related: Renegade Rows Guide
5. Single-arm cable chest press
While the single-arm chest press is not an especially good exercise for your pecs, it is an excellent anti-rotation core exercise. It teaches you how to integrate your core with your upper and lower body.
Steps:
Attach a D-shaped handle to a chest-high cable machine. Hold the handle and turn your back on the machine so the cable runs outside your arm. Adopt a split stance for balance. Brace your core.
Keeping your hips and shoulders stationary, push your arm forward and out to full extension.
Bend your arm, bring the handle back to your chest, and repeat.
Switch sides and do the same number of reps with the other arm.
Muscles targeted:
Obliques, rectus abdominus, pectoralis major, deltoids, triceps, erector spinae.
Benefits:
A very lower back-friendly anti-rotation exercise.
Infinitely scalable by increasing or reducing the weight.
Suitable for beginner, intermediate, and advanced exercisers.
Tips:
Press up at an incline to change the feel of this exercise.
Do this exercise with your feet together to challenge your core and balance more.
Do this exercise with a resistance band or in a half-kneeling position:
Anti-Core Exercises – FAQs
Do you have a question about anti-core exercises? No problem, because we’ve got the answers!
1. How many reps and sets should I do?
There is no magic number of reps you should use to train your core. You will make progress whether you do 10 or 30 reps per set. That said, lower reps are generally more time-efficient, so it’s worth choosing exercises that are demanding enough to fatigue your muscles relatively quickly, e.g., between 12-20. Wherever possible, avoid very high-rep sets, e.g., 50.
In terms of sets, 3-5 should be sufficient for most people. If you can do more, the chances are that you a) aren’t getting close enough to failure or b) are resting too long between efforts.
2. How often should I do anti-core exercises?
It’s generally accepted that it takes 48-72 hours for a muscle or muscle group to recover from a workout. As such, you should aim to do anti-core exercises 2-3 times per week on non-consecutive days, e.g., Monday and Thursday, or Monday, Wednesday, and Friday. This provides a good balance between work and recovery.
Training your core more often, i.e., daily, won’t necessarily produce better results, and could even lead to overtraining.
3. Will anti-core exercises give me a six-pack?
While doing anti-core exercises will develop your six-pack muscle (the rectus abdominis) and other critical core muscles, you won’t be able to see them until your body fat percentage is low enough. This usually means under ten percent for men and 15 percent for women.
It’s true what they say – six-pack abs are made in the kitchen, and your diet will determine if your abs and core muscles are visible.
4. Are anti-core exercises safe?
Because they involve minimal movement, most anti-core exercises are very safe. As long as you brace and stabilize your spine correctly, there should be very little stress on your intervertebral discs or spinous ligaments, so many are even okay for folk who suffer from back pain.
That said, exercises that involve additional movements, e.g., suitcase deadlifts and single-arm overhead presses, are somewhat riskier than static exercises like planks and side planks.
However, if performed correctly and with appropriate loads, there is a very low risk of injury with most anti-core exercises.
5. Do I have to do anti-core exercises – aren’t regular core exercises enough?
While all core exercises are beneficial, anti-core exercises are often more functional. That’s because you often need to use these muscles to prevent unwanted movement of your lumbar spine, e.g., during deadlifts, push-ups, and overhead presses.
If your core is strong, you may not need to do a lot of anti-core training. However, if your lumbar spine lacks the stability it needs, then anti-core exercises are a must.
Wrapping Up
Whether you’re training for performance, aesthetics, or health, your workouts should include anti-core exercises. Anti-core exercises teach you how to stabilize your lumbar spine, which will protect you from lower back injury.
A more stable spine will also let you do more reps with heavier loads, making the rest of your workout more effective.
With 20 anti-core exercises to choose from, you have more than enough options to keep you busy and progressing for years to come. Include anti-core exercises in all your midsection workouts for best results.
References:
Hanson P, Nagle F. Isometric Exercise: Cardiovascular Responses in Normal and Cardiac Populations. Cardiol Clin. 1987 May;5(2):157-70. PMID: 2884033. https://pubmed.ncbi.nlm.nih.gov/2884033
10 Best Core Exercises For Beginners (Killer Workout Included)
Core exercises are like a tough-love friend; they push you to be your best self even though you sometimes hate them for it. You might grumble and groan through the workout and even experience an ab cramp during one of those dreaded crunches, but in the end, you can’t help but love the results they bring.
Besides improving your physique aesthetics, core exercises can help improve your overall strength, balance, and stability, which can boost your performance in functional exercises and daily activities.
Contrary to what most people think, all core exercises are not the same. Some core exercises are more complex than others. For example, the front lever, back lever, L-sits, and toes-to-bar are best left to advanced lifters.
Before you move on to advanced core exercises, you must build a solid foundation by drilling the more basic movements. The best core exercises for beginners are versatile exercises that can be included in various training regimens and programmed according to your goals.
In this article, we cover the best core exercises for beginners, an ab workout that will help you achieve a ripped six-pack, tips for making the most of your training regimen, and the benefits of training your core.
What are Core Exercises?
Whether you want to perform a crunch, handstand, deadlift, or clean and jerk, you need a solid core. In contrast to the prevailing view, your ‘core’ isn’t limited to your abdominal muscles. It also includes your lower back, hips, and pelvis. Since your core includes multiple muscles, you must perform different exercises in your core workout to train the target muscles from several angles for optimal results.
The exercises in this article help boost the strength, stability, and flexibility of the core muscles, which are essential for proper body mechanics, balance, and posture.
Core exercises can be done in all three planes of movement:
Frontal Plane: Dumbbell side bend and hyperextension oblique crunch
Saggital Plane: Crunch and hanging leg raise
Transverse Plane: Russian twist and windshield wiper
We will include exercises in all three planes to ensure overall core development. To make the core workout for beginners more accessible, we have only included bodyweight exercises. It also allows you to perform them anywhere.
10 Best Core Exercises For Beginners
These are the most effective core exercises for beginners:
Plank
The plank is one of the most popular core exercises. It is an isometric exercise that allows for optimal muscle contraction without visible movement. This exercise is a must-have in every ab training regimen.
Steps:
Lie face-down on the floor.
Your body should be in a straight line from head to heels throughout the exercise.
Position your elbows under your shoulders and your forearms parallel to each other.
Get up on your toes.
Hold this position for the recommended time while contracting your glutes and abs.
Pro Tip: You could also perform a high plank variation of this exercise, which is considered more challenging. The high plank variation involves staying in a push-up position.
Check out our complete plank guide here!
Side Plank
Obliques are often overlooked in an ab workout; however, we are not leaving any stone unturned in this article. The side planks are a frontal plane exercise that will work your obliques and the rectus abdominis muscle.
Steps:
Lie on your left side on an exercise mat.
Your legs should be stacked, and your right arm should rest on your side.
Plant your left elbow under your shoulder.
Brace your core and glute and drive your left elbow into the floor to lift your hips off the floor. Your body, from head to toe, should be in a straight line.
Hold this position for the recommended time.
Repeat on the other side.
Pro Tip: Make the exercise harder by performing hip dips while holding the plank. Ensure that you keep your shoulders pulled back and down throughout the exercise.
Check out our complete side plank guide here!
Sit-Up
The sit-up is a staple in most ab training workouts. It works your rectus abdominis muscle with a focus on the upper abs.
Steps:
Lie supine on the floor with your knees bent and feet planted flat on the floor.
Hold your hands in front of your chest or at the sides of your head.
Lift your upper back off the floor by driving your lower back and hips into the floor.
Your torso should be a few inches away from your quads at the top.
Slowly lower to the starting position.
Repeat for recommended reps.
Pro Tip: Avoid interlacing your fingers behind your head, as it can strain your neck. Keep your reps slow and controlled, and avoid using momentum during the concentric (upward) motion.
Reverse Crunch
The reverse crunch is an incredibly effective exercise for the more stubborn lower abs. It might look easy, but it will smoke your core in no time.
Steps:
Lie on your back on the floor. Bend your knees and plant your feet on the floor.
Extend your arms at your sides.
Lift your feet off the floor and bring your thighs to your chest.
Pause and contract your abs.
Return to the starting position.
Repeat for reps.
Pro Tip: Extend your legs at the bottom of the movement to bump up the intensity of this exercise.
Check out our complete reverse crunch guide here!
Dead Bug
The dead bug is one of the best core exercises for beginners. Getting into the dead bug is easy, and it helps achieve optimal core activation.
Steps:
Lie flat on the floor while facing the ceiling.
Extend your arms so they are perpendicular to your torso.
Lift your legs off the floor; your legs should be at a 90-degree angle.
Slowly extend your right arm overhead while extending your left leg. At the bottom of the movement, both should be a few inches from hitting the floor.
Return to the starting position.
Repeat on the other side.
Alternate between sides for the recommended reps.
Pro Tip: Make the exercise harder by using ankle weights and dumbbells. You could perform this exercise for reps or time.
Check out our complete dead bug guide here!
Hollow Hold
The hollow hold is a variation of the dead bug. It is excellent for building a rock-solid core, which will translate to better performance in functional movements. The hollow hold is one of the best core exercises for CrossFit beginners.
Steps:
Lie face up on the floor with your body in a straight line from head to toe.
Extend your arm overhead.
Brace your core and glute, and lift your head, upper back, and arms off the floor. Your arms should be at a 45-degree angle with the floor.
Simultaneously, lift your legs until your body resembles a “V.”
Hold this position for as long as possible.
Pro Tip: Holding your hands together makes the exercise a little easier. On the flip side, you can hold onto dumbbells or a weight plate to make it harder.
Check out our complete hollow hold guide here!
Superman
The Superman exercise is the mirror opposite of the hollow hold. This exercise targets your lower back and glutes and can help improve your mobility.
Steps:
Lie face down on the floor with your arms extended overhead.
Lift your head and chest off the floor so that your arms are a few inches off the floor.
Contract your core, glutes, and lower back, and lift your knees and thighs off the floor.
Hold the position for as long as possible.
Pro Tip: Maintain a neutral head throughout the exercise to avoid straining your neck. Lift your arms and legs as high as possible.
Check out our complete Superman guide here!
Russian Twist
The Russian twist works your core in the transverse plane. It will help develop your obliques and six-pack. After mastering the movement, hold onto a kettlebell, dumbbell, or weight plate for better muscle stimulation.
Steps:
Sit on the floor with your knees bent and feet flat on the ground.
Lean back so your torso forms a 45-degree angle with the floor, and lift your feet off the floor.
Extend your arms straight in front of you. Your palms should be over your knees.
Keeping your pelvis stable, turn to your right side.
Slowly return to the starting position.
Repeat on the left side.
Pro Tip: Perform this exercise on a decline bench for greater core engagement. Adjust the angle of the bench according to your experience level.
Check out our complete Russian Twist guide here!
Lying Leg Raise
This exercise works your middle and lower abs. Keep your knees locked out and pull your toes toward your torso while performing the lying leg raise for optimal lower ab engagement.
Steps:
Lie face up on the floor with your body in a straight line.
Keeping your knees locked, lift your legs toward the ceiling until they are perpendicular to the floor.
Slowly return to the starting position.
Repeat for reps.
Pro Tip: Place your hands under your hips for leverage. You could also perform this exercise on an elevated platform like a flat bench for an extended range of motion.
Check out our complete lying leg raise guide here!
Heel Tap
Think of heel taps as crunches for your obliques. Maintain a constant rep tempo on this exercise for optimal midriff engagement.
Steps:
Lie supine on the floor with your knees bent and your feet flat on the ground.
Your heels should be next to your hips.
Extend your arms at your sides.
Lift your shoulders, upper back, and head off the floor.
Turn to your right side and touch the side of your foot.
Return to the starting position.
Repeat on your left side.
Alternate between sides for recommended reps.
Pro Tip: Increase the distance between your hips and heels as you get better at this exercise. You could also aim for touching your toes instead of the side of your feet.
Check out our complete heel tap guide here!
Best Core Workout For Beginners
Now that you know about the best core exercises for beginners, it is time to put the knowledge to work. We have programmed these 10 beginner-friendly core exercises into a HIIT workout, which can be completed within 15 minutes.
High-intensity interval training (HIIT) workouts are incredibly effective at annihilating your midsection quickly and helping you achieve washboard abs.
In this workout, you’ll perform each exercise for 60 seconds. You are allowed a 30-second rest between exercises. Feel free to take a small breather (1-5 seconds) if you are unable to perform an exercise unbroken.
Tips To Maximize Core Workout Results
Here are a few tips to get the best bang for your buck from your core workouts:
If your goal is to build a diced midsection, you must also focus on your diet. Furthermore, you must enter a calorie deficit to shed excess body fat.
As you get better at these exercises, you can make them more challenging by adding resistance using weight plates, dumbbells, kettlebells, or resistance bands.
Breathing plays a vital role during core workouts. You must exhale sharply during the concentric part of the motion to achieve optimal core activation. Breathe in as you return to the starting position.
Spend 5-10 minutes warming up your core with light dynamic and static stretches to reduce the risk of muscle cramps.
It is common to experience ab cramps (especially for beginners) during ab workouts. Spend 5-10 seconds between sets rubbing down your abs to reduce the risk of cramping.
Benefits of Core Exercises For Beginners
Given below are the advantages of adding core exercises to your training regimen:
Aesthetics
Who are we kidding? Most people do the borning crunches because of the aesthetic benefits attached to them. A chiseled midsection makes you stand out and is one of the best indicators of physical fitness.
Improve Functionality
Most compound exercises like the squat, bench press, deadlift, and Olympic lifts require a strong core. Doing core exercises can improve your performance in the gym and daily activities. [1]
Boost Balance, Stability, and Flexibility
Core exercises can improve your balance, stability, and flexibility as it works your midsection, lower back, hips, and pelvis. Perform core exercises regularly for at least 12 weeks to start noticing the difference. [2]
Improves Posture and Reduces the Risk of Lower Back Pain
Folks that spend most of their days hunched over a computer or phone are at a higher risk of developing poor posture and lower back pain. Performing core exercises can strengthen your spine-supporting muscles, which can help improve your posture and lower the risk of lower back pain and injury during training.
Do Not Require Any Equipment
All the best core exercises for beginners in this article are bodyweight movements that can be done anywhere at your convenience. Plus, core exercises are incredibly versatile and can be squeezed into any workout.
Wrapping Up
Adding core workouts into your training regimen helps you achieve more than a carved midsection. It improves your balance and stability, boosts your overall functionality, promotes a better posture, and reduces your risk of lower back pain and injury.
This article covers the 10 best core exercises for beginners. Follow the 15-minute HIIT workout detailed above to set your midriff on fire in a short period. Pair these exercises and workout with a robust diet and recovery program to achieve a diced six-pack. Best of luck!
More Core Exercises and Workouts:
References
Okada, Tomoko; Huxel, Kellie C; Nesser, Thomas W. Relationship Between Core Stability, Functional Movement, and Performance. Journal of Strength and Conditioning Research 25(1):p 252-261, January 2011. | DOI: 10.1519/JSC.0b013e3181b22b3e
Manjusha K, Nithya Narayanan Kutty, Shilpa Chandran. The Effectiveness of Core Strength Training to Improve Functional Mobility and Balance in Geriatric Population: A Literature Review. Ortho Res Online J. 9(1). OPROJ. 000701. 2021. DOI: 10.31031/OPROJ.2021.09.000701
The Rock Shares Abs Workout for Building Strength & Gains
Dwayne ‘The Rock’ Johnson is one of the most popular names in the entertainment industry. He started out as an athlete before becoming a prolific actor who prides himself on his insane work ethic. In a recent post made on Instagram, Johnson shared a challenging abs workout to build strength and gain muscle.
The Rock grew up playing football with ambitions to make it big in the NFL. After missing the 1995 NFL draft, Johnson decided to follow in the footsteps of his father Rocky, and explore the world of professional wrestling. He joined the infamous WWF/WWE banner in 1996 and quickly established himself as a leading talent with his sharp wit and charismatic personality.
Johnson got signed to make his acting debut in The Mummy Returns (2001). Although he continued wrestling infrequently, Johnson switched to acting full-time following the role. His extraordinary discipline helped him find success in the new venture. He quickly gained over 377 million followers on the photo-sharing platform and racked up several blockbuster films under his belt.
His last appearance came in the DC comic book film adaption of Black Adam in Oct. 2022. Johnson gave fans a look into a brutal legs workout he used to get his quads ready for portraying the superhero one month before the release. Then, he joined forces with NFL standout Aaron Donald of the LA Rams for a tough back workout last October. They started the session by demolishing a taxing superset of one-arm dumbbell row.
The Rock offered a laborious workout finisher routine for leg day training sessions last November. He crushed five monster sets of four exercises that were to be performed without any rest in between. He followed up with another crazy leg workout using squat variations a few weeks later.
The 51-year-old has drawn allegations of steroid use due to his humongous build. UFC color commentator Joe Rogan called on Johnson to admit his alleged gear use after social media fitness influencer Liver King got exposed for lying about using steroids last December. Strongman icon Eddie Hall weighed in on the debate by theorizing Johnson was likely on TRT (testosterone replacement therapy) and argued in his favor.
Two months ago, The Rock provided a challenging upper body workout for maximizing pump. The workout routine targeted chest and back muscles by only using supersets. He continued to motivate his fans with another effective superset routine fit for building muscle on leg day. He gave another intense late-night superset workout session to feel the burn in lats last month.
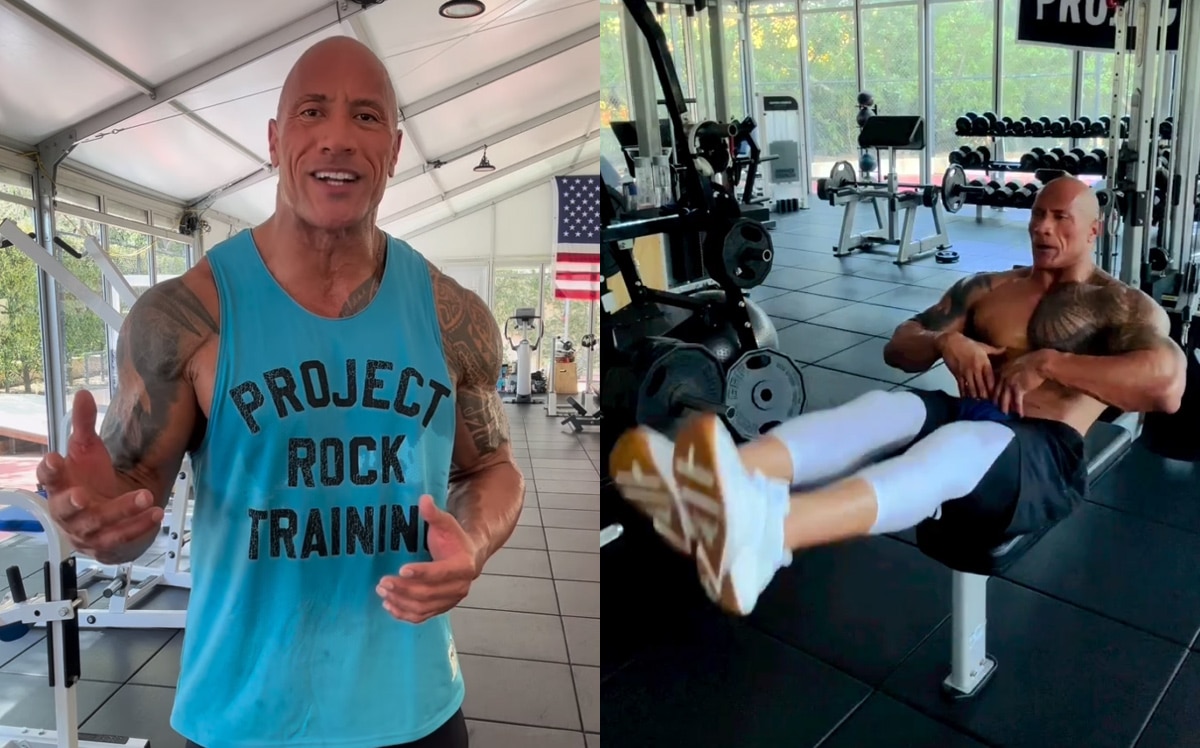
The Rock shares abs workout for building strength & gains
In a recent Instagram post, The Rock shared a tough abs workout to build core strength and muscle.
“i’m the last dude to give abdominal advice, but after I tore my abdomen wall during a wrestling match (fun pain) I had to really concentrate on ab exercises that strengthened my entire wall and core again ~ over the years I’ve found that a strong core/tight abdomen wall is super beneficial to your gains,” he wrote.
The Rock laid out a brutal chest and back workout last week. He stressed the importance of doing controlled movements and being careful about the range of motion to minimize stress on shoulders.
Given Johnson’s massive influence, his latest offering will certainly encourage fitness enthusiasts to get a stronger midsection.
Published: 3 May, 2023 | 12:30 AM EDT