Tag: exercise guide
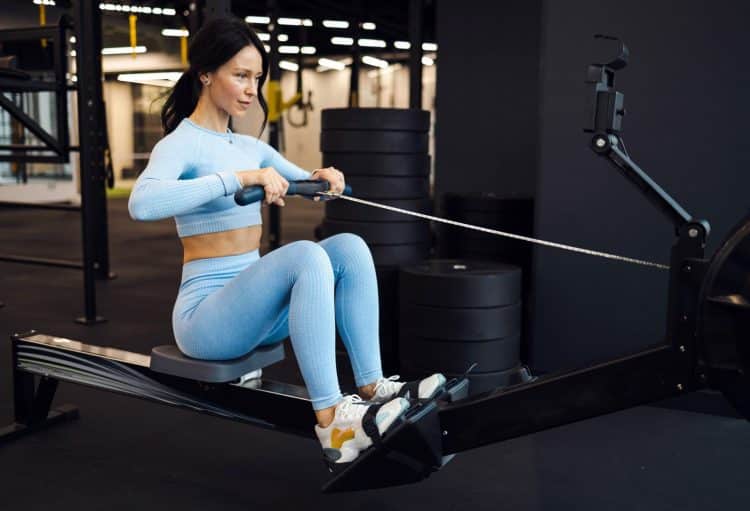
Rowing Machine Form Guide: Use The Rower To The Best Effect
There are plenty of options out there when it comes to getting a good cardio workout. As a personal trainer, I’ve tried them all. Yet after 30 years of training athletes, sports people, and everyday gym goers, I’ve settled on just one device — the rowing machine.
Rowing has a lot going for it. Besides working more than 80% of your muscles, it provides a joint-friendly way to get a great cardio workout. Your rowing workout, though, is only as effective as your form. Unless you learn how to do it right, you will develop poor habits that could lead to injuries. In this article, I’ll explain exactly what proper rowing machine form looks like. I’ll also cover the most frequent rowing machine form mistakes and address the most common rowing machine form questions.
Rowing Machine Benefits
Before we get into the specifics of how to row with proper form, let’s consider the benefits of rowing:
Full Body Training
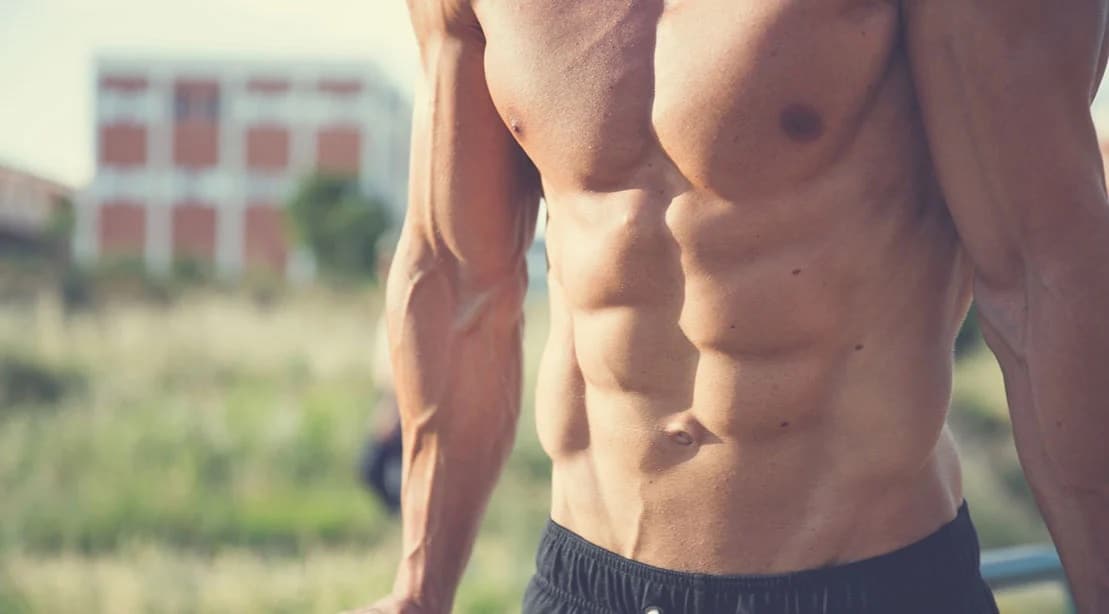
Lower body muscles are the main focus of most cardiac activities. This is because their primary workout movement is typically some variant of walking. These workouts effectively tone and strengthen the quads, hamstrings, glutes, and calves. However, the upper body gets very little stimulation.
Rowing is different, as 85% of your body’s muscles are used during a rowing workout. Besides the leg muscles, rowing engages the latissimus dorsi and trapezius muscles of the upper back, the deltoids, biceps, and core, as well as the muscles that run down either side of the spine.
Working out on a rowing machine won’t give you bodybuilder-like muscles but will strengthen your muscles. You can increase the rowing resistance if you want to employ more pulling power to complete the rowing motion. The strength and endurance of your muscles will increase by performing hundreds or even thousands of repetitions while rowing.
Joint Friendly Cardio
Rowing is a classic example of a closed-chain exercise. This is because your feet are always in contact with the foot platform. In contrast, most cardio exercises have an open chain, which causes the feet to rise and drop frequently. This results in recurrent foot strikes.
Since rowing is a closed chain movement, there is minimal impact pressure on the ankles, knees, and hips. Rowing also relieves the compressive pressure on the spine because it is a sitting workout.
Rowing not only lessens the strain on your joints but it also improves the health of those joints. In a 2014 study, 24 participants were followed for eight weeks as they exercised on rowing machines. Their knee, shoulder, and elbow joints’ capacity for rotation had increased by an astounding 30% on average by the time the trial was over. [1]
Calorie Burn
Rowing burns a whole lot of calories. Your heart and lungs have to work harder to deliver the nourishment required for those muscles to work since you are using both your upper and lower body muscles. Because of this, rowing is a fantastic option for those looking to lose weight.
For a 180-pound person, a 30-minute workout of moderate-intensity rowing will burn about 200 calories. They could easily burn more than twice as many calories if they increased their effort. You can regularly lose weight by combining a daily rowing program with a calorie-reduced, nutritious diet.
Cardio Workout
Rowing is an excellent cardiovascular workout. Since cardiovascular exercise is aerobic, oxygen must be consumed to fuel the activity. That oxygen and other nutrients are delivered to the working muscles through the bloodstream. Your cardiovascular system facilitates this process.
Your heart is the central organ in your cardiovascular system. The stronger it is, the more effectively it will pump the blood that delivers the nutrients to your cells. Rowing strengthens the heart so it can act as a more efficient pump.
Understanding the Rowing Machine
Rowing machines are designed to simulate the experience of rowing on the water. The parts of a rowing machine work together to enable the user to perform the four key movements that a rower performs:
Catch
Drive
Finish
Recovery
Here are nine rowing machine parts that you need to become familiar with:
Flywheel: The flywheel is the large wheel at the front of the machine. It is connected to the handle by a cable. When you pull on the cable, you create resistance. This may be air resistance through fab blades, magnetic resistance through magnets, or water resistance as the flywheel churns through the water.
Damper: Air and water resistance rowers usually feature a damper. This is a lever that controls the amount of air that gets to the fan. Most dampers will have settings from 1 to 10. The higher you set the damper, the more air flows to the fan. This makes the rower feel heavier and, therefore, more challenging to operate.
Footplates: The footplates are positioned where the rail meets the front housing of the machine. The best footplates pivot to allow for natural ankle motion while rowing. They should also be adjustable and feature sturdy foot straps to allow you to lock your feet in place securely. Getting the correct foot placement will help with proper rowing form. You won’t be able to drive as hard and risk lower back damage if your heel height is too low. Your stroke length will be constrained, and your form will deteriorate if your feet are too high in the footplate.
Seat: Many modern seats are ergonomically contoured for comfort. Others are molded, padded, or flat. You can increase your sitting comfort by sitting a few inches forward from the back of the seat and not leaning back excessively at the top of each rowing stroke.
Seat Rollers: Seat rollers sit on the underside of the seat, connecting it to the rail. High-quality rollers will allow for smooth movement up and down the rail.
Handle: The handle may be ergonomically contoured for comfort. It should be long enough to allow you to grip it out wide. The best handles will also have a center cut out to allow you to row one-handed.
Rail: The rail is the central part of the frame that the seat moves up and down. It may use aluminum or steel. The rail may also be parallel to the floor or slightly angled. Angled rails are more challenging because they offer more resistance.
Monitor: The monitor displays your key training data, including your time, strokes per minute, total strokes, calories burned, and heart rate.
Frame: The frame of a rower may be made of aluminum, steel, or wood. It should have a maximum user weight of at least 50 pounds heavier than the user. This will ensure the rower is sturdy and won’t move around during use.
Proper Body Positioning
The correct rowing form starts with your setup. Begin by sitting on the rower seat and putting your feet on the foot pedals. Adjust the footrests so they are aligned with your feet, and then secure the foot straps so you are locked in.
Sit upright with a naturally slight back arch and lean forward to grab the handles with an overhand grip. Hold the handles with a relaxed grip, avoiding squeezing too tightly.
Lean slightly forward while maintaining a neutral spine position and bending your knees slightly. Keep your shoulders relaxed and down. Finally, engage your core to activate your abs and lower back muscles.
Executing the Rowing Stroke
The rowing stroke has four distinct parts — catch, drive, finish, and return. Let’s break down each part with an explanation of its purpose.
The Catch
The catch is the portion of the stroke where you are most squeezed and tense at the beginning. Your arms are straight, your knees and hips are bent, your ankles are dorsiflexed, and you feel like there is nowhere for your stomach to go. In terms of rowing on the water, this is the portion of the stroke where your oar has just been lowered into the water, and you are about to push or drag the oar through the water to propel the boat.
The Drive
During this phase of the stroke, you push incredibly hard with your leg muscles to propel the oar through the water and propel the boat forward. It is what determines the numbers on the rowing machine’s LCD that displays your split time and indicate how much effort you are exerting. This is what accelerates you. It is the portion of the stroke where you put in all the effort, requiring a powerful leg push.
The Finish
The finish comes at the conclusion of the drive. This is the point where the oar emerges from the water. Your core is tight, your arms are bent, your knees are straight, and your hips are extended further than before. After completing the movement of the handle, you are prepared to bring it back to the front, or the catch, position.
The Recovery
You must go through the recovery portion of the rowing stroke to get from the finish back to the catch. It is called recovery because you get to rest (very briefly) and recover during this part.
Putting It All Together
Each of the four phases is covered with the following cue:
“Legs, core, arms … arms, core, legs”
Many people have a natural tendency to think “pull” when in the catch position. They want to pull with their arms when they should be pushing with their legs first. Your legs provide 60% of the force for the movement.
So, most of the work is being performed by your leg muscles, the largest in your body. However, if you pull with your arms first, your smaller, weaker arms do most of the work, producing much less force and efficiency. So, straighten your knees and push back through your feet rather than pulling with your arms first while using those bigger, stronger leg muscles. Your legs will straighten, and the seat will slide backward.
Once your legs are straight, you can begin to open up your hips by moving from a slightly forward-bent position to a slightly backward position. Keep your core tight as you bring your arms into the action.
By this time, your legs have already exerted so much force that the flywheel is turning very quickly, and you do not need to exert much force with your arms to bend your elbows and pull the handle close to your body. About 20% of the power for the rowing stroke comes from the arms.
The driving phase of the stroke was formed by the three motions (legs, core, and arms). You are now in the finish position when your legs are straight, your core is slightly leaned back to the 1 o’clock position, your elbows are bent, and the handle is close to your body.
You must go through the recovery phase to return to the catch position. To do this, you simply reverse the actions you’ve just performed, making it arms, core, and legs.
As soon as you are in the finish position, immediately push your hands away from you and straighten your elbows to allow the handle to pull your arms in front of you. This will be made easier with the help of the handle and chain recoil. When your elbows are straight, you close the hip angle, which causes your trunk to go from 1 to 11 o’clock. You must perform the leg component of the stroke in reverse once your core and trunk have reached that position. This will bring you back to the catch position.
You are now ready to start the stroke cycle over again.
Common Mistakes to Avoid
Here are the ten common mistakes that people make on the rowing machine and how to fix them:
1. Overgipping the Handle
You should grip the handle with a relaxed grip. There is no need to grab it tightly or overgrip with the wrists angled downward. Your fingers should be comfortable around the handle with your thumbs underneath. Your wrists should remain flat throughout the entire rowing stroke.
2. Leaning Forward in the Catch Position
People frequently slump forwards at the catch to reach further forwards. This results in the rounding of the upper and mid-back. This is not the best position for your shoulders or back. Instead, try sitting straighter-backed and more upright, but not so straight that your spine is overextended.
If your back is rounded with your arms far in front of you in the catch position, you will struggle to maintain contact with your body. That’s because you rely more on your ligaments and arms to start rowing than back and shoulders.
You want to be in the catch position with your back straight, hips still tilted forwards at 11 o’clock, core engaged, and lats (back shoulder) engaged. Pull your shoulders back and down to engage the lats.
3. Breaking the Arms at the Catch
Your arms should be as straight as possible in the catch position. This allows you to more effectively connect the handle to the power of your leg drive. So, avoid the tendency to bend the elbows in the catch; that will come as you move into the drive.
4. Chicken Wing Arms
Chicken wing arms occur when you stick your elbows out to the side in the finish position. This results in quite a lot of energy loss. Allowing the elbows to return past the body with relaxed rather than hunched shoulders is far more efficient.
5. Lunging at the Catch
It’s common to see people lunging their torso forward just before the catch position. This puts excessive strain on your lower back and could result in pulling a muscle in the mid-back. Establish the proper forward upper body lean during recovery before you bend your knees to avoid this tendency. Your shoulders should be in front of your hips before you move into the catch position. Do not deviate from this position.
6. Overreaching at the Catch
Avoid reaching too far toward the flywheel in the catch position. Doing so puts you in a weaker, compromised position. You want your torso to be in a 1 o’clock position, with your shoulders in front of the hips. Do not overextend the shoulders, keeping them down and relaxed.
7. Leaning Too Far Back in the Finish Position
Leaning too back in the finish position is the most common mistake I see among rookies. Doing so negatively affects your balance and stability, puts excessive strain on the lower back, and prevents you from adequately engaging the upper back, glutes, quads, and hamstrings.
In the finish position, your torso should be in the 1 o’clock position. Another cue is to look at the chain or belt that connects the handle to the flywheel. It should be parallel to the floor throughout the stroke, including in the finish position. You are leaning too far back if it is angled upward in the finish position.
8. Only Pushing Through the Heel in the Drive Position
Let’s now focus on what part of your foot you are pushing through in the drive position. In the catch position, many people lift the heel and push through the toes. That is perfectly fine, but as you transition into the drive, you must drop your heels to push through the entire foot — not just the heel or toe.
Some people find they can only push through the heel as they complete the drive position. This can result in your shin and toe muscles being overworked, which can also result in an injury.
9. Bending the Knees Too Early on the Recovery
If you bend your knees too early on the recovery, your arms have to row too high or follow an arcing movement. Maintain a parallel chain position throughout the entire stroke. Achieve this by extending the arms and allowing your body to swing naturally so that the hands and handle clear the knees before you bend your knees.
10. Rushing the Slide
If you try to move forward too quickly on the rail as you transition from recovery to catch, you won’t be able to establish a smooth rowing cadence. Allow time during the recovery phase to breathe, and ensure you’re in the proper position for the next drive.
Watch The Correct Technique for Rowing Machine Exercise:
Frequently Asked Questions
Why is the rowing technique important?
By learning proper technique, you will be able to avoid common rowing machine injuries, especially those relating to the lower back. You will also become a more efficient rower, able to burn more calories with less wasted effort and to row faster and in a way that engages more muscles.
What key cues should I think about when rowing?
Good rowing form can be distilled to a simple six-word cue — “legs, core, arms … arms, core, legs.”
You can follow the proper bodily sequence to achieve proper rowing form by repeating this cue to yourself.
What muscles does rowing work the most?
The main muscles worked when rowing are the glutes, quadriceps, hamstrings, upper back, lower back, and core. Rowing has been described as a horizontal deadlift repeated hundreds of times over.
Wrap Up
Rowing is one of the most effective forms of cardio you can do. It is also one of the safest, being extremely joint-friendly. However, the benefits you’ll get from rowing are only as good as your technique. Take the time to apply the technique guidance we’ve provided, avoid the 10 common rowing mistakes, and your rowing workouts will be far more productive, safe, and enjoyable.
References
Kang SR, Yu CH, Han KS, Kwon TK. Comparative analysis of basal physical fitness and muscle function in relation to muscle balance pattern using rowing machines. Biomed Mater Eng. 2014;24(6):2425-35. doi: 10.3233/BME-141056. PMID: 25226943.
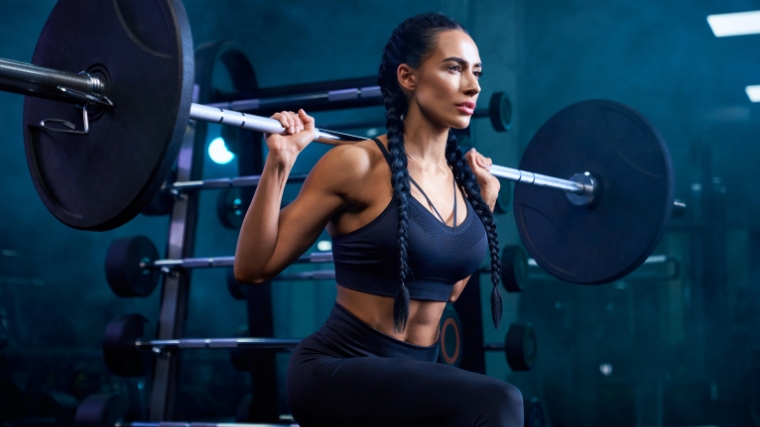
How to Do the Barbell Bulgarian Split Squat — Technique Tips, Variations, & More
Single-leg training is the embodiment of the “no pain, no gain” philosophy. Not only do unilateral exercises help reinforce good posture and improve your balance, they’re also devilishly effective at building muscle and strength. None, perhaps, more so than the barbell Bulgarian split squat.
The Bulgarian split squat is among the most high-value movements you can do for your glutes, quads, and core — and that’s before you even think about adding any extra resistance into the mix.
Credit: Serhii Bobyk / Shutterstock
Throw a loaded (or unloaded, even) barbell onto your back and you’ve got an all-in-one leg builder. However, the Bulgarian-style barbell split squat isn’t for the faint of heart; nor is it easy to perform. Here’s what you need to know about this exercise and, if you can stand it, what you stand to gain.
How to Do the Barbell Bulgarian Split Squat
It’s no secret; if you want to do the barbell Bulgarian squat, you’ll need a barbell. Additional weight plates are optional but will extend the utility of the exercise as you get stronger.
An elevated surface on which to rest your non-working leg is mandatory as well. A weight bench or plyometric box both work, but any stable knee-height surface will do.
Step 1 — Set Yourself Up
Credit: Sports Rehab Consulting / Youtube
Your best bet is to perform barbell-based split squats in a squat rack. Begin by unracking the barbell from the hooks as if you were going to perform a standard back or front squat. Take a few steps back and then lift and plant your non-working leg onto an elevated surface behind you.
Find your footing and stabilize your body. Grip the barbell tightly and contract your core. That’s the starting position.
Coach’s Tip: Taking a wide grip on the barbell might improve your balance.
Step 2 — Drop Your Hips
Credit: Sports Rehab Consulting / Youtube
From your starting position, descend into the squat by sitting down and slightly back with your hips. Allow your knee to travel freely in front of your toes if necessary. Sit down until the crease of your hip is lower than your kneecap, and then push forcefully into the floor with your working leg to return to the starting position.
Coach’s Tip: Fix your gaze on a point several feet away from you, close to the floor, to help maintain your balance as you move.
Barbell Bulgarian Split Squat Sets and Reps
When it comes to programming single-leg exercises, you should always be cognizant of the balance requirement before jumping into a heavy or high-repetition set. If you’re training to improve your balance, great — but there are other ways to program this movement as well.
To Improve Balance: Go for 2 sets of 15 to 20 reps with a light weight and a slow tempo.
For Muscle Growth: Try 3 or 4 sets of 8 to 10 reps with a moderate weight.
To Gain Leg Strength: Keep it heavy and do 3 to 5 sets of 4 to 6 reps.
Common Barbell Bulgarian Split Squat Mistakes
There’s a lot that can go awry during any single-leg exercise, and the barbell Bulgarian split squat is no exception. To do a proper split squat with the barbell, you need to steer clear of these mistakes.
Too Much Weight on Your Back Leg
The biggest mistake you can make during any single-legged squat is relying too heavily on your non-working leg. In a proper Bulgarian squat (whether you use a barbell or not), your non-working leg should do nothing more than help you suspend yourself in space.
80 to 90 percent of your body weight should rest on your working leg. Think of your off leg as a kickstand. Once you’ve established your setup, shift the bulk of your weight onto your working leg and keep it there for the entire set.
The placement of your working leg during barbell Bulgarian split squats will affect how you perform the exercise and what muscles do the majority of the work.
Credit: Prostock-studio / Shutterstock
If you plant your foot directly under your hips, you’ll need exceptional ankle mobility to sit down into a deep squat. This will tax your quadriceps more than your glutes and also make the exercise more difficult to balance.
On the other hand, stretch your foot out too far in front of your body and you’ll limit quad engagement in favor of more glute and adductor activation instead. This position will also require you to lean forward and stretch your groin.
You should, at first, aim for a happy medium between these two extremes. Once you’re comfortable with the groove of the split squat, you can inch your foot forward or backward a bit to bias certain muscles over others.
Shifting Your Gaze
If you’re having trouble steadying yourself during an exercise like the split squat, one of the worst things you can do is shift your gaze around during your set. Instead, your best bet is to fix your eyes on a specific point from start to finish.
Ideally, you should look forward and down. This will help keep your head aligned with the angle of your torso. Also, your point of focus should be at least five feet in front of you, but what matters most is that your eyes don’t go wandering.
Barbell Bulgarian Split Squat Variations
It may not look like the most versatile movement out there at a glance, but there’s a lot you can do with the barbell Bulgarian split squat. If you’re bored of the standard movement or want to adjust the stimulus, you can try out these variations.
Safety Bar Bulgarian Split Squat
If you have access to a safety bar in your gym, you might want to give it a go during the split squat. The safety bar adjusts the resistance such that it falls closer to your midline, which should make it easier to maintain your balance.
Safety bars also come with two ergonomic handles to hold onto, which can be highly useful if you can’t grasp a bar on your back due to inflexibility or injury.
Front Rack Bulgarian Split Squat
If you’re a true masochist, you can double down on the difficulty of a barbell split squat by holding it in the front rack position instead of across your back.
The front rack barbell split squat takes almost every aspect of the exercise up a notch. It challenges your upper back to a greater degree since the anterior load will constantly attempt to collapse your torso. It’s also harder to balance and asks more of your core.
The only potential downside is that you can’t use as much weight, but the exercise is challenging enough that you won’t need to in most cases.
Barbell Bulgarian Split Squat Alternatives
Heavy single-leg squats have a lot to offer, but the barbell Bulgarian split squats aren’t everyone’s cup of tea. If you like them in theory but don’t gel with them in practice, there are other ways to reap many of the same benefits. Try out some of these alternatives instead.
Assisted Dumbbell Bulgarian Split Squat
Holding a heavy dumbbell (or two) during your split squats works wonders if you don’t have access to a barbell. However, dumbbell Bulgarian squats can be just as challenging to balance.
If you want to stimulate your legs unilaterally for muscle growth and aren’t concerned with the “acrobatics” of the exercise, you can support your balance by holding a dowel or PVC pipe in your free hand. This provides another point of contact with the ground and makes balance an afterthought, allowing you to focus harder on squeezing your legs.
Barbell Step-Up
Step-ups work just as well for building your legs as any split squat, particularly if you’re willing to load them up with heavy weights.
One unique benefit of the barbell step-up is that you can fine-tune your desired range of motion by adjusting the height of whatever you’re stepping up on to. This can help you ensure you don’t push into a range of motion you aren’t comfortable with or get stuck in the bottom of a split squat with no way out.
Single-Leg Leg Press
Single-leg training may sound alluring but you might only be after some targeted muscular stimulation. In the event that balance and hip mobility aren’t concerns of yours, you can still train your legs one at a time by hopping onto the leg press station.
Single-leg leg presses enable you to overload your quads and glutes with no fear of losing your balance. You also don’t have to devote nearly as much energy to maintaining core stability and posture. This frees you up to focus entirely on taking your muscles to, or beyond, failure.
Muscles Worked by the Barbell Bulgarian Split Squat
To make the most of any exercise you perform in (or out of) the weight room, you should have a working knowledge of the muscles that make each rep possible. Here’s a short overview of the major muscles that contribute to the barbell Bulgarian split squat.
Quadriceps
Your quadriceps, or “quads,” sit on the front of your thighs and control the bending and extending of your knee During the barbell Bulgarian split squat, your quad engages to help you stand up and complete each repetition.
Credit: DmitryStock / Shutterstock
You can also shift more or less load onto or away from your quads by adjusting the distance of your foot relative to your torso. The further away your foot is from your body, the less forward knee movement you’ll have, generally speaking. This limits how much your quads can contribute to each repetition, but you won’t be able to take them out of the equation entirely.
Glutes
Single-legged squatting is among the most effective things you can do in the gym to target your gluteal muscles. Not only do your glutes have to contract to push you out of the bottom of each rep of the split squat, but the gluteus medius and minimus have a stability-focused role.
This makes the barbell Bulgarian split squat a two-for-one glute builder. You can use it to build glute strength and power, while also developing robust hip stability at the same time.
Core
Any movement that requires you use one limb at a time will involve the muscles of your core to some degree. During a movement like the barbell Bulgarian split squat, your body weight isn’t evenly distributed across your base of support.
This requires you to contract your abdominals and obliques isometrically to help stabilize your trunk not only against gravity but the added resistance of the barbell as well.
Benefits of the Barbell Bulgarian Split Squat
Single-leg squatting is among the most valuable things you can do during your leg workouts. From forcing new muscle hypertrophy to shoring up weaknesses, here’s what you stand to gain by adding in the barbell Bulgarian split squat.
Targeted Muscle Growth
When you go to train your arms, you probably don’t perform exclusively bilateral, two-armed exercises. Unilateral training helps you devote all your might to one muscle at a time; the same principle applies to leg training as well.
During back or front squats, your focus can easily shift away from the muscles you’re trying to work and toward simply pushing as hard as you can. While there’s nothing wrong with that, some single-leg work during which you give all your attention to your legs individually can do wonders.
Develops Hip Mobility and Strength
Working on one leg is one of the best ways to bulletproof your hips. Not only do the muscles surrounding your hips have to stabilize the joint as you descend and ascend through the split squat, but those tissues also have to prevent any errant side-to-side shifting as well. That added pelvic stability should carry over to other two-legged exercises as well.
Great Stimulus Without Lifting Heavy
Loading up a heavy barbell is one of the best parts of hitting the weight room, but ultra-heavy training isn’t for everyone. You may be tired, nursing an injury, or simply not have access to enough plates for a heavy squat workout.
Whatever the reason, you can get a brutally-effective workout in by swapping to single-leg training with the barbell Bulgarian split squat. The barbell itself may be enough, and every extra pound you add will be equal parts challenging and rewarding.
Who Should Do the Barbell Bulgarian Split Squat
If you have the guts — and a barbell, of course — you can take on the barbell Bulgarian split squat and reap the rewards. Beyond that, there are a few select groups that stand to benefit from this exercise in particular.
Beginners
If you’re taking your first steps on your fitness journey, a few of those steps should probably happen while you’re setting up for some sort of split squat. Unilateral training is a great way to set you up for long-term success in the gym.
Credit: MDV Edwards / Shutterstock
An exercise like the barbell Bulgarian split squat will help you improve your proprioception, or your bodily awareness in space. This carries over to every other exercise you perform. You’ll also build muscle and strength in the process, of course.
Strength Athletes
Strength athletes who practice powerlifting, weightlifting, strongman, or even CrossFit should consider adding the barbell Bulgarian split squat to their accessory repertoire. Most strength sports involve plenty of bilateral squatting but little to no movement or training on one leg.
Attacking aspects of your athleticism that aren’t covered by your sport will keep your workouts fresh, fun, and diverse. Furthermore, you can use exercises like the split squat as a screener to identify any weaknesses in your joint stability or leg strength that may impact your sport-specific performance.
Those Recovering from Injury
Single-legged movements are among the most commonly prescribed rehabilitative tools for soft tissue injuries. This is partly due to the fact that bilateral exercises (movements like the back squat, where you stand on both legs) can mask discrepancies in strength or stability. Or, your stronger side may pick up too much of the load, robbing the damaged area of proper stimulation.
Alternatively, the setup and execution of the barbell Bulgarian split squat naturally limits the amount of knee flexion. You also simply cannot move as much weight as during a two-legged squat. These factors have led some researchers to recommend split squats as a replacement for bilateral squats for those suffering from knee ailments. (1)
Credit: Manu Padilla / Shutterstock
That said, if you’re injured in any way, you should always consult with your physician or physical therapist before using any form of resistance training as a rehabilitative treatment.
Stand Your Ground
If you want to test your mettle in the weight room and build a pair of beastly wheels in the process, you need to swallow your pride and start doing the barbell Bulgarian split squat. You’d be shocked at how heavy an empty barbell can feel, but the gains are more than worth it.
FAQs
Still wondering if the barbell Bulgarian split squat is right for you? Check out some of these common questions to find the answers you seek.
Are split squats safe with a barbell?Absolutely. The barbell Bulgarian split squat may require a more intricate setup than working with just your own body weight or using dumbbells, but that doesn’t mean the exercise is unsafe.
That said, it’s not as easy to dump the weight and exit the set if you reach failure on this exercise. You may want to recruit a spotter to assist you from time to time, especially if you decide to go heavy.
What leg should I start with during barbell Bulgarian split squats?Generally speaking, during most unilateral movements you should start the set by working your non-dominant limb first. That leg is already working at a small disadvantage of strength or coordination; you don’t want to also be tired from working your stronger leg right before. Work your weaknesses while you’re fresh.
References
Mackey, E. R., & Riemann, B. L. (2021). Biomechanical Differences Between the Bulgarian Split-Squat and Back Squat. International journal of exercise science, 14(1), 533–543.
Featured Image: Serhii Bobyk / Shutterstock
Stronglifts 5×5 vs German Volume Training: Which is Best?
Stronglifts 5×5 vs German Volume Training: Which is Best?
So your training routine has become stale, you have plateaued, and your monstrous gains have stalled, so what do you do?
So do you keep plugging along with the same routine? As the saying goes, ‘if it ain’t broke…..’ but in this case not fixing it means you won’t be able to break the mold, and potentially add to your physique. So with that said, you need to change it up. But the question is, what kind of new routine should you try?
Today I am looking at two hypertrophy based routines: Stronglifts 5×5 program, and German Volume Training (GVT).
Stronglifts 5×5 programme:
This programme is designed to build muscle and strength and was used by the legendary Reg Park.
So How it works:
You only need to train 3 days a week, and you only perform 5 sets x 5 reps on each exercise, this is usually Monday/ Wednesday/ Friday (but can be alternated, but you will need at least a days rest between each session)
To ensure proper recovery, this program advises against training on consecutive days or doing two sessions in one day.
Workout options:
You will need to alternate between workout A and workout B, so workout A would be performed on Monday and workout B on Wednesday and then back to A on Friday.
Workout A. Workout B.
At the beginning of the program start with 50% of your 5 rep max and then add 5lbs/2.5kg of total weight to each exercise (each lift), and then progressively during each week keep doing this until you can’t get 5 reps on all 5 sets anymore.
If you happen to stall on an exercise and cannot perform 5 reps then take off 10% of the weight. This should help get your back on track for that particular session and the decrease in weight should only apply to that session only,, the next workout session should be back to your previous weight load.
This is a great beginner or even a great back to basics program, and it’s also a great program if you don’t have access to any fancy equipment.
This kind of workout is efficient as more muscle groups are being stimulated simultaneously, it is also more functional, it can burn more calories, and because compound movements create more muscle damage, it can lead to the increased levels of testosterone and Growth Hormone (GH).
It sounds like a winning formula to me, so now let’s have a look at German Volume Training.
German Volume Training (GVT) is designed to hit your larger muscle groups with intensity, and it is very simple in its execution: 10 sets x 10 reps.
The premise is that the 10 set method originated in Germany in the 70’s, and was used in the off season by weightlifters to help them gain lean mass, and the GVT method was cultivated further by Canadian weightlifter Jacques Demers.
So Why choose GVT:
This workout will help in maximising blood flow, as the muscles are hit using high volumes, and by repeatedly hitting the muscles with this kind of intensity it will allow for increased muscle hypertrophy.
The Workout:
Ten sets of ten reps, with the same weight for each exercise, so pick a weight which is suitable for that duration, so approximately 50-60% of your 1 Rep Max (1RM)
With a rest period of 60 seconds between sets
So if your 1RM for squat is 315lbs, your weight would be approximately 126-157lbs.
Due to the intensity of the workout one exercise per body part would be sufficient, in my workout plan below I have added some optional exercises too for those that can;t help themselves.
Also this workout should not be exceeded for more than 4 weeks as it could lead to injury.
Workout split:
Monday: Quads + Hams + upper abs
Tuesday: Rest
Wednesday: Chest + Biceps + lower abs
Thursday: Rest
Friday: Back + Triceps
Saturday: Shoulders + Calves + obliques
Sunday: Rest
Monday:
Quads: Front squats: 10 x 10 reps
Leg extension 3 x 10 reps (optional)
Hamstrings: Stiff leg deadlift: 10 x 10 reps
Lying leg curl 3 x 10 reps (optional)
Upper abs: weighted cable crunch 10 x 10 reps
Tuesday: rest
Wednesday:
Chest: DB flat bench press: 10 x 10 reps
DB flyes: 3 x 10 reps (optional)
Biceps: EZ bar curl: 10 x 10 reps
Lower abs: weighted knee raises 10 x 10 reps
Thursday: rest
Friday:
Back: single arm DB row 10 x 10 reps
Weighted pull ups: 3 x 10 reps (optional)
Triceps: lying down EZ bar French press 10 x 10 reps
Saturday:
Shoulders: clean and press 10 x 10 reps
Calves: Seated calf raises: 10 x 10 reps
Donkey calf raises: 10 x 10 reps (optional)
Oblique’s: weighted oblique crunch (with a plate or cables) 10 x 10 reps
Sunday: rest
As with 5 x 5 even though GVT isn’t all compound movements it is still a great regimen for building lean muscle, burning fat and increasing strength.
So which routine is better? A study from 2017 found ‘the 10 sets method, is no more effective than performing 5 sets per exercise for increasing muscle hypertrophy and strength’.
The study also goes on to state that ‘To maximize the training effects, 4–6 sets per resistance exercise is recommended as it appears that muscular hypertrophy will plateau beyond this range and may even regress due to overtraining’
So this would seem to suggest that 5 x 5 would be a more practical approach than GVT but not enough research has been done specifically on 5 x 5.
Conclusion:
So in conclusion 5×5 V GVT? Why not mix it up and combine the two? Such as 10 sets x 5 reps per exercise with a weight load similar to that of GVT, or go a bit heavier and attempt 5 sets of 10 reps, (with a rest pause if you start to fail).
The beauty here is that as long as it works there is no right or wrong routine.
References:
https://journals.lww.com/nsca-jscr/Fulltext/2017/11000/Effects_of_a_Modified_German_Volume_Training.21.aspx
https://pubmed.ncbi.nlm.nih.gov/27102172/
https://pubmed.ncbi.nlm.nih.gov/25932981/
https://pubmed.ncbi.nlm.nih.gov/24732784/
https://www.ncbi.nlm.nih.gov/pmc/articles/PMC5969184/
https://www.ncbi.nlm.nih.gov/pmc/articles/PMC6303131/
https://www.mdpi.com/2075-4663/6/1/7/htm
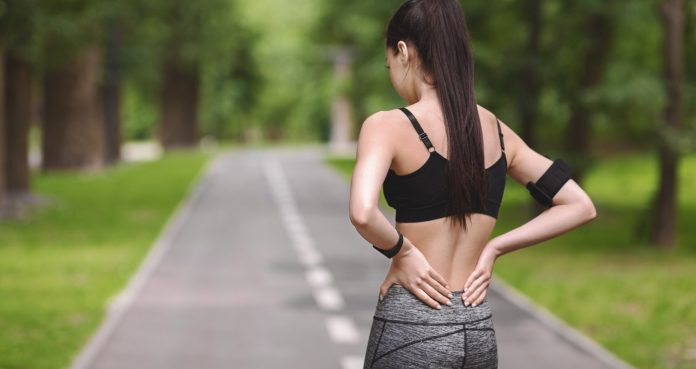
Good Exercises For Lower Back Pain Alleviation & Support
Don’t let lower back pain stop you in your tracks and keep you from seeing big gains.
Lower back pain plagues us all. That uncomfortable feeling of rolling out of bed and suffering through the stiffness and pain throughout the day. There are simple and convenient ways to strengthen your lower back without succumbing to one more day of lower back pain.
Work to help yourself get better with these great exercises because you have the power to change your posture and ability to lift big for the better. All it takes is the will to make this much needed change.
The back is without a doubt one of the most important parts of your body. More confidence in the gym, in your everyday life, and in yourself can enhance your gains and keep you seeing those goals you desire most come to fruition without back pain. Any big lift requires good stability and these workouts can get you there so you look and feel great.
While it is imperative to train your whole back in order to help support the spine, strengthening the lower back is going to offer an extra level of spinal support while also keeping your hip flexors and core in great shape. This will aid in not only overall daily functioning, but also those big lifts so you start seeing huge personal records and outlift others in competition without low back pain and sore back muscles.
Lower back pain is hard to exactly pinpoint and can be caused by a host of things from improper form, strenuous activity, or muscle strain. These lower back exercises are great for strengthening and maintaining a good, solid lower back to keep you feeling great, looking great, and thriving in and out of the gym with strong core muscles keeping your lift moving.
Squats
Many associate the squat with simply the legs. But the lower back is the most targeted area during a squat and without proper strength and correct form, your lower back can suffer greatly.
Starting light with squats and gradually building to heavier weights is a great way to strengthen and maintain the lower back in order to see those gains. As a staple in the big three powerlifts, squats are great for seeing huge growth in the lower body while also promoting a solid core. With a more engaged and stable core, your low back will take less of a load, thus decreasing unwanted pain and strain and lower back pain.
How to: Start with a wide stance and have your feet shoulder width apart. Squeezing your core to maintain a flat back, sit back as if a chair is under you. Your feet should be flat on the ground with your knees behind your toes. Be sure to keep your chest up and head facing front.
Bridges
Bridges are often seen as a warm-up exercise, but the benefits of a bridge far outweigh the common misconception surrounding them. Too often we sit hunched at our desks and bridges can help strengthen not just the lower back, but the entire back.
For those looking to lift heavy and be more explosive, bridges can aid in these movements and support your workout endurance. They provide for a great stretch as well to really elongate the spine and feel longer. Opening up your spine with an exercise like this can also promote better breathing and posture and really work to aid in those big lifts and more advanced workouts without lower back pain.
How to: Lie flat on your back with your knees up. Pushing your hips off the ground, keep your arms and head relaxed down while lifting your chest. Gently lower your hips to release to the initial position and take strain off the low back.
Knee-to-Chest
While primarily a stretch, the knee-to-chest workout will increase your range of motion allowing that stiffness to be released. Whether done as a double- or single-legged exercise, this is a great warm-up or mid workout stretch. This can work to loosen up any tight muscle and really work to alleviate pain that occurs in the low back.
How to: For the single-leg, lie on your back flat on the ground with your feet on the floor and knees bent up. Raise one knee and interlace your fingers underneath. Pull the bent knee to chest, pause for a moment, then return to the floor. The same premise follows with the double-leg except lift both knees off the ground and gently pull towards your body for back pain relief.
Lying Lateral Leg Lifts
Lying lateral leg lifts will help work the hip abductor muscles used to support the pelvis and reduce unwanted strain on the lower back. This will help with balance as well as mobility and provide for a more stable core. A more stable abdominal center means less back strain and a more solid low back to aid in any big lift or serious workout and relieve pain.
How to: Lie on one side of your body with your legs together, avoiding your hands and knees. Keeping the lower leg slightly bent, raise the top leg while keeping it straight. It is important to engage the ab muscles. Hold at the top and gently lower back down. Turning onto your other side, you can repeat these steps for the other leg for back pain relief which may help it go away as this exercise helps with that for your muscles and spine.
Supermans
With Supermans, the lower back and glutes are primarily involved giving those lower back muscles the opportunity to work. Although a simple exercise, it allows you to build fundamental skills for more advanced workouts. This is also a great ab workout so you can start to see that desired physique take effect. With a solid low back and rocking core, your aesthetic and support base are seriously enhanced and ready to relieve pain in all body parts like your back and legs.
How to: Lie face down on the ground and stretch both arms out front. At the same time, raise both your hands and feet off the ground about six inches. Engage your abdominals while keeping your head straight down at the floor. Hold for a brief pause and lower back to the ground gently for pain relief from your muscles, spine and arms.
Side Plank
A good side plank can help strengthen the muscles of your lower back. While also working your core, the side plank improves stability and offers the benefit of a solid lower back. Working those obliques is a great way to get that V-shape we all desire with the added benefit of helping yourself see great gains in alleviating low back pain.
How to: This can be done on either your elbow or with your hand on the floor and arm stretched out. Choose a side and lie on the ground. Tightening your core, raise your hips so your body forms a line from your feet to your shoulder. You can place your free hand either on your hip or extended in the air. Hold for as long as you’d like in a straight line and gently lower to the ground. The same steps apply for the other side for pain relief and strengthen more core muscles and abdominal muscles.
Wrap Up
While lower back pain can be debilitating in all facets of life, don’t let it take you down. Give these lower back exercises a try and you will see significant progress with how you feel with stronger abdominal muscles and less low back pain to help relieve pain and tension. Don’t let neglect and poor movement hurt your gains and really work to help your back and overall body stay upright and with good posture. You have the power to change the way your back feels and these exercises will help greatly in your quest for increased confidence and a better overall quality lift. Try these exercises today to see how they can help you.
Let us know how these exercises are in the comments below. Also, be sure to follow Generation Iron on Facebook, Twitter, and Instagram.
*Images courtesy of Envato
How Exercise Improves Your Dating Experience
There are many ways that exercise can improve aspects of life!
Nowadays, you see endless posts about how you should be happy before you start exercising or how weight loss won’t make you any happier. There’s definitely truth to of this. I think you should be fulfilled and happy to a degree before embarking on any fitness journey and dating.
However, many people find romance valuable and that area of their life is undoubtedly improved from exercise. No matter how much we tell people exercise is for health, their true intent is to look hot naked.
People don’t care that much if their doctor gives them a pat on the back for healthy bloodwork. They care if they can get laid and attract the opposite sex.
So it’s no surprise as a coach that many people seek exercise to look better and thus, improve their dating experience. In fact, many of my single clients who start exercising and improve their physiques often rave about their dating life improving. I don’t think there’s anything inherently wrong with that.
So if you somehow needed more convincing, here’s 4 reasons how exercise will improve your dating experience and get you dates on repeat.
1 – You’ll Look Better
Let’s address the elephant in the room first. People who exercise generally look better than people who don’t. While romance is not entirely physical, initial attraction and how we subconsciously treat people is largely based on appearance.
And sure, we all find different things attractive, but by and large, most people are attracted to a bit more muscle and a bit less fat which exercising helps with both, particularly strength training.
You know that you judge dates based on appearance often, so it’s only logical that you would want to put your best foot forward, or in this case, your best body forward.
This is within both male and female biology. Our brain assesses people based on appearance to make conclusions on their health and reproductive capabilities.
Men will pick women who are generally fitter because her physique communicates she’s more able to bare his children. Vice versa as well. Women will pick men who are generally fitter because his body communicates he can protect and defend said children.
Let me be clear here before I get skewered. I’m not saying looks are all that matters, but it’s one powerful way to increase your buying power as far as the dating world goes. Any politically correct fitness coach who says otherwise is speaking from a position of privilege. They say one thing, but would never switch their fit body for a less aesthetic one.
2 – You’ll Feel Better
Exercising undoubtedly makes you feel better. When you feel better, you’re more positive, confident, and healthy. Oh wait, those are all qualities that skyrockets your dating value.
So the value in exercising isn’t simply from the exterior change, but also internally. In fact, even if you exercised consistently for months and months and still see no physical changes, there is still much value.
You’re still getting healthier and your confidence would be far higher than if you didn’t exercise. Negative people who complain about their lives generally don’t exercise or at least not as much.
The personality qualities you are attracted to can be developed and nurtured through exercise. Women feeling more secure in their bodies and men feeling the confidence they need to approach women. That’s a recipe for romantic awesomeness if you ask me.
3 – You Communicate Desirable Qualities
Working out is like saving money. People who do it probably have their lives together. It’s obviously not a guarantee, but in our fast-paced world, we need to make conclusions in dating fast.
You don’t like your time being wasted, so you’re generalizing qualities about a person based on their habits. But guess what?
They’re doing the same about you, so if you want a leg up on the competition, exercise regularly, so it at least appears that you have your crap together.
And I get it exercising and grinding through weights to build muscle is hard. But having scarce dating candidates is hard too. By developing a consistent training schedule, you’re communicating discipline, delayed gratification, and responsibility which are hot characteristics.
In fact, one published study titled, “Does Exercise Make Me More Attractive? Exploring the Relations Between Exercise and Mate Value,” found more frequent exercisers had a higher perceived mate value than less frequent exercisers, independent of sex (1).
4 – Meet Other Like-Minded People
Now that you’re all steamy and confident, what’s next? Well, you can meet like minded people at the gym. It’s not too uncommon to meet and connect with like-minded individuals at the gym.
According to Canoodle.com, 62% of singles think the gym is a good place to find love and 75% of people would rather meet at the gym than at a bar.
The quality of candidates is inherently better at the gym. Everyone there is putting in the effort to get hotter, healthier, and get out of the house. Pretty attractive right?
Furthermore, it’s not uncommon for people to meet in group exercise classes, basketball courts, or the sauna.
And research often finds couples who train together often stay together, so the gym is an easy way to enhance your dating life. Get out there my friend.
References
1. Dobersek, Urska, et al. “Does Exercise Make Me More Attractive? Exploring the Relations between Exercise and Mate Value – Evolutionary Psychological Science.” SpringerLink, Springer International Publishing, 13 Nov. 2020, https://link.springer.com/article/10.1007/s40806-020-00270-w.
For more news and updates, follow Generation Iron on Facebook, Twitter, and Instagram.
Back At It: Top 3 Back Exercises For Beginners
Here are some of the elite back workouts for beginners to try!
So you are the newbie in the gym, and the back can be quite a complex muscle to understand and train. And just because you can’t see your back in the mirror doesn’t mean you should ignore it.
A good muscular back will give your physique a wide and powerful look, and it will also give you the illusion of having a smaller waist.
So how do you build a strong V shape back? Well I am going to detail my top 3 back exercises that will hit your lats, middle and lower back.
Middle Back (Rhomboids)
The middle back is attached to the lats around the shoulder blade region and is involved in moving and stabilizing the shoulder blades, as well as helping the lats move the arms.
Exercise 1
Seated one arm cable row:
To get into the starting position, first sit down on the machine and place your feet on the front platform provided, making sure that your knees are slightly bent and not locked.
Lean over as you keep the natural alignment of your back and grab the single handle attachment with your left arm using a palms-down grip.
With your arm extended pull back until your torso is at a 90-degree angle from your legs.
Your back should be slightly arched and your chest should be sticking out.
You should be feeling a nice stretch on your lat as you hold the bar in front of you.
The right arm can be kept by the waist, and this can be the starting position of the exercise.
Keeping the torso stationary, pull the handles back towards your torso while keeping the arms close to it as you rotate the wrist, so that by the time your hand is by your abdominals it is in a neutral position (palms facing the torso).
Breathe out as you perform that movement.
At that point you should be squeezing your back muscles hard.
Hold that contraction for a second and slowly go back to the original position while breathing in.
Repeat for number of sets and reps below
Number of sets: 3
Number of reps per set: 12-15
The reason I’ve selected cables instead of a single arm dumbbell row is to ensure that you control the positive and negative parts of the movement.
Lats (Latissimus Dorsi)
The lats are located right under the armpits and stretch down attaching to the waist. Their function is to bring the arms down and backward.
Exercise 2
Close grip lat pulldown:
Sit down on a pull-down machine with a wide bar attached to the top pulley.
Make sure that you adjust the knee pad of the machine to fit your height.
These pads will prevent your body from being raised by the resistance attached to the bar.
Grab the bar with the palms facing forward using the prescribed grip.
Note regarding hand positioning.
Wide: For a wide grip, your hands need to be spaced out at a distance wider than your shoulder width.
Medium: For a medium grip, your hands need to be spaced out at a distance equal to your shoulder width
Close: For a close grip, your hands need be at a distance smaller than your shoulder width.
As you have both arms extended in front of you – while holding the bar at the chosen grip width
Bring your torso back around 30 degrees or so while creating a curvature on your lower back and sticking your chest out, this is your starting position.
As you breathe out, bring the bar down until it touches your upper chest by drawing the shoulders and the upper arms down and back.
Repeat for number of sets and reps below
Number of sets: 3
Number of reps per set: 12-15
Again I’ve selected cables and not body weight/ weighted pull ups is to ensure correct form, and to ensure that positive an negative parts of the movement are controlled
Now the next exercise doesn’t involve cables but many people seem to neglect the lower back, one of my favourites is the rack pull.
Lower Back (Erector Spinae)
The erector spinae, is a group of muscles that originate that extend vertically along the length of the back. They lie on each side of the vertebral column and extend alongside the lumbar and spine, and thus helps protect the spine.
Exercise 3
Rack pulls:
Set up in a power rack with the bar on the pins.
The pins should be set to the desired point; just below the knees, just above, or in the mid thigh position.
Position yourself against the bar in a proper deadlifting position.
Your feet should be under your hips, your grip shoulder width, back arched, and hips back to engage the hamstrings.
Since the weight is typically heavy, you may use a mixed grip, a hook grip, or use straps to aid in holding the weight.
With your head looking forward, extend through the hips and knees, pulling the weight up and back until lockout.
Be sure to pull your shoulders back as you complete the movement.
Return the weight to the pins and repeat.
Repeat for number of sets and reps below
Number of sets: 3
Number of reps per set: 8-10
So there you have it, a very quick look at the back that will definitely help if you are a newbie, but there is definitely a lot more to cover on the back but I will save that for another more extensive time.
So start incorporating these exercises and your back will certainly start getting more attention
Until next time, keep pumping!

Top 8 Tips for a Tip Top Chest for Beginners
Here are some tips on how to build a bigger chest!
If you are new to the gym it can be quite daunting, where do you even start? Well let’s start by looking at the chest muscle, how do you build a monster chest?
Well to really build muscle mass and induce muscle hypertrophy it is all about incorporating multi joint exercises into your chest routine.
The chest is best stimulated, and developed, when it is fully stretched and flexed and targeted through movements designed to maximize development.
For example, the upper chest is best stimulated from exercises done on a 30-45% incline bench, the middle chest is best stimulated from exercises done on a flat bench and the lower chest is best stimulated from exercises done on a 30-45% decline bench.
The exercises below will ensure that each part of your chest is targeted.
1. Wide Grip Flat Bench Press (barbell)
Lie back on a flat bench with feet firm on the floor.
Using a wide grip, with your palms facing forward and grip that is approx 3 inches away from shoulder width
Lift the bar from the rack and hold it straight over you with your arms locked.
The bar will be perpendicular to the torso and the floor
As you breathe in, come down slowly until you feel the bar on your middle chest.
After a second pause, bring the bar back to the starting position as you breathe out and push the bar using your chest muscles.
Lock your arms and squeeze your chest in the contracted position, hold for a second and then start coming down slowly again.
2. Incline DB Press
Lie back on an incline bench with a dumbbell in each hand atop your thighs.
Ensure that the palms of your hands will be facing each other.
Then, using your thighs to help push the dumbbells up, lift the dumbbells one at a time so that you can hold them at shoulder width.
Once you have the dumbbells raised to shoulder width, rotate your wrists forward so that the palms of your hands are facing away from you.
Be sure to keep full control of the dumbbells at all times. Then breathe out and push the dumbbells up with your chest.
Lock your arms at the top, hold for a second, and then start slowly lowering the weight.
3. Heavy Pec Deck
Sit on the machine with your back flat on the pad.
Take hold of the handles.
Your upper arms should be positioned parallel to the floor; adjust the machine accordingly
Push the handles together slowly as you squeeze your chest in the middle.
Breathe out during this part of the motion and hold the contraction for a second.
Return back to the starting position slowly as you inhale until your chest muscles are fully stretched.
4. Heavy Dips
For this exercise you will need access to parallel bars.
Get yourself into the starting position, hold your body at arms length above the bars.
While breathing in, lower yourself slowly with your torso leaning forward around 30 degrees or so and your elbows flared out slightly until you feel a slight stretch in the chest.
Once you feel the stretch, use your chest to bring your body back to the starting position as you breathe out.
Make sure you squeeze the chest at the top of the movement for a second.
5. Incline DB Flyes
Lie on an incline bench that is set to an incline angle of no more than 30 degrees
Holding the dumbbells in each hand extend your arms above you with a slight bend at the elbows.
Now rotate the wrists so that the palms of your hands are facing you
Slowly lower the arms to the side while keeping the arms extended and while rotating the wrists until the palms of the hand are facing each other
As you exhale start to bring the dumbbells back up to the starting position by reversing the motion and rotating the hands
6. Decline DB Bench Press
Position yourself into a decline bench press.
Once you are laying down, move the dumbbells in front of you at shoulder width.
Ensure the palms of your hands are facing away from you.
Bring down the weights slowly to your side as you breathe out and keep full control of the dumbbells at all times.
As you breathe out, push the dumbbells up using your pectoral muscles.
Lock your arms in the contracted position, squeeze your chest, hold for a second and then start coming down slowly.
7. Bent Arm DB Pullover
Place a dumbbell standing up on a flat bench.
Then lie perpendicular to the bench (torso across it as in forming a cross) with only your shoulders lying on the surface.
Hips should be below the bench and legs bent with feet firmly on the floor, your head will be off the bench as well.
Grasp the dumbbell with both hands and hold it straight over your chest with a bend in your arms.
Both palms should be pressing against the underside of the dumbbell.
While keeping your arms locked in the bent arm position, lower the weight slowly in an arc behind your head while breathing in until you feel a stretch on the chest.
At that point, bring the dumbbell back to the starting position using the arc through which the weight was lowered and exhale as you perform this movement.
Hold the weight on the initial position for a second
8. Cable crossover
Place the pulleys in a high position (above your head), select the resistance to be used and hold the pulleys in each hand.
Step forward in front of an imaginary straight line between both pulleys while pulling your arms together in front of you.
Your torso should have a small forward bend from the waist.
With a slight bend on your elbows, extend your arms to the side (straight out at both sides) in a wide arc until you feel a stretch on your chest.
Then return your arms back to the starting position as you breathe out.
There you have it, these exercises will get all you beginners on the right road to building a rock solid chest!
So until next time, keep pumping!
Mehmet Edip is a fitness writer, actor, and model who has worked in the industry for over 8 years. He focuses on achieving his physique through an all natural plant-based diet and shares his insight via his workout & nutrition guides.
How to Add Inches To Your Guns
Here is how to add some size to your arms.
How do you make your arms bigger? Well there is obviously one simple answer to this, and that is to shop one size smaller…
All kidding aside, good arms can really make a physique pop and make everyone take notice
So what is the secret?
Well the secret to getting big is muscular hypertrophy, and that essentially means an increase in muscle mass. And this muscle mass is built by overcoming an external force ie – weights, it is really that simple.
Now let’s take a moment to look at the arms in particular which is a combination of the biceps and triceps.
The Biceps (biceps brachii):
The biceps consists of two heads (as per the name suggest), there is a ‘long head’ and a ‘short head’, and they work as a singular muscle and they are responsible for arm flexion.
The Triceps:
The triceps consists of three heads, again as per the name suggests. It has a long, head, lateral and medial heads, and is responsible for elbow extension.
So what exercises will help me achieve muscle hypertrophy?
Biceps:
Here is a rundown of some great exercises to give you that bicep peak bulging
21’s (curls):
The number “21” refers to the number of total reps you do in one set, but the “21” is also divided into three 7-rep segments that ultimately target the entire bicep.
1st 7 reps: For the first seven reps, go from the bottom of the movement up to the halfway point (with your arms at a 90 degree angle and hands at elbow level)
2nd 7 reps: Go from the halfway point up to the top of the bicep curl (hands up near shoulder level.
3rd 7 reps: Start at the bottom of the movement and complete a full range of movement all the way up
How To Perform 21s Bicep Barbell Curls
Stand upright and grab a barbell with an underhand grip.
Place your hands shoulders width apart and allow your arms to hang toward the floor.
Tuck your elbows tight to the sides of your body.
Curl upward until you make a 90-degree angle at your elbow.
Bring your arms back to full extension and repeat six more curls reaching the 90-degree angle at your elbow.
Now, from the 90-degree at your elbow position, curl the weight up until the barbell is one to two inches away from your shoulder.
Lower the weight back to the 90-degree elbow position and repeat six more times.
Now, allow your arms to return to full extension.
This time, curl your arms all the way to full extension.
Keep curling until the bar is about one to two inches away from your shoulder.
Repeat six more curls through this full range of motion to complete a total of 21 curls.
Kettlebell Curl – as the name suggests either using a kettlebell in each hand, curl as you would do with dumbbells or using a heavier kettlebell curl using both hands.
Concentration Curls
Sit on a bench with desired weight
Then lean forward and place your elbow to the base of your knee
You will be curling one are at a time
Palms facing upwards
Let the dumbbell hang towards your foot
Then curl up towards your shoulder while ensuring the elbow does not move
Bring the weight back down and repeat accordingly
Clairemont curls
Start in a similar position as you would do with seated dumbbell curls
Ensure the bench is slightly inclined
Grab the dumbbells and lean back
Then curl the weight, instead of down and up, you arms will be curling out wide and up
During the movement ensure your body does not move forward or cheats
Ensure the elbows stay tight and don’t flare out during the movement
Repeat reps accordingly
Spider Curl – using the flat part of an arm curl/ preacher curl bench. Grab your barbell or dumbbell, with palms facing upwards, bring the weight down while the elbow and triceps stay tight and close to the flat part of the bench. Fully extend then slowly contract back upwards.
Waiter curls
Grab one dumbbell, and cup it with both hands
Palms facing upwards
Ensure hands are either side of the handle
Start with the dumbbell hanging low
Then slowly curl the dumbbell using both arms towards your chest while keeping the elbows tight to the body
To ensure maximum bicep contraction try to push using your palms and not your fingers
Bring the weight back down and repeat accordingly
Triceps:
Here is a rundown of some great exercises to get your tricep horseshoe to pop
Weighted Dips – add weights to your body via a dipping belt, weighted vest or by holding dumbbells in between your legs
Closed grip bench press – similar to bench to hit the chest, this time being the grip closer to ensure that the triceps are taxed instead of the chest
Weighted bench dips – get yourself in between two benches, hands on one and feet on the other, and get someone to add weight to your legs. Then dip while keeping the weights balanced on your legs
Skull Crushers – lying down on a bench, bring the weight towards your head and then extend upwards to flex the tricep.
Body Weight Skull Crusher
Either set up a smith machine or use the fixed barbells or similar on a rack
Grab the bar with an overhand grip and ensure with a shoulder width stance
Ensure the rest of the body is rigid
Then lower your body down below bringing your head just below the bar
Then use your triceps to extend back up
Repeat again as required
Cable Skull Crushers
Set a bench next to a cable machine
Set the pulley to its lowest setting
Attach EZ attachment or similar to pulley
Make sure the bench is not too close so you have enough tension on the negative part of the movement
LIe back on the bench, and grab the attachment and extend above your head
The bring it back down slowly (the cable will ensure that you have to control the negative aspect of the movement)
Repeat accordingly
So there you have it, these bicep and tricep exercises will ensure your t-shirt sleeves are bursting at the seams and everyone will be asking if you have a permit for your guns.
For more news and updates, follow Generation Iron on Facebook, Twitter, and Instagram.
Monster Leg Workout With Klaus Myren Riis
Check out this mean but effective leg workout from bodybuilding pro Klaus Myren Riis.
Leg day. We all know we need it, but too often we make an excuse and jump over to the bench press. It’s easy to spot who in the gym has skipped a leg day (or two), and for those of us who take pride in working out our legs, sometimes we find ourselves struggling for diversity. Some people argue the basics work best and that going back to fundamental movements and exercises will increase muscle growth. Others preach more complex workouts to target many muscles at once to promote big gains. But which one is best?
Professional bodybuilder Klaus Myren Riis says that the basics are just as effective as anything else. As a coach, fitness instructor, and personal trainer, Riis has helped so many people find their niche and see those big gains they thought would never come. Starting out as a fitness model and partaking in fitness competitions, Riis became known for his generosity and knowledge by those looking for guidance when it came to their own health and fitness. As Denmark’s first professional bodybuilder, he has competed in many different competitions and amassed a large following.
His work as a coach and personal trainer has done wonders for so many looking to progress in their own lives. He has helped so many competitors on the national and international level as coach of Team Riis Physiques take home the top prize and his 18 years of experience has given him great clout amongst fitness enthusiasts and athletes seeking a healthier lifestyle.
As a spokesmodel for health and fitness, he loves traveling the world and meeting fans from his massive social media following. For Riis, “Being fit, working out, and living a healthy lifestyle is what I love and live for. It has gotten me to experience different, exciting and challenging jobs and activities all around the world.”
This basic but effective leg day workout is a great way to improve your overall performance and see huge muscle growth. Give this routine a try and take advice from one of the best in the business.
Leg Extensions
Leg extensions are great for targeting the quads and are considered an open chain kinetic exercise, meaning the chain of movement is open and your legs are free to move. A strong quad can have great benefits to strengthen key attachments at the knee joint (1).
How to: Place your hands on the bar and your knees will be on the pad at 90 degrees. Lift your legs until they are extended straight, but do not lock them out. As you lower your legs, exhale to the starting position.
Total: 4 set of 15 reps each. On the last set, do 10 reps, drop the weight, do 10 more reps, drop the weight again, and do 10 more reps plus 10 partial reps.
[embedded content]
Seated Leg Curls
Seated leg curls are a great hamstring exercise that move the weight through the knee. At the starting position, your hamstrings are relatively stretched, but as the weight starts to move, they contract to move the weight. The longer the muscle length, the more resistance can be applied to the muscle.
How to: Your back will be against the pad and your thighs under the leg pad. Your legs will be fully extended out in front of you and parallel to the starting position. Bending your knee, begin to lower your legs to a 90-degree angle. After a slight pause, raise your legs to the starting position.
Total: 4 sets of 10 reps. With each set, do 10 reps leaning forward off the back pad and 10 reps leaning back.
Good Old Squats
The squat is a great leg exercise that many of us already incorporate into our leg day. Squats can strengthen your core which provides benefits to posture and can increase balance. By strengthening the muscle of your lower body, squats will allow for better execution of full body movements to reduce the risk of injury (2).
How to: Place the bar just below shoulder height and rest it on the top of your back. Your feet should be slightly wider than shoulder width apart. Lower so your hips are below your knees and on the way up, drive through your feet and push your hips back to the starting position.
Total: 10 sets of 10 reps pyramiding up in weight on each set.
[embedded content]
Sissy Squats
Sissy Squats are an underutilized exercise and a great way to supplement a quad exercise because they don’t put excessive pressure on your joints. These are great for those with a bulge in the back of the thighs because they work out your quads without any involvement from the glutes or hamstrings.
How to: With your feet slightly closer than shoulder-width apart, maintain a flat back and tight core and sit back as if a chair was under you. Maintain a constant breathe and stay moving at a gradual speed.
Total: 4 sets of 15 reps.
Lunges
Lunges are great quad builders with the added benefits of strengthening your knees and increasing high leg muscle activity (3) while toning your glutes. They can also increase hip flexibility, core strength, and improve balance.
How to: Maintaining a tight core, step one foot forward slightly off center and bend to the ground. Alternate each leg and do so in a continuous movement.
Total: 4 sets of 30 reps.
[embedded content]
Tips From Riis
Too often does Riis see people in the gym not pushing themselves, either by texting or talking on the phone and not going back to the BASICS. A lot of influencers on social media will try and make money by inventing new, complex ways to work out, but all you need are the basics to see big gains. If you push yourself to your limit, your legs will be trembling and burning and you will feel the effect of this monster leg workout.
Instead of relying on hashtags like beastmode, nodaysoff, or workhard to get you there, use correct form to maximize intensity and these basic workouts will prove to be more than effective. Riis says, “You can’t sculpt something if there’s no clay on there to begin with”, and he could not be more right. Rely on the basics for foundational strength and let your hard work show by the effort you put in.
Instead of excuses year after year, build muscle faster and more efficient by pushing your limits and having fun doing so. Try this monster leg workout for big gains and take advantage of this amazing advice from an all-time pro and champion coach in Klaus Myren Riis.
Let us know what you think in the comments below. Also, be sure to follow Generation Iron on Facebook, Twitter, and Instagram.
*Images courtesy of Klaus Myren Rys Instagram
References
Journal of Orthopaedic & Sports Physical Therapy (2014). “Knee Pain: Safely Strengthening Your Thigh Muscles“. (source)
Case, Marcus J.; Downey, Darcy L.; Knudson, Duane V. (2020). “Barbell Squat Relative Strength as an Identifier for Lower Extremity Injury in Collegiate Athletes”. (source)
Jakobsen, Markus D.; Sundstrup, Emil; Andersen, Christoffer H.; Aagaard, Per; Andersen, Lars L. (2012). “Muscle activity during leg strengthening exercise using free weights and elastic resistance: Effects of ballistic vs controlled contractions”. (source)
Best Bodyweight Triceps Workout For Horseshoe-Shaped Arms
Get those arms to pop and show your triceps some love with these bodyweight triceps workouts.
We often focus so much on our pecs, biceps, and abs, that we leave out one crucial spot: the triceps. That definition is just as much the back of the arms as it is the front. That horseshoe-shaped muscle is every bodybuilder, gymgoer, and athlete’s dream, but it requires more than just curls and the bench for exercises. Targeting your these is critical to seeing big gains and loving how your arms look, sleeves or no sleeves from some of the best bodyweight exercises.
It is important to note that aesthetic is just half the battle. What healthy and huge arms can do is balance out and stabilize the bicep giving your body that much needed equilibrium you may not even notice. Much of the pain people suffer is from an imbalance between the biceps and triceps and through constant training and recovery, this pain will subside from repeated workouts with some of the best bodyweight exercises.
Your triceps make up two-thirds of your arm, so stop neglecting them and let that hard work you put into your biceps show. Many of these exercises below will target multiple muscles so the overall benefit is great to not only your arms, but other important muscles as well. Add to your growth and overall wellness with these 7 bodyweight triceps workouts.
Narrow-Grip Pushups
A slight variation on a standard pushup, narrow-grip pushups are slightly closer to the midline of your body, therefore using your triceps much more. Using explosive movements for power, or slower ones for size, these are some of the best bodyweight exercises to get the arms fired up.
To begin, place your hands under your chest closer than shoulder-width apart. Lower your body by bending your elbows but keep them tucked close to your torso. Remember to keep a tight core and flat back. Using your triceps and pecs, push your body back up and repeat.
Bench Dips
Bench dips are perfect for muscle definition and tone, increasing strength in the upper body. Bench dips are great because you can use a bench, chair, and even a low table for these bodyweight exercises and the push motion to build the upper arms and strong triceps.
With your hands on the edge of a bench (or whatever you’ve chosen to use), sit with your legs out in front of you. With your elbows tight to your sides, lower to the ground bending your arms at 90 degrees. Push back up, locking your elbows at the top.
Plank-To-Pushup
The plank-to-pushup is a great all-around exercise for it combines to target the triceps, pecs, shoulders, and abs. Not only can this exercise build overall arm strength, but it can increase shoulder mobility as well from some of the best bodyweight exercises with extension for a solid workout derived from push ups for strong triceps.
Start in a plank position with your forearms under your shoulders. Driving from the ground, use your triceps to get onto the palms of each hand, driving head first up. Drop back to your forearms into a plank position and repeat for the best results from this triceps exercise and upper arm burner.
Pike Pushup
The pike pushup is an interesting variation of the pushup and is highly effective in building upper body strength. It can also improve focus and balance given its level of difficulty as a bodyweight movement taken from push ups.
The starting position for the pike pushup is the downward dog position with your hips up and each arm extended out and down. Bending your elbows, allowing them to flare out slightly, lower your head to the ground. Push back through each arm past your head to return to the starting position of downward dog.
Press Up
The press up begins in the cobra position, on your stomach with your hands shoulder-width apart and hips down. Drive into the ground and start to straighten your arms which will raise your upper body. The key is to maintain tension in the arms to get the maximum benefit. Lower the upper body to return to the starting position and repeat for the best results for your muscles.
Diamond Pushup
Diamond pushups are considered one of the best push-ups for triceps for it is effective and forces much of the work. Slightly different than the narrow-grip pushups in hand placement, diamond pushups are also great for chest and shoulder muscle development to help stay on top of your training.
Begin in a pushup position with your hands placed under your chest forming a diamond. With a tight core and flat back, lower to the ground, keeping your elbows tight to your body. It is important to not flare your arms out with this exercise and keep a straight back.
Triceps Bodyweight Extension
Another variation of a plank, this triceps extension exercise is great for building not only core strength but also pumping up those triceps.
This exercise requires a bar, rope, or at least something that allows you to hold onto with room to duck under that will add resistance. Grip the bar overhand and with a sturdy core, assume a plank position with a straight back. Bend your elbows and duck under the bar. Push your body back to the plank position as you straighten your elbows and repeat the process of the triceps extension.
Wrap Up
Try these exercises as you look to make big gains in the gym or wherever your workouts take you. Having triceps that pop are key to getting that horseshoe-shape arm and balancing out the chest and bicep. Stop overlooking this vital muscle that will help you both aesthetically and athletically look good and feel great. Give yourself the benefits of performing daily functions efficiently and effectively, while also owning every aspect of your strength building experience.
What are your favorite triceps workouts?
Let us know in the comments below. Also, be sure to follow Generation Iron on Facebook, Twitter, and Instagram.
*Images courtesy of Envato
- 1
- 2