Tag: Exercise Guides
The Ultimate Landmine Row Guide: Benefits, How To, and Variations
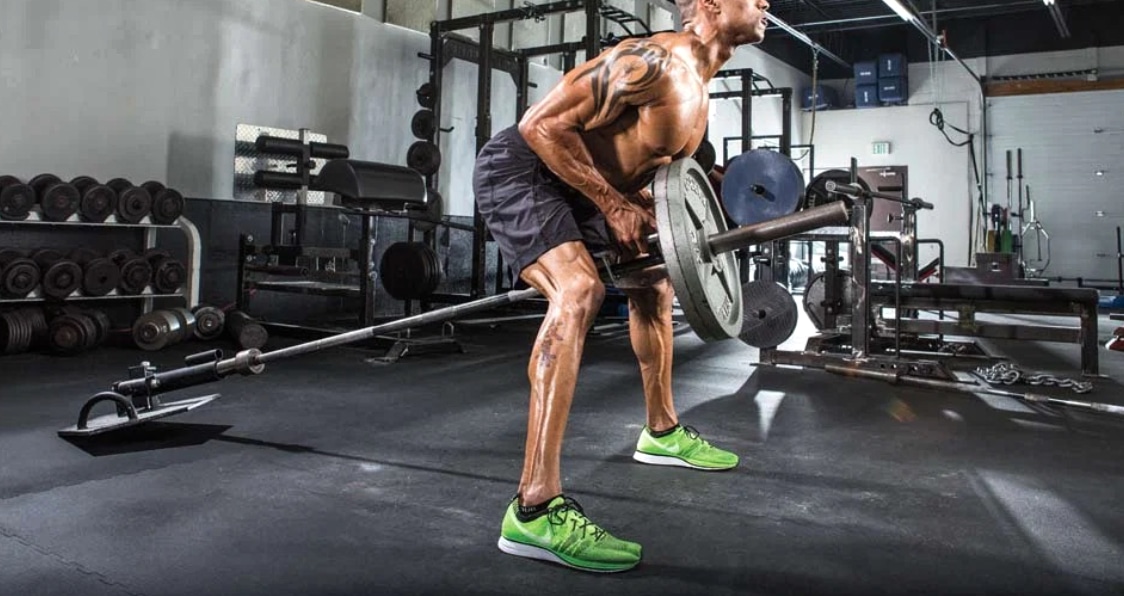
The landmine row is a classic exercise to build a strong back.
The landmine row is an incredibly effective exercise to work your upper body. It is a compound exercise that can help you build strength and add muscle mass to your back.
Your back is the second largest muscle group (after legs). To train it optimally and ensure overall development, you need to perform a variety of exercises to ensure optimal muscle fiber recruitment.
Since you only need a barbell for the landmine rows, you could do it even in a bare-bone gym. The anchored barbell also allows you to get maximum contraction and muscle fiber recruitment in your back while performing the exercise.
What is a landmine?
If the information above has you sold on the benefits of landmine rows but has left you wondering if you would be walking blindfolded across a landmine-ridden field, do not fret. We have got you covered.
To set up a landmine row, you could:
Place a weight plate at one end of the barbell to anchor it to the floor.
Anchor the barbell in the corner of a wall or squat rack in your gym.
Use a piece of specialized equipment like a landmine tube.
Ask your training partner to step onto the other end of the barbell while you complete your set.
Must Read: How The Landmine Press Boosts Strength Training
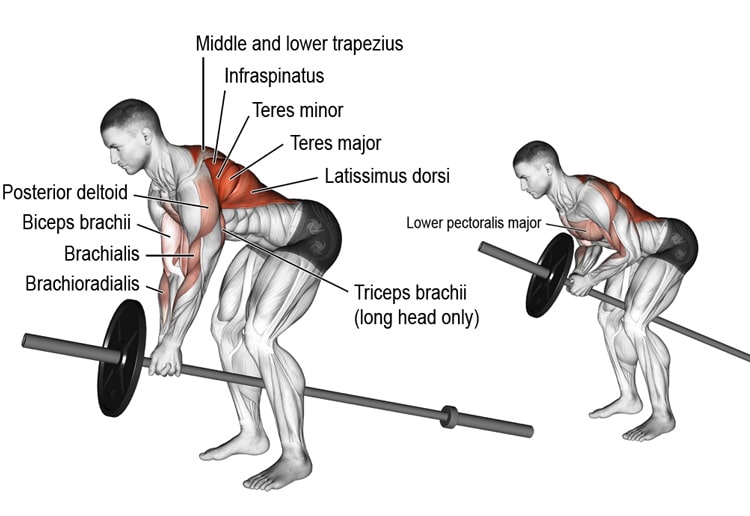
Muscles Worked
Since the landmine row is a compound (multi-joint) life, it engages multiple muscles, including:
Rhomboids
Teres Major & Teres Minor
Erector Spinae
Posterior Deltoid
Trapezius
Infraspinatus
Latissimus Dorsi
Brachialis
Brachioradialis
Biceps Brachii
Lower Pectoralis Major
Benefits
1. Allows a Bigger and Controlled Range of Motion
Since the barbell is anchored at one end while performing the landmine row, the other end moves at an angle. The angle of the bar allows you to apply force vertically and horizontally. You use a steady, controlled speed to move the barbell in a natural arc instead of in a straight line.
Since the bar follows a natural arc, you will feel more in control while performing the lift and might experience greater muscle fiber recruitment and better muscle pumps as you’ll be able to hold for longer at contraction points.
But why is that, you ask?
Because…
2. Changes in “Strength Curve“
The strength curve of an exercise refers to how “heavy” an exercise is at different points. While using a regular barbell, you will experience the same amount of force whether you are holding it one foot or five feet off the ground. The landmine, however, varies at different points.
When you first lift a landmine off the ground (do not try this in a war-infested zone), it is a horizontal movement, and so you are fighting against gravity – making the movement harder in the process.
However, as you go further up, the weight moves in an arc, increasing the slope. Meaning – Even though there is the same amount of weight on the bar, the higher the bar is, the “lighter” it will feel.
Related: How The Horizontal Row Enhances Solid Back Development
3. Great For Beginners
Since the landmine row has a pre-defined pattern of movement, it makes it easy for beginners to perform the exercise with the correct form. And because the bar moves in an arc, it increases your shoulder stabilizer muscle recruitment which can be very hard to achieve for a noob in exercises like the barbell or dumbbell row.
Check Out: 5 Tips For A Weight Room Beginner
4. Improves Muscle Balance and Stability
The landmine row can be easily adapted into a unilateral exercise which can help improve your muscle imbalances, core stability, and overall body balance.
Related: The Benefits Of Unilateral Training & Why It Matters
5. Reduces Chances of Injury
The landmine row is a great alternative for people with pre-existing back issues as it allows a greater degree of freedom to work around your injuries.
This exercise also places less pressure on your shoulders and spine as compared to the barbell or T-bar row.
Must Read: 4 Golden Rules You Need To Follow To Lift For Decades Injury-Free
Technique
This is how to perform the landmine row correctly:
Secure one end of a barbell in a corner or a landmine attachment.
Load appropriate weight on the free end.
Face away from the anchor point and stand near the shoulder of the other end.
Stand over the barbell with one foot on either side with a slightly wider than shoulder-width stance.
Bend down and grab the barbell with both hands.
Hinge at your lower back and push your hips back as you lower your upper torso until it is at a 30-40 degree angle with the floor.
Slightly bend your knees and keep your back straight. Maintain this position throughout the exercise.
Take a deep breath and brace your core.
Pull the barbell towards your chest while leading with your elbows.
Focus on pulling back your shoulder blades as you elevate the bar.
Pause and contract your lats at the top of the movement.
While exhaling, return to the starting position with a slow and controlled motion.
Repeat for recommended reps.
Pro Tip: You could also use a V-handle bar attachment in this exercise as it can help you get a better grip on the bar.
Common Mistakes
Here are some of the most common mistakes that lifters commit while performing the landmine row:
1. Bending Too Low
Many gym-goers overdo the movement by bending over way too much. Bending over too low has a couple of drawbacks:
You cannot lift heavy as your center of gravity is off. This is a major setback as optimal back training requires both volume and intensity.
Makes your lower back vulnerable to an injury.
On the other hand, some lifters do not bend over at all. You need to be at a 30-40 degree angle with the floor to train your target muscles effectively.
Related: 7 Common (But Lethal) Fitness Mistakes You Need To Avoid
2. Flairing Out Your Elbows
Bodybuilding requires optimal muscle fiber recruitment and annihilation that you can only achieve through a solid mind-muscle connection.
If you flair out your elbows while performing the landmine row, you will not be able to contract your shoulder blades and lats at the top of the movement. Keep your elbows as close to your body as possible to make the most of the exercise.
3. Incorrect Back Posture
You need to ensure that you maintain a neutral spine throughout the exercise. Most lifters either make the mistake of arching their back or worse – hunching over.
The most common reason for a bad form is excessive use of weight. If you cannot maintain a neutral spine or cannot bend over to the 30-40 degree mark, you should drop the weight (and your ego) and try again.
4. Not Trying New Things
Apart from trying advanced training techniques like dead stops, intraset stretching, and varied TuTs, the anchored barbell allows you to try many variations to train your back from different angles. This point is also a perfect segue into…
Variations
Trying different variations and alternatives of the landmine row is a great way to ensure you never hit a plateau. Here are some variations that you need to try in your next back workout:
1. Parallel One-Arm Landmine Row
Since unilateral exercises allow you to focus on one side at a time, they are a great alternative if you are dealing with muscle or strength imbalances.
Steps:
Anchor a barbell in a corner.
Stand on the right side of the barbell so that your left foot is a few inches away from the bar.
Assume a shoulder-width stance.
Hinge at your hips and bend over while maintaining a neutral spine until your torso is at a 30-40 degree angle with the floor.
Grab the shoulder of the barbell with your left hand and place your right elbow on your right knee to help stabilize your lower back and pelvis.
Take a deep breath and pull the bar towards your chest.
Pause and contract at the top of the movement.
Return to the starting position slowly while breathing out.
Repeat for recommended reps before switching sides.
2. Meadows Row
[embedded content]
This variation was made famous by the late, John Meadows. Although the Meadows row primarily targets your back, it also challenges one’s grip and indirectly targets the bicep.
Steps:
Position a barbell in a landmine attachment or the corner of a wall.
Stand at one end of the barbell so that your body is perpendicular to the bar.
Assume a split stance with the inside leg back and the outside leg forward.
Bend forward until your chest is just above parallel to the floor.
Grab the bar with a pronated grip.
Begin the movement by driving the elbow behind the body while retracting the shoulder blade.
Pause and contract your lat at the top of the movement.
Return to the starting position.
Repeat for recommended reps before switching sides.
Pro Tip: In the Parallel One-Arm landmine row and Meadows row, you could also use a bench to add variety to the exercise. Using a bench reduces your core engagement and allows you to focus on contracting your lats and shoulder blades during the movement.
3. Inverted Row
Inverted rows are one of those exercises that look super easy but will have you running on fumes by the time you are done with them – or they are done with you.
Steps:
Stand in front of a squat rack or Smith machine.
Set the bar at the desired setting. If you are a beginner, consider setting it at your waist height as it will allow your arms to fully extend while keeping your body off the floor.
Get under the bar and grab it with a pronated shoulder-width grip.
At the start of the movement, your body will be suspended or just off the floor, with your heels being the only body part in contact with the floor.
Contract your core and glutes and pull yourself up, leading with your chest.
Your body should remain in a straight line throughout the movement.
Pause and contract for a second at the top of the movement and ensure that your shoulder blades are retracted (imagine squeezing a small ball between the shoulder blades) before slowly lowering to the starting position, with your arms fully extended.
Repeat for recommended reps.
4. Seal Row
Seal row is an isolation exercise that will take your back gains to the next level.
Steps:
Elevate a flat bench by placing an aerobic step under each side.
The height of the bench should be adequate so that the weight plates do not touch the floor when your arms are fully extended.
Grab the bar with an overhand grip, slightly wider than shoulder-width apart.
Inhale and pull the bar towards your abdomen.
Pull the bar until it touches the underside of the bench.
Pause and contract your shoulder blades and lats at the top of the movement.
With control, lower the bar back to the starting position.
Repeat for recommended reps.
Related: T-Bar Row Your Way To A Cobra Back: How-To, Muscles Worked, and Variations
5. Pendlay Row
[embedded content]
Developed by Olympic weightlifting coach Glenn Pendlay, the Pendlay row is a bodybuilding exercise that activates muscle groups throughout your body—including your lats, rhomboids, biceps, glutes, hamstrings, and rear deltoids.
Steps:
Stand upright in front of a barbell with a shoulder-width stance.
Hinge at your hips and begin to bend your hips and knees to lower your body toward the barbell.
Grab the bar with an overhand grip and engage your back muscles by rotating your shoulders outward.
Maintain a flat back and keep your chin tucked throughout the movement (as if you were holding an egg under your chin).
Initiate the upward movement by squeezing your lats and pulling the barbell toward your lower chest. Keep your elbows as close to your body as possible.
Pause and contract your lats at the top of the movement.
While maintaining your rowing alignment, straighten your elbows and allow the barbell to travel back toward the floor until the weight plates contact the ground.
Pause for a second at the starting position.
Repeat for recommended repetitions.
Next Read: Annihilate Your Workout with These Landmine Exercises
Conclusion
The landmine row is an effective back builder and should be a part of every lifter’s exercise arsenal. Switching up your time under tension and rep tempos while performing the exercises mentioned above will give you enough variations that will keep you busy for a long time.
Which is your favorite back exercise? Let us know in the comments below. Also, be sure to follow Generation Iron on Facebook and Twitter.

Zac Perna’s Guide To Picture Perfect Abs
Checkout how Zac Perna has built incredible abs.
Zac Perna is an Australian fitness influencer, coach, and trainer born on 7 May 1995. Known for his engaging content, Perna is fast becoming one of the most popular personalities in the fitness industry.
Zac Perna first started working out at the age of 15. Growing up, he suffered from a negative body image and low self-esteem. Not long after joining a gym Zac fell head-over-heels in love with the fitness lifestyle and the positivity it breeds.
The positive influence of working out on his mental and physical well-being inspired Zac to work towards helping people achieve the same result.
“My goal is to personally change as many people’s lives for the better through an honest, genuine connection; educating in fitness and health. My vision is to become the leading fitness influencer in Australia to demonstrate the impact humility and a passion for change can have on spreading positivity and reaching your goals.” – Zac Perna on being asked about his coaching aim.
Zac Perna Stats
Name: Zac Perna
Height: 5’7″
Weight: 156 lbs
D.o.B: 7 May 1995
Zac Perna Diet
Contrary to what most people think, abs are made in the kitchen. The crunches and leg raises you do in the gym only help carve your abdomen.
If you want chiseled abs, you will need to do more than a few crunches. Everybody has abs. It is just that most of us love them so much that we keep them protected under a layer of fat – at least this is what I tell myself every time I look at my flab.
But how do you build abs in the kitchen, you ask?
Crafting Greek gods’ like abs requires you to stay away from junk food as they contain unhealthy amounts of fats, carbs, and sugar and increase your risk of weight gain.
On the other hand, ab building foods help boost metabolism, enhance fat burning, and keep you feeling full between meals.
Related: Generation Iron Management Signs Rising Fitness Star Zac Perna
Zac Perna Nutrition Tips For Building Abs
According to the Australian fitness star, he suffered in the initial days of his transformation because he had no clue about what to eat. To help his fans from falling into the same trap, Zac recommends:
1. Not Overcomplicate Your Diet
Zac Perna feels that most people obsess way too much about macro splits and other minute diet details. He recommends keeping it simple and focusing on eating healthy, especially if you are just getting started.
You should include a variety of fruits, vegetables, animal products in your diet and minimize processed food consumption. Cut out sugar, soft drinks, and processed food from your diet regimen and include nutrition-dense foods.
Next Read: 10 Best Food For Gaining Size and Strength
2. Educate Yourself
Even after arriving at the ‘perfect’ diet plan, you should never give up researching how to improve it. Zac advocates reading about dieting, different foods, macros, and calories, and how you can manipulate them to suit your goals.
Perna also recommends downloading a calorie tracking app and logging your everyday meals. By counting your calories, you will get a good idea of what you are eating and what you need to do to improve your physique.
3. Meal Prep
Zac Perna suggests learning how to cook delicious and healthy food. According to him, meal prep is an easy way to stay compliant and consistent.
Perna has tried all the meal prep methods and believes that cooking every three days works the best for staying consistent with your nutrition program as you do not need to freeze any meals, and the food stays fresh and delicious.
Zac Perna Diet Plan
Zac routinely switches between bulking and cutting phases. He increases his calorie intake during the off-season and cuts them back when prepping for a show.
Related: Zac Perna Breaks Down The TRUTH About Burning Fat
Zac Perna Bulking Diet
While some people like to dine at McDonald’s every day during their bulking cycle, Zac prefers eating clean when trying to put on muscle mass. Here is what he eats:
Meal #1: Tuna and rice (515 calories, 28g protein, 66g carbs, 14g fat)
Meal #2: 2 pieces of fruit during his workout (400 calories, 100g carbs)
Meal #3: Rice flakes and crumpets (932 calories, 45g protein, 160g carbs, 7g fat)
Meal #4: Beef sumo and white rice (820 calories, 61g protein, 80g carbs, 29g fat)
Meal #5: Salmon and egg rice (722 calories, 40g protein, 80g carbs, 23g fat)
Meal #6: Chicken and sweet potato (500 calories, 46g protein, 70g carbs, 3g fat)
Meal #7: Protein shake (130 calories, 25g protein, 1g carbs, 1g fat)
Next Read: Different Diets You Should Try to Build Muscle and Lose Fat
Zac Perna Shredding Diet
Unlike most athletes, Zac does not eat boring while leaning down for a show. He eats ice cream every day while shredding. Yes, you read that right. Here is Perna’s shredding diet regimen:
Meal #1: Japanese style omelet (207 calories, 17g protein, 4g carb, 13g fat)
Meal #2: Post-workout protein bowl (410 calories, 32g protein, 56g carbs, 4g fat)
Meal #3: Chicken tenders and potatoes (433 calories, 48g protein, 44g carbs, 8g fat)
Meal #4: Chicken thighs and mixed vegetables (412 calories, 38g protein, 0g carbs, 28g fat)
Meal #5: Protein ice cream (31g protein, 16g carbs, 10g fat)
Zac Perna Workout Principles
Being equipped with the correct training principles from the get-go can make all the difference in your transformation. Zac’s most important training tips include:
1. Finding the Right Training Time
Zac Perna prefers training early in the morning as, this way, he can start his day with what he loves the most. On top of that, his morning workout routine powers him to get through the rest of his day.
As per Perna, waking up early every day trains your body to perform in a state with distractions and teaches your mind to suck it up and do what has to be done.
2. Finding the Right Training Program
Zac believes that many people make the mistake of imitating someone else’s training routine. He recommends trying a variety of training routines and coming up with a personalized program based on what works the best for you.
3. Focus on Your Form
Perna is a huge advocate of starting small and focusing on your form in your initial days. If you train with poor form for three years and develop bad habits, you will end up doing the same thing for another three years, but probably with twice the amount of weight, increasing your chances of injury.
On top of that, unlearning the bad habits can take a lot of time and set you back on your transformation journey by a big margin. Zac Perna recommends focusing on the eccentric and concentric parts of every lift as it can help improve your mind-muscle connection and leave you with a muscle-ripping pump.
Related: 6 Ways To Improve Your Mind-Muscle Connection
4. The Ideal Rep Range
According to Zac Perna, if you are looking to build muscle mass, you should be performing anywhere between 8-12 reps of every exercise. If you want to build strength, do six reps or less.
On the other hand, if you want to work on your endurance, target 20-25 reps. Zac is a proponent of lifting heavy and believes in using a weight that helps him reach muscle failure between 8-12 reps.
5. Do Not Overlook the Importance of Rest
The YouTube sensation believes that the importance of rest is often overlooked, and most beginners are attracted to the ‘hardcore’ training philosophy and end up adopting the “rest when I’m dead” approach.
Remember: You break muscle when you are in the gym, and growth occurs outside when you are resting.
If you do not give your body enough time to rest and recuperate from your workouts, you will fail to improve and grow. Rest is especially important in cases of small muscle groups like abs, arms, and calves. If you train them every day, you will end up overtraining them.
Check Out: This Awesome Zac Perna Home Workout Routine is Simple Yet Effective
Zac Perna Ab Workout
Zac follows a circuit training routine for his abdomen. It helps him annihilate his abs in a short period. His ab workouts do not last more than 15-20 minutes.
The fitness athlete focuses on contracting his abs with every rep and hits them from every angle possible to ensure overall development. Perna also advocates not going too heavy while training abs or hitting them too often as, like every other muscle group, they too are a muscle, and you might end up with a bloated-looking gut.
Zac Perna Ab Training Routine
Circuit Training: 4 circuits of 4 exercises
In the circuit, you will not be taking a break between the exercises but are allowed a one-minute rest after completing one circle. You will complete four circuits in total.
Must Read: Top Signs Of Overtraining And How To Avoid It & Tackle Fatigue
1. Hanging Leg Raise: 15-20 reps
Steps:
Grab a pull-up bar with a shoulder-width overhand grip.
Your body should be in a straight line at the starting position. Keep your toes pointed throughout the exercise.
Lift your legs in front of you while keeping your upper body stable and maintaining a slight bend in your knees.
Raise your legs until your legs are slightly above parallel to the floor.
Exhale sharply at the top of the movement and contract your abs.
Slowly return to the starting position.
Repeat for recommended reps.
Make sure you are not using momentum by swinging back and forth to lift your legs.
Zac’s Tip: On the way up, lift your hips along with your legs. Limiting the movement to your legs will result in greater hip flexor recruitment.
2. Rope Crunch: 15-20 reps
Steps:
Set the pulley machine at the highest setting, add a rope attachment and position yourself beneath it, on your knees and facing the machine.
Reach up and grab the rope attachment with a neutral grip (palms facing each other).
Pull the rope down until your hands are next to your ears.
Crunch down, lowering your elbows to your knees.
Exhale and contract your abs at the bottom of the movement.
Return to the starting position with a slow and controlled movement.
Repeat for recommended reps.
Zac’s Tip: The rope crunch is one of Zac’s favorite ab exercises. He uses a moderate weight on the exercise. Using more weight than you can handle takes away the tension from your abs and puts it on your back.
3. Cable Oblique Side Crunch: 15-20 reps (each side)
Steps:
Set the pulley machine at its highest setting and add a D-handle attachment.
Position yourself beneath the D-handle, on your knees with your left side towards the pulley machine.
Reach up with your right arm and grab the handle with an overhand grip.
Place your left hand on the obliques on your right side.
While breathing out, perform a crunch on your right side and contract your obliques at the bottom of the movement.
Instead of bending to your right, perform a diagonal crunch so that your obliques get the most work.
Return to the starting position.
Repeat for recommended reps before switching sides.
Zac’s Tip: In the side crunch, your goal should be oblique annihilation. Use a lightweight and focus on following the perfect form.
4. Vacuum: 1 Minute
Steps:
Bend at your waist and support your upper body with your hands on a table or dumbbell rack around hip height.
Take in a deep breath through your nose and then blow it out through your mouth sharply until you feel there is no more air left in your lungs.
With your lungs devoid of air, pull your abdominal column in by inhaling sharply through your nose.
While performing the final step, try to touch your navel to your spine.
Note: At first, it will be hard to hold a vacuum for even 10 seconds. Practice it repeatedly throughout the day until you hit the 1-minute mark.
Zac’s Tip: Everyone focuses on ab moves that hit the visible rectus abdominis, the six-pack muscle. But they skip the transverse abdominis, or TVA, which is the deepest layer of abdominal muscles. Performing the vacuum pose trains the TVA which, in turn, helps stabilize your core.
Next Read: Pump With Perna: Massive Chest Workout With Zac Perna
Wrapping Up
Zac Perna takes a mindful approach to his training, diet, and recovery programs. His training and diet routine focuses on getting the best bang for his buck.
Building a picture-perfect midsection requires discipline, patience, and persistence. Now that you have all the tools, we look forward to seeing your transformation. God speed!
Who is your favorite fitness YouTuber? Let us know in the comments below. Also, be sure to follow Generation Iron on Facebook and Twitter.
Cable Pull Through – Benefits, Muscles Worked, and Alternatives
There are many benefits and alternatives to cable pull-throughs!
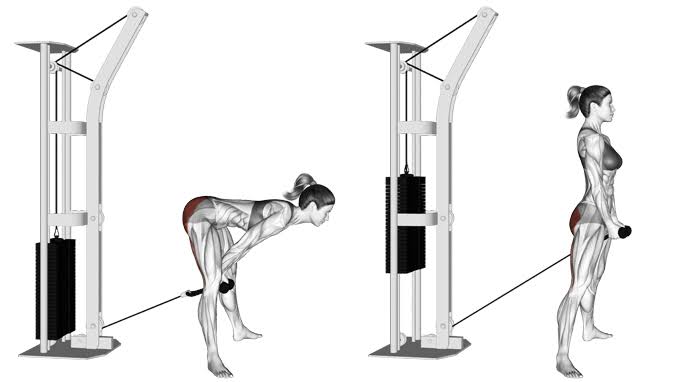
Cable pull-through is one of the most underutilized exercises for posterior chain development. Not only does it help with your glute and ham development, but it also improves muscular endurance, hip flexion, and extension mechanics, helps with muscle imbalances, corrective routines, and can be a great warm-up exercise.
The cable pull-through (aka glute pull-through) is a compound exercise that primarily works your hamstrings, gluteus maximus, and lower-back muscles.
Cable-pull through is a hip-hinge functional movement and should be an indispensable part of your training routine. These movements help you perform essential activities such as picking things up off the ground. They also assist in keeping your hips mobile and strengthen muscles that can prevent lower back pain.
The exercise can be highly beneficial for a fitness rookie for balance in the frontal plane and posterior chain (hamstring, glute, calves) muscle recruitment.
Related: The Most Effective Compound Exercises For All Levels of Experience
Cable Pull Through Exercise Details
Target muscle: Hamstrings, Gluteus Maximus
Synergists: Erector Spinae, Hamstrings, Adductor Magnus, Soleus
Mechanics: Compound
Force: Pull
Benefits of Cable Pull Through
1. Reinforces the Hip Hinge
If you are a beginner, cable pull-through is a great exercise to learn and reinforce proper hip flexion and hinging patterning necessary for advanced lifts like the deadlift.
The added tension in the eccentric phase due to the use of a cable can provide neurological and motor patterning feedback to help increase a lifter’s understanding of what hamstring flexion and extension should feel like.
Check Out: How These Hinge Exercises Can Boost Hip Strength
2. Glute and Hamstring Hypertrophy
Since cable pull-through requires the use of a cable pulley, it increases time under tension, eccentric muscle damage, and overall muscular activation of your glutes and hamstrings.
3. Cable Pulley is a God-send
The cable pull-through can be a deadlift substitute. You might find the perfect resistance on a pulley machine faster than on a barbell while performing the deadlift since a pulley offers a wide range of resistance options.
On top of that, cable pull-through give you a better way to monitor your progress and isolate your working muscles.
4. Muscle Annihilation
While performing the cable pull-through, your target muscles are under constant tension. It aids with establishing a mind-muscle connection and muscular hypertrophy.
The degree of muscle fiber recruitment while performing the cable pulley pull-through can be altered by switching up the time under tension.
Related: The Importance of Mind-Muscle Connection To See Huge Gains
5. A Great Posterior Chain Exercise
Cable pull-through is one of the most reliable posterior chain exercises.
While exercises like the leg curl isolate your hams, cable pull-through helps train your butt, hamstrings, and lower back effectively and at the same time.
6. Cable Pull-Through is Lower Back-Friendly
While performing the exercise, the rope handles stay close to your center of gravity, which means you are less likely to round your back and end up putting unnecessary stress on your lower back.
Must Read: 4 Exercises to Alleviate Lower Back Pain
Muscles Worked While Performing Cable Pull Through
Cable pull-through works the posterior chain muscles, especially around your hips. These muscles are responsible for generating most of your lifting, running, and jumping power.
The cable pull-through target muscles consist of:
1. Gluteus Maximus
The gluteus maximus is the main extensor muscle of the hip. It is the largest and outermost of the three gluteal muscles and makes up a large part of the shape and appearance of each side of the hips. The gluteus maximus is the large muscle driving the powerful hip extension of cable pull through.
2. Hamstrings
Along with your glutes, your hamstrings play a vital role in hip extension and flexion. There are three muscles in the hamstring group; biceps femoris, semimembranosus, and semitendinosus. The hams are involved in explosive lower body movements such as sprinting and jumping.
3. Erector Spinae
The erector spinae run up both sides of your back and are responsible for extending your spine. It is formed of 3 muscles (spinalis, longissimus, and Iliocostalis muscles), and its fibers run more or less vertically throughout the lumbar, thoracic, and cervical regions. These muscles are also important for maintaining posture.
4. Core
The cable pull-through works the muscles of your midsection, including rectus abdominis, obliques, and transverse abdominis. These muscles stabilize your spine and prevent your lower back from rounding.
Next Read: Build a Rock-Solid Core With These Exercises
5. Iliopsoas
The iliopsoas is the primary hip flexor. It consists of major and minor psoas muscles and the iliacus muscle that forms the iliopsoas musculotendinous unit (IPMU). The muscles can function in isolation to stabilize the pelvis and lumbar spine during hip movement and support flexion of the trunk.
How To Perform A Cable Pull Through With Perfect Form
[embedded content]
Most people leave gains on the table by performing the exercise with an incorrect technique. Here is how to perform the cable pull-through:
1. Secure a cable attachment to the pulley and adjust it to the lowest height setting on the cable machine.
2. Face away from the cable machine and reach between your legs to grab the rope handles with a neutral grip (palms facing each other).
3. Take a step forward to engage the weight. Make sure you are far enough from the pulley so that the weight remains off the stack at the bottom of the movement while performing the exercise.
4. Stand with an upright torso, feet slightly wider than hip-width apart, and a slight bend in your knees.
5. Your shoulders should be directly over your feet with a neutral head and neck position.
6. Keep your chin tucked throughout the movement, as if you are trying to hold an egg under your chin.
7. Pre-tension your shoulders and hips, and engage your core.
8. Keep your arms straight and elbows locked out throughout the lift.
9. Without letting your toes lift off the floor, hinge at your hips until you feel a stretch in the back of your legs while maintaining a neutral spine. At the bottom of the movement, your lower arms should be between your thighs and hands behind your knees. At this point, your upper body should be at a 45-degree angle with the floor.
10. While maintaining a neutral spine, return to the starting position by driving your heels into the floor. As you rise, squeeze your glutes and thrust your hips forward.
11. Pause and contract your glutes and hams at the top of the movement.
12. Repeat for the recommended repetitions.
Cable Pull Through Tips
Avoid using your back and focus on pulling with your glutes and hamstrings.
Do not hyperextend your lower back upon standing. Your body should be in a straight line at the top of the movement.
Start with light to moderate weight and increase as you become more proficient with the exercise.
Who Should Perform the Cable Pull Through
The cable pull-through can be especially beneficial for:
1. Strenght and Power Athletes
The hip-hinge exercise can help in improving glute activation, muscle hypertrophy, and maintaining proper hip flexion and hamstring flexibility if performed with a full range of motion. All these benefits can add to a strength or power athlete’s performance matrix.
Related: Full Range Of Motion Vs Partials: Which Is The Way To Go?
2. Functional Fitness and Bodybuilding
The cable pull-through can help add glute training volume for increased muscle hypertrophy, endurance and improve muscle activation. The glutes are involved in almost every functional fitness movement and exercise (running, squatting, pulling, jumping, etc.), making this movement pattern a great one to reinforce and strengthen with the cable pull through.
Must Read: Top Exercises To Increase Hip Mobility To Improve Performance
3. General Fitness
The isolated range of motion of the exercise helps fitness rookies understand the proper position and muscle activation for advanced exercises like deadlifts and good mornings.
Ideal Sets, Reps, and Programming for Cable Pull Through
You are not making the most of the cable pull-through if you limit yourself to three sets of 10 reps while performing the lift. You should program the exercise depending on your goals. Here is a quick rundown on the sets and reps you should be performing based on different goals:
I) General Fitness
If your main objective is to build muscular strength, you should perform lower reps for more sets.
4-6 sets of 5-8 repetitions, resting 1-2 minutes between sets
II) Muscle Hypertrophy
Most bodybuilding enthusiasts would fair the best by targeting muscle hypertrophy while performing the cable pull-through. The set and rep range mentioned below will perform the best for glute development.
4-6 sets of 8-12 reps, resting 60-90 seconds between sets
Pro tip: Using tempos and isometric holds can increase time under tension (TuT) and muscle fiber recruitment.
Related: Struggling to Build Muscle? Here’s Why Your Muscle Fiber Type is Important
III) Muscle Endurance
Some lifters (especially athletes) might want to train for muscular endurance. In such cases, higher rep ranges and shorter rest periods between sets is the way to go.
2-3 sets of 15+ repetitions (at least 45-60 seconds under tension), resting 30-60 seconds between sets
Cable Pull Through Alternatives
Although cable pull-through is an incredibly effective exercise to improve your posterior chain muscles, you can always use a little variety in your workouts. Here are five alternatives and variations you can use to ensure you never hit a plateau:
1. Hyperextension
[embedded content]
Also known as the 45-degree back extensions, most people know this lift as a lower back exercise. Hyperextension is a complete posterior chain exercise. Contrary to popular opinion, the goal while performing this exercise should be to minimize lower back movement and maximize movement at the hip. In other words, the goal is a hip extension, and that’s probably what the exercise should be called.
Steps:
Adjust the pad so that it is right below your pelvic bone.
Turn your feet out 45-degrees as it winds the hips up into external rotation which makes your glutes work harder.
Cross your arms over your chest and lower your torso towards the floor until you feel a strain in your hamstrings.
Round your upper back and maintain this form throughout the exercise.
Raise your upper body explosively until you are almost parallel to the floor.
Slowly return to the starting position and repeat for reps.
2. Reverse Deficit Lunge
[embedded content]
Most people consider lunges to be a quadriceps exercise. But if you lunge backward, you will feel a higher degree of glute and hamstring muscle fiber recruitment. Want to take your glute and hams activation a step further? Use a 6″ box to perform the deficit variation.
Steps:
Stand on a 6″ platform with a shoulder-width stance while holding a dumbbell in each hand.
Take a giant step back.
Keep your front shin and torso upright, bend your legs, and lower your rear knee down to within an inch of the floor.
Using the ball of your back foot, push off your back leg and bring your feet back together on the platform.
Perform the recommended reps with the same leading leg before switching sides.
3. Kettlebell Swing
[embedded content]
The kettlebell swing is probably the closest cable pull-through alternative there is. The kettlebell swing is a more explosive exercise as compared to the cable pull-through and focuses on increasing muscle power. On the other hand, there is a constant tension on your posterior chain muscles while performing the cable pull-through which is not the case with the kettlebell swing.
Steps:
Stand upright with a shoulder-width stance.
Hold a kettlebell in front of your body with both hands, arms straight.
With a slight bend in your knees and a flat back, hinge at your hips and swing the kettlebell back through your legs.
Use that momentum to stand and swing the kettlebell out in front of your body until it is parallel to the floor.
Thrust your hips forward, and engage your glutes and core as you stand up straight.
When the kettlebell hits shoulder height, your knees should be straight and glutes contracted in a full hip extension.
Allow the kettlebell to swing back down through your legs.
Repeat for recommended reps.
4. Romanian Deadlift
[embedded content]
Romanian deadlifts are one of the purest hip-hinge movements and should be a part of every lifter’s exercise arsenal. This variation of the standard deadlift focuses primarily on your hamstrings, building flexibility, strength, and power.
Steps:
Stand with an upright torso with your feet placed under your shoulders.
Use an overhand grip to hold the bar at hip level.
Draw your shoulders back and keep your spine straight.
Push your hips back as you slowly lower the bar toward your feet.
Press your hips forward to come into a standing position with the barbell in front of your thighs.
5. Barbell Hip Thrust
[embedded content]
Oh, so you do not have a cable pulley machine at your gym? No problem!
The barbell hip thrust will get you a glute and ham pump, unlike anything you have ever experienced before.
Steps:
Place a loaded barbell parallel to a flat bench.
Sit on the floor with your back up against the bench. Roll the barbell over your hips until the barbell rests in the crease of your hips.
With your upper back against the bench, lift your hips slights off the floor.
Squeeze your glutes and push your feet into the ground as you begin the upward hip thrust.
Continue contracting your glutes as you push your hips toward the ceiling to achieve full hip extension.
Pause and squeeze the life out of your hams and glutes at the top of the movement.
Slowly return to the starting position and repeat for reps.
Conclusion
Whether you are a powerlifter, bodybuilder, or just want a better-looking rear-end, the cable pull-through should be a part of your lower body workout regimen.
Use the variations, alternatives, and different set and rep range combinations laid out in the article to keep your posterior chain muscles guessing and avoid hitting a plateau.
Which is your favorite hamstring exercise? Let us know in the comments below. Also, be sure to follow Generation Iron on Facebook, Twitter, and Instagram.
7 Kettlebell Exercises For a Nice Butt
Kettlebell exercises can help build up many areas!
Kettlebells are all the rage these days. Many people consider kettlebell exercises to have better functional value than dumbbells, and for that reason, it is drawing a cult following. Heck, we even have kettlebells that look like chimps, orangutans, Bigfoot, and even Darth Vader.
While kettlebells provide the convenient size and portability of a dumbbell, they have a unique impact on your muscles. The spherical weight of a kettlebell can be anywhere between six to eight inches from your hands, which adds an unparalleled challenge for core stability and stabilizer muscles.
Kettlebell exercises usually involve several muscle groups at once, making them a potent compound lift-focused training tool. The versatile tool that they are, kettlebells can be used for a variety of exercises that improve both your strength and cardiovascular fitness.
Check Out: Best Kettlebells For Durability & Versatility (Updated 2021)
Origin of The Kettlebell
Before we get to the exercises which will transform your rear forever, let us talk about how the weird-looking training equipment came to be.
Kettlebells were developed by Russian strongmen in the 1700s.
Interestingly, in the 18th century, the girya (as the kettlebells are called in Russia) were primarily used to weight crops until some burly Russians started lifting them for building strength and endurance.
Russians and their awkward inventions, right?
The cannonball resembling training equipment began to be used for recreational and competition strength athletics in Russia and Europe in the late 19th century.
Trivia: The English term kettlebell has been in use since the early 20th century.
Kettlebells are usually made of iron or steel and are sometimes covered in colorful vinyl with a comfortable handle grip.
Must Read: The Most Effective Compound Exercises For All Levels of Experience
Benefits of Kettlebell Training
So, you are wondering why bother with the kettlebells and not just use dumbbells instead? Here are the benefits of using kettlebells in your workouts:
1. Helps Develop Explosive Hip Strength and Speed
You cannot go wrong with kettlebells if your goal is to build explosive hip strength. Don’t worry. We won’t ask you what you need the explosive hip strength for in the first place.
Kettlebell swings are one of the most common and effective kettlebell exercises. They are also efficient at training your glutes for strength and speed.
But why is hip strength so important, you ask?
Hip strength can help improve your overall stability and can prevent injuries. Also, hip strength and speed play an important role in many athletic movements, such as jumping, sprinting, and squatting.
Related: Fifteen Essential Lower Body Exercises To Add To Your Training
2. Improves Core Strength and Stability
Most kettlebell movements are a form of ballistic training. Ballistic training improves explosive power by maximizing acceleration and minimizing deceleration. These explosive lifts activate the abdominal muscles and require core contraction and coordinated breathing. This process results in an improvement in core strength.
On top of this, kettlebell exercises are multiplanar, meaning – you will be training your core from all directions. It helps with building overall core strength.
3. Increases Range of Motion
Most kettlebell exercises are compound movements that require you to move through multiple planes of motion. Explosive movements through these planes, over time, results in improved flexibility, mobility, and as a result – a better range of motion.
Related: Full Range Of Motion Vs Partials: Which Is The Way To Go?
4. A Total Body Conditioning Tool
Don’t let the little friendly-looking weight training equipment fool you. They can cause total body annihilating in no time. Maybe there is a reason why some brands make them in the Primal shape.
Kettlebells are great at all the four aspects of fitness – strength, endurance, flexibility, and balance training. No matter how packed your schedule, you can always fit a 20-minute kettlebell routine into your day. The best part? You do not need to hit the gym to complete a kettlebell circuit, you could do it from the comfort of your living room or your garage.
Next Read: At Home Workouts With A Single Kettlebell
5. Facilitates Fat Torching Workouts
Kettlebell training circuits are nothing less than fat-burning fests. According to a study, swinging a kettlebell burns as many as 20 calories per minute. For people too lazy to do the math, that’s 400 calories for a 20-minute workout.
Better yet, kettlebell training often results in EPOC (express post-exercise oxygen consumption). Before you freak out – this is a good thing. It means that you would still be burning calories throughout the day after you are done with your kettlebell workout.
6. Improves Balance
Unlike while training with machines, you need to control your movement path while working with kettlebells. Since kettlebell movements have no predetermined movement paths, it requires your stabilizers to work extra hard, and over time results in their strengthening and improvement in overall body balance.
7. Develops a Stronger Posterior Chain and Improves Posture
Most kettlebell exercises are great for your posterior chain as they target your entire backside. Ballistic exercises like Kettlebell Swings help develop explosive strength in your glutes, hamstrings, lower and middle back, and traps.
Your newfound posterior chain strength will aid in jumping higher, running faster, and kicking harder. Not to mention, strong posterior muscles result in a better posture. Goodbye, slouching.
Must Read: Improve Hip Mobility to Boost Lower Body Power
8. Improves Muscles Imbalances
Since many of the kettlebell exercises involve unilateral movements, they help nail down muscle weakness and imbalances. While performing a kettlebell exercise, you might notice that your right side is weaker than the left on a specific lift.
With this information, you can re-design your training program to fix these discrepancies. If you have been training with barbells and machines for a long time, add kettlebell training to your regimen, and you will notice an improvement in muscle imbalances and symmetry.
Check Out: The Benefits Of Unilateral Training & Why It Matters
9. Enhances Muscle Coordination
Unlike the linear movement pattern of barbells and machines, the dynamic nature of kettlebell training forces you to focus on the movement and have a sharp mind-muscle connection. This leads to improved muscle coordination.
Read: 6 Ways To Improve Your Mind-Muscle Connection
10. Builds Lean Muscle Mass
Although kettlebell training alone does not build crazy muscle mass, it increases the amount of lean muscle tissue. If you are a fan of ripped physiques, kettlebell workouts can help you achieve the conditioning you are after.
Not only does kettlebell training help build lean muscle mass, but it also helps in staying agile, athletic and improves mobility, flexibility, and range of motion. What else could you ask for?
7 Kettlebell Exercises For a Pear Shaped Rear
Contrary to popular opinion, you do not need barbells and dumbbells to build shredded wheels. The cannonball with handles is quite a powerful tool when it comes to building strength, conditioning, and mobility. So, grab a kettlebell and start carving legs that Greek gods would approve.
1. Kettlebell Goblet Squat
[embedded content]
Goblet squat is one of the most versatile kettlebell leg-building exercises. Holding a kettlebell in front of your chest allows you to squat deep while minimizing the risk of an injury. Goblet squat also activates the highest number of muscle fibers in your glutes because you are holding the weight in the front and are hinging and leaning slightly forward.
Steps:
Stand upright with a shoulder-width stance, and your toes pointed slightly outwards.
Hold a heavy dumbbell (as per your strength level) in front of your chest. You could either hold the kettlebell upside down or hold the horns with both your hands.
Pull your elbows in towards your sides and maintain this position throughout the exercise.
While keeping your chest lifted, squat down as deep as you can comfortably.
The kettlebell and your arms should stay inside of your legs and close to your body at all times.
Return to the starting position explosively.
Pause and contract your glutes at the top of the movement.
Repeat for recommended repetitions.
Related: How to Perfect the Goblet Squat
2. Kettlebell Swing
[embedded content]
Kettlebell swings are a popular cannonball exercise. It is an incredibly effective exercise for building hip power and explosiveness. This high-intensity exercise will also help burn off excess body fat.
Steps:
Hold a kettlebell with both hands by the flat, top handle.
Stand with a slightly wider than shoulder-width stance and let the kettlebell hang between your legs.
At the starting position, keep your torso upright and brace your core.
Bend at your knees as you push your glutes back, and lower the kettlebell straight towards the floor.
Keep your arms straight and elbows locked out throughout the movement.
Thrust your hips forward explosively and raise the kettlebell until your arms are parallel to the floor.
Squeeze your glutes, core, and quads at the top of the movement.
Hinge forward at your hips and push your butt back again, letting the bell drop on its own as you do.
Keep a neutral spine throughout the exercise.
Repeat for reps.
3. Bulgarian Split-Squat with Kettlebell (in racked position)
[embedded content]
Kettlebell Bulgarian split-squat will set your glutes and hamstrings on fire. The racked position (in front of your chest) will help strengthen your core and stabilizers.
Steps:
Grab a kettlebell in your right hand and hold it in front of your chest.
Drape your left foot on a flat bench as you firmly plant the right on the floor.
Make sure your right foot is out far enough so that when you lower your hips, your knee stays directly over your ankle.
Bend your right knee and lower your body until your left knee is a few inches off the floor.
Return to the starting position explosively and squeeze the life out of your right hamstring and glute.
Complete the recommended reps on the right side before switching sides.
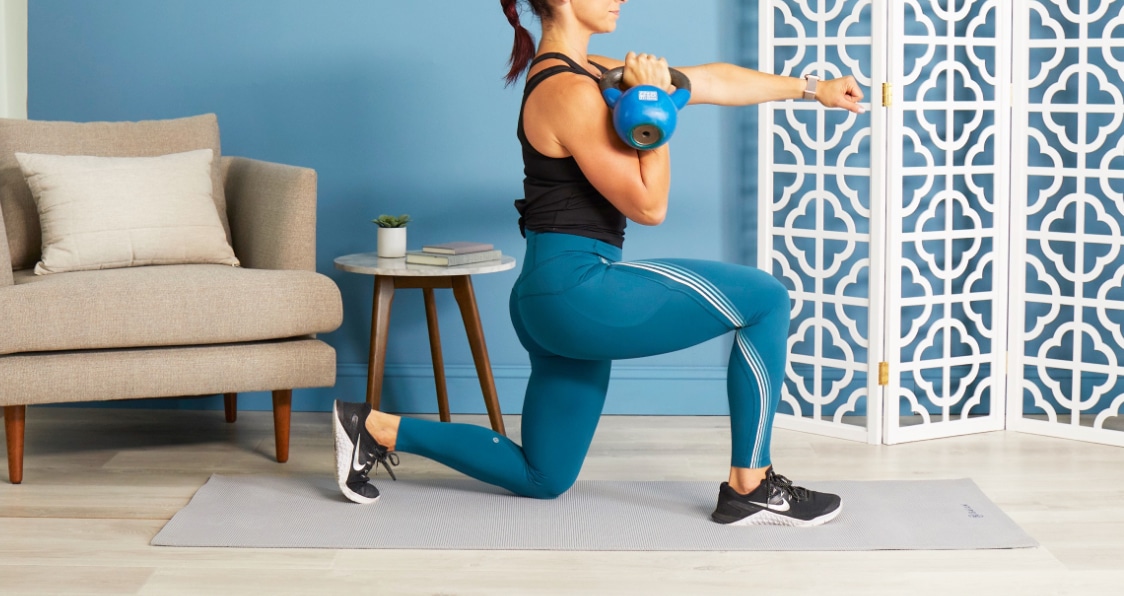
4. Overhead Kettlebell Lunge
[embedded content]
This is probably the hardest exercise on the list. Overhead lunge forces your glutes and hamstrings to work on full throttle to stabilize the lunge. It also requires good shoulder and traps strength and stability.
Steps:
Grab a kettlebell in one hand and press it overhead. Keep your arm straight and elbow locked out throughout the exercise. Your overhead arm should be perpendicular to the floor for the entire duration of the lift.
Drop into a reverse-lunge by extending the leg opposite to the arm holding the weight.
Bend your rear knee and lower your body until your knee is a few inches off the floor.
Push with your rear foot and return to the starting position explosively.
Complete the recommended reps on one leg before switching sides.
5. Single-Arm Racked Curtsy Lunge
[embedded content]
You probably have seen the curtsy lunges on Instagram. Confused? These are a #FitGirl favorite, and hey, we are not complaining. Curtsy lunges are a god-send for glute development.
Steps:
Stand with your feet shoulder-width apart and your left hand on your left hip.
Hold a kettlebell in your right hand in the racked position at your shoulder. Let the cannonball rest on your shoulder for the duration of the exercise.
Step your left foot diagonally behind you and lower your left knee until it almost touches the floor.
Your right knee should bend to about 90-degrees at the bottom of the movement.
Drive through your right heel to return to the starting position.
Pause and squeeze the life out of your glutes and hams at the top of the movement.
Do all your reps on one leg before switching sides.
6. Single-Leg Kettlebell Deadlift
[embedded content]
Single-leg kettlebell deadlift is an incredibly effective kettlebell exercise for isolating your glutes.
Steps:
Hold a kettlebell in your right hand, and lift your left foot slightly off the ground.
While keeping your back and head neutral, lean forward by hinging at your hips.
Raise your left leg off the floor slowly while keeping it in line with your body.
Lower the kettlebell until it almost touches the floor.
Keep your left shoulder blade pulled down your back.
Slowly return to the starting position, and contract your glutes. Make the most of the move by keeping your rear foot off the floor as you go through the reps.
Repeat for recommended repetitions before switching sides.
7. Kettlebell Squat and Clean
[embedded content]
There is some learning curve to this exercise. Make sure you are not going too easy on yourself by using lighters kettlebells. Use a weight that puts a strain on your glutes from the first rep.
Steps:
Stand with an upright torso and your feet placed shoulder-width apart.
Bend at your knees and push your hips back to lower yourself and grab a kettlebell with both hands by the top of the handle.
Drive through your heels to stand up as you pull the weight up to your chest.
During the upward movement, quickly swap your hands from the handles to the cannonball.
Lower into a squat, shifting your weight into your heels and pushing your hips back as you bend your knees.
Drive your body up explosively and squeeze your glutes at the top of the movement.
Reverse the movement by switching your hands back to the kettlebell handle and lowering the weight back down to the floor, bending your knees and pushing your hips back to keep your spine straight.
Repeat for recommended repetitions.
Conclusion
You could perform all these exercises in a single leg workout or use some of them in separate routines to make the most of your glute training. After you see the results, kettlebells will become an indispensable part of your leg training regimen.
Which is your favorite kettlebell exercise? Let us know in the comments below. Also, be sure to follow Generation Iron on Facebook, Twitter, and Instagram.
The Ultimate Lat Pulldown Guide: Technique, Benefits, and Variations
The lat pulldown machine is one of the most popular gym equipment. It has the glam and macho appeal that draws in the fitness newbies and experienced lifters alike.
Be it a motivational YouTube training video, or a snippet of Rocky Balboa training for a big fight, it will probably feature the star performing a set on the lat pull-down machine.
Almost every gym around the world has a lat pulldown machine, and yet most lifters fail to make the most of it. The ultimate lat pulldown guide will ensure you do not leave gains on the table.
Target muscle: Latissimus Dorsi
Synergists: Brachialis, Brachioradialis, Biceps Brachii, Teres Major, Posterior Deltoid, Infraspinatus, Teres Minor, Rhomboids, Levator Scapulae, Middle and Lower Trapezius, Pectoralis Minor
Mechanics: Compound
Force: Pull
Pull-up is an incredibly effective exercise for building upper body strength and muscle mass. But there is a catch. Performing a pull-up is no joke, and performing 30+ pull-ups in a workout will test your mettle.
Performing a pull-up will fire up every muscle fiber in your back, arms, and shoulders. While nailing this exercise could prove to be a lifesaver sometime in the future (if you find yourself hanging from a building or a chopper in the event of an alien invasion), most people usually give it a pass for its friendlier sibling – the lat pulldown.
1. Engages the same muscles as a pull-up
The lat-pulldown involves a similar movement to the pull-up, challenging your mid and upper-back muscles, trapezius, arms, and grip. The exercise is a god-send for beginners or people who cannot perform a bodyweight pull-up.
Next Read: 6 Badass Exercises You Can Do With A Pull-Up Bar
2. Puts you in the driver seat
The lat pulldown machine gives you more control over how much you lift and the rep tempo as compared to vanilla pull-ups. You could perform a new variation of the lat pull-down every week just by switching up rep tempos.
Check Out: How To Increase The Time Under Tension To Maximize Your Gains
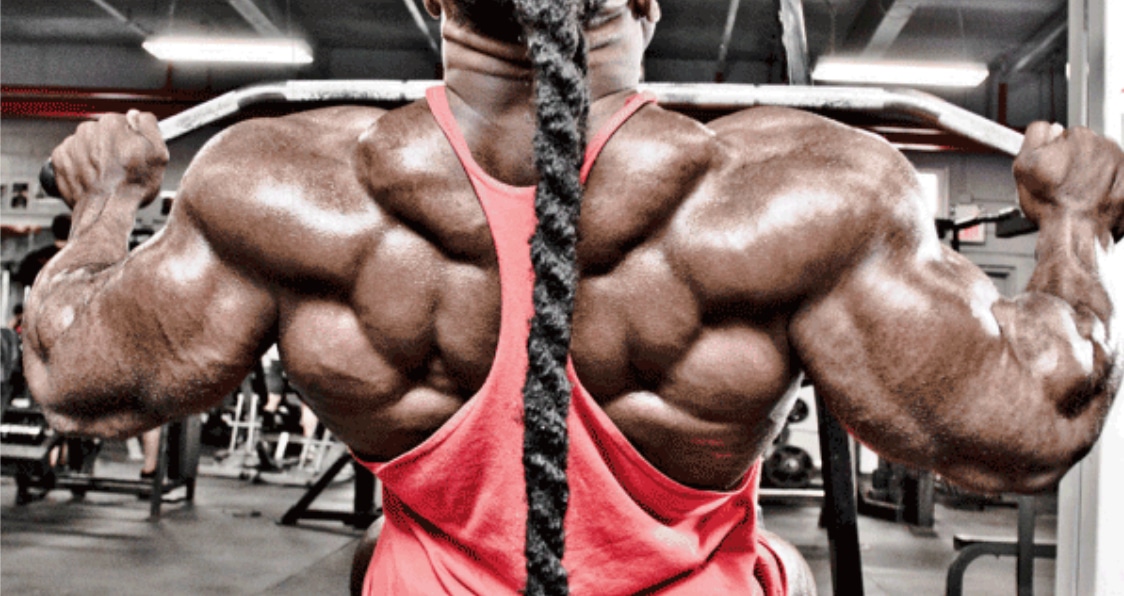
3. One of the best ways to build a V-taper
Forget Red Bull, lat pull-downs give you wings that make you look like you can fly. It targets the latissimus dorsi – the large, flat muscles across your mid-back. A strong and wide back is also vital for a Superman chest. The more you work on your lat pull-downs, the better equipped you’ll be to go big on the bench press.
4. Constant tension on your working muscles
The cable-operated machine ensures constant tension on your muscles throughout the movement pattern – even on the eccentric part of the lift. Unlike the pull-ups, lat pulldowns also put less tension on the secondary muscle groups during a set.
Must Read: The Gym Machines You’re Probably Using Incorrectly
5. Can Help Improve Your Posture
By working the muscles in your back, lat pulldowns can improve your posture. You will rarely see a person with solid V-taper suffering from a bad posture. On top of this, lat pulldowns can improve your performance during other compound exercises that use your back muscles like pull-ups, deadlifts, and good mornings.
Related: Programming Vertical Pulling For Greater Back Gains
The lat pull-down machine is usually swamped – especially during rush hours at the gym. Listed below are the most common lat pulldown errors:
1. Partial reps
Partial reps are a sign that you have more weight on the cable than you can lift. If you cannot pull the bar down to your chin level, you are letting your ego get the better of you.
Once you have the bar at your chin level, you need to contract your lats and shoulder blades. If you cannot perform this step, you are leaving gains on the table.
Also, make sure you are not pulling the bar using your forearms. Focus on contracting and relaxing your lats as you move the weight. Tip: Activate your lats by pulling down from your armpits.
Related: Is This The Worst Case Of Ego Lifting?
2. Arching your back
While you might be able to lift a few extra pounds by arching your back as you pull the bar down, it can put unwanted tension on your lower back and expose you to an injury. Sit upright and keep your chest lifted while performing the exercise.
3. Pulling the bar down past your chest
This is a rookie mistake, and it can stem from both – lifting too light or heavy. Pulling the bar past your chest and almost in line with your stomach takes away almost all the tension from your lats and back. Keep your chest lifted and stop when you reach chin level.
4. Using momentum
Most lifters make the mistake of swinging back and forth while performing lat pulldowns. It is yet another case of ego lifting. While using a jerking motion might help you pull down the weight, it takes away the tension from the primary muscles and increases the odds of an injury.
Sit upright, keep your chest lifted throughout the exercise and perform the pulldown with control. Utilizing rep tempos and contracting your back with every rep ensures optimal muscle fiber recruitment.
Also Read: Lat Pulldown Vs Pull-Up: Which Is Better For Wide Lats?
[embedded content]
In bodybuilding, your results depend on how well you perform an exercise, and your diet and recovery programs. Follow the steps below to nail the first part of the equation:
Adjust the seat or thigh pads so that your upper thighs are tucked firmly under the pads. Place your feet flat on the floor.
Grab the bar with a wider than shoulder-width overhand grip.
While breathing out, pull the bar down until it is almost at your chin level.
Make sure your torso is stationary and you are not reclining back while lowering the bar.
Squeeze the shoulder blades together while maintaining square shoulders.
Return to the starting position with a slow and controlled motion as you exhale.
Do not lock out your elbows at the top of the movement. Keep the weight engaged, and do not let it crash into the racked plates.
Repeat for recommended repetitions.
Bored of the good old lat pulldown? Use these variations to keep your muscles guessing:
1. Underhand Lat Pull-down
Changing grips is a great way to add variety to the lat pulldown exercise.
Reversing your hand placement to a supinated (palms facing you) grip puts more tension on your biceps.
The underhand lat pull-down is a great variation if you are performing the exercise at the end of your back workout when your posterior muscle group is relatively fatigued.
Read: How The Underhand Lat Pulldown Can Give You Wing-Like Lats
2. Wide-Grip Lat Pull-down
Using a wide grip engages the latissimus dorsi to a higher degree compared to the shoulder-wide grip.
In this variation, you will pull the bar down to your upper chest, pause, and squeeze the life out of your lats.
Make sure you are keeping your torso upright and not reclining back while performing the movement.
3. Close-Grip Lat Pull-down
[embedded content]
In the close-grip lat pulldown variation, you will be holding the bar with a narrower than shoulder-width grip.
Embrace your core and pin back your shoulders as you pull the bar under your chin.
Squeeze your lats at the bottom of the movement.
Return to the starting position with a slow and controlled motion.
Repeat for recommended reps.
4. V-Bar Lat Pull-down
Cable-operated machines give you the liberty to swap the wide bar for several other attachments to target your back differently.
Replace the bar with a v-grip attachment.
Secure your legs under the thigh pads and maintain an upright torso throughout the movement.
While keeping your chest lifted, pull the v-grip attachment until your palms are a few inches away from your upper chest.
Pause and contract your lats at the bottom of the movement.
Return to the starting position with a controlled motion and repeat for recommended reps.
Read: V-Bar Pulldown – Exercise Guide
5. Behind the Neck Lat Pull-down
Behind the neck variation is probably the most advanced lat pulldown technique on the list.
Grab the bar with a slightly wider than shoulder-width overhand grip.
Straighten your body to a point where the cable and pull-down bar is directly above your spine, and tuck your head forward to allow the bar to be safely lowered.
Shrug your shoulder blades back to set your shoulders, this allows the tension to stay on your lats throughout the exercise.
Slowly lower the bar behind your head until it is at your ear level as you breathe out.
Squeeze your lats at the bottom of the movement.
Return to the starting position with a slow and controlled motion.
Repeat for recommended reps.
Depending on your experience level, you could use the following exercises to train your back optimally:
1. Pull-up
We are sure you are not surprised to find pull-ups on the list. Once you develop enough strength to perform pull-ups with the correct form, you should make them a constant in your back training regimen.
Stand on an aerobic stepper and grab the pull-bar with a slightly wider than shoulder-width grip.
Hang from the bar and bend at your knees so that your lower legs are parallel to the floor.
Pull yourself towards the roof while focusing on your back until your chin reaches the bar level.
Return to the starting position with a controlled motion.
Repeat for recommended reps.
2. Negative Pull-up
[embedded content]
If you are a beginner, negative pull-ups are a great exercise to build strength for the orthodox pull-ups. It involves performing only the lowering, or eccentric phase of an exercise.
Start by standing on a box or bench.
Jump high enough so your face it at the pull-up bar level and grab it with a shoulder-width grip.
Once you have gripped the bar, lower yourself as slowly as you can while focusing on your lats.
When you reach the bottom of the movement, release the bar and step back.
Step back onto the box and repeat for recommended reps.
Related: Use Negative Training For Positive Mass Gains
3. Unilateral Lat Pull-down
This variation of the lat-pull down works each side of your back individually. It is great for fixing muscle imbalances and improving symmetry. If you do not have access to a unilateral lat pulldown machine at your gym, you could use the standard lat pulldown machine with a D-bar handle attachment.
Hold the D-handle attachment with a neutral grip.
Rotate your palm as you pull the handle towards your chin.
Your palm should be facing you at the bottom of the movement.
Pause and contract your lat.
Slowly return to the starting position.
Repeat for recommended reps before switching hands.
Next Read: The Benefits Of Unilateral Training & Why It Matters
4. Straight Arm Lat Pull-down
[embedded content]
The straight arm lat pulldown is a great exercise for building a V-taper. It also avoids over-using your arms which is the case with the standard lat pull-downs.
Attach a wide-grip handle to a cable pulley.
Stand upright with a shoulder-width stance.
Grab the bar with a pronated (overhand) grip at shoulder-width and lean forward slightly by hinging at your hips.
Keep your elbows slightly bent throughout the movement and initiate the movement by depressing your shoulder blades and extending the shoulders.
Pull the bar to your thighs until your lats are fully contracted.
Return to the starting position with a slow and controlled movement.
Repeat for recommended reps.
Check Out: Mastering The Straight Arm Pulldown
5. Bent-Over Barbell Row
Bent-over barbell row work your lats and multiple back muscles.
Grab a barbell with a shoulder-width overhand grip.
Unrack the bar and stand upright.
Slowly lower your torso until your upper body is at a 60-degree angle with the floor.
Keep your knees slightly bent and maintain an arch in your back throughout the movement.
Lift the weight to your sternum, keeping your elbows tucked in and close to your body.
Contract your lats at the top of the movement.
Slowly return to the starting position.
Repeat for recommended repetitions.
Lat pulldown is suitable for lifters of all experience levels, and most gyms have the machine. While the lat pulldown is a part of most back training routines, it is essential to be following the correct form to get the most bang for your buck.
You should also try new variations and alternatives to keep your muscles guessing and avoid hitting a plateau. Things as small as switching up the number of reps, sets, and rep tempos can do the trick and get you that much sought-after V-taper.
Which is your favorite lat pulldown variation? Let us know in the comments below. Also, be sure to follow Generation Iron on Facebook, Twitter, and Instagram.
T-Bar Row Your Way To A Cobra Back: How-To, Muscles Worked, and Variations
Here is a way to build a huge back using different workouts!
If you are a bodybuilding fan, you probably have watched Pumping Iron – the critically-acclaimed bodybuilding documentary. If you don’t remember watching the movie, you certainly would have seen snippets of Arnold Schwarzenegger T-bar rowing to a monstrous V-taper.
Pumping Iron is a little too old-school for you? How about you check out its younger sibling – Generation Iron?
Bodybuilders have a saying; if you want your back to grow, you gotta row. If you want a V-taper, you need to maintain a balance between rowing and pulling back exercises. While horizontal pulling exercises (pull-up, pull-down) help in building a wide back, vertical pulling movements (t-bar row, cable row, dumbbell row) get you that much sought-after back thickness.
[embedded content]
How To Perform The T-Bar Row
Do not fret if you do not have access to a T-bar row machine at your gym. You could perform the exercise using a barbell. Follow these steps to make the most out of the T-bar row –
If you have access to a T-bar row machine:
Step onto a T-bar row platform and stand with one foot on either side of the bar.
Place your feet slightly wider than shoulder-width apart.
The remaining steps will be the same as the barbell T-bar rows described below.
If you do not have a T-bar row machine at your gym:
Place one end of a barbell into a corner.
Rest some weight plates or a heavy dumbbell on the hinged side to hold it down (landmine setup).
Load the opposite end of the bar with an appropriate weight.
Take position by standing with one foot on either side of the bar.
Hinge at your hips until your torso is at a 45-degree angle with the floor.
Hook a V-grip handle under the weighted end at the bar’s neck and grab it with both hands.
While maintaining the natural arch in your back, squeeze your shoulder blades together and pull the bar until the plates touch your chest.
Pause and contract your lats at the top of the movement.
Slowly return to the starting position.
Repeat for recommended reps.
Related: This Is How To Master The T-Bar Row For Massive Back Gains
Muscle Worked While Performing The T-Bar Row
The T-bar row might look easy but will test your mettle – they are one of Governator’s favorite exercises for a reason, after all. It is an overall upper body posterior muscle builder and will leave you exhausted by the last set. Here is the list of muscles worked:
Latissimus dorsi: It is the largest back muscle and is located on the sides of your back. Latissimus dorsi (aka lats) are responsible for shoulder extension and adduction.
Bicep brachial: Your biceps are your main elbow flexors, and you will be using them to perform T-bar rows.
Forearms: You need a strong grip to perform the exercise optimally. If you lack a solid grip, this exercise will help you build one over time.
Middle trapezius: It is the diamond-shaped muscle that covers much of your upper back. The middle trapezius (aka traps) is primarily responsible for the retraction of the shoulder girdle.
Rhomboids: Located under your mid-traps.
Posterior deltoids: Rear delts are responsible for horizontal extension and external rotation of the shoulder joint.
Erector spinae: It is the collective name for the small muscles that make up your lower back. The erector spinae works isometrically or statically during T-bar rows to hold your spine in a stable position and prevent your back from rounding.
Glutes, hamstrings, and quadriceps: You cannot exclude your lower body from the exercise (unless you are using the chest-supported T-bar machine). Your glutes and hamstrings contract to hold your hips in place while your quadriceps work hard to stabilize your knees.
Next Read: 4 Exercises to Alleviate Lower Back Pain
Benefits of the T-Bar Row
Making the T-bar row a constant in your back training entails the following benefits:
1. A Thick and Strong Back
Rowing movements help develop a thick back, and the T-bar row follows an optimal range of motion that recruits the maximal muscle fibers in your back.
The compound exercise is also a great strength builder and can aid in other pulling exercises such as pull-ups and deadlifts.
2. Improved Functional Strength
T-bar row works your entire posterior chain. Since it is a compound (multi-joint) movement, the T-bar row helps strengthen muscles that you use in your day-to-day and outdoor activities.
3. Better Core Stability
Since you spend all your time bent over while performing the exercise, it helps develop core stability and strength.
4. Better Posture
A wide and thick back (results of the t-bar) can help improve your posture. You will hardly ever see someone with a solid V-taper slouching or having a bad body posture.
5. Promotes Balance and Symmetry
The unilateral (single-arm) variations of the T-bar row can help improve muscle imbalances and strength. Performing the exercise on one side at a time can help focus on the muscle and improve your mind-muscle connection.
Also Read: 6 Ways To Improve Your Mind-Muscle Connection
6. Versatility
Different variations of the T-bar row allow you to use different hand positions and hence work your back from a variety of angles. The most common grips for T-bar include:
Close-neutral
Shoulder width-neutral
Wide-overhand
Narrow-underhand
On top of that, since most T-bar equipments have a plate-loading mechanism, you can use low denomination weights to increase your workload in small increments until you hit the right spot.
Common T-Bar Mistakes To Avoid
The T-bar row requires balance and core stability and leaves a lot of room for error. Here are the most common T-bar mistakes:
1. Using 45-Pound Weight Plates
Most people make the mistake of exclusively using 45lb weight plates on the T-bar machine. Using several smaller weight plater rather than a few big ones have the following benefits:
a) It helps follow a longer range of motion since the smaller plates have a smaller diameter compared to the 45lb plates.
b) Helps you nail the perfect weight by using smaller denominations.
Related: Full Range Of Motion Vs Partials: Which Is The Way To Go?
2. Maintaining Straight Legs
Locking out your legs and knees can cause back, knee, or hip injuries. Make sure that you have your knees slightly bent throughout the exercise as it gives you a solid base to hold yourself in place.
3. Rounding Your Lower Back
We cannot help but cringe when we see someone rounding their back while performing the T-bar row. Rounding your back during the lift leaves your spine vulnerable to injuries – and makes you look like a rookie!
4. Flexing Your Wrists
To lift heavier while performing the T-bar rows, many gym-goers flex their wrists. Not only does this not help, but it also puts unwarranted stress on your wrists and increases the odds of an injury. It can also cause your grip to fail prematurely.
Next Read: Build a Massive Back Like The Legend Dorian Yates
5. Flaring Your Elbows
Flaring your elbows out can cause your chest to cave in and limit your ability to contract your back muscles. Keep your elbows close to your body throughout the range of motion.
6. Pulling With Your Biceps
While there is no way to avoid bicep recruitment during the exercise, leading with your elbows will optimally engage your back and help you build a thick back. Pulling with your elbows also allows you to contract your back muscles efficiently.
7. Not Using Lifting Accessories
Many gym-goers leave gains on the table by not using lifting accessories. Accessories like weight lifting straps and belt can help improve your form, reduce the chances of an injury, and set you up for lifting heavier.
Check Out: 5 Lifting Accessories You Should Have In Your Gym Bag
T-Bar Row Variations and Alternatives
1. Chest Supported / Lying T-Bar Row
The chest-supported T-bar row is a great variation for beginners or people who have lower back issues.
Steps:
Load the T-bar machine with an appropriate weight.
Lie prone on the pad and grab the handles with an overhand grip.
Brace your core and pull the T-bar towards your chest.
Contract your shoulder blades and keep your elbows flared in throughout the movement.
Your upper back muscles and shoulder blades should be fully contracted at the top of the movement.
Slowly return to the starting position.
Repeat for recommended reps.
2. Barbell Row
Barbell rows are a staple in most back training routines. The barbell row is quite similar to the T-bar row with the main difference being that the barbell row allows you to move the weight through greater degrees of freedom.
Steps:
Stand upright and grab a barbell with a shoulder-width overhand grip.
Push your shoulders down and back while maintaining an exaggerated chest forward position.
Hinge at your hips and lower your torso until it is at a 60-degree angle with the floor.
Pull back your elbows while keeping them close to your body as you lift the bar towards your upper abdomen.
Pause and contract your lats at the top of the movement.
Return to the starting position with a slow and controlled motion.
Repeat for recommended reps.
3. Pendlay Row
[embedded content]
Pendlay rows are a great T-bar alternative, especially for powerlifters as it targets the exact opposite muscles of the bench press. It allows for greater stability when performing heavy presses.
Steps:
Unlike the orthodox barbell row, the starting position of the bar in the Pendlay row will be on the floor.
Stand with a shoulder-width grip and grab the bar with a pronated grip.
Get into position by pushing back your hips and lowering your torso until it is parallel to the floor.
Pull the bar towards your lower chest while keeping your elbows close to your sides.
Pause and contract your lats at the top of the movement.
Related: The Pendlay Row vs The Barbell Row
4. Meadows Row
[embedded content]
The Meadows row is named after the late bodybuilder, John Meadows. The Meadows row is a single-arm landmine row that allows a greater stretch at the bottom of the movement.
Steps:
Stand next to a barbell that is in a landmine setup or wedged into the corner of a wall.
Stand in a staggered stance with the leading foot perpendicular to the bar.
With your right foot as the leading foot, bend over at the waist, and grab the end of the bar with your left hand using an overhand grip.
Rest your right elbow on your thigh for support.
While keeping your elbow close to your body, pull up the bar until it is just outside your chest.
Pause and contract your lats at the top of the movement.
Slowly return to the starting position.
Repeat for recommended reps before switching sides.
Check Out: 5 Landmine Exercises For A Shredded Body
5. Seal Row
The seal row is an isolation variation of T-bar and barbell rows. The exercise locks your body in place, taking away the ability for you to heave the weight as you perform the lift.
Steps:
Elevate a flat bench by placing a couple of aerobic steps under it on both sides.
Lay on the bench in a face-down position. Keep your leg elevated and make sure your body is in a straight line throughout the movement.
Grab a barbell with an overhand grip.
While maintaining a stable core, lift the bar to your lower chest by pulling your elbows towards the roof.
The bar should hit the bottom of the flat bench at the top of the movement.
Pause and squeeze the life out of your lats at the top of the movement.
Lower the bar with a slow and controlled motion.
Repeat for recommended reps.
6. Inverted Row
[embedded content]
Inverter rows are one of the best bodyweight T-bar row alternatives. This exercise might look easy but will leave you begging for mercy when it is done with you.
Steps:
Stand in a squat rack or front of a Smith machine.
Set the bar at your waist height. This will allow your arms to fully extend while keeping your body off the floor.
Get under the bar and lie down on your back.
Reach up for the bar and grab it with an overhand grip. Your arms should be fully extended at this point.
Your body will be suspended or just off the floor, with your heels being the only thing in contact with the floor.
While keeping your core and glutes contracted, brace your lower back and keep your body in a straight line.
Pull yourself up until your chest touches the bar.
Keep your elbows close to your sides throughout the movement.
Pause and contract your lats at the top of the movement.
Slowly return to the starting position.
Repeat for recommended reps.
Next Read: Barbell Row VS Inverted Row, Which One Reigns Supreme?
7. Seated Close Grip Cable Row
For lifters who fancy themselves a cable exercise, you cannot go wrong with the seated close-grip cable rows:
Steps:
Grab a v-handle and sit back on the machine.
Maintain an upright torso throughout the exercise.
Sweep back with your elbows and pull the v-handle towards your naval/lower abdomen.
Pause and contract your lats at the top of the movement.
Slowly return to the starting position.
Repeat for reps.
Must-Try: Build A Thick and Wide Cobra Back With This Workout
Conclusion
If you want to carve a thick and wide back, the T-bar row is a must-have in your exercise arsenal. The compound exercise might take some time to master, but the dividends it will pay in the long run make the upfront investment worth it.
For people who do not have a T-bar machine at their gym, this article lists enough variations to ensure the development of your posterior muscles.
Which is your favorite T-bar row variation? Let us know in the comments below. Also, be sure to follow Generation Iron on Facebook, Twitter, and Instagram.

Chris Bumstead Back Workout For A Sprawling Christmas Tree
3x Classic Physique Olympia champion Chris Bumstead shares a massive back workout!
Believe us when we say there will be major posterior pounding on the Chris Bumstead back workout routine. Honestly, we would be disappointed if we did not have to crawl out of the gym by the end of the 3X Mr. Olympia Classic Physique champion’s training regimen.
Building a V-taper is easier said than done. Your back is the second largest muscle group after legs. An effective back training session can be as taxing (if not more) than a leg workout. You need to target your back from every angle to ensure overall development.
Check Out: Chris Bumstead Gives Answer On Whether or Not to Use Steroids
Chris Bumstead Stats
Name: Christopher Adam Bumstead
Nickname: CBum
D.o.B: 2 February 1995
Birthplace: Ottawa, Ontario, Canada
Height: 6’0”
Weight: 225 pounds
Chest: 51″ (130 cm)
Waist: 30″ (76 cm)
Bicep: 20″ (51 cm)
Chris Bumstead Story
The reigning Mr. Olympia Classic Physique champ was born in Ottawa, Canada. He was involved in multiple sports through his childhood, playing football, baseball, basketball, and hockey in high school.
CBum started lifting at the age of 14 and fell in love with working out. He went from 170 to 225 pounds between the ninth and twelfth grades, growing his legs the most.
After building what he thought was a good physique, Bumstead met his sister’s boyfriend (a pro bodybuilder), Iain Valliere, and things started to change for the better. Iain made Chris believe that he could compete and become a fierce competitor.
Check Out: Iain Valliere Deadlifts 675lb Five Times Ahead Of 2021 Arnold Classic
In 2016, at the age of 21, he earned his pro card after taking home the IFBB North American Bodybuilding Championship trophy.
Chris Bumstead draws inspiration from the golden age bodybuilders. He focuses on keeping his waist small and building broad shoulders. It would be safe to say that CBum is one of the most popular bodybuilders of our time.
Bodybuilding legends like Jay Cutler have predicted that Chris could win the Mr. Olympia crown if he were to change divisions in the future. Given his monster size and razor-sharp conditioning, we would not be surprised to see him lift the Sandow a few years down the line.
Trivia: In 2021, Chris Bumstead won his third consecutive Mr. Olympia Classic Physique title at the age of 26. He was the runner-up in 2017 and 2018.
Next Read: Chris Bumstead’s Rules For Cheat Meals & Alcohol
Chris Bumstead Back Workouts Principles
CBum follows a 5-day training split, and some of his favorite exercises include squats, incline dumbbell press, and bent-over barbell rows. He uses the following training principles to make the most of his back workout:
1. Get the Form Right
Chris Bumstead is big on building a strong foundation. Before he starts prepping for a show, he takes a few weeks to work on his lifting form. Once in tune with the exercises, he adds weight to the bar (or machine) and gets after it.
Most rookies let their egos get the better of them in the gym. Remember – weightlifting and bodybuilding are two different sports. Chasing weights before nailing down your form can put you at risk of injuries.
If you are new to the fit lifestyle, do not hesitate to ask for help from more experienced lifters in your gym. Tip: If you are in it for longevity, you should steer clear of the broscientists.
Next Read: 5 Uncomfortable Truths About Exercise Form
2. Do Not Pull With Your Biceps
Many lifters use their biceps to pull the weight during back training. Doing this takes the tension off the back and puts it on your upper arms. If you have a more intense pump in your arms compared to your lats at the end of a back exercise, you are probably doing it wrong.
Focus on pulling the weight using your elbows and keep them close to your sides while performing back exercises. Flaring out your elbows distributes the tension to your biceps and shoulders.
For some people, gripping the dumbbell, barbell, or machine handle too hard has been known to ignite bicep and forearm recruitment. If you face similar issues, weightlifting straps can take the tension off your arms and transfer it to your target muscles.
Watch: Chris Bumstead Is The Next Generation Of Jacked And Shredded Bodybuilder
3. Focus on Lat Isolation
You should be able to see your lats and shoulder blades move during your back exercises. If you only notice arm movement, you are not following a full range of motion. On top of that, with every rep, pause and squeeze the life out of your lats.
For optimal lat recruitment and stimulation, you need to follow a full range of motion and contract your muscles with every rep. Just going through the motions for the sake of it is not going to cut it. You need to have a strong mind-muscle connection to make the most of your workouts.
If you face muscle or strength imbalances, unilateral lifts will help better isolate your lats and fix the issues. Research has shown that most athletes can benefit immensely from adding unilateral training to their training regimen.
Related: Chris Bumstead Shows Off Dungeon Style Gym and Training
4. Use Different Grips
Switching grips can make your back light up like the 4th of July. A pronated (palms facing downward), supinated (palms facing upward), and neutral (palms facing each other) all target your back differently.
You also have the option of adding more variations in your back training by using W or V-bars during cable exercises. Having a mix of these grips in your back workouts can ignite muscle growth and help grow that sprawling Christmas tree.
5. Include a Ton of Variety
You need to constantly add variety to your training to ensure that you never hit a wall. Performing the same exercise over and over for weeks on end is a sure-shot way of hitting a plateau.
Chris Bumstead changes up the start of his back workout after every three back days. He rotates through deadlifts for three back workouts, then switches to rack pulls for the next three sessions, and then skips both, moving right to dumbbell rows for the last three workouts of the cycle.
Apart from switching exercises, you could also add variety to your workouts by using advanced training principles like supersets, dropsets, intraset stretching, and experimenting with the number of reps, sets, and time under tension (TuT).
Must Read: Four Plateau-Busting Strategies To Apply To Your Training
6. Keep Rest Between Sets to a Minimal
If you are eating 5,000 monster calories like Chris Bumstead, you need to utilize every opportunity you can find to burn them off. While performing the Chris Bumstead back workout, limit your rest duration between sets and exercise to less than 60 seconds.
Note: Do not waste your resting time checking Instagram or clicking selfies. Use it to stretch your muscles and pose. Posing can improve your mind-muscle connection and help induce muscle-ripping pumps.
Related: Chris Bumstead Details 5,000-Calorie Diet During Bulking Phase
Chris Bumstead Back Workout
If you have seen Chris Bumstead hitting back poses on stage or his Instagram page, you know there are no weak spots in his posterior muscle chain. Let kids near CBum while he is posing, and they might end up hanging lights and stockings on his sprawling Christmas tree.
Building thickness in his already-wide back is one of Chris Bumstead’s back workout goals.
During Mr. Olympia 2021 presser, Bumstead explicitly mentioned that his back gains were on another level, and he had added 10 pounds of muscle mass just in his back.
Watch: Dennis James – Can Chris Bumstead Improve His Back Enough To Beat Breon Ansley?
Chris Bumstead Back Training Routine
Here is the Chris Bumstead back workout that will help you achieve similar results:
1. Deadlift: 6 sets of 6-8 reps
Steps:
Stand behind a barbell with a shoulder-width stance and your knees slightly bent.
Hinge at your hips and bend slightly at your knees.
Push back your butt while keeping your core engaged so that your back stays flat.
Squat down and bend at your knees to grab the bar with a mixed grip – one hand in supinated and the other in a pronated position.
Keeping your core tight, push through your heels, and lift the weight, straightening your knees first, keeping your back flat, and then reversing the hinge at your hip to stand up.
Pause at the top of the movement and contract your lats and shoulder blades.
Return to the starting position in a controlled motion.
Repeat for recommended reps.
Check Out: Chris Bumstead Answers: Is Classic Physique Easier Than Men’s Open? | GI Vault
2. Single-Arm Neutral-Grip Dumbbell Row: 4 sets of 10-12 reps (each arm)
Rather than using a staggered stance on dumbbell rows, Chris Bumstead likes to square his feet to the bench where he stabilizes his body with his resting arm. It makes the movement more concentrated.
Steps:
Set an incline bench at a 60-degree angle to the floor.
Place your left hand on the edge of the inclined side of the bench, take a step back, and stand with a narrower than shoulder-width stance.
Grab a dumbbell with your right hand using a neutral grip.
Pull your elbow back and upwards towards the roof without letting it flare out.
Pause and contract your lat at the top of the movement.
Return to the starting position with a slow and controlled motion.
Repeat for recommended reps before switching sides.
3. Seated Cable Row: 4 sets of 10-12 reps
Use a V-handle attachment on the cable row machine. To hit your lower lat, make sure you are performing seated rows low – below your belly button.
Steps:
Sit on the cable row machine with your knees bent and grab the V-bar attachment with a neutral grip.
Position yourself with your knees slightly bent and so that you have to reach to grab the handle with outstretched arms yet without curling the lower back over.
Pull the handle toward your lower abdomen without using momentum and swinging back and forth.
Keep your torso upright and chest raised throughout the movement.
Contract your shoulder blades and lats at the top of the movement.
Return to the starting position with a controlled motion.
Repeat for recommended reps.
4. Close Grip Lat Pulldown (rope attachment): 4 sets of 12-15 reps
Incorporating both close and wide-grip pulldowns in the Chris Bumstead back workout help target different posterior muscles.
Steps:
Sit on the pulldown machine with an upright torso.
Secure your legs under the thigh pad.
Grasp the rope attachment with a neutral grip (palms facing each other).
While keeping your chest raised, pull the rope down until your elbows move behind you.
Keep your elbows close to your body throughout the movement.
Pause and contract your shoulder blades and lats at the bottom of the movement.
Slowly return to the starting position.
Repeat for recommended repetitions.
5. Wide-Grip Lat Pulldown: 2 sets of 12-15 reps (dropset)
Wide-grip lat pulldowns consist of dropsets. After performing 12 reps, you will drop down the weight and perform another 15 reps. Choose a weight that will make you hit failure in the dropset.
Steps:
Choose your weight, and sit down on the pulldown machine with an upright torso.
Adjust the thigh pad so that your legs fit snuggly under the support.
Grasp the bar with a pronated (overhand) grip, with your hands more than shoulder-width apart.
Pull down the bar until it is a few inches away from your upper chest.
Pause and contract your shoulder blades and lats at the bottom of the movement.
Return to the starting position with a controlled motion.
Repeat for recommended reps.
6. Dumbbell Pullover: 4 sets of 10-12 reps
While performing the dumbbell pullover, focus on a deep stretch and only come about 3/4th of the way up to keep tension on the lats.
Steps:
Lie across a stable flat bench. Your upper back, neck, and head should be fully supported.
Plant your feet shoulder-width apart on the floor.
Hold a dumbbell at its neck with both hands.
Extend your arms toward the ceiling, over your chest. Your palms should be facing each other, and your elbows slightly bent.
As you inhale, extend the weights back and over your head, keeping a strong back and core.
Exhale slowly and come about 3/4th of the way up.
Repeat for recommended reps.
Related: Golden Era Lifts: 5 Exercises From The Iconic Era You Need To Try
7. Back Extension (bodyweight): 2 sets to Failure
Back extension is one of the most effective ways of training your lower back. CBum performs two bodyweight sets of back extensions to failure.
Steps:
Position yourself on the back extension machine with your hips on top of the cushioned pads and your feet secured under the leg anchor.
Your body should be in a straight line at the starting position.
Place your arms behind your head or cross them in front of your chest.
Lower your torso until your head is a few inches off the floor.
Return to the starting position explosively and lift your torso a few inches.
Pause and contract your back for a couple of seconds.
Repeat for recommended reps.
Conclusion
By the end of the Chris Bumstead back workout, your muscles will be begging for mercy. Remember – Do not engage in ego lifting. If you do not feel a pump after every set, you should lower the weight and focus on contracting your back with every rep.
Put in the work, and the Gods of bodybuilding shall bless you with the physique of your dreams. Good luck!
Who is your favorite bodybuilder? Let us know in the comments below. Also, be sure to follow Generation Iron on Facebook, Twitter, and Instagram.
Ball Busting: Get Lean With Exercise Balls
Here are some exercises that can help you get in shape using exercise balls!
It is technically winter time but that is no excuse to allow your abs to be covered with all that visceral fat, so put the cookies and milk down and read how to stay or get lean and ensure your abs are on point this year only using exercise balls…. And with it nearly being the holidays I don’t mean borballs.
So let’s look at different balls you can use to keep those abs on point, starting with one of my favorites:
The Slam Ball
Now the slam ball is sometimes referred to as the medicine ball but that is not correct, as the slam ball is significantly different as it is specifically designed for throwing exercises and can take the impact against hard surfaces and will not bounce back and hit you in the face.
Slam Ball Exercise 1
Standing overhead slam
Feet shoulder width apart
Hold the slam ball with both hands
Extend the ball over your head
Then slam it to the ground with full force
Squat down to pick it up
Repeat accordingly
Alternative version:
Oblique focused
So rather than going straight on, lift the ball over your head but this time target the left and right side separately.
So lift over the left hand side
Slam down on that side
Squat to pick up
Then slam down on the right side
And repeat accordingly
Slam Ball Exercise 2
Slam Ball reverse scoop toss
This move seems to have a variety of names but this seems to sum it up perfectly, this move can also be done with a wall ball.
Feet shoulder width apart
Holding the ball with both hands
Then squat down and throw the ball over your head and behind you as far as you can
Variation:
Add a sprint
After each scoop sprint after the ball and reverse scoop toss in the direction you came from and continue doing so until you complete you desired reps.
The Wall Ball
Now the next piece of equipment I want to focus on is the wall ball, again the name is a dead giveaway, as it is usually used to hit walls with.
The wall ball is a lot bigger than the slam ball or medicine ball and is not designed for slamming but great for hitting against walls or throwing overhead.
Wall Ball Exercise 1
Wall ball rotational throws
Standing a few feet away from a wall
Hold the wall ball with both hands
If the wall is to your right then take the ball towards your back hip (on the left hand side)
Then while rotating your body throw the ball against the wall
This should be an explosive movement
Catch the ball
The repeat for desired reps
Repeat on opposite side and ensure you do same rep range
Wall Ball Exercise 2
Wall ball throws
Standing close to a wall
Hold the wall ball with both hands
Ensure it is chest height
Then squat down
And drive up and throw the wall ball uo and slightly forward so it hits the wall
Then catch the ball and descend into a squat and back into the next rep
Repeat for desired reps accordingly
Wall Ball Exercise 3
Wall ball partner squat toss
Standing opposite a partner about 5-6 yards away
One of you will be holding the wall ball
Then squat and toss the ball to your partner
Your partner will catch the ball and then squat and toss back to you accordingly
Keep repeating for desired rep range
This exercise can also be done with a medicine ball.
Make it harder:
Add intensity by mirroring your partner, so squat when your partner squats even when you do not have the ball.
Medicine Ball
So now let’s move onto the most commonly found ball in gyms up and down the country, it is of course the medicine ball.
Medicine Ball Exercise 1
Medicine ball stomach hits
So my first exercise is a real gut buster (pun intended).
Start by lying down on the floor
Have your training partner standing over you with the medicine ball in hand
Have your partner throw the ball towards your abdomen
Ensure you take the hit and try not to catch or block the ball
Once it has hit its intended target area grab the ball and throw it back to your partner
Then brace yourself again for the next hit
Repeat for desired rep range
Alternative target area:
Oblique focus
So if you want to only target the obliques only, have your partner stand much closer.
They will literally be towering over you.
They will be holding the ball constantly and not letting go at any point
Brace your abs
And ensure they hit the obliques with ‘mini’ hits on one side
Once one side has been annihilated, move onto the other side
Medicine Ball Exercise 2
Medicine ball kneeling partner twists
Make sure you are kneeling down
And back to back with your partner who should also be kneeling down
One of you should have a medicine ball to hand
Both of your brace your cores
Then slowly twist to one side and pass the ball to your partner (so your left will be there right and vice versa)
To keep things symmetrical ensure to twist and pass in the opposite direction also, so if you have been passing to your left for 20 seconds, pass to your right for the same duration of time
Alternative:
This can also be done standing up.
So there you have it, some great exercises to get you in tip top shape during the holiday season. And if your gym doesn’t have any of the balls mentioned in this article then you better add it your holiday wish list.
So until next time, keep pumping!
For more news and updates, follow Generation Iron on Facebook, Twitter, and Instagram.
5 Ways To Improve Your Grip & Deadlift More Than Larry Wheels
You are only as strong as your grip strength.
There comes a day in every lifter’s life when he is handed a stuck jar to open. And then there comes a day when you run out of excuses to defend your poor grip strength – “I just washed my hands,” “The jar lid is greasy,” or “I am neither your butler nor Larry Wheels” only work for so long. No matter how hard you try to save face, people will eventually look into your eyes and see your sorry soul.
The day your grip strength starts becoming a problem in your workouts is the day you have entered the pro territory. As you gain experience, get stronger, and lift heavier, your grip might start giving out at knee level while deadlifting.
Also, Check-Out: Deadlift – Exercise Guide
A grip failure while deadlifting should bring you both – joy and sorrow.
You should be joyous because you are finally strong enough to have a grip problem and sorrowful because it takes time to build grip strength – meaning you will be stuck on a plateau for a while.
If your grip gives up before your target muscle, know that you are getting stronger. It is also one of the most common yet unspoken phenomenons in the fitness industry.
The Instagram fitness celebrity you see deadlifting 585lbs will tell you the importance of wearing a weightlifting belt and using lifting straps, but they will never tell you the role of grip strength in a deadlift. We do not mean this in the sense that they are trying to hide something. The truth is – talking about grip strength is not sexy enough for Instagram.
If you want to improve your physique, you need to work on every aspect – from muscle composition and symmetry to grip strength.
You might be able to add to your deadlift by using lifting accessories like straps, but your grip will eventually become the limiting factor.
https://www.instagram.com/p/CG7-ISepG0Y/
Breaking Down Grip Strength
To begin with, grip strength is not limited to hand strength. It includes everything from the muscle near the elbow down to your fingertips. Fun Trivia: 35 forearm and hand muscles are involved in moving the fingers.
The majority of muscles used during grip work begin between the elbow and upper portions of the forearm bones (ulna and radius) and go down into the thumb or fingers (phalanges).
On top of this, the scope of grip strength extends far beyond deadlifts. It is required for almost every physical activity and more so for every sport. Doing laundry, driving a car, wrestling, playing badminton, cricket, golf, and tennis; all need good grip strength.
Grip Strength Has More To It Than Meets The Eye
In 2015, the international Prospective Urban and Rural Epidemiological (Puree) researched 140,000 adults over four years and found that there is a significant relationship between a decrease in grip strength and an increase in the risk of cardiovascular disease
A paper published in the American Journal of Preventive Medicine conducted in 2015 concluded that people with a lower grip strength were more likely to be diabetic or record higher blood pressure.
The sports science journal Shoulder & Elbow published a study in 2016 that concluded there is a strong correlation between grip strength and lateral rotator strength. The study stated that “Each 11-pound decrease in grip strength throughout the study was linked to a 17% higher risk of dying from heart disease, a 9% higher risk of stroke and a 7% higher risk of a heart attack.”
Types of Grip Strength Exercises
There are four main types of grips that we use in our workouts and day-to-day life. Each of these forms engages different muscles and hence requires different training techniques.
1. Crush
It is the act of closing fingers against resistance. When most people think of grip strength, they think about crushing exercises using grip strengtheners.
Although crushing exercises get you the macho-man handshake, it does close to nothing for your deadlift. To crush a deadlift, you need to have monster strength in at least one of these grips: overhand grip, hook grip, or mixed (over-under) grip.
Since a crushing exercise only lasts for a few seconds, it is not the best choice for building grip strength for a deadlift. TuT (time under tension) is a crucial factor in building grip strength. If you want to develop your grip strength, you would be better off performing exercises where TuT is substantial.
To put it precisely – if grip workout was a love-making session, you want to be a brown antechinus and not a jackrabbit.
Related Read: How To Increase The Time Under Tension To Maximize Your Gains
2. Pinch
Make an alligator mouth with your hands and chomp down on weight plates. This grip tends to be a lot more stress/work on the thumb. You cannot afford to miss pinching exercises if you want to improve your grip strength.
3. Support
Supporting includes lifting something where your fingers take the majority of the load. These exercises test your ability to hold resistance for extended periods.
4. Extension
If you did not notice, all the three types of grip exercises mentioned above are contracting movements – meaning you need to pull your fingers towards your palms to perform the exercises.
The human hand has evolved to be great at grabbing and holding onto things, so the muscles used in extension exercises are not usually as strong as the flexion muscles.
For balanced grip strength, you need to add extension movements to your exercise arsenal.
5. Bonus: Wrist Work
When it comes to arm, forearm, or grip strength training, wrists usually get a step-motherly treatment.
Little do people realize that the wrist is where the magic happens – if you know what we mean.
Wrist strength, mobility, and stability play a crucial role in your upper body strength. To transfer energy from the body through the hands, you need to make sure every link in the chain is strong.
Remember the stuck jar example in the opening paragraph of this article? You can never open a jammed jar with puny writ strength.
How To Test Your Grip Strength
Before you start working on your grip, you should know your current grip strength level. Your grip strength result can act as a benchmark against which you can gauge your current strength and track your progress.
For the grip strength test, you will need a handgrip dynamometer to measure the maximum isometric strength of the hand and forearm muscles. Here is the dynamometer we recommend.
Perform at least three squeezes on each hand to get an accurate reading.
If you want a better reading of your grip strength, you can take a pinch strength test in addition to the handgrip dynamometer test. A pinch strength test measures the maximum isometric strength of the hand and forearms muscles when performing a pinching action.
According to numerous pinch stress tests conducted across different age ranges, fitness levels, and athletic ability, a scorecard for adults (in both kgs and lbs) was produced:
Excellent: >141lbs ( >64kg)
Very good: 123-141lbs (56-64kg)
Above average: 114-122lbs (52-55kg)
Average: 105-113lbs (48-51kg)
Below average: 96-104lbs (44-47kg)
Poor: 88-95lbs (40-43kg)
Very poor:

Eight Best Dumbbell Exercises for Your Biceps
Here are dumbbell exercises to work into your bicep routine.
The biceps figure into most moves in the weight room and everyday life and yet advocates of core training and functional movement suggest time spent isolating the biceps could be better spent on movements that target more areas of the body at once.
The core crowd has a point, though there’s nothing like a rigorous biceps-focused workout to produce the sleeve-bursting guns you want. When it comes to isolating the biceps, dumbbells do a better job than machines, barbells, and even chin-ups. And if you’re still looking for more benefit for your workout time, consider that studies suggest that the biceps help stabilize the shoulders.
In this 30-minute dumbbell workout to build your biceps, we’ll hammer through four sets of these eight moves in a circuit fashion, alternating between pushing and pulling movements, so we can produce maximum results with minimal time, resting only briefly between sets.
Pete Williams is a NASM certified personal trainer and the author or co-author of several books on performance and training.
1. Bicep Curls
What it does: It’s simple yet challenging and a mainstay of any bicep workout.
How to do it: Stand with feet shoulder-width apart and biceps at your sides. Keeping your elbows still, lift the dumbbells to your shoulders as you rotate your palms to the ceiling. Keep your back still and stomach tight. Return to starting position.
How many? 4 sets of 10 reps.
2. Farmer’s Carry, Racked Position
What it does: The traditional farmer’s carry is an effective full-body move that also challenges endurance as you increase distance carried. By carrying the dumbbells in a racked position (heads of dumbbells at shoulder level) we isolate the biceps.
How to do it: Carrying the dumbbells in a racked position, walk for 30 seconds – 15 seconds out and back or in a loop around the gym.
How many? 4 sets.
3. Four-in-One
What it does: This keeps your biceps under tension for four sets in one.
How to do it: Start with light dumbbells and curl 10 times. Next curl halfway, pausing for a second just above your navel at each of 10 reps. After that, take the dumbbells up and descend just below your pecs, again pausing for a second before returning for 10 reps. Finally, do 10 more full reps.
How many? 4 sets
4. Dumbbell Row
What it does: Though it’s more of a back and shoulder exercise, it targets the biceps. By placing this move between two curl exercises, it allows us to keep moving without rest.
How to do it: Place a dumbbell on either side of a flat bench. Place your left leg on the bench, bending forward from the waist until your upper body is parallel to the floor. Place your left hand on the other end of the bench for support. Grab the dumbbell off the floor with your right hand while keeping your back straight. Lower to the floor. Do 10 reps and switch sides.
How many? 4 sets of 10 reps per side.
5. Hammer Curls
What it does: The neutral grip targets the forearms but also hits the biceps.
How to do it: Standing with feet shoulder-width apart, hold a set of dumbbells with a neutral grip so your hands face each other. Curl the dumbbells to shoulder height, keeping hands facing each other. Pause at the top of the lift, squeezing the biceps, and then lower to starting position.
How many? 4 sets of 10 reps.
6. Renegade Rows
What it does: It’s a simple yet challenging move that hits the biceps and also the back, shoulders, and triceps.
How to do it: Start in the top position of a pushup with your hands on dumbbells shoulder-width apart. Row one dumbbell toward the side of your body while balancing on the opposite hand and feet. Pause for one second at the top and return the weight slowly to the start position. Repeat on the other side.
How many? 4 sets of 10 reps per side.
7. Split Dumbbell Curl to Press
What it does: It isolates the biceps while also targeting the shoulder and overall core strength.
How to do it: Stand holding dumbbells at your sides and resting your front foot on a bench at mid-thigh height. Perform a biceps curl then press the weight over your head. Do 10 reps then put the opposite foot on the step for your next set.
How many? 4 sets of 10 reps.
8. One-Arm, One-Leg, Dumbbell Row
What it does: A variation on the traditional one-arm row works the biceps while also challenging the hamstrings.
How to do it: Keep your non-lifting hand balanced on a dumbbell rack or bench.
Extend the corresponding leg of your lifting hand back. Not only does this push you to work each side independently, as with a traditional one-arm row, but you work your hamstrings while inevitably lowering the dumbbell deeper.
How many? 4 sets of 10 reps to each side.
For more news and updates, follow Generation Iron on Facebook, Twitter, and Instagram.