Tag: Exercise Guides

Cable Upright Row: Technique, Benefits, and Variations
Build monster shoulders with the cable upright row.
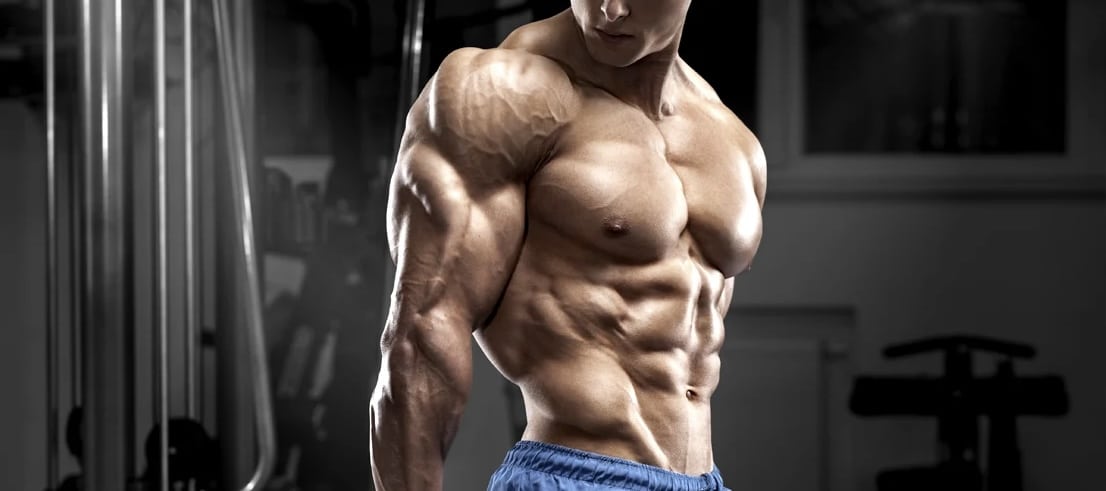
Beefy shoulders and traps are a trademark of a solid V-taper. While most people want to build round and ripped shoulders, only a few lifters ever achieve the goal.
Bodybuilding is a game of illusions, and broad and thick shoulders can make your waist look smaller and tighter. However, building boulder shoulders is easier said than done.
Shoulders can be a tricky muscle group to train. Most deltoid exercises focus on one of the three shoulder heads and mainly work on improving muscle definition. However, the cable upright row is one of the few compound shoulder exercises that activate muscle groups across your shoulders and upper back and help build muscle mass and definition.
The cable upright row is a variation of the barbell upright row that utilizes the cable pulley machine to ensure constant tension on the target muscles throughout the exercise.
There are two main types of pulling exercises — horizontal and vertical. While both types of movements usually deal with building a thick and wide back, the cable upright row is a vertical pulling exercise that trains your shoulders.
The cable upright row is one of the few vertical pulling exercises where you pull the weight from in front of your thighs towards your shoulders. Generally, the back-focused vertical pulling exercises involve pulling an overhead bar towards your chest.
Notably, the cable upright row can be potentially dangerous for the shoulders, especially for people dealing with injuries. You need to perform the exercise with a perfect form to avoid injury and ensure you are not leaving gains on the table.
Muscles Worked
The cable upright row is a functional (multi-joint) movement and targets the following muscle groups:
1. Trapezius
Traps are the primary target muscle group of this exercise. They aid in pulling the barbell upwards towards your shoulders by employing a shrugging motion. Following a full range of motion while performing the lift will help achieve optimal trap recruitment and activation.
2. Deltoids
You will be engaging all three deltoid heads (anterior, medial, and posterior) while performing the cable upright row. If you do not feel tension in your delts and traps while doing the exercise, check your form or try using lighter weight.
3. Biceps
Your biceps are engaged in the first half of the movement. Additionally, you might be able to pause and contract your biceps at the top if you are using a relatively light weight. Biceps brachii and brachialis are the upper arm muscles recruited in the exercise.
4. Upper Back
While performing the cable upright row, you will be maintaining a rigid upright stance throughout the exercise. The movement involves pulling the weight up and back to keep it close to the body. Hence, the upper back contracts and is engaged in the lift.
5. Forearms
Grip strength is one of the most overlooked aspects of the cable upright row. If you do not have strong forearms, you’ll not be able to lift heavy. Furthermore, a weak grip will automatically force you into focusing all your attention on holding onto the bar and not letting it slip, deviating you from establishing a mind-muscle connection with the primary muscle group.
While secondary muscle groups like biceps and forearms might kick-in in the first half of the lift, your shoulders are solely responsible for the second half (from your waistline to your shoulders).
6. Core
You’ll be engaging your core while performing the cable upright row as it will help maintain an upright torso throughout the exercise. People with weaker cores usually swing back and forth to lift the weight towards their shoulders.
Benefits of Cable Upright Row
The cable upright row is an incredibly effective exercise to build your shoulder size and strength. Here are a few benefits of the compound lift:
1. Reduces Odds of an Injury
The cable upright row is a variation of the conventional barbell upright row. Using a cable while performing the lift removes some moving parts from the equation and puts less strain on your shoulders, elbows, and bicep tendons.
The cable upright row is a great exercise for people dealing with injuries and can be used for muscle rehab.
2. Builds Core Strength
You’ll feel your core engage the moment you assume the starting position. Your midriff will help you maintain posture throughout the exercise.
Pulling the weight upwards towards your shoulders while maintaining a still and upright torso requires stability in your abs, glutes, and lower back.
3. Unique Movement Pattern Builds Upper Body Strength
The upright row is one of the few exercises that require you to pull weight while keeping it close to your body. The unfamiliar movement pattern helps build strength and improves your muscle coordination.
Making the upright row a part of your exercise arsenal will make you stronger in other compound exercises like snatch, clean and press, clean and jerk, and power clean.
Related: Isolation Vs. Compound Exercises: Strength, Weight Loss & More
4. Improves Shoulder Strength and Functionality
The upright row puts your shoulder joints through a full range of motion, strengthening them for functional activities. Performing the exercise regularly reduces the risk of shoulder injuries. [1]
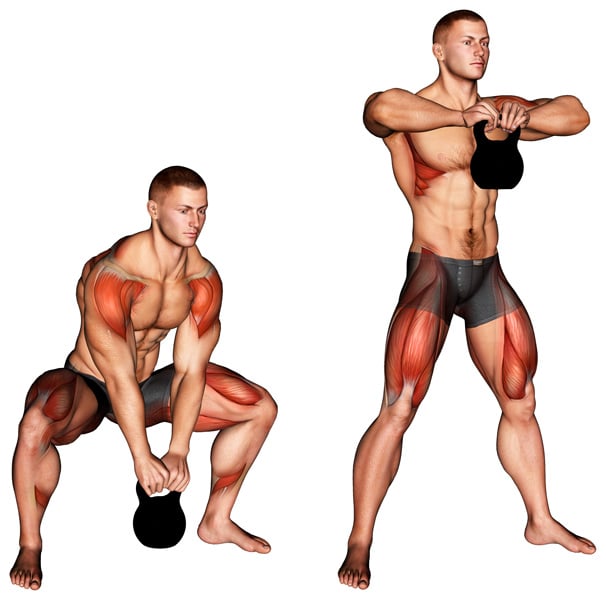
Cable Upright Row Technique
Here is how to perform the cable upright row:
[embedded content]
Attach a straight bar to a cable pulley set at the lowest setting possible.
Grab the handle with a shoulder-width pronated grip (palms facing inwards). Keep your shoulders tight and pinched back.
Assume the starting position by standing upright with a shoulder-width stance and holding the bar in front of your thighs.
Squeeze your core, glutes, and quads to maintain rigid legs for the duration of the set.
Maintain a neutral head and neck position throughout the exercise.
While leading with your elbows, pull the bar towards the ceiling while keeping it close to your body.
Pause and contract at the top of the movement.
Slowly return to the starting position.
To maintain constant tension on your muscles, make sure the weight does not rack at the bottom.
Repeat for recommended reps.
Tips
Make the most of the cable upright row with the following tips:
While performing the exercise, most lifters make the mistake of raising their elbows and hands higher than their shoulder level. Doing so takes off the tension from your shoulders and puts it on your arms. Additionally, it can cause impingement, which is a condition that reduces your shoulders’ range of motion.
The upright row can put unnecessary strain on your wrists if you hold the bar with an incorrect grip. Shoulder-width grip is recommended for wrist and shoulder safety. Furthermore, a wide grip also increases the activation of deltoid and trapezius muscles.
Make sure you are not using momentum by swinging back and forth while performing the lift. Doing so can strain your lower back and take the tension away from your shoulders.
Lifting heavier than you can handle can lead to injuries. The shoulder joint involves a very complex mechanism. Shoulder injuries can severely impact your exercise goals while also being slow to heal.
If the straight bar version of the upright row is harsh on your wrists or shoulders, you could experiment with a rope or V-handle bar attachment.
Your chin should remain tucked throughout the movement as if you were holding an egg under your chin.
Variations
Here are a few variations of the cable upright row that you can add to your exercise arsenal:
1. Dumbbell Upright Row
[embedded content]
In this upright row variation, you will be using a pair of dumbbells instead of the cable pulley machine. Dumbbell upright rows require greater stabilizer and core recruitment as you need to balance both dumbbells as you pull them towards your shoulders.
2. Barbell Upright Row
[embedded content]
The barbell upright row is arguably the most popular upright row variation. Grab a bar with a shoulder-width overhand grip and lift it while driving through your elbows.
3. Kettlebell Upright Row
[embedded content]
The kettlebell upright row should be performed with a lighter weight as a close grip on this exercise can lead to shoulder impingement. Grab a kettlebell with both hands, and pull it towards your shoulders while keeping your arms close to your body.
Tip: If you are a beginner, you should opt for an upright row variation that allows you to maintain a wide grip.
4. Snatch-Grip Upright Row
[embedded content]
The snatch-grip upright row is performed using a barbell. You will be grabbing the bar with a snatch grip (extremely wide). At the start of the exercise, your arms should be extended straight, and the bar should rest in your hip crease.
This is one of the riskiest upright row variations and should be done with utmost care. Make sure you are not using a jerking motion to lift the barbell towards your chin, as it can lead to a lower back and shoulder injury.
The exercise will help improve your snatch technique and isolate and strengthen the traps.
5. Single-Arm Upright Row
[embedded content]
The single-arm upright row can either be performed with a dumbbell or kettlebell. Since it is a unilateral exercise, it can help fix muscle imbalances and improve conditioning and strength.
6. Resistance Band Upright Row
[embedded content]
If you are a beginner, you cannot go wrong with the resistance band upright row. It is a low-risk upright row alternative that will prime you for the free-weight exercises.
Stand on a resistance band and hold the handles with an overhand grip. Your arms should be resting against your thighs at the starting position. Keep your hands shoulder-width apart throughout the exercise to reduce the chances of shoulder impingement.
Alternatives
People dealing with shoulder injuries can have a tough time performing the cable upright row. If you are one such individual, you can get similar benefits by adding the following alternatives to your training regimen:
1. Inverted Row
The inverted row is one of the most underrated bodyweight exercises. It works your core, hams, glutes, upper body, including traps, posterior delts, biceps, forearms, lats, and rhomboids.
How to perform inverted row:
[embedded content]
Stand in front of a squat rack or Smith machine.
Set the bar at waist height.
Get under the bar and lie on the floor so that the bar is directly above your chest.
Reach up for the bar and grab it with a shoulder-wide overhand grip.
At the starting position, your arms should be fully extended, and your body should be suspended or just off the floor, with your heels being the only body part in contact with the floor.
Pull yourself towards the bar, leading with your chest.
Pause at the top and contract your lats and shoulder blades.
Slowly return to the starting position.
Repeat for reps.
2. Barbell Bent-Over Row
The traditional barbell row trains many of the same muscles but from different angles and to varying degrees. While an upright vertical row puts most of the tension on your shoulders, a bent-over vertical row focuses on your lats.
How to perform barbell bent-over row:
[embedded content]
Get into the starting position by holding a barbell with a shoulder-wide overhand grip and hinging forward until your torso is roughly parallel with the floor.
While driving with your elbows, pull the barbell towards your abdomen.
The bar should be a few inches away from your belly button at the top. Pause and contract your lats and shoulder blades at this position.
Slowly return to the starting position.
Repeat for recommended reps.
3. Snatch Pull
The snatch pull is arguably the hardest exercise on the list. The exercise involves using power from the lower body to row the barbell upward.
How to perform snatch pull:
[embedded content]
Stand with your feet hip-width apart.
Grab the barbell with a snatch grip.
Once the start position is set tight, push through your legs to lift the bar off the floor.
When the bar reaches your hip level, make strong hip contact and rapidly extend your hips and legs.
Pull your elbows up and back as your ankles, knees, and hips drive you to full extension.
Aim to lift the barbell to your chest but not any higher.
Slowly return to the starting position.
Repeat for reps.
Wrapping Up
The cable upright row is one of those exercises that look super easy but will smoke you by the time you are done with it. To make the most of the exercise, prioritize form over lifting heavy.
Using different variations of the exercise will ensure you do not hit a plateau and have something to look forward to in every workout. Best of luck!
References
Trivisonno A, Laffan M, Giuliani H, et al. The influence of age on the recovery from worksite resistance exercise in career firefighters. Exp Gerontol. 2021;152:111467. doi:10.1016/j.exger.2021.111467
Kettlebell Sumo High Pull — How To, Variations and Muscles Worked
The kettlebell sumo high pull (or kettlebell sumo deadlift high pull) is a functional exercise that also builds strength and muscle throughout the entire body. It combines a deadlift and upright row, and, therefore isn’t just a simple movement which is why it’s so effective. Consequently, it’s not the best option for beginners to try…
Stronglifts 5×5 vs German Volume Training: Which is Best?
Stronglifts 5×5 vs German Volume Training: Which is Best?
So your training routine has become stale, you have plateaued, and your monstrous gains have stalled, so what do you do?
So do you keep plugging along with the same routine? As the saying goes, ‘if it ain’t broke…..’ but in this case not fixing it means you won’t be able to break the mold, and potentially add to your physique. So with that said, you need to change it up. But the question is, what kind of new routine should you try?
Today I am looking at two hypertrophy based routines: Stronglifts 5×5 program, and German Volume Training (GVT).
Stronglifts 5×5 programme:
This programme is designed to build muscle and strength and was used by the legendary Reg Park.
So How it works:
You only need to train 3 days a week, and you only perform 5 sets x 5 reps on each exercise, this is usually Monday/ Wednesday/ Friday (but can be alternated, but you will need at least a days rest between each session)
To ensure proper recovery, this program advises against training on consecutive days or doing two sessions in one day.
Workout options:
You will need to alternate between workout A and workout B, so workout A would be performed on Monday and workout B on Wednesday and then back to A on Friday.
Workout A. Workout B.
At the beginning of the program start with 50% of your 5 rep max and then add 5lbs/2.5kg of total weight to each exercise (each lift), and then progressively during each week keep doing this until you can’t get 5 reps on all 5 sets anymore.
If you happen to stall on an exercise and cannot perform 5 reps then take off 10% of the weight. This should help get your back on track for that particular session and the decrease in weight should only apply to that session only,, the next workout session should be back to your previous weight load.
This is a great beginner or even a great back to basics program, and it’s also a great program if you don’t have access to any fancy equipment.
This kind of workout is efficient as more muscle groups are being stimulated simultaneously, it is also more functional, it can burn more calories, and because compound movements create more muscle damage, it can lead to the increased levels of testosterone and Growth Hormone (GH).
It sounds like a winning formula to me, so now let’s have a look at German Volume Training.
German Volume Training (GVT) is designed to hit your larger muscle groups with intensity, and it is very simple in its execution: 10 sets x 10 reps.
The premise is that the 10 set method originated in Germany in the 70’s, and was used in the off season by weightlifters to help them gain lean mass, and the GVT method was cultivated further by Canadian weightlifter Jacques Demers.
So Why choose GVT:
This workout will help in maximising blood flow, as the muscles are hit using high volumes, and by repeatedly hitting the muscles with this kind of intensity it will allow for increased muscle hypertrophy.
The Workout:
Ten sets of ten reps, with the same weight for each exercise, so pick a weight which is suitable for that duration, so approximately 50-60% of your 1 Rep Max (1RM)
With a rest period of 60 seconds between sets
So if your 1RM for squat is 315lbs, your weight would be approximately 126-157lbs.
Due to the intensity of the workout one exercise per body part would be sufficient, in my workout plan below I have added some optional exercises too for those that can;t help themselves.
Also this workout should not be exceeded for more than 4 weeks as it could lead to injury.
Workout split:
Monday: Quads + Hams + upper abs
Tuesday: Rest
Wednesday: Chest + Biceps + lower abs
Thursday: Rest
Friday: Back + Triceps
Saturday: Shoulders + Calves + obliques
Sunday: Rest
Monday:
Quads: Front squats: 10 x 10 reps
Leg extension 3 x 10 reps (optional)
Hamstrings: Stiff leg deadlift: 10 x 10 reps
Lying leg curl 3 x 10 reps (optional)
Upper abs: weighted cable crunch 10 x 10 reps
Tuesday: rest
Wednesday:
Chest: DB flat bench press: 10 x 10 reps
DB flyes: 3 x 10 reps (optional)
Biceps: EZ bar curl: 10 x 10 reps
Lower abs: weighted knee raises 10 x 10 reps
Thursday: rest
Friday:
Back: single arm DB row 10 x 10 reps
Weighted pull ups: 3 x 10 reps (optional)
Triceps: lying down EZ bar French press 10 x 10 reps
Saturday:
Shoulders: clean and press 10 x 10 reps
Calves: Seated calf raises: 10 x 10 reps
Donkey calf raises: 10 x 10 reps (optional)
Oblique’s: weighted oblique crunch (with a plate or cables) 10 x 10 reps
Sunday: rest
As with 5 x 5 even though GVT isn’t all compound movements it is still a great regimen for building lean muscle, burning fat and increasing strength.
So which routine is better? A study from 2017 found ‘the 10 sets method, is no more effective than performing 5 sets per exercise for increasing muscle hypertrophy and strength’.
The study also goes on to state that ‘To maximize the training effects, 4–6 sets per resistance exercise is recommended as it appears that muscular hypertrophy will plateau beyond this range and may even regress due to overtraining’
So this would seem to suggest that 5 x 5 would be a more practical approach than GVT but not enough research has been done specifically on 5 x 5.
Conclusion:
So in conclusion 5×5 V GVT? Why not mix it up and combine the two? Such as 10 sets x 5 reps per exercise with a weight load similar to that of GVT, or go a bit heavier and attempt 5 sets of 10 reps, (with a rest pause if you start to fail).
The beauty here is that as long as it works there is no right or wrong routine.
References:
https://journals.lww.com/nsca-jscr/Fulltext/2017/11000/Effects_of_a_Modified_German_Volume_Training.21.aspx
https://pubmed.ncbi.nlm.nih.gov/27102172/
https://pubmed.ncbi.nlm.nih.gov/25932981/
https://pubmed.ncbi.nlm.nih.gov/24732784/
https://www.ncbi.nlm.nih.gov/pmc/articles/PMC5969184/
https://www.ncbi.nlm.nih.gov/pmc/articles/PMC6303131/
https://www.mdpi.com/2075-4663/6/1/7/htm
5 Best Supersets To Crush Biceps
Here are some supersets to hit biceps hard!
Spending a training day focused solely on the biceps seems like an exercise in vanity. Why not incorporate the “guns” into a typical chest-and-arms routine?
But there’s nothing wrong with spending a full workout training for the gun show. Plus, there’s no reason to feel guilty about it. For all the talk in recent years about training for functional movement and core strength – not just like a bodybuilder for aesthetics – there’s been little appreciation of the functional role of the biceps.
Try lifting a couch or kid without the biceps – or pushing or pulling just about anything. Sure, movement starts from the core but your arms aren’t just levers along for the ride. The biceps are fully engaged, guns locked and loaded. Studies show that the biceps support many movements across the elbow and shoulder joints.
Even if you’re a dedicated athlete training for a specific sport, there’s nothing wrong with taking an occasional workout to focus on your biceps. If nothing else, it’s a welcome diversion and the best workout is, of course, the one you haven’t done before, or at least not in some time.
In this biceps superset workout, we’ll pair a push and a pull movement. This way we both activate and challenge the biceps in an efficient manner that enables us to keep moving through the workout with no rest.
Pete Williams is a NASM certified personal trainer and the author or co-author of several books on performance and training.
FIRST SUPERSET: DIVE BOMBER PUSHUPS AND PRONE GRIP PULLUPS
Dive Bomber Pushups
What it does: This pushup variation requires more use of the biceps and shoulders.
How to do it: Start with hips in the air and feet shoulder-width apart. Lower head and shoulders down as if going under a bar. As you push your head and shoulders into position, arch your back. Reverse process to return to starting position.
How many? 10 reps.
Prone Grip Pullups
What it does: Though best known as a back movement, you’re also hitting the biceps, along with the shoulders and chest.
How to do it: Grab the bar with an overhand grip. Hanging from the bar, pull your shoulder blades back and down to lift your body and build momentum. Finish by pulling up with your arms.
How many? 10 reps
SECOND SUPERSET: FARMER’S CARRY/RACKED POSITION AND INVERTED BAR ROWS
Farmer’s Carry, Racked Position
What it does: The traditional farmer’s carry is an effective full-body move that also challenges endurance as you increase the distance carried. By carrying the dumbbells in a racked position (heads of dumbbells at shoulder level) we isolate the biceps.
How to do it: Carrying the dumbbells in a racked position, walk for 30 seconds, carefully avoiding the oblivious earbud zombies not paying attention in your gym.
How long? 30 seconds.
Inverted Bar Rows
What it does: This provides many of the benefits of a pullup while better isolating the biceps.
How to do it: Lie underneath a bar that’s several feet above you, such as in a squat rack. Hang underneath the bar with heels on the ground and arms fully extended. Pull your chest toward the bar. Pause at the top and return to starting position.
How many? 10 reps.
THIRD SUPERSET: DYNAMIC PUSHUPS AND CHIN-UPS
Dynamic Pushup
What it does: By exploding on the upward movement, you hit the biceps harder.
How to do it: Slowly lower yourself down then explode up as hard as you can. The upward movement should take no longer than 1 second.
How many? 10 reps.
Chin Ups
What it does: Like the overhead pull-up, the chin-up is a terrific shoulder and back exercise to build that V-shaped torso. But by doing the underhanded chin up, we place more emphasis on the biceps.
How to do it: Grab the bar with an underhand grip. Hanging from the bar, pull your shoulder blades back and down to lift your body and build momentum. Finish by pulling up with your arms.
How many? 10 reps
FOURTH SUPERSET: SUSPENSION TRAINER PUSHUPS AND SUSPENSION TRAINER CURLS
Suspension Trainer Pushups
What it does: The instability of the trainer forces you to recruit more muscles and the biceps play a prominent role. Plus, by pairing it with suspension trainer curls, we can keep things moving.
How to do it: Feet on the ground, assume pushup position and grab the handles. Lower and push up.
How many? 10 reps.
Suspension Trainer Curls
What it does: With your body weight as resistance, this move hits the biceps hard.
How to do it: Grab the suspension trainer handles with both hands. Lean back to fully extend your arms. With feet shoulder-width apart and back straight, use your arms to pull yourself up (toward the trainer) by performing a curl. Bend the elbows and curl the handles as close to your shoulders; use the biceps instead of your upper arms.
How many? 10 reps.
FIFTH SUPERSET: FOUR-IN-ONE AND PLANK
Four-In-One
What it does: This challenging four-in-one exercise hits your biceps from all angles.
How to do it: Start with light weight on a barbell and curl 8 times. Next curl halfway, pausing for a second just above your navel at each of 8 reps. After that, take the bar up and descend just below your pecs, again pausing for a second before returning for 8 reps. Finally, do 8 more full reps.
How many? 1 set
Plank
What it does: This promotes overall core stability, but your biceps are keeping you in a proper position. Plus, after doing the Four-in-One, this will seem like a break.
How to do it: Lie in a prone pushup position with hands on the floor, elbows under shoulders, and bent 90 degrees. Push up off the elbows, tucking your chin so your head is in line with your body. Keep head in line with spine and belly button drawn in. Hold for one minute.
How long? 60 seconds.

8 Closely-Guarded Secrets of Guys with Abs, Revealed!
“I don’t want six-pack abs” – No-one ever.
Abs are one of the most sought-after muscle groups. Besides making you look super fit, a shredded midsection can make you a hit among the women, or at least this is what Instagram Reels makes us believe.
Quick question: Have you ever seen a Greek god statue without a chiseled midriff? Heck, superhero costumes come with six-pack engravings.
The grown men in costumes want the world to know they have a shredded abdomen under the suit. We cannot think of another reason why a superhero would need abs drawn on his outfit. We are pretty sure it does not help fight the bad guys, but we digress.
Carving a Greek god-like midsection requires a lot of patience, persistence, and determination. More than all of this, it requires you to watch what you put in your mouth throughout the day. It came out wrong, but we hope you get what we mean.
So, you have a big day coming up in eight weeks, and you want to sport a six-pack for the special occasion? We hate to be the ones breaking this to you, but you are never going to look like a cover model in such a short period, especially if you have never hit a gym or followed a strict diet plan before.
If you are a fitness noob, the only chance of a physique transformation you have in such limited time is to make best friends with a guy who is into selling juice. Just so you know, we are not talking about fruit juices here.
Related: Best on the Planet! Physiques with Picture Perfect 6-Pack Abs
8 Closely-Guarded Secrets of Guys with Abs
Carving a six-pack is much more than a weekend project. It requires a lot of trial and error, and individuals usually need to follow a personalized approach to see optimal results.
But if you study the techniques and habits of people with a shredded midsection, you will find a lot of similarities. They might be eating different amounts of calories in a day or performing different exercises, but they are usually following the same principles.
Decrypting the Secrets Behind Building Abs
Here are eight totally doable things guys with a ripped midsection do every day of the week:
1. Start with You!
No two individuals have the same body composition. Let’s say you want to have a midsection like Wolverine. But before you start your transformation journey, you need to complete a very important step. No, we are not talking about buying adamantium from the black market.
To ensure an effective transformation, you need to do the preliminary work. Note down your current body fat percentage, weight, and goal numbers.
Put down your current diet plan into a calorie tracking app and figure out your daily caloric intake and the macronutrient breakdown. This and not crunches should be the first exercise you do if you want to build picture-perfect abs.
On top of that, many rookies make the mistake of choosing a super-strict diet program right out of the gates. Building abs requires you to drop your body fat considerably that, if done sustainably, can take some time. You want to follow a diet that consists of your favorite food (healthy) and fits your environment.
You do not want to pick a diet from YouTube that has you eating exotic foods that are not available in your neighborhood or relies heavily on seasonal fruits that can burn a hole in your pocket.
Check Out: Zac Perna’s Guide To Picture Perfect Abs
2. Crunches (alone) are Not Going to Cut it
If you think you can crunch your way to a six-pack, you are in for a rude shock. By the way, when we say “crunch,” we are referring to all the abdominal exercises – leg raise, plank, Russian twist, and the works.
Building a solid core requires much more than performing these exercises in isolation. Your core stabilizes the entire body and helps transfer power between your lower and upper limbs, and training it that way yields the best results.
Compound exercises that challenge your full-body stability and power should be a constant in your ab training routine. The clean and jerk and snatch are a couple of compound lifts you should be doing if you want a shredded midriff.
Other multi-joint lifts like barbell front squat and kettlebell goblet squat are also great for building a strong anterior chain.
3. Do NOT Be Afraid of Carbs
Many fitness newbies make the mistake of demonizing carbs. They think the bread loaf is the reason why they are not able to build abs. Only when they cut out the villain, can they have the six-pack of their dreams, or so they think.
Contrary to what most people think, carbs from nutrient-dense whole foods can give you the energy to perform high-intensity workouts, recover properly, drop body-fat percentage, and, in the end, develop a six-pack.
As per research, high-quality carbs can help boost endurance performance, burn fat, and build muscle.
Now, the next logical question would be – If you are just starting your fitness journey, how many carbs should you be eating every day?
While every individual is different and might need a different amount of carbs to see optimal results, 1g of carbs per pound of your bodyweight per day is a good starting point for most abs-chasing guys.
We highly recommend taking a professional’s help when you are starting out. It will help shorten your learning curve drastically. While we understand it might cost a little money upfront, it will pay dividends in the long run.
4. Be Like Johnie Walker, Always “Keep Walking”
Let us let you in a little secret. Guys with a six-pack do not train their abs every day or work out every day, for that matter. But one thing all of them do consistently is move.
The WFH lifestyle has turned many people into couch potatoes. Walking from their room to their car and from their car to their office was the only workout most of these people got pre-COVID. Now that it is gone, they spend most of their day hunched over a computer screen or phone.
Homo sapiens evolved into hunters and gatherers. Our bodies were not designed to be completely sedentary. Sitting for long durations can contribute to tightness, poor blood and nutrient transport to your muscles, and a sluggish metabolism.
If you cannot go out for a daily walk on your rest days, make sure you are doing at least 15 minutes of stretching. It will help ease your muscles and get your blood pumping.
Besides, you should make the most of your rest days and focus on optimizing your recovery process. Getting your blood flowing throughout your body is key to recovery. Any movement that gets your limbs to stretch through a large range of motion at a relatively low intensity can be beneficial.
Next Read: Debunked: The Top 5 Myths About Six Pack Abs
5. Food is Your Fuel
When training to build abs, many people like to starve themselves. Eating too few calories can be counterproductive to your six-pack goal. Consuming fewer calories than your body needs to function optimally can put you in a catabolic state.
When you are in a catabolic state, you are breaking down or losing overall mass, both fat and muscle. Your body does this to sustain its energy reserves.
So, burning muscle by being in a catabolic state and building abs do not go hand-in-hand. If you had an intense training session, do not hold yourself back from a high-calorie meal. It might be exactly what your body needs at that point.
6. Sleep Your Way To a Six-Pack
Working out does not give you abs. It helps carve your abs, but it is not the be-all and end-all of building a six-pack. Everyone has abs, but most people have their abs hidden underneath a layer of body fat.
To build a shredded mid-riff, you need to fix your diet, train your core optimally, and rest. You break muscle tissue when you are training in the gym. Your muscles grow back bigger, stronger, and more defined when you are in deep sleep.
On top of that, lack of sleep puts your body under stress and has a detrimental impact on your metabolism and hormonal balance, resulting in increased appetite and accumulation of abdominal fat
If your goal is to build a six-pack, you need to sleep at least seven hours every night. However, if you are unable to log the seven hours in a single night, make up for it by napping during the day.
Next Read: Build Superhero Abs with these 5 Routines
7. Protein is Your Savior
Protein is the building block for your muscles. It is no secret that protein is the most important macronutrient when it comes to building muscle mass.
There is a reason why most shredded guys have protein in every meal. Not only does protein make you feel full for long periods, but it also helps in burning body fat, even when you are not physically active.
Your preferred protein sources should include turkey breast, soybeans, red meat, and mung beans. They are rich in the powerful muscle-building amino acid leucine.
8. Cut Out the Junk
Nothing kills an ab-building dream faster than junk food. If you are setting out on your transformation journey, you should avoid processed foods at all costs.
Processed foods are high in refined and added sugars, sodium, fat, and other inflammatory chemicals that can interfere with your ability to sculpt a six-pack.
Also, calories from processed food can be more fattening than those from whole foods. Refined foods are processed to the point where they are digested quickly, and the body can absorb more of these calories. This helps add to McDonald’s bottom line and your waistline.
But what about cheat meals, you ask?
Well, forget about eating junk food until you have visible and defined abs.
Related: How To Get A Six-Pack (Post Pandemic Edition)
Bonus
Six-Pack Ab Workout
There are plenty of reasons to want a strong set of abs. Since they are incredibly difficult to carve, one of these reasons could be that they provide a fitness challenge.
To sculpt your midsection, you need to incorporate exercises that target all four major muscle groups in your midsection – the transverse abdominis, rectus abdominis, internal obliques, and external obliques.
Here is an ab workout you can do at your home that will help you build a shredded midriff:
Circuit: 3-rounds
Bicycle Crunch: 10 reps, no rest
Side Hip Bridge: 10 reps (on each side), no rest
Reverse Crunch: 10 reps, no rest
Air Chop: 10 reps, no rest
Shoulder Tap: 10 reps (each side), no rest
Extended Arm Plank Bird Dog: 10 reps (each side), no rest
Extended Arm Plank To T-Raise: 10 reps (each side), no rest
Plank to Toe Touch: 10 reps (each side), no rest
Russian Twist: 10 reps (each side), no rest
Hollow Hold: 30-seconds, 1-minute rest
Six-Pack Ab Diet
Here is a sample 8-week six-pack diet plan to help you build the abs of your dreams.
Note: This diet is designed for people weighing around 170 lbs. You can follow the same diet if you are in the 160-180 lbs range.
Phase 1: Weeks 1-4
Meal 1: Breakfast
4 egg whites
1 whole egg
3 oz chicken breast
½ cup green pepper
1 medium apple
Meal 2: Snack
Coconut-Lime Chicken Bites with Baked Zucchini Fries
Meal 3: Lunch
4 oz turkey breast, boneless, skinless
½ cup brown cooked rice
1 cup broccoli, steamed
½ large grapefruit
Meal 4: Snack
⅔ cup cottage cheese
¼ cup blueberries
10 almonds, chopped
Meal 5: Dinner
Spicy Citrus Shrimp with Quinoa
Meal 6: Bedtime
20g whey protein isolate
½ tbsp peanut butter, natural
Daily Totals:
Calories: 1,480
Protein: 169g
Carbs: 119g
Fat: 40g
Phase 2: Weeks 5-8
Meal 1: Breakfast
3 oz chicken breast, boneless, skinless
3 egg whites
1 whole egg
½ cup green pepper
6 almonds (as a side)
Meal 2: Snack
Purple Sweet Potato Parfait
Meal 3: Lunch
4 oz turkey breast, boneless, skinless
½ cup brown cooked rice
1 cup broccoli, steamed
½ large grapefruit
Meal 4: Snack
⅔ cup cottage cheese
¼ cup blueberries
10 almonds, chopped
Meal 5: Meal Dinner
Chicken Kababs with Mediterranean Brown Rice
Meal 6: Bedtime
20g whey protein isolate
½ tbsp peanut butter, natural
Daily Totals:
Calories: 1,437
Protein: 164g
Carbs: 124g,
Fat: 34g
Phase 3: Weeks 9-12
Meal 1: Breakfast
½ cup oatmeal, uncooked
20g chocolate whey protein
½ tbsp coconut oil
Meal 2: Snack
½ cup egg whites
3 oz chicken breast, boneless, skinless
½ cup green peppers, chopped
½ large grapefruit
Meal 3: Lunch
1 cup broccoli
½ cup cooked brown rice
4 oz turkey breast, boneless, skinless
Meal 4: Snack
Baked Sole with Grapefruit Avocado Salsa and ½ cup brown rice
Meal 5: Dinner
Sweet Chili-Lime Barbecue Chicken with Cucumber Salad
Meal 6: Bedtime
6 egg whites
1 cup baby spinach
Daily Totals:
Calories: 1,311
Protein: 152g
Carbs: 122g,
Fat: 24g
Which is your favorite ab exercise? Let us know in the comments below. Also, be sure to follow Generation Iron on Facebook and Twitter.

How Exercise Improves Your Dating Experience
There are many ways that exercise can improve aspects of life!
Nowadays, you see endless posts about how you should be happy before you start exercising or how weight loss won’t make you any happier. There’s definitely truth to of this. I think you should be fulfilled and happy to a degree before embarking on any fitness journey and dating.
However, many people find romance valuable and that area of their life is undoubtedly improved from exercise. No matter how much we tell people exercise is for health, their true intent is to look hot naked.
People don’t care that much if their doctor gives them a pat on the back for healthy bloodwork. They care if they can get laid and attract the opposite sex.
So it’s no surprise as a coach that many people seek exercise to look better and thus, improve their dating experience. In fact, many of my single clients who start exercising and improve their physiques often rave about their dating life improving. I don’t think there’s anything inherently wrong with that.
So if you somehow needed more convincing, here’s 4 reasons how exercise will improve your dating experience and get you dates on repeat.
1 – You’ll Look Better
Let’s address the elephant in the room first. People who exercise generally look better than people who don’t. While romance is not entirely physical, initial attraction and how we subconsciously treat people is largely based on appearance.
And sure, we all find different things attractive, but by and large, most people are attracted to a bit more muscle and a bit less fat which exercising helps with both, particularly strength training.
You know that you judge dates based on appearance often, so it’s only logical that you would want to put your best foot forward, or in this case, your best body forward.
This is within both male and female biology. Our brain assesses people based on appearance to make conclusions on their health and reproductive capabilities.
Men will pick women who are generally fitter because her physique communicates she’s more able to bare his children. Vice versa as well. Women will pick men who are generally fitter because his body communicates he can protect and defend said children.
Let me be clear here before I get skewered. I’m not saying looks are all that matters, but it’s one powerful way to increase your buying power as far as the dating world goes. Any politically correct fitness coach who says otherwise is speaking from a position of privilege. They say one thing, but would never switch their fit body for a less aesthetic one.
2 – You’ll Feel Better
Exercising undoubtedly makes you feel better. When you feel better, you’re more positive, confident, and healthy. Oh wait, those are all qualities that skyrockets your dating value.
So the value in exercising isn’t simply from the exterior change, but also internally. In fact, even if you exercised consistently for months and months and still see no physical changes, there is still much value.
You’re still getting healthier and your confidence would be far higher than if you didn’t exercise. Negative people who complain about their lives generally don’t exercise or at least not as much.
The personality qualities you are attracted to can be developed and nurtured through exercise. Women feeling more secure in their bodies and men feeling the confidence they need to approach women. That’s a recipe for romantic awesomeness if you ask me.
3 – You Communicate Desirable Qualities
Working out is like saving money. People who do it probably have their lives together. It’s obviously not a guarantee, but in our fast-paced world, we need to make conclusions in dating fast.
You don’t like your time being wasted, so you’re generalizing qualities about a person based on their habits. But guess what?
They’re doing the same about you, so if you want a leg up on the competition, exercise regularly, so it at least appears that you have your crap together.
And I get it exercising and grinding through weights to build muscle is hard. But having scarce dating candidates is hard too. By developing a consistent training schedule, you’re communicating discipline, delayed gratification, and responsibility which are hot characteristics.
In fact, one published study titled, “Does Exercise Make Me More Attractive? Exploring the Relations Between Exercise and Mate Value,” found more frequent exercisers had a higher perceived mate value than less frequent exercisers, independent of sex (1).
4 – Meet Other Like-Minded People
Now that you’re all steamy and confident, what’s next? Well, you can meet like minded people at the gym. It’s not too uncommon to meet and connect with like-minded individuals at the gym.
According to Canoodle.com, 62% of singles think the gym is a good place to find love and 75% of people would rather meet at the gym than at a bar.
The quality of candidates is inherently better at the gym. Everyone there is putting in the effort to get hotter, healthier, and get out of the house. Pretty attractive right?
Furthermore, it’s not uncommon for people to meet in group exercise classes, basketball courts, or the sauna.
And research often finds couples who train together often stay together, so the gym is an easy way to enhance your dating life. Get out there my friend.
References
1. Dobersek, Urska, et al. “Does Exercise Make Me More Attractive? Exploring the Relations between Exercise and Mate Value – Evolutionary Psychological Science.” SpringerLink, Springer International Publishing, 13 Nov. 2020, https://link.springer.com/article/10.1007/s40806-020-00270-w.
For more news and updates, follow Generation Iron on Facebook, Twitter, and Instagram.
Back At It: Top 3 Back Exercises For Beginners
Here are some of the elite back workouts for beginners to try!
So you are the newbie in the gym, and the back can be quite a complex muscle to understand and train. And just because you can’t see your back in the mirror doesn’t mean you should ignore it.
A good muscular back will give your physique a wide and powerful look, and it will also give you the illusion of having a smaller waist.
So how do you build a strong V shape back? Well I am going to detail my top 3 back exercises that will hit your lats, middle and lower back.
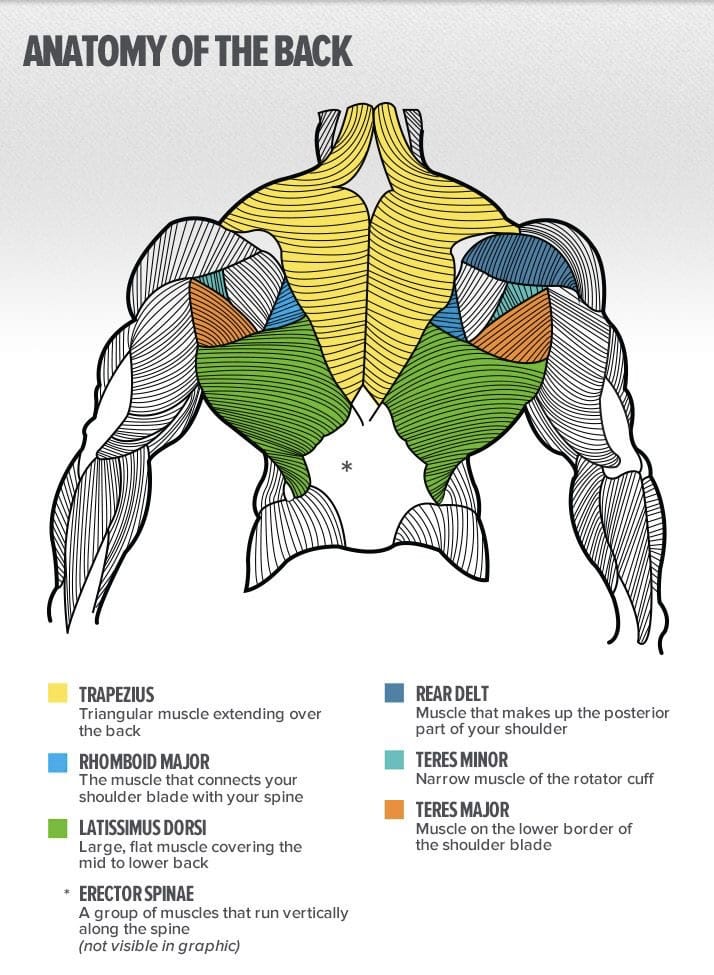
Middle Back (Rhomboids)
The middle back is attached to the lats around the shoulder blade region and is involved in moving and stabilizing the shoulder blades, as well as helping the lats move the arms.
Exercise 1
Seated one arm cable row:
To get into the starting position, first sit down on the machine and place your feet on the front platform provided, making sure that your knees are slightly bent and not locked.
Lean over as you keep the natural alignment of your back and grab the single handle attachment with your left arm using a palms-down grip.
With your arm extended pull back until your torso is at a 90-degree angle from your legs.
Your back should be slightly arched and your chest should be sticking out.
You should be feeling a nice stretch on your lat as you hold the bar in front of you.
The right arm can be kept by the waist, and this can be the starting position of the exercise.
Keeping the torso stationary, pull the handles back towards your torso while keeping the arms close to it as you rotate the wrist, so that by the time your hand is by your abdominals it is in a neutral position (palms facing the torso).
Breathe out as you perform that movement.
At that point you should be squeezing your back muscles hard.
Hold that contraction for a second and slowly go back to the original position while breathing in.
Repeat for number of sets and reps below
Number of sets: 3
Number of reps per set: 12-15
The reason I’ve selected cables instead of a single arm dumbbell row is to ensure that you control the positive and negative parts of the movement.
Lats (Latissimus Dorsi)
The lats are located right under the armpits and stretch down attaching to the waist. Their function is to bring the arms down and backward.
Exercise 2
Close grip lat pulldown:
Sit down on a pull-down machine with a wide bar attached to the top pulley.
Make sure that you adjust the knee pad of the machine to fit your height.
These pads will prevent your body from being raised by the resistance attached to the bar.
Grab the bar with the palms facing forward using the prescribed grip.
Note regarding hand positioning.
Wide: For a wide grip, your hands need to be spaced out at a distance wider than your shoulder width.
Medium: For a medium grip, your hands need to be spaced out at a distance equal to your shoulder width
Close: For a close grip, your hands need be at a distance smaller than your shoulder width.
As you have both arms extended in front of you – while holding the bar at the chosen grip width
Bring your torso back around 30 degrees or so while creating a curvature on your lower back and sticking your chest out, this is your starting position.
As you breathe out, bring the bar down until it touches your upper chest by drawing the shoulders and the upper arms down and back.
Repeat for number of sets and reps below
Number of sets: 3
Number of reps per set: 12-15
Again I’ve selected cables and not body weight/ weighted pull ups is to ensure correct form, and to ensure that positive an negative parts of the movement are controlled
Now the next exercise doesn’t involve cables but many people seem to neglect the lower back, one of my favourites is the rack pull.
Lower Back (Erector Spinae)
The erector spinae, is a group of muscles that originate that extend vertically along the length of the back. They lie on each side of the vertebral column and extend alongside the lumbar and spine, and thus helps protect the spine.
Exercise 3
Rack pulls:
Set up in a power rack with the bar on the pins.
The pins should be set to the desired point; just below the knees, just above, or in the mid thigh position.
Position yourself against the bar in a proper deadlifting position.
Your feet should be under your hips, your grip shoulder width, back arched, and hips back to engage the hamstrings.
Since the weight is typically heavy, you may use a mixed grip, a hook grip, or use straps to aid in holding the weight.
With your head looking forward, extend through the hips and knees, pulling the weight up and back until lockout.
Be sure to pull your shoulders back as you complete the movement.
Return the weight to the pins and repeat.
Repeat for number of sets and reps below
Number of sets: 3
Number of reps per set: 8-10
So there you have it, a very quick look at the back that will definitely help if you are a newbie, but there is definitely a lot more to cover on the back but I will save that for another more extensive time.
So start incorporating these exercises and your back will certainly start getting more attention
Until next time, keep pumping!

Top 8 Tips for a Tip Top Chest for Beginners
Here are some tips on how to build a bigger chest!
If you are new to the gym it can be quite daunting, where do you even start? Well let’s start by looking at the chest muscle, how do you build a monster chest?
Well to really build muscle mass and induce muscle hypertrophy it is all about incorporating multi joint exercises into your chest routine.
The chest is best stimulated, and developed, when it is fully stretched and flexed and targeted through movements designed to maximize development.
For example, the upper chest is best stimulated from exercises done on a 30-45% incline bench, the middle chest is best stimulated from exercises done on a flat bench and the lower chest is best stimulated from exercises done on a 30-45% decline bench.
The exercises below will ensure that each part of your chest is targeted.
1. Wide Grip Flat Bench Press (barbell)
Lie back on a flat bench with feet firm on the floor.
Using a wide grip, with your palms facing forward and grip that is approx 3 inches away from shoulder width
Lift the bar from the rack and hold it straight over you with your arms locked.
The bar will be perpendicular to the torso and the floor
As you breathe in, come down slowly until you feel the bar on your middle chest.
After a second pause, bring the bar back to the starting position as you breathe out and push the bar using your chest muscles.
Lock your arms and squeeze your chest in the contracted position, hold for a second and then start coming down slowly again.
2. Incline DB Press
Lie back on an incline bench with a dumbbell in each hand atop your thighs.
Ensure that the palms of your hands will be facing each other.
Then, using your thighs to help push the dumbbells up, lift the dumbbells one at a time so that you can hold them at shoulder width.
Once you have the dumbbells raised to shoulder width, rotate your wrists forward so that the palms of your hands are facing away from you.
Be sure to keep full control of the dumbbells at all times. Then breathe out and push the dumbbells up with your chest.
Lock your arms at the top, hold for a second, and then start slowly lowering the weight.
3. Heavy Pec Deck
Sit on the machine with your back flat on the pad.
Take hold of the handles.
Your upper arms should be positioned parallel to the floor; adjust the machine accordingly
Push the handles together slowly as you squeeze your chest in the middle.
Breathe out during this part of the motion and hold the contraction for a second.
Return back to the starting position slowly as you inhale until your chest muscles are fully stretched.
4. Heavy Dips
For this exercise you will need access to parallel bars.
Get yourself into the starting position, hold your body at arms length above the bars.
While breathing in, lower yourself slowly with your torso leaning forward around 30 degrees or so and your elbows flared out slightly until you feel a slight stretch in the chest.
Once you feel the stretch, use your chest to bring your body back to the starting position as you breathe out.
Make sure you squeeze the chest at the top of the movement for a second.
5. Incline DB Flyes
Lie on an incline bench that is set to an incline angle of no more than 30 degrees
Holding the dumbbells in each hand extend your arms above you with a slight bend at the elbows.
Now rotate the wrists so that the palms of your hands are facing you
Slowly lower the arms to the side while keeping the arms extended and while rotating the wrists until the palms of the hand are facing each other
As you exhale start to bring the dumbbells back up to the starting position by reversing the motion and rotating the hands
6. Decline DB Bench Press
Position yourself into a decline bench press.
Once you are laying down, move the dumbbells in front of you at shoulder width.
Ensure the palms of your hands are facing away from you.
Bring down the weights slowly to your side as you breathe out and keep full control of the dumbbells at all times.
As you breathe out, push the dumbbells up using your pectoral muscles.
Lock your arms in the contracted position, squeeze your chest, hold for a second and then start coming down slowly.
7. Bent Arm DB Pullover
Place a dumbbell standing up on a flat bench.
Then lie perpendicular to the bench (torso across it as in forming a cross) with only your shoulders lying on the surface.
Hips should be below the bench and legs bent with feet firmly on the floor, your head will be off the bench as well.
Grasp the dumbbell with both hands and hold it straight over your chest with a bend in your arms.
Both palms should be pressing against the underside of the dumbbell.
While keeping your arms locked in the bent arm position, lower the weight slowly in an arc behind your head while breathing in until you feel a stretch on the chest.
At that point, bring the dumbbell back to the starting position using the arc through which the weight was lowered and exhale as you perform this movement.
Hold the weight on the initial position for a second
8. Cable crossover
Place the pulleys in a high position (above your head), select the resistance to be used and hold the pulleys in each hand.
Step forward in front of an imaginary straight line between both pulleys while pulling your arms together in front of you.
Your torso should have a small forward bend from the waist.
With a slight bend on your elbows, extend your arms to the side (straight out at both sides) in a wide arc until you feel a stretch on your chest.
Then return your arms back to the starting position as you breathe out.
There you have it, these exercises will get all you beginners on the right road to building a rock solid chest!
So until next time, keep pumping!
Mehmet Edip is a fitness writer, actor, and model who has worked in the industry for over 8 years. He focuses on achieving his physique through an all natural plant-based diet and shares his insight via his workout & nutrition guides.
The Ultimate Cable Tricep Extension Guide – Benefits, Muscles Worked, and Variations
The cable tricep extension is an important exercise for any arm day!
Cable tricep extension, also known as the straight bar tricep pushdown, is one of the most common and effective tricep exercises. It is also one of the first exercises people learn to perform when they join a gym, but still, most people leave gains on the table while performing the lift.
With this article, we are going to dive deep and help you make the most of the exercise.
Cable Tricep Extension – Introduction
Chest striations and visible abs are cool, but nothing says badass like a pair of sleeve-ripping horseshoe triceps. It is no secret that biceps are one of the most-loved muscle groups. However, triceps do not get as much love as their siblings.
The reason behind the step-motherly treatment with the triceps? The bicep flex is a much easier pose to strike compared to the side chest that puts your triceps on display in their full glory.
Not focusing on the triceps is one of the most common rookie mistakes, especially if you are into bodybuilding.
Bodybuilding is a game of illusions. The bodybuilders you see on the Olympia stage are not as big as they appear on camera. Okay, Big Ramy is actually a giant, but we hope you get the point we are trying to make here.
Bodybuilders with small joints and waists, full muscle bellies, and perfect muscle symmetry look larger than life. Muscle proportionality plays a vital role in this sorcery.
Coming back to the triceps, if you lay an equal emphasis on your triceps as you do on your pythons, your arms will look bigger and more defined. And yes, you would turn heads with your front double bicep pose.
Side note: You seriously need to get over your bicep obsession.
Check Out: Best on the Planet – Triceps That Need Horseshoes of Their Own
Benefits of Cable Tricep Extension Exercise
Adding the cable tricep extension to your exercise arsenal has the following benefits:
1. Convenient and Effective in Building Muscle Mass
If you are anything like most lifters, you probably start most of your tricep workouts with the cable tricep extension. This exercise is a great way to pump your horseshoes and flush them with lactic acid at the beginning of your workout.
Besides, would you ever perform an exercise if it did not help you put on muscle mass? Oh wait, we completely forgot about the CrossFitters for a second, our bad.
2. Improves Conditioning
Compound exercises like barbell row and deadlift involve multiple muscle groups and are great for building strength and muscle mass but do little to improve your muscle conditioning.
However, since the cable tricep extension is an isolation (single-joint) lift, it helps you focus on a single muscle group at a time. While performing the cable pushdown, your goal should be to pump your triceps with blood and lactic acid and take your muscles beyond the point of exhaustion.
Doing a higher number of reps with controlled rep tempos can help you improve the conditioning of your triceps.
3. Improves Your Performance on Pressing Movements
Your triceps are responsible for elbow extension and elbow/shoulder/wrist stability in the extended position. These are key factors for a strong lockout in Olympic lifts like bench press, overhead press, snatch, clean and press, etc.
Not only this, but stronger triceps can also help you perform bodyweight exercises like push-ups and dips.
4. Offers Numerous Variations
The cable tricep extension or tricep press-down is a versatile exercise and offers the option of adding variety to your workouts by using one of the many variations it offers.
Must Read: Have Non-Existent Triceps? Use These Horseshoe Building Tricks
Muscles Worked While Performing the Cable Tricep Extension
When you extend your arm, the long, lateral, and medial heads of the tricep move together. It is also the reason why it is called tricep brachii. The literal translation for the same is “three-headed muscles of the arm.”
However, while performing the cable tricep extension (straight bar tricep pushdown), you are only working the medial and lateral heads of your tricep.
How To Perform Cable Tricep Extension
Follow these steps to perform the cable tricep extension correctly:
Attach a straight bar to a cable pulley set at the highest setting.
Stand at an arm’s length from the pulley.
Grab the straight bar with a pronated (palms facing the floor) grip.
Lean forward slightly by hinging at your hips.
Without using momentum, initiate the movement by extending your elbows.
Push down the handle until your elbows are almost locked out.
Squeeze the life out of your triceps at the bottom of the movement.
Return to the starting position with a slow and controlled motion.
Repeat for recommended reps.
Related: Chest Dips Vs. Triceps Dips: What’s The Real Difference?
Common Mistakes While Performing Cable Tricep Extension
Most people leave gains on the table while performing this exercise due to their incorrect form. The cable tricep extension might look like a walk in the part, but it can drain you out if done correctly. Here are the most common mistakes people commit while doing the lift:
1. Locking Out Elbows
While performing the cable tricep extension, you need to maintain constant tension on your triceps, and you can only do that if you do not lock out your elbows at the top or bottom of the movement.
Some lifters use the excuse (see what we did there?) that they lock out their elbows to get a proper tricep contraction. While in reality, they just lock out to give their triceps a few extra seconds of rest.
2. Position of Your Elbows
If you did not realize it yet, elbows are where the magic happens in the tricep press-downs. Make sure you are not flaring out your elbows while performing the exercise.
Keeping your elbows pinned to your sides will help you direct all the tension towards the medial and lateral tricep heads. However, letting your elbows flare takes off the tension from the target muscles and puts it on the long tricep head.
3. Leaning Forward Too Much
The position of your torso plays a vital role in cable tricep extensions. How much you lean while performing the exercise can determine the effectiveness of your set.
While some lifters stand upright while performing the exercise, the others maintain a 45-degree angle with the floor. Both these techniques are sub-optimal.
While performing the cable tricep press-down, your upper body should be at a 60-degree angle with the floor. This position gives you enough leverage to lift heavy without engaging secondary muscle groups.
4. Rounding Your Back
Rounding your back while performing the lift gives you an edge. It puts you in a position to lift heavier. At any point during the exercise, if you feel that you have rounded shoulders and you are leaning over the bar, it is a sign that you are ego lifting.
Lifting with a rounded back takes off the tension from your triceps and puts it on your shoulders. Your shoulder blades should be retracted throughout the exercise.
Related: Top 12 Triceps Building Exercises
Variations
The pulley machine gives you the freedom to use a variety of extensions for this exercise. Some variations of the cable tricep extension include:
1. Rope Pushdown
[embedded content]
Rope pushdown is probably the most famous variation of the tricep pushdown. The rope extension allows a higher degree of tricep recruitment as you can spread the rope handles apart at the bottom of the movement.
Steps:
Attach a double rope handle to a cable pulley machine set at the highest notch.
Face the pulley and stand at arm’s length from the machine.
Pin your elbows to your sides and grab the ropes with a neutral grip.
Push down the rope explosively and spread the handles apart at the bottom.
Pause and contract at this position for a couple of seconds.
Slowly return to the starting position.
Repeat for reps.
2. Overhead Tricep Extension
[embedded content]
Overhead tricep exercises like the overhead cable tricep extension primarily target the long tricep head. You could perform this exercise with a straight bar, rope, or V-bar attachment. For the sake of this example, we are going to use a V-bar.
Steps:
Attach a V-bar attachment and set the pulley around hip level.
Stand at an arm’s length from the pulley.
Grab the V-bar with an overhand grip.
In one swift motion, turn your body away from the cable station and place your arms behind your head so that your elbows are bent, and your triceps are stretched.
Keep your elbows close to your head throughout the exercise.
Lift the weight by extending your elbows.
Pause and contract your triceps at the top of the movement.
Return to the starting position with a slow and controlled motion. In the pulley exercises, the eccentric movement is as important as the concentric. Focus on contracting your triceps as you return to the starting position.
Repeat for recommended repetitions.
Must Read: THE NATURAL WAY TO FIX YOUR PROBLEM AREA: TRICEPS
3. Skull Crusher
[embedded content]
Skull crushers aka head smackers are one of the most brutal tricep exercises. Your triceps will be begging for mercy by the time you are done with this exercise.
Tip: If you are a beginner, you should not perform this exercise without a spotter.
Steps:
Sit on a flat bench with an EZ bar placed on your thighs.
As you lie down on the bench, thrust the bar to your chest.
Press the bar so that your arms are extended straight over your chest and are perpendicular to the floor.
While keeping your elbows fixed at this position, slowly lower the bar towards your forehead by bending at your elbows.
At the bottom of the movement, the bar should be a few inches off your forehead.
You could also increase your range of motion by lowering the bar behind your head.
Pause and push the bar explosively to the starting position.
Pause and contract your triceps at the top for a couple of seconds.
Repeat for recommended res.
4. Reverse-Grip Tricep Pushdown
[embedded content]
The reverse grip tricep push-down is an incredibly effective cable tricep extension alternative. Although this is a push-down exercise, it primarily focuses on the medial and long tricep heads.
Steps:
Attach a straight bar to a cable pulley set at the highest setting.
Stand at an arm’s length from the pulley.
Grab the straight bar with a supinated (palms facing upwards) grip.
Lean forward slightly by hinging at your hips.
Without using momentum, initiate the movement by extending your elbows.
Pause and contract your triceps at the bottom.
Slowly return to the starting position with a slow and controlled motion while focusing on your triceps.
The movement should look like a strict bicep curl but in reverse.
Repeat for recommended reps.
Many lifters make the mistake of lifting too heavy in this exercise. Contracting at the bottom is the key to optimal tricep recruitment in this exercise.
Make sure you have a solid grip throughout the exercise. Keep your wrists and forearms in a straight line and locked. Do not curl your wrists while performing the movement.
5. Dumbbell Tricep Kickback
[embedded content]
Dumbbell tricep kickbacks are a great exercise to isolate your medial and lateral tricep heads. Most people leave gains on the table while performing this lift by lifting heavier than they should.
Steps:
Hold a dumbbell in each hand with your palms facing in toward each other.
While keeping your knees bent slightly, engage your core and maintain a straight spine as you hinge forward at the waist, bringing your torso almost parallel to the floor.
Pin your elbows to your sides.
Keep your head in line with your spine and tuck your chin in slightly. Imagine holding an egg under your chin.
Push the dumbbell back explosively by straightening your elbows.
Pause and contract your triceps at the top.
Slowly return to the starting position.
Repeat for recommended reps.
Next Read: The Best Cable Exercises For Your Triceps
Wrapping It Up
Cable tricep extensions can open the doors to ultimate horseshoe gains. Now that you have all the tools you need to turn your twigs into venomous pythons, you need to ensure you are not half-assing your way through your workouts.
Focus on establishing a mind-muscle connection, perform the exercises with perfect form, channel the power of visualization, and soon enough, it will look like a horse kicked you in the back of your arm. Good luck!
Which is your favorite tricep exercise? Let us know in the comments below. Also, be sure to follow Generation Iron on Facebook and Twitter.
Close Grip Lat Pulldown For a Cobra Back: Techniques, Benefits, and Variations
Close grip lat pulldown is a great back workout and here is a closer look at the exercise!
Close Grip Lat Pulldown is a variation of the lat pull down. In this exercise, you target your back differently compared to the traditional variation by keeping your hands and arms close together. Although the close grip lat pulldown primarily works your lats, you will experience a decent amount of bicep and middle back activation.
But why do we need close grip lat pulldown when we already have the orthodox exercise, you ask?
Since your back is the second largest muscle group (after your legs), you need to perform a plethora of exercises and variations to train it optimally and ensure overall development. So, do not be afraid of experimenting with several different hand positions and angles to maximize your back gains.
Due to its versatility, the close grip lat pulldown can be incorporated in your back, upper body, pull, and full-body workouts.
Next Read: The 6 Best Exercises for Annihilating Back Fat for Men and Women
Muscles Worked
Since the lat pulldown is a compound movement, it works multiple muscles, including:
Lats: No points for guessing here. As the name suggests, latissimus dorsi (lats) are the primary target muscles of the close grip lat pulldown.
Biceps: Although the lat pulldown is primarily for your back, secondary muscle recruitment, especially the biceps, is unavoidable.
Shoulders: If you follow the correct form (discussed below), you will experience shoulder recruitment at the top and bottom of the movement.
Upper Back: While the close grip lat pulldown is essentially for your lats (flat muscle covering the width of your middle and lower back), you cannot factor out upper back stimulation.
Abs: People who think there is no core engagement during the lat pulldown have never gone heavy on the exercise.
Check Out: Build A Thick and Wide Cobra Back With This Workout
Benefits
The close grip lat pulldown is an incredibly effective exercise for:
1. Building Bigger and Stronger Lats
Compared to the traditional lat pulldown, the close-grip version offers an increased range of motion as your elbows are relatively closer to your body throughout the exercise. Holding the bar with a close grip allows you to pull the bar slightly further than you could while holding the bar with a wider grip.
The increased range of motion maximizes your lat contraction at the bottom of each rep resulting in a higher degree of muscle tissue recruitment and stimulation. The additional workload helps build wider, bigger, and stronger lats.
Must Read: Isolation Vs. Compound Exercises: Strength, Weight Loss & More
2. Improving Your Posture
Our current lifestyle, especially with the onset of WFH, has us bent over our computer screens or phones for the majority of the day. This posture causes underuse of your lats and other muscles resulting in slouching, pain, and tension in your shoulders and back.
Close grip lat pulldown helps strengthen your posterior chain and reduces the chances of developing a hunch. The exercise can also help treat your pre-existing slouching posture.
Related: Top Tips & Stretches For Improved Posture With Don Saladino
3. Helping Build a V-Taper
Well-developed lats help carve the much sought-after V-taper. A solid V-taper amplifies the illusion of a small waist and broad shoulders, making you look bigger and stronger than you actually are IRL.
Watch: How To Truly Develop A Bodybuilding V-Taper
4. Great For Beginners
The lat pulldown is an easy exercise to perform. It is, for a reason, one of the first exercises a newbie learns to do when he joins a gym. The lat pulldown is a godsend for individuals who lack the upper body strength to do a pull-up.
How To Perform Close Grip Lat Pulldown
Step by step instructions of how to perform a close grip lat pulldown:
Attach a wide grip handle to the lat pulldown machine.
Adjust the thigh pad so that your legs fit snuggly under the cushion.
Grab the handle at slightly narrower than shoulder-width with a pronated (overhand) grip
Get into the starting position by unracking the weight and locking your legs under the thigh pad.
Start the movement by depressing your shoulder blades and flexing your elbows while extending the shoulders. Keep your chest raised and your back arched throughout the movement.
Pull the handle toward your body until your elbows are in line with your torso.
Bring the attachment as close to your upper chest as possible.
Pause and contract your lats at the bottom of the movement.
Return to the starting position with a slow and controlled motion.
Repeat for recommended reps.
Common Mistakes
Although the close grip lat pulldown is a fairly simple exercise, most lifters make the following mistakes:
1. Using Momentum
Many lifters make the mistake (read: sin) of utilizing momentum to lift the weight. If you look like a pendulum while performing the exercise, you are doing it wrong.
If you cannot move the weight without leaning back more than 20-degrees, you should drop the weight (and your ego). Swinging back and forth takes off the tension from the primary muscle (lats) and puts it on the helping muscles.
Also, when you are using more weight than you can handle, you will not be able to pause and contract your lats at the bottom of the movement, leaving gains on the table in the process.
Watch: When Ego Lifting Goes Wrong
2. Going Too Low
This mistake is mostly made by people who use relatively easy weight.
It is the mirror opposite of the first mistake mentioned above. Overdoing the range of motion takes away the tension from the target muscles and puts it on your joints.
As mentioned above, you should not be going below your upper chest level while performing the close grip lat pulldown. If the weight feels too easy, contact your lats for longer at the bottom of the movement, instead of overdoing the ROM.
3. Using Your Arms
We understand that it is virtually impossible to eliminate your arms from the exercise, but you need to have a strong mind-muscle connection so that your back gets the most work done.
If you feel your biceps are taking over the exercise and your back is underactive, you should consider using a false grip. In a false grip, you do not wrap your thumbs around the bar. It is also called a monkey grip.
Pro tip: Focus on pulling the bar towards your body using your elbows. Leading with your bis will leave you with nothing more than a bicep pump.
Related: Full Range Of Motion Vs Partials: Which Is The Way To Go?
4. Body Posture
Many lifters tend to round their backs as they bring the bar down. Hunching over the bar elevates the tension off your back and puts it on your shoulders.
While performing the close grip lat pulldown, ensure that your lower body is locked under the knee pads.
Pro tip: Do not place your feet flat on the floor. Keeping your heels raised ensures a better fit under the thigh pads.
Variations
“I know more exercise variations than I will ever need.” – No one ever
Utilizing exercise variations can help target your muscles differently and induce growth by shocking your CNS.
Here are some of the most effective close grip lat pulldown variations:
1. Underhand Close Grip Lat Pulldown
In this variation, you will be grabbing the bar with a supinated (palms facing you) instead of a pronated grip. The underhand close grip lat pulldown is great for targeting your lower lats.
Note: You might experience a higher degree of bicep recruitment in this variation.
Steps:
Sit facing a lat pulldown machine and grab the bar with an underhand grip.
Pull the bar towards your upper chest while leading through your elbows.
Keep your elbows as close to your body as possible while pulling the bar down.
Pause and squeeze the life out of your lats at the bottom of the movement.
Slowly return to the starting position and repeat for recommended reps.
Also Read: Chris Bumstead Back Workout For A Sprawling Christmas Tree
2. V-Bar Lat Pulldown
[embedded content]
The V-bar pull-down is commonly mistaken for the close grip lat pulldown. The neutral hand placement in this variation can aid in alleviating stress placed on your shoulders during the vertical pulling movement pattern.
Holding the bar with a hammer grip is an excellent option to improve the center of your back while still targeting your lats.
The V-handlebar lat pulldown variation brings your hands closer to each other and, hence, allows a larger range of motion and better contraction at the bottom of the movement.
Note: While performing this variation, you will have to lean back slightly more than normal to allow for a full range of motion.
Steps:
Attach a V-bar to the lat pulldown pulley.
Grab the handle with a neutral (palms facing each other) grip.
While keeping your chest raised and back arched, pull the bar down until it is a few inches away from your upper chest.
Pause and contract at the bottom.
Return to the starting position slowly and repeat for reps.
Must Read: Chris Bumstead Back Workout For A Sprawling Christmas Tree
3. Behind the Neck Lat Pulldown
Behind the neck variation of the lat pulldown is slightly harder to execute as compared to the traditional version, especially for people with a limited range of motion in their shoulders and rotator cuffs.
Most lifters who incorporate behind-the-neck lat pulldown in their back training routines report a better range of motion in their lats and a deeper contraction in their lats and middle back at the bottom of the movement.
Caution: The risk of injury is higher with behind-the-neck lat pulldowns. If you are a beginner, consider starting with a lighter weight and a higher number of reps.
Steps:
Attach a wide bar to the lat pulldown machine.
Sit with your back towards the lat pulldown machine and your lower back supported against the thigh pad.
Grab the bar with a wider than shoulder-width pronated grip.
Pull down the bar using your elbows until it nearly touches the back of your neck.
Pause and contract at the bottom.
Slowly return to the starting position and repeat for reps.
Tips:
Keep your head pointed forward slightly throughout the exercise.
Do not use momentum and bring the bar down too fast as it can lead to an injury.
Check Out: The Ultimate Guide to a Ripped Back
4. Single Arm Lat Pulldown
The single-arm lat pulldown is an incredibly effective unilateral exercise. The benefits of unilateral movement include:
Helps correct muscle imbalances
Improves core stabilization
Boosts sports performance
Reduces chances of an injury
Improves muscle recruitment and stimulation
Allows you to train around an injury
Improves mind-muscle connection
Develops motor skills
Steps:
Attach a D-handle to the lat pulldown pulley.
Reach up and grasp the handle with a neutral grip (palm facing in).
Keep your chest raised and your back arched throughout the movement.
With your working arm fully extended, lean back 10–15 degrees.
Squeeze your shoulder blades together, take a deep breath and pull the handle to your upper chest, focusing on the lats and pulling your elbow back and down.
Pause and contract at the bottom.
Slowly return to the starting position and repeat for reps.
Related: The Benefits Of Unilateral Training & Why It Matters
5. Pull-up
It does not matter who you are, what you do, or where you live, pull-ups should be a part of your training routine. No exercise comes close to helping you build a V-taper as the pull-up.
Steps:
Start with your hands on the bar approximately shoulder-width apart with your palms facing forward.
With arms extended above you, stick your chest out and curve your back slightly.
While breathing out, pull yourself up towards the bar using your back until the bar is at chest level.
Slowly lower yourself to the starting position.
Repeat for recommended repetitions.
Tip: If you are a beginner and cannot complete a bodyweight pull-up, you could use an assisted pull-up machine, a spotter, or a resistance band.
Next Read: These Machines Are Better Than Free Weights
Conclusion
When it comes to building a solid back, most lifters limit themselves to rows and deadlifts. The close grip lat pulldown is a great exercise to amp up your back and should be a part of your exercise arsenal.
At the same time, do not get stuck with a single exercise. Maximize your results and build a venomous cobra back by alternating between the variations mentioned in the article.
Which is your favorite back exercise? Let us know in the comments below. Also, be sure to follow Generation Iron on Facebook and Twitter.