Tag: Guides
How to Do Fish Pose (Matsyasana): Muscles Worked, How-To, Benefits, and Variations
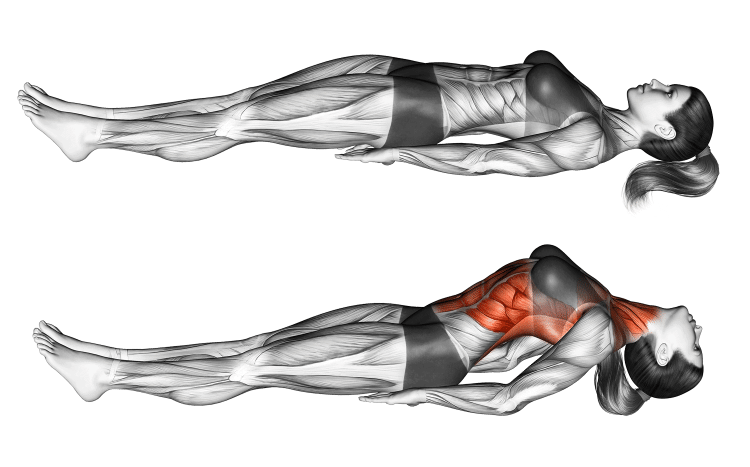
One of the fun parts about learning yoga poses is that you can imagine how the name correlates to what the movement looks like. Fish pose is a rear bending, counterasana (to the shoulder stand) technique, where you prop up on the elbows, lift the heart toward the sky, draw the head back, and gently settle the crown of the head on the floor.
The term matsyasana, its sangskrit name, is also used to identify this pose, matsya or “fish”, and asana, “posture”.
The benefits of this pose extend (pun intended) from the head down to the hips, relieving tension in the neck and throat, lengthening the back and spine, strengthening the arms and delts, and refreshing the abdomen and midsection.
Fish pose is a good counter to keyboard neck, while targeting the throat energy center, chest, and abdomen where we hold lots of anxious tension from stressful habits.
In this guide, you’ll find the best fish pose techniques, while learning about the benefits, beginner variations, and how to make Matsyasana more challenging and advanced.
Muscles Worked During Fish Pose Matsyasana
The fish pose is an opportunity to stretch and strengthen your upper body muscles. The following section is for those who’d like to better understand how these muscles work, their location, and benefits.
Back
The fish pose is a type of backbend pose where the elbows help support the upper body. It’s similar to a bodyweight variation that works the back muscles. However, in a yoga pose, you’ll strengthen the back via an isometric hold, rather than performing actual repetitions with a positive and negative component.
Having several muscles in the back, each has a special role, moving the shoulder blades and arms.
Arms
The arms have an important role in supporting your bodyweight as you tilt your head back onto the floor. Without them it’s not happening. Try the pose and notice that it requires strong arms and shoulders. The tree heads on the ear upper arm, aka triceps are great for stabilizing the arm while the back delts keep the arms behind you.
Deltoids
Fish pose also creates resistance for the shoulders to support, stabilize and decelerate the body when dropping the head back. The anterior delt stretches out when reclining on the elbows, while the back delts decelerate the drop, and keep you up.
Core muscles
No one every thinks about stretching the core muscles and midsection. Yoga techniques like fish pose give us an excuse to do so. Made of the abdominal muscles both deep and superificial, obliques, and spinal column muscles, the torso has many muscles that stabilize our trunk and help us bend in various directions.
How To Do Fish Pose Matsyasana
Not too difficult, most reasonable fit people have the ability to get into a fish pose. Use the following step by step instructions and video demonstration to guide your technique. Then, once you’ve mastered it, or if you need a regression, scroll down for some awesome variations.
Steps
Come onto your back with your knees bent and feet flat on the floor. You also want to keep your lower back flat on the ground so there’s no space underneath.
Slide your hands under your butt, tucking your elbows under your back as close to together as possible, then straighten your legs.
Inhale deeply, then sit up halfway, look down at your feet, and place your elbows and forearms under your back in a reverse plank to hold yourself up.
Now lift your chest, roll your shoulders back, and slowly drop the top of your head onto the floor. Balance gently on your elbows and head. Hold this position for 10-15 seconds.
Slowly undo the pose by lying flat on your back, bending your knees, and moving your arms out from underneath your back.
Spread your legs a few feet apart, and move your arms slightly out away from your body in what’s called a corpse or Shavasana pose. Stretch your neck by moving it to the left and right. Remember to breathe in and out.
Now bring your feet together, reach your arms back overhead, and inhale. Then bring your arms back to a resting position next to your body and exhale.
Then slowly sit up.
Here’s a beautifully done tutorial on the fish pose Matsvasana.
Tips
Ideally, you should not be an absolute beginner before performing this exercise. Fish pose places the neck in extension and loads the spine, therefore, you should be somewhat fit, and aware of your body before attempting this technique.
We highly recommend using a yoga mat or soft surface for this pose for comfort, support, and to avoid hitting your head hard on the floor.
If you’re an absolute beginner, we recommend having something to support your back like a junior bolster, or some yoga blankets to prop you up roughly five to six inches high.
It’s important to not place too much weight on the head, the hips and shoulders be supporting most of your weight.
It’s crucial that your head is aligned with an even spine, not allowing your head to just fall back at a sharp angle.
This Exercise
Target Muscle Group: Back, abdomen, neck
Type: Yoga
Mechanics: Isolation
Equipment: Cushioned surface, exercise mat, junior bolster (Optional), yoga blankets (Optional), yoga blocks (Optional)
Difficulty: Intermediate
Benefits of Fish Pose Matsyasana
Fish pose incorporated a backbend which has many benefits in itself. Here are the highlights of this yoga technique.
Stretch your neck, chest, shoulders, back and throat muscles
Stretching is a healthy habit for healthy, flexible, mobile, and strong muscles. Functional joints that bend and move can only do so when a muscle contracts and expands. If they’re tight, you’ll have limited range of motion, and open yourself up for injuries.
The fish pose is a type of backbend technique that places the body in a position to lengthen the abdominal muscles in the core, the spine, back, neck, and even the front deltoids. It’s so useful that you could do it everyday.
Interrupts negative affects of declining posture
Let’s face it, our postural muscles take lots of abuse especially nowadays, due to being so immersed in the dopamine that comes out of our electronic devices. Forward head posture is a pose itself, although not a good one.
Fish pose does the opposite, helping to improve and reverse this common modern problem. Your chest, spine, shoulders, and neck are all affected from bad stance, and doing the opposite is part of the solution.
Counter stretch tech neck
Forward head posture, turtle neck, or whatever you’d like to call it… a common modern body posture where the neck is far in front of the head. This can cause pressure, sore muscles, a weak neck, more stress, and it’s bad news. The fish pose counters this posture by pulling the head back and stretching the muscles in the neck.
Target the stress centers
Fish pose is a triple whammy for relaxing and shedding off some stress. It targets the throat chakras (associated with expression, and confidence), the stomach muscles, and opens up the chest which are key areas we feel noticeable discomfort when anxious and stressed.
Opening up the chest is also good because we lean forward so much looking at our phones. This can cause thoracic outlet syndrome where the nerves, veins, and arteries become compressed in the neck and chest, causing numbness and the tingles in the arms, shoulders, and neck.
Common Mistakes While Performing Fish Pose
In a pose like this one, you want to be sure to avoid mistakes that could place you in a dangerous position.
Too much weight on the head
What you don’t want to do is focus on leaning your weight back on your head. Although it’s tempting! Instead, use your legs, core, back, arms and shoulders to control the movement, then gently tip the crown of your head on the floor into the fish pose.
A helpful trick is to try and distribute 80 percent of your weight through the legs, core and back, while only allowing 20 percent of your weight to shift onto the head.
Steep drop off at the head
If you’re in the correct position from toe to head, then you should be in the proper alignment to safely tilt your head back and rest it on the floor. The mistake is letting your head snap back, steeply bending at the neck. Think of arcing your torso in a semi rainbow shape, actively engaging your back muscles and shoulders to help you get in an accurate and safe pose.
Too much uneven (Lower) back arch
There does need to be some lower back arch to effectively complete the fish pose. But you don’t want to overdo it. You see, the lower back is more mobile compared to the upper back. And if you don’t have a proper hold on your positional abilities it’s easy to overcompensate and overarch your lower back. While that’s not reciprocated for the upper back.
This can cause issues in the disc fluids in your spine and hence, result in pain while making you more susceptible injuries.
The solution: Focus on lengthening your spine, lifting the chest toward the sky, and pulling the shoulders back to create more arch in the upper back, and torso as a whole.
Variations of Fish Pose Matsyasana
These variations can make the fish pose easier, more challenging, or touch an area that the basic fish pose doesn’t. See some common variations below.
Fish block with yoga block under the back
If the basic fish pose is too hard, yoga blocks are much appreciated. It’ll support your back so that you can rest in the arched position, and focus on your breathing with less muscular effort.
Steps
Place the block on the mat standing on its long end.
Lie back on the block so it’s across both shoulder blades, then straight your legs, and relax your arms by your sides after you’ve found a comfortable position.
Drop your head back until its resting on the floor. You may need to adjust the block under your back, then continue the technique. Bring our feet together and relax your body.
When you’re ready, lift up on your elbows, remove the block, and then lie flat on your back in the corpse pose. Rest here, then slowly get up.
For more support, use a block or junior bolster under your head and neck too.
Fish pose in lotus or with legs crossed
You can do a more basic or advanced version of fish pose with legs crossed. You can cross your legs under your bottom, or if you have good flexibility, you can cross them over your your upper thighs. The former is good for beginners, while the former will take more time.
Both will stretch the hips and groin, supporting healthy movement in the hip flexors and lower body.
Steps
While lying on your back with your arms under your body, cross your legs under your butt.
Proceed to lift up onto your forearms, and pull your head back to the floor.
Camel pose
More of a preparatory technique, the camel pose is a modified exercise that includes a backbend while sitting upright. It still carries all the same benefits, but is just performed a little differently to the fish pose.
Steps
The following instructions and video tutorial demonstrate two phases of the camel pose. One to prepare you for the backbend, and then the actual technique.
Begin in a vajrasana position sitting on the floor with your knees bent and calves under your bottom.
Stand on your knees, so that your shins and the top of your feet are in contact with the mat, and your torso is tall and upright. Widen your legs into a comfortably balanced position.
Now place your hands on your lower back, with the fingers pointed down.
Inhale, then slowly push your hips forward, while slowly arcing your upper body, leaning back, exhaling, and shifting your gaze up.
Repeat this a few more times.
Inhale, slowly push your hips forward while exhaling, slowly lean back and bring your arms down to your ankles. Arch your torso and drop your head back toward the floor, so the crown of the head is pointing straight down.
Inhale, then transition to the child’s pose where you lean forward into the floor while outstretching your arms forward.
Flying fish pose
You’ll engage more core, hips, and anterior deltoids, while the flying fish pose includes muscle strengthening components involving the legs and arms. Consequently, it’s more advanced but also more risky because now there’s more weight on the head and neck. So you need to be proficient in the regular fish pose, and you need to understand how to safely focus your weight through your body.
Steps
Note: For the flying fish variation, start with your arms by your sides, not underneath your back and butt.
From the fish pose position with your head back and resting on the floor, lift your legs until they’re roughly 45 degrees to the floor.
Now extend your arms in the same direction as your legs, so they’re roughly parallel.
Hold for about 10 seconds.
To undo the pose, bring your elbows to the supporting position, then slowly drop your legs down to the floor.
Reverse plank
While it’s not technically a type of fish pose, you’re already in a similar position. The reverse plank is arguably more challenging than basic plank where you’re facing the floor, and it will help to strengthen the muscles that we use in a fish pose.
FAQs
Who should not do the fish pose?The people who should avoid fish pose are those suffer from blood pressure issues, migraines, vertigo or injuries in the neck, back, and spine.
How long should I hold the fish pose position? Try to maintain the fish pose for 10-15 seconds which is approximately 3-5 breaths.
We recommend using props like yoga blocks or blankets if you want to hold the pose for longer and up to a minute or more.
Wrapping Up
Fish pose is a technique that’ll get you excited to get down on the mat, because it tackles elements that we’re not typically used too. Stimulating the throat chakras, expanding the pecs, stretching the abdominals, and unraveling bottled up tension and stress is an easy sell.
This guide has everything you need to simulate matsyasana, and if you’re not ready or a novice, there are beginner techniques, as well as a bigger challenge in more advanced versions. We strongly recommend checking out the fish pose tips section and don’t skimp over the common mistakes as this meditation includes neck and spine extension. But it can be performed perfectly safe with attention to proper technique!

How to Do a Tree Pose (Vrksasana): Muscles Worked, Benefits, and Variations
Tree pose, also known as Vrksasana is a body posture reminiscent of a healthy, tall, and resilient tree. Rooted down by the feet, and supported by the pelvis and core muscles, this yoga technique combines balance, coordination, flexibility, pelvic stability, core strength, and upper body mobility. But you’re also reaping the rewards of increased focus, and concentration while opening the hips, lengthening the spine, and strengthening the legs and feet.
For such a simple pose, Vrksasana sure carries along lots of advantages, and there are lots of reasons to do it daily. In this guide, we want to walk you through a proper tree pose while discussing the advantages, drawbacks, commonly performed mistakes and more.
Muscles Worked
While the tree pose is NOT a “muscle-building exercise”, it is a body and mind-building pose that will help keep your muscles loose, flexible, and functional as they move the joints. Learn about the muscles targeted with this technique.
Legs
Powerful and resilient, the legs represent the trunk while the feet are the roots that ground you in the tree pose. The weight bearing leg takes on more of the load than normal, while the glutes, hips and pelvis help to stabilize the trunk and act as support for the remaining steps.
Core
Strong core muscles support an upright posture and open diaphragm, which translates to healthier breathing, and hence better focus, and energy.
Shoulders
Lifted shoulders also help open the chest and back area to release tension, and promote posing stamina.
How To Do The Tree Pose (Vrksasana)
If you have the flexibility, and experience, the tree pose may be easy for you. But for everyone else, it will take some practice. While this technique appears to be simple and easy, well, try it and see if that’s true. You may be very surprised at how difficult it can be.
That’s why we created this step by step guide with video demonstrations, tips, and how to fix common mistakes. The key is to be patient, don’t rush, and make sure your body is aligned, tall, and balanced, while engaging the necessary muscles.
Steps
Stand tall with your feet together.
Slowly lift one knee up to roughly belly button height, then grab the front of the knee with both hands to keep the leg up.
From here, root down through all four corners of your standing foot, and align your pelvis and core to find your balance. Keep your pelvis straight and in line with your body, and low back lengthened.
Then grab the ankle of your lifted leg with the same-side hand, and rotate your thigh outward to open the hips.
Now flex your foot by lifting the toes up, then bring the sole of your foot as high as you can on the standing-leg inner thigh with your toes facing down.
Press your foot into the squishy part of your thigh and pull your thigh into the foot to keep it in place and avoid it sliding down the leg.
Here you can bring your hands together by your heart, or extend your arms overhead. Hold for 30-60 seconds.
Take your foot off the inner thigh, bring the knee to waist height, then place it back on the floor.
You can then switch legs, pulling the opposite foot to your inner thigh, and repeat the movement.
Check the short tree pose video demonstration below.
If you have 12 minutes for a more in-depth tutorial that shows all the technique tips and tricks, we highly recommend watching the following video.
Tips
Before you start the pose, spread your toes and bring awareness to your feet. After all, the feet are the roots and you want to feel a strong base before beginning.
Before you lift the leg and foot into position on your inner thigh, ease yourself into it by first lifting one heel off the ground with the toes still on the ground.
Remember to keep the pelvis tucked in and aligned with your torso. Do not let your buck curl up and arch the lower back.
Gently push yourself into the correct position if the pelvis shifts back or to the side when the foot is pressed into the inner thigh.
Use a wall or place your foot on the lower leg, rather than the top of the inner thigh for support, if you have trouble balancing.
It’s important to root your feet and stand tall in maintaining good balance.
Keep in mind, everyone may not have the same exact form during the tree pose.
If you want more of a challenge, try closing your eyes or looking up at the ceiling to train your balance.
Benefits of Tree Pose Vrksasana
There may not appear to be so many benefits of the tree pose, but we can assure you that there are many worthwhile. Here are the unique benefits of this exercise.
A functional test of balance, coordination and concentration
Challenging indeed, but consequently beneficial, tree pose tests and grows your balance, positional awareness, and concentration. Seldom do basic exercises have you stand on one leg to complete an exercise. Tree pose involved various elements, making you more functional and coordinated.
It’s so beneficial for the aging population who incur injuries from balance issues, in addition to the sports crowd.
One sided
The tree pose is asymmetrical in nature, with the left and right sides performing a different function. This develops proprioception (physical awareness of the body and coordination), unilateral function (training one side at a time), and trains us to perform as humans.
Tree Pose
Posture pose
The tree pose can challenge you to maintain good posture, by standing upright, and consciously focusing on being a tall tree! Today we slouch more than ever, looking down at our devices, and this technique gently helps to reinforce and focus on good body position.
Stretches the full body
We don’t do stretches like this often enough. Lifting the foot and placing it against the inner thigh opens the hips and stretches the groin area, while you’ll also feel it in the quads, and hamstrings via knee and hip flexion. Move up the torso, raise the arms overhead, and the upper chest and latissimus dorsi fibers lengthen, as well as the shoulders and arms.
Keeps you flexible
It takes practice to stretch the groin area if you lack the flexibility to pull your heel into the upper inner thigh region. As school kids, the butterfly stretch hit this area but most of us never did it again. Tree pose is a great way to bring it back into your routine!
Activates the core muscles
Balancing on one leg will naturally recruit your core muscles to do more to stabilize your body. It’s a nice routine for anyone, and especially elderly individuals who need a light, functional activity to help maintain their coordination and stability.
A pelvis exercise
Your pelvis is bones that connect the trunk and legs near the hips. When you stand on one leg, the pelvis is called upon for extra duty where it supports the weight of the upper body, and maintains stability there to keep you in proper posture. From there, you can comfortably perform the moving parts of the pose such as raising the arms overhead.
Builds patience
We live in a very instant world where we can get an immediate dopamine rush without having to wait like we did in the old days. This has caused us to become less patient, more anxious, irritated and yeah you get the point. The tree pose, and yoga, in general, is a form of meditative exercise that can help calm our nerves, reduce anxiety, and teach us that patience creates worthwhile rewards.
Drawbacks of Tree Pose
Take a look at this pose in motion, and it’s easy to see the potential drawbacks. But don’t mistake drawbacks with negatives as practice will change them into positives.
You’ll need some darn good balance!
There’s no way around it, you must have exceptional balance to the do the tree pose. However, we’d assume most people practicing this pose are capable of standing on one leg. But if you’re doing it for the first time and hardly test your balance, it will be difficult.
The good news is that a wall or chair can be used as a progression to a non-supported variation of tree pose.
But you should also take your time with the tree pose, and practice easing yourself onto one leg, and establishing your balance.
Can be frustrating to learn
For beginners especially, it can sometimes be frustrating when you can’t quite nail a pose. Balance, groin flexibility, and are the big annoyances during tree pose.
Common Mistakes While Performing The Tree Pose
While there’s no cookie cutter technique, there are general form cues and recommendations to ensure you stay injury free, maximize the muscles involved, and enjoy the process. Here are some things to avoid.
You can actually place your foot on the lower leg below the knee, if above the knee is too difficult yet. However, we do not recommend placing your foot directly on your knee, which will put unnecessary pressure on this joint. The knee is to meant to bend to the side, but rather back.
Not using the weight bearing/standing leg
If you’re doing nothing with the standing leg, you’re doing the tree pose wrong. You need the counter pressure from the standing weight bearing leg not only to keep the foot from sliding down, but to keep your body straight, which will allow you to have a tall posture and maintain your balance.
Clenching your toes
It’s normal to want to dig your toes into the mat to maintain your balance. But it’s more accurate to relax the toes, so that you can tense the quads and pull them up, to lift the hips in the proper position. Then you’ll have a more efficient tree pose.
Rotating the knees and hips to the side
When the foot is pressed into the upper thigh, there may be a tendency for some people to swing the bent leg and rotate the body. Focus on keeping your body facing one direction and don’t deviate or turn your body. The only thing that should be moving is your arms, whatever you decide to do with them during the pose.
Wandering eyes
Your eyes are also important for maintaining your balance during the tree pose. If you’re looking around, you’ll probably have a difficult time standing on one leg, much less doing anything else. Try to fix your gaze on a spot on the wall and keep it there.
Variations of Tree Pose Vrksasana
A base to other variations, tree pose is a fundamental pose that opens up the door to these similar, but individually unique exercises.
Tree pose with a block
Some people need to ease themselves into a pose, and using a block is a great idea. You can use it to inch your way higher up the leg, while having something to hold your foot up and in position. It will also allow you to focus on engaging the leg muscles and working that flexibility before you go full on tree pose. When you can move beyond this beginner technique, place your foot on the lower leg below the knee.
Steps
Stand tall with your feet roughly hip width apart.
Place a block long ways between your feet.
Find your balance on one leg by rooting down into the four points of your foot.
Bend the other foot and lift your knee up, then place the ball and toes of that foot on the top of the block. Keep your heel close to the ankle bone of the weight bearing leg.
Now focus on keeping your body squared up, with the hips straight, and body nice and tall.
Lift the foot off the block for a few seconds and try to find how you’ll gain balance on the standing leg. Do it a few more times.
Now, switch your legs and repeat.
Windy tree
As the name implies, a windy tree blows the branches from side to side. This can actually challenge your core muscles, stretch your midsection, improve total body stability, balance, focus, and your mind.
Steps
Find your tree pose stance, then raise your arms in the air in the form of a V.
Wave your arms from side to side while rotating your body from left to right.
If you thought tree pose was challenging, bring your feet a little higher on your hips, and try to do the same thing. You’ll also stretch out your abductor muscles on the outer thigh if performed correctly.
Steps
From a standing position, bend your left leg, pull the left foot up, and hold it across the top of your right thigh in the hip crease. Flare your toes and flex your foot. You can hold your foot in place, or let go and try to keep it there.
Stay in this position and try to feel out the movement, and get accustomed to holding your feet there, or bring your arms to a prayer position or raise them overhead.
Arms reaching to sky
There’s nothing like leaning forward and reaching your arms toward the sky to throw off your balance, or rather, force you to maintain it. Try the tree pose with this additional step.
Steps
Get into tree pose stance with one foot pressed into the opposite thigh.
Hinge forward at the hips, rotate your torso toward the bent leg, and lean forward.
Extend the top arm toward the sky, and use the bottom arm to stabilize yourself.
Toe stand pose
You need to be a vrksasana master to get deep down in this sitting pose, and support your entire weight on your toes, while crossing one foot over the opposite thigh. It requires an extreme degree of focus or you can easily be thrown off course.
Steps
Start from a full tree pose with one foot pressed into the opposite inner thigh.
Next grab your foot and pull it into your hip crease. Flare your toes and flex your foot.
Now hinge at the hips, bend your upper body down, extend your arms toward the floor, and slowly drop down on your hands.
Then walk your hands forward, rise up onto the toes of the standing leg, then bend the standing leg and slowly drop your butt down to within a few inches from the floor.
Keep your hands on the floor for support, and instead of sitting all your weight on your calf muscle, focus on pushing into the ground with your toes and lifting yourself up.
Wrapping Up
Balance, coordination, positional awareness, and every functional foundation are vital abilities that we need, yet often fail to maintain. Planting yourself in the tree pose on a weekly basis will help counteract aging’s effects on our balance, while keeping our groins and hips healthier, reinforcing good posture, and easing our minds from the stressful modern culture. Then when you’re ready for something more advanced, you can step into more complex variations that will challenge your body, mind, and spirit on higher levels.
Standing Dumbbell Fly Exercise Guide: How To, Benefits, Muscles Worked, and Variations
Close your eyes and think about an ideal free-weight chest workout. Chances are the training session includes the bench press, dumbbell press, dumbbell fly, and some variation of the incline or decline fly. All these exercises share something in common — they require a bench.
Busy folks that train during rush hours might not have the luxury of waiting for a bench. On the other hand, people that work in their minimal garage gyms might not have access to a bench.
Contrary to what most lifters think, you can train your pecs effectively without a bench with free weights; one of the best exercises to do this is the standing dumbbell fly.
Whether you don’t want to wait for your turn on the bench, don’t have a bench in your home gym, or want to try a new exercise to spark chest growth, the standing dumbbell fly has you covered.
The standing dumbbell fly is a versatile exercise that can be included in your chest, push, upper body, or full-body workouts. This movement demands decent core stability to perform correctly. Furthermore, going too heavy on the standing dumbbell fly can render the exercise ineffective.
You must follow a slow and controlled range of motion while using moderate weights to make the most of the standing dumbbell fly, making it an excellent exercise for beginners. It will also help improve your mind-muscle connection, which will carry over to other lifts.
In this article, we cover everything you need to learn about the standing dumbbell fly to make the most of this lift, including its benefits, the common mistakes, the muscles worked, how to perform correctly, and the best variations and alternatives.
What is a Standing Dumbbell Fly?
Developed pectoral muscles take your physique aesthetics to the next level. They add to your V-taper, draw eyes to your midsection, and improve your overall functionality. However, most lifters leave gains on the table during their chest workout as they chase weights and forget about using a full range of motion and contracting their muscles with each rep. The unique setup of the standing dumbbell fly fixes this. This exercise also improves your stability and balance. Furthermore, the range of motion of the standing dumbbell fly will make you strong enough to lift the love of your life in your arms.
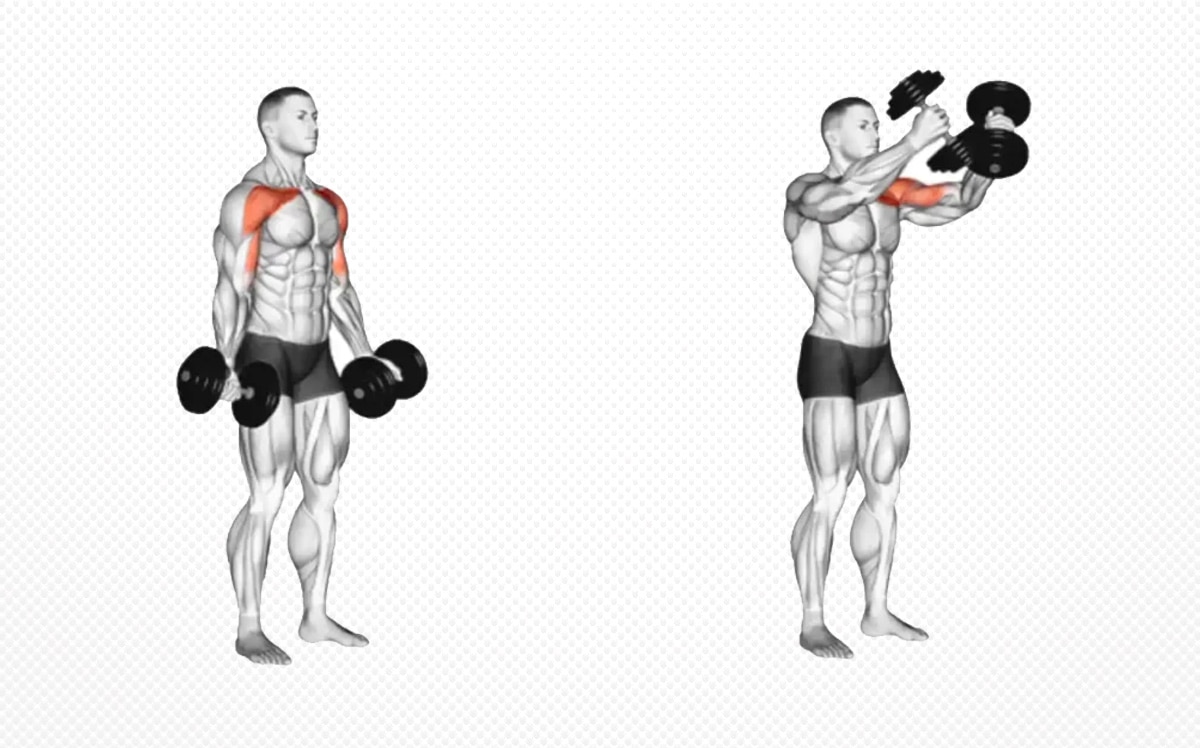
The standing dumbbell fly is a standing low to high cable fly variation. To perform a standing dumbbell fly, assume a hip-width stance while holding a dumbbell in each hand. Maintain an upright torso, push your chest out, and raise your hands to shoulder level while maintaining a slight bend in your elbows.
You could also turn this exercise into a unilateral movement by working one side of your body at a time. Unilateral exercises are incredibly effective at fixing muscle and strength imbalances. While doing the single-arm variation of this lift, keep your other hand on your hip or hold onto a dumbbell for better balance.
Muscles Worked During Standing Dumbbell Fly
The standing dumbbell fly works the following muscles:
Chest
The pectoralis muscle consists of two muscles, the pectoralis major and the pectoralis minor. The pectoralis major is a fan-shaped superficial muscle in the front of your chest wall. On the other hand, the pectoralis minor is triangular and located under the pectoralis major.
The standing dumbbell flys mainly target the pectoralis major, which helps with the adduction, or depression, of the arm and arm rotation forward about the axis of the body.
Shoulders
The standing dumbbell fly is an isolation exercise that restricts movement to the shoulder joint. Since this exercise involves movement in the sagittal plane, it results in anterior deltoid recruitment.
Biceps
This dumbbell fly variation involves maintaining a slight bend in your elbows throughout the range of motion. You might experience a slight biceps engagement during the movement’s concentric (upward) part while performing this exercise, especially while lifting heavy.
Benefits of Standing Dumbbell Fly
Adding the standing dumbbell fly to your exercise arsenal entails the following advantages:
Helps Build Muscle Mass
The standing dumbbell fly is an isolation exercise that can help build muscle mass and improve your conditioning. Perform 3-5 sets and 8-12 reps of this exercise once weekly using appropriate weight to induce hypertrophy. [1]
Beginner-Friendly
This dumbbell fly variation involves lifting light to moderate weights while focusing on your form, making it an excellent exercise for beginners. You must readjust your form if you don’t feel your chest muscles contracting with each rep. Use this exercise as an opportunity to polish your mind-muscle connection.
Variety
Most free-weight chest exercises require lying on a bench. The unique stimulus of the standing dumbbell flies can shock your muscles, sparking new muscle tissue growth. Plus, it is a versatile exercise that can be added as an accessory lift in most training programs. Since it requires only dumbbells, the standing dumbbell fly is incredibly convenient.
How To Do Standing Dumbbell Fly
This is how to perform the standing dumbbell fly with the correct form:
Steps:
Stand upright with a shoulder-wide stance.
Grab a dumbbell in each hand with a supinated (palms facing forward) grip.
Tuck your chin slightly, pull your shoulders back and down, and push out your chest.
Maintain a slight bend in your elbows and lift your arms toward the ceiling until your hands are at shoulder level.
Your hands should move toward the center line of your body during the upward motion and should be next to each other at the top.
Focus on contracting your pecs throughout the range of motion.
Pause and squeeze the life out of your chest at the top.
Slowly return to the starting position.
Repeat for recommended reps.
Standing Dumbbell Fly Tips:
Avoid touching the dumbbells at the top, as it will remove the tension from your chest and put it on your shoulders.
Keep your core and glutes braced throughout the range of motion for optimal stability and balance.
Many lifters make the mistake of extending their elbows at the bottom. Your elbows should be slightly bent throughout the ROM.
Breathe in during the concentric (upward) motion and exhale during the eccentric (downward) motion.
To prevent trapezius muscle activation, refrain from shrugging your shoulders as you lift your arms.
In This Exercise:
Target Muscle Group: Chest
Secondary Muscle Groups: Shoulders and Biceps
Type: Strength
Mechanics: Isolation
Equipment: Dumbbells
Difficulty: Beginner
Best Rep Range: 8-12
Common Mistakes While Performing Standing Dumbbell Fly
Avoid these lapses to make the most of the standing dumbbell fly:
Going Too Heavy
The standing dumbbell fly is an isolation exercise. Using heavier dumbbells than you can handle comfortably can remove tension from your pecs and put it on your shoulders and biceps. For optimal results on this lift, use a moderate weight and focus on contracting your pecs with every rep.
Leaning Forward
Many lifters tend to lean forward while performing this exercise. However, it can result in greater deltoid engagement and remove tension from your chest. You must maintain an upright torso and push your chest out to work your pecs.
Holding the Dumbbells Too Tight
Squeezing the dumbbell handles too hard can fire up your forearms and biceps. Additionally, since you’ll maintain a slight bend in your elbows, it can result in a biceps pump. Use a false (thumbless) grip if you feel excessive forearm engagement while performing this exercise.
Variations and Alternatives of Standing Dumbbell Fly
Add the following standing dumbbell fly variations and alternatives to your training regimen to build a full and round chest:
Standing Low To High Cable Fly
This chest movement is the closest alternative to the standing dumbbell fly exercise. The cables help keep constant tension on your muscles throughout the range of motion.
Steps:
Set the cable pulleys at the lowest setting and hook up a D-handle attachment.
Grab a handle in each hand, walk to the pulley machine’s center, and then take a step forward. The cable should be taut at the starting position.
Your hands should be at the sides of your thighs at the starting position.
While maintaining a slight bend in your elbows, lift your arms until your hands are at shoulder level.
Pause and contract your pecs throughout the range of motion.
Slowly return to the starting position.
Rinse and repeat.
Pro Tip: Slow down the exercise’s eccentric (lowering) motion for optimal pectoral engagement.
Pec Deck Fly
Since the pec deck fly machine follow a fixed movement path, it is a beginner-friendly chest exercise. The fixed movement trajectory allows you to focus on establishing a mind-muscle connection with your pectoral muscles and contracting them throughout the ROM.
Steps:
Set the seat of the pec deck machine at a height so that the machine handles are at shoulder level.
Grab the handles with a neutral (palms facing inward) grip.
Push out your chest slightly.
While maintaining a slight bend in your elbows, bring your hands together.
Pause and contract your pecs at the top.
Slowly return to the start position.
Pro Tip: Keep your shoulder blades pinched throughout the exercise. Rounded shoulders take tension off your pecs.
Check out our complete pec deck fly guide here!
Barbell Fly
Although this exercise requires barbells, it is a bodyweight movement. Besides annihilating your pecs, the barbell fly will engage your core and help improve your balance and stability.
Steps:
Place two barbells together on the floor.
Add a weight plate on the same end of both barbells.
Get into a push position while holding the barbells a few inches below their necks on the weighted sides.
The non-weighted ends of the bars should be between your feet.
Slowly roll out the bars and lower your chest as close to the floor as possible.
Pause at the bottom.
Bring the bars back to the starting position. Pause and contract your pecs at the top.
Repeat for reps.
Pro Tip: Place a weight plate on each side to keep the bars from rolling too far out. The weight plates on the floor will act as guard rails.
Check out our complete barbell fly guide here!
Flat Bench Dumbbell Fly
This is a staple exercise in most chest training routines. It helps develop your inner chest, giving it a fuller appearance.
Steps:
Lie supine on a flat bench while holding a dumbbell in each hand with a neutral grip.
Extend your arms so they are perpendicular to the floor.
While maintaining a slight bend in your elbows, lower your arms to your sides.
Pause at the bottom.
Explode back to the starting position. Contract your pecs at the top.
Rinse and repeat.
Pro Tip: Keep your rhomboids pinched together as if holding a pencil between them. This will improve your chest stimulation.
Check out our complete flat bench dumbbell fly guide here!
Incline Dumbbell Fly
The upper pecs are a lagging muscle group for most lifters. Not only does the incline dumbbell fly improve your upper shelves, but it also enhances your muscle separation.
Steps:
Set the back of an incline bench at a 45-degree angle with the floor.
Lie on the bench holding a dumbbell in each hand using a neutral grip.
Extend your arms so they are perpendicular to the floor.
While maintaining a slight bend in your elbows, slowly lower the bar toward the floor.
Return to the starting position.
Repeat for reps.
Pro Tip: Many lifters make the mistake of holding the dumbbells at an angle, which removes tension from their chest and puts in on their anterior deltoids. Your arms should be at a 90-degree with the floor for optimal chest engagement.
Check out our complete incline dumbbell fly guide here!
Wrapping Up
The standing dumbbell fly is an unorthodox exercise that can spark new growth in your chest. Perform 3-5 sets of 8-12 reps of this exercise with moderate weights to put you in the sweet spot for gaining muscle mass and conditioning.
You must follow a full range of motion to get optimal results. Furthermore, switch this exercise with the alternatives and variations mentioned in this article to target your pectoral muscles from different angles and fast-track your pectoral growth.
References
Krzysztofik M, Wilk M, Wojdała G, Gołaś A. Maximizing Muscle Hypertrophy: A Systematic Review of Advanced Resistance Training Techniques and Methods. Int J Environ Res Public Health. 2019 Dec 4;16(24):4897. doi: 10.3390/ijerph16244897. PMID: 31817252; PMCID: PMC6950543.
Downward Facing Dog (Adho Mukha Svanasana) – How-To, Muscles Worked, Benefits, and Variations
As the name implies, there is a similarity between the downward facing dog and a common habit of our favorite furry sidekicks. Also called Adho Mukha Svanasana in yoga words, this pose is akin to how a dog stretches itself by leaning back onto the legs and lengthening its spine (svana). And this full-body technique will benefit you just the same!
The downward dog is one of the most commonly practiced yoga techniques, cued often in vinyasa yoga, flowing into other poses, but also effective all on its own! But most importantly, the goal isn’t ultimately the downward dog pose, but how it makes us feel and progress in our yoga journey, or life in general.
It’s a tricky one, but follow along with the instructions and tips in this guide, and you’ll get it down pat!
Muscles Worked
A yoga-based pose, downward facing dog still requires various muscles to perform it correctly. Here are brief descriptions of the muscles you’ll use during this technique.
Arms and delts
Anytime your body is being supported by your arms, you’re recruiting the triceps and deltoid muscles. Both muscle groups have a combined three heads, one on the anterior, another laterally, and the third on the posterior or backside of the body.
With the arms extended, your triceps resist elbow flexion, allowing you to support your weight. The front deltoids are engaged when the arms move forward in front of the body.
Trapezius
Traps too have three components – upper, middle, and lower fibers. Individually, they lift the scapula, pull it back, and retract it. The upper fibers are most prominent during a downward facing dog when the arms are in an overhead position.
Core
Finding their role in every total body movement, your core and abdominal muscles stabilize your trunk, and help you to maintain balance, and force efficiency, to keep you in the inverted ‘V’ position.
Leg muscles
Don’t expect much physical gains but the quads, glutes, hamstrings, and calves do bear some of your weight. Not to mention, the calf raise component during a more advanced variation where the toes are dorisflexed which activates the rear lower leg muscles. Then you have the inner thighs or adductor muscles which should be used to keep the lower body in stable and strong position.
How To Do Downward Facing Dog
In this section, we break down the downward facing dog technique with step-by-step instructions. So be sure to follow along closely, and check out the video demonstration below to hear all the important form ques.
Steps
Note: The following instructions and demonstration are the quick and easy steps to get into a downward facing dog position. If you plan to progress in your yoga journey, we recommend learning additional pre-pose techniques. This will make your yoga practice more enjoyable, productive, and sustainable.
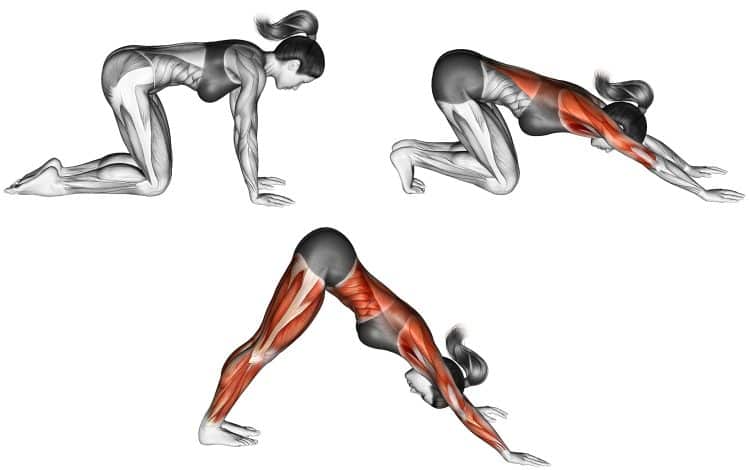
Get down on your hands and knees in a tabletop position. Your hands should be roughly shoulder width apart, shoulders slightly forward past the wrists, with arms fully extended, knees directly under the hips, and back neutral. Turn your hands slightly outward so your elbows are pointing straight behind you, not completely out to the sides.
While you’re in this position, you may feel the natural need to do a cat-cow pose, to stretch your back and abdomen. It’s a great choice before hopping into the downward dog. We’ve included a video example of cat-cow below.
From your hands and knees, squeeze your hands together, without physically moving them inward, to activate your chest.
Now curl your toes under and press your feet into the ground bringing your knees into full extension, while lifting your hips up and back. In this position, your arms should be aligned with your torso in a straight line from your hands to your butt. Bring your gaze down so you’re looking down at the floor, or at the back of the room through your legs.
Accentuate the extension through your spine by lifting up through the pelvis and pressing the full hands into the floor. Externally rotate your arms, to create space between the shoulder blades. Lift the heels, and pretend to squeeze the inner thighs together.
Congrats! You just did the downward facing dog!
Here’s a short video demonstration of cat-cow pose.
Tips
Take some time and find the right knee and foot position to ensure you are doing the downward facing dog with the correct technique.
One way people find the optimal feet to hands distance is to get into a plank.
You should be able to transition between a plank and downward facing dog without moving your hands and feet.
If you cannot keep your spine straight during the downward facing dog, do it with your knees bent until you gain more flexibility.
Your heels do not need to be touching the ground.
Do a few reps of a cat-cow pose to warm up the spine before the downward dog.
Consider easing into the downward dog by incorporating pre-movement techniques beforehand.
You need a comfortable and non-slip surface to do this technique safely and effectively.
Press down into the floor with the entire hands (palms and fingers) to get the most efficiency from the movement.
Benefits of Downward Facing Dog
The advantages of learning this technique surely outweigh any potential negatives. It does a whole lot of good for the body and mind, and it’s also challenging and a good transition pose to other yoga practices.
Get a lovely stretch!
If done right, the downward facing dog should stretch your back first and foremost, followed by everything from your wrists to your shoulders, abs, and leg muscles. However, the back should be the focal point. The goal should not be to force a stretch in your legs.
Stretching has many benefits including healthier muscles, increased range of motion and flexibility, more blood flow to the area, reduced muscle soreness, and even stress relief. During downward facing dog you’re also strengthening the aformentioned muscles.
Strengthen all your muscles
The downward dog involves your push muscles, back, abdominals and obliques, hips, legs, and feet. There’s literally no muscle sitting out. While there is some muscular strengthening from movement (isotonic), you also benefit from static strengthening, where the muscles are not contracting, but support your weight in a contracted state.
Learn about the differences and benefits of isotonic vs isometric training here.
Form of inversion
Most exercises don’t involve hanging the head down, somewhat upside down. But what this does is increase blood flow and circulation to the brain possibly enhancing mental performance, while decompressing the spine and creating more space between the vertebra which may allow better disk hydration and hence greater spine mobility and reduced risk of injury.
Many experts also believe that inversion supports the lymphatic system, which helps the body cleanse itself. And this is said to only be able to occur via the movement of muscles, and breathing. Some other supposed benefits include improving back pain, and increasing torso strength and mobility too.
It’s important to note, however, that studies are limited and not conclusive on the potential benefits of inversion.
Ease your mind
Yoga has long been practiced for its stress-relieving effects. Most of us live every day without releasing the tension that we build up in our muscles due to mental stress, physical stress, lack of activity, and high intensity exercise. Bringing flexibility, and stretch into our daily routines can have a great effect on us. Not to mention, yoga technique are therapeutic alone.
May support better digestion
For the same reason the brain and spine may benefit from downward facing dog, so too may your digestive system. In normal conditions, the belly has to work a little to digest food against gravitational forces. Well, the increased blood driven to the stomach could possibly stimulate a healthier process.
Burn calories
Moving your body and using your muscles to resist your body weight is one way to burn calories. During this process, your body uses energy from stored food for fuel, and if you expend more energy than you consume, you’ll lose fat. Yoga is one way to contribute to the weight loss process if you’re not eating too much every day.
Try our yoga calories burned calculator to see how much energy you’re using during your sessions.
This Exercise:
Target Muscle Group: Arms, delts, core, quads, glutes, hamstrings, calves
Type: Yoga
Mechanics: Compound
Equipment: Cushioned surface, exercise mat
Difficulty: Intermediate
Drawbacks of Downward Facing Dog
If you want to try the downward facing dog, you could experience some of these negatives.
Not as easy as it looks
If you’re not decently flexible or fit, you may be in for a nice surprise. It’s harder than it looks both on video, and in your head. But… if you use a suitable surface, wear the right clothing, and follow the form instructions, you’ll have the best chance at nailing this technique. The good news is, if you can’t yet, you’re totally allowed to bend your knees. So keep practicing and you’ll master this staple pose!
Bad form is common and good form ignored
Without a proper understanding of basic exercise technique mechanics, or yoga experience, it’s too easy to do this exercise wrong. Not that its the worst thing you could do, but people try to force their heels down when they shouldn’t, or they don’t realize they have bad form. The downward dog should be a beautiful exercise that feels good, and encourages you do it more.
Common Mistakes When Performing Downward Facing Dog
If you want to get the most out of the downward facing dog, try to keep these bad habits out of your checklist.
Tucking in the tailbone
You want to lift the tailbone, not tuck it in. The latter will move the pelvis rearward and round the back in a convex shape which you don’t want. Rather bend the knees to bring the back into a better and safer alignment.
Forcing the heels down
We’re not all physically constructed the same, hence different heights, proportions, movement, etc. If your heels don’t naturally touch the floor, don’t force them. As you stretch, you’ll learn if it’s tight calves and hamstrings. But it could also be a shorter achilles tendon, or someone’s bone structure, and that’s fine, there’s nothing to do there. After all, the goal is not to stretch the calves, it’s to target the back.
Bad shoulder position
Slouching over and letting your head into your shoulders is the wrong way. The delts and scapular area should be set properly with proper arm placement and involved to make the exercise most efficient.
Wrong hand positioning
When pushing your hands into the floor, you should focus on shifting the weight onto your thumbs, index and middle fingers, not the pinkies or palms only. This will create a better position for your shoulders and it’s more efficient.
Not bending the knees
While you will need to lengthen the legs to lift the tailbone and stretch the back, you are free to keep the knees slightly bent.
Internal shoulder rotation
Remember that these three words are something you seldom ever wanted to do during any exercise. Turning the shoulders inward toward the chest can cause impingement issues, and it doesn’t make for efficient technique. Instead, turn your biceps slightly out to open up the delts and create a safer position.
Feet too close or wide
Your feet should be roughly the same distance apart that they are in a plank. That’s why it’s good to start the movement from a plank, especially if you’re a beginner. But, you may find the need to adjust your footing slightly.
Variations of Downward Facing Dog
You can find so many different variations of the downward facing dog. Unfortunately, there are too many to list here, however, we picked some favorites for you to try!
Single leg downward facing dog
Also called Eka Pada Adho Mukha Svanasana, this single leg downward facing dog variation stretches the hamstrings, engages more core muscles, and trains your balance.
Steps
Assume the basic downward facing dog as shown in the primary example in this guide. Your feet should be fully planted on the mat.
Press down into the left foot, and lift the right heel as high as you can while keeping it fully extended. Point the toes straight down. You should feel a nice stretch in the left hamstring. Keep your gaze down toward the floor, or back toward your feet.
Hold then switch legs and repeat.
Tips
Inhale as you lift the leg and exhale as you drop it down.
Keep your shoulders and hips square, avoiding allowing the body to rotate in either direction.
For a more advanced technique, great for training balance, lift one leg, and the opposite arm.
Knee to elbow
If you want to take the previous variation a step further, hence increasing the benefits, you can introduce more movement.
Steps
From the three legged, or single leg downward facing dog with one leg extended in the air, bend the knee and bring it into the same side elbow. Keep your core tense and spine neutral.
Lift the same leg back up into extension or the three legged dog, now pull the knee into your opposite elbow.
Do several reps, then switch legs.
Twisted dog
Here’s a simple, but challenging variation you should also try. It will wake up your obliques, and give you a releasing stretching in the waist.
Steps
From the basic downward facing dog position, move your feet closer to your arms and simply reach one hand back and grab the opposite ankle. Rotate your upper body to face the same side as the leg you’re grabbing. Return to the starting position, then reach with the opposite hand to the other ankle.
Make sure to keep your spine lengthened.
Bent knee dog
From the inverted downward dog position, bend one knee so that your toes are pointed at the ceiling. Reset, and repeat with the other leg.
Downward facing dog on blocks
Prop your feet or hands up on some blocks to vary the angle and lessen the difficulty of the downward facing dog. Elevating the hands, for example, creates more space in the upper body like shoulders, back and neck. It also helps maximize space on the mat during vinyasa flow!
Steps
Prop your hands up on blocks and find your downward dog.
Keeping your toes on the mat, lift your heels high, and extend your spine by raising your hips up above your shoulders.
Now exhale, bend your knees, tighten your core, press into the blocks and hop your feet forward in between your hands. As you jump, keep the hips higher than the shoulders.
Inhale, stand halfway up keeping your hands on the blocks, exhale, fold your upper body into your lower body, then inhale, and stand all the way up reaching your arms overhead with hands together.
Finally, exhale and bring your hands to your heart.
FAQs
Below we included a few common questions and answers regarding the downward facing dog pose.
Who is the downward facing dog not good for? Due to the nature of this exercise, it’s best avoided by people with wrist problems such as carpal tunnel, or those with back issues, vertigo, high blood pressure, or eye conditions that affect vision. We also don’t recommend it for women who are pregnant.
What should be the primary goal of the downward facing dog?Stretching the back, activating the core, and really becoming more in tune with your body. There are many benefits of downward facing dog that can enhance your physical, mental, and yoga progression.
Wrapping Up
Congrats on mastering the downward facing dog pose! But if you haven’t yet, don’t worry you’re not alone, it’s by no means an easy exercise for most people. But this common yoga class pose should be learned as it’s a fundamental technique and you’ll probably be called to do it. The tips, tricks and variations in this guide are going to help you utilize the downward dog effectively, build more confidence in your yoga journey, and enhance your life!
Block Pulls Guide: Muscles Worked, How-To, Benefits, and Alternatives
If you only had the time and energy to perform one exercise per workout, the deadlift would probably be your best choice. Deadlifts work almost every major muscle on the back of your body and several on the front, too. They build real-world functional strength and, frankly, make you look and feel like a badass.
Combine deadlifts with an upper-body push, such as push-ups, dips, or bench presses, and you can get a full-body workout from just two exercises.
Deadlifts are AWESOME!
That said, deadlifting from the floor is not easy, especially when you’re tall or inflexible. Also, doing nothing but conventional deadlifts will eventually get boring, even if you love what Victorian physical culturalists used to call the health lift.
Thankfully, there is more than one way to deadlift, and block pulls, aka partial deadlifts, are a great alternative to regular deadlifts.
We reveal why and how to do this excellent exercise and provide you with a few equally effective alternatives to try.
Block Pulls – Muscles Worked
Block pulls are a compound exercise, meaning they involve several joints and multiple muscles working together. In fact, block pulls use so many muscles that they’re virtually a full-body exercise.
Block Pulls Muscles Worked
The main muscles (listed from top to bottom) trained during block pulls are:
Trapezius
The trapezius, or traps for short, is the large diamond-shaped muscle of your upper back. It consists of three groups of fibers – upper, middle, and lower. The upper and middle fibers are the most active during block pulls. Block pulls are very effective for building bigger, thicker traps.
Rhomboids
Located between the shoulder blades, the rhomboids work with your middle traps to pull your shoulders back and together.
Deltoids
The deltoids are your shoulder muscles. Like the trapezius, the deltoids are made up of three groups of fibers called heads – anterior (front), medial (middle), and posterior (rear). All three deltoid heads are working during deadlifts, but the posterior delts are the most active.
Biceps brachii
Located on the front of your upper arm, your biceps flex your elbows. However, in block pulls, their job is to stop your elbows from hyperextending.
Forearm flexors
Block pulls are a very grip-centric exercise. Gripping the bar involves lots of lower arm muscles, which are collectively called the forearm flexors. If you want bigger, more powerful forearms and a vice-like grip, block pulls are sure to help.
Latissimus dorsi
Located on the sides of your torso, the latissimus dorsi, or lats for short, give your upper back its width. Well-developed lats look like wings! You use your lats to keep the bar pressed in toward your legs during block pulls. Bodybuilders do this exercise to develop a thicker, more powerful-looking back.
Erector spinae
Erector spinae is the collective name for the muscles that run up either side of your spine. During block pulls, you use these muscles to prevent your back from rounding. Rack pulls will give you a more muscular lower back.
Core
Core is the name given to the muscles of your midsection, including your rectus abdominis, obliques, and transverse abdominis. Together, these muscles contract inward to create intra-abdominal pressure to support and stabilize your lumbar spine. Wearing a weightlifting belt allows you to produce even more intra-abdominal pressure.
Gluteus maximus
Known as the glutes for short, this is the largest and most powerful muscle in the human body. The glutes extend your hips, which is the main lower body movement during block pulls. If you want a bigger butt, block pulls will help!
Hamstrings
Located on the backs of your thighs, the hamstrings work with your glutes to extend your hips during block pulls. However, the range of motion is relatively small, so if you want to work your hammies harder, you should also include exercises like leg curls and Romanian deadlifts in your lower body workouts.
Quadriceps
Block pulls start with your knees bent and end with your knees extended. This means they involve your quadriceps as well as your hamstrings and glutes. However, quads engagement is quite low because the range of motion at your knees is relatively small.
How to Do Block Pulls
Get more from block pulls while keeping your risk of injury to a minimum by following these guidelines:
Place your barbell on blocks so it’s between lower knee and mid-thigh height. The lower the blocks, the more you’ll need to use your glutes and hamstrings to lift the weight.
Stand behind the barbell with your feet between shoulder and hip-width apart. Your feet should be under the bar.
Grip the bar with a double overhand or mixed shoulder-width grip.
Straighten your arms, brace your core, and pull your shoulders back and down. Engage your lats by pressing the barbell toward your legs.
Without rounding your lower back, drive your feet into the floor and stand up.
Lock out your hips and knees, taking care not to lean back at the top of your rep. Leaning back increases your risk of injury.
Lower the bar back to the blocks, let it settle for a second or two, reset your core and grip, and repeat.
Pro Tips:
Use chalk and/or lifting straps for a stronger grip.
If you use a mixed grip, make sure you switch hands set by set to avoid muscle imbalances.
Use lower blocks to work your glutes and hamstrings more or higher blocks to emphasize your upper back.
Wear flat shoes or go barefooted to prevent your weight from shifting forward onto your toes.
Use a weightlifting belt when training with heavy loads.
Block Pulls Benefits and Drawbacks
Not sure if block pulls deserve a place in your workouts? Consider these benefits and then decide!
Better for tall or inflexible lifters
Conventional deadlifts start with the weights on the floor and the bar about nine inches above the deck. Reaching down to grab the bar requires good flexibility, especially if you are taller than average. As such, some people end up rounding their lower backs during deadlifts, and that’s a recipe for injury.
A rounded lower back is a weak lower back and puts tremendous pressure on the intervertebral discs and ligaments of the lumbar spine. Starting with the bar on blocks means you don’t have to lean so far forward, so there is less chance of rounding. This means that block pulls are more lower back-friendly than off-the-floor deadlifts, especially for tall or inflexible lifters.
Boost your lockout strength
Full deadlifts, like most compound freeweight exercises, have sticking points. Some lifters get stuck trying to break the bar away from the floor, while others get stuck at the midway point. Rack pulls allow you to focus on your lockout. For this reason, powerlifters use block pulls as a deadlift accessory exercise to boost their full deadlift performance.
Fatigue management
Full deadlifts can be exhausting. Because of this, some lifters only deadlift once a week or even less often when using maximal weights. Block pulls are a little less fatiguing, so you should be able to do them more often or in conjunction with regular deadlifts. For example, you could alternate block pulls with conventional deadlifts workout by workout if you want to train your posterior chain twice a week.
Build a more muscular back
Few exercises have the potential to build back size like rack pulls can. Pushing the bar back toward your legs maximizes lat engagement while keeping your shoulders back and down hits your traps and rhomboids. Stopping your lumbar spine from rounding will thicken and strengthen your lower back muscles. In short, rack pulls are a total back builder.
While block pulls are a mostly beneficial exercise, there are also a few drawbacks to consider:
Equipment
While most gyms have barbells and weight plates for deadlifts, lifting blocks are not as common. As such, you may not have access to the equipment you need to do block pulls. However, there are alternatives to this exercise, which we have detailed below.
Less functional than full deadlifts
A functional exercise mirrors the demands of daily living or a sport. Deadlifts from the floor are a very functional exercise, as many lifting movements start with the weight resting on the deck, e.g., picking up your kids, a pet, or grocery bags.
However, block pulls start with a weight resting above the floor, so they may not be as functional as regular deadlifts. That said, they work the same muscles as regular deadlifts, so block pulls will still enhance your functional strength, albeit to a somewhat lesser degree.
Lift heavier weights
Block pulls have a smaller range of motion than conventional deadlifts, so most people can use heavier weights for them. While lifting more weight can be a good thing, it could be a drawback, too.
Some lifters load block pulls with way more weight than they can handle safely. This can lead to injury, especially to the lower back.
7 Block Pulls Variations and Alternatives
Block pulls are a highly effective compound exercise, but that doesn’t mean you need to do them all the time. There are several variations and alternatives you can use to keep your workouts productive and interesting:
1. Rack pulls
No suitable lifting blocks? No problem! You can also do partial deadlifts using a power rack. This exercise looks and feels very similar to block pulls, and as most gyms have a suitable power rack, they may be more accessible for some lifters. However, do not do this exercise with a deadlift bar, as doing so will damage it. In contrast, block pulls will not damage a deadlift bar.
Steps:
Place your barbell on the safety pins of a power rack so it’s between lower knee and mid-thigh height.
Stand behind the barbell with your feet between shoulder and hip-width apart. Your feet should be under the bar.
Grip the bar with a double overhand or mixed shoulder-width grip.
Straighten your arms, brace your core, and pull your shoulders back and down. Engage your lats by pressing the barbell toward your legs.
Without rounding your lower back, drive your feet into the floor and stand up.
Lock out your hips and knees, taking care not to lean back at the top of your rep.
Lower the bar back to safety pins, let it settle for a second or two, reset your core and grip, and repeat. Do not bounce your bar off the pins, as doing so could damage the bar and the power rack.
Muscles Targeted:
Primary: Latissimus dorsi, trapezius, rhomboids, gluteus maximus, hamstrings, erector spinae, core.
Secondary: Biceps, forearm flexors, quadriceps.
Benefits:
More accessible than block pulls for some lifters.
Easier to adjust the height of the bar, as most power racks are drilled with one-inch holes.
An excellent total back and posterior chain exercise.
Tips:
Try a lower starting point to emphasize your glutes and hamstrings or a higher one to emphasize your back.
Use a mixed or double overhand grip as preferred.
Use lifting straps and/or chalk to prevent your hands from slipping on the bar.
Related: The Ultimate Guide to Rack Pulls
2. Paused deadlifts
Like block pulls, paused deadlifts are designed to improve your mid-rep strength and boost your lockout. However, as an extra advantage, you don’t need any additional equipment to do them. Paused deadlifts are another common powerlifting accessory exercise.
Steps:
Place your barbell on the floor and stand with your toes beneath it, feet between shoulder and hip-width apart.
Grab the bar using an overhand or mixed grip, hands shoulder-width apart.
Straighten your arms, brace your core, set your shoulders, and drop your hips down below your shoulders. Take the slack out of the bar.
Drive your feet into the floor and stand up, pausing as the bar reaches about knee height. Hold this position for 1-3 seconds.
Push your hips forward and stand fully upright.
Lower the bar back to the floor, reset your core and grip, and repeat.
Muscles Targeted:
Primary: Latissimus dorsi, trapezius, rhomboids, gluteus maximus, hamstrings, erector spinae, core.
Secondary: Biceps, forearm flexors, quadriceps.
Benefits:
A very accessible exercise as no extra equipment is required.
An effective way to strengthen your deadlift lock out.
A good way to make light weights feel heavier.
Tips:
The longer you pause, the harder this exercise becomes.
Vary the height of the pause to change the effect and feel of this exercise.
Use less weight than normal, as this exercise is much more demanding than full deadlifts or block pulls.
3. Deadlifts with chains
Chains are another way to overload the top part of the deadlift movement. Doing deadlifts with chains is a type of training called accommodating resistance. As well as overloading the upper range of motion, using bands or chains teaches you to lift more explosively and develops your ability to use power to blast through your sticking points.
Steps:
Load your barbell and attach your chains.
Place your barbell on the floor and stand with your toes beneath it, feet between shoulder and hip-width apart.
Grab the bar using an overhand or mixed grip, hands shoulder-width apart.
Straighten your arms, brace your core, set your shoulders, and drop your hips down below your shoulders. Take the slack out of the bar.
Drive your feet into the floor and stand up. Do not lean back, as doing so increases your risk of injury.
Lower the bar back to the floor, reset your core and grip, and repeat.
Muscles Targeted:
Primary: Latissimus dorsi, trapezius, rhomboids, gluteus maximus, hamstrings, erector spinae, core.
Secondary: Biceps, forearm flexors, quadriceps.
Benefits:
A very movement-specific deadlift accessory exercise.
An excellent way to overload the top part of your deadlift.
An effective exercise for developing deadlift speed and power.
Tips:
This exercise works best when done for low reps, e.g., 3-5.
Start with light chains, as this exercise can be very challenging.
No chains? You can also use strong bands for accommodating resistance training.
4. Trap bar block pulls
Because the load is in front of your base of support, barbell deadlifts have a tendency to pull you forward onto your toes. This increases the shearing force on your lumbar spine. Shearing force isn’t a problem for some lifters but can be a deadlift deal breaker for those with pre-existing back pain. Trap or hex bar block pulls allow you to keep your torso more upright, making them far more lower back-friendly.
Steps:
Load up your trap bar and place it on blocks.
Stand between the handles, feet about shoulder-width apart.
Grip the handles, straighten your arms, pull your shoulders down and back, and brace your core.
Drive your feet into the floor and stand up straight.
Lower the weights back to the blocks, allow them to settle, and then repeat.
Muscles Targeted:
Primary: Latissimus dorsi, trapezius, rhomboids, gluteus maximus, quadriceps, hamstrings, erector spinae, core.
Secondary: Biceps, forearm flexors.
Benefits:
More quadriceps engagement than regular block pulls.
Much less lower back stress.
The parallel grip makes trap bar deadlifts more biceps and shoulder-friendly.
Tips:
Adjust the height of your blocks to change the effect of this exercise.
You can also do this exercise in a power rack, i.e., trap bar rack pulls.
Experiment with the width of your stance to see what feels best.
5. Snatch grip deadlift
Lifters often do block pulls to overload their upper back muscles. Using a wider-than-shoulder width or snatch grip also increases upper back engagement but requires no additional equipment. As an added advantage, this exercise increases off-the-floor strength and explosiveness.
Steps:
Place your barbell on the floor and stand with your toes beneath it, feet between shoulder and hip-width apart.
Grab the bar using an overhand, wider than shoulder-width grip.
Straighten your arms, brace your core, set your shoulders, and drop your hips down below your shoulders. Take the slack out of the bar.
Drive your feet into the floor and stand up. Do not lean back, as doing so increases your risk of injury.
Lower the bar back to the floor, reset your core and grip, and repeat.
Muscles Targeted:
Primary: Latissimus dorsi, trapezius, rhomboids, gluteus maximus, quadriceps, hamstrings, erector spinae, core.
Secondary: Biceps, forearm flexors.
Benefits:
A very effective upper-back builder.
A precursor for doing Olympic snatches.
A great upper trap and mid-back strengthening exercise.
Tips:
The wider your hands, the more challenging this exercise becomes.
Use a hook grip to prevent your hands from slipping.
You can also do this exercise off blocks or power rack safety pins, like this:
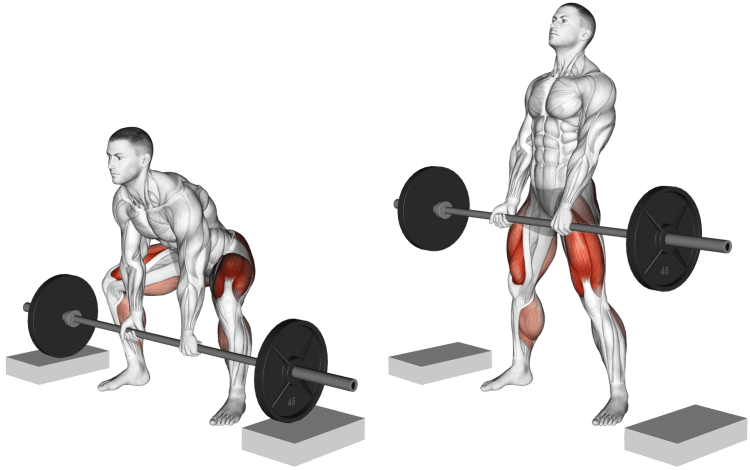
6. Romanian deadlifts
Like block pulls, Romanian deadlifts emphasize the top of the deadlift movement. However, performed with semi-straight legs, Romanian deadlifts are more glute and hamstring-dominant than block pulls. Romanian deadlifts are arguably one of the best posterior chain exercises around.
Steps:
Hold a barbell in front of your thighs using a double overhand or mixed grip.
Stand with your feet hip-width apart, knees slightly bent but rigid.
Brace your core and set your shoulders back and down.
Push your hips back and hinge forward, lowering the bar down the fronts of your thighs to below your knees.
Drive your hips forward and stand back up.
Muscles Targeted:
Primary: Gluteus maximus, hamstrings, core, latissimus dorsi, trapezius, rhomboids.
Secondary: Forearms, biceps.
Benefits:
More glute and hamstring-centric than block pulls.
No additional equipment is required.
A very functional posterior chain exercise.
Tips:
Adjust your range of motion according to your flexibility.
Do NOT round your lower back!
Keep your neck long and your chin tucked in to avoid cervical spine stress.
7. Kettlebell block pull
Most deadlift variations revolve around barbells. However, you can also deadlift other heavy objects, including sandbags, dumbbells, and kettlebells. The kettlebell block pull is an especially useful exercise for home lifters.
Steps:
Place your kettlebell on a block and stand astride it, toes pointing slightly outward.
Grip the handle with an overhand, narrow grip.
Straighten your arms, pull your shoulders down and back, brace your core, and lower your hips below your shoulders.
Drive your feet into the floor and stand up straight.
Lower the kettlebell back down to your block and repeat.
Muscles Targeted:
Primary: Gluteus maximus, hamstrings, core, latissimus dorsi, trapezius, rhomboids.
Secondary: Forearms, biceps.
Benefits:
A very accessible block pull variation.
Minimal lower back stress.
An excellent block pull option for home exercisers.
Tips:
Experiment with the height of your block.
Push your knees outward to increase glute engagement.
You can also do this exercise with a single dumbbell standing on end.
Block Pulls FAQs
Do you have a question about block pulls or posterior chain training in general? No worries, because we’ve got the answers!
1. How many times a week can I do block pulls?
Most lifters should be able to do block pulls twice a week, e.g., Monday and Thursday. This will allow adequate time for rest, recovery, and muscle growth. However, if you train very heavy (90%+ of your 1RM) or perform a high volume of sets per session, once a week may be all you can recover from. Doing block pulls more often could result in overtraining.
Adjust your training frequency based on your progress, and if you’re feeling tired or burnt out, you probably need to do block pulls less rather than more often.
2. Are block pulls safe?
Compared to conventional deadlifts from the floor, block pulls should be somewhat safer. The shorter range of motion and higher starting position means less low back stress. However, these benefits will soon vanish if you use too much weight or poor technique.
So, block pulls are pretty safe, but only if performed correctly and with appropriate loads.
3. How many reps and set should I do for block pulls?
Your rep scheme depends on your training goal. To build strength, you must lift heavy weights for low reps, typically in the 1-5 range. For muscle building, you need to do moderate to high reps (6-30) using lighter loads. However, to build muscle, you also need to take your sets to within a couple of reps of failure.
Regarding sets, provided you train hard enough, you should be able to fatigue your muscles in 2-4 sets. If you feel you need to do many more, you are either not training hard enough or are resting too long between sets. That said, strength-specific workouts often involve more sets than hypertrophy programs, e.g., six sets of three reps.
Check out this guide to learn more about effective program design.
4. Are deadlifts the only way to train the posterior chain
While deadlifts and block pulls are an effective way to develop your posterior chain, they’re not the only way to train this critical area. Other exercises you can do include:
Kettlebell swings
45-degree back extensions
Barbell hip thrusts
Good mornings
Read about these and other exercises in this article.
5. Are block pulls part of powerlifting?
While block pulls are not an official part of competitive powerlifting, powerlifters often do them as an assistance exercise to improve their lockout strength. However, variations of the block pull, such as the silver dollar deadlift, often feature in strongman competitions.
Because of the raised bar height and shorter range of motion, partial deadlift weights are almost always significantly higher than full deadlifts.
Image via @sirseaningtoniii Instagram
Block Pulls – Wrapping Up
Deadlifts are one of the most productive exercises you can do with a barbell. They’re functional as they replicate several everyday and sporting movements and are great for building full-body muscle and strength.
However, there is no law saying that you have to deadlift from the floor. In fact, if you are tall or inflexible, you may find that doing so leads to injuries.
Block pulls raise the bar to a more mechanically advantageous height, so you don’t have to bend over so far to reach it. In addition, they provide a way to train the upper part of your deadlift more, which may help you blast past your sticking points.
Whether you are an experienced deadlifter or a novice, block pulls are a very beneficial exercise, so try ‘em – you’re gonna like ‘em!
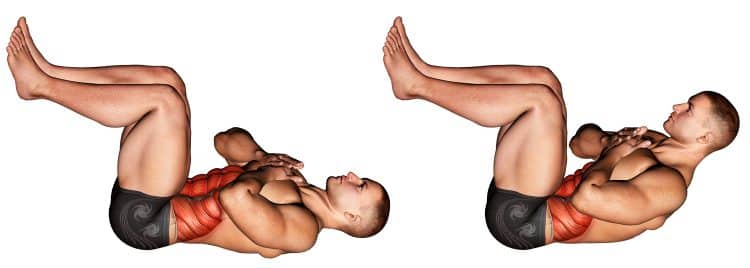
Tuck Crunch Guide: How-To, Muscles Worked, Benefits, and Variations
A versatile, entry-level ab exercise, tuck crunches use isometric loading of the lower body, and a regular crunch to stimulate the rectus abdominis six-pack muscles. It’s a also great learning variation as you should focus on core activation at both ends of where the abdominal muscles attach and function. No ab tools or equipment required, we can’t recommend this convenient variation enough.
But if you find tuck crunches too easy, there’s a simple way to progress them, plus you can and should utilize the more advanced variations and alternatives included below.
Check out our full tuck crunch guide below with simple how-to instructions, benefits, drawbacks, and programming tips!
Muscles Worked During Tuck Crunches
If you want to maximize your gains, it’s important that you understand how your muscles work so you can train them properly. Crunches are a core exercise that primarily involves one function of the abs explained below.
Rectus abdominis
The aim of any crunch variation is to improve your six-pack (If we’re being honest) muscles. Also called the rectus abdominis in scientific terms, your abs are long, twin muscles parallel to each other that extend from the lower chest area down to the pelvis region.
Read: How Many Abs Can You Have? 4-Pack vs 6-Pack vs 8-Pack
Not for aesthetic purposes, the rectus abdominis functions relative to its location, curling both ends the trunk, between the ribcage and pelvis, toward each other. This is experienced when you do a basic ab crunch which emphasizes the upper abs, or a leg lift that works the lower core muscles.
Obliques
Playing Robin to the rectus abdominis in tuck crunches, your obliques are side core muscles, found and functioning laterally. As a result, obliques do things like bend us sideways, and rotate our upper bodies. However, the obliques will always get action, no matter what exercise you do.
How To Do Tuck Crunches
Tuck crunches are a very beginner-friendly exercise, but it’ll be most effective if you understand the mechanics of a basic core crunch (one of the variation included below). Because you’re just incorporating the legs via hip flexion, to isometrically engage the lower abs.
You can find the simple tuck crunch exercise steps below, and we also included a quick video tutorial.
Steps
Find a cushioned but firm surface, or use an exercise mat.
Lie on your back, then lift your knees up perpendicular to the floor, and bend your legs at a 90-degree angle. Your lower back should be flat and pressed into the floor.
Cross your arms on your chest, tense your core, and use your ab muscles to curl your upper body toward your knees. Push as far as you can without lifting your upper back. Squeeze your abs hard, and exhale.
While maintaining a tense core, slowly reverse the motion by lowering your shoulders to the ground. Inhale, and prepare for the next rep. Continue for the desired number of repetitions.
It’s that easy and effective!
Here’s a short video example of tuck crunches.
Tips
You can also place your fingers behind your head during tuck crunches. However, do not pull up on your neck. Keep your head neutral and use your abs to control the movement.
Your lower back should not leave the ground during tuck crunches.
For increased ab activation, bend your knees in as you crunch your upper body, then extend your legs out as you drop your shoulder to the floor. Just make sure your back stays flat against the floor, which means you won’t be able to drop your legs too far down.
Hold a weight in both hands to drive more stimulation in your abs!
This Exercise
Target Muscle Group/s: Rectus abdominis
Secondary muscle group/s: Obliques
Type: Hypertrophy
Mechanics: Isolation
Equipment: Cushioned surface, exercise mat
Difficulty: Beginner/Intermediate
Benefits of Tuck Crunches
If you need convincing of why tuck crunches are a cool ab exercise, here are a few reasons.
Show off your midsection
As the summer months draw near, eyes will also right in that midsection area if you put together the right ab training routine. Tuck crunches are not only a good way to stimulate your core, but they’re so quick and simple that you can even do them before you hit the sand, and get a nice midriff pump!
No ab tools needed
No bars, cables, weights, or machines necessary… tuck crunches require nothing but a cushioned surface, your commitment, and intensity.
Related: The best six-pack workout you can do at home
Learn to use your lower body to load your core
While leg involvement is minimal in tuck crunches, incorporating your legs in ab training is good practice. Your legs weigh a lot and are a convenient way to add a lot more resistance. You can do gradual progressions starting from tuck crunches, incorporating the many leg crunch variations.
Drawbacks of Tuck Crunches
Tuck crunches are a good exercise choice, but they aren’t perfect. Here are some drawbacks of this movement.
You’ll eventually need more…
Unless you’re maintaining or using it to warmup (both strategies are beneficial), there will come a point when you need to step up your tuck crunch game. Think around the 35+ rep mark, then progress by holding a weight, or progress to more challenging variations.
Leg movement would be better!
In tuck crunches, your legs remain in one static position, not moving. While it may increase lower ab activation, it’s undoubtedly better to move your legs, whether it’s lifting them up and down, doing bicycle crunches, or pulling them in and out.
More lower body involvement will simulate a lower core crunch, contracting the abs more, which should translate to a more effective exercise.
But holding your legs steady is a a good way to introduce your legs in your ab training, or cool down after an intense workout.
Variations and Alternatives of Tuck Crunches
There are endless crunch variations and alternatives, however, we wanted to choose ones that closest replicate a similar body position and movement to tuck crunches.
Basic ab crunch
The standard ab crunch is known as the exercise in its most basic and beginner-friendly form. You should definitely learn how to do it correctly before introducing your legs into the movement. That means contracting your abs, and using them to curl your torso off the ground.
As simple as they seem, there’s a right and wrong way to do them, and it’s too easy to slack off.
Steps
Lie on your back on a cushioned yet firm surface such as a carpet or training mat.
Bend your knees, and place your feet flat on the floor roughly hip width apart. Your feet should be close enough to your butt that you can reach forward and touch your heels. Your lower and upper back should be flat against the floor.
Then place both hands behind your head and keep your elbows flared out to the sides, where they should stay throughout the movement.
Now tighten your core, and lift your shoulders in, squeezing your abdominals. Keep your head neutral.
Slowly lower your upper body to the floor and repeat until you’re satisfied.
Here’s a short and sweet video of the basic ab crunch.
Weighted tuck crunch
It’s as easy as picking up a five pound dumbbell, weight plate, or any evenly weighted object that you can hold in both hands. Crunches may have a reputation of being a bodyweight-based exercise. However, your abs are muscles like any other muscles, and they need progressive resistance to respond and develop.
If you’re more advanced in your training, you should always add more weight/ more reps, and variations that challenge your core further.
Steps
To avoid dropping a weight on yourself, first, place the weight on the floor, and then sit next to it.
Then, hold the weight with both hands in front of your chest, lie on your back, and lift both legs up while keeping your knees bent at 90 degrees. Your lower back should be flat on the floor.
Press the weight up over your chest and lock out your elbows.
Engage your core, and use your ab muscles to crunch up and forward while reaching for your toes. Squeeze your core muscles hard.
Slowly roll back to the starting position but don’t allow yourself to rest. Immediately perform the next repetition and continue until the set is completed.
Bicycle crunches
They look simple, but bicycle crunches done right are a crazy good core builder that also promotes more mobile hips. While more of a rotation exercise, the legs follow a similar movement to wind sprints, and they’re totally worth including in your workouts.
Steps
Lie down on an exercise mat or soft surface.
Place your fingertips behind your head near your ears and lift your feet about 12 inches off of the floor.
Then, pull your left knee into your abdominals while twisting your body to the left. Try to touch your left knee and right elbow. Contract your abs during this part of the movement.
Immediately do the opposite motion with your legs, and rotate to the right.
Alternate your legs until you’ve completed one set. Rest for 30 seconds, and repeat.
Pro tips:
Pretend you’re trying to touch your shoulder to the opposite knee. This will ensure that you get optimal trunk rotation, and hence fully stimulate the obliques.
Make sure to alternate between bent and extended legs, kicking your legs in circles like you’re riding a bicycle.
On a weight loss journey? Use our calories burned during bicycle crunches calculator to track your progress.
V-Ups
A worthy variation in our books, v-ups allows you to perform a bodyweight floor crunch using the full weight of your arms and legs at the same time, targeting both the upper and lower abdominals. It is advanced though, so you should be somewhat of a crunch master beforehand.
Steps
Lie on the floor face up with your legs straight out, feet pressed together, and arms extended above your head.
Brace your core by pushing the pelvis down, taking a breath in, and tensing the midsection.
Then, simultaneously lift your legs up toward the center of the body, and reach your arms toward your toes.
Reverse the motion and return to the starting position while keeping your heels a few inches off the floor. Your back should always be flat against the floor and your core tensed.
FAQs
What are the best sets and reps for tuck crunches?Because tuck crunches are a fairly basic bodyweight based ab crunch variation, we recommend doing 2-3 sets of high rep sets, or training to complete muscular failure.
Then when you become more advanced, switch to weighted tuck crunches (included in this guide), and aim for a 12-20 rep range, using a weight that challenges you and makes you work for the last five repetitions!
How far should I crunch? The idea is to crunch as far as you can forward without lifting your upper back. You want to squeeze hard and contract your core muscles, which is best with a full range of motion, getting as much spine flexion as possible.
Tuck crunches are too easy. How to make them harder? Grab a weight plate, dumbbell or evenly weighted object and hold it above your chest. You can also bend and extend your legs as you crunch. See variations and alternatives section for reference.
Wrapping Up
There’s really nothing more to it… tuck crunches are simple but ab gains friendly exercise when you’re ready to go beyond a basic crunch, need a quick ab pump, or a warmup before your more intense core training. It’s a great exercise to train both ends of your core, while developing your mind muscle connection, making your ab training even better, so you can get those dreamy abs!
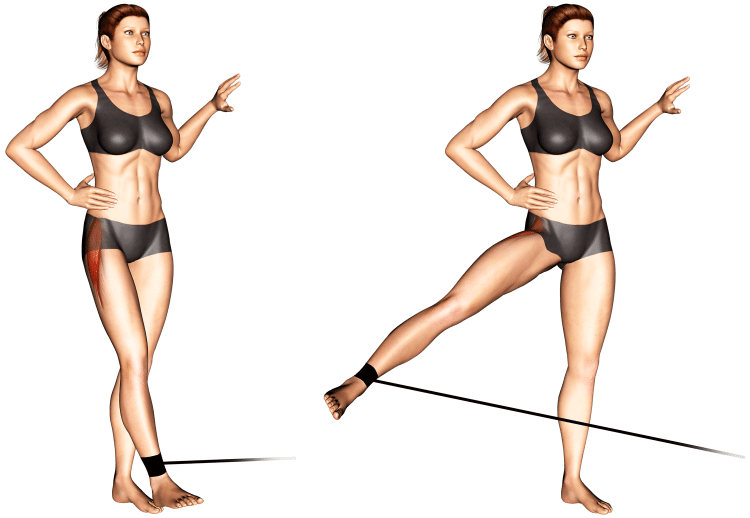
Band Hip Abduction Guide: How-To, Muscles Worked, Benefits, and Variations
Most exercisers program their training around the major muscle groups (quads, glutes, back, chest, etc). While they do contribute the most to strength, muscle gains, and performance, they aren’t the only muscles in need of attention. The abductor muscles, for example, may get indirect stimulation from squats and lunges, but these exercises can’t do what band hip abductions can do, for instance.
Your hip abductor muscles in the butt and thighs, especially glute medius, and tensor Fascia latae (TFL), are important for swinging the leg laterally, lower body joint and muscle stability, performing functional movements, and preventing daily injuries from everyday activities.
But how often do we perform lateral isolation movements? For many, never.
All you need is a resistance band and a stable base to anchor it to, or you can opt for one of the variations using just a band and your legs. This article features the abductors’ anatomy, how-to, benefits, variations, and FAQs, and more.
Muscles Worked During Band Hip Abductions
Located on the outer hips, your abductors are important muscles for maintaining strength and stability in the lower body. There are two significant abductor muscles that take control of this movement pattern.
Gluteal muscles – medius, and minimus
You can think of your gluteal butt muscles as three siblings, from youngest to oldest. The gluteus minimus is the youngest (smallest), medius middle child, and maximus (oldest and biggest). Medius covers minimus, and is found deep to the maximus.
The two younger siblings, medius and minumus are given the chore of abducting or moving the leg outward away from the midline of the body. Therefore, band hip abductions rely heavily on these two muscles.
Tensor fascia latae
While it sounds like someone’s favorite Starbucks beverage, tensor fascia latae is a muscle that rides the outer thigh from the iliac crest, down and through the iliotibial (IT) band, before crossing the knee and inserting into the tibia. Together with the glute medius and minumus, TFL abducts, and internally rotates the hip. It also has an anatomical association with glute maximus, where it helps the former in hip abduction.
TFL other functions include hip flexion, although a weaker flexor than iliopsoas, knee flexion past 30 degrees, and, hip and knee stabilization, and tibial lateral rotation.
How To Do Band Hip Abductions
One of the biggest benefits of band hip abductions is that they’re relatively simply, and non intimidating. Anyone, including beginner exercises can do them.
Steps
Attach one end of the band/s to an object at lower shin height just above the ankle.
Stand sideways to the base and hold onto it if you need the stability. Then wrap the other end of the band around the ankle furthest away from the base, not the foot closest to the anchor point.
Take a few steps away from the base to stretch the band and create tension.
With your feet closer together, move the banded leg out and away from your body laterally while keeping your knee fully extended.
Pull your leg back in and repeat the exercise until you’ve completed the set. Then turn your body to face the opposite direction, attach the band to the other ankle, and repeat the movement. Make sure to alternate legs for each side to train your abductors equally.
Check out the short video tutorial below to see an example of band hip abductions.
Tips
Make sure there’s always a little tension (stretch) in the bands, even in the starting position. This will help keep your abductors active.
The band should not be rolling up and down your ankles or the base.
If you only have a loop band, you can wrap it around both ankles, and then work one leg at a time, while the other legs acts as the base.
This Exercise
Target Muscle Group: Gluteus medius
Type: Strength, function
Mechanics: Isolation
Equipment: Resistance band
Difficulty: Beginner
Benefits of Band Hip Abductions
Band hip abductions offer some nice benefits and only require a small commitment of your time. But they’re absolutely worth it if you take them seriously like the other important movements.
Remain a functional, performing beast
Strengthening and maintenance are two essential components of performance, and longevity. Band hip abductions are good for both when it comes to your hip abductors. They’re especially useful for preventing long term negative effects of “coma glutes”, or when the butt muscles shut off due to long inactivity and modern day tech heavy lifestyles.
Band hip abductions are an easy, low stress/physically taxing activity that anyone can pick up.
Change your plane
Some people only ever do a select few exercises, that happen to occur in the same plane, like squats, lunges, and leg extensions. But we can move sideways, and diagonal too in multiple planes, and it’s good to use these built in capabilities. Not just for performance reasons, but to help maintain healthy and mobile joints, that protect us from injuries.
Popular rehab exercise
Band hip abductions are great for assisting the rehabilitation of the outer hip muscles, or correcting structural issues like knee valgus, or knock knee syndrome, which is when the knees appear to collapse in toward each other (hence the reference to the knees knocking together), can be the result of weak hips. Using band hip abductions as part of a rehabbing program can help to create big improvements.
One study from 2018 found a connection between knee valgus and weak hips. Therefore, performing hip abduction exercises should improve the condition (1).
There’s also patellofemoral pain syndrome (PFPS), which as the name implies affects the patella or kneecap. Commonly caused by strenuous, repetitive activity, or misalignment of the kneecap due to various reasons, PFPS can be helped through a rehabbing program that includes hip abduction specific exercises.
User-friendly
The entry to do band hip abductions is minimal. Anyone can get up and do them because, well, there’s not much to it. You do, however, need decent hip mobility, and flexibility but at a basic functional human level. Not to mention, there are several variations.
Common Mistakes When Performing Band Hip Abductions
While it’s hard to mess up this movement, try not to do these things, and you’ll get the most out of this exercise.
Doing them too fast
We could see why someone would attach an ankle band and start pumping out reps like a cardio workout. But most people never really train these undervalued muscles with focused isolation movements. In the little time we train the abductors, it’s better to go slow, and feel the muscles working equally on each side. You can also more easily identify a weaker side, whereas using momentum can hide structural flaws.
Using too much resistance
Ego training or not understanding your capabilities is a common theme for many exercisers. And bands are no exception. If you cannot move your legs far enough away from your body, you’re not training the abductors to their full potential.
Variations and Alternatives of Band Hip Abductions
Band abductions is one way to do it. But there are advantages and disadvantages, These variations too have theirs. Check out the best alternative hip abductor exercises for you to try out.
Lying band hip abductions
Whether you perform them while lying on your side (clamshells) or back, you can accomplish something similar. But, you’ll need a loop band that you can wrap around both legs. Then, you’ll pull your legs apart, activating those hip abductor muscles.
Steps
Sit on the floor and wrap a loop band around your knees or ankles, then lie on your side, with both legs extended, and feet together.
Now lift the top leg up high, then slowly drop it back down, keeping a small amount of tension or stretch in the bands. Then repeat as many times as needed.
Seated band hip abductions
If you feel more in control doing band hip abductions seated, then its another great option. Just wrap the loop band around your knees while seated on a chair or bench, and do the same technique as explained for the lying variations.
Pro tip: Some people may feel it better if they wrap the band just below the knees. Feel free to experiment a little!
Monster/lateral bands walks
If monsters have taught us anything, it’s a better way to walk to build our glute medius and lateral thigh muscles… Monster walks are a booty band exercise that isometrically, and isotonically work the abductors by walking in a wide, quarter squat stance, maintaining tension in the bands.
Steps
Wrap a band around both legs on the lower thigh just above the knees and keep your legs far enough apart to create tension in the band.
Descend into a quarter squat and bend slightly forward at the waist. Note: The quarter squat stance will fire up your gluteus medius and tensor fasciae latae.
Tense your abs and take large normal forward making sure to maintain tension in the band/s.
Now take small steps backward maintaining the same technique.
Cable hip abductions
For home, bands are king. In the gym, cables are arguably better and it’s obvious why. You have control over the weight, the resistance is consistent (not varying the resistance based on how much the band is stretched), and the pulley won’t slide up and down. Additionally, most gyms have ankle strap attachments, so they’re also convenient.
Steps
1. Slide the cable pulley all the way down to the last notch on the cable railing. Then connect an ankle attachment, and secure it around the ankle furthest away from the cable machine.2. While standing sideways and just off center to the cable machine, hold onto it with one arm for balance, then take a step away until the cable is tight.3. Lift the strapped leg away from the opposite leg like you’re doing a side kick.4. Under control, reverse the movement to bring your leg back to the starting position.
Tips
Go light, and focus on performing a full lateral swing outward.
Aim for 10-15 reps per leg/set.
Machine hip abductions
Probably the most common variation, machine abductions are going to be preferred by most gym goers because they’re convenient, you can choose your weight, and both legs can work at the same time. Nowadays there are several variations, from the conventional seated machine abductor to standing versions.
Pro tip: Sit straight up with your back fully against the machine pad to target more of the abductors, or scoot your butt to the edge of the seat, lean forward and grab onto the machine to hit more of the overall glutes, as demonstrated in the video example below.
FAQs
Check out our frequently asked questions section for some band hip abduction training tips.
How many sets and reps of band hip abductions should I do? At a minimum, we recommend 2 sets x 12-15 reps performed slow, and controlled.
How often should I do band hip abductions? Like any muscles, you’ll get the most benefit from training it a few times per week. Depending on your level of experience, and goals, two to three times per week should be adequate.
Can I load band hip abductions heavy? You can certainly challenge yourself with this movement. After all, that’s the whole point of resistance training. However, band abductions should not be a max loaded movement.
It’s better to focus on performing each rep slow and under control, with a full range of movement. Plus, most people aren’t strong enough in this position.
Why are bands an effective tool for working the hip abductors? Bands are easy to access, and offer an effective way to train the abductors while standing. Because bands stretch, the pressure is lighter at the beginning of each rep, which may be a good way for exercisers and rehab patients to ease into the movement.
Wrapping Up
A car isn’t just an engine, there are several components that keep it running, just like your body. While squats will give you big quads, you’d have neither without strong, stable, and healthy joints. Your hip abductors are those smaller components that’ll keep you training, performing, and living free of pain and injury.
If you haven’t already, get yourself a band, or try one of the equipment free abductor variations. You may not see immediate, visible benefits, but what goes on in the background is just as important.
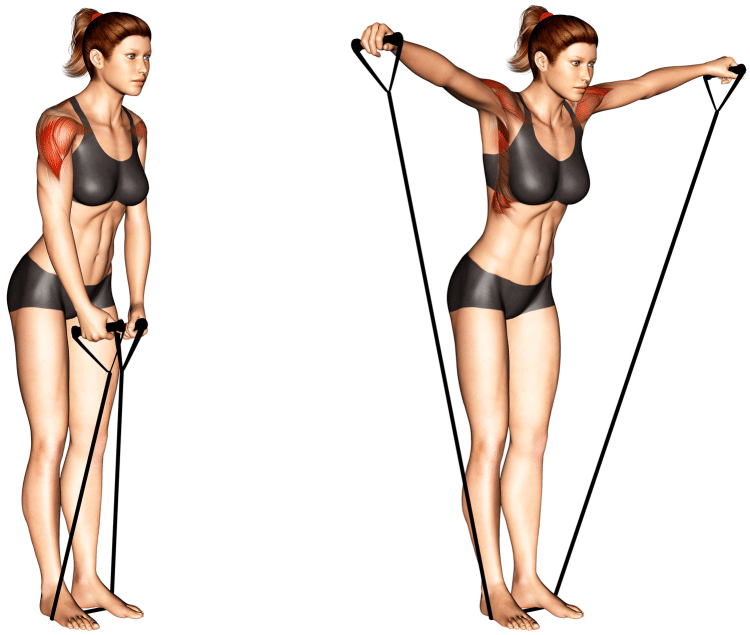
Band Lateral Raise Guide: Muscles Worked, How-To, Benefits, and Variations
If you want to build half-moon-shaped delts at home, or on the go, then you need to get well acquainted with band lateral raises, and resistance bands in general… the ultimate budget and minimalist training tool. But make no mistake, if you know how to use them effectively, you can achieve gains a notch below other training methods like cables, and weights, (we will explain this drawback of bands later on).
If you need an alternative way to stimulate growth in your shoulders and improve your v-taper, then this guide will be a helpful resource for you. Keep reading to learn about lateral delts anatomy, how to accurately perform band raises, benefits you can expect, and the best variations, alternative, and optimal sets and reps.
How To Do Band Lateral Raises
When it comes to exercise technique, the more experienced you are, the more you can modify an exercise to your liking. But for people just starting out, it’s better to get the basics down, to ensure you’re training a muscle properly, using a full range of motion, and keeping yourself pain and injury free.
You can find detailed instructions with a video tutorial below.
Steps
Grab both ends of your resistance band and step on the center of it. Hold the ends of the band (where you grip it) together without stretching it, to make sure the bands are of equal length on both sides. Note: The closer your feet are to each other, the less resistance there will be and vice versa. You may need to do a few practice reps to find your optimal foot placement.
With your hands next to your outer thighs, stand up straight, bend your elbows slightly, breathe in, and brace your core.
Now raise both arms up laterally to your body, then stop when your hands are roughly shoulder level, or slightly higher. Keep your hands higher than your elbows. Breathe out during this phase of the rep. You should feel your outer delts contracting.
Slowly drop your arms to your sides but not all the way (a few inches away from your outer thighs), so that the band doesn’t lose its stretch. Breathe in, brace your core, and repeat.
Here’s a basic tutorial for anyone starting out.
Tips
Beginner exercisers will benefit most from starting with the lightest resistance band first. Focus on feeling the lateral delts work, and optimizing your form to avoid feeling pain in your shoulders.
If you feel pain in your shoulders, rotate your forearms so that your thumbs are pointing up to the ceiling.
If the resistance is too challenging when standing on the band with both feet, take one foot off the band. But still make sure both sides are even.
This Exercise:
Target Muscle Group: Deltoid lateral
Secondary Muscles: Deltoid anterior, serratus anterior, trapezius
Type: Hypertrophy
Mechanics: Isolation
Equipment: Resistance band
Difficulty: Intermediate
Muscles Worked
While primarily an exercise used to add muscle to your outer shoulder muscles, you’ll find that other muscles are involved in band lateral raises too. You can learn about their anatomy, and functional purpose in the following section.
Band Lateral Raise Muscles Worked
Deltoid lateral
When viewed from the front, your lateral or outer deltoid muscles, along with the rear delts are what help to create the half moon shape on the upper arm, right above the triceps. If you want impressive upper arms, developing this head is non negotiable.
Your side delts lift the arms up to either side of your body between 15-100 degrees, which is why lateral raises are most effective for targeting this head.
Deltoid anterior
Many exercisers find that the best way to perform lateral raises is to lift the dumbbells out but also slightly forward too. This engages the front delts, and it’s a good way to nail both heads at the same time. Although, of course, you want to focus more on the side delts.
Serratus anterior
The boxer’s muscle as they call it… your serratus anterior is actually a fan-shaped chest muscle (most of us never knew that) located in the rib area. Serratus anterior protracts the scapula, like when you throw a punch, and it works with the traps to lift objects overhead.
Upper, middle, and lower trapezius
You may hear to “relax the traps” as to not involve them in lateral raises. But it’s almost impossible to not involve them to some extent. After all, they do help to move the scapula and arms up (upper traps), back (mid traps), and down (lower traps).
Benefits of Band Lateral Raises
Band and other lateral raise variations allow you to give special, detailed attention to your outer delts. Here’s why you need them.
Want rounder delts?
Yeah, we thought so…
While pressing movements are also good for building your shoulders, prioritized, progressive lateral raises are going to help you create that wow factor, and 3D look (especially if you focus on your rear delts too). The side deltoids are also what helps to create your best V-taper, and make your waist appear smaller.
Related: How to Build a V-Taper – Training Guide and Nutrition Tips
Don’t have weights? No problem
Dumbbells can be expensive, and if you don’t train at a gym, you need alternatives. While we do have some out of the box bodyweight only band lateral raise variations for you later in this guide, bands are the most practical. They’re also more affordable, and portable. So you never have an excuse as to why you can train delts with limited equipment.
But even if you train at a gym, you may be too exhausted from heavy presses and other movements to include a few sets of focused side lateral raises. You can also do them at home using your bands when you have free time.
Drawbacks of Band Lateral Raises
There are a few potential negatives to consider when including band lateral raises in your workouts. However, none should deter you from doing them because they do have their place.
Bands lack consistent resistance
A problem absent in free weights, cables, and machines, bands do not provide the same challenge throughout the entirety of a repetition. The aformentioned tools are superior if you train at a gym, but having access to them is not always possible. And that’s okay! All tools can be valuable, and you can always use heavier bands. Plus, the more advanced you are, the more you can make bands work in your training program.
Can’t see the numbers
If you train at home, then the numbers don’t really matter as much as they do if you train at a gym, and are serious about tracking your poundages. With bands, you have to consider foot placement, hand placement, band quality, band wear and tear over time, etc. But you can note all of these things and make adjustments to maximize your band usage.
Common Mistakes When Performing Band Lateral Raises
It’s normal that a beginner exerciser trains below their potential. But these guides are designed to help you avoid common mistakes, and get straight to the good stuff.
Using bands that are too heavy
It’s very common that exercisers, especially beginners use bands that are above their strength capabilities. If you’re stepping on the band with one foot and you are straining to raise your arms, you need a lighter band. You won’t make progress this way and you’ll mess up your shoulders.
A lot of times, when people do band lateral raises, they don’t adjust their stance to give them an optimal workout. While we mentioned it before, move your feet closer together, or use one foot to lighten the resistance. If band raises are too easy for you, spread your feet out wider.
7 Variations and Alternatives of Band Lateral Raises
Here are some different, yet similar exercise variations that mimic band lateral raises. They all work, and will give you more rounded delts. However, we love to use a variety of movements to prevent boredom, and stimulate the same muscles with a different technique, which should maximize your muscular potential.
Single arm band lateral raise
Some exercisers prefer single arm lateral raises because it allows them to focus their attention on one delt at a time. While you can just alternate raising your arms while standing on the band with both feet, you can do cross body lateral raises. To do it, you’ll step on the band with either foot, and then use the opposite side arm to perform the exercise. There are several different ways to do it.
Dumbbell lateral raise
Dumbbell lateral raises will always be a classic variation. But a big supposed form flaw is lowering the arms too far down, and taking tension off the delts. Instead, most experts recommend performing lateral raises in a sweet spot.
You can also use weight plates, or anything two object of similar weight that you have lying around.
Steps
Hold your dumbbells together in front of your body with your palms facing each other, and keep your elbows slightly bent.
Then bend your knees and hips, and lean your upper body slightly forward. Tense your core muscles for stability.
Now, raise your arms up and out to the sides until the weight is about head level. Keep your hands higher than your elbows. Slowly lower the weights back down and repeat for the desired number of repetitions.
Cable lateral raise
In many ways, cable lateral raises are better than all of the other variations. It’s the combination of a numbered weight stack, constant muscle tension at every range of motion (if done correctly), various handle/attachment options, and freer range of movement than machines.
Step
Attach a single-grip handle to the lowest point of the cable pulley system.
Stand sideways to the cable pulley and grip the handle with the outside hand.
Either hold onto the cable system and lean away from it or take a step away and remain upright. The cable should have tension before you begin.
Hold the handle in front of or behind your body so that you feel a slight stretch in the delts.
With elbows slightly bent, raise your arm to shoulder level, leading with the elbow.
Slowly lower your arm back down until you feel a stretch in your delts and repeat. Don’t forget to do both sides.
Machine lateral raise
The best option if you don’t want to think too much, just select the weight and go. Lateral raise machines typically have arms with handles that move in a predetermined path, so you don’t have to stabilize the weight. If your gym has one of these machines, we see no reason not to use it.
Bodyweight wall side delt raise
If you don’t have weights, try this variation, as well as the exercise listed below this one. They use just your body weight to train the side delts, but you have to do them correctly, otherwise you can hurt yourself. So, we only recommend them for those with some training experience, and a good understanding of proper form.
Steps
Stand sideways to a wall with your feet together and roughly twelve inches away from the wall.
Then bend the arm closest to the wall at a roughly 90 to 45 degree angle, ball your fist, and lean your body against the wall. Keep your body upright.
Now tense your core muscles, and use your delts to push your body away from the wall. At this point, you can adjust your footing closer to the wall if it’s too hard, or move your feet farther away to make the exercise more challenging.
Complete the set by performing the desired number of reps, then switch sides and repeat. Make sure to alternate to train both sides equally.
You can also do this exercise on a rack or slippery surface like this example.
Side plank lateral raise
A genius idea to train your side delts using your body weight, Jeff Cavaliere of the popular YouTube channel Athlean X introduced this gamechanging variation a few years ago, and it’s a keeper for sure. Rather than lift your arm away from your body, your body is rotating away from your arm. So it essentially does the same thing, just using opposite movement. And your core will also get a great workout.
The drawback is that you need to be decently strong to move a portion of your body weight using your deltoids. There’s no lightening the load or picking the resistance.
Steps
Get in a standard plank position, propped up on your forearms and toes. Your body should form a straight line from head to toe, and you should be looking straight down at the floor.
Now rotate your torso to either side while pushing your forearm into the ground. Your upper body should resemble a side plank.
Return to a standard plank position, but don’t touch the other forearm to the floor. Repeat for the chosen number of reps and switch sides, and do the same thing.
Pro tip: Collapse your body to your left or right side, allowing your body weight to fall onto either shoulder during the negative phase of the exercise, if you want to stretch your delts, as shown in the video example below.
Note: Because of the potential complexity of this variation, we highly recommend watching the following video demonstration, as this exercise can be hard to replicate via written instructions alone.
Shoulder presses
An alternative method of hammering your outer delts is to do overhead presses with your elbows mostly lateral to your body. This guide will show you proper overhead pressing technique for building insane shoulders.
FAQs
Check out the following questions and answers section below, to help you program band lateral raises effectively.
How many sets and reps are best for band lateral raises? Here are the general recommendations for optimal sets and reps based on the desired goal. However, keep in mind, experience, and individual programming will ultimately determine the ideal sets and reps.
Additionally, lateral raises are best performed in a moderate to higher rep range due to the risk of should injury. Therefore, we do not suggest using maximal weight in a 3-5 rep range.
Remember to use a band resistance that challenges you, especially during the last several reps.
Hypertrophy/muscle gains: 2-4 sets x 8-20 reps
Strength focused: 6-8 reps
Muscle conditioning and hypertrophy: 2 sets x 25+ reps
What is the best type of resistance band to use for this exercise? Any long standard resistance band will work whether it’s a looped band or one with handles at the ends. Use what you have, but make sure the resistance is suitable for your experience level.
Wrapping Up
If you want impressive delts that draw eyes, then you need to prioritize shoulder training. That means including isolation work, specifically in the form of lateral raise variations. If you can’t train at a gym, and need a simple, portable way to get the job done, look to resistance band lateral raises.
They’re a great option for dialing in side delt gains, and you can always move up in band strength to continue making progress. Of course, bands do have their drawbacks, but they’re still worth every bit of use.
- 1
- 2