Tag: obliques
Tuck Crunch Guide: How-To, Muscles Worked, Benefits, and Variations
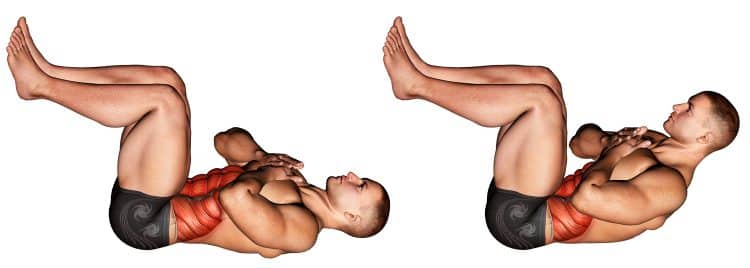
A versatile, entry-level ab exercise, tuck crunches use isometric loading of the lower body, and a regular crunch to stimulate the rectus abdominis six-pack muscles. It’s a also great learning variation as you should focus on core activation at both ends of where the abdominal muscles attach and function. No ab tools or equipment required, we can’t recommend this convenient variation enough.
But if you find tuck crunches too easy, there’s a simple way to progress them, plus you can and should utilize the more advanced variations and alternatives included below.
Check out our full tuck crunch guide below with simple how-to instructions, benefits, drawbacks, and programming tips!
Muscles Worked During Tuck Crunches
If you want to maximize your gains, it’s important that you understand how your muscles work so you can train them properly. Crunches are a core exercise that primarily involves one function of the abs explained below.
Rectus abdominis
The aim of any crunch variation is to improve your six-pack (If we’re being honest) muscles. Also called the rectus abdominis in scientific terms, your abs are long, twin muscles parallel to each other that extend from the lower chest area down to the pelvis region.
Read: How Many Abs Can You Have? 4-Pack vs 6-Pack vs 8-Pack
Not for aesthetic purposes, the rectus abdominis functions relative to its location, curling both ends the trunk, between the ribcage and pelvis, toward each other. This is experienced when you do a basic ab crunch which emphasizes the upper abs, or a leg lift that works the lower core muscles.
Obliques
Playing Robin to the rectus abdominis in tuck crunches, your obliques are side core muscles, found and functioning laterally. As a result, obliques do things like bend us sideways, and rotate our upper bodies. However, the obliques will always get action, no matter what exercise you do.
How To Do Tuck Crunches
Tuck crunches are a very beginner-friendly exercise, but it’ll be most effective if you understand the mechanics of a basic core crunch (one of the variation included below). Because you’re just incorporating the legs via hip flexion, to isometrically engage the lower abs.
You can find the simple tuck crunch exercise steps below, and we also included a quick video tutorial.
Steps
Find a cushioned but firm surface, or use an exercise mat.
Lie on your back, then lift your knees up perpendicular to the floor, and bend your legs at a 90-degree angle. Your lower back should be flat and pressed into the floor.
Cross your arms on your chest, tense your core, and use your ab muscles to curl your upper body toward your knees. Push as far as you can without lifting your upper back. Squeeze your abs hard, and exhale.
While maintaining a tense core, slowly reverse the motion by lowering your shoulders to the ground. Inhale, and prepare for the next rep. Continue for the desired number of repetitions.
It’s that easy and effective!
Here’s a short video example of tuck crunches.
Tips
You can also place your fingers behind your head during tuck crunches. However, do not pull up on your neck. Keep your head neutral and use your abs to control the movement.
Your lower back should not leave the ground during tuck crunches.
For increased ab activation, bend your knees in as you crunch your upper body, then extend your legs out as you drop your shoulder to the floor. Just make sure your back stays flat against the floor, which means you won’t be able to drop your legs too far down.
Hold a weight in both hands to drive more stimulation in your abs!
This Exercise
Target Muscle Group/s: Rectus abdominis
Secondary muscle group/s: Obliques
Type: Hypertrophy
Mechanics: Isolation
Equipment: Cushioned surface, exercise mat
Difficulty: Beginner/Intermediate
Benefits of Tuck Crunches
If you need convincing of why tuck crunches are a cool ab exercise, here are a few reasons.
Show off your midsection
As the summer months draw near, eyes will also right in that midsection area if you put together the right ab training routine. Tuck crunches are not only a good way to stimulate your core, but they’re so quick and simple that you can even do them before you hit the sand, and get a nice midriff pump!
No ab tools needed
No bars, cables, weights, or machines necessary… tuck crunches require nothing but a cushioned surface, your commitment, and intensity.
Related: The best six-pack workout you can do at home
Learn to use your lower body to load your core
While leg involvement is minimal in tuck crunches, incorporating your legs in ab training is good practice. Your legs weigh a lot and are a convenient way to add a lot more resistance. You can do gradual progressions starting from tuck crunches, incorporating the many leg crunch variations.
Drawbacks of Tuck Crunches
Tuck crunches are a good exercise choice, but they aren’t perfect. Here are some drawbacks of this movement.
You’ll eventually need more…
Unless you’re maintaining or using it to warmup (both strategies are beneficial), there will come a point when you need to step up your tuck crunch game. Think around the 35+ rep mark, then progress by holding a weight, or progress to more challenging variations.
Leg movement would be better!
In tuck crunches, your legs remain in one static position, not moving. While it may increase lower ab activation, it’s undoubtedly better to move your legs, whether it’s lifting them up and down, doing bicycle crunches, or pulling them in and out.
More lower body involvement will simulate a lower core crunch, contracting the abs more, which should translate to a more effective exercise.
But holding your legs steady is a a good way to introduce your legs in your ab training, or cool down after an intense workout.
Variations and Alternatives of Tuck Crunches
There are endless crunch variations and alternatives, however, we wanted to choose ones that closest replicate a similar body position and movement to tuck crunches.
Basic ab crunch
The standard ab crunch is known as the exercise in its most basic and beginner-friendly form. You should definitely learn how to do it correctly before introducing your legs into the movement. That means contracting your abs, and using them to curl your torso off the ground.
As simple as they seem, there’s a right and wrong way to do them, and it’s too easy to slack off.
Steps
Lie on your back on a cushioned yet firm surface such as a carpet or training mat.
Bend your knees, and place your feet flat on the floor roughly hip width apart. Your feet should be close enough to your butt that you can reach forward and touch your heels. Your lower and upper back should be flat against the floor.
Then place both hands behind your head and keep your elbows flared out to the sides, where they should stay throughout the movement.
Now tighten your core, and lift your shoulders in, squeezing your abdominals. Keep your head neutral.
Slowly lower your upper body to the floor and repeat until you’re satisfied.
Here’s a short and sweet video of the basic ab crunch.
Weighted tuck crunch
It’s as easy as picking up a five pound dumbbell, weight plate, or any evenly weighted object that you can hold in both hands. Crunches may have a reputation of being a bodyweight-based exercise. However, your abs are muscles like any other muscles, and they need progressive resistance to respond and develop.
If you’re more advanced in your training, you should always add more weight/ more reps, and variations that challenge your core further.
Steps
To avoid dropping a weight on yourself, first, place the weight on the floor, and then sit next to it.
Then, hold the weight with both hands in front of your chest, lie on your back, and lift both legs up while keeping your knees bent at 90 degrees. Your lower back should be flat on the floor.
Press the weight up over your chest and lock out your elbows.
Engage your core, and use your ab muscles to crunch up and forward while reaching for your toes. Squeeze your core muscles hard.
Slowly roll back to the starting position but don’t allow yourself to rest. Immediately perform the next repetition and continue until the set is completed.
Bicycle crunches
They look simple, but bicycle crunches done right are a crazy good core builder that also promotes more mobile hips. While more of a rotation exercise, the legs follow a similar movement to wind sprints, and they’re totally worth including in your workouts.
Steps
Lie down on an exercise mat or soft surface.
Place your fingertips behind your head near your ears and lift your feet about 12 inches off of the floor.
Then, pull your left knee into your abdominals while twisting your body to the left. Try to touch your left knee and right elbow. Contract your abs during this part of the movement.
Immediately do the opposite motion with your legs, and rotate to the right.
Alternate your legs until you’ve completed one set. Rest for 30 seconds, and repeat.
Pro tips:
Pretend you’re trying to touch your shoulder to the opposite knee. This will ensure that you get optimal trunk rotation, and hence fully stimulate the obliques.
Make sure to alternate between bent and extended legs, kicking your legs in circles like you’re riding a bicycle.
On a weight loss journey? Use our calories burned during bicycle crunches calculator to track your progress.
V-Ups
A worthy variation in our books, v-ups allows you to perform a bodyweight floor crunch using the full weight of your arms and legs at the same time, targeting both the upper and lower abdominals. It is advanced though, so you should be somewhat of a crunch master beforehand.
Steps
Lie on the floor face up with your legs straight out, feet pressed together, and arms extended above your head.
Brace your core by pushing the pelvis down, taking a breath in, and tensing the midsection.
Then, simultaneously lift your legs up toward the center of the body, and reach your arms toward your toes.
Reverse the motion and return to the starting position while keeping your heels a few inches off the floor. Your back should always be flat against the floor and your core tensed.
FAQs
What are the best sets and reps for tuck crunches?Because tuck crunches are a fairly basic bodyweight based ab crunch variation, we recommend doing 2-3 sets of high rep sets, or training to complete muscular failure.
Then when you become more advanced, switch to weighted tuck crunches (included in this guide), and aim for a 12-20 rep range, using a weight that challenges you and makes you work for the last five repetitions!
How far should I crunch? The idea is to crunch as far as you can forward without lifting your upper back. You want to squeeze hard and contract your core muscles, which is best with a full range of motion, getting as much spine flexion as possible.
Tuck crunches are too easy. How to make them harder? Grab a weight plate, dumbbell or evenly weighted object and hold it above your chest. You can also bend and extend your legs as you crunch. See variations and alternatives section for reference.
Wrapping Up
There’s really nothing more to it… tuck crunches are simple but ab gains friendly exercise when you’re ready to go beyond a basic crunch, need a quick ab pump, or a warmup before your more intense core training. It’s a great exercise to train both ends of your core, while developing your mind muscle connection, making your ab training even better, so you can get those dreamy abs!
Rocking Plank Guide: Muscles Worked, How-To, Benefits, and Alternatives
Planks are one of the most popular core exercises on the planet. Not so long ago, if you wanted to work your abs, you did crunches and sit-ups. However, those exercises gradually fell out of favor, and the plank took over.
This history of planks is long and storied, and there are examples of planks in yoga, Pilates, and other traditional workout methods.
Fast forward to the 21st century, and now there are online plank challenges, plank workout apps, and competitive planking is a thing. Did you know that the Guinness World Record for holding a continuous plank is a staggering 9 ½ hours!
While planks are undoubtedly an effective exercise, some people find them boring. After all, planks are an isometric exercise, meaning you contract your muscles without moving. So, instead of planking for reps, you just maintain your position for longer and longer durations.
Getting good at planks means you could be doing them for several minutes at a time, which is neither efficient nor very interesting. It’s no wonder that planks can seem dull.
The good news is that you don’t have to limit your core workouts to the same old static plank. There are several variations and alternatives you can use to make your training more time-efficient and interesting.
In this article, we take a look at rocking planks, explaining why and how to do this great bodyweight core exercise.
Rocking Plank – Muscles Worked
Rocking planks are a core exercise, and core is the collective term for the muscles of your midsection. However, they also involve several other muscles. The main muscles developed by rocking planks are:
Rectus abdominis
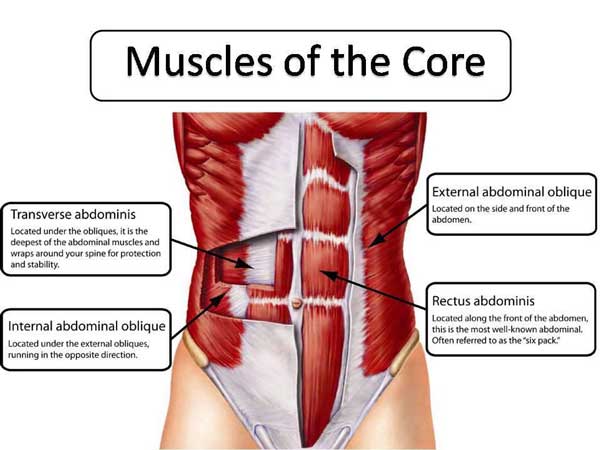
The rectus abdominis is the long, flat muscle on the front of your abdomen. Its functions are flexion and lateral flexion of your spine. It’s also involved in the compression of the abdominal contents. During rocking planks, the rectus abdominis works to stop your lumbar spine from extending.
Transverse abdominis
Where the rectus abdominis runs vertically up your abdomen, the transverse abdominis runs around it horizontally. Known as the TVA for short, this weightlifting belt-like muscle encircles your midsection and, when it contracts, squeezes inward to create intra-abdominal pressure (IAP). IAP supports your lumbar spine and prevents unwanted movement.
Obliques
The obliques are basically your waist muscles. There are two sets of oblique muscles – internal and external – which work together to rotate and laterally flex your spine. The obliques act as stabilizers during rocking planks, preventing any unwanted side-to-side movement.
Erector spinae
The erector spinae are the muscles of your lower back that work to prevent unwanted movement during rocking planks. However, if you do rocking planks correctly, you should not be able to feel these muscles working.
Quadratus lumborum
Known as the QL for short, these muscles lie beneath your obliques and are involved in lateral flexion and stabilization of your lumbar spine. While you can’t see your QL muscles, you may feel them working during rocking planks.
Deltoids
While rocking planks are undeniably a core exercise, your upper body will also get a workout. The rocking motion hits your deltoids, which are your shoulder muscles.
Done correctly, rocking planks involve many other muscles and muscle groups, including your quadriceps, calves, lats, and glutes. However, these muscles aren’t working particularly hard, so they won’t get much benefit from this exercise.
How to Do Rocking Planks
Get more from rocking planks while keeping your risk of injury to a minimum by following these guidelines:
Kneel down and place your forearms on the floor. Brace your core and pull your shoulders down and back.
Walk your feet back so your body is straight. Your shoulders should be over your elbows.
Point your toes and shift your weight forward, lowering your shoulders down toward your hands.
Push back with your arms and return to your starting position.
Continue for the desired number of reps.
Pro Tips:
Place your elbows on a folded exercise mat or foam pad for comfort.
Keep your core braced but do not hold your breath during this exercise.
Keep your forearms parallel or clasp your hands together as preferred.
Make this exercise harder by wearing a weighted vest.
The larger your movements, the more demanding this exercise becomes. Adjust your range of motion based on your core strength.
Rocking Plank Benefits and Drawbacks
Not sure if rocking planks deserve a place in your workouts? Consider these benefits and then decide!
No equipment required
Rocking planks are an excuse-free exercise that you can do anywhere and anytime. With no equipment required, you can do this exercise at home, in your hotel room, or anywhere else you have enough space to lie down.
Count reps instead of time
No watch or timer app? No problem! Instead of working your core for a fixed duration with stationary planks, rocking planks are done for reps. Do sets of straight reps, and don’t worry about how long you’ve been planking for.
More challenging than regular planks
Rocking planks increase the length of your support base, making them more challenging than stationary planks. However, because they’re done for reps, the tension on your muscles is not constant. In this way, rocking planks are more like an isotonic than an isometric exercise.
While rocking planks are a mostly beneficial exercise, there are also a few drawbacks to consider:
Increased shoulder stress
Rocking planks are a core exercise, but you’ll also be working your shoulders. Depending on how far you shift your weight forward, this could put undue stress on your shoulder joints. Perform this exercise with caution if you have a history of shoulder pain.
Increased lower back stress
Planks are perfectly safe if you maintain a neutral (slightly arched) spine. However, if you hyperextend your spine, you could experience back pain. Because rocking planks are more demanding than regular planks, you may find your core muscles fatigue faster, making it harder to maintain a neutral spine. Brace your core muscles hard to prevent this problem.
7 Rocking Plank Variations and Alternatives
Rocking planks are a highly effective core exercise, but that doesn’t mean you need to do them all the time. There are several variations and alternatives you can use to keep your workouts productive and interesting:
1. Body saw
While rocking planks are undeniably harder than stationary planks, your range of motion is limited by your ankle mobility. With body saws, you are free to move further, putting more tension on the target muscles. This exercise is significantly more intense than rocking planks, so proceed with caution!
Steps:
Adopt the plank position with your feet resting on a gym towel or sliding discs. Alternatively, you can take your shoes off and do this exercise in your socks. Brace your core.
Push yourself backward and slide your feet away from your arms. Do not allow your lower back to hyperextend.
Pull yourself forward again and repeat.
Muscles Targeted:
Primary: Core.
Secondary: Deltoids, latissimus dorsi.
Benefits:
A low-tech but high-effect bodyweight core exercise.
More strenuous than rocking planks, so suitable for more experienced exercisers.
Do this exercise anywhere you have a smooth surface to slide on.
Tips:
Do this exercise from the push-up position for a more intense workout.
Adjust your range of motion according to your core strength. The further you slide your feet, the harder the exercise becomes.
You can also do this exercise with your feet in a suspension trainer:
2. Stability ball stir the pot
Rocking planks primarily work your rectus abdominus. While your obliques are involved, they mostly work in a supporting role. With the stability ball stir-the-pot exercise, the obliques get promoted and have much more work to do.
Steps:
Place a stability ball on the floor and kneel behind it. Place your forearms on the ball and then walk your feet out and back into the plank position. Brace your core.
Keeping your body straight, make circles with your arms. Go clockwise and counterclockwise.
Continue for the desired number of reps and then rest.
Muscles Targeted:
Primary: Core.
Secondary: Deltoids.
Benefits:
The obliques get more of a workout.
More demanding than rocking planks.
A functional and effective core exercise.
Tips:
Dust your forearms with lifting chalk to stop them from sliding off the ball.
Bend your legs and rest on your knees to make this exercise easier.
Raise your feet to make this exercise more challenging:
3. Ab wheel rollouts
Rocking planks increase the length of your support base, but not by much. Once you are strong enough to do a dozen or so rocking planks in good form, you should be ready for a new challenge. Ab wheel rollouts are an excellent option and one of the best anterior core exercises you can do.
Steps:
Kneel down and place your ab wheel in front of your knees. Brace your core and straighten your arms.
Without hyperextending your lumbar spine, push the wheel away from you and lower your chest toward the floor. Go as far as you can without losing your neutral spine.
Pull the wheel back into your knees and then repeat.
Muscles Targeted:
Primary: Core.
Secondary: Deltoids, latissimus dorsi.
Benefits:
A challenging movement for more experienced exercisers.
Low-tech but high-effect.
Ab wheels are cheap and readily available.
Tips:
No ab wheel? You can also do this exercise with a barbell.
Wear a weighted vest to make this exercise harder.
Progress to doing this exercise from standing:
4. Walkouts
Walkouts are like ab wheel rollouts, but you don’t need any equipment to do them. They work the same muscles as rocking planks, but the distance between your feet and hands is greater, so they’re a little more challenging. Kick your core workout up a level with walkouts.
Steps:
Stand with your feet together, arms by your sides. Brace your abs.
Hinging from your hips, lean forward and place your hands on the floor.
Taking small steps, walk your hands forward as far as you can while maintaining a neutral spine.
Hold the extended position for a couple of seconds.
Without relaxing your core, walk your hands back toward your feet and stand up.
Continue for the required number of reps.
Muscles Targeted:
Primary: Core.
Secondary: Deltoids, triceps.
Benefits:
A very challenging bodyweight core move that’s ideal for more experienced exercisers.
No equipment required, so ideal for home workouts.
A significant step up from rocking planks.
Tips:
Stop your set if you cannot maintain core stability or start to feel this exercise in your lower back more than your abs.
The further you walk your hands beyond your shoulders, the harder this exercise becomes.
You can also do this exercise from kneeling.
5. Inchworm
Inch worms are very similar to walkouts. However, instead of walking your hands backward to return to the standing position, you move your feet forward to meet your hands. This makes inchworms ideal for outdoor workouts or when training in spacious gyms.
Steps:
Stand with your feet together, core braced, and arms by your sides.
Hinging from your hips, lean forward and place your hands on the floor.
Walk your hands forward as far as you can while maintaining your core stability.
Still bracing, and bending your knees as little as possible, walk your feet up to your hands.
Without standing up, start walking your hands forward into another rep.
Muscles Targeted:
Primary: Core.
Secondary: Deltoids, triceps.
Benefits:
Tips:
Walk your hands as far forward as you wish. The further your hands are from your feet, the harder this exercise becomes.
Take care not to move your hands so far forward that you feel this exercise in your lower back.
Bend your knees as you lean forward if your hamstrings are tight.
6. High bird dog
Bird dogs are so-called because, when you do them, you look a little like a hunting dog pointing at its fallen prey. Regular bird dogs are performed from kneeling and are a great exercise for beginners. However, the high bird dog is much more challenging and an excellent core strengthener for more experienced exercisers.
Steps:
Adopt the push-up with your arms, legs, and body straight. Brace your core.
Keeping your hips and shoulders level, lift your left hand and right foot so they are roughly parallel to the ground.
Hold this position for 3-5 seconds.
Lower your arm and leg, and then repeat on the opposite side.
Continue alternating sides for the duration of your set.
Muscles Targeted:
Primary: Core.
Secondary: Deltoids, triceps.
Benefits:
A very challenging bodyweight core exercise.
Increased oblique engagement.
A good exercise for developing better balance.
Tips:
Take care not to hyperextend your lumbar spine, as doing so could cause lower back pain and injury.
Make this exercise harder by moving your arms forward to extend your base of support.
You can also do this exercise with your legs bent and knees hovering a few inches off the floor, which is called the bear plank bird dog:
7. Kneeling overhead Pallof press
The horizontal Pallof press is a proven core anti-rotation exercise. However, the overhead version is more similar to rocking planks. Because weights are involved, you can easily make this exercise harder or easier according to your needs and goals. However, you should start with a light load because this exercise is harder than it looks.
Steps:
Attach a rope handle to a pulley machine set to about waist height.
Core braced, kneel with your back to the pulley and hold one end of the rope handle in each hand at shoulder level.
Keeping your torso upright, extend your arms overhead.
Lower the handles back to your shoulders and repeat.
Muscles Targeted:
Primary: Core.
Secondary: Deltoids, triceps.
Benefits:
Infinitely scalable by adjusting the weight.
An excellent exercise for all levels of fitness.
Easier to progress/regress than most bodyweight core exercises.
Tips:
Kneel on a folded exercise mat or foam pad for comfort.
This exercise can also be done standing, making it more challenging, but it may also increase lower back stress.
You can also do this exercise with a resistance band:
Rocking Plank FAQs
Do you have a question about rocking planks or core training in general? No problem, because we’ve got the answers!
1. Will rocking planks give me six-pack abs?
While rocking planks will undoubtedly strengthen your rectus abdominis or six-pack muscle, they won’t necessarily give you a visible six-pack. Getting a six-pack involves lowering your body fat percentage so the outline of your abs shows through. For men, this usually means getting your body fat down to ten percent or less. Women typically need to hit 15% or lower.
As such, you’ll need to pay equal attention to your diet and your workouts if you want to get a six-pack.
Read more about training and eating for six-pack abs here.
2. Rocking planks hurt my lower back – what gives?
While rocking planks are generally safe, they could cause back pain if you let your hips drop or hyperextend your lumbar spine. Keeping your core brace will help prevent this problem, as will paying attention to your form.
However, if you still experience discomfort and pain during this exercise, it could be that your core muscles are too weak to fully support your lower back. In this case, choose a less demanding exercise, such as regular planks, and use them to build up your strength until you’re ready to try rocking planks again.
Either way, do not ignore pain, as it’s your body’s way of telling you something is wrong. Working through pain invariably makes things worse.
3. Should I train my abs every day?
While training your abs every day might be tempting, it’s probably not a good idea. Exercises like rocking planks cause micro trauma to your core muscles, which is the trigger for them to get stronger. However, the rebuilding process takes time, so you need to let your muscles to rest and recover so this can occur.
So, it’s generally best to limit your abs workouts to 2-3 times per week. This provides a good balance between work and rest. Training your abs every day could result in overtraining and inhibit rather than speed up your progress.
4. How many reps and sets of rocking planks should I do?
The answer to this question is, how many reps CAN you do? Because rocking planks are a bodyweight exercise, their difficulty depends on things like your weight and limb length, so some people will find them harder than others.
So, it’s up to you to determine how many reps to do. Perform the exercise until you feel the target muscles starting to fatigue. Then, over the coming weeks, gradually try to do more reps.
Regarding sets, 2-4 should be sufficient for most exercisers. If you feel you need to do more than four sets, you are either not working hard enough or are resting too long between sets. Try to fatigue your muscles in three sets to make your workouts more time-efficient.
5. Are rocking planks safe?
Performed correctly, rocking planks are a relatively safe exercise. Unlike crunches and sit-ups, they involve no significant movement of your spine, so they’re very lower back-friendly. However, if you lose core stability and hyperextend your lumbar spine, rocking planks could cause injury.
That said, if your technique is good and you stop your set before your form begins to deteriorate, rocking planks should be no more dangerous than regular planks.
Rocking Plank Guide – Wrapping Up
There is no denying the popularity and effectiveness of regular planks. They’re simple, accessible, and safe. That said, like most exercises, if you do them too often, planks can soon become boring and lose some of their benefits.
While you could just plank for longer, you’ll probably get better results from your workouts if you use some different exercises in your core workouts.
Rocking planks are a logical progression from regular planks and a simple way to take your core workouts to a new level.
Try them – you’re going to like them!
Cable Reverse Crunch: Muscles Worked, How-To, Benefits, and Variations
The cable reverse crunch is not a familiar exercise to most of us (admit it, you’ve never tried it). Hopefully, that will change as we’re convinced it’s one of the most potent variations for bringing out those stubborn and oftentimes invisible lower abs.
Effective core training is not just doing a few weighted crunches, and planks (although they’re part of it). For the best results, you need to incorporate movements that curl the torso at both ends and emphasize core muscle contraction (and oh, it feels so good!).
In this guide, we spill the beans on this must-have ab movement, that offers advantages over similar core-building powerhouses. We’ll show you how to do it correctly, and explain why the hips are key!
Muscles Worked During The Cable Reverse Crunch
A powerful core, and hip strengthening exercise, learn how cable reverse crunches train the abdominal and lower body muscles and understand the importance of training them.
Rectus abdominis
The fancy term for abdominal muscles, rectus abdominis are a long pair of muscles that run between the pelvis and lower chest. Consequently, these muscles serve to curl the torso at both ends of its attachments. We see this during a regular lying floor crunch (lifting the head and shoulders off the floor), and when curling the pelvis and lifting the hips off the ground.
Transverse abdominis
Most people think the abs are the bumpy ridges, aka six pack muscles. Well, that’s one set of abdominals. We also have deeper core muscles called the transverse abdominis. Slung between the ribs and pelvis too, they wrap around the torso, horizontally, like a lifting belt, and consequently acts like one, compressing the core, and stabilizing the spine.
Reverse cable crunches activate transverse abdominis, especially during the hip raise.
Obliques
Playing a sidekick role to the rectus abdominis during cable reverse crunches, obliques lie on either side of the abdominals, more laterally on the torso. The obliques’ position allows them to crunch the trunk sideways, and perform rotational movement of the upper body.
Hip flexors
The hip flexors are muscles that connect our spines to our legs, and they allow us to pull the knees back and lift the butt off the floor. Not just one muscle, but several contribute to this action.
Hip flexor muscles include:
Iliacus
Psoas (major and minor)
Rectus femoris
Iliocapsularis
Sartorius
However, “hip flexors” usually refers to the psoas and iliacus that form the iliopsoas muscle. A powerful duo, these muscles, together, are the strongest and most important hip flexors. Consequently, when iliopsoas contracts, it supports standing, sitting, and overall lower body movement.
How To Do The Cable Reverse Crunch
The cable reverse crunch requires a little more setup and training experience compared to more basic abdominal exercises.
This section will guide you through the proper step-by-step process including machine setup, pre-set routine, and finally, the cable reverse crunch.
Steps
Slide the cable pulley to the lowest notch on the railing. Then attach an ankle strap.
Sit on your butt facing the machine, then wrap the strap around your ankles and make sure it’s secure, and will not come off. Tip: Start with a very light weight and do a few reps to test the secureness of the ankle strap.
Now lie back on the floor and lift your knees up so you’re upper legs are vertical or perpendicular to the floor, and the legs are bent at a 90-degree angle. Extend your arms forward next to your butt and place the palms flat on the floor. Press your lower back flat on the ground.
Lift your shoulders and head off the floor like you’re doing an upper ab crunch, as shown in the video example below.
Tense your core muscles, then pull your knees into your chest and lift your butt off the floor. Focusing on curling the pelvis toward the ceiling, and squeeze both your lower and upper abs hard.
Slowly drop your hips and move your legs forward in the starting 90-degree legs bent position. Then repeat for the preferred number of reps. That’s one set!
Watch a video demonstration of the cable reverse crunch, below.
Tips
If you’re a beginner to exercise or direct ab training, start with the bodyweight variation first. It should be very challenging without extra resistance.
If you don’t have access to a cable machine but still want to benefit from weighted leg crunches, you can do hanging leg raises, strap on some ankle weights, or hold a dumbbell, or exercise ball between your feet.
Focus on curling the pelvis and remember to lift the butt off the floor to really engage the lower abs. Don’t just focus on pulling the knees back as it’s more about what’s happening with the butt!
This Exercise:
Target Muscle Group: Rectus abdominis
Secondary Muscles: Obliques, hip flexors
Type: Strength, hypertrophy
Mechanics: Isolation
Equipment: Cables and ankle strap
Difficulty: Intermediate
Benefits of Cable Reverse Crunch
The cable reverse crunch fits a specific role, not really offered by other options. Besides the main benefits of training the abdominals, there are bonus benefits too. Here’s why we like it.
Add resistance to bodyweight lying leg crunches
A basic lying leg crunch can become boring and unchallenging for those who are more advanced in their training. The cable variation is a gamechanger because you can add incremental weight, and most people will never outgrow the full weight stack. Although, you don’t need much weight anyhow.
It’s also more convenient to use ankle straps, and not have to hold a weight between your feet. You can focus more on the actual exercise.
Awesome hanging leg raise alternative
Numbered weights are the easiest way to track and make progress. With bodyweight variations and banded movements, it’s harder to do. How else can you measure strength progress using your legs during ab training?
Easier to measure gains!
Numbered weights are the easiest way to track your progress, and that’s something cable training offers. Unlike bodyweight and banded exercises where you need to be more strategic about measuring your gains!
Drawbacks of Cable Reverse Crunches
While the cable reverse crunch is a sweet movement, there could be some potential drawbacks.
Requires a decent level of fitness and core strength
While it is a weighted variation, reverse crunches are hard enough without the added resistance. They require strong ad mobile hips, plus decent strength from the deeper and more superficial abdominal muscles. Therefore, we can see why weighted cable reverse crunches are not the best for beginners or those out of shape.
Cables are ideal, but not required
Cables allow you to easily track your progress using a numbered weight stack.
Unless you have regular access to a cable machine, the other variations and alternatives (like the ones below) may require a little more planning and strategy, as you cannot as easily add resistance or measure the weight loads as accurately.
Cable Reverse Crunch Variations and Alternatives
One of the exciting things about training is there are so many different ways to train a muscle. Not only does this combat workout boredom, but using different angles and techniques will undoubtedly get you the best results. The following exercises add extra resistance to your lower ab crunches.
Check out our favorite cable reverse crunch variations and alternatives…
Banded reverse crunches
Resistance bands are the natural alternative to using cables because, when used correctly, they should provide constant tension, not allowing your muscles to take a break at any point during a repetition.
Steps
Wrap one end of a loop resistance band around a heavy, stable object close to floor level as shown in the video example below.
Sit on the floor and wrap the other end of the band around the top of your feet.
Lie back and bring your knees up so the upper legs are vertical and your lower legs are horizontal.
Engage your core, drive your knees back, and lift your butt off the ground, curling the hips upward. Squeeze your abs, then drop your butt down to the floor, and return your legs to the starting angle.
That’s one rep… Now do several more to complete your set!
Tips
Start with a light band and focus on performing the exercise with a full range of motion, and feeling the abs contract. If you can do 15 easy reps, it’s time to add more resistance!
Keep your feet pointed toward the ceiling and toes curved back, or the band will snap back toward the base, throwing off your set.
Recliner crunch
One of the simplest and most effective ways to make leg crunches more challenging is to recline your body, so that your legs are at an angle, forcing gravity to create more resistance for your abs.
Steps
Sit in the center on the long side of a bench.
Grab the edge of the bench on either side of your thighs.
Lean back, keep your back straight, and raise your feet off the ground while keeping your feet together. Your core should tense naturally.
Now simultaneously pull your chest and knees into each other while squeezing your ab muscles hard.
Reverse the motion and repeat as many times as needed.
Related: 13 Best Hanging Leg Raise Alternatives For Beginner, Intermediate and Advanced Levels
Hanging leg and hip raise
If you have access to a pull-up bar, hanging leg raises are a must. The core works extra to stabilize the trunk, and you’re working the abs against the full weight of the legs, unlike a basic lying leg crunch. A more functional option than the cable reverse crunch, hanging variations should be in your top five!
Steps
Reach up and grab the bar with your hands spaced roughly shoulder width apart. Pull your shoulders down.
Hold your feet together and tense your core muscles.
Now bend your knees and lift them up past your waist, then curl your pelvis up and lift your butt to engage the lower abs. Contract the lower core, then slowly drop your legs to the starting position, but don’t fully straighten them.
Repeat until your set is finished.
Pro tip: For more lower ab engagement, lift your butt even higher than what’s demonstrated in the video provided below.
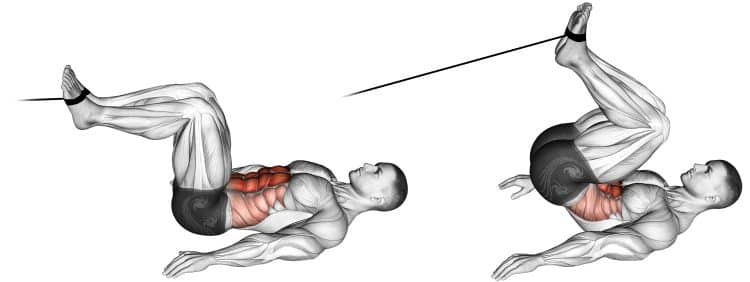
TRX/suspension trainer knee tuck
You can also flip around and use a suspension trainer like TRX or alternatives to imitate a similar movement. It’s more challenging than a lying bodyweight reverse crunch because you’re in a high plank position and the feet are elevated several inches the ground. There are a lot more muscles involved too, making suspension crunches a more functional, and mental fortitude building exercise.
Steps
Adjust the suspension handles to roughly mid calf height.
Place the top of your feet in the loops as shown in the video demonstration.
Get in a push-up position with your hands shoulder width apart, elbows locked out, and arms vertical. Keep your body straight.
Push your feet down into the straps to keep them stable, then tense your abs, and pull your knees to your chest and squeeze your core.
Extend your legs and repeat for the desired number of reps. Do not allow your hips to sag.
Stability ball ab tucks
A perfect home variation, if you have a decent level of fitness ability. Exercise ball knee tucks are harder than a basic lying ab tuck, and the stability requirements work your abs overtime!
Note: Use a quality ball and make sure it’s properly inflated.
Steps
Assume a push-up position with your hands roughly shoulder width apart, palms aligned with the lower chest, fingers pointed forward, and arms fully extended.
Prop your lower shins and feet on top of the ball keeping your legs close together. Your body should be straight with the butt slightly lifted.
Now pull your knees into your chest and squeeze your abs.
Extend your legs back to the starting position and repeat for the desired number of repetitions.
Dragon flag/fly
Dragon flags need no convincing, used by none other than legends Bruce Lee, Sylvester Stallone, and pro trainer/ fitness celebrity Jeff Cavaliere (Athlean X YouTube channel). It’s a more advanced core exercise that uses just the body weight for resistance. Static in nature, you must use more muscles to stabilize, balance, and create the movement.
The challenge comes from extended legs, which creates a longer lever arm.
Steps
Lie flat on your back and grab a stable section of your chosen object behind your head. Ideally, you can grab underneath and apply upward force.
With your legs and feet pressed together, use your hips and core to lift your feet toward the ceiling. Your body should form a straight line. This is your starting position.
Now brace your core strong and squeeze your butt muscles, then slowly drop your legs until they’re at a roughly 45-degree angle to the surface you’re lying on.
Pull your legs back to the starting spot and repeat!
Tips
Grip matters! Ideally, you can anchor yourself down by holding an object from underneath with the palms facing the sky.
Work on just eccentric phase to build strength by cheating your legs to the top and slowly fighting against gravity as it pushes your body back down. There’s a progression in the video example below.
Squeeze your glutes! Your butt muscles are important for hip extension (straightening the legs), so they need to be activated, especially during the lowering phase, do this exercise effectively.
Watch the video below to see the important form cues.
Here’s a detailed video that we recommend watching if you have a few minutes to spare!
FAQs
Below you’ll find answers to some common questions about cable reverse crunches.
What are the best sets and reps for cable reverse crunches?It depends on your level of experience, goals, and current routine. We generally recommend using a variety of sets and rep ranges to get the benefits of increased core strength, more muscle development, and building a more resilient and athletically capable midsection.
Below we listed a few examples of ideal rep ranges for each desired outcome.
Stronger core: 6-8 reps
A little strength and muscle growth: 8-12 reps
Ab development and endurance: 15-25 reps
Note: You should be using a weight that challenges you in the last few reps of each set.
Do cable reverse crunches train the entire abs?Yes, it’s impossible to entirely isolate one part of the abdominal muscles. While leg crunches emphasize the lower abdomen, the abs are a pair of long muscles that split down the center and run parallel. Therefore, a crunch activates the length of the abs.
Wrapping Up
We said the cable reverse crunch was a powerful ab variation and we meant it. Unlike using the forces of gravity (e.g., decline crunches and hanging leg raises), and your body weight, this exercise uses adjustable resistance, and replicates the same lying position as conventional ab crunches.
There are few downsides except you need access to a cable machine and decent fitness ability. But we’ve also shown you other effective options too if that’s ever the case.
Program cable reverse crunches to take your core gains to the next level!
Best Exercises To Sculpt Your Obliques
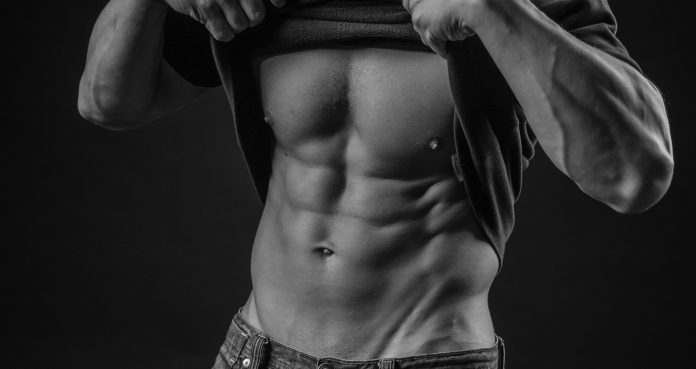
Help make that six-pack pop with sculpted obliques.
When we picture a perfectly sculpted mid-section, we think of that washboard six-pack that stands front and center. But your obliques are equally as important as that shredded core. Not only do sculpted obliques make you look good, but they can provide great benefits to your overall physical health in terms of preventing lower back pain and offering great overall support. For the strongest, most sculpted looking core, your obliques need as much work as the rest of your abs.
Everyone is guilty of skipping an oblique exercise here and there in order to squeeze one more exercise in for those front and center abs. While your main core is equated to a building, your obliques are the support system that holds that building in place. The building only looks good if its able to stand for all to see.
So, while the argument can be made that your mid-section gets all the attention because that is what people see, think again. Every chiseled part of your abs matter for that toned physique and stellar V-shape taper. As the largest ab muscles, your obliques should never be neglected and with strong, stable oblique muscles, your lifts and ab workouts will be more effective and efficient.
What Are Your Obliques?
Located on either side of your abs, your obliques sit between your hip flexors and lats. As an important muscle and source of connection for your abs and lower back, these muscles are responsible for bridging two of the largest and most important muscles in the body. Otherwise known as your transverse abdominis, your obliques are responsible for assisting with rotational exercises and core stabilization.
Not only will strong obliques help with overall core function with other ab exercises, but they provide a source of balance and support for big lifts like the squat (1). For help in your total body transformation, your oblique muscles deserve as much love as everything else.
Benefits of Strong Obliques
The benefits of strong obliques are also reasons to make sure you do not skip over these muscles during your ab routine. That more toned appearance you desperately want will come as a result of working these obliques more and more. As the bridge between your abs and lats, this muscle can truly make both pop and show off those hard-earned wings and washboard abs. Working your obliques will not make you bulky or overly muscular, but will in fact totally change your appearance into one of a sculpted athlete, bodybuilder, or gym fanatic.
Aside from the benefit of a sculpted appearance, strong obliques can work to prevent injuries and assist in lower back pain. In order to compensate for weak obliques, your lower back takes much more strain than it actually wants, leading to tightness and added stress with the unfortunate side effect of potential injury (2). Working to your overall performance benefit, strong obliques can help strengthen your entire mid-section, so whether it’s a big powerlifting exercise, like the squat, bench press, or deadlift, high-intensity interval circuit, or a bodyweight routine, your entire body will be balance and stable for a great athletic boost (3).
Top Oblique Exercises
Russian Twists
As a widely used ab exercise by people of all fitness levels, Russian twists are great for working the obliques. As a great exercise for control, Russian twists work to build balance and rotational strength as well as isometric core strength, since your body maintains rigid form throughout the exercise. These can be done with no equipment or modified to use a med ball, plate, or dumbbell.
How to: Start seated with your knees bent and feet slightly elevated. Keeping a long spine and an engaged core, lean back slightly as you rotate from one side to the other. If you are holding a weight of some kind, hold it out in front of you.
Side Planks
Side planks are a classic core exercise that really work the obliques for balance and stabilization. The added benefit is that your glutes, hips, and shoulders also feel this workout. Side planks will help with good posture and better movement by really working to build your core.
How to: Laying on your side, raise your hips so only one elbow and your feet are touching the ground. Make sure your body is in a straight line from your head to your feet and really engage your core to stay balanced and firm.
Single Leg Toe Touches
Single leg toe touches work for overall balance and strength and work your obliques while also hitting your hamstrings and hips. As a simple movement, this is a convenient exercise to target your obliques and really ensure great growth in strength, balance, and coordination.
How to: Lie on your back and engage your core. Lift one leg and the opposite arm and bend upwards to touch them. Lower back down and repeat the same motion with the opposite arm previously used and the opposite leg as well.
Bicycle Crunches
Bicycle crunches are one ab workout that really works for body movement. Combined with a healthy diet and cardio, these can aid in weight loss and work to build muscles in your abs and obliques. By strengthening these muscles, you will work to add better movement to a host of other activities.
How to: Lying on your back, bend your knees at a 90-degree angle and put your arms on your head with your elbows out. Engage your core and twist upwards touching one elbow to the opposite knee. Straighten out your legs and repeat this movement with the other arm and leg.
Dumbbell Side Bend
Side bends in general are great for working your mind-muscle connection, as well as overall core strength and spinal mobility. Adding a dumbbell or a plate will only strengthen your obliques even more and for those who struggle to get up and down from the floor easily, these are a great standing oblique exercise.
How to: Stand tall with your shoulders back and core engaged. Holding the weight in one arm, slowly tilt downward toward the side with the dumbbell. Slowly return to standing straight and repeat for your desired number of reps.
Wrap Up
While our obliques are often overlooked, they provide great benefit for our overall core strength and toned physique. As a large abdominal muscle and bridge between our abs, hips, and back, it is important to work this muscle as equally as the others to avoid unwanted pain and to improve balance and stability. Don’t neglect this powerful muscle and see your overall growth and physique shine by working your sometimes overlooked yet always important obliques.
Let us know what you think in the comments below. Also, be sure to follow Generation Iron on Facebook, Twitter, and Instagram.
*Images courtesy of Envato
References
Martinez, Amy; Brookbush, Brent (2020). “Internal Obliques”. (source)
Kravitz, Len. “Super Abs Resource Manual”. (source)
Olson, Michele (2013). “Core Strength: The “Anatomy” of Investigating Abdominal Exercises”. (source)