Tag: push up
Yoga Push-Up Guide: Muscles Worked, How-To, Benefits, and Alternatives
The classic push-up is one of the best exercises you can do for your upper body. Requiring nothing more than the space to lie down, you can pump out push-ups anywhere and anytime, which is why they’re such a favorite of the military, martial artists, prisoners, and home exercisers alike.
Standard push-ups are almost unbeatable, and training to do more push-ups will increase chest, shoulder, and triceps muscle size and endurance.
However, as potent as push-ups are, you can have too much of a good thing. Do enough push-ups, and they can lose some effectiveness and even become boring.
That’s why most push-up aficionados include different push-up variations in their workouts, including decline, diamond, paused, deficit, and explosive push-ups. While each of these push-up exercises uses many of the same muscles, they hit them in a slightly different way.
And now you can add a new exercise to your push-up arsenal – yoga push-ups.
In this article, we reveal why and how to do this fantastic exercise and some of the best variations and alternatives.
Yoga Push-Ups – Muscles Worked
Yoga push-ups are a compound upper-body exercise. This means they work multiple joints and muscles working together. The main muscles involved in yoga push-ups are:
Pectoralis major
Known as the pecs for short, these muscles make up the bulk of your chest. There are three sets of pec fibers, called heads: clavicular (upper), sternal (mid), and coastal/abdominal (lower). The pecs are the agonist or main muscle trained during yoga push-ups. All three pec heads are involved in this exercise.
Deltoids
The deltoids, or delts, are your primary shoulder muscles. Like the pecs, there are three sets of deltoid fibers or heads: anterior (front), medial (middle), and posterior (rear). All three deltoid heads are involved in yoga push-ups, but the anterior head is the most active. The medial and posterior delts work mostly as stabilizers.
Triceps brachii
Better known simply as the triceps, this three-headed muscle is located on the back of your upper arm and is mainly responsible for elbow extension. Because of its relatively small size, the triceps are usually the first muscle to fail during yoga push-ups.
Serratus anterior
Also known as the boxer’s muscle, the serratus anterior is located on the side of your chest and is responsible for keeping your scapulae or shoulder blades flat against your ribs. This muscle is so-called because, when well-developed and you are lean enough to see it, it looks like the blade of a serrated knife.
Trapezius
The unusual shoulder movement during yoga push-ups means your trapezius is more active than with regular push-ups. The trapezius is the large, flat, kite-shaped muscle of your upper back. It comprises three sets of fibers: upper, middle, and lower. All three groups of fibers work during yoga push-ups, but the upper fibers are the most active.
Core
Core is the collective name for the muscles that encircle your waist, including the rectus abdominis, obliques, transverse abdominis, and erector spinae. These muscles contract inward to increase intra-abdominal pressure, which helps support your lumbar spine and prevent unwanted movement. Yoga push-ups are more core-centric than regular push-ups.
While yoga push-ups are most definitely an upper-body exercise, your legs are also involved. You’ll need to use your glutes, quadriceps, and hamstrings to keep your lower body straight and rigid. However, the load on these muscles is pretty low, so you’ll still need to train your legs separately if you want to make them stronger or more muscular.
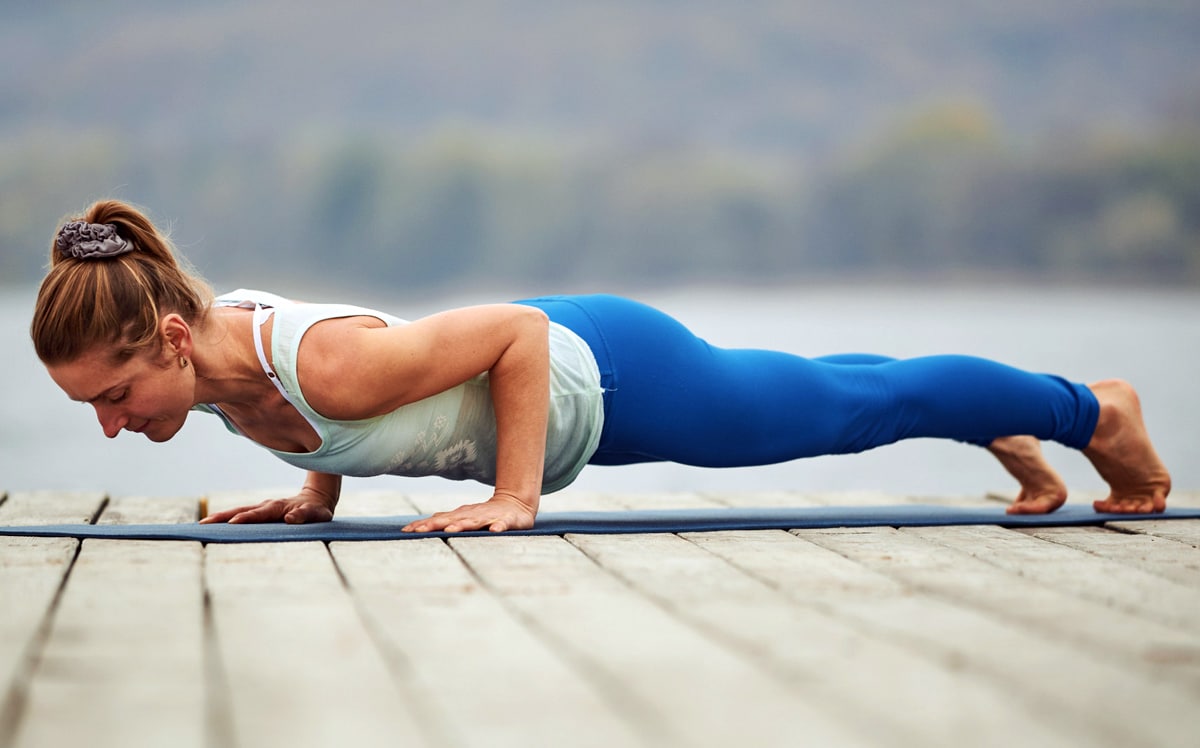
How to Do Yoga Push-Ups
Get more from yoga push-ups while keeping your risk of injury to a minimum by following these guidelines:
Squat down and place your hands flat on the floor, roughly shoulder-width apart, and fingers pointing forward. Brace your core and pull your shoulders down and back.
Walk your feet out and back so your body is straight. Engage your legs to stabilize your lower body.
Bend your arms and lower your chest down to within an inch of the floor.
Next, push up and back, lifting your hips up toward the ceiling. Gently push your head between your arms to extend your shoulders, open your chest, and stretch your lats.
Keep your legs as straight as possible, and press your heels down toward the floor. Your body should now resemble an inverted V.
Return to the starting position, bend your arms, and repeat.
Pro Tips:
Inhale as you lower your chest to the floor, and exhale as you push yourself back and up.
Experiment with the width of your hands to see what feels the most comfortable.
Pause at the midpoint of each rep to maximize the stretching and mobilizing effect of this exercise.
Do yoga push-ups as part of your warm-up or morning routine or during your chest or shoulder workout.
Use push-up handles to increase your range of motion and take stress off your wrists.
Yoga Push-Up Benefits and Drawbacks
Not sure if yoga push-ups deserve a place in your workouts? Consider these benefits and then decide!
Anywhere, anytime
Like most push-up variations, you can do this exercise almost anywhere and anytime. As such, yoga push-ups are perfect for home exercisers and anyone who wants an excuse-free upper body workout.
An effective mobilizer
While yoga push-ups are a great upper-body muscular endurance exercise, they’re also an effective full-body mobilizer. A few reps of yoga push-ups will stretch your shoulders, chest, upper back, lower back, hips, hamstrings, and calves. This means yoga push-ups aren’t just a conditioning exercise but are also suitable for warm-ups.
Increased shoulder engagement
All push-ups involve your deltoids, but yoga push-ups work them more than most. The semi-inverted position at the mid-point of each rep is similar to that of an overhead press or handstand push-up, both of which are great deltoid exercises.
While yoga push-ups are a mostly beneficial exercise, there are also a few drawbacks to consider:
No regressions
There is no obvious way to make yoga push-ups easier. With regular push-ups, you can always bend your legs and rest on your knees to do three-quarter push-ups. Unfortunately, there is no such regression for yoga push-ups.
Potentially more shoulder stress than regular push-ups
Some exercisers struggle with overhead movements and find they cause shoulder discomfort and pain. Yoga push-ups place your arms overhead, so they may cause more shoulder joint stress than other types of push-ups. If yoga push-ups bother your shoulders, you should drop them from your program.
7 Yoga Push-Up Variations and Alternatives
Yoga push-ups are a highly effective upper-body exercise, but that doesn’t mean you need to do them all the time. There are several variations and alternatives you can use to keep your workouts productive and interesting:
1. Feet-elevated yoga push-up
While there is nothing wrong with doing a few yoga push-ups to mobilize and warm up your upper body, some people prefer to do them as a main workout exercise. If you want to overload more than stretch your muscles, feet-elevated yoga push-ups are the answer.
Steps:
Adopt the push-up position with your feet on a knee-high box or step. Brace your core, set your shoulders down and back, and engage your legs.
Bend your arms and lower your chest to about an inch above the floor.
Push back and up and lift your hips into the air so your body resembles an inverted V.
Return to the push-up position, bend your arms, and repeat.
Muscles targeted:
Primary: Pectoralis major, deltoids, triceps.
Secondary: Core.
Benefits:
A more demanding variation of yoga push-ups.
A great movement for more experienced exercisers.
Even better for mobilizing the shoulders and hips.
Tips:
Make sure your bench/step is stable and won’t tip over.
Warm up your hamstrings before attempting this exercise.
Take care not to hyperextend your lower back.
2. Single-leg yoga push-ups
Yoga push-ups provide a welcome core workout. However, the core is not working all that hard. This single-leg variation is much more core-centric and provides an excellent flexion/anti-rotation core workout.
Steps:
Adopt the push-up position with straight arms, core braced, and shoulders back and down. Lift one foot off the floor.
Bend your arms and lower your chest to about an inch above the floor.
Push back and up and lift your hips into the air so your body resembles an inverted V.
Return to the push-up position, bend your arms, and repeat.
Switch legs set by set.
Muscles targeted:
Primary: Pectoralis major, deltoids, triceps.
Secondary: Core.
Benefits:
An intense core and upper body exercise.
More leg and glute engagement than regular yoga push-ups.
Requires and develops greater coordination and positional awareness.
Tips:
Wear non-slip shoes or do this exercise barefoot.
Lift your non-weight-bearing leg higher to engage your glutes more.
You can also do this exercise with your foot on a step or box, i.e., single-leg foot elevated yoga push-ups.
3. Toe-tap yoga push-ups
Toe-tap yoga push-ups increase shoulder and core engagement while adding a rotational element for greater spinal mobility. If regular yoga push-ups are not challenging enough, and you don’t have a step to put your feet on, this is the next logical progression.
Steps:
Adopt the push-up position with straight arms, core braced, and shoulders back and down.
Bend your arms and lower your chest to about an inch above the floor.
Push back and up and lift your hips into the air so your body resembles an inverted V.
Reach back with one hand and touch your opposite foot.
Return to the push-up position and repeat.
Alternate sides rep by rep.
Muscles targeted:
Primary: Pectoralis major, deltoids, triceps.
Secondary: Core.
Benefits:
More challenging than regular yoga push-ups.
Increased core engagement.
Greater mobility, balance, and coordination demands.
Tips:
Touch your shin and not your toes if you lack flexibility.
Try to hinge from your hips rather than round your lower back.
You can also do this exercise with your feet on a step or box, i.e., feet elevated toe-tap yoga push-ups.
4. Y-reach yoga push-up
This yoga push-up variation works your upper back as well as your chest, shoulders, and triceps. As such, it’s both time-efficient and a great way to prepare your major muscles and joints for upcoming workouts.
Steps:
Adopt the push-up position with straight arms, core braced, and shoulders back and down.
Bend your arms and lower your chest to the floor.
Lift your hands off the floor and extend your arms forward to form a Y-shape. Point your thumbs up to the ceiling.
Bring your hands back in and under your shoulders.
Push back and up and lift your hips into the air so your body resembles an inverted V.
Return to the push-up position, bend your arms, and repeat.
Muscles targeted:
Primary: Pectoralis major, deltoids, triceps.
Secondary: Core.
Benefits:
An excellent postural exercise.
Trains your pushing and pulling muscles simultaneously for a time-efficient upper body workout.
A great way to prepare your upper body for your upcoming workout.
Tips:
Place a folded exercise mat under your hips for comfort.
Keep your upper back engaged and shoulders pulled down and back throughout.
Take care not to lift your head and hyperextend your neck when lying on the floor. Tuck your chin in and look down.
5. Dive bomber push-ups
Dive bomber push-ups are very similar to yoga push-ups. However, they involve some additional movements designed to increase spinal mobility. Dive bomber push-ups are great for loosening up your entire back after a long day sitting at your desk.
Steps:
Adopt the push-up position and then lift your hips into the air. Brace your core and pull your shoulders back and down.
Bend your arms and lower your head toward the floor.
Imagining you are ducking under a low bar, lower your chest to the floor, and then, keeping your hips low, extend your arms and push your upper body away from the ground.
Reverse the motion, again ducking under that imaginary bar, and repeat.
Muscles targeted:
Primary: Pectoralis major, deltoids, triceps.
Secondary: Core.
Benefits:
An excellent mobilizer for the entire spine.
A challenging alternative to regular push-ups.
More lat engagement than with regular push-ups.
Tips:
Adopt a wide stance to take tension off your hamstrings.
Use push-up handles for less wrist strain and a bigger range of motion.
Take care not to hyperextend your spine.
6. Pike push-ups
Yoga push-ups work your chest and deltoids pretty equally. But, if you want to focus more on your shoulders and avoid working your chest, pike push-ups are the exercise for you. They also involve less coordination than yoga push-ups, so they may be a better option for some beginners.
Steps:
Adopt the push-up position with your arms straight and hands roughly shoulder-width apart.
Lift your hips and push your butt back so your body resembles an inverted V. Brace your abs.
Bend your arms and lower your head to the floor, taking care not to bump it.
Extend your arms and repeat.
Muscles targeted:
Primary: Deltoids, triceps.
Secondary: Core.
Benefits:
An excellent bodyweight deltoid exercise.
More weight on your arms than conventional push-ups.
Simpler to learn than yoga push-ups.
Tips:
Experiment with the width of your hands to see what works best and feels most comfortable.
Use parallettes, push-up handles, or yoga blocks to increase your range of motion.
You can also do this exercise with your feet elevated, like this:
7. Mike Tyson push-ups
While boxer Mike Tyson probably didn’t invent this exercise, his use of it means it now bears his name! Yoga push-ups require good hamstring flexibility to perform them correctly. Mike Tyson push-ups work the same muscles but without needing such supple hammies.
Steps:
Adopt the push-up position with your feet pressed against the bottom of a wall to stop them from slipping.
Bend your arms and lower your chest to the floor.
Extend your arms, bend your legs, and push your hips backward so you’re in a semi-crouched potation.
Extend your legs and descend into another rep.
Muscles targeted:
Primary: Pectoralis major, deltoids, triceps.
Secondary: Core.
Benefits:
A more accessible exercise for people with tight hamstrings.
A challenging chest and deltoid exercise.
It was Iron Mike Tyson’s favorite exercise!
Tips:
Keep your feet pressed against the wall throughout.
Experiment with the position of your hands to see what’s comfortable and works best.
Take care to flex from your hips and not round your back as you move into the semi-crouched position.
Yoga Push-Up FAQs
Do you have a question about yoga push-ups or push-up training in general? Don’t worry because we’ve got the answers!
1. How many reps and sets of yoga push-ups should I do?
Because yoga push-ups are a bodyweight exercise, it’s hard to say how many reps you should do. Depending on your body weight and fitness, you might be able to do 10, 30, or even 50 reps, so telling you how many to do would be a mistake.
So, you’ll have to determine how many reps to do. Start your set and continue until you cannot do any more reps in good form. Then, as the weeks pass, do your best to crank out more reps. However, never sacrifice good (and safe) technique for more reps. The trade-off isn’t worth it.
In terms of sets, 3-5 should be enough for most people. If you can do more than this, you probably aren’t pushing your sets close enough to failure, or you are resting too long between efforts.
2. Can I do yoga push-ups every day?
You can do yoga push-ups daily provided you don’t train them too hard each time you work out. For example, you could do 3-4 hard sets close to failure one day and a couple of easy sets for mobility and warming up the next. This will give your muscles the time they need to rest, recover, and adapt to your more intense workouts.
Related: 12 Reasons to Do Push-Ups Every Day
3. Will yoga push-ups build muscle?
Provided you take your sets close to failure, yoga sets could help you build bigger pecs, delts, and triceps. However, this may entail doing high-rep sets, which is not the best use of your training time.
So, if you want to build muscle with yoga push-ups, choose a variation that takes you close to muscular failure in 20 reps or less. This will save you from doing long, inefficient workouts.
4. Are yoga push-ups safe?
Yoga push-ups should be safe for most exercisers. After all, with no barbell to come crashing down on your chest, they’re obviously much less risky than bench presses. That said, the overhead aspect of yoga push-ups means that they put some stress on your shoulders. So, if overhead presses bother your shoulders, yoga push-ups probably will, too.
If you have a history of shoulder pain, introduce yoga push-ups gradually and be prepared to drop them from your workouts if they bother your joints. However, people with healthy shoulders should have no problems with this exercise.
5. Are yoga push-ups better than regular push-ups?
While yoga push-ups differ from regular push-ups, that doesn’t mean they’re better. Yoga push-ups involve more shoulder and core engagement and also mobilize your hips and spine. Regular push-ups do not do this. However, if those benefits don’t interest you, it would be wrong to say that yoga push-ups are better.
In almost every instance, the best exercise is the one that delivers the results you want, is the safest, and that you enjoy. For some, this will be yoga push-ups; for others, regular push-ups will be the best.
Therefore, it’s up to you to determine which is the correct push-up for you.
Yoga Push-Ups – Wrapping Up
With so many types of push-ups to choose from, it can be hard to know which one to do. After all, they’re all excellent, and you can do most of them anywhere and anytime. Regular push-ups are most people’s first choice, but they have their limitations.
Yoga push-ups are an excellent exercise for working your chest, shoulders, and triceps while simultaneously mobilizing your hips and lower back. They’re also a little more core-centric than regular push-ups.
So, whether you’re bored of regular push-ups or just want a new challenge, why not give yoga push-ups a go? Try ‘em; we think you’re going to love ‘em!

How to Get Better at Push-Ups
Push-ups, or press-ups as the Brits call them, should be at the top of every exerciser’s to-do list. Working your chest, shoulders, and triceps, push-ups are more joint-friendly than bench presses, require no equipment, so they’re the perfect excuse-free exercise and can be modified to suit all fitness and experience levels.
Being able to do push-ups is a sign that you are fit and healthy. In fact, in studies, people who could do an above-average number of reps had a lower risk of heart disease, diabetes, and all-cause mortality (1).
Unfortunately, a lot of people are bad at push-ups. Either their form needs work, or they can’t do many reps. Needless to say, you can’t wish yourself to get better at push-ups – it takes time and effort!
However, that work will pay off. With dedication, perspiration, and time, you’ll soon be banging out push-ups like a pro.
We reveal the best strategies for becoming a certified push-up master!
How to Perform the Perfect Push-Up
Before we reveal the best methods for getting better at push-ups, it’s worth spending a moment to check that you know how to do this classic exercise correctly. Poor form wastes energy, making push-ups less effective, and could even lead to injury.
So, revise your push-up technique and make sure that each and every rep will make your inner drill instructor proud!
Kneel down and place your hands on the floor so your fingers point forward and are about shoulder-width apart.
Brace your core, pull your shoulders down and back, and rotate your elbows in towards your sides to engage your lats.
Contract your glutes and quadriceps to increase full-body rigidity.
Walk your feet out and back until your body and legs are perfectly straight. Lengthen your neck and tuck your chin in.
Keeping your body straight, bend your arms and lower your chest to within an inch of the floor. Pause for one second.
Drive your hands into the floor and push yourself back up to full arm extension.
Pause for a second and then descend into another rep.
Inhale as you bend your arms, and exhale as you straighten them.
Looking good, bro! Now you’ve got your technique dialed in, it’s time to look at the strategies and methods you can use to boost your push-up numbers.
How to Get Better at Push-Ups
Whether you are a beginner or an experienced expert, these methods will help reinforce your technique and improve your push-up numbers:
1. Grease the groove
To get better at push-ups, you need to practice doing push-ups. This is the heart of training specificity, one of the most important fitness principles. Grease the Groove (GTG) is a training method popularized by strength specialist and former Soviet special forces instructor Pavel Tsatsouline.
With the GTG method, you do multiple low-rep sets of your chosen exercise spread throughout the day. You avoid training to failure, which causes fatigue. Instead, each set is only about 50% of your maximum and ideally separated by an hour or more.
So, for example, if you can do a maximum of ten push-ups, to grease the groove you do multiple sets of 4-6 reps, focusing on making each push-up as technically perfect as possible. Remember, this is meant to be push-up practice and not a fatiguing workout.
Aim to clock up 6-10 GTG sets per day for the next 21-28 days. Then, when you retest your maximum, you should find that you can do more reps despite not having done any max-rep sets.
2. Train using a more challenging push-up variation
If you want to get better at bench presses or squats, you don’t just load up the bar with the same old weight and use that load for every workout. As every lifter knows, that’s a great way to go nowhere fast.
Instead, you gradually put more plates on the bar, forcing your muscles to adapt and get stronger. This is called progressive overload and another critical fitness principle.
While you could wear a weighted vest to make push-ups harder, it’s usually more convenient to overload your muscles with more demanding push-up variations. For example, putting your feet on a raised box shifts more weight onto your arms, and using push-up handles increases your range of motion. Both make your reps harder.
So, spend the next few weeks focusing almost entirely on a more demanding push-up variation. Then, when you return to standard push-ups, they’ll feel more manageable, and you’ll be able to crank out more reps.
Related: 15 Intense Push-up Variations for Bodybuilders
3. Train your push-ups like you mean it!
Wanting to get better at push-ups is not the same as training to get better at push-ups! So, if you want to become a push-up pro, you must make them the cornerstone of your workouts.
Ideally, you should do a push-up workout three times a week, working a little harder each time you train. So, for example, you could do 3-5 straight sets per workout, pushing each one to failure, or follow one of the push-up workouts in this article.
Either way, if you want to get better at push-ups, you must prioritize them.
Related: How to Train for 20 Consecutive Pull-ups and 50-Push-ups
4. Strengthen your core
While push-ups are undeniably a chest, shoulders, and triceps exercise, they also require plenty of core strength. If your core is weak, your midsection will sag and collapse, and some of the force generated by your arms will be lost.
Think about a sportscar spinning its wheels – all that smoke and rubber looks impressive, but until the car starts going forward, all that energy is wasted.
Plug your energy leaks by strengthening your core. That way, your whole body will move as one solid unit, and all of your efforts will go into pumping out push-ups.
The best core strengtheners for better push-ups mirror the demands of the exercise you’re training for. Planks are a great choice, as are Pallof presses, hollow body holds, body saws, pot stirrers, and ab wheel rollouts.
These are anti-core exercises, meaning they prevent rather than promote movement, so your core muscles work the same way they do during push-ups, i.e., as stabilizers.
5. Pump up the volume with some easier push-up variations
How do you train to do more push-ups when you can’t do very many push-ups yet? Short of moving to Mercury, where gravity is about two-thirds of Earth, the most obvious way is to regress your push-ups and perform a less demanding variation.
Making push-ups easier means you’ll be able to do more reps, developing your muscular endurance and work capacity simultaneously.
Ways to make push-ups easier include:
Three-quarter or kneeling push-ups
Incline push-ups (hands on a bench or similar)
Wall push-ups
Band-assisted push-ups
Do a few sets of regular push-ups, and then, as fatigue sets in, switch to a less challenging variation so you can do more sets. This extra volume will lead to greater and more rapid increases in push-up performance.
6. Strengthen your triceps
Lots of muscles are involved in push-ups, but the most common “weak link” is the triceps. This is hardly surprising, given the size of the triceps compared to the chest. As such, a lot of people find that their arms fail before their pecs, bringing their sets to a premature end.
Avoid this trap by working on triceps strength and training them separately. Good exercises for this purpose include:
Spending extra time on your triceps will turn what is usually a push-up weak link into a much stronger one.
7. Beef up your upper back
Believe it or not, your upper back plays a crucial role during push-ups. Muscles like your lats, traps, and rhomboids must work hard to stabilize your shoulders and prevent unwanted movement. A weak upper back can undermine your push-up performance, like doing chest presses on a wobbly bench.
So, for every set of push-ups you do, make sure you also perform at least one set of upper back training.
Good upper back exercises include:
In addition, complementing your push-up training with upper back exercises will prevent any muscle imbalances and keep your shoulders healthy.
8. Be consistent
Getting better at push-ups will take time. You must train hard and often to develop the muscles that drive your body up and away from the floor against the pull of gravity. Not only do these adaptations take time, but they’re also quickly lost if you fail to keep up your training.
In other words, consistency matters.
So, don’t expect any quick fixes; you’re not going to become a push-up stud overnight. However, if you keep pumping out the push-ups 3-4 times a week for the next few months, your performance will improve, and your hard work will pay off.
Set yourself some targets, e.g., doing 10, 30, or 50 perfect push-ups, to help keep you motivated and to remind yourself what you’re trying to achieve.
9. Eat for success
Good nutrition goes hand in hand with better push-up performance – or it should do! You are what you eat, and if your diet consists mainly of junk food, your muscles will probably perform like junk, too.
Eating healthily ensures your body gets all the nutrients it needs to power your muscles and recover from your workouts. Of course, food is also one of life’s pleasures, so you should enjoy what you eat, too.
This all means you need to adopt a balanced, mostly healthy diet, with a little wiggle room left for the occasional unhealthy snack. Make sure that you consume enough protein for muscle repair and growth, adequate carbohydrates for energy, and sufficient healthy fats. You’ll also need vitamins, minerals, and fiber, all of which are easily sourced from vegetables, fruits, and whole grains.
Finally, adjust your food intake based on your dietary goals, i.e., eat more for muscle growth and less for fat loss.
There is no need to adopt a strict diet. Rather, it’s best to create your own eating plan based on your grocery budget, likes and dislikes, and your cooking ability.
10. Have a plan
You now have all the information you need to become a fully qualified push-up ninja! However, it would be a mistake to try and use all these tips and strategies at once. That will probably cause a “system overload,” and you’ll end up making no progress at all.
Instead, you need a plan!
A plan will help you focus on what’s important while ignoring what is not. It’ll provide you with a path to follow, taking you gradually closer toward your goal. Training without a plan is like going on a journey without a map; you might end up in the right place, but if you do, it’ll be more by accident than design.
So, grab a sheet of paper and start planning your future push-up workouts, starting with some goals. Then, decide on how many push-up workouts you will do per week and what training methods you will use.
Example goal – 50 straight push-ups
Monday – three max rep sets, two minutes rest between each one
Wednesday – 100 push-ups in as few sets as possible
Friday – 10 push-ups every minute, on the minute (EMOM)
Grease the groove push-up workouts twice a week (Tuesday and Saturday)
Don’t worry if your plan isn’t quite right – you can finetune it as you go. Just make sure it’s progressive, i.e., you do a few more reps each week.
Get Better at Push-Ups – FAQs
Do you have a question about getting better at push-ups or push-ups in general? No sweat because we’ve got the answers!
1. What muscles do push-ups work?
Push-ups are a compound exercise, meaning they involve multiple muscles and joints working together. As such, they use a comprehensive list of muscles.
Because you must work hard to keep your body straight and stable, push-ups work virtually every muscle on the front of your body, including your legs and abs. However, the load on these muscles is relatively small. Instead, the push-up mainly works your upper body pushing muscles.
These muscles are:
Pectoralis major – located on the front of your chest and known as your pecs for short, these muscles are the agonist or primary mover during push-ups. In other words, they’re the muscle doing most of the work.
Anterior deltoids – the deltoids are your shoulder muscles. There are three groups of fibers or heads: anterior (front), medial (middle), and posterior (rear). All three are involved in push-ups, but the anterior deltoids are the most active.
Triceps – located on the back of your upper arm, the triceps are responsible for extending your elbows during push-ups. The triceps are often the first muscle to fatigue when you do a high-rep set of push-ups.
Serratus anterior – so called because it looks a little like the edge of a serrated blade, the serratus anterior is located to the side of your chest and helps keep your scapulae or shoulder blades flat against your ribs. Well-developed serratus anterior muscles look super cool!
Rotator cuff – the rotator cuff is the collective name for the four small muscles that control and stabilize your shoulder joint. They are the supraspinatus, infraspinatus, teres minor, and subscapularis. With no bench to support your shoulders, you’ll need to use these muscles to prevent unwanted shoulder joint movements.
Other push-up muscles include your rectus abdominis, hip flexors, quadriceps, and tibialis anterior.
2. Aren’t push-ups a beginner exercise?
While many exercisers do push-ups when starting out, they usually progress to bench presses as they get stronger and more experienced. This suggests that push-ups are only useful for novices.
This is not the case!
While you can bench press more weight, push-ups teach you to use your entire body, making them much more functional. With no bench to support you, you’ll need to stabilize yourself, just like in “real life” outside of the gym.
Plus, there are many ways to make push-ups more demanding and as effective as bench presses for increasing strength and muscle mass.
The bench press is arguably the most popular gym exercise. Still, in terms of bang for your buck, push-ups could be better and are the most widely performed exercise on the planet. Push-ups are definitely not a beginner’s exercise, and everyone who works out should do them.
3. I can’t do a single push-up – what can I do?
Plenty of people can’t do a single push-up. However, almost everyone can learn and train to do this awesome exercise.
Your first step is to regress the push-up until you find a variation you CAN do. For example, you can do kneeling push-ups, countertop push-ups, or wall push-ups. Work on mastering that variation and then progress to a more difficult one when you feel ready. Continue in this way until you can do regular push-ups.
You can also supplement your push-up training with strength exercises such as chest presses, bench presses, machine dips, and triceps pushdowns. All of these exercises can be scaled and progressed to match your current strength level.
The other thing to consider is your body weight. If you are very overweight, push-ups are bound to be challenging. Start trying to lose a few pounds, and you should find push-ups begin to feel easier.
4. Push-ups hurt my wrists – what can I do?
Many people suffer from tight forearms and wrists, especially those who spend a lot of time using a keyboard, performing repetitive manual tasks, or otherwise keeping their hands and fingers clenched.
Doing push-ups takes your wrists into extension, which means those tight muscles are strongly stretched, and can be uncomfortable or even painful.
Ideally, you should work on your forearm flexibility to alleviate this problem with targeted stretching. The prayer and kneeling forearms stretches are ideal for this purpose:
In the short term, using push-up handles allow you keep your wrists straight, which should take pressure off your joints so you can do push-ups without the pain.
5. How many push-ups should I be able to do?
The number of push-ups you can do will depend on your age, gender, weight, fitness, and experience level. That said, there are norm tables that indicate how many push-ups the average person should be able to do.
For example, men in their 30s should be able to do 41 push-ups, while women should be able to do 19.
Check out this article to see how many push-ups YOU should be able to do.
Closing Thoughts
Push-ups are a fantastic exercise! You can do them anywhere and anytime, and you don’t need any equipment, so they won’t cost you a dime. Regular push-up workouts will develop a stronger, more muscular upper body, pumping up your pecs, delts, and triceps. They’re even good for your health, and people who can do a lot of push-ups generally live longer (1) and suffer fewer cardiovascular events.
There are lots of different push-up variations to try, from beginner to ultra-advanced. There are also several ways to organize your push-up workouts, from straight sets to ladders to pyramids.
Push-ups need never be boring!
That said, you CAN have too much of a good thing, and it’s probably a bad idea to do push-ups every day. In fact, you should be good results from 3-4 push-up workouts per week.
Use the strategies and tips in this article to master the push-up and become a certified push-up master. Your efforts will be rewarded!
References:
Yang J, Christophi CA, Farioli A, et al. Association Between Push-up Exercise Capacity and Future Cardiovascular Events Among Active Adult Men. JAMA Netw Open. 2019;2(2):e188341. doi:10.1001/jamanetworkopen.2018.8341 https://pubmed.ncbi.nlm.nih.gov/30768197/

How to Train For 20 Consecutive Pull-Ups and 50 Push-Ups
Pull-ups and push-ups are two of the absolute best exercises you can do. Note we didn’t say best bodyweight exercises, but best exercises – period. Between them, they work every major upper body muscle and teach you how to control and stabilize your body in ways that no machine or freeweight exercise ever will.
Better yet, you can do pull-ups and push-ups almost anywhere. All you need is some space and something to hang from. Get yourself a doorway pull-up bar, and you’re all set. You can also do pull-ups from the top of a power rack, a ceiling joist, the underside of an open staircase, or a tree branch – anywhere you can find to hang will do.
However, some people complain that pull-ups and push-ups are boring, and we respect that point of view. Once you have mastered these exercises and can do a handful of reps, you’ll probably be itching for a new challenge.
One way to reignite your enthusiasm for classic pull-ups and push-ups is to set yourself a repetition goal. Having a training target will make your workouts much more focused and motivating.
Assuming you can do pull-ups and push-ups reasonably well, the next logical goal for reasonably fit exercisers is 20 non-stop pull-ups and 50 push-ups. While these numbers might sound daunting, with time and determination, most people should be able to achieve and even surpass them.
In this article, we share two training programs that’ll have you cranking out 20 non-stop pull-ups and 50 push-ups in just a few months.
Related: How Many Push-Ups Should I Be Able to Do? The Ultimate Guide
Why Train for 20 Pull-Ups and 50 Push-Ups?
Is training for 20 pull-ups and 50 push-ups worth your time and energy? Consider these benefits and then decide!
Increased workout motivation
While any workout is a good workout, training without a goal often means your progress is slow or even non-existent. Following a progressive program toward a definitive goal gives your training focus and purpose, which can be very motivating.
The more motivated you are, the harder you’ll train, and the harder you train, the better your progress will be. This creates a positive feedback loop that will help you maintain your exercise habit and stay on the track to improved fitness and better health.
More dedication and discipline
Sticking to a workout plan as you progress toward your goal forces you to take a more dedicated, disciplined approach to your training. Week after week, you must keep on punching the clock, and missed workouts will hurt your progress.
This teaches you dedication and discipline and spreads to other parts of your life, making you a more productive and successful person in general.
Greater muscle mass
Not so long ago, we (the fitness industry) believed that you had to train in the 6-12 rep range to build muscle. Anything outside of that range was considered a waste of time.
It turns out that this was wrong.
Studies have revealed that you can build muscle by doing as many as 30+ reps per set, provided you work close to failure (1). Training to do 20 pull-ups and 50 push-ups will invariably involve training to failure. As such, you’ll build muscle despite cranking out lots of high-rep sets.
Simply making the switch from 6-12 reps to sets of 20-30 could be the shock your muscles need to trigger renewed growth.
Personal satisfaction
Setting and reaching training goals is very satisfying. It teaches you that if you set your mind to a task, you can complete it. Doing 20 pull-ups and 50 push-ups is a very notable achievement and something that will raise your standing in the fitness community.
Imagine how good you’ll feel when you finally hit 20 pull-ups and 50 push-ups. Pretty damn awesome, right?!
Master the Basics
Before we get into the nitty-gritty of training for 20 pull-ups and 50 push-ups, you need to become an expert in doing these two exercises. Poor form will undermine your performance, lead to injuries, and stop you from achieving your goals.
In addition, sloppy technique makes it harder to quantify your progress as each rep has the potential to be done with different speeds and ranges of motion. Good form standardizes your performance, so you can more acutely measure your improvements.
So, make sure you know how to do these exercises correctly, with your metaphorical eyes tightly closed. Good technique should be automatic and not something you have to think about too much. That way, you’ll be free to focus on pumping out the reps.
Pull-ups 101
Muscles worked:
Latissimus dorsi
Trapezius
Rhomboids
Deltoids
Biceps
Brachialis
Brachioradialis
Forearm flexors
Core
Everyone thinks they know how to do pull-ups but turn into swinging, jerking monkeys when they hang from the bar! Make sure you’re not one of them by following these step-by-step instructions:
Grip an overhead bar with an overhand, slightly wider than shoulder-width grip. Use a full or thumbless grip as preferred.
Your arms should be straight, shoulders down and back, and abs brace.
Bend your legs so your feet are clear of the floor.
Without kicking or swinging, smoothly bend your arms and pull your chin up and over the bar without craning your neck.
Lower yourself back down with control, pause with your arms straight, and repeat.
Push-ups 101
Muscles worked:
Pectoralis major
Deltoids
Triceps
Core
Like pull-ups, most exercisers think they know how to do push-ups. In fact, many are quick to label push-ups as a beginner’s exercise. And yet, even some so-called fitness experts who brag they can do 100 reps manage to murder this classic calisthenic movement. Follow these steps to ensure that your push-ups are a thing of beauty:
Kneel on all fours and place your hands flat on the floor, shoulder-width apart, with your fingers pointing forward.
Pull your shoulders down and back, and brace your core.
Walk your feet out and back until your legs and body are perfectly straight. Tuck your chin in and extend your neck – do not look forward.
Keeping your upper arms close to your sides, bend your arms and lower your chest down to within an inch of the floor.
Push yourself back up to full arm extension and repeat.
Perform all your reps with perfect form and make your inner drill instructor proud!
20 Pull-ups and 50 Push-Ups Workout One: Density Training
The basic premise of density training is simple – you keep your workout volume the same but gradually complete that volume using fewer sets and in less time. This provides the progressive overload your muscles need to get stronger and more enduring.
This workout uses the EMOM (every minute on the minute) method, meaning you start each set at the top of every minute, and whatever time that remains is your recovery.
For example, start your stopwatch and pump out ten push-ups, which will probably take about 20-30 seconds. This leaves 30-40 seconds until the top of the next minute when you’ll do your next set.
The great thing about this workout is that it’s entirely self-regulatory. You only progress when your body is ready for a greater challenge. As such, it’s an open-ended workout plan with no time limit.
If you fail a phase, do as many complete sets as you can and then as many reps as possible for the remaining sets. As you get stronger, you’ll be able to complete more full sets and eventually will graduate to the next level.
It’s broken down into six phases, and you stay with each phase until you complete it. Train 2-3 times per week on non-consecutive days.
You can do the pull-ups and push-ups in the same workout or do them on separate days if you wish. However, because pull-ups and push-ups are your priority, do them at the start of your program, e.g., push-ups at the beginning of your chest-training day and pull-ups before the rest of your back workout.
Plan for 20 Pull-ups
Phase
Sets
Reps
Time allowed
Total reps
1
10
4
10 minutes
40
2
8
5
8 minutes
40
3
7
6
7 minutes
42
4
6
7
6 minutes
42
5
5
8
5 minutes
40
6
4
10
4 minutes
40
After completing phase six, you should be able to do 20 non-stop pull-ups.
Plan for 50 Push-ups
Phase
Sets
Reps
Time allowed
Total reps
1
10
10
10 minutes
100
2
8
13
8 minutes
104
3
7
15
7 minutes
105
4
6
17
6 minutes
102
5
5
20
5 minutes
100
6
4
25
4 minutes
100
After completing phase six, you should be able to do 50 non-stop push-ups.
20 Pull-ups and 50 Push-Ups Workout Two: The Backfill Method
This program involves doing four sets of pull-ups and push-ups per workout. However, as the weeks pass, you do more reps in your first set and less for your last set(s). In essence, you “borrow” reps from your final set(s) and add them to the start of your workout, so the rep count per workout remains the same. This is called backfilling.
While such small increases may seem inconsequential, over almost three months, you’ll gradually progress toward hitting 20 pull-ups and 50 push-ups in a single set.
If you are unable to complete any of the weekly workouts, stick with it for as long as it takes to achieve success and then continue.
Plan for 20 Pull-ups
Week
Set 1
Set 2
Set 3
Set 4
Total Reps
1
10
10
10
10
40
2
11
10
10
9
40
3
12
10
10
8
40
4
13
10
10
7
40
5
14
10
10
6
40
6
15
10
10
5
40
7
16
10
9
5
40
8
17
10
8
5
40
9
18
10
7
5
40
10
19
10
6
5
40
11
20
10
5
5
40
* Rest 2 minutes between sets
Plan for 50 Push-ups
Week
Set 1
Set 2
Set 3
Set 4
Total Reps
1
25
25
25
25
100
2
27
25
25
23
100
3
29
25
25
21
100
4
31
25
25
19
100
5
33
25
25
17
100
6
35
25
25
15
100
7
37
25
23
15
100
8
39
25
21
15
100
9
41
25
19
15
100
10
43
25
17
15
100
11
45
25
15
15
100
12
47
23
15
15
100
13
49
21
15
15
100
14
50
20
15
15
100
* Rest 2 minutes between sets
FAQs
Do you have a question about these workouts or pull-ups and push-ups in general? No problem, because we’ve got the answers!
1. Are pull-ups and push-ups the only exercises I need to do for my upper body?
Between them, pull-ups and push-ups work all your major upper body muscles. Doing these exercises should develop a strong, muscular upper body. However, you may want to supplement your push-up and pull-up workouts with some additional upper-body exercises to build a balanced, aesthetically-pleasing physique.
Good workout additions include:
However, when time is short, it’s reassuring to know that doing just pull-ups and push-ups will deliver a reasonably complete upper body workout, and any additional exercises you perform are a bonus.
Cable Face Pulls
2. How many reps of pull-ups and push-ups should I be able to do before starting these workouts?
Ideally, you should be able to comfortably complete the first stage/week of your chosen workout. This typically means being able to do 10 pull-ups and 25 push-ups, or half your ultimate rep goal.
If you cannot reach these standards, you should work on your pull-up and push-up performance until you can. Straight sets, e.g., three sets of eight, is probably the best way to do this.
Related: 8 Ways to Get Better at Pull-Ups and Chin-Ups
3. How many times a week should I do pull-ups and push-ups?
You can do pull-ups and push-ups almost every day if you wish. Daily workouts are one of the best ways to get really good at an exercise. However, the more often you train, the lower the volume and intensity of your workouts must be. Working too hard or too long will make recovery impossible.
With that in mind, if you do the workouts in this article, you should limit your push-up and pull-up training to 2-3 times per week. This provides an ideal balance between work and recovery.
However, training just once per week probably won’t produce the results you want.
4. Which of the two programs should I do?
With two programs (density training and backfill method) to choose from, you may be wondering which approach is best. The truth is that both of these workouts can be equally effective, so it’s up to you to choose the one that resonates with you the most.
The density training program is more flexible, and you only progress from one stage to the next when you’re ready. The backfill program is a bit more linear, which may appeal more if you prefer a more regimented training plan.
Cannot decide between them? Then why not run both consecutively? For example:
Week 1
Monday – program one
Wednesday – program two
Friday – program one
Week 2
Monday – program two
Wednesday – program one
Friday – program two, etc.
Similarly, you could do the EMOM density workout for push-ups and the backfill workout for pull-ups, or vice versa. Ultimately, there is no right or wrong way to make these programs work for you.
5. What is the best way to warm up for these workouts?
Warming up will prepare your muscles and joints for what you’re about to do. In addition, it may help reduce your risk of injury.
Strength training warm-ups usually consist of the following:
Pulse raise, e.g., 5 to 10 minutes of easy cardio
Mobility and dynamic flexibility for the joints and muscles you’re about to use
Practice/rehearsal, e.g., a couple of sub-maximal sets of pull-ups and push-ups
After that, you should be good to go and ready to start your workout. Read more about warming up for strength training here.
6. Do I have to train for 20 pull-ups and 50 push-ups concurrently?
While it makes a certain amount of sense to train for more pull-ups and push-ups at the same time, you certainly don’t have to. For example, if you have to do a push-up test for work, e.g., an army physical fitness test, you can skip the pull-ups and focus on what you’ll be assessed on instead.
However, if you only do one workout, make sure you also include exercises for the rest of your body. While push-ups (or pull-ups) are a great exercise, they are not a one-step solution for all-around fitness and strength. You also need to develop your pulling, core, and lower body muscles.
7. Can I do chin-ups instead of pull-ups?
Chin-ups and pull-ups are so similar that they’re virtually interchangeable. You perform pull-ups with an overhand grip, while chin-ups use an underhand grip. Because they work the same muscles, you can do pull-ups or chin-ups as preferred. You could also alternate between pull-ups and chin-ups from workout to workout for variety.
Closing Thoughts
You now have two programs you can use to train for 20 pull-ups and 50 push-ups. Besides a pull-up bar, you don’t need any equipment to work toward these targets, so there is no excuse for not rising to the challenge.
Is the thought of doing 20 pull-ups and 50 push-ups a little daunting? Does it feel like it might be impossible?
Good; that’s precisely how a challenge should feel!
It’s only by overcoming difficulties and doing hard things that we develop and grow, not just muscularly but as people.
So, choose your program, commit to the process, and work hard. You CAN do 20 pull-ups and 50 push-ups!
References:
1 – Lasevicius T, Ugrinowitsch C, Schoenfeld BJ, Roschel H, Tavares LD, De Souza EO, Laurentino G, Tricoli V. Effects of different intensities of resistance training with equated volume load on muscle strength and hypertrophy. Eur J Sport Sci. 2018 Jul;18(6):772-780. doi: 10.1180/17461391.2018.1450898. Epub 2018 Mar 22. PMID: 29564973. https://pubmed.ncbi.nlm.nih.gov/29564973/

The Essential Eight-Week Push-Up Training Plan
The Push-Up Plan: Developing Upper Body Power, Core Strength, and Injury Resilience
The push-up is held in high regard by many and is often seen as a test of true muscular strength and endurance.
In addition to developing upper body strength, power, and endurance, one of the best things about the push-up is its simplicity and versatility. Despite this, many people really struggle with push-up and find it to be a challenging exercise to master.
This article will provide an eight-week training program that has been specifically designed to improve your upper body strength, power, and push-up abilities.
Push-Up Technique
Poor technique is often the reason why many individuals struggle with the push-up. Therefore, this section will run through five steps that will allow you to perform the perfect push-up.
Begin in a push-up position. Assume this position by placing the hands slightly wider than shoulder-width and then extended the legs out fully so that the body is flat
Before beginning the descent, squeeze the core muscles tight to prevent any movement through the trunk
In a controlled manner, begin the descent by hinging both elbows. Continue to drop down to the floor until the chest touches the floor
As you are descending, ensuring that the elbows stay tucked in tight towards the ribcage. Allows the elbows to flare out may lead to injury
Powerfully push into the floor with the hands to extend the elbows and return to the starting position.
Push-Up Benefits
There are many benefits associated with regularly performing push-ups. This section will outline four of the greatest benefits.
1) Builds Upper Body Strength
Considering that the push-up requires movement through the shoulder and elbow joints, a large number of upper body muscles are recruited.
While the pectorals (chest) and the triceps (arms) are activated most highly during a push-up, the deltoids and traps (shoulders/ upper back) also assist (1).
Therefore, following a push-up program will develop these major upper body muscle groups while also enhancing your pressing ability.
2) Develops Core Strength
The core is often misunderstood to be the abdominals. However, the core is actually a whole host of the muscles found in the trunk that works to provide the body with stability.
During the push-up, the core must engage to ensure that the body remains stable during motion. Furthermore, it works to stabilize the spine and facilitate good push-up technique.
By regularly performing push-ups it is possible to increase the isometric strength of the core muscles thus increasing strength, stability, and technique (2).
3) Reduces Risk Of Injury
Another benefit of the push-up is the impact that it can have on reducing the risk of injury.
Strengthening the muscles around the shoulder will significantly reduce the risk of a shoulder injury.
Furthermore, having a weak core is commonly associated with low back pain and problems. By performing push-ups and strengthening the core, the risk of low back issues may be reduced (3).
4) Functional and Convenient
You may have heard the push-up be referred to as a “functional” exercise.
This simply means that it is an exercise that typically requires no equipment, works a variety of muscles throughout the body, and has transferable benefits to day-to-day life.
As reflected on, because the conventional push-up is bodyweight only, it is also highly convenient. To perform the push-up all you need is to find a space – no equipment required.
The Eight Week Push-Up Plan
The plan outlined in the following section has been designed to drastically improve pressing strength and enhance push-up performance.
Pre-Test
Regardless of the training program you are following, testing is a hugely important aspect as it will allow you to evaluate your progress and make any appropriate alterations to your training.
Therefore, prior to beginning the eight-week program, perform a maximal push-up test. Simply perform as many push-ups as possible without resting at the top or bottom of the movement.
If you have trained your upper body recently, avoid performing this test. Take a day or two to rest before attempting this test to ensure that fatigue is not a factor.
Once you have completed this test, record your result, and then determine your rep goal. A useful guide is to aim for four times your max rep.
For example, if you complete ten reps in the pre-test, your rep goal will be forty.
Week One and Two
During weeks one and two, you will perform the same workout twice per week at a minimum.Using the rep goal, complete as many sets as required until you have successfully performed all of the reps.
Using the above example, let’s say you complete ten reps during the first set, eight in the second set, six in the third, and so on. Keep going until you have performed forty reps in total.
In terms of rest, during week one take one full minute rest between sets. In week two, look to reduce rest time to thirty seconds between sets.
Additionally, in the second week, you should also look to reduce the total number of sets needed to complete all of the reps.
In terms of assistance exercises, performing light bench and shoulder presses may be beneficial. Other useful exercises include dips and front raises.
Week Three and Four
As you move into week three and four, frequency and training volume increase to ensure that progress continues to be made.
Instead of training a minimum of twice per week, you should now look to workout three times.
As with week one and two, you will continue to base the workouts of your rep goal. However, this time the total number of reps to perform is 150% of your rep goal.
Using the previous example, sixty reps are to be performed per workout. These reps should be performed using as few sets as possible.
With both weeks three and four, the rest period between sets should be kept at approximately thirty seconds. That said, the goal should be to reduce this rest time to allow you to get through the reps quicker.
Week Five and Six
Moving into week five and six, frequency, training volume, and rest periods are all altered once again. At this stage, you can also look at introducing some push-up variations.
During these weeks, you will increase training frequency from three times to four times per week.
Furthermore, increase the total reps performed by another 50% to make it 200% of your rep goal. Referring back to the previous example, this would mean performing a total of eighty reps.
As with the previous weeks, perform as many sets as needed to complete the reps and look to keep the rest periods minimal.
Begin to experiment with your push-ups by performing different variations such as the narrow and wide push-up. Doing this can alter muscle activation (4) and consequently change the training stimulus.
Take care with these variations and, as always, ensure that good technique is the number one priority.
Week Seven and Eight
Intensity has been gradually building throughout the weeks and it culminates in weeks seven and eight. These weeks following the same pattern and structure as the previous weeks.
Frequency is to be increased to five times per week with rest periods between sets to be no more than fifteen seconds.
Total reps performed increases by another 50%. In the example, this means performing a total of one hundred reps.
You should continue to utilize different push-up variations and experiment with hand placement and angles to help you maximize push-up progress.
Be sure to include a number of sets of feet-elevated and hand-elevated push-ups to increase the demand on the muscles of the upper body and core.
Post-Test
Having completed the eight weeks, repeat the test that was performed at the start of the plan and compare the results.
If you feel that you want to improve your push-ups further, the eight weeks can be cycled once again using the new test results.
Program Considerations
In order to maximize progress, there are a number of considerations that must be made before beginning this training plan.
First and foremost, heavy compound lifts may need to be reduced. This is particularly true for pressing exercises such as the bench press and overhead press.
Furthermore, isolation exercises that target the shoulder joint may also need to take a back seat.
Continuing with frequent heavy lifting and isolation work in conjunction with the eight-week push-up training plan may place too much stress on the shoulder joint and cause injury.
As highlighted earlier, the core muscles play a huge, but often unseen, role during the push-up by providing the body with stability.
Having a weak core will likely cause the hips to lift or sag thus interfering with good push-up technique.
Therefore, increasing the strength of the core muscles may facilitate a greater performance with the push-up by enhancing stability and technique.
Finally, ensure that each and every push-up repetition is performed with the strict form.
Not only will this substantially reduce the risk of injury, it will also ensure that you make the best progress possible.
Final Word
The push-up is regarded as one of the best bodyweight exercises for building upper body power and endurance, core strength, and injury resilience.
The eight-week push-up plan, outlined above, is a highly effective and methodical training plan that will allow you to experience all of these benefits.
References:
1 – https://www.ncbi.nlm.nih.gov/pmc/articles/PMC6728153/ Tillaar, Roland van den (2019-09-05). “Comparison of Kinematics and Muscle Activation between Push-up and Bench Press”. Sports Medicine International Open. 3 (3): E74–E81. doi:10.1055/a-1001-2526. ISSN 2367-1890. PMC 6728153. PMID 31508485.
2 – https://www.ncbi.nlm.nih.gov/pmc/articles/PMC4126284/ Calatayud, Joaquin; Borreani, Sebastien; Colado, Juan C.; Martín, Fernando F; Rogers, Michael E.; Behm, David G.; Andersen, Lars L. (2014-09-01). “Muscle Activation during Push-Ups with Different Suspension Training Systems”. Journal of Sports Science & Medicine. 13 (3): 502–510. ISSN 1303-2968. PMC 4126284. PMID 25177174.
3 – https://www.ncbi.nlm.nih.gov/pmc/articles/PMC4395677/ Chang, Wen-Dien; Lin, Hung-Yu; Lai, Ping-Tung (2015-3). “Core strength training for patients with chronic low back pain”. Journal of Physical Therapy Science. 27 (3): 619–622. doi:10.1589/jpts.27.619. ISSN 0915-5287. PMC 4395677. PMID 25931693.
4 – https://pubmed.ncbi.nlm.nih.gov/16095413/ Cogley, Robert M.; Archambault, Teasha A.; Fibeger, Jon F.; Koverman, Mandy M.; Youdas, James W.; Hollman, John H. (2005-08). “Comparison of muscle activation using various hand positions during the push-up exercise”. Journal of Strength and Conditioning Research. 19 (3): 628–633. doi:10.1519/15094.1. ISSN 1064-8011. PMID 16095413.