Tag: stretch
Calves Stretch Guide: How-To, Calves Anatomy, Benefits, and Variations
Whether you like it or not, stretching is part of the body’s necessary maintenance routine. It alleviates stress, keeps our muscles and surrounding tissues healthy, prevents avoidable injuries, and allows us to move every day, even in our older years. Tight muscles are a problem, and today we want to focus on the calves stretch. These rear-facing lower leg muscles are both key performance and postural muscles that take a lot of abuse. Or not, for the average couch potato. Doesn’t matter, both are good candidates for regular stretching.
This guide demonstrates the very best calf stretches to improve your range of motion, alleviate and prevent common foot problems, and stop injuries due to high-intensity activities.
Muscles Involved During Calves Stretch
Let’s talk about what makes up these smaller leg muscles, and how they work.
Calves
Slapped on the posterior lower leg and threaded through the knee and ankle joints, the calf muscle fibers are divided into two heads – gastrocnemius, and soleus. The former is the larger, more visible, and also the stronger calf, while the soleus is a longer, and flatter muscle underneath the gastrocnemius.
The gastrocnemius and soleus fuse together at the lower leg to form what’s known as the achilles tendon, which connects the calves to the heel.
What do the calves do for us?
When you flex a muscle, it’s performing the function in which it was designed. For the calves, that is plantarflexion of the foot and ankle. We do this when pressing the gas pedal in a car, or when standing on our tiptoes to reach something above us.
Consequently, calves are heavily involved in physical performance, contributing to explosive movements like running and jumping. Calves, especially the soleus, is important for helping us to stand upright.
And because the calves are so active, we need to give them adequate stretching to keep them mobile, flexible, and strong enough to endure what we put them through.
How To Do The Calves Stretch
A calf stretch done wrong can be less forgiving than stretches for other muscle groups. That’s because the ankle and foot area, while strong, can easily be overstressed. So we’re going to show you a basic calf stretch from a step, but also consider the variations offered too.
Before stretching any muscle, it’s best to warm up with light intensity technique to drive blood in the area, and make it more pliable. Otherwise, stretching a cold muscle could cause harm. A few minutes of running in place, or a brisk walk are sufficient, according to the American Academy of Orthopedic Surgeons.
Note: We only recommend this stretch for people with healthy ankles, and feet, and good balance, and coordination. Jumping straight into a deep calf stretch using your body weight, with incorrect form, can stress everything from the achilles tendon, to the ankle, and even the fascia tissue in your feet.
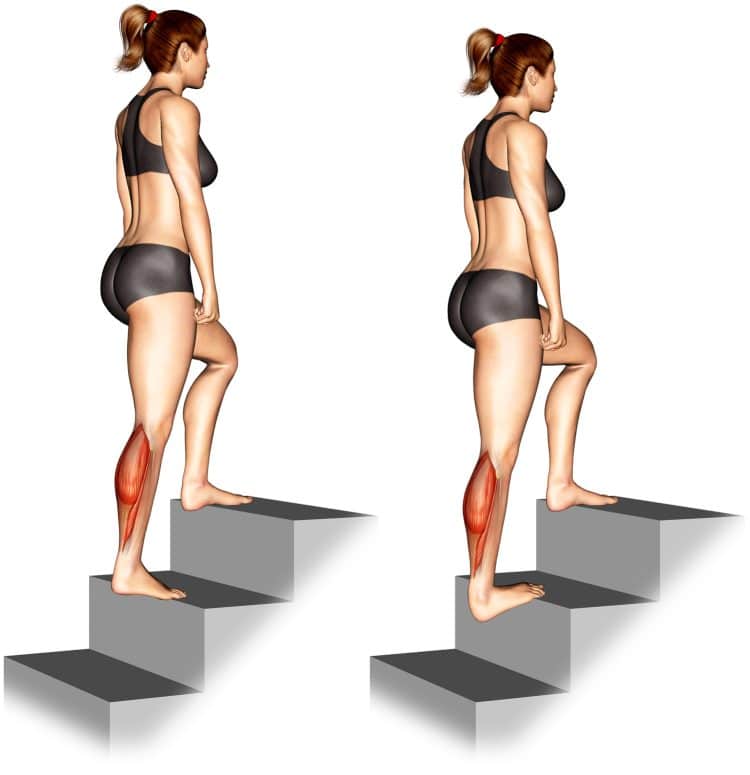
Also, make sure to use a stable, safe object to do calves stretches, like a staircase, doorstep, cement platform, bench, etc.
Steps
Step up on a raised platform with both legs. You can hold onto an object for balance, and to have better control over the stretch and prevent injuries.
Now slide either foot back until the heel is hanging off the edge of the step, and keep the other, non-working foot where it is, flat on the platform.
Keeping the rear leg straight, slowly drop the heel down a few inches, while bending the front leg. You should feel a nice stretch in the calf of the back leg.
Hold for about 10-20 seconds, reset, and do it again a few more times.
Here’s a quick video example of the calves stretch from a platform.
Tips
Don’t lean your full weight onto the calf being stretched. The goal is to drop the heel, and use your body to control the resistance, only applying enough force to stretch the calves without feeling strain in the joints and foot.
You can use a thick book or yoga block, which will allow your heel to touch the floor, and reduce the force applied to your ankles and feet.
As you can see from the video example, keeping the non-working foot on the platform, rather stretching both calves at the same time allows you more control over how much force is applied to the stretch. Reducing your body weight load, and preventing overstressing the ankles and feet.
This Exercise:
Target Muscle Group: Gastrocnemius, soleus
Type: Stretch
Mechanics: Isolation
Equipment: Step
Difficulty: Beginner
Benefits of Calves Stretch
Stretching is something we should all be doing, and while the calves may be ignored compared to other muscles, they’re just as, if not more important because they bear our weight. Let’s discuss the benefits of stretching your calves frequently.
Keep performing
As explained in the muscles involved during calves stretch section, your calves are performance muscles. Sprinting, running long distances, and lifting heavy on your feet punishes the calves too. But calves also assist in the gait or walking cycle, and support standing posture. So keeping them healthy, functional, and able to fully contract is key to longevity, and staving off injuries because physical performance is very demanding on the lower body.
Speaking of injuries…
Prevent injuries
Tight calf muscles are most commonly caused by overuse or lots of physical activity. Although underuse, improper warmup, and other causes exist. But overuse without proper maintenance can run you into injuries from tightness that affects lower body function. So if you’re someone who runs and plays sports you should be stretching the calves regularly.
Not to mention, you may benefit from increased blood flow to a muscle, which could reduce muscle soreness. But it could also be what helps improve certain foot conditions…
Possibly improve common foot and lower leg issues
When you stretch the calves, you’re also stretching the foot. This is said to be one thing you can do to improve common foot conditions such as plantar fasciitis (affects the thick tissue connecting heel bone to toes causing pain and discomfort).
Another common stiff area in need of being stretched is the achilles tendon, especially when someone develops achilles tendinitis. This tendon is formed by the two calf muscles and helps connect to the heel bone. It’s also the largest tendon in the human body. Recruited during walking, running, jumping, etc, achilles tendon experiences a lot of wear. Tight calves can also affect the achilles tendon.
The American Academy of Orthopaedic Surgeons recommends calf stretches to help alleviate minor achilles tendon issues.
Common Mistakes When Performing Calves Stretch
Bad calves stretch technique is dangerous and it can sideline you for a while, or cause ongoing issues in the ankle and foot. Follow these tips to help keep those problems in the rearview mirror.
Placing all your weight into the stretch
Unlike a calf raise exercise, you don’t actually want all your weight on the foot and ankle. In fact, this will force the calf muscles to contract in order to resist your body weight load. And it’s a lot of stress on the ankles and feet. It’s better to stretch one calf at a time, so you can use the stationary, non-working foot to help control the depth of stretch in the working calf. This is a much safer, and healthier way to stretch the calves.
Rushing the stretch
Due to the nature of a calves stretch, it’s not one you want to rush through, although the variation can make a big difference too. But we’re talking about the variation from a step or platform where the heel hangs off the edge and your weight is on the ankles, creating unequal force distribution.
Many people notice the same discomfort and pain when they do weighted calf raises too heavy, and too quickly. Drop the ankle, feel a little stretch, and don’t overdo it.
Being unbalanced
You don’t want to be unstable while doing calf stretches as the lack of control can be dangerous for the joints. It’s better to hold onto something for support if you cannot maintain balance without it.
Variations of The Calves Stretch
All calves stretch variations can be useful, and you may prefer one over the other. But we also included the following calves stretches that are unique in their own way, and, are top notch!
Runners stretch
Commonly called the runner’s stretch for obvious reasons, it’s a good technique for most people. It offers a solid, stable stretch with equal weight balance, and you can have more control, pushing as little or hard during the stretch.
Steps
Find a wall or similar, and place your palms against it, spaced roughly shoulder width apart, and elbows slightly bent. Stand with your feet far enough back, about 12 inches or so from the wall.
Now slide one foot back about 6-12 inches behind the other in a split stance, and keep both feet flat on the ground. Keep your toes pointed straight forward towards the wall.
Now push into the wall, and feel the stretch on the calf of the rear foot. Keep the front leg bent and the rear leg mostly extended.
Hold for 10-20 seconds, rest a few seconds, and do it two more times.
Switch your foot position, bringing the rear foot forward, and sliding the other one back. Repeat.
Pro tip: Bend both knees together to emphasize the stretch in your soleus calf muscle, which also benefits the achilles tendon.
Calf stretch on a slant board
A good choice for those with plantar fascitis, and other common foot issues, stretching the calf on a slant board creates equal weight distribution, it’s more stable, and allows you to better control the intensity of the stretch.
Steps
Step your heel at the base of the slant board and lie your foot flat against it with the toes pointing forward.
Move the other foot forward to increase the stretch in your calf.
Hold for 10-20 seconds, relax, and repeat a few more times, then switch legs.
Calf stretch sitting down with legs extended
If you want to stretch your calves with less resistance, in a more relaxed position, you can sit on the floor with legs extended, and use a belt, leash, or resistance band to pull against your toes, and stretch the calves.
Make sure to relax your ankle, and pull for a few seconds at a time. Lean into the stretch to include your hamstrings too.
Calf foam rolls
One way that you probably didn’t expect to loosen up the calves is using a foam roller. You’ll create healthier fascia, and calf muscles.
Steps
Sit on the floor and lay a foam roller where your legs will be. Extend both legs and rest your calves on the foam roller.
Now place your hands on the floor, and use your arms to lift your butt off the ground.
Use your arms to move your body forward and back, rolling the roller up and down your calves.
Roll for about a minute, rest, and do it again for another minute.
Pro tip: For a more intense calf massage, cross one leg over the other and repeat steps above.
FAQs
How many sets should I do? There’s no sure answer to this. It really depends on how much time you have, how many times per day you stretch a muscle, how long you’ve been stretching, and the length of each set or number of seconds you hold a stretch.
If stretching once a day, two-three sets x 20-30 second stretches should be plenty.
But you could also do more sets and shorter stretch durations. Find what works best for you, but try not to overdo it.
What is the most convenient calf stretch?Out of the many variations, we’d say the runner’s stretch is the simplest and most convenient. You don’t need any aids or tools, and it is safe on the joints and more supported with the feet flat on the ground, not stressing the ankles and feet.
Wrapping Up
It’s as simple as that. Warm up with a brisk walk, then get to stretching, or stretch your calves after your physical activities. You’ll ensure that your calves, ankles and feet stay up to health. Plus, calves stretching requires a very small time commitment, and no equipment (for some variations).
Just be sure to go slow, don’t force anything, and be consistent. These are key to effective stretching, and avoiding worse problems due to bad technique.
This guide is a detailed resource that explains and demonstrates proper calves stretching, with tips that you don’t want to skip over.
The Best Quadratus Lumborum Exercises and Stretches
When it comes to core and lower back training, most people focus on the well-known muscles, like the rectus abdominis, obliques, transverse abdominis, and erector spinae. This makes a lot of sense as these muscles are the biggest and usually the most visible. Exercisers often know these muscles by name and use carefully-chosen exercises to target them.
However, delve a little deeper, and you’ll find many other muscles that are every bit as important. While you usually can’t see these muscles, they’re always working in the background, providing aid and support.
In some instances, tightness or weakness in these lesser-known muscles can cause pain and dysfunction. After all, a chain is only as strong as its weakest link. For example, a weak rotator cuff can wreak havoc on your shoulder joint.
In this article, we examine the role of the quadratus lumborum muscle and reveal the best stretching and strengthening exercises for this unsung hero of the lower back.
Quadratus Lumborum Anatomy
The quadratus lumborum, or QL for short, is a deep back muscle. That means it lies beneath other muscles, including the lats and paraspinal muscles. QL is a large, flat muscle located between the iliac crest of your upper pelvis and your 12th (lowermost) ribs.
There are two QL muscles – left and right – that can work independently as well as together.
The functions of the quadratus lumborum are:
Lateral flexion of the spine – bending sideways.
Extension of the spine – bending backward.
Stabilizing the spine – preventing unwanted movement.
QL tightness can affect your lower back and pull your spine sideways, putting undue stress on your hips, lumbar spine, and intervertebral disks. In contrast, a weak QL can reduce lumbar spine and hip complex stability, increasing your risk of injury.
7 Best Quadratus Lumborum Stretches
Do you feel like you’re being pulled sideways? Do you have pain in one side of your lower back? Are your hips uneven heights? If so, your QL could be tight. Use these stretches to restore your QL to its ideal resting length.
1. Standing QL stretch
The standing QL stretch is probably the most basic way to lengthen your quadratus lumborum. Requiring no equipment and minimal space, it’s the ideal stretch for home exercisers. You can also do this exercise after long periods of sitting to release any accumulated QL muscle tension.
Steps:
Standing tall, cross your left foot over your right foot.
Raise your left arm above your head.
Lean your upper body over to the side, gently pushing your hips in the opposite direction to intensify the stretch.
Hold for 30-60 seconds, and then relax.
Repeat on the opposite side.
Muscles Targeted:
Primary: Quadratus lumborum, latissimus dorsi, obliques.
Secondary: Erector spinae, rectus abdominis.
Benefits:
An easy exercise to learn.
Very spine-friendly.
Provides a welcome lat stretch as well as elongating your QL muscle.
Tips:
Note any left-to-right flexibility imbalances and spend more time on the side that feels tightest.
Keep your hips and shoulders square to maximize the effect of this stretch.
You can also do this exercise standing next to a wall for support:
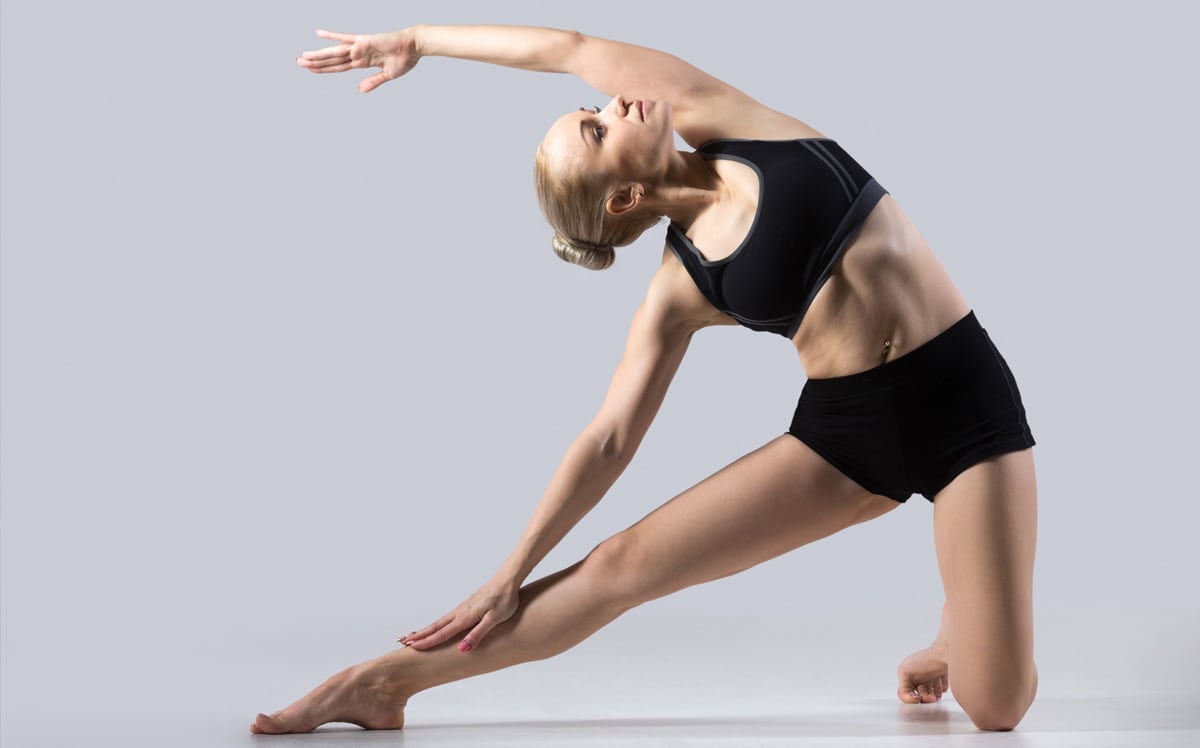
2. Gate pose
Gate pose is a yoga exercise for your QL, lats, lower back, abs, and hips. It’s an effective way to stretch and relax all the muscles on one side of your body. Because there are two sets of QL muscles, it’s quite likely that you will find that one side is tighter than the other. If this is the case, spend more time stretching the side that feels most restricted.
Steps:
Kneel down so you’re in good posture, with your torso upright and shoulders down and back.
Move one foot out and away to the side so your leg is straight. Engage your core and glutes.
Next, slide your hand down your outstretched leg while simultaneously raising your other arm above your head.
Lean over as far as is comfortable, taking care not to twist your shoulders or hips.
Hold this position for 30-60 seconds, and then slowly relax.
Swap sides and repeat.
Muscles Targeted:
Primary: Quadratus lumborum, latissimus dorsi, obliques.
Secondary: Erector spinae, rectus abdominis, adductors.
Benefits:
A very comfortable stretch.
Easy to modify based on your current flexibility level.
Quite relaxing and an excellent way to ease tension in your lower back and hips.
Tips:
Kneel on a folded mat for comfort.
Increase the stretch as you exhale and feel your muscles relaxing.
Gently ease your open armpit backward to deepen the stretch.
3. Triangle pose
The triangle pose is another yoga stretch that involves multiple lateral chain muscles, including your QL. The advantage of this pose is that you do it standing, which leads to a deeper quadratus lumborum stretch. However, it’s also a more challenging exercise, so make sure you master the gate pose before trying it.
Steps:
Stand with your feet slightly wider than shoulder-width apart. Your right foot should face forward, while your left foot should be turned out at a slight angle.
Raise your arms so they’re parallel to the floor, palms facing down.
Hinge at your right hip and lower your right hand down your right leg.
Simultaneously extend your left arm up toward the ceiling.
Hold this position for 30-60 seconds.
Switch sides and repeat.
Muscles Targeted:
Primary: Quadratus lumborum, latissimus dorsi, obliques.
Secondary: Erector spinae, rectus abdominis, adductors.
Benefits:
Provides a deep stretch for your QL and other waist and lower back muscles.
Performed standing, so no mat required.
Good for developing full-body positional awareness and balance.
Tips:
Experiment with the width of your stance to see what feels most comfortable.
Place your lowermost hand on a raised surface, i.e., a yoga block, to take the stress off your lower back.
Do this stretch on a non-slip surface, preferably barefoot, for stability and safety.
4. Seated QL stretch
Muscle tightness can strike at any time, but it’s most often caused by prolonged sitting, e.g., while you’re at work. Standing up and stretching is not always convenient – your boss may get upset! The good news is that you can stretch your QL without leaving your desk.
Steps:
Sit on the edge of your chair with your legs bent to 90 degrees, your shins vertical, and your feet planted firmly on the ground. Get into a good, upright posture.
Raise your right arm above your head and gently lean over to the left. Keep both sides of your butt on your chair.
Hold for 30-60 seconds, and then swap sides.
Muscles Targeted:
Primary: Quadratus lumborum, latissimus dorsi, obliques.
Secondary: Erector spinae, rectus abdominis.
Benefits:
An excellent exercise for office workers.
An ideal stretch for beginners.
An easy exercise for those with less mobility, e.g., older or chair-bound.
Tips:
This exercise works best on a chair without wheels.
You can also do this exercise while sitting on a bench or stool.
Sit on the floor with your legs crossed if you wish:
5. Child’s pose
Child’s pose gently eases your spine into a flexed position, stretching your quadratus lumborum and other lower back muscles. This exercise is excellent for releasing tension from your posterior chain. It is ideal for people with mild lower back tightness or pain. A few minutes in child’s pose is a great way to cool down after your workout.
Steps:
Kneel on all fours with your arms straight and shoulders above your hands. Your knees should be below your hips.
Ease your butt back and sit on your heels.
Lower your chest down toward the floor while keeping your arms extended in front of you.
Remain in this position for 1-5 minutes, going deeper as you feel your muscles relax.
Walk your fingers further away from you to deepen the stretch. You can also place your hands on yoga blocks.
Muscles Targeted:
Primary: Quadratus lumborum, erector spinae, latissimus dorsi.
Secondary: Gluteus maximus.
Benefits:
A gentle stretch for your QL and lower back.
A very relaxing, calming exercise.
An ideal exercise for cooldowns.
Tips:
Kneel on a folded mat for comfort.
Breathe slowly through your nose to maximize relaxation.
Experiment with different knee positions to find what’s most comfortable.
6. Knees-to-chest stretch
The knees-to-chest exercise provides a gentle stretch for your quadratus lumborum and other lower back muscles. Using your arms means you can increase the depth of the stretch as you feel your muscles start to relax.
Steps:
Lie on your back with your legs bent and feet close to your butt.
Lift your legs and hold on to the backs of your thighs.
Gently pull your knees toward your chest.
Hold for 30-60 seconds, and then relax.
Muscles Targeted:
Primary: Quadratus lumborum, erector spinae, latissimus dorsi.
Secondary: Gluteus maximus.
Benefits:
A gentle, relaxing stretch.
An ideal stretch for deconditioned exercisers.
Excellent for easing lower back tension and stress.
Tips:
Keep your shoulders and upper back on the floor.
Rest your head on a pillow or yoga block for comfort.
You can also do this exercise by lifting one leg at a time:
7. Dynamic standing QL stretch
Static stretches are great for easing muscle tension and increasing flexibility. Still, they tend to put your muscles to sleep and reduce contractility. As such, static stretches are ideal for cooldowns but less useful for warm-ups. This dynamic stretch won’t deactivate your muscles and is an excellent way to prepare your QL for your upcoming workout.
Steps:
Stand with your feet about shoulder-width apart, knees slightly bent. Hold your arms down by your sides.
Without twisting your hips or shoulders, lean to the left and stretch your hand down the outside of your leg.
Stand upright and repeat for 10-15 reps.
Switch sides and do the same number of reps on the right.
Muscles Targeted:
Primary: Quadratus lumborum, erector spinae, rectus abdominis.
Secondary: Hip abductors.
Benefits:
An excellent warm-up exercise.
Good for mobilizing your lower back before more intense activities.
An easy exercise to learn and ideal for novices and less fit people.
Tips:
Keep your knees slightly bent throughout.
Take care not to twist your hips or shoulders.
You can also do this exercise in an alternating fashion.
7 Best Quadratus Lumborum Strengthening Exercises
Weak quadratus lumborum muscles can increase your risk of back pain and injury. You need strong QLs to stabilize your lumber spine and prevent unwanted lateral movements.
While most people should train both sides of their QL, you may find that one side is weaker than the other. In this case, do an extra few reps or sets for the weaker side so it can catch up with the stronger side.
1. Bird dog
Bird dogs are a useful exercise that works your glutes, core, shoulders, and upper back. It’s also an effective quadratus lumborum strengthener. During this exercise, you must use your QL to stabilize your lumbar spine, which is one of its most critical functions.
Steps:
Kneel on all fours with your arms straight and shoulders above your hands. Your knees should be below your hips. Brace your core.
Extend one arm forward and your opposite leg backward until they’re parallel to the floor.
Return to the starting position and repeat on the other side.
Alternate arms/legs for a desired number of reps.
Muscles Targeted:
Primary: Rectus abdominus, transverse abdominus, quadratus lumborum, erector spinae, gluteus maximus.
Secondary: Hamstrings, deltoids.
Benefits:
A very spine-friendly exercise.
Teaches you how to brace your core while moving your arms and legs.
A great way to warm up before more demanding activities.
Tips:
Kneel on a folded mat for comfort.
Take care not to arch your lower back, as doing so increases your risk of injury.
Keep your core braced throughout.
2. 45-degree back extensions
This exercise provides a great way to overload your lower back and QL to make them stronger. However, to avoid injury, you must keep your spine in a neutral position, i.e., do not allow it to round. 45-degree back extensions are also an awesome glute and hamstring builder.
Steps:
Climb aboard the 45-degree back extension machine. Place your hips against the leg pad and your feet on the footplate. Bend your knees slightly.
Lean as far forward as your flexibility allows and without rounding your lower back.
Push your hips forward and raise your upper body back up so your shoulders, hips, and feet form a straight line.
That’s one rep – keep going!
Muscles Targeted:
Primary: Erector spinae, quadratus lumborum, gluteus maximus, hamstrings.
Secondary: N/A.
Benefits:
An effective way to overload your lower back muscles.
A very accessible exercise as most gyms have a 45-degree back extension machine.
A proven glute and lower back developer.
Tips:
Make this exercise harder by bolding a barbell in your hands or a weight plate across your chest.
You can also do this leg using one leg at a time to increase the overload on your glutes and hamstrings.
No 45-degree back extension machine? No problem – you can also do this exercise with your hips resting on a stability ball:
3. Side plank
Everyone knows that side planks work the obliques. But they’re also an excellent exercise for your quadratus lumborum. Best of all, because they’re isometric or static, they put very little stress on your spine, so they’re ideal for back pain sufferers.
Steps:
Lie on your side and rest on your lowermost forearm and elbow. Brace your core.
Lift your hips off the floor so your body is straight.
Hold this position for the required duration.
Lower your hips to the floor, roll over, and repeat on the other side.
Muscles Targeted:
Primary: Obliques, quadratus lumborum, rectus abdominis, erector spinae.
Secondary: Deltoids, hip abductors.
Benefits:
A very lower-back-friendly core exercise.
Good for increasing lateral stability and strength.
Do this exercise anywhere and anytime, as no equipment is required.
Tips:
Do not hold your breath during this exercise.
Rest your elbow/forearm on a folded exercise mat or foam pad for comfort.
Push your hips up toward the ceiling to maximally engage your QL and obliques.
4. Dumbbell side bend
The great thing about dumbbell side bends is that you can increase or decrease the weight to suit your fitness and how many reps you want to do. Use light weights for high reps to improve your endurance or heavy weights for low reps to build strength. With this exercise, you are the boss!
Steps:
Hold a dumbbell in one hand, arm down by your side.
Stand with your feet shoulder-width apart, knees slightly bent. Brace your core.
Lean sideways and lower the dumbbell down the outside of your leg.
Stand up straight and repeat.
Do the same number of reps on both sides.
Muscles Targeted:
Primary: Obliques, quadratus lumborum, rectus abdominis, erector spinae.
Secondary: Forearms.
Benefits:
An excellent way to overload your lateral chain muscles.
An accessible exercise as all you need is a single dumbbell.
A great exercise for building more muscular abs, a tighter waist, and a stronger lower back.
Tips:
Do NOT use two dumbbells, as doing so make the exercise much less effective.
Keep your hips and shoulders square throughout.
Use lifting straps if your grip fatigues before your core.
5. Single-arm farmer’s walk
Farmer’s walks are a popular conditioning exercise. It’s also one of the events often contested in strongman competitions. However, done using a single dumbbell or kettlebell, the farmer’s walk is also a tremendous quadratus lumborum exercise. Carrying an offset load forces you to use your QL to stabilize your lumber spine. Think of single-arm farmer’s walks as a moving side plank.
Steps:
Stand side-on to a dumbbell or kettlebell.
Squat down and grab your weight with the closest hand. Pull your shoulders down and back, and brace your core.
Stand up straight and then go for a walk around your training area.
Continue for the desired duration or until your grip starts to fail.
Lower the weight to the floor, swap sides, and repeat.
Muscles Targeted:
Primary: Obliques, quadratus lumborum, rectus abdominus, erector spinae, forearms.
Secondary: Upper traps, calves.
Benefits:
A highly functional exercise.
A great way to build a stronger grip and core.
An excellent calorie burner and cardio finisher.
Tips:
Keep your hips and shoulders level throughout your set.
Do this exercise with any heavy implement, including a barbell.
You can also do this exercise with your weight above your head – the waiter’s walk:
6. Kettlebell suitcase deadlift
No space to do farmer’s walks? We hear you! The good news is that you can get all the benefits of farmer’s walks without taking a single step. Suitcase deadlifts work in much the same way, but you do them on the spot. This is an ideal exercise for anyone who works out in a small gym.
Steps:
Stand side-on to a kettlebell. Your feet should be roughly shoulder-width apart.
Squat down and grab your weight with the closest hand. Pull your shoulders down and back, and brace your core.
Drive your feet into the floor and stand up, taking care not to round your lower back or allow your hips to rise faster than your shoulders. Do not lean to the side or twist your hips or shoulders.
Lower the weight back to the floor, reset your core, and repeat.
Continue for the desired number of reps, and then swap sides.
Muscles Targeted:
Primary: Quadriceps, hamstrings, gluteus maximus, obliques, quadratus lumborum, forearms.
Secondary: Upper traps, biceps.
Benefits:
A very functional core, forearm, and lower body exercise.
A great way to fix left-to-right strength imbalances.
A home gym-friendly alternative to conventional deadlifts.
Tips:
Use gym chalk on your hands to stop them from slipping.
You can also do this exercise with a dumbbell or barbell.
Place your kettlebell on a raised platform if you find it hard to bend over and reach the floor without rounding your lower back.
7. Medicine ball rotational slam
Most quadratus lumborum exercises are performed slowly and smoothly. While that’s fine for building endurance and strength, it’s less useful for developing muscle power, which is your ability to generate force quickly and is an integral part of most sports. Power training should be part of your workouts if you’re an athlete. Medicine ball rotational slams are one way to build a more powerful QL.
Steps:
Stand with your feet shoulder-width apart, knees slightly bent. Hold a medicine ball in front of you. Brace your core and set your shoulders.
Raise your arms above your head and, using a twisting motion, throw the ball down at the floor to the outside of one foot.
Catch the ball as it bounces, lift it up, and hurl it down to the other side.
Continue for the desired number of reps.
Muscles Targeted:
Primary: Rectus abdominis, obliques, quadratus lumborum, latissimus dorsi.
Secondary: Deltoids, hip flexors.
Benefits:
An explosive exercise for building core rotational power.
A fun, satisfying workout.
An excellent stress reliever.
Tips:
Do not use a gel-filled medicine ball, as they’re prone to splitting.
Rise up onto your toes and put your entire body into each throw.
Wind up each throw using a circular arm action to increase core and QL engagement.
FAQs
Do you have a question about quadratus lumborum stretching or strengthening exercises? No problem, because we’ve got the answers!
1. How do I isolate my QL muscle?
Whether you are stretching or strengthening, you cannot isolate the quadratus lumborum. Invariably, it works in conjunction with several other muscles, including your obliques, rectus abdominis, and erector spinae.
So, when you try to stretch or strengthen your QLs, you’ll also be working other muscles. This is no bad thing, as that’s how the QL works in nature – with other muscles and never alone.
2. How long should I hold QL stretches for?
The time you hold a stretch depends on what you are trying to achieve. For example, if you are stretching to maintain your current flexibility, you only need to hold a stretch for 15-20 seconds. This should be enough to prevent your flexibility from decreasing.
However, if you want to improve your flexibility, you need to hold your stretches for longer, usually 30-60 seconds. During this time, you should try to increase the depth of your stretch as you feel your muscles relax.
You don’t need to choose between these two durations. You may have one QL tighter than the other, so you could do short maintenance stretches on one side and longer developmental stretches on the other to fix the imbalance.
3. Will training my QL make my waist thicker?
The quadratus lumborum is a relatively long, slender muscle. As such, while training it will produce some hypertrophy or growth, it won’t make your waist thicker. If anything, a better-developed QL with give you a tighter waist.
Too much body fat is a far more common reason for having a thick waist. Too much muscle mass around the midsection is rarely a problem.
4. Some of these QL exercises hurt my back – what gives?
The quadratus lumborum muscles are located on the sides of your lower back. As such, overstretching can cause lower back pain. Also, exercises that affect your QL invariably involve your lower back.
If any of these exercises hurt, you should stop immediately, check that you are doing them correctly, and gently try again. Should the pain persist, skip the movement that bothers you can try something else.
Finally, if you’re still experiencing QL or lower back pain, get it checked out by a medical professional, as it could require treatment. Never train through pain, as that will probably make it worse.
5. Do I really need to stretch or strengthen my QL?
When it comes to prehab and rehab stretching and strengthening, you should choose your exercises based on your needs. For example, if your QL feels tight, limits your lateral movements, or causes pain, stretching could help. In contrast, if you lack lateral stability, you probably need to strengthen your QL.
However, if you have no such issues, you may not need to spend time on your QL. It’s probably getting sufficient indirect work from the rest of the exercises in your training program.
Wrapping Up
While the quadratus lumborum is a lesser-known back muscle, it’s still important. A weak QL can cause lumbar instability and dysfunction. In contrast, a tight QL can affect your posture and cause pain.
Thankfully, stretching and strengthening the QL is relatively simple, and the exercises for both of these purposes are simple and easy to perform. Many can be done at home as they require no special equipment.
But before you head off to stretch or strengthen your QL, you need to understand that it may not need any extra work. If you have no noticeable tightness or weakness in this area, your QL is probably strong and flexible enough.
That said, if you do need to pay more attention to your quadratus lumborum, you now know the best exercises to use.
The Best Supraspinatus Stretching and Strengthening Exercises
Few things will disrupt your workouts like shoulder pain. Painful shoulders can stop you from training your upper body and even interfere with your lower body workouts. Benching and squatting with bad shoulders is especially unpleasant.
Painful shoulders can also affect your ability to perform everyday tasks, from brushing your teeth to pulling on your favorite T-shirt. And sleeping on your side when your shoulders hurt? Forget about it!
And yet, despite being so debilitating, a lot of lifters pound their joints with constant abuse and only worry about the health of their shoulders when they start to go wrong. Needless to say, if you have chronic shoulder pain, you have already neglected them for too long.
The good news is that it’s never too late to start working on your shoulder health, and many types of shoulder pain can be treated with targeted stretching and strengthening exercises.
In this article, we reveal the best stretching and strengthening exercises for the supraspinatus muscle, which is part of your rotator cuff.
Please Note: This article is for educational and informational purposes only. It should not be used for diagnosing or treating health problems or diseases. Those seeking medical advice should consult with a licensed physician.
Supraspinatus Anatomy Basics
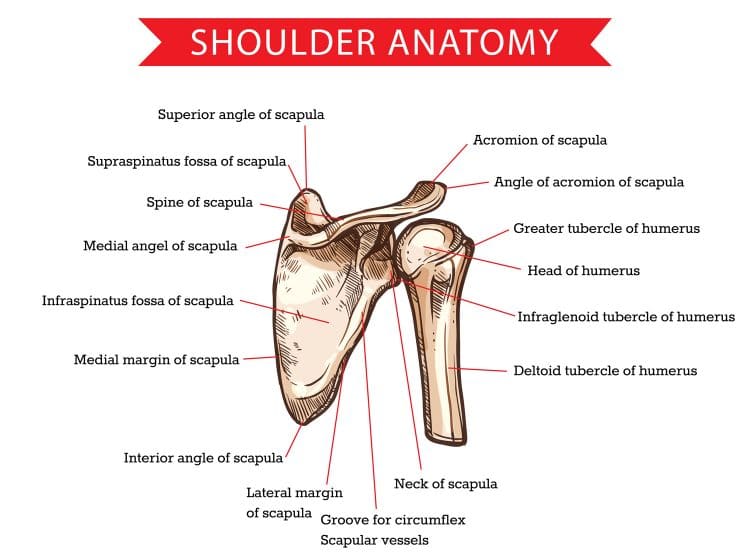
The supraspinatus is one of four muscles that make up your rotator cuff. The other three muscles as the subscapularis, infraspinatus, and teres minor. The rotator cuff is found interior to (beneath) your deltoids and is responsible for stabilizing and controlling your shoulder joint.
Supraspinatus is located below the trapezius and toward the rear scapular region. It originates from the supraspinous fossa of the scapular and inserts onto the greater tubercle of the humerus. Its name reveals its position, and the supraspinatus lies along the superior (supra-) spine (-spinatus) of the scapula or shoulder blade.
During shoulder movements, the supraspinatus helps stabilize the head of the humerus in the glenoid fossa or socket. It also plays a role in the abduction of the arm and assists the medial deltoid in raising your arm up and away from the midline of your body.
Many rotator cuff injuries start with problems affecting the supraspinatus. As such, strengthening and stretching this muscle may help prevent future shoulder pain and may be necessary for rehabbing existing injuries – with medical supervision, of course!
5 Best Supraspinatus Stretches
A tight supraspinatus can cause shoulder pain and dysfunction. Common causes of supraspinatus tightness include using a keyboard for a long time, especially without supporting your arms, driving long distances, and repetitive overhead movements, such as painting a ceiling, swimming, or strength training.
Muscle tightness impedes blood flow, leading to an accumulation of waste products within the muscle, causing tension and pain.
Use the following exercises to stretch your supraspinatus and restore it to its correct resting length.
1. Pendulum stretch
The supraspinatus is located toward the rear of your shoulder. As such, pulling your arm forward will provide this muscle with a beneficial stretch. The pendulum stretch is good for your entire shoulder complex, especially the posterior compartment. This exercise is often part of rotator cuff rehab and prehab prescriptions.
Steps:
Rest one arm on a bench or chair and lean forward so your upper body is just above parallel to the floor.
Let your other arm hang down from your shoulder.
Keep your shoulder and arm relaxed and gently circle clockwise, counterclockwise, forward, and back.
Continue for 30-60 seconds, and then swap arms.
Muscles targeted:
Supraspinatus, posterior deltoid, rhomboids, trapezius.
Benefits:
A gentle, decompressing exercise for the entire posterior shoulder region.
Good for increasing general shoulder mobility.
Increases blood flow and synovial fluid production to ease shoulder pain and enhance healing.
Tips:
Increase your range of movement as your shoulder loosens up.
You can also do this exercise while holding a light dumbbell to achieve a deeper stretch.
Keep your neck and lower back neutral for comfort and safety.
2. Cross-body arm stretch
The cross-body arm stretch is a passive exercise that elongates your supraspinatus and other posterior shoulder and arm muscles. Pull gently to avoid overstretching your muscles and causing more harm than good. Constant pressure is always better than jerky movements.
Steps:
Seated or standing, place one hand on your opposite shoulder and lightly grip your arm just above your elbow joint.
Pull your arm across your body until you feel a mild stretch in the back of your shoulder.
Hold for 30-60 seconds, and then relax.
Repeat on the opposite aide for the same duration.
Muscles targeted:
Supraspinatus, posterior deltoid, rhomboids, trapezius, triceps.
Benefits:
A very convenient exercise that you can do almost anywhere and anytime.
A very gentle exercise that’s ideal for anyone suffering from shoulder pain.
A useful shoulder cool-down exercise.
Tips:
Do this stretch to break up long periods of sitting.
Increase the depth of the stretch as you feel your muscles relax.
Raise or lower your elbow to seek out areas of tightness.
3. Seated table slide
Prolonged sitting is one of the worst things you can do for your shoulder health. The longer you remain in a fixed position, e.g., while working at a computer, the tighter your muscles become. The good news is that you can release your shoulders and stretch your supraspinatus without leaving your desk.
Steps:
Sit at a table or desk.
Place a small towel on your desk and place your hand on it so your palm faces downward.
Lean forward and slide the towel as far away from you as possible.
Hold the deepest comfortable stretch for 30-60 seconds, and then relax.
Sit back up, swap sides, and repeat.
Muscles targeted:
Supraspinatus, deltoids, latissimus dorsi, triceps, trapezius, rhomboids.
Benefits:
An excellent way to break up long periods of sitting.
A deep yet relaxing upper body stretch.
Very good for improving posture and releasing tension from your shoulders.
Tips:
Move your chair backward if your desk is not big enough to get a full stretch.
You can also do this exercise with both arms at the same time.
Do this exercise standing at a kitchen countertop.
4. Arm behind the back supraspinatus stretch
This exercise is quite intense, so ease into it and don’t stretch too far too fast. However, the position of your arm means you’ll get a deep stretch in your supraspinatus, medial deltoid, and upper traps. Use your non-working arm to increase the depth of the stretch.
Steps:
Place the arm you want to stretch behind your back. Grip your wrist with your other hand.
Gently pull your arm across to increase the depth of the stretch.
Hold for 30-60 seconds, and then relax.
Swap sides and repeat.
Muscles targeted:
Supraspinatus, deltoids, trapezius.
Benefits:
You can use your free arm to get a deeper, more intense stretch.
One of a few stretches to take your upper arm into adduction.
A good way to preferentially target the supraspinatus.
Tips:
Make sure you keep your shoulders down and relaxed throughout.
Tilt your head to the side you are pulling to increase the depth of the stretch.
Hold a towel or band behind you if you find gripping your wrist uncomfortable.
5. Seated hug shoulder stretch
The great thing about this simple stretch is that you can do it at your desk, while sitting in your car in traffic, or during a TV ad break. As such, you can do it anytime you feel your shoulders or upper back starting to tighten up. Do it whenever you want to release some tension but can’t get up and move around to do more complex stretches.
Steps:
Cross your arms over your chest like you are hugging yourself. Put your hands on your upper back. It doesn’t matter which hand is uppermost.
Walk your fingers toward the middle of your upper back to increase the stretch.
Hold for 30-60 seconds, and then relax.
Muscles targeted:
Supraspinatus, deltoids, trapezius, rhomboids.
Benefits:
A very accessible exercise that’s ideal for beginners.
Feels good!
Great for releasing tension from your upper back and shoulders.
Tips:
Raise or lower your elbows to seek out and treat areas of tightness.
Walk your hands further around your back as your muscles begin to relax.
Visualize spreading your shoulder blades to achieve a deeper stretch.
5 Best Supraspinatus Strengthening Exercises
A chain is only as strong as its weakest link, and for many lifters, their weakest link is the rotator cuff. This small but crucial group of muscles takes a lot of abuse and can easily become inflamed and damaged. Torn rotator cuffs can take months, if not years, to heal.
Needless to say, prevention is better than cure, and building a resilient rotator cuff could save you a lot of missed workouts.
Use the following exercises to beef up your supraspinatus. While this won’t add a lot to your physique, it will help keep you in the gym and out of your doctor’s office.
1. Side lying lateral raise
One of the main functions of the supraspinatus is the initiation of upper arm abduction. In other words, it’s the muscle that gets your arm moving away from your body. As your arm starts to move, the more powerful medial deltoids take over. This exercise puts more stress on the supraspinatus than it does on the medial delts.
Steps:
Lie on your side so your hips and shoulders are square. Hold a light dumbbell in your uppermost hand. Bend your elbow slightly, but then keep it rigid throughout.
Lift your arm up until it’s vertical.
Lower your arm and repeat.
Roll over and do the same number of reps on the opposite side.
Muscles targeted:
Supraspinatus, medial deltoid.
Benefits:
An effective way to strengthen the supraspinatus.
An excellent shoulder rehab/prehab exercise.
Low-tech but high-effect exercise that’s ideal for home use.
Tips:
Go light – this exercise is not suitable for heavy weights.
Use a single weight plate, water jug, wrist weight, etc., instead of a dumbbell.
You can also do this exercise on a slightly inclined bench if that’s more comfortable.
2. Behind the Back Single-Arm Cable lateral raise
Cable lateral raises put your deltoids under near-constant tension, making them potentially more effective than the same exercise done with dumbbells. But, as an added benefit, they also stress your supraspinatus more. Doing cable lateral raises behind the back is even more effective because it loads your supraspinatus more and uses a larger range of motion.
Steps:
Attach a D-shaped handle to a low pulley machine. Stand sideways onto the weight stack and pick up the handle. Hold it in your furthest hand so the cable runs behind your legs.
Bend your knees slightly, brace your core, and pull your shoulder back and down. Your elbow should be slightly bent but rigid.
Raise your arm up and away from your side until your arm is roughly parallel to the floor.
Lower your arm, taking your hand a little way behind you to increase the range of motion.
Do the desired number of reps and then swap sides.
Muscles targeted:
Supraspinatus, medial deltoids.
Benefits:
An effective way to develop your deltoids and supraspinatus simultaneously.
A very shoulder-friendly exercise.
Even more tension on the target muscles compared to dumbbell lateral raises.
Tips:
Use a light weight and move slowly with control to target the supraspinatus.
Do not raise your arm above shoulder height, as doing so could increase your risk of impingement.
Keep your thumb pointing forward throughout. Do not rotate your wrists or rotate your arm inward, as doing so could hurt your shoulder joint.
3. Resistance band lateral raise
The great thing about resistance band lateral raises is that you can do them almost anywhere – even at home. As such, they’re the perfect prehab/rehab exercise, and you can do them without adding extra time to your existing workouts. So keep a set of bands nearby so you can pump out a set of lateral raises whenever you have a few minutes spare.
Steps:
Stand on the middle of your resistance band and hold an end/handle in each hand. Bend your knees slightly, brace your core, and set your shoulders. Your arms should be slightly bent but rigid.
Raise your arms up and out to the sides to form a T-shape.
Lower your arms and repeat.
Muscles targeted:
Supraspinatus, medial deltoids.
Benefits:
A very accessible and convenient exercise for home workouts.
Joint-friendly and comfortable.
Easy to progress or regress by changing the length/strength of your band.
Tips:
You can also do this exercise by using one arm at a time.
Do this exercise seated if you want to put less pressure on your muscles.
Cross the bands so that the tension comes onto your muscles sooner.
4. Full can raises
Full can raises are a traditional supraspinatus exercise often prescribed by physical therapists. It provides a strengthening and mobilizing effect for the entire shoulder complex, especially the rear of the shoulders and the rotator cuff. Like all rotator cuff exercises, this move works best when done slowly and smoothly with light weights.
Steps:
Stand with your feet about shoulder-width apart, knees slightly bent.
Hold a dumbbell in each hand and, with your arms straight but not locked, hold them against your thighs with your thumbs pointing forward. Brace your core and pull your shoulders down and back.
Raise your arms forward and up to form a V-shape above your head.
Slowly and smoothly lower your arms and repeat.
Muscles targeted:
Supraspinatus, deltoids, trapezius, rhomboids.
Benefits:
A simple yet effective exercise.
An ideal warm-up before more demanding upper body exercises.
A great way to improve shoulder mobility and stability.
Tips:
Only raise your arms as high as your mobility/pain allows. Do not force your arms up if they don’t want to go that high.
You can also do this exercise with a resistance band instead of dumbbells.
Place a mini band around your wrists to increase supraspinatus activation, like this:
5. BOSU push-up
The supraspinatus is responsible for upper arm abduction but also plays a crucial role in shoulder joint stabilization. While all supraspinatus exercises will increase joint stability, using an unstable surface is arguably the best way to develop this function. Doing push-ups on a BOSU balance trainer is a great way to challenge and develop your shoulder stability.
Steps:
Place your BOSU on the floor, curved side down. Squat down and grip the side edges of the BOSU with your thumbs pointing forward.
Walk your feet out and back so your legs are straight. Brace your core and contract your legs.
Bend your arms and lower your chest down to within an inch of the top of the BOSU. Work hard to keep your hands level. However, some shaking is normal.
Push yourself back up and then repeat.
Muscles targeted:
Pectoralis major, deltoids, triceps, rotator cuff, core.
Benefits:
A very functional rotator cuff exercise.
A great way to identify and fix strength imbalances.
Makes regular floor push-ups feel much easier.
Tips:
Bend your legs and rest on your knees to make this exercise easier.
Wear a weight vest or raise your feet to make it harder.
No BOSU? No problem! You can also use a medicine ball, stability ball, or balance board:
Supraspinatus Exercises – FAQs
Do you have a question about the best exercises for stretching and strengthening your supraspinatus? No worries because we’ve got the answers!
1. Will training my supraspinatus muscle give me bigger shoulders?
The supraspinatus is a small muscle that lies beneath several much bigger muscle. As such, you’ll never see it, and developing it won’t add anything to your physique. But before you dismiss supraspinatus training altogether, it’s important to stress that this little muscle has a significant impact on what exercises you can and cannot do and how well you perform those exercises.
For example, a weak or painful supraspinatus could prevent you from doing overhead presses or bench presses. It could make barbell back squats uncomfortable or even affect your ability to do biceps curls.
So, while training your supraspinatus won’t directly make your shoulders bigger, it will indirectly influence your ability to build muscle.
2. How do I know if my supraspinatus is weak?
The most common way to determine if your supraspinatus is weak is with the empty can test.
Raise your arm to the side and rotate your shoulder internally so your thumb points downward. Next, a training partner should gently push down on your outstretched hand. If you are unable to keep your arm up against mild to moderate pressure, your supraspinatus is probably weak and requires strengthening.
3. What should I do if I have sudden pain in my shoulder during training?
Acute or sudden pain could indicate that you have strained a muscle or sprained a ligament. In either case, you should stop what you’re doing to prevent things from worsening.
Depending on the severity of the injury, you may also need to use RICE (Rest, Ice, Compression, and Elevation) to speed up recovery.
Do not return to training until the pain has subsided. If the pain is severe, or lasts more than a couple of days, get it checked out by a sports injury doctor. You may still be able to work out, but you must avoid aggravating the injured area.
Train around the injury and not through it! This will probably mean not training your upper body for a few days or even a week or two. Some lower body exercises may also be off-limits, such as barbell squats and deadlifts.
Once the pain begins to subside, you can start gently stretching, mobilizing, and strengthening the area with, for example, the exercises in this article.
4. How do I know if my supraspinatus is tight?
The easiest way to determine if your supraspinatus is tight is to do some of the stretching exercises from this article and see how they feel. If you don’t feel much tension during the stretches, your supraspinatus is probably as flexible as it needs to be. However, if the area feels uncomfortable or tight, you probably need to stretch more often.
5. What is the difference between maintenance and developmental stretching?
Maintenance and developmental refer to the duration of each stretch. For example, if you have good flexibility and just want to preserve or maintain it, you should hold each stretch for 10-20 seconds. That will be sufficient to prevent your muscles from shortening.
However, if your flexibility needs developing or improving, you’ll need to stretch for longer, typically 30-60 seconds. During this time, you’ll feel your muscles relax so you can ease into a deeper stretch.
Choose the right type of stretching for your goals. You will probably find that some muscles need stretching more than others. For example, it’s common to have tight hamstrings, pecs, and lats, while the triceps, biceps, and calves are usually naturally flexible. Of course, this pattern varies from person to person.
Program your stretches based on what you need to work on. Spend more time on the tightest muscles and less time on those that are sufficiently flexible.
Supraspinatus Exercises – Wrapping Up
There are over 600 muscles in the human body, and each one plays a critical role in how your body functions. Some muscles, like the gluteus maximus, are large and weigh several pounds. Others, like the supraspinatus, are much smaller and only weigh a few ounces.
However, muscle size does not determine importance, and in many cases, it’s the smallest muscles that need the most care and attention.
So, don’t let your supraspinatus become the weak link that holds you back. Instead, stretch and strengthen this small but critical muscle so your shoulders remain stable, strong, and pain-free.