Tag: training
Forearm Pull-Up Pain – Causes, Treatment, and How to Avoid
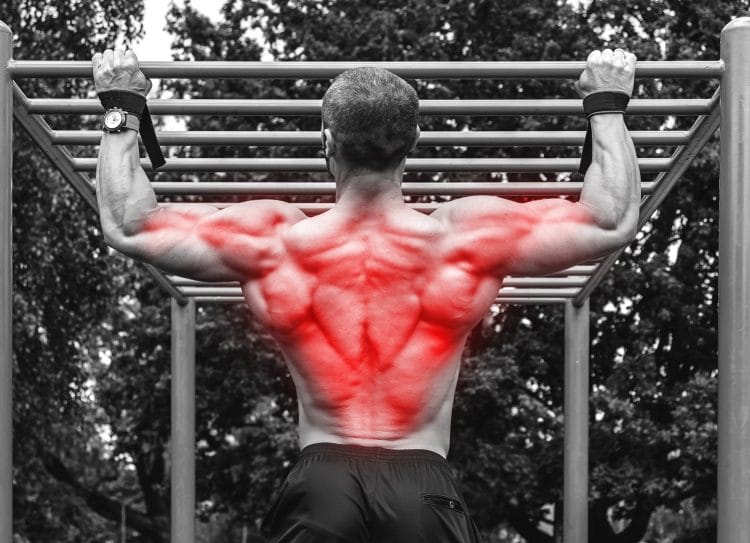
Pull-ups are one of the best exercises you can do for your upper body. Doing pull-ups will widen your lats, build your biceps, strengthen your lower traps, and develop your grip. Pull-ups also let you know if you are getting a little too chunky, as excess body fat always makes them feel harder!
Unfortunately, even good exercises go bad, and pull-ups can sometimes cause forearm pain.
While this could be nothing more than a mild annoyance, pain often worsens and can become debilitating. As the forearms are involved in almost every upper and many lower body exercises, pain in your lower arms could even stop you from training.
In this article, we explain why pull-ups can cause forearm pain, how to treat it, and how to stop it from returning.
Please Note: This article is for educational and informational purposes only. It should not be used for diagnosing or treating health problems or diseases. Those seeking medical advice should consult with a licensed physician.
Why Pull-Ups Cause Forearm Pain
So, why do your forearms hurt when you do pull-ups? While we can’t diagnose the precise cause of your forearm pain, there are several reasons that pull-ups can cause lower arm discomfort.
These include:
Forearm overload
Compared to the other muscles involved in pull-ups, the forearms are the smallest and weakest link in the kinetic chain. As such, it’s not surprising that pull-ups sometimes cause forearm pain.
Think about it; those slender muscles must produce enough force to support your entire body weight. This is no mean feat. Overloading the forearms could cause a lot of localized discomfort.
Forearm muscle weakness
In addition, unless you actually train your forearms, they’re probably not as well-developed as the other muscles in your arms. Apart from dedicated bodybuilders and powerlifters, exercisers tend not to do additional training for their forearms.
Stronger muscles tend to be more resilient and enduring. If pull-ups hurt your forearms, they could be telling you that they need some extra work to make them stronger.
Forearm overuse
The forearms are a hard-working group of muscles, and they’re involved in almost all upper-body and some lower-body exercises. As such, doing pull-ups could be “the straw that broke the camel’s back” that causes pain in this overused body part.
Overuse is often accompanied by inflammation and swelling. But, because you keep on training, this never gets a chance to subside. Instead, your forearm pain worsens, affecting your ability to perform all your upper-body exercises.
Depending on what tissues have become inflamed, your pain may have a specific name, such as carpal tunnel syndrome, radial tunnel syndrome, or tennis elbow. However, such conditions require a medical diagnosis to confirm.
Prevent Forearm Pain
Forearm muscle stains
Muscle strains are tears that disrupt the integrity of your muscle fibers. Muscle strains usually occur when you stretch a muscle too fast or too far or lift more weight than you are used to. For example, if you are new to pull-ups, have weak forearms, or have started doing weighted pull-ups, you may have strained your forearm muscles.
Muscle strains are graded according to their severity and depth. Grade one strains are mild and involve minimal amounts of muscle fiber damage. In contrast, grade three muscle strains are much more severe and involve complete muscle or tendon ruptures which usually require surgery to repair.
Forearm tendonitis
Tendons attach muscles to bones. They’re made of tough, inelastic connective tissue, and they transmit the forces produced by your muscles into the joints you want to move.
While tendons are very robust, they also have a poor blood supply, which means they take a long time to heal when damaged. Tendons are also prone to overuse and inflammation, which is called tendonitis.
If you have recently started doing more pull-ups than usual or just doing more grip or forearms training, your forearm tendons may be inflamed and painful, which you feel when doing pull-ups.
Forearm splints
Forearm splints are an injury where overuse leads to inflammation of the connective tissue in the forearm region. This could be the fascia surrounding the forearm muscles, the periosteum that covers the bones, the muscles, or the tendons and ligaments.
Forearm splints are usually caused by overuse and increasing training volume and intensity too quickly. Shock loading and high-impact movements, e.g., plyometric pull-ups, can also cause forearm splints, as can doing heavy negatives.
General forearm pain is often referred to as forearm splints. The lower body equivalent of forearm splints is shin splints, which is a common lower leg injury in runners.
Forearm compartment syndrome
Muscles are enclosed in a layer of connective tissue called fascia. Fascia is tough, relatively inflexible, and surrounds, separates, and connects all the muscles and organs in your body.
If your forearms get too big for the fascia surrounding them, pain can be the result. This is called compartment syndrome. This condition makes your forearms feel tight and restricted, and the muscles may burn and throb. The pain tends to be worse when you’re training but lessens soon afterward. This is because getting pumped makes the muscles expand within their fascial sheath.
Compartment syndrome is more common in the calves but can also affect the forearms.
Delayed onset muscle soreness
Doing more exercise than usual often causes delayed onset muscle soreness or DOMS for short. This is thought to be caused by localized inflammation and the accumulation of metabolic waste products, such as lactate. DOMS typically comes on 12-24 hours after training and can last several days.
The good news is that DOMS tends to decrease as you get used to your new workout, which is called the repeated but effect.
Tight forearm muscles
Muscle tightness is a common source of pain. Tight muscles usually have a reduced blood flow which leads to an accumulation of irritating waste products. They may also have localized tenderness, called trigger points.
While most exercisers know to stretch their hamstrings, quadriceps, and even their pecs, fewer spend time stretching their forearms. As such, there is a high probability that your forearms are tight and are causing your forearm pull-up pain.
Improper grip/technique
There is more to a safe, effective set of pull-ups than simply grabbing the bar and heaving your chin up to meet it. Your grip needs to be firm but not so tight your hands go into spasm, and you need to avoid jerking the bar. Shock-loading your forearms increases the risk of pain and injury.
The bar itself is also important. If it’s too thin or too thick, it’ll put undue stress on your fingers, hands, and forearms. A very narrow grip is also harder on your wrists and forearms.
So, make sure you grip the bar correctly – not too tight or too wide – and do your reps smoothly and without swinging or jerking. These techniques will make pull-ups harder, but they’ll also be safer.
How to Treat Pull-Up Forearm Pain
Most pull-up forearm pain originates in your soft tissues, i.e., muscles, tendons, and ligaments. Soft tissue injuries are generally treated the same way – with PRICE.
No, PRICE is not a miracle drug or special taping method. Instead, it is an acronym for the steps you need to take to promote healing.
Please note: This information is not meant to replace advice from a trained medical professional.
P – Protection: Protect your forearms from further injury. Invariably, this means dropping pull-ups from your workouts until the pain subsides. After all, if pull-ups hurt your forearms, it doesn’t make a lot of sense to keep doing them, as you’ll probably make the problem worse.
Find exercises that don’t cause pain and do them instead. For example, lighter lat pulldowns may allow you to continue training without aggravating the affected area.
R – Rest: Depending on the severity of your injury, you may need to take a break from training. Or, at least, you may need to stop doing exercises that directly challenge your forearms, such as most back and biceps exercises.
You may be able to continue doing upper body pressing exercises, provided you don’t grip the bar/dumbbells/handles too tightly.
Avoid testing your injury to see if it still hurts. This can lead to reinjury and a longer recovery period. Rest a little longer than you think you need to allow the tissues to fully heal.
I – Ice: Ice reduces inflammation and also provides natural pain relief. Apply ice to the affected area for 15-20 minutes, 3-5 times per day. Reduce the duration and frequency of your icing sessions as the injury heals.
Avoid painful ice burns by never applying ice directly to your skin. Instead, use an ice pack or washcloth as a barrier between the ice and your forearm.
C – Compression: Like ice, compression helps reduce inflammation and swelling. Wrap the affected area with an elastic bandage or use a forearm sleeve to apply medium, even pressure to the affected area. However, make sure you unwrap your forearm from time to time to ensure there is good blood flow into the affected area. If your fingers are cold or numb, you have probably cut off the blood supply.
E – Elevation: Raising your forearm above head height will help reduce swelling and inflammation. There is no need to keep your arm raised all the time, but you may get some pain relief if you elevate your arm when seated for long periods, e.g., at night when relaxing in front of your TV.
Other strategies that may enhance recovery and reduce forearm pain include:
NSAIDs and OTC painkillers
If your forearm pain is severe, you may want to dull it by using over-the-counter (OTC) anti-inflammatory drugs like ibuprofen or aspirin. You can also use painkillers like paracetamol.
In addition, there are pain-relieving and anti-inflammatory gels that you can apply directly to your injured forearm. This is useful for people who find taking pills upset their stomachs.
However, do not use medicines to mask the pain so you can continue training. That will just make things worse.
Massage
Massage can help speed up the healing of chronic injuries. It’s also valuable for the latter stages of injury repair, i.e., 5-7 days after it happened. Massage improves blood flow and speeds up the removal of waste products from the injured area. It also provides natural pain relief and can help restore range of motion.
The forearms are very easy to self-massage, so you don’t need to hire a therapist to do it for you.
Apply even pressure with your non-injured hand and work up the forearm toward your heart. Use oil to lubricate your skin and make the massage go more smoothly. Start with light pressure and increase gradually as the area warms up.
You can also use a massage gun to help speed up your recovery. Still, good massage guns can be expensive and offer little additional benefit compared to a hands-on massage. That said, they allow you to get a good massage without using oil or even rolling up your sleeves, so some people may find them more convenient.
Stretch
Gentle stretching can help ease the tension in your forearms, increase blood flow, and promotes proper soft tissue remodeling. There are several ways to stretch your forearms, but the most convenient is probably the prayer stretch:
Place the palms of your hands together in front of your chest.
Gently press your hands downward to extend your wrists and stretch your forearms.
Hold for 30-60 seconds, increasing the depth of the stretch as you feel your muscles relax.
Take care not to force this movement, and ease off if you feel burning or shaking in your muscles.
Be a patient patient!
No one likes being injured, and it can be tempting to try and rush the recovery process so you can get back in the gym sooner. However, returning to training before you are ready could result in reinjury and an even longer layoff.
So, be patient and let nature run its course. It’s better to rest a little longer than return to training too soon, hurt yourself again, and then have to restart the recovery process.
For most people, being patient is the hardest thing to cope with when injury strikes.
Use this time to work on other aspects of your fitness, such as training your legs and core or doing more cardio and stretching. There is no need to be completely inactive.
How To Avoid Forearm Pain In The First Place
As the old saying goes, an ounce of prevention is worth a pound of cure. In other words, it usually takes less effort to avoid injuries than it does to treat and heal them. Use the following tips to reduce your risk of developing forearm pain in the first place.
Warm up properly
While we can’t guarantee that warming up will prevent all injuries, it should reduce your risk. Warmer muscles stretch and contract more efficiently, so they’re less likely to be damaged when you start working hard.
Most people focus on their warm-ups on big joints and muscle groups, such as the hips and shoulders, hamstrings, and pecs. However, if you are doing a very forearm or grip-centric exercise like pull-ups, you should warm up your lower arms, too.
So, in addition to your usual warm-up, make sure you include some wrist rotations, forearm flexions and extensions, and some light stretches to ensure this area of your body is as ready as possible for what you’re about to do.
Take care when using overly thin and thick pull-up bars
Very thin or thick pull-up bars put a lot of stress on your forearm muscles, increasing your risk of injury. Skinny bars force you to close your hand tighter than usual, putting your fingers in a mechanically disadvantageous position. Thicker grips force you to keep your hands more open, which makes it harder to maintain your grip.
Avoid forearm pain by introducing thick bar pull-ups gradually into your program and avoiding thin bars whenever possible. You can make a thin bar less stressful to grip by wrapping it in tape, wearing gloves, or using clip-on handles.
Don’t grip the bar too tightly
Pull-ups are a very grip-centric exercise. However, a lot of people make the mistake of gripping the bar too tightly. This “death grip” could be the reason for your forearm pain. Avoid this by only holding the bar hard enough to support your weight. There is no need to try and crush the bar. Use no more and no less hand pressure than you need.
Use lifting straps
Lifting straps provide more friction between your hands and the bar, so you don’t have to grip it as tightly. This takes the stress away from your forearms. While many people avoid using straps so they can develop a firmer grip, if you experience forearm pain during pull-ups, reducing lower arm engagement may help cure the problem.
Learn how to use lifting straps here.
Use gym chalk
Sweaty hands mean you’ll need to grip the bar tighter during pull-ups. This increases the stress on your forearms. Like lifting straps, lifting chalk increases the friction between your hands and the bar, so you won’t need to hold on so tightly.
Keep a bag of powdered chalk or a bottle of liquid chalk in your gym bag so you can use it before every set of pull-ups. Chalk is a real forearm and grip saver!
Stretch your forearms between workouts
A lot of strength training exercises involve your forearms. Your forearms are also often flexed during everyday activities, such as driving and using a computer keyboard. As such, tight forearms are common. Despite this, relatively few people spend much, if any, time stretching their lower arm muscles.
Avoid tight forearms and the pain they can cause by stretching them between workouts. This kneeling forearm stretch is one of the best ways to do it:
Kneel down and place your hands on the floor, fingers facing your knees. Your arms should be straight and your palms flat.
Gently lean back and press the heels of your hands into the floor.
Hold for 30-60 seconds, and then relax.
You can also stretch the muscles that extend your wrists by turning your hands over and pressing the backs of your hands into the floor.
Train your finger extensors
Muscles are generally arranged in opposing pairs. For example, the biceps oppose the triceps, and the quadriceps oppose the hamstrings. These paired muscles affect the same joint, with one flexing and the other extending it.
If one muscle in the pair gets much stronger than the other, an imbalance will occur. Muscular imbalances can cause pain and dysfunction.
As such, you need to work on your finger extension strength as well as your grip. While your finger extensors will never be as strong as the finger flexors, they still need to be trained so they are not weak.
One easy way to do this is to include rubber band finger extensions in your grip workouts. Just a few sets a couple of times per week will be sufficient for most people.
With your fingers straight and together, take a large rubber band and loop it around your fingertips and thumb. A standard stationary-type band should suffice.
Open your hand and spread your fingers and thumb apart as far as possible.
Slowly close your hand and repeat.
Try some different grips
There is more than one way to position your hands during pull-ups. You may find that some feel more comfortable and are less stressful for your forearms than others. For example, if overhand medium-width pull-ups with a full grip around the bar bother your forearms, you could try a thumbless narrow grip instead.
You may also find that underhand and neutral grip pull-ups are more comfortable than the overhand version.
Experiment to see which feels best. You could change hand positions workout-by-workout to spread the stress to different forearm muscles and avoid overloading the same ones repeatedly.
Read more about your grip options here.
Strengthen your forearms
Weak forearms are more prone to injury than stronger forearms. If you know your grip and lower arms are weak, it’s time to start training them. There are lots of exercises you can do to strengthen your forearms and grip, including wrist and reverse wrist curls, hammer curls, and dead hangs. Add a forearm exercise or two to your upper arm workouts or train your grip on separate days as preferred.
However, take care not to train your grip and forearms too hard or too often, as doing so could result in more forearm pain.
Forearm Pull-Up Pain – FAQs
Do you have a question about treating or preventing forearm pain? No problem, because we’ve got the answers!
1. How do I know what type of forearm pain I have?
There are several different conditions that cause forearm pain, including compartment syndrome, tendonitis, and muscle strains. However, they can sometimes present similar symptoms, so you may not be able to determine which one you’ve got.
For this reason, it’s always best to seek qualified medical advice and get an accurate diagnosis.
This is important because the treatment for one condition could actually make another problem worse.
So, use the PRICE protocol, but if the pain is severe or persists, get it checked out by a sports injury doctor.
2. Can I train around forearm pain?
Forearm pain doesn’t always mean you can’t train. So, while you should avoid exercises like pull-ups, pulldowns, deadlifts, rows, and curls, you still do leg presses, leg extensions, leg curls, and may even be okay doing squats, bench presses, overhead presses, etc.
In simple terms, exercises that involve a tight grip are out while you let your injuries heal. However, activities involving minimal forearm engagement should be fine, provided they don’t cause pain.
Learn more about how to safely train around injuries here.
3. How long does it take for forearm pain to subside?
Sadly, this question is unanswerable as it depends on the cause of your pain and the nature of your injury. Other factors affecting the healing process include how much you rest the painful area and what other treatments you use.
The one thing you must avoid doing is trying to rush the healing process; it will take as long as it takes. Returning to training before you’ve healed could result in reinjury and more time off.
4. If pull-ups hurt my forearms, can I do lat pulldowns instead?
Overhand lat pulldowns and pull-ups work many of the same muscles. The main difference between these exercises is the amount of weight used.
You can scale pulldowns to match your current level of strength, but doing pull-ups means lifting your entire body weight with just your arms. Pull-ups are much more strenuous than pulldowns.
As such, you can do pulldowns instead of pull-ups if you wish, providing they don’t also hurt your forearms.
5. Are hand grippers a good way to strengthen my forearms and grip?
Hand grippers are a convenient, time-efficient, and cost-effective way to train your forearms and grip. You can use them at home while relaxing in front of the TV, at work between meetings or phone calls, or even while on your morning commute.
There are lots of different strengths and styles of hand grippers to choose from, so shop around to find one you like. Also, don’t use your hand gripper too often, i.e., every day; otherwise, you could end up with an overuse injury, negating the benefits of forearm and grip training.
Read More on Forearm Pain:
Forearm Splints — All You Need to Know
How To Prevent Forearm Pain When Curling
Closing Thoughts
Like all types of pain, forearm pain tells you something is wrong and you should stop what you are doing. Ignoring pain could make the problem worse.
The good news is that most types of forearm pain are due to soft tissue injuries, which usually heal fully in a relatively short time. Resting and controlling the inflammation will have you back in the gym in no time.
However, if the pain is severe or persists despite resting and icing the area, you should get your forearm pain checked by a medical professional. While serious forearm injuries are rare, it’s always better to be safe than sorry.

The 10 Best Quad Exercises for Bad Knees
No pain, no gain, or so the popular saying goes. However, there is a huge difference between the pain caused by fatigue and oxygen debt in your muscles and joint pain. While the former is part and parcel of an effective workout, the latter should set alarm bells ringing.
Exercisers ask a lot of their knees, and as such, knee pain is very common. High-impact activities like running are often associated with painful knees, and so is heavy strength training.
However, that doesn’t mean that knee pain signals the end of your exercising or lifting career. In fact, staying in shape can prevent some types of knee pain from progressing and may even make the pain more manageable (1).
That said, if you have knee pain, you should modify your workouts to avoid making it worse. You should also get the source of the pain checked out to ensure that you aren’t inadvertently turning a minor injury into a major one.
In this article, we reveal ten of the best quadriceps exercises for lifters with bad knees.
Knee Anatomy Basics
The knee is a hinge joint that opens (extends) and closes (flexes) and can laterally and medially rotate slightly when bent. It comprises the femur or thigh bone and the tibia, which is the bigger of your two shin bones. The ends of the bones are covered with a smooth, slippery substance called hyaline cartilage, which aids in the movement of the joint.
As a weight-bearing joint, the knee must be very strong and stable. As such, it’s held together by tough, inelastic cords called ligaments, and the end of the femur sits in small cartilaginous cup-like structures called the meniscus.
These structures (hyaline cartilage, ligaments, and meniscus) are prone to wear and tear and injuries. In some cases, surgical repair is necessary, while in others, rest and rehab are all that is needed. In most cases of knee pain, these are the cause of the problem, e.g., a torn ligament or meniscus or worn hyaline cartilage.
The knees are controlled by several muscles, including:
Quadriceps – also known as the quads and consisting of the vastus lateralis, vastus intermedius, vastus medialis, and rectus femoris. The quads extend your knees.
Articularis genus muscle and tensor vastus intermedius – two small but powerful knee extenders sometimes listed as part of the quadriceps group.
Popliteus – a small muscle behind the knee that initiates flexion.
Hamstrings – the collective name for the semimembranosus, semitendinosus, and biceps femoris, which are located on the back of your thighs. The hamstrings flex the knee.
Sartorius – also known as the tailor’s muscle, the sartorius is the longest muscle on the human body. It is responsible for the flexion of the knee.
Gastrocnemius – the larger of the two calf muscles, gastrocnemius works with your hamstrings to flex your knee.
While knee pain can be unpleasant, it doesn’t have to mean quitting your workouts. Instead, providing you avoid activities that exacerbate or worsen your pain, you can often train around whatever ails your knees.
In fact, stronger quadriceps help stabilize your knees, which is why it’s worth seeking out quads exercises even if you have bad knees.
The 10 Best Quad Exercises for Bad Knees
Is knee pain making it hard for you to build the quads of your dreams? We hear you! Try these exercises to see if they provide the workout you want without the discomfort. However, it’s generally best to get knee pain checked out by a medical professional. In some cases, continuing to train may make it worse.
1. Seated straight leg raises
If bending your knees causes pain, you need a quads exercise that lets you keep your leg extended. Seated straight leg raises put plenty of tension through your quads, emphasizing the often hard-to-hit rectus femoris. This is a common quads exercise in early-stage post-injury rehab.
Steps:
Sit on the floor with your legs extended in front of you. Place your hands behind your hips and use your arms for support. Pull your toes up to increase quads engagement.
Contract the quads of the leg you want to train first.
Keeping your knee straight, lift your foot 12-24 inches off the floor.
Lower your leg and repeat.
Switch legs and do the same number of reps on the other leg.
Muscles Targeted:
Primary: Quadriceps.
Secondary: Hip flexors.
Benefits:
A joint-friendly isometric quads exercise.
Virtually no stress on the knee joint.
No equipment is required.
Tips:
Use an alternating leg action if preferred.
You can make this exercise harder by wearing ankle weights or putting a resistance band around your legs.
Pause for 2-3 seconds with your leg raised to make this exercise more challenging.
2. Wall squat
The wall squat is another isometric or static exercise that puts plenty of stress on your muscles but virtually none on your joints. The key to this exercise is pushing as hard as possible to fatigue your muscles in 30 seconds or less. Long, passive holds are much less time-efficient.
Steps:
Stand with your back to a smooth wall, feet about 18 inches away.
Lean your back on the wall and then slide down until your thighs are roughly parallel to the floor. Your shins should be vertical.
Push your lower back into the wall and hold for the prescribed duration.
Muscles Targeted:
Primary: Quadriceps, hamstrings, gluteus maximus.
Secondary: N/A.
Benefits:
An intense but joint-friendly exercise.
No equipment required.
Easy to adjust the difficulty of your workout by changing how hard you push your back into the wall.
Tips:
Adjust the angle of your knees for comfort.
Do not hold your breath.
You can also do this exercise using one leg at a time:
3. Split squat
Lunges and squats are popular leg exercises, but despite their effectiveness, they can also be hard on your knee joints. Split squats are more knee-friendly than both these exercises but still deliver a similarly effective quads workout.
Steps:
Stand with your feet together and your arms by your sides.
Take a large step forward and stop. Your feet should be roughly shoulder-width apart.
Bend your legs and lower your rear knee down to within an inch of the floor. Keep your torso and front shin upright.
Extend your legs and continue for the prescribed number of reps.
Switch lead legs and repeat, doing the same number on the opposite side.
Muscles Targeted:
Primary: Quadriceps, hamstrings, gluteus maximus.
Secondary: Core.
Benefits:
A good exercise for quadriceps strength and hip mobility.
An excellent balance exercise.
Ensures that both legs are developed equally.
Tips:
Do this exercise next to a railing or wall for support if necessary.
You can also do split squats with dumbbells.
Put your front foot on a raised step to increase your range of motion and make this exercise more challenging.
4. Reverse lunges
Lunges are an awesome leg exercise, but unfortunately, they can also be hard on your knees. This is especially true for forward and walking lunges. Reverse or backward lunges are much more knee friendly but no less effective for strengthening your quads.
Steps:
Stand with your feet together and your arms by your sides.
Take a large step backward, bend your legs, and lower your rearmost knee down to within an inch of the floor. Your torso and front shin should remain vertical.
Push off your back foot and return to your starting position.
Do your next rep with your opposite leg.
Continue alternating sides for the duration of your set.
Muscles Targeted:
Primary: Quadriceps, hamstrings, gluteus maximus.
Secondary: Core.
Benefits:
A knee-friendly alternative to regular lunges.
A good exercise for mobility and balance.
Easier to master than forward or walking lunges.
Tips:
Step backward off a raised platform for a bigger range of motion and a more intense workout.
You can also do this exercise with dumbbells.
Take a shorter step to increase knee flexion and therefore quads engagement.
5. Goblet box squats
Bad knees do not have to step you squatting. However, you may find that descending no deeper than parallel is helpful for alleviating knee pain. Squatting to a box ensures you descend slowly and go no further than is comfortable.
Steps:
Stand with your back to a knee-high exercise bench or plyo box. Your feet should be roughly shoulder-width apart.
Hold a kettlebell in front of your chest, upper arms tucked into your sides. Brace your core and pull your shoulders back and down.
Bend your knees and squat down until your butt lightly rests on the bench.
Drive your feet into the floor and stand back up.
Muscles Targeted:
Primary: Quadriceps, hamstrings, gluteus maximus.
Secondary: Core.
Benefits:
A very functional exercise.
A knee-friendly way to overload your quadriceps.
A very scalable movement – use more or less weight as needed.
Tips:
Use a lower box to increase your range of motion and, therefore, the difficulty of the exercise.
Raise your heels on blocks or weight plates to increase quads engagement.
Do this exercise without weights if necessary.
6. Backward sled drags
Most people view sled training as a conditioning tool. However, working with a sled can also build strength and muscle size. Reverse sled drags are a very effective and joint-friendly quads exercise. And yes, that burn and pump you can feel in your quads is entirely normal!
Steps:
Load up your sled and attach a handle to it. Take the handle in your hands and stand facing your sled.
Brace your core and pull your shoulders back and down.
Bend your knees slightly and then take small steps backward.
Continue for the required time or distance.
Muscles Targeted:
Primary: Quadriceps.
Secondary: Trapezius, rhomboids, biceps, core.
Benefits:
A low-impact quads and conditioning exercise.
A very functional workout.
An excellent calorie burner.
Tips:
Keep your torso upright or lean back slightly. Do NOT lead with your butt, as doing so could cause lower back injury.
Go heavy – this is a powerful exercise.
Use a waist harness instead of handles to remove your upper body from this exercise.
7. Deadlifts
Deadlifts are often viewed as a posterior chain exercise, meaning they work your glutes, hamstrings, and back. However, deadlifts also involve your quads, albeit with a relatively short range of motion. This makes deadlifts more knee-friendly than squats while allowing you to lift moderate to heavy weights.
Steps:
Place your barbell on the floor and stand behind it with your feet under the bar, shoulder to hip-width apart.
Squat down and hold the bar with a double overhand or mixed grip.
Straighten your arms, drop your hips, and lift your chest. Pull your shoulders back and down and brace your core.
Drive your feet into the floor and stand up, taking care not to round your lower back or allow your hips to rise faster than the bar.
Lower the weight back to the floor, let it settle for a couple of seconds, and repeat.
Muscles Targeted:
Primary: Hamstrings, gluteus maximus, quadriceps, latissimus dorsi, trapezius, core.
Secondary: Biceps, forearms.
Benefits:
A knee-friendly alternative to squats.
A very functional exercise.
A great way to build a bigger, stronger back.
Tips:
8. Standing quadriceps stretch
Your quads don’t just need to be strong; they need to be flexible too. The standing quads stretch is simple yet effective. Tight quads are a leading cause of knee pain, so stretching is just as important as lifting for people with bad knees.
Steps:
Stand with your feet together and arms by your sides.
Bend your leg, lift your foot behind you, and reach back and grip the top of your ankle with one or both hands.
Keeping your thighs together, gently pull your foot toward your butt to lengthen and stretch your quads.
Hold for 20-60 seconds, increasing the stretch as your quads relax and lengthen.
Lower your foot to the floor, swap legs, and repeat.
Muscles Targeted:
Primary: Quadriceps.
Secondary: Hip flexors.
Benefits:
A simple and convenient exercise.
Ideal for warm-ups.
Good for developing better balance.
Tips:
Push your knee backward to extend your hip and increase the stretch on your rectus femoris muscle.
Lean against a wall and use a hand for balance if required.
Keep your hips and shoulders square and level throughout.
9. Prone quadriceps stretch
While the standing quads stretch is an excellent exercise, it does require a reasonable amount of balance. Also, it’s not easy to hold for lengthy periods, which you may want to do during your cool down. Stretching your quads in the prone (lying face down) position is the obvious solution to both these issues.
Steps:
Lie on your front with your head resting on your folded right arm.
Bend your left leg and reach back with your left arm, taking hold of your foot.
Gently pull your foot into your butt and hold it for 20-60 seconds, increasing the stretch as your quads relax and lengthen.
Lower your foot to the floor, swap legs, and repeat.
Muscles Targeted:
Primary: Quadriceps.
Secondary: Hip flexors.
Benefits:
A very comfortable quads stretch that’s perfect for cooldowns.
Ensures you keep your hips level and square.
A relaxing exercise that’s ideal for longer developmental stretches.
Tips:
Loop a yoga strap or belt around your feet if you cannot reach it without straining.
Increase the depth of the stretch by resting your bent knee on a yoga block.
Rest your head on a cushion or folded towel for comfort.
Related: Quadriceps Stretch Guide: How-To, Muscles Involved, Benefits, and Variations
10. Half-kneeling quads stretch
Most quads stretches are done with the knees together. That’s great for your joint health but not so good for hitting your rectus femoris, which crosses the knee and the hip joints. The half-kneeling quads stretch puts your hips into mild extension, so it stretches the rectus femoris more. However, this exercise may be challenging if you have poor flexibility.
Steps:
Adopt a half-kneeling position with one foot flat on the floor in front of you and your opposite knee roughly two feet behind.
Bend your back leg, grasp your ankle, and pull your foot into your butt. Keep your torso upright, do not twist your hips or shoulders, and do not hyperextend your lumbar spine.
Remain in position for 20-60 seconds or more, increasing the stretch as you feel your muscles relax and lengthen.
Release your foot, swap sides, and repeat.
Muscles Targeted:
Primary: Quadriceps.
Secondary: Hip flexors.
Benefits:
Provides a deeper-than-usual quadriceps stretch.
An excellent hip opener.
A good movement for more advanced exercisers.
Tips:
Place your knee on a folded exercise mat, towel, or foam pad for comfort.
Loop a yoga strap or belt around your feet if you cannot reach it without straining.
Take care not to hyperextend your hip, as doing so could cause injury.
Quad Exercises FAQs
Do you have a question about the best quad exercises for bad knees? No problem, because we’ve got the answers!
1. What are some of the common causes of bad knees?
While some knee pain is idiopathic, meaning it has no obvious or known cause, others are caused by specific conditions or injuries. These include:
Bursitis – inflammation of the bursa, which are fluid-filled sacks that reduce the friction between tendons and bones.
Iliotibial band syndrome – where the iliotibial band, which runs down the outside of the thigh, rubs against the outside of the knee joint, causing inflammation and knee pain.
Knee crepitus – grinding, cracking, or popping within the knee joint, which could be a precursor of osteoarthritis.
Meniscal tears – damage to the meniscus.
Osteoarthritis – wear and tear of the hyaline cartilage within the knee joint.
Patellar tendonitis – inflammation of the tendon that connects the kneecap to the tibia.
Patellofemoral pain syndrome – pain behind the patella or kneecap caused by roughening of the inside of the patella.
Strains and sprains – strains affect the muscles, while sprains affect the ligaments.
Tendonitis – inflamed, swollen tendons, usually caused by overuse.
Tendonosis – degeneration of the tendons, often caused by ignoring chronic tendonitis.
Some knee conditions get better with rest or light training, which others need medical intervention to heal properly. As such, and with so many possible causes, getting knee pain properly diagnosed is vital.
2. How often should I train and stretch my quads?
It’s generally best to train a muscle 2-3 times per week or every 48-72 hours. This allows adequate time for rest, recovery, and muscle growth. Exercising a muscle more often than this could lead to overtraining and poor progress.
In contrast, you can stretch your quads daily or even several times a day. In fact, if you have tight quads, i.e., cannot get your heel to your butt during prone or standing quad stretches, more frequent bouts of stretching will help you restore lost flexibility sooner.
3. So, are squats bad for your knees?
Contrary to common opinion, squats are not bad for your knees (2). The original studies that reported a link between squats and knee pain were performed on veteran NFL players, many of which already had banged-up knees.
Rather, doing squats with appropriate loads and good form can help prevent and control knee pain.
That said, squats are not the only exercise for strengthening your quads. As revealed in this article, there are plenty of other knee-friendly exercises you can use instead.
4. Some exercise hurts my knees – what gives?
While the exercises in this article are all certified knee-friendly, that doesn’t mean they won’t cause some people knee pain. Instead, knee pain can be influenced by a host of factors, from injury status to muscle tightness to leg length to underlying joint structure.
So, if one or more of these exercises bother your knees, cut them from your workout and try something else. You may find that you can return to the offending exercise in a few weeks or months once whatever is affecting your knee has a chance to heal.
5. What should I do if my knees hurt?
If you experience knee pain, you should initially use the RICE method. RICE is an acronym for:
Rest – take a break from the activity(s) that cause pain.
Ice – use ice packs for 15-20 minutes 3-5 times a day to reduce swelling and pain.
Compression – wear knee supports to protect the joint and further reduce swelling.
Elevation – raise your knee above heart height to minimize swelling and keep your weight off the injured limb.
Once the pain subsides, you can gradually return to exercise, backing off it the pain returns or worsens. However, if the pain is severe or long-lasting, you should seek medical attention.
Read more about coping with and preventing knee pain here.
Closing Thoughts
Exercise is good for everybody’s body. Not only can it change the way you look and improve your body composition, but it can also make you healthier and could even lead to a longer life. Ironically, though, being physically active can also take its toll on your joints, and shoulder, hip, lower back, and knee pain are common in exercisers.
The good news is that pain doesn’t mean you have to quit working out. However, you may need to modify your training to work around any aches and pains that have developed.
Use the exercises in this article to train around bad knees while building bigger, stronger quads. In many cases, keeping your quads in shape will enhance knee stability, taking stress off your joints.
However, if your knee pain is new, severe, or long-lasting, get it checked out to make sure your workouts aren’t making it worse.
References:
1 – Susko AM, Fitzgerald GK. The pain-relieving qualities of exercise in knee osteoarthritis. Open Access Rheumatol. 2013 Oct 15;5:81-91. doi: 10.2147/OARRR.S53974. PMID: 27790027; PMCID: PMC5074793. https://www.ncbi.nlm.nih.gov/pmc/articles/PMC5074793/
2 – Hartmann H, Wirth K, Klusemann M. Analysis of the load on the knee joint and vertebral column with changes in squatting depth and weight load. Sports Med. 2013 Oct;43(10):993-1008. doi: 10.1007/s40279-013-0073-6. PMID: 23821469 https://doi.org/https:/link.springer.com/article/10.1007%2Fs40279-013-0073-6
How to Train For 20 Consecutive Pull-Ups and 50 Push-Ups
Pull-ups and push-ups are two of the absolute best exercises you can do. Note we didn’t say best bodyweight exercises, but best exercises – period. Between them, they work every major upper body muscle and teach you how to control and stabilize your body in ways that no machine or freeweight exercise ever will.
Better yet, you can do pull-ups and push-ups almost anywhere. All you need is some space and something to hang from. Get yourself a doorway pull-up bar, and you’re all set. You can also do pull-ups from the top of a power rack, a ceiling joist, the underside of an open staircase, or a tree branch – anywhere you can find to hang will do.
However, some people complain that pull-ups and push-ups are boring, and we respect that point of view. Once you have mastered these exercises and can do a handful of reps, you’ll probably be itching for a new challenge.
One way to reignite your enthusiasm for classic pull-ups and push-ups is to set yourself a repetition goal. Having a training target will make your workouts much more focused and motivating.
Assuming you can do pull-ups and push-ups reasonably well, the next logical goal for reasonably fit exercisers is 20 non-stop pull-ups and 50 push-ups. While these numbers might sound daunting, with time and determination, most people should be able to achieve and even surpass them.
In this article, we share two training programs that’ll have you cranking out 20 non-stop pull-ups and 50 push-ups in just a few months.
Related: How Many Push-Ups Should I Be Able to Do? The Ultimate Guide
Why Train for 20 Pull-Ups and 50 Push-Ups?
Is training for 20 pull-ups and 50 push-ups worth your time and energy? Consider these benefits and then decide!
Increased workout motivation
While any workout is a good workout, training without a goal often means your progress is slow or even non-existent. Following a progressive program toward a definitive goal gives your training focus and purpose, which can be very motivating.
The more motivated you are, the harder you’ll train, and the harder you train, the better your progress will be. This creates a positive feedback loop that will help you maintain your exercise habit and stay on the track to improved fitness and better health.
More dedication and discipline
Sticking to a workout plan as you progress toward your goal forces you to take a more dedicated, disciplined approach to your training. Week after week, you must keep on punching the clock, and missed workouts will hurt your progress.
This teaches you dedication and discipline and spreads to other parts of your life, making you a more productive and successful person in general.
Greater muscle mass
Not so long ago, we (the fitness industry) believed that you had to train in the 6-12 rep range to build muscle. Anything outside of that range was considered a waste of time.
It turns out that this was wrong.
Studies have revealed that you can build muscle by doing as many as 30+ reps per set, provided you work close to failure (1). Training to do 20 pull-ups and 50 push-ups will invariably involve training to failure. As such, you’ll build muscle despite cranking out lots of high-rep sets.
Simply making the switch from 6-12 reps to sets of 20-30 could be the shock your muscles need to trigger renewed growth.
Personal satisfaction
Setting and reaching training goals is very satisfying. It teaches you that if you set your mind to a task, you can complete it. Doing 20 pull-ups and 50 push-ups is a very notable achievement and something that will raise your standing in the fitness community.
Imagine how good you’ll feel when you finally hit 20 pull-ups and 50 push-ups. Pretty damn awesome, right?!
Master the Basics
Before we get into the nitty-gritty of training for 20 pull-ups and 50 push-ups, you need to become an expert in doing these two exercises. Poor form will undermine your performance, lead to injuries, and stop you from achieving your goals.
In addition, sloppy technique makes it harder to quantify your progress as each rep has the potential to be done with different speeds and ranges of motion. Good form standardizes your performance, so you can more acutely measure your improvements.
So, make sure you know how to do these exercises correctly, with your metaphorical eyes tightly closed. Good technique should be automatic and not something you have to think about too much. That way, you’ll be free to focus on pumping out the reps.
Pull-ups 101
Muscles worked:
Latissimus dorsi
Trapezius
Rhomboids
Deltoids
Biceps
Brachialis
Brachioradialis
Forearm flexors
Core
Everyone thinks they know how to do pull-ups but turn into swinging, jerking monkeys when they hang from the bar! Make sure you’re not one of them by following these step-by-step instructions:
Grip an overhead bar with an overhand, slightly wider than shoulder-width grip. Use a full or thumbless grip as preferred.
Your arms should be straight, shoulders down and back, and abs brace.
Bend your legs so your feet are clear of the floor.
Without kicking or swinging, smoothly bend your arms and pull your chin up and over the bar without craning your neck.
Lower yourself back down with control, pause with your arms straight, and repeat.
Push-ups 101
Muscles worked:
Pectoralis major
Deltoids
Triceps
Core
Like pull-ups, most exercisers think they know how to do push-ups. In fact, many are quick to label push-ups as a beginner’s exercise. And yet, even some so-called fitness experts who brag they can do 100 reps manage to murder this classic calisthenic movement. Follow these steps to ensure that your push-ups are a thing of beauty:
Kneel on all fours and place your hands flat on the floor, shoulder-width apart, with your fingers pointing forward.
Pull your shoulders down and back, and brace your core.
Walk your feet out and back until your legs and body are perfectly straight. Tuck your chin in and extend your neck – do not look forward.
Keeping your upper arms close to your sides, bend your arms and lower your chest down to within an inch of the floor.
Push yourself back up to full arm extension and repeat.
Perform all your reps with perfect form and make your inner drill instructor proud!
20 Pull-ups and 50 Push-Ups Workout One: Density Training
The basic premise of density training is simple – you keep your workout volume the same but gradually complete that volume using fewer sets and in less time. This provides the progressive overload your muscles need to get stronger and more enduring.
This workout uses the EMOM (every minute on the minute) method, meaning you start each set at the top of every minute, and whatever time that remains is your recovery.
For example, start your stopwatch and pump out ten push-ups, which will probably take about 20-30 seconds. This leaves 30-40 seconds until the top of the next minute when you’ll do your next set.
The great thing about this workout is that it’s entirely self-regulatory. You only progress when your body is ready for a greater challenge. As such, it’s an open-ended workout plan with no time limit.
If you fail a phase, do as many complete sets as you can and then as many reps as possible for the remaining sets. As you get stronger, you’ll be able to complete more full sets and eventually will graduate to the next level.
It’s broken down into six phases, and you stay with each phase until you complete it. Train 2-3 times per week on non-consecutive days.
You can do the pull-ups and push-ups in the same workout or do them on separate days if you wish. However, because pull-ups and push-ups are your priority, do them at the start of your program, e.g., push-ups at the beginning of your chest-training day and pull-ups before the rest of your back workout.
Plan for 20 Pull-ups
Phase
Sets
Reps
Time allowed
Total reps
1
10
4
10 minutes
40
2
8
5
8 minutes
40
3
7
6
7 minutes
42
4
6
7
6 minutes
42
5
5
8
5 minutes
40
6
4
10
4 minutes
40
After completing phase six, you should be able to do 20 non-stop pull-ups.
Plan for 50 Push-ups
Phase
Sets
Reps
Time allowed
Total reps
1
10
10
10 minutes
100
2
8
13
8 minutes
104
3
7
15
7 minutes
105
4
6
17
6 minutes
102
5
5
20
5 minutes
100
6
4
25
4 minutes
100
After completing phase six, you should be able to do 50 non-stop push-ups.
20 Pull-ups and 50 Push-Ups Workout Two: The Backfill Method
This program involves doing four sets of pull-ups and push-ups per workout. However, as the weeks pass, you do more reps in your first set and less for your last set(s). In essence, you “borrow” reps from your final set(s) and add them to the start of your workout, so the rep count per workout remains the same. This is called backfilling.
While such small increases may seem inconsequential, over almost three months, you’ll gradually progress toward hitting 20 pull-ups and 50 push-ups in a single set.
If you are unable to complete any of the weekly workouts, stick with it for as long as it takes to achieve success and then continue.
Plan for 20 Pull-ups
Week
Set 1
Set 2
Set 3
Set 4
Total Reps
1
10
10
10
10
40
2
11
10
10
9
40
3
12
10
10
8
40
4
13
10
10
7
40
5
14
10
10
6
40
6
15
10
10
5
40
7
16
10
9
5
40
8
17
10
8
5
40
9
18
10
7
5
40
10
19
10
6
5
40
11
20
10
5
5
40
* Rest 2 minutes between sets
Plan for 50 Push-ups
Week
Set 1
Set 2
Set 3
Set 4
Total Reps
1
25
25
25
25
100
2
27
25
25
23
100
3
29
25
25
21
100
4
31
25
25
19
100
5
33
25
25
17
100
6
35
25
25
15
100
7
37
25
23
15
100
8
39
25
21
15
100
9
41
25
19
15
100
10
43
25
17
15
100
11
45
25
15
15
100
12
47
23
15
15
100
13
49
21
15
15
100
14
50
20
15
15
100
* Rest 2 minutes between sets
FAQs
Do you have a question about these workouts or pull-ups and push-ups in general? No problem, because we’ve got the answers!
1. Are pull-ups and push-ups the only exercises I need to do for my upper body?
Between them, pull-ups and push-ups work all your major upper body muscles. Doing these exercises should develop a strong, muscular upper body. However, you may want to supplement your push-up and pull-up workouts with some additional upper-body exercises to build a balanced, aesthetically-pleasing physique.
Good workout additions include:
However, when time is short, it’s reassuring to know that doing just pull-ups and push-ups will deliver a reasonably complete upper body workout, and any additional exercises you perform are a bonus.
Cable Face Pulls
2. How many reps of pull-ups and push-ups should I be able to do before starting these workouts?
Ideally, you should be able to comfortably complete the first stage/week of your chosen workout. This typically means being able to do 10 pull-ups and 25 push-ups, or half your ultimate rep goal.
If you cannot reach these standards, you should work on your pull-up and push-up performance until you can. Straight sets, e.g., three sets of eight, is probably the best way to do this.
Related: 8 Ways to Get Better at Pull-Ups and Chin-Ups
3. How many times a week should I do pull-ups and push-ups?
You can do pull-ups and push-ups almost every day if you wish. Daily workouts are one of the best ways to get really good at an exercise. However, the more often you train, the lower the volume and intensity of your workouts must be. Working too hard or too long will make recovery impossible.
With that in mind, if you do the workouts in this article, you should limit your push-up and pull-up training to 2-3 times per week. This provides an ideal balance between work and recovery.
However, training just once per week probably won’t produce the results you want.
4. Which of the two programs should I do?
With two programs (density training and backfill method) to choose from, you may be wondering which approach is best. The truth is that both of these workouts can be equally effective, so it’s up to you to choose the one that resonates with you the most.
The density training program is more flexible, and you only progress from one stage to the next when you’re ready. The backfill program is a bit more linear, which may appeal more if you prefer a more regimented training plan.
Cannot decide between them? Then why not run both consecutively? For example:
Week 1
Monday – program one
Wednesday – program two
Friday – program one
Week 2
Monday – program two
Wednesday – program one
Friday – program two, etc.
Similarly, you could do the EMOM density workout for push-ups and the backfill workout for pull-ups, or vice versa. Ultimately, there is no right or wrong way to make these programs work for you.
5. What is the best way to warm up for these workouts?
Warming up will prepare your muscles and joints for what you’re about to do. In addition, it may help reduce your risk of injury.
Strength training warm-ups usually consist of the following:
Pulse raise, e.g., 5 to 10 minutes of easy cardio
Mobility and dynamic flexibility for the joints and muscles you’re about to use
Practice/rehearsal, e.g., a couple of sub-maximal sets of pull-ups and push-ups
After that, you should be good to go and ready to start your workout. Read more about warming up for strength training here.
6. Do I have to train for 20 pull-ups and 50 push-ups concurrently?
While it makes a certain amount of sense to train for more pull-ups and push-ups at the same time, you certainly don’t have to. For example, if you have to do a push-up test for work, e.g., an army physical fitness test, you can skip the pull-ups and focus on what you’ll be assessed on instead.
However, if you only do one workout, make sure you also include exercises for the rest of your body. While push-ups (or pull-ups) are a great exercise, they are not a one-step solution for all-around fitness and strength. You also need to develop your pulling, core, and lower body muscles.
7. Can I do chin-ups instead of pull-ups?
Chin-ups and pull-ups are so similar that they’re virtually interchangeable. You perform pull-ups with an overhand grip, while chin-ups use an underhand grip. Because they work the same muscles, you can do pull-ups or chin-ups as preferred. You could also alternate between pull-ups and chin-ups from workout to workout for variety.
Closing Thoughts
You now have two programs you can use to train for 20 pull-ups and 50 push-ups. Besides a pull-up bar, you don’t need any equipment to work toward these targets, so there is no excuse for not rising to the challenge.
Is the thought of doing 20 pull-ups and 50 push-ups a little daunting? Does it feel like it might be impossible?
Good; that’s precisely how a challenge should feel!
It’s only by overcoming difficulties and doing hard things that we develop and grow, not just muscularly but as people.
So, choose your program, commit to the process, and work hard. You CAN do 20 pull-ups and 50 push-ups!
References:
1 – Lasevicius T, Ugrinowitsch C, Schoenfeld BJ, Roschel H, Tavares LD, De Souza EO, Laurentino G, Tricoli V. Effects of different intensities of resistance training with equated volume load on muscle strength and hypertrophy. Eur J Sport Sci. 2018 Jul;18(6):772-780. doi: 10.1180/17461391.2018.1450898. Epub 2018 Mar 22. PMID: 29564973. https://pubmed.ncbi.nlm.nih.gov/29564973/
The Best Quadratus Lumborum Exercises and Stretches
When it comes to core and lower back training, most people focus on the well-known muscles, like the rectus abdominis, obliques, transverse abdominis, and erector spinae. This makes a lot of sense as these muscles are the biggest and usually the most visible. Exercisers often know these muscles by name and use carefully-chosen exercises to target them.
However, delve a little deeper, and you’ll find many other muscles that are every bit as important. While you usually can’t see these muscles, they’re always working in the background, providing aid and support.
In some instances, tightness or weakness in these lesser-known muscles can cause pain and dysfunction. After all, a chain is only as strong as its weakest link. For example, a weak rotator cuff can wreak havoc on your shoulder joint.
In this article, we examine the role of the quadratus lumborum muscle and reveal the best stretching and strengthening exercises for this unsung hero of the lower back.
Quadratus Lumborum Anatomy
The quadratus lumborum, or QL for short, is a deep back muscle. That means it lies beneath other muscles, including the lats and paraspinal muscles. QL is a large, flat muscle located between the iliac crest of your upper pelvis and your 12th (lowermost) ribs.
There are two QL muscles – left and right – that can work independently as well as together.
The functions of the quadratus lumborum are:
Lateral flexion of the spine – bending sideways.
Extension of the spine – bending backward.
Stabilizing the spine – preventing unwanted movement.
QL tightness can affect your lower back and pull your spine sideways, putting undue stress on your hips, lumbar spine, and intervertebral disks. In contrast, a weak QL can reduce lumbar spine and hip complex stability, increasing your risk of injury.
7 Best Quadratus Lumborum Stretches
Do you feel like you’re being pulled sideways? Do you have pain in one side of your lower back? Are your hips uneven heights? If so, your QL could be tight. Use these stretches to restore your QL to its ideal resting length.
1. Standing QL stretch
The standing QL stretch is probably the most basic way to lengthen your quadratus lumborum. Requiring no equipment and minimal space, it’s the ideal stretch for home exercisers. You can also do this exercise after long periods of sitting to release any accumulated QL muscle tension.
Steps:
Standing tall, cross your left foot over your right foot.
Raise your left arm above your head.
Lean your upper body over to the side, gently pushing your hips in the opposite direction to intensify the stretch.
Hold for 30-60 seconds, and then relax.
Repeat on the opposite side.
Muscles Targeted:
Primary: Quadratus lumborum, latissimus dorsi, obliques.
Secondary: Erector spinae, rectus abdominis.
Benefits:
An easy exercise to learn.
Very spine-friendly.
Provides a welcome lat stretch as well as elongating your QL muscle.
Tips:
Note any left-to-right flexibility imbalances and spend more time on the side that feels tightest.
Keep your hips and shoulders square to maximize the effect of this stretch.
You can also do this exercise standing next to a wall for support:
2. Gate pose
Gate pose is a yoga exercise for your QL, lats, lower back, abs, and hips. It’s an effective way to stretch and relax all the muscles on one side of your body. Because there are two sets of QL muscles, it’s quite likely that you will find that one side is tighter than the other. If this is the case, spend more time stretching the side that feels most restricted.
Steps:
Kneel down so you’re in good posture, with your torso upright and shoulders down and back.
Move one foot out and away to the side so your leg is straight. Engage your core and glutes.
Next, slide your hand down your outstretched leg while simultaneously raising your other arm above your head.
Lean over as far as is comfortable, taking care not to twist your shoulders or hips.
Hold this position for 30-60 seconds, and then slowly relax.
Swap sides and repeat.
Muscles Targeted:
Primary: Quadratus lumborum, latissimus dorsi, obliques.
Secondary: Erector spinae, rectus abdominis, adductors.
Benefits:
A very comfortable stretch.
Easy to modify based on your current flexibility level.
Quite relaxing and an excellent way to ease tension in your lower back and hips.
Tips:
Kneel on a folded mat for comfort.
Increase the stretch as you exhale and feel your muscles relaxing.
Gently ease your open armpit backward to deepen the stretch.
3. Triangle pose
The triangle pose is another yoga stretch that involves multiple lateral chain muscles, including your QL. The advantage of this pose is that you do it standing, which leads to a deeper quadratus lumborum stretch. However, it’s also a more challenging exercise, so make sure you master the gate pose before trying it.
Steps:
Stand with your feet slightly wider than shoulder-width apart. Your right foot should face forward, while your left foot should be turned out at a slight angle.
Raise your arms so they’re parallel to the floor, palms facing down.
Hinge at your right hip and lower your right hand down your right leg.
Simultaneously extend your left arm up toward the ceiling.
Hold this position for 30-60 seconds.
Switch sides and repeat.
Muscles Targeted:
Primary: Quadratus lumborum, latissimus dorsi, obliques.
Secondary: Erector spinae, rectus abdominis, adductors.
Benefits:
Provides a deep stretch for your QL and other waist and lower back muscles.
Performed standing, so no mat required.
Good for developing full-body positional awareness and balance.
Tips:
Experiment with the width of your stance to see what feels most comfortable.
Place your lowermost hand on a raised surface, i.e., a yoga block, to take the stress off your lower back.
Do this stretch on a non-slip surface, preferably barefoot, for stability and safety.
4. Seated QL stretch
Muscle tightness can strike at any time, but it’s most often caused by prolonged sitting, e.g., while you’re at work. Standing up and stretching is not always convenient – your boss may get upset! The good news is that you can stretch your QL without leaving your desk.
Steps:
Sit on the edge of your chair with your legs bent to 90 degrees, your shins vertical, and your feet planted firmly on the ground. Get into a good, upright posture.
Raise your right arm above your head and gently lean over to the left. Keep both sides of your butt on your chair.
Hold for 30-60 seconds, and then swap sides.
Muscles Targeted:
Primary: Quadratus lumborum, latissimus dorsi, obliques.
Secondary: Erector spinae, rectus abdominis.
Benefits:
An excellent exercise for office workers.
An ideal stretch for beginners.
An easy exercise for those with less mobility, e.g., older or chair-bound.
Tips:
This exercise works best on a chair without wheels.
You can also do this exercise while sitting on a bench or stool.
Sit on the floor with your legs crossed if you wish:
5. Child’s pose
Child’s pose gently eases your spine into a flexed position, stretching your quadratus lumborum and other lower back muscles. This exercise is excellent for releasing tension from your posterior chain. It is ideal for people with mild lower back tightness or pain. A few minutes in child’s pose is a great way to cool down after your workout.
Steps:
Kneel on all fours with your arms straight and shoulders above your hands. Your knees should be below your hips.
Ease your butt back and sit on your heels.
Lower your chest down toward the floor while keeping your arms extended in front of you.
Remain in this position for 1-5 minutes, going deeper as you feel your muscles relax.
Walk your fingers further away from you to deepen the stretch. You can also place your hands on yoga blocks.
Muscles Targeted:
Primary: Quadratus lumborum, erector spinae, latissimus dorsi.
Secondary: Gluteus maximus.
Benefits:
A gentle stretch for your QL and lower back.
A very relaxing, calming exercise.
An ideal exercise for cooldowns.
Tips:
Kneel on a folded mat for comfort.
Breathe slowly through your nose to maximize relaxation.
Experiment with different knee positions to find what’s most comfortable.
6. Knees-to-chest stretch
The knees-to-chest exercise provides a gentle stretch for your quadratus lumborum and other lower back muscles. Using your arms means you can increase the depth of the stretch as you feel your muscles start to relax.
Steps:
Lie on your back with your legs bent and feet close to your butt.
Lift your legs and hold on to the backs of your thighs.
Gently pull your knees toward your chest.
Hold for 30-60 seconds, and then relax.
Muscles Targeted:
Primary: Quadratus lumborum, erector spinae, latissimus dorsi.
Secondary: Gluteus maximus.
Benefits:
A gentle, relaxing stretch.
An ideal stretch for deconditioned exercisers.
Excellent for easing lower back tension and stress.
Tips:
Keep your shoulders and upper back on the floor.
Rest your head on a pillow or yoga block for comfort.
You can also do this exercise by lifting one leg at a time:
7. Dynamic standing QL stretch
Static stretches are great for easing muscle tension and increasing flexibility. Still, they tend to put your muscles to sleep and reduce contractility. As such, static stretches are ideal for cooldowns but less useful for warm-ups. This dynamic stretch won’t deactivate your muscles and is an excellent way to prepare your QL for your upcoming workout.
Steps:
Stand with your feet about shoulder-width apart, knees slightly bent. Hold your arms down by your sides.
Without twisting your hips or shoulders, lean to the left and stretch your hand down the outside of your leg.
Stand upright and repeat for 10-15 reps.
Switch sides and do the same number of reps on the right.
Muscles Targeted:
Primary: Quadratus lumborum, erector spinae, rectus abdominis.
Secondary: Hip abductors.
Benefits:
An excellent warm-up exercise.
Good for mobilizing your lower back before more intense activities.
An easy exercise to learn and ideal for novices and less fit people.
Tips:
Keep your knees slightly bent throughout.
Take care not to twist your hips or shoulders.
You can also do this exercise in an alternating fashion.
7 Best Quadratus Lumborum Strengthening Exercises
Weak quadratus lumborum muscles can increase your risk of back pain and injury. You need strong QLs to stabilize your lumber spine and prevent unwanted lateral movements.
While most people should train both sides of their QL, you may find that one side is weaker than the other. In this case, do an extra few reps or sets for the weaker side so it can catch up with the stronger side.
1. Bird dog
Bird dogs are a useful exercise that works your glutes, core, shoulders, and upper back. It’s also an effective quadratus lumborum strengthener. During this exercise, you must use your QL to stabilize your lumbar spine, which is one of its most critical functions.
Steps:
Kneel on all fours with your arms straight and shoulders above your hands. Your knees should be below your hips. Brace your core.
Extend one arm forward and your opposite leg backward until they’re parallel to the floor.
Return to the starting position and repeat on the other side.
Alternate arms/legs for a desired number of reps.
Muscles Targeted:
Primary: Rectus abdominus, transverse abdominus, quadratus lumborum, erector spinae, gluteus maximus.
Secondary: Hamstrings, deltoids.
Benefits:
A very spine-friendly exercise.
Teaches you how to brace your core while moving your arms and legs.
A great way to warm up before more demanding activities.
Tips:
Kneel on a folded mat for comfort.
Take care not to arch your lower back, as doing so increases your risk of injury.
Keep your core braced throughout.
2. 45-degree back extensions
This exercise provides a great way to overload your lower back and QL to make them stronger. However, to avoid injury, you must keep your spine in a neutral position, i.e., do not allow it to round. 45-degree back extensions are also an awesome glute and hamstring builder.
Steps:
Climb aboard the 45-degree back extension machine. Place your hips against the leg pad and your feet on the footplate. Bend your knees slightly.
Lean as far forward as your flexibility allows and without rounding your lower back.
Push your hips forward and raise your upper body back up so your shoulders, hips, and feet form a straight line.
That’s one rep – keep going!
Muscles Targeted:
Primary: Erector spinae, quadratus lumborum, gluteus maximus, hamstrings.
Secondary: N/A.
Benefits:
An effective way to overload your lower back muscles.
A very accessible exercise as most gyms have a 45-degree back extension machine.
A proven glute and lower back developer.
Tips:
Make this exercise harder by bolding a barbell in your hands or a weight plate across your chest.
You can also do this leg using one leg at a time to increase the overload on your glutes and hamstrings.
No 45-degree back extension machine? No problem – you can also do this exercise with your hips resting on a stability ball:
3. Side plank
Everyone knows that side planks work the obliques. But they’re also an excellent exercise for your quadratus lumborum. Best of all, because they’re isometric or static, they put very little stress on your spine, so they’re ideal for back pain sufferers.
Steps:
Lie on your side and rest on your lowermost forearm and elbow. Brace your core.
Lift your hips off the floor so your body is straight.
Hold this position for the required duration.
Lower your hips to the floor, roll over, and repeat on the other side.
Muscles Targeted:
Primary: Obliques, quadratus lumborum, rectus abdominis, erector spinae.
Secondary: Deltoids, hip abductors.
Benefits:
A very lower-back-friendly core exercise.
Good for increasing lateral stability and strength.
Do this exercise anywhere and anytime, as no equipment is required.
Tips:
Do not hold your breath during this exercise.
Rest your elbow/forearm on a folded exercise mat or foam pad for comfort.
Push your hips up toward the ceiling to maximally engage your QL and obliques.
4. Dumbbell side bend
The great thing about dumbbell side bends is that you can increase or decrease the weight to suit your fitness and how many reps you want to do. Use light weights for high reps to improve your endurance or heavy weights for low reps to build strength. With this exercise, you are the boss!
Steps:
Hold a dumbbell in one hand, arm down by your side.
Stand with your feet shoulder-width apart, knees slightly bent. Brace your core.
Lean sideways and lower the dumbbell down the outside of your leg.
Stand up straight and repeat.
Do the same number of reps on both sides.
Muscles Targeted:
Primary: Obliques, quadratus lumborum, rectus abdominis, erector spinae.
Secondary: Forearms.
Benefits:
An excellent way to overload your lateral chain muscles.
An accessible exercise as all you need is a single dumbbell.
A great exercise for building more muscular abs, a tighter waist, and a stronger lower back.
Tips:
Do NOT use two dumbbells, as doing so make the exercise much less effective.
Keep your hips and shoulders square throughout.
Use lifting straps if your grip fatigues before your core.
5. Single-arm farmer’s walk
Farmer’s walks are a popular conditioning exercise. It’s also one of the events often contested in strongman competitions. However, done using a single dumbbell or kettlebell, the farmer’s walk is also a tremendous quadratus lumborum exercise. Carrying an offset load forces you to use your QL to stabilize your lumber spine. Think of single-arm farmer’s walks as a moving side plank.
Steps:
Stand side-on to a dumbbell or kettlebell.
Squat down and grab your weight with the closest hand. Pull your shoulders down and back, and brace your core.
Stand up straight and then go for a walk around your training area.
Continue for the desired duration or until your grip starts to fail.
Lower the weight to the floor, swap sides, and repeat.
Muscles Targeted:
Primary: Obliques, quadratus lumborum, rectus abdominus, erector spinae, forearms.
Secondary: Upper traps, calves.
Benefits:
A highly functional exercise.
A great way to build a stronger grip and core.
An excellent calorie burner and cardio finisher.
Tips:
Keep your hips and shoulders level throughout your set.
Do this exercise with any heavy implement, including a barbell.
You can also do this exercise with your weight above your head – the waiter’s walk:
6. Kettlebell suitcase deadlift
No space to do farmer’s walks? We hear you! The good news is that you can get all the benefits of farmer’s walks without taking a single step. Suitcase deadlifts work in much the same way, but you do them on the spot. This is an ideal exercise for anyone who works out in a small gym.
Steps:
Stand side-on to a kettlebell. Your feet should be roughly shoulder-width apart.
Squat down and grab your weight with the closest hand. Pull your shoulders down and back, and brace your core.
Drive your feet into the floor and stand up, taking care not to round your lower back or allow your hips to rise faster than your shoulders. Do not lean to the side or twist your hips or shoulders.
Lower the weight back to the floor, reset your core, and repeat.
Continue for the desired number of reps, and then swap sides.
Muscles Targeted:
Primary: Quadriceps, hamstrings, gluteus maximus, obliques, quadratus lumborum, forearms.
Secondary: Upper traps, biceps.
Benefits:
A very functional core, forearm, and lower body exercise.
A great way to fix left-to-right strength imbalances.
A home gym-friendly alternative to conventional deadlifts.
Tips:
Use gym chalk on your hands to stop them from slipping.
You can also do this exercise with a dumbbell or barbell.
Place your kettlebell on a raised platform if you find it hard to bend over and reach the floor without rounding your lower back.
7. Medicine ball rotational slam
Most quadratus lumborum exercises are performed slowly and smoothly. While that’s fine for building endurance and strength, it’s less useful for developing muscle power, which is your ability to generate force quickly and is an integral part of most sports. Power training should be part of your workouts if you’re an athlete. Medicine ball rotational slams are one way to build a more powerful QL.
Steps:
Stand with your feet shoulder-width apart, knees slightly bent. Hold a medicine ball in front of you. Brace your core and set your shoulders.
Raise your arms above your head and, using a twisting motion, throw the ball down at the floor to the outside of one foot.
Catch the ball as it bounces, lift it up, and hurl it down to the other side.
Continue for the desired number of reps.
Muscles Targeted:
Primary: Rectus abdominis, obliques, quadratus lumborum, latissimus dorsi.
Secondary: Deltoids, hip flexors.
Benefits:
An explosive exercise for building core rotational power.
A fun, satisfying workout.
An excellent stress reliever.
Tips:
Do not use a gel-filled medicine ball, as they’re prone to splitting.
Rise up onto your toes and put your entire body into each throw.
Wind up each throw using a circular arm action to increase core and QL engagement.
FAQs
Do you have a question about quadratus lumborum stretching or strengthening exercises? No problem, because we’ve got the answers!
1. How do I isolate my QL muscle?
Whether you are stretching or strengthening, you cannot isolate the quadratus lumborum. Invariably, it works in conjunction with several other muscles, including your obliques, rectus abdominis, and erector spinae.
So, when you try to stretch or strengthen your QLs, you’ll also be working other muscles. This is no bad thing, as that’s how the QL works in nature – with other muscles and never alone.
2. How long should I hold QL stretches for?
The time you hold a stretch depends on what you are trying to achieve. For example, if you are stretching to maintain your current flexibility, you only need to hold a stretch for 15-20 seconds. This should be enough to prevent your flexibility from decreasing.
However, if you want to improve your flexibility, you need to hold your stretches for longer, usually 30-60 seconds. During this time, you should try to increase the depth of your stretch as you feel your muscles relax.
You don’t need to choose between these two durations. You may have one QL tighter than the other, so you could do short maintenance stretches on one side and longer developmental stretches on the other to fix the imbalance.
3. Will training my QL make my waist thicker?
The quadratus lumborum is a relatively long, slender muscle. As such, while training it will produce some hypertrophy or growth, it won’t make your waist thicker. If anything, a better-developed QL with give you a tighter waist.
Too much body fat is a far more common reason for having a thick waist. Too much muscle mass around the midsection is rarely a problem.
4. Some of these QL exercises hurt my back – what gives?
The quadratus lumborum muscles are located on the sides of your lower back. As such, overstretching can cause lower back pain. Also, exercises that affect your QL invariably involve your lower back.
If any of these exercises hurt, you should stop immediately, check that you are doing them correctly, and gently try again. Should the pain persist, skip the movement that bothers you can try something else.
Finally, if you’re still experiencing QL or lower back pain, get it checked out by a medical professional, as it could require treatment. Never train through pain, as that will probably make it worse.
5. Do I really need to stretch or strengthen my QL?
When it comes to prehab and rehab stretching and strengthening, you should choose your exercises based on your needs. For example, if your QL feels tight, limits your lateral movements, or causes pain, stretching could help. In contrast, if you lack lateral stability, you probably need to strengthen your QL.
However, if you have no such issues, you may not need to spend time on your QL. It’s probably getting sufficient indirect work from the rest of the exercises in your training program.
Wrapping Up
While the quadratus lumborum is a lesser-known back muscle, it’s still important. A weak QL can cause lumbar instability and dysfunction. In contrast, a tight QL can affect your posture and cause pain.
Thankfully, stretching and strengthening the QL is relatively simple, and the exercises for both of these purposes are simple and easy to perform. Many can be done at home as they require no special equipment.
But before you head off to stretch or strengthen your QL, you need to understand that it may not need any extra work. If you have no noticeable tightness or weakness in this area, your QL is probably strong and flexible enough.
That said, if you do need to pay more attention to your quadratus lumborum, you now know the best exercises to use.

Workout Split For Women: The Ultimate Guide To Get Fit and Fabulous
Over the last decade, women have been cozying up to weight training. However, this has led us into a unique situation; the ladies look like deers caught in headlights as soon as they enter the weight room.
Although girls no longer need to be convinced to start lifting weights, only a handful of these women follow a structured workout split. Performing a few dumbbell curls one day, a couple of sets of squats the next day, and a little of everything every other day isn’t going to do you any good.
Finding the right workout split can be daunting. Furthermore, stepping inside the free-weight section of a gym for a newbie can be overwhelming, especially if they have no idea what they are doing.
A balanced training program is key to achieving your dream figure. Furthermore, the ideal workout regimen for an individual can change depending on their preferences, schedules, goals, and experience levels. Following an incompatible training split increases your risk of injury.
In this article, we dive into the meaning of workout splits, the factors and tips to consider while choosing a workout split for women, its benefits, and the five best workout splits for women at different experience levels. We have a lot to cover. So, sit tight.
What are Workout Splits?
A workout split refers to how you divide your training into different muscle groups or body parts. Many exercisers avoid picking a workout split as they find it too restrictive. Although a workout split requires you to train a specific muscle group on a particular day of the week, you are free to choose the exercises you perform in each training session.
Notably, programming a workout is best left to advanced lifters or personal trainers. Each muscle consists of different heads that must be trained from multiple angles for optimal growth. Performing similar movements can lead you to a muscle and strength plateau. For example, the deltoid muscle has three heads — anterior, lateral, and posterior. If you only perform shoulder press and front raise exercises in your training regimen, you’ll have substandard lateral and posterior deltoid head development. Does this sound like too much work? Don’t worry; we have included a sample workout plan for overall muscle and strength development with each workout split.
Many people think the ‘bro split’ is the only workout program. A bro split includes training chest on Mondays, back on Tuesdays, shoulders on Wednesdays, and so on. While there is nothing wrong with this split, most exercisers can get better results by following a more focused workout split.
For example, ladies with lagging lower bodies would want to train their legs twice a week. However, the bro split has no provisions for accommodating a second leg workout. An upper and lower body workout split will be a better fit in this case.
Benefits of Following a Structured Workout Split For Women
Here are the advantages of selecting a structured workout split for women:
Makes Your Workouts More Efficient
Many lifters treat the gym as a restaurant, and their training split as an à la carte menu. They enter the iron paradise without a plan and tackle their workout on the fly; these lifters perform the exercises that feel the most comfortable and put the least strain on their muscles. As you could have guessed, these folks see little to no progress and are most likely to drop off.
A structured workout split leaves nothing to chance. Here, you plan your workouts weeks in advance. Everything from the exercises, sets, and reps is determined before entering the gym. Having an action plan ensures you make the most of your time in the gym.
Built-in Progressive Overload
Progressive overload is indispensable if you want to make strength or muscle gains. It includes placing ever-increasing stress on your muscles by increasing the intensity and volume of your workouts. You could achieve this by doing more sets, reps, and exercises, reducing rest between sets, or incorporating advanced training principles in your workouts, such as super sets, drop sets, intra-set stretching, etc. [1]
A balanced workout split will help progressively overload your muscles and reduce your risk of hitting a plateau by shocking your muscles with varying training intensity and volume. Furthermore, an efficient workout split also allows your muscles to rest and recuperate between workouts, reducing your risk of injury.
Fix Muscle and Strength Imbalances
An effective workout split can aid in fixing muscle and strength imbalances by allowing you to work on your weaknesses multiple times a week. At the same time, it will help you polish your strengths.
Monitor Progress
You must stick to a workout split for at least 12 weeks before arriving at conclusions about its effectiveness. Since you’ll perform the same exercises, number of sets, and reps in each workout for the entire duration, it’ll make it convenient for you to track your progress.
Additionally, following a workout split and tracking your progress will help you stay accountable. Sharing your progress with your friends and family can be a potent motivator.
Keeps You Interested
Choosing a workout program is like choosing a life partner — you want someone who compliments your strengths and weaknesses.
Although the workout splits below define the exercises you’ll perform in each training session, you are free to perform their variations instead. You must, however, ensure that the replacement exercises target the same muscle groups. For example, you could do the cable side lateral raise instead of the dumbbell side lateral raise. You must, however, not replace side lateral raises with shrugs.
Knowing the exercises you’ll perform in a workout in advance can allow you time to prepare for a workout, which can improve your performance. Plus, tracking your progress will keep you hooked to your workout split.
5 Best Workout Splits For Women
Depending on your current physique and experience level, you can choose a workout split that aligns with your goals. Each workout split has its unique benefits and allows you to focus on particular muscles to fix imbalances and take you to your objectives.
Below, you’ll find five workout splits for women that involve training up to three muscle groups per training session twice a week.
Full-Body Workout Split For Women
The basic full-body workout split for women is a two-day-a-week training regimen. It is perfect for beginners and ladies with busy schedules who can only make time for a couple of weekly training sessions.
In the full-body training split, you could work all your muscle groups in a single workout or divide them into two sessions.
Since this workout split involves training most of your muscle groups in a single workout, you must follow a HIIT (high-intensity interval training) method for these workouts to get a lot of work done in a short period. Women aiming to shed weight must engage in full-body cardio exercises.
Day 1
Full-Body Workout
Day 2
Rest
Day 3
Rest
Day 4
Full-Body Workout
Day 5
Rest
Day 6
Rest
Day 7
Rest
As you gain more experience, you could go from performing two weekly full-body training sessions to doing four weekly workouts. Perform variations of the exercises listed in the sample workout below on the two additional days to add variety to your training regimen.
Full-Body Workout 1:
Beginners must seek expert help to drill the movements. It will help you make the most of the exercises while limiting your risk of injury.
Exercise
Sets
Reps
Barbell Bench Press
3
8-12
Barbell Bent-Over Row
3
8-12
Dumbbell Shoulder Press
3
8-12
Barbell Biceps Curl
3
8-12
Cable Triceps Extension
3
8-12
Barbell Squat
3
8-12
Crunch
3
8-12
Full-Body Workout 2:
Since these workouts are programmed to induce hypertrophy, avoid resting for more than 60 seconds between sets, as it can significantly hamper your training intensity.
Exercise
Sets
Reps
Dumbbell Chest Fly
3
8-12
Dumbbell Deadlift
3
8-12
Barbell Skull Crusher
3
8-12
Dumbbell Side Lateral Raise
3
8-12
Dumbbell Hammer Curl
3
8-12
Barbell Sumo Squat
3
8-12
Hanging Leg Raise
3
8-12
Full-Body HIIT Cardio Workout
The HIIT cardio workout below includes nine exercises; perform two rounds of this circuit. You must perform each exercise for 45 seconds. Rest 15 seconds between exercises. Plus, you are allowed a two-minute rest after completing a round.
Exercise
Time (in seconds)
Rest (in seconds)
Lunge
45
15
Push-Up
45
15
Burpee
45
15
Star Jump
45
15
Leg Raise
45
15
Squat Jump
45
15
Bicep Curl
45
15
Lateral Shuffles
45
120
Use appropriate dumbbells for exercises like bicep curls and lunges. Feel free to use additional resistance in the squat jump. However, you must ensure you are not compromising your form to lift heavy weights.
Benefits of Full-Body Workout Splits
Here are the advantages of doing a full-body workout split for women:
The full-body workout split is excellent for beginners as it helps them acclimatize to weight training.
This workout regimen is great for ladies on a tight schedule, as the most basic version of the full-body split requires hitting the gym twice a week.
Since you’ll do only one exercise per muscle group, we’ll mostly stick to compound lifts for this workout program. Besides helping you build muscle and strength, multi-joint exercises improve your overall functionality.
Training twice weekly gives your body enough time to rest and recuperate between workouts.
Drawbacks of Full-Body Workout Splits
Here are the cons of doing a full-body workout split for women:
As you’ll be training all your muscles in a single workout, it can be incredibly exhausting, especially as you graduate to training four days a week.
Full-body strength training workouts can take longer to complete. Expect to spend 60-120 minutes in the gym.
The full-body workout split is not the best for fixing strength and muscle imbalances unless you want to boost your training volume significantly.
Upper Lower Body Workout Split For Women
The upper lower body is the perfect next step for ladies wanting to move up from a two-day training regimen. It is a four-day workout split that involves training half of your body on a single day.
Notably, you should ideally start the training week by training your weaker half. Lifters with lagging lower bodies should start the week with a leg workout instead of hitting an upper body training session.
Many lifters go all-out on their stronger muscle group training day, leaving them tired and sore for their weaker muscle group workouts. Since this is a four days a week workout split, you can also rest after each workout to allow your muscles enough time to rest and recuperate between training sessions.
Day 1
Upper Body
Day 2
Lower Body
Day 3
Rest
Day 4
Upper Body
Day 5
Lower Body
Day 6
Rest
Day 7
Rest
As this workout regimen involves training all your muscles twice a week, you shouldn’t add more training days to this training split. Instead, you could increase your training volume and intensity to get the best bang for your buck.
A study found that an upper and lower body workout split is more effective at helping you build muscle strength and size over 10 weeks than a full body workout regimen done thrice a week. [2]
Upper Body Workout:
The upper and lower body workouts primarily consist of functional (multi-joint) exercises to maximize your muscle and strength-building potential. Focus on contracting your muscles with each rep to induce hypertrophy.
Exercise
Sets
Reps
Barbell Bench Press
3
8-12
Dumbbell Bent-Over Row
3
8-12
Arnold Press
3
8-12
Barbell Biceps Curl
3
8-12
Close-Grip Bench Press
3
8-12
Russian Twist
3
8-12
Lower Body Workout:
You could change the order of the exercises depending on your preferences. If you have lagging calves, we recommend starting your leg workout with the standing calf raise. Use a weight that helps you achieve muscle failure between the eighth and 12th rep.
Exercise
Sets
Reps
Barbell Squat
3
8-12
Walking Lunge
3
8-12
Romanian Deadlift
3
8-12
Goblet Squat
3
8-12
Leg Curl
3
8-12
Standing Calf Raise
3
8-12
Benefits of Upper Lower Body Workout Splits
The pros of the upper-lower body workout split include the following:
It allows you to train all your muscle groups twice a week.
Training your upper and lower body muscles separately can help you fix muscle and strength imbalances, improving your overall physique proportions and symmetry.
The upper-lower body workout split will help you build a solid foundation. You could easily pivot to a powerlifting or bodybuilding-focused workout program after following this workout split for 12 weeks.
This workout split for women allows sufficient recovery time between workouts, which can fast-track results and reduce your risk of injury.
Training four days a week allows you the flexibility to program your workouts according to your schedule. You could take an off day after each workout or reshuffle the training days.
Drawbacks of Upper Lower Body Workout Splits
The cons of the upper-lower body workout split include the following:
The upper-lower body workout split is volume heavy since you’ll be training all your muscles twice weekly, which is not the best for newbie lifters.
On the other hand, although you’ll be training all your muscles twice a week, the training volume for each muscle group can be limiting.
Since you’ll be training half of your body in a single workout, these workouts can take a lot of time to complete. Expect to spend 60-120 minutes in the gym during your upper-lower body workouts.
Push-Pull Workout Split For Women
The push-pull workout split for women is the perfect middle ground between full-body workouts and upper-lower body workouts. Gym exercises can be broken into two main categories — push and pull.
As the name suggests, the pushing exercises involve pressing weights away from your body, for example, the bench press, overhead triceps extension, and leg extension. On the flip side, the pulling exercises include pulling the weights toward your body, such as the deadlift, biceps curl, and seated cable row.
Push-pull workouts are popular among bodybuilders and powerlifters as they help focus on a single movement pattern. This workout split can help you achieve muscle-ripping pumps and ensure you’ve got nothing left in the tank by the end of a workout.
Day 1
Push
Day 2
Pull
Day 3
Rest
Day 4
Push
Day 5
Pull
Day 6
Rest
Day 7
Rest
Although the push-pull workout split is a four-day training program, you could increase your training volume by adding a couple of workout sessions to the split — one for each movement pattern. Also, you could increase your training volume gradually by alternating between an additional push and pull workout for the initial 4-6 weeks.
Push Workout
In the push-pull workouts, the first two exercises of the training schedule are the big lifts. The remaining four to six exercises are considered accessory lifts, which help improve your performance in the main lifts.
The ladies training for hypertrophy should stay in the 8-12 rep range and perform three sets with a moderate weight. On the other hand, lifters trying to maximize strength should do 3-5 sets of 1-5 reps with 80-90% of their one-rep max. [3]
Exercise
Sets
Reps
Squat
3
8-12
Bench Press
3
8-12
Cable Triceps Extension
3
8-12
Dumbbell Chest Fly
3
8-12
Machine Shoulder Press
3
8-12
Seated Calf Raise
3
8-12
Keep the main lifts, such as the squat, bench press, and deadlift, constant throughout the 12 weeks. However, you could change the accessory lifts each week to keep your workouts interesting.
Pull Workout
The deadlift is the main lift in the pull workout. All the other movements in this workout are accessory lifts. We recommend using weightlifting accessories, such as a weightlifting belt, lifting straps, wrist wraps, and knee sleeves, in these workout splits, as they help maximize your performance and reduce your risk of injury.
Exercise
Sets
Reps
Deadlift
3
8-12
Wide-Grip Lat Pulldown
3
8-12
Barbell Biceps Curl
3
8-12
Lying Leg Curl
3
8-12
Dumbbell Romanian Deadlift
3
8-12
Dumbbell Side Lateral Raise
3
8-12
Benefits of Push-Pull Workout Splits
Using the push-pull workout split entails the following benefits:
The push-pull workout split for women is great for building strength and muscle mass. Change the number of reps on the three big lifts (squat, bench press, and deadlift) to 1-5 and the number of sets to five to focus on building strength.
Training a specific movement pattern can help you achieve a better mind-muscle connection, improving hypertrophy.
Since this workout split involves training the same muscle group at least twice, the high volume will speed up your results.
This training split is great for powerlifters that want to improve their performance on the big three lifts.
It allows you to further boost your training volume by doing up to two more weekly workouts.
The push-pull workouts involve a healthy balance of compound and isolation exercises, which can help develop a balanced, proportionate, and conditioned physique.
The four-day push-pull training split allows you ample time to recover between workouts.
Drawbacks of Push-Pull Workout Splits
Using the push-pull workout split entails the following disadvantages:
Since this workout split involves compound and isolation exercises and requires training multiple muscle groups, the push-pull workouts can take longer to complete than the conventional workouts.
The push-pull split is not ideal for beginners.
This training split can be exhausting, as the push workouts include high-demanding exercises, such as the bench press, squat, and overhead shoulder press in the same workout.
Push, Pull, Legs Workout Split For Women
This training split takes the push-pull workout program up a notch. Although the push-pull routine was originally designed for powerlifters, many lifters didn’t appreciate training for the bench press and squat on the same day; hence, the push, pull, and leg workout split was born.
The push, pull, and leg split is a six-day workout program. It increases the training volume of the basic push-pull regimen by a massive 50%. This training split is best suited for advanced female lifters, as the trainers will only get one day to recover from their workouts.
Although you could do the push, pull, and leg split three days a week, you would have to increase the volume and intensity significantly, which will not only make the workouts more exhausting but would also considerably increase your risk of injury.
Day 1
Push
Day 2
Pull
Day 3
Legs
Day 4
Push
Day 5
Pull
Day 6
Legs
Day 7
Rest
Since you have two training sessions in this workout split for each muscle group, you don’t have to do the three big lifts in each workout. Do them at the beginning of the training week and resort to accessory movements for the remaining three workout sessions.
Pay close attention to the number of sets and reps in the workouts below.
Push Workout 1
The first exercises of the first three training days of the week will be strength-focused, meaning you’ll be doing one to five reps of the exercises for three to five sets using 80-90% of your one-rep max. You must only perform these big lifts with a spotter.
Exercise
Sets
Reps
Bench Press
3-5
1-5
Incline Dumbbell Press
3
8-12
Cable Crossover
3
8-12
Behind-the-Neck Shoulder Press
3
8-12
Weighted Dips
3
8-12
Lying Leg Raise
3
8-12
Rest for three to five minutes for the strength-focused exercises. You must, however, limit the rest between sets to 60 seconds for the remaining lifts to ensure optimal training intensity for inducing hypertrophy.
Pull Workout 1
You are allowed a five-minute rest after the strength-focused exercise to reset and prepare for the high-rep workout. Track your workouts (sets, reps, and weights) in a journal to ensure you’re hitting your goals and are progressively overloading your muscles in each training session.
Exercise
Sets
Reps
Deadlift
3-5
1-5
Dumbbell Curl
3
8-12
Lat Pulldown
3
8-12
Bent-Over Barbell Row
3
8-12
Dumbbell Side Lateral Raise
3
8-12
Upright Row
3
8-12
Leg Workout 1
You could rejig the exercises in this workout if you prefer doing quad-focused accessory lifts before the hamstring-focused movements.
Exercise
Sets
Reps
Squat
3-5
1-5
Leg Extension
3
8-12
Leg Curl
3
8-12
Romanian Deadlift
3
8-12
Leg Press
3
8-12
Leg Press Calf Raise
3
8-12
Push Workout 2
Use advanced training principles, such as super sets, drop sets, and intra-set stretching in the second half of the push, pull, and leg training split to push up your training intensity. You must use a weight that allows you to perform each exercise with a picture-perfect form.
Exercise
Sets
Reps
Dumbbell Bench Press
3
8-12
Decline Barbell Press
3
8-12
Pec Deck Fly
3
8-12
Arnold Press
3
8-12
Barbell Skull Crusher
3
8-12
Cable Crunch
3
8-12
Pull Workout 2
We encourage using different hand grips on these exercises each week (supinated, pronated, and neutral) to train your muscles from different angles. It will help induce hypertrophy and keep your workouts interesting.
Exercise
Sets
Reps
Dumbbell Deficit Deadlift
3
8-12
Cable Biceps Curl
3
8-12
Seated Cable Row
3
8-12
Inverted Row
3
8-12
Dumbbell Front Raise
3
8-12
Barbell Shrug
3
8-12
Leg Workout 2
Feel free to swap the accessory exercises in the second workouts for the week to address any lagging muscle groups.
Exercise
Sets
Reps
Box Squat
3
8-12
Walking Lunge
3
8-12
Leg Curl
3
8-12
Stiff-Legged Deadlift
3
8-12
Hip Thrust
3
8-12
Standing Calf Raise
3
8-12
Benefits of Push-Pull-Legs Workout Splits
Performing the push-pull-legs training split has the following pros:
It is one of the best workout splits for powerlifting enthusiasts. Furthermore, bodybuilders can use this 12-week program to improve their overall strength without compromising on their muscle mass.
This six-day training split allows you to focus on each muscle group twice a week.
A high-volume and intensity training regimen that is incredibly effective for breaking through plateaus.
The push-pull-legs training split can accommodate many modifications to suit the lifter.
Drawbacks of Push-Pull-Legs Workout Splits
Performing the push-pull-legs training split has the following cons:
A six-day training regimen that is best left to advanced lifters.
Not enough recovery time, especially for lifters pushing their limits on this training regimen.
The push-pull-legs workout split can take longer to complete than all the other training splits listed in this article.
Bro-Split Workout Split For Women
We know what you are thinking. Yes, we were kind of dissing the bro-split at the beginning of this article. However, if your goal is to build muscle mass, you cannot go wrong with this training split.
The standard bro-split is a six-day training program that includes training each muscle group once weekly. It allows you to train each muscle with ample volume and intensity to induce hypertrophy.
You could modify the workout split depending on your personal goals and preferences. For example, ladies with weaker lower bodies should begin their training week with a leg workout instead of a chest session. Restructure your workouts according to your needs.
Day 1
Chest
Day 2
Back
Day 3
Shoulders
Day 4
Biceps
Day 5
Triceps
Day 6
Legs
Day 7
Rest
Avoid training two large muscle groups on consecutive days, such as legs and back. Have at least 48 hours between large muscle group workouts to ensure optimal rest and recovery. It also reduces your risk of injury.
Chest Workout
Many lifters leave gains on the table by following a restricted range of motion. It limits your muscle fiber engagement and leads to suboptimal gains. Use a weight that allows you to follow a full ROM.
Exercises
Sets
Reps
Barbell Bench Press
3
8-12
Incline Dumbbell Press
3
8-12
Decline Dumbbell Fly
3
8-12
Dips
3
8-12
Cable Crossover
3
8-12
Decline Crunch
3
8-12
Back Workout
During your back workouts, focus on driving through your elbows. Pulling the weight using your biceps can remove tension from your back and put it on your guns. Use a false (thumbless) grip where possible to limit biceps engagement. You could also experiment with using lifting straps to limit forearm stimulation.
Exercises
Sets
Reps
Deadlift
3
8-12
Bent-Over Barbell Row
3
8-12
Lat Pulldown
3
8-12
Seated Cable Row
3
8-12
Hyperextension
3
8-12
Seated Calf Raise
5
8-12
Shoulders Workout
You must include exercises for all three shoulder heads (anterior, lateral, and posterior) and the trapezius muscle to ensure overall growth.
Exercises
Sets
Reps
Military Press
3
8-12
Dumbbell Side Lateral Raise
3
8-12
Barbell Front Raise
3
8-12
Bent-Over Rear Delt Fly
3
8-12
Barbell Shrug
3
8-12
Cable Crunch
3
8-12
Biceps Workout
You’ll use pronated, supinated, and neutral grips in the biceps workout to ensure optimal biceps brachii, brachialis, and brachioradialis development. The forearm exercises at the end of the workout ensure you don’t leave any stone unturned.
Exercises
Sets
Reps
Barbell Biceps Curl
3
8-12
Alternating Hammer Curl
3
8-12
Cable Reverse Curl
3
8-12
Machine Preacher Curl
3
8-12
Concentration Curl
3
8-12
Wrist Curl
3
8-12
Reverse Wrist Curl
3
8-12
Triceps Workout
The triceps workout in the bro-split targets all three triceps heads (long, lateral, and medial) for building horseshoe triceps.
Exercises
Sets
Reps
Cable Triceps Pushdown
3
8-12
Dumbbell Overhead Extension
3
8-12
Dumbbell Kickback
3
8-12
EZ Bar Skull Crusher
3
8-12
Reverse-Grip Triceps Pushdown
3
8-12
Cable Wood Chopper
3
8-12
Legs Workout
Since this training session involves performing the squat and deadlift, you’ll have to go extra hard on this one. Ensure your pre-training nutrition is on point to make the most of these workouts.
Exercises
Sets
Reps
Barbell Squat
3
8-12
Leg Extension
3
8-12
Leg Curl
3
8-12
Barbell Walking Lunge
3
8-12
Romanian Deadlift
3
8-12
Standing Calf Raise
5
8-12
Benefits of a Bro-Split Workout Regimen
Sticking to the bro-split allows you to:
This workout split for women allows you to focus on a single muscle group in a training session, which can help boost your strength and muscle mass gains.
The bro-split is highly customizable and allows you to modify it according to your needs.
Since this workout focuses on a single muscle, it requires lesser time to complete than the multiple muscle group training sessions.
This is a versatile training split that can be used by beginners and advanced athletes alike.
Drawbacks of a Bro-Split Workout Regimen
The bro-split regimen has the following cons:
Since you’ll be training six days a week, it gives your muscles limited time to recover.
Folks with a busy schedule might have difficulty sticking to the six days a week training split.
Factors To Consider While Choosing a Workout Split For Women
You must consider the following factors before choosing a workout split:
Experience Levels
You must always choose a training split that is fitting for your experience level. For example, beginners should stay away from the push, pull, and leg training split and instead favor the full-body training regimen.
Further; you must adjust your training intensity and volume based on your experience. Choosing a training split based on your experience level helps streamline your progress and reduces your risk of injury in the gym.
Goals
Setting a goal before starting a training program gives you a road map. Lifters that want to build strength should opt for the push, pull, and legs training split, ladies that want to build a chiseled figure should go for the bro-split, and the women that want to hit the gym for overall fitness should stick to the full-body workouts.
Time
You should choose a training program that will fit into your lifestyle. Choosing a workout split that necessitates you to go to the gym six times a week, but you can only fit in four workouts per week is a recipe for failure. You will likely lose motivation and drop out before achieving your fitness goals.
Focus Muscle Groups
Many exercisers join a gym to improve a particular muscle group. Some ladies want a bigger booty, whereas others might want shapely arms. If you want bigger muscles, you’ll be better off choosing a training split that allows you to focus on a particular muscle group, like the bro split.
Other training splits that involve training a muscle group twice weekly, such as the push-pull regimen, can also come in handy for fixing muscle and strength imbalances.
Tips For Workout Split For Women
The following tips will help you maximize your results:
Be Open to Trial and Error
Even after you spend days reviewing the pros and cons of a workout split, the program you choose might not work for you — which is perfectly fine. Choosing the right workout split requires trial and error. Give your training split 12 weeks to work its magic. If you’re unhappy with your results, move on to something different. Ensure that you implement the learning from the previous workout split into the new one.
Nutrition and Recovery
Whether you want to build strength or carve a Greek goddess-like figure, you must back up your workout regimen with a balanced and proven nutrition and recovery program. Follow a macronutrient-focused diet to ensure you are meeting your daily protein, carbs, and fat goals. Ladies trying to gain muscle should stay in a calorie surplus, whereas those trying to shed the spare tire should be in a calorie deficit.
Plus, you must ensure you are giving your muscles enough time to rest and recuperate from your workouts. Sleep seven to eight hours each night to ensure you are properly rested for your upcoming workouts. We recommend using sports nutrition supplements to speed up your recovery process between workouts. Alternatively, you could lower your training frequency if you experience chronic muscular fatigue or soreness.
Seek Guidance
Starting a workout split can be intimidating, especially for beginners. Plus, performing the exercises with an incorrect form can increase your risk of injury. Hiring a personal trainer can help shorten your learning curve and fast-track your progress.
Stay Consistent
Consistency is key in any training program. You must stick to a suitable workout split for at least 12 weeks to achieve your desired results. Avoid skipping training sessions unless absolutely necessary.
Warm Up and Cool Down
Spend 5-10 minutes performing a mix of dynamic and static stretching exercises before each training session. It helps improves your flexibility and mobility and reduces your risk of injury. Furthermore, spend 5-10 minutes cooling down after a workout to kickstart your recovery process.
More Workout Splits:
FAQs
What is the ideal workout split for women?The ideal workout split will depend on your training goal, experience, time availability, and if you have any muscle groups that you want to focus on. With that said, beginner trainers will be better off starting with a full-body workout regimen; intermediate lifters can try the push-pull workout split, and advanced lifters should go for the push, pull, and legs regimen.
Can you alter a workout split?You could switch the exercises in the workout splits mentioned above to better suit your training needs. However, we advise against tinkering with the foundations of a workout split. For example, you should not combine the push and pulls workouts in the push, pull, and leg routine.
Which workout split for women is best for weight loss?Ladies trying to shed excess body fat should opt for the full-body HIIT workout listed in this article. HIIT workouts force your body to use energy from fat instead of carbs, making losing fat more efficient.
Wrapping Up
Congratulations, ladies! You are now equipped with everything you need to know to pick the most effective workout split for yourself and begin your journey to get fit and fabulous. We have also included a sample workout with each workout split, making starting your workout regimen as frictionless as possible.
Nonetheless, fine-tuning a training split to fit your needs might require some trial and error. Stay patient and consistent; work hard, and the results will follow. Best of luck!
References
Yue FL, Karsten B, Larumbe-Zabala E, Seijo M, Naclerio F. Comparison of 2 weekly-equalized volume resistance-training routines using different frequencies on body composition and performance in trained males. Appl Physiol Nutr Metab. 2018 May;43(5):475-481. doi: 10.1139/apnm-2017-0575. Epub 2017 Dec 7. PMID: 29216446.
Lasevicius T, Schoenfeld BJ, Grgic J, Laurentino G, Tavares LD, Tricoli V. Similar Muscular Adaptations in Resistance Training Performed Two Versus Three Days Per Week. J Hum Kinet. 2019 Aug 21;68:135-143. doi: 10.2478/hukin-2019-0062. PMID: 31531139; PMCID: PMC6724585.
Krzysztofik M, Wilk M, Wojdała G, Gołaś A. Maximizing Muscle Hypertrophy: A Systematic Review of Advanced Resistance Training Techniques and Methods. Int J Environ Res Public Health. 2019 Dec 4;16(24):4897. doi: 10.3390/ijerph16244897. PMID: 31817252; PMCID: PMC6950543.
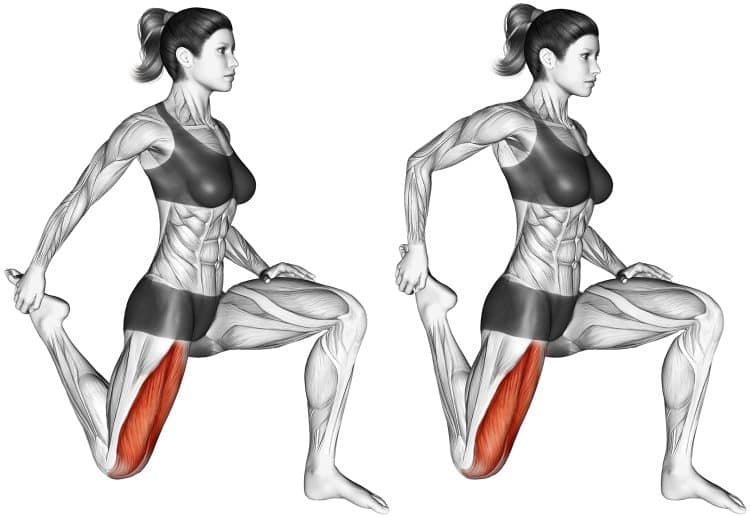
Quadriceps Stretch Guide: How-To, Muscles Involved, Benefits, and Variations
Pesty tight quads can wreak havoc not just on the front thigh but the effects can also be felt in the lower back, knees, and even the hip flexors. It’s an issue that many of us ignore but the good news is the quadriceps stretch is one way to prevent, combat, and reverse those ailing pains and aches.
Consisting of five individual muscles, the quadriceps are a complex, yet powerful muscle group crucial for performance, posture, and well-being. So you don’t want to be caught with stiff quads, and it’s even more imperative with our modern minimally active lifestyles.
Check out our prime quadriceps example, and the best variations for all experience levels.
Muscles Involved During Quadriceps Stretches
While not a muscle-building or strengthening exercise, the goal of quadriceps stretch is to create healthier and more functional leg muscles. Here’s some anatomy on the quadriceps thigh muscles.
Quadriceps
The quadriceps is a significant muscle group covering the front part of your upper leg between the hips and knees. Although, the quad fibers cross both of the aformentioned joints, of which the quads muscle group performs functions such as knee extension and hip flexion.
It was previously believed that the quadriceps was made up of four individual heads, hence the word ‘quad’. However, more recently, a fifth muscle was identified as part of the quadriceps.
Five quad muscles
Rectus femoris
Vastus lateralis
Vastus medialis
Vastus intermedius
Tensor of the vastus intermedius
How To Do The Quadriceps Stretch
While it may appear easy in a video instructional, or seem simple in your mind, the quadriceps stretch is actually a little challenging, but worth the effort.
Below we’ll show you one version of the quadriceps stretch, but keep in mind there are several ways to achieve a nice stretch in your anterior thigh muscles.
Steps
Drop down on your knees and keep your body tall and upright (tall kneeling position).
Keep one knee down, then bring the other leg forward at a 90-degree angle, and plant your foot flat on the floor.
Reach behind and grab your rear foot, then pull it into your butt. Keep your body upright, and don’t lean forward. Hold this position for 10 seconds, then relax and repeat a few more times. You should feel a nice stretch in your quadriceps!
Don’t forget to alternate your leg position, and make sure to stretch both sides equally.
Watch the following video example to see a demonstration of the quadriceps stretch.
Tips
Use a looped resistance band, belt, or similar object if flexibility is an issue.
Try to keep your body upright or only slightly leaned forward, but do not lean too far forward.
If this variation doesn’t suit you, try some of the other variations.
This Exercise
Target Muscle Group/s: Quadriceps
Type: Stretch
Mechanics: Isolation
Equipment: Cushioned surface, exercise mat
Difficulty: Beginner/Intermediate
Benefits of Quadriceps Stretch
Stretching, in general, has many proven benefits. In fact, it’s necessary that we all do some form of stretching.
Reverse tight quads from prolonged sitting
With our modern, tech heavy lifestyles, we do more sitting than ever before. Too much and we risk the quads becoming tight and even shortened. This can cause injuries, and will most certainly affect maximal physical performance.
Prevent or fix lower back and knee pain
Tense front thigh muscles can cause lower back as well as knee pain. In fact, not stretching often causes many issues that people have, but they never realize what’s causing it. Better to stretch regularly to stave off future problems.
Avoid or correct muscle imbalances
You probably didn’t know that tight quads can weaken the opposite hamstring muscles on the rear thigh, creating muscle imbalances that affect both function and appearance. This will also ramp up the chance of injury, and limit mobility. You may also notice discomfort in your hips like tightness and pain.
Stronger legs
Muscle tightness can lead to muscle weakness. When it comes to the quadriceps it’s not only the quads that are affected but so are the hamstrings on the rear thigh.
Maintain healthy posture
Tight muscles can limit our ability to maintain a good posture for obvious reasons. It limits our natural range of movement, and how we move and perform. The muscles in our bodies flex and move the joints, allowing us to move.
Drawbacks of Quadriceps Stretch
Here are some potential negatives of the quadriceps stretch.
More challenging than meets the eye
Even people who exercise regularly may underestimate the quads stretch. In fact, if it’s not something you do often, get down on the floor and try it… not so easy eh? That’s because the quads stretch requires a little balance, and flexibility. It may even feel a little painful, if you have tight quads, or do the movement on a hard surface.
Of course, as suggested, you can also use a looped resistance band, which is always handy to have around anyway!
Should follow warm-up activities
While it’s shouldn’t be a huge deal, we do always recommend warming up your muscles before stretching. That means 5-10 minutes of light activity such as walking at a decent pace, or doing your workout first before stretching. This could be an inconvenience for those who want to hop right into stretching.
Common Mistakes When Performing Quadriceps Stretch
There are lots of things you can do wrong when performing a quadriceps stretch. Here are some quick tips on technique dont’s.
Stretching cold quads
Many health publications agree that it’s better to stretch a muscle, especially intensively, following warmup activities (1, 2). A cold muscle that’s suddenly and intensely stretched could cause injury. So it’s better to do some walking, or workout first, then stretch your quads.
Pulling the leg out
While it may not be dangerous, and you’ll still stretch the quads, it’s better to pull the leg straight back, not out sideways to your body. You’ll also get a deeper stretch in the meatier part of the quads this way, and it’s just the recommend technique.
Arching your lower back
While you may get the same depth of stretch if you arch your back, this just places a lot of unnecessary stress on your lower back. It may not be intentional, but you want to avoid doing this.
Not stretching evenly
You should take stretching seriously, as you would other forms of training techniques. That means you should aim to stretch each leg with the same pressure, and duration. So, if you stretch one side for twenty seconds, make sure to do the same on the other side. And apply an equal amount of pressure.
Bounce stretching
Also known as ballistic stretching, we don’t recommend bouncy, jerking stretch motions for the quads, or any muscle. There’s too much injury risk and it’s not necessary for general stretching. Instead, static stretching is a better option, pulling the muscle into a stretched position, and holding it there (3).
Quadriceps Stretch Variations
If you don’t like the quadriceps variation shown as the primary example for this guide, or if you like to change things up, check out these other options.
We also included this top 5 quads stretch video below that demonstrates and explains many of the variations in this section.
Standing Quadriceps Stretch
Perhaps the most popular variation, the standing quadriceps stretch is also the most convenient. It’s a great way to stretch between workout sets, while you’re moving about, after a run, or during sports play. You can do it wherever you’re standing, which we can’t say about the following quad stretch exercises.
Steps
Stand up straight with your feet close together. You can hold onto something for balance support, if needed.
Lift one foot up behind you and grab it with the same side hand. You should be standing on one leg.
Pull straight back and feel the stretch in your quads!
Switch and repeat.
Side Lying Quadriceps Stretch
If balance is a problem, or you just prefer to stretch in a more relaxed position without thinking, the side lying quads stretch is best. It basically replicates the standing quads stretch except you’re on the floor now.
Steps
Grab a foam roller, pillow, or something to rest your head on for neck support.
Lie on your side with your head propped up, and bottom arm in a comfortable position, not laying on it.
Bend the top leg, reach back and grab your foot and pull it back.
Turn to the other side and so the same thing.
Prone Quads Stretch
This time we’re going face down to get a soothing thigh stretch. Sometimes, changing your body position can be therapeutic in itself, encouraging regular stretching, or being the preferred quadriceps stretch method.
Steps
Grab a light resistance band, belt, dog leash, sheet, or something similar that’s long enough to wrap around your foot while holding the other end in a prone position.
Get down on your knees, then loop the band around the top of one foot. Hold the other end of the band in the same side hand, then as you lie face down, pull the band over your shoulder and hold it there.
Pull the band to stretch your quads, using both hands if needed. Hold the position for 10 seconds, relax, and repeat a few more times.
Repeat the previous steps on the other leg, wrapping the band around the opposite foot.
Make sure to alternate sides to stretch both legs.
Quads Wall / Couch Stretch
To hit more of the rectus femoris quad muscle, this hip flexor stretch commonly performed against the wall or on a bench height object works great.
Steps
Set up in front of an object about level with the lower part of your butt. A bench, stacked mats, couch, box or even a wall can work.
Assume a half kneeling position with one knee on the floor and the same side foot propped up on the object. Place your other leg in front of you with your foot flat on the ground.
Keep your body tall and upright, and simply feel the stretch. The closer your knee is to the object, the more pronounced the stretch in your anterior thigh.
Wrapping Up
If you read through this training guide, you’re probably in need of a good quadriceps stretch. But you’ve also learned about the benefits, what causes tight quads, side effects of tense thigh muscles, and how to maximize the stretch to become a healthier and more functional individual.
Stretching is a non-negotiable form of body maintenance and we all need more of it to keep doing what we enjoy whether that’s performing, or maintaining physical mobility.

Rucking Basics for Fitness and Fat Loss
There are many different workouts you can use to get fit, lean, and healthy. And, contrary to what a lot of people will tell you, one is not better than the others. While some workouts may burn more calories per hour, the differences are marginal and easily offset by making small adjustments to your diet.
Rather, what separates a good workout from a great one is enjoyment and convenience. If you like what you are doing and can do it regularly, it’s more likely to provide results than the so-called best workout you hate and hardly ever do.
Because of that, it’s worth exploring all your workout options to find activities that fit best into your lifestyle and schedule.
In this article, we lift the lid on rucking, explaining why and how to do this popular workout.
What is Rucking?
Rucking is a military-inspired cardio workout that involves walking or hiking while carrying weight. In military circles, a ruck is a rucksack or backpack, so rucking means walking with a bag on your back.
As a cardio workout, rucking works your heart, lungs, and circulatory system. It’s an effective calorie burner and will help strengthen your core and legs. It’s a viable alternative to regular walking, jogging, running, cycling, etc., and provides a simple yet effective way to burn calories, get lean, improve your muscular endurance, and get fit.
Rucking is simple, low-tech, and effective, requiring no special athletic skills; if you can walk, you can ruck!
However, like most workouts, there is a right way and a wrong way to ruck. Mistakes can leave you exhausted and miles from home. That said, rucking is such a simple workout that such mistakes are easy to avoid, especially if you follow the guidelines in this article.
The Benefits and Advantages of Rucking
Not sure if rucking is the right workout for you? Consider these benefits and advantages and then decide!
Improved cardiovascular fitness
Cardiovascular fitness is your ability to take in, transport, and utilize oxygen, typically expressed as your VO2 max. Walking doesn’t usually have much of an effect on your cardiovascular fitness as the intensity is too low. However, that all changes when you strap on your ruck.
Rucking with weight will increase your heart rate as much as running, cycling, and other cardio workouts. As such, it can help you develop an impressively high level of cardiovascular fitness.
A higher VO2 max will make you more fatigue-resistant, help you recover faster between sets of strength training, improve your athletic performance, and may even help you live a longer, healthier life (1).
Stronger, more enduring legs
Walking briskly with a weight on your back feels very different from strolling without a backpack. It challenges your legs in a whole new way and will develop your muscular strength and endurance. Walking up and downhill is especially challenging, and as your heart rate soars, so too does the fatigue in your legs.
You can expect to feel rucking in your entire lower body, including your quadriceps, hamstrings, glutes, calves, and core.
It’s no coincidence that soldiers and long-distance hikers often have very well-develop legs. You can usually spot people who walk a lot by their well-developed (and often super-defined) calves.
An effective calorie burner
Several factors determine how many calories you’ll burn while rucking, including gender, age, speed, duration, and how much weight you are carrying. However, rucking could potentially burn as many calories as running. Walking with a weighted backpack will certainly burn more calories than walking without one.
As such, rucking can contribute to your weekly caloric expenditure and help you burn fat and lose weight. However, like all workouts, you’ll only lose weight if your diet is on-point.
Good for your posture and core
Walking is good for your posture. Firstly, it gets you up off your butt, onto your feet, and away from your keyboard or screen. Simply standing up straight can help fix your desk slouch and nerd neck.
Secondly, walking stretches and mobilizes your hips and lower back. This is also beneficial for your posture.
Finally, wearing a heavy backpack engages your deep core muscles. You must use your core to stop the pack from pulling you backward. A stronger core will also enhance your posture, as well as lowering your risk of back pain.
Accessible
You need very little equipment to start rucking. In fact, you probably have everything you need already (check out the next section for details). That means you can get started immediately and without having to buy any special equipment.
Rucking also requires no athletic skill, so it’s ideal for those with no sporting background.
As far as where to ruck, you can go anywhere you like. Put your backpack in your car and drive to the countryside or ruck around your neighborhood. You can ruck to and from work, ruck to the store to buy your groceries, or go rucking with your kids or dog – it’s a very convenient and accessible way to work out.
Remember, the best workout is the one that you can do frequently and that you enjoy. Rucking removes many of the barriers to regular exercise.
Low impact
While running is a popular cardio workout, it is not without risks. When you run, your feet hit the floor with a force equal to several times your body weight. All that impact can have an adverse effect on your feet, ankles, knees, hips, and lower back, plus all the associated muscles, tendons, and ligaments.
There is a reason that many athletic injuries are prefixed with the word running – such as runner’s knee and runner’s hip. Running-related injuries are very common.
In contrast, rucking is a low-impact activity, so despite the added weight, it puts far less stress on your joints. With a lower risk of injury, you are less likely to miss workouts because you are hurt.
Low-impact rucking is also an excellent workout for people who are overweight that would otherwise find running uncomfortable or risky.
Scalable
Rucking workouts can be modified to match your current fitness level. Start light and short, gradually increasing the weight and distance as you get fitter.
With this in mind, you can also ruck in a group of people with different abilities. For example, less fit individuals carry light packs, while the fitter members of the group carry heavier packs. With a little trial and error, everyone should be able to have a similar workout.
Sociable
Leading on from the point above, while there is nothing wrong with rucking alone, this workout is ideal for couples, families, and groups. You can ruck with your kids, your pets, your partner, or your friends.
If you enjoy group exercise classes but prefer to work out outdoors, rucking with friends could be perfect for you.
A functional workout
Functional workouts and exercises develop fitness that you can use outside of the gym. They prepare your body for the demands of daily life and sports.
For example, squats are very functional because the squat is one of the movements most people do many times each day. In contrast, machine leg curls are less functional because they aren’t an everyday movement.
Rucking is simply walking with weight, so it’s a very functional exercise. Humans have been doing it since they learned to stand on two legs.
Gear for Rucking
While rucking is a very low-tech, no-frills sort of workout, you still need a couple of things to do it.
A rucksack
The first thing you need to start rucking is a ruck, better known as a rucksack or backpack. Ideally, your ruck should be strong and sturdy, with a hip and chest strap to keep it secure on your back. The back panel and shoulder straps should be padded for comfort.
You don’t need a special rucking backpack, although such things are available. Rather, a standard hiking pack will suffice and is usually much cheaper.
Alternatively, you can wear a weighted vest. However, you’ll still need to find a way to carry water on your ruck, especially on longer workouts.
Weights
You can load your ruck with just about anything you have available. Small-denomination weight plates and dumbbells are a good option, as are tightly-sealed water bottles, bags of sand or gravel, rocks, books, and canned goods.
However, ensure that whatever you put on your ruck doesn’t poke you in the back. What started off as a mildly annoying pressure point can turn into a major pack rash when you start to get hot and sweaty. Wrap your weights in towels or old workout mats if you need extra padding.
You don’t need to buy specialist rucking shoes or military boots for your ruck workouts. However, your footwear needs to be supportive, cushioned, and comfortable. Trail running shoes are a good option, and walking shoes are another.
Regardless of what you choose, make sure your shoes don’t rub, as blisters can bring even the toughest soldier to their knees. This is not the time to wear new, untested shoes. Instead, stick with footwear you are familiar with and that you know are comfortable.
Appropriate clothing
The most important rule for rucking clothing is to dress for the elements. Wear layers when the weather is cold, and wear less on warm days to avoid overheating. Grab a wide-brimmed hat to protect your face from strong summer sunshine and warm gloves and a beanie in winter.
Remember, too, that the weather can change, and so too will your body temperature as your workout progresses. Make sure you can add or remove layers as conditions and your body temperature dictates.
And that’s all you really need to start rucking – a backpack, weights, shoes, and suitable clothes. That said, there are a couple of additional items that may enhance your workouts:
Water bottle – rucking is thirsty work. Wearing a rucksack means that heat cannot escape from your back, and your body temperate will probably increase more than usual. As a result, you’ll probably sweat more, which can lead to dehydration. Carry a water bottle and drink from it little and often to stay hydrated.
A smartwatch – handy for tracking steps, distance, and calories burned. Some can also be programmed with your rucking route.
Navigation app – downloading a navigation app to your phone means you can create and follow pre-planned routes. Navigation apps are an excellent alternative to a traditional map and compass. However, if you plan on rucking in wild country, you should also carry a map as phone batteries die, screens break, and apps crash.
Earbuds – rucking is a great way to unplug from technology and enjoy some time alone or with friends. However, if you prefer to work out to music or want to remain contactable during your ruck, earbuds will be invaluable. However, don’t turn the volume up too high, or you could fail to hear upcoming hazards, such as traffic.
First-aid kit – if you are rucking far from the maddening crowds, a first-aid kit is a must. While rucking is a very safe workout, you could still trip and fall, sprain an ankle, get snake-bit, get a blister, or otherwise get hurt. A first-aid kit means you can patch yourself up and get home safely.
Trekking poles – walking with trekking poles is very popular in Nordic counties. The poles are helpful for balance and extra traction on rough terrain and let you take some of the weight off your legs and put it on your arms. Using trekking poles turns a lower-body activity into a full-body workout.
How to Get Started with Rucking
While rucking is simple and accessible, it’s still possible to get it wrong and turn what should be an enjoyable workout into a painful nightmare. Follow these steps to ensure your first few rucking excursions go as smoothly as possible.
Pick your distance carefully
Walking with weight is much more challenging than walking while unencumbered. Short distances feel much further when you’re wearing a heavy pack. With that in mind, be conservative and keep your first few rucks relatively short. Choose distances you can cover comfortably in an hour or less, i.e., 2-4 miles.
While you’ll soon work up to rucking faster and further, not going too far too soon will make your first few outings much more enjoyable.
Be conservative with your ruck weight
While it might be tempting to load all the weight you can into your backpack, carrying too much weight too soon could put you off rucking for good. Heavy loads get heavier as you start to feel tired, and your shoulders and back probably aren’t used to being loaded down with a heavy pack.
So, start with no more than about 10% of your body weight. This will be enough to be challenging but not so heavy that you feel crushed under the weight of your backpack. If in doubt, use less weight rather than more. You can always increase the load on subsequent ruck outings if your pack isn’t heavy enough.
Start slow
While soldiers ruck at four miles an hour or faster, you don’t have to. In fact, you should start slow, feeling like you could go more quickly if needed. You can increase your speed as you get used to walking with a weight on your back. However, remember it’s the weight that makes rucking such an effective workout, and you don’t need to walk at top speed or break into a run for it to be effective.
Choose easy to moderate terrain
Rucking in wild countryside is an awesome workout, but uneven terrain and steep inclines can be too challenging for beginners. So, for your first few rucks, stick primarily to flat, easy paths and trials, saving the rough stuff for when you are more experienced.
Enjoy it!
Don’t turn your rucking workout into a race. Take your time, look around, open your ears, and enjoy your surroundings. Breathe deeply and easily, relax your shoulders and arms, and even try some moving meditations. Stay off your phone, and use your ruck as an opportunity to decompress.
Rucking Basics for Fitness and Fat Loss – FAQs
Do you have a question about rucking? No problem, because we’ve got the answers!
1. How fast should I walk when rucking?
There is no set speed for rucking. However, most people average between 3-4 miles per hour or 15-20 minutes per mile. Your rucking speed depends on the terrain, your fitness, how much weight you are carrying, and how far you plan on walking.
Adjust your speed so you are slightly out of breath but comfortable enough that you can maintain your pace for the duration of your ruck. However, if you cannot maintain three miles an hour, you may be carrying too much weight.
2. How far should I ruck?
Like rucking speed, distance is also dependent on numerous factors, including your fitness and the time you have available. If you are unsure how far to ruck, start with a couple of miles and increase gradually as you get used to the demands of the workout.
It’s usually best to under-commit and over-deliver, so you finish your workout feeling like you could have done more. This is a much better approach than a “death march” that you can only just complete and never want to repeat.
3. How often can I ruck?
While rucking is low impact, it will still take a toll on your muscles and joints, especially if you walk fast and with heavy loads. As such, you should probably do 3-5 rucking workouts per week.
While you could do more than this, e.g., every day, the accumulated stress could lead to aches, pains, and injuries.
So, you could do one “big” ruck per week, perhaps at the weekend, plus a couple of shorter rucks spread throughout your week. Experiment with different training frequencies to see what works best for you.
4. Do I need a specialist backpack or shoes for rucking?
While there are companies making and selling rucking-specific shoes and backpacks, you don’t need them for this style of training. In fact, all you really need is a hiking daypack and comfortable, supportive footwear, like your usual athletic shoes.
That said, if you plan on rucking over rugged terrain, a pair of hiking shoes may be beneficial.
So, while you can buy a specialist rucking pack and shoes, you don’t need them. If you are new to rucking, use the equipment you already have, and then upgrade if you make rucking part of your regular workouts.
5. Is rucking good for weight loss?
Like all types of exercise, rucking can help you lose weight when combined with a sensible, sustainable diet. It burns a similar number of calories as running. Still, the impact is less, so you may be able to do it longer and more often, making it potentially more effective for weight loss.
However, what makes rucking so great is how it requires no specialist equipment, and you can do it almost anywhere and anytime. The best workouts for weight loss are the most accessible and convenient, as you need to do them frequently and consistently for them to be effective.
Long story short? Yes, rucking is good for weight loss!
Closing Thoughts
Getting fit and losing weight often seem like complicated pursuits, but really, they don’t have to be. In fact, all you need to do is toss some weights in a backpack and go for a brisk walk. Eat a few more salads and a bit less junk food, and your body will start burning fat for fuel.
You see – not complicated at all!
That said, simple doesn’t mean easy, and working out and eating healthily are often incompatible with our modern, hectic lifestyles.
That’s why convenience and accessibility matter; the easier something is to do, the more likely you are to do it. Rucking is exceptionally simple yet extremely effective, providing a workout you can do almost anywhere and anytime.
So, if you are looking for an excuse-free workout, try rucking. It’s no better than any other type of training, but nor is it any worse. Instead, it’s just another tool you can use to lose weight and get fit.
References:
1 – Strasser B, Burtscher M. Survival of the fittest: VO2max, a key predictor of longevity? Front Biosci (Landmark Ed). 2018 Mar 1;23(8):1505-1516. doi: 10.2741/4657. PMID: 29293447. https://pubmed.ncbi.nlm.nih.gov/29293447/
Nick Walker Reveals Training Structure, Role of Science & Drugs in Bodybuilding
American bodybuilder Nick Walker is one of the frontrunners for the upcoming 2023 Mr. Olympia competition. After placing third at the previous event, he will look to challenge for the coveted Sandow trophy later this year. In a recent video posted on YouTube, Walker shared the changes in his training structure after the 2023 Arnold Classic, how much science goes into his training, and the role of drugs in bodybuilding.
Nick Walker first gained attention for his freakish muscle mass, size, and granite conditioning levels in the IFBB Pro League Men’s Open division. He took home the top prize at the 2021 New York Pro and scored another win at the 2021 Arnold Sports Festival. He concluded one of the best rookie years of his generation with a fifth-place finish in his Olympia debut.
Walker presented a significantly enhanced package with a narrower waistline at the 2022 Mr. Olympia last December. He placed third behind runner-up Derek Lunsford and champ Hadi Choopan. After the result, he set his eyes on the 2023 Arnold Classic title. He went into the show as the betting favorite and the highest-ranked Olympian. In the end, Walker took silver as Samson Dauda pulled off the upset and won the title.
Considering the improved package Walker brought to the stage in Ohio, many thought he performed well enough to get the win. Walker admitted it was a tough reality to accept for him as he came into the show brimming with confidence. Former Mr. Olympia Samir Bannout sided with Walker in the matter in his analysis of the competition. IFBB Pro League athletes’ representative Bob Cicherillo argued against their stance and laid out a comprehensive guide on judging a freaky physique against a more aesthetic one.
Nick Walker / Instagram
Two months ago, ‘The Mutant’ opened up on being a hyper-responder to steroids while detailing the evolution of his cycles over time. While he doesn’t push gear as hard as he used to, he indicated plans to dial in on his nutrition for the current season. Olympia judge Terrick El Guindy and Hall of Famer Chris Cormier praised Walker’s potential and backed him as a potential champion if he worked on his legs. Cormier highlighted the intense rivalry Walker developed with Lunsford, which has fans even more enthusiastic about their next meeting.
Nick Walker made his way to Canada for a guest posing appearance at the 2023 Pure Muscle Championships last month. A week later, he voiced his disapproval of his defeat to Dauda at the Arnold Classic. Although he’s not resentful of the outcome, he believes he had the better package and vowed to leave no stone unturned in his preparations for the Olympia. He’s confident he could dethrone Choopan based on his track record of coming in better shape.
Nick Walker reveals training structure & changes after the 2023 Arnold Classic
Nick Walker shared the structure of his training sessions in a recent appearance on YouTube.
“[Most important movement] is usually first or second movement,” said Walker. “Just for the connection. It’s already pumped it’s warm so now when I go to press I just feel I connect better. It’s the same thing with legs like if I start with the leg press when I go to a squat type movement my legs automatically connect better than anything. If I start with a squat I feel it in my knees a little bit. I got to take for everyone and it’s not the same when I do a leg press I feel nothing.
“There’s no pain. I’m good on that one so when I kill that leg press they’re always pumped. They’re fired up. I go to a squat now. The pump is so big it hurts and it’s just unbearable at that point and then even after that to finish off with leg extensions I’m toasted.”
He laid out the changes he made after the 2023 Arnold Classic.
“I’m all for learning the biomechanics. I was working with Matt. He’s the very low volume high intensity guy that’s also what I’m used to but I kinda steered away from it a little bit. I have the size so I’m going to not go not once they go as intense but more volume without taking a lot more sense to failure to get more round fullness that I think I needed which I do think benefited me for the Olympia. But at the same time I enjoy that low intensity high training, high volume is fun. But there’s just nothing better than picking some heavy sh*t out there.”
“That’s not all because we can all do that but if you’re not targeting the muscle you want to target it becomes pointless and you’re just kind of fatiguing yourself and youre not getting anything out of it.”
“Training with Jared, he’s all about full range. I thought I always was I guess not so my feet actually are a little wider on a platform and a little more put out so I can go all the way down. A lot of people would be like that’s what a duck is doing, more hamstring when I’m done. First of all, my legs, my quads are so pumped outer sweep that everyone thinks are so weak or flaring. I get their point but if it’s working for me it’s working.”
Walker argued he should’ve defeated Lunsford for second place at the 2022 Mr. Olympia.
“I knew it was going to be between me, Hadi, Derek just the way things were moving around. That’s what I figured out through prejudging. I didn’t think I was going to win just because I was never directly ever in the middle but I did believe I was going to be at least second. Obviously, no disrespect to Derek but I just think I get it and I said this before he has one of, if not the best shape on the stage.
There’s so much more to it and I felt like beside that aspect I feel like I beat him in every other criteria. That’s they want. I do think I should’ve gotten second but again I wasn’t disappointed by any means. It’s a two-place jump.”
Walker talks about the role of science & drugs in bodybuilding
Nick Walker shared his thoughts on how much science goes into his approach to training.
“Zero. When people are trying to preach size to them they shut the f**k up. I’m number three in the world. This works for me. It’s as basic as it would sound from a bodybuilder it’s just I’m a bro and bro stuff and it works. It’s like hiring a coach that’s been through it knows what he’s doing than someone who’s just science. It’s cool to know that I do but if that’s all we’re not going to work.”
He gave his take on the importance of steroids as a competitor.
“Drugs play a role so I do agree with that but to get to that point I’m going to be honest and say I don’t think, growth’s a different story, that’s a different type of animal but I don’t think people need as much as they think they need to progress to where they need. There some people that are not I would say to the genetic elite that I am that may have to push a little harder. Sure, there are those that’s where science doesn’t make sense for someone like me. I can get away with not doing a crazy amount of things and progress haywire and the three major things that will take somebody to that next level as you already stated training, recovery, sleep, body, work.
Consistency, eating, and training hard those are like the three main things and consistency with those things over time. Those are the things that need to be addressed. People are not as disciplined. They can do it for a week, two weeks, maybe two months but if they’re not necessarily seeing what they want to see they’re like yeah it’s all right, then you have the party drugs if you are mixing that with anabolics, you’re just waiting for a big problem to happen.”
Cicherillo favored Hadi Choopan to retain his title against Nick Walker in his early prediction last month. He highlighted the danger Samson Dauda would present to any contender on the Olympia stage, including Choopan.
Walker crushed a heavy push-day training session last week. He offered some vital tips on how to maximize the effectiveness of the chest, shoulders, and triceps workout. He received major praise for his intense mindset from renowned bodybuilding guru Hany Rambod days later.
‘The Mutant’ is confident with the amount of muscle size on his frame. He’s aiming to bring an impeccable blend of the freak factor as displayed at the last Olympia, and aesthetics, similar to his Arnold Classic performance, in hopes of becoming the new champion.
You can watch the full video below.
RELATED: Nick Walker on Using Kratom for Cardio Before 2023 Arnold Classic: ‘I Feel Great and Full of Energy’
Published: 9 May, 2023 | 8:16 PM EDT
3 Arm Workouts For Women To Build Strong and Sculpted Guns (Featuring 22 Killer Exercisers)
Whether you want to get ready for the summer or build strength to boost your functionality and perform better at daily activities, you must train your arms. Furthermore, strong arms can help you do more in other workouts that require pulling and pushing strength.
Due to hormonal differences, women are more likely to develop bat wings than men. Arm workouts will not only make you look amazing in that sleeveless top, but you’ll also be able to carry those heavy grocery bags with ease.
Arm workouts are an essential part of any fitness routine, especially for women. Besides making you look stunning in sleeveless dresses, arm workouts, provide numerous benefits, including improved strength, posture, and metabolism.
In this article, we cover the 22 best arm exercises to help you carve the perfect arms. We have also programmed these 22 movements into three workouts for women at different experience levels to help maximize the results. This article has something for everyone. So, let’s roll up our sleeves and dive into the world of arm workouts for women — trust us, your arms will thank you!
22 Best Arm Exercises For Women
The arm workouts for women article compiles the most effective biceps and triceps exercises that women can incorporate into their workout routine to achieve beautifully sculpted arms reminiscent of Greek goddesses. Here are the lifts that should be a part of your exercise arsenal:
Barbell Biceps Curl
The barbell biceps curl is an isolation exercise that is incredibly effective for building size and strength. Follow a strict form on this movement for optimal muscle fiber recruitment.
Steps:
Stand upright with a hip-width stance while holding a barbell with a shoulder-wide underhand grip.
Keep your elbows pinned to your sides, and curl the bar to your shoulder level.
Pause and contract your pythons at the top.
Slowly return to the starting position.
Repeat for recommended reps.
Pro Tip: Grab the bar as tightly as possible to engage your forearms. Alternatively, use a false (thumbless) grip to limit forearm recruitment.
Check out our complete barbell biceps curl guide here!
Dumbbell Biceps Curl
The dumbbell biceps curl is a unilateral exercise that can help fix muscle and strength imbalances.
Steps:
Stand erect with a shoulder-wide stance while holding a dumbbell in each hand using a neutral (palms facing your thighs) grip.
While keeping your left arm in place, bend your right elbow to curl the bar to your shoulder level. Twist your arm to the outside during the concentric (upward) motion. Your palm should face your shoulder at the top.
Slowly return to the start position.
Alternate between sides for recommended reps.
Pro Tip: Beginners can hold the dumbbell in front of their thighs with a supinated (palms facing forward) grip. It will help improve your mind-muscle connection.
Check out our complete dumbbell biceps curl guide here!
Dumbbell Hammer Curl
The dumbbell hammer curl helps improve your biceps thickness by working the brachialis muscle.
Steps:
Stand erect while holding a dumbbell in each hand with a neutral grip.
Keeping your elbows pinned to your side, curl the dumbbells to your shoulder level.
Return to the start position.
Repeat for recommended reps.
Pro Tip: Ensure you are not using momentum to lift the weight by swinging your torso back and forth.
Check out our complete dumbbell hammer curl guide here!
Barbell Reverse Curl
The barbell reverse curl engages the forearm muscles, which helps improve your arm symmetry and balance.
Steps:
Stand upright with a hip-width stance.
Grab the bar with a shoulder-wide overhand grip.
Keeping your elbows pinned, curl the bar to your shoulder level.
Rinse and repeat.
Pro Tip: Use a thumbless grip for greater forearm muscle recruitment.
Check out our complete barbell reverse curl guide here!
Underhand Pull-Up
Contrary to what most lifters believe, you don’t always need weights to train your biceps. The bodyweight underhand pull-up will set your pythons on fire.
Steps:
Grab a pull-up bar with a supinated shoulder-wide grip.
Bend at your elbows to bring your chest to the pull-up bar level.
Pause and contract your pythons at the top.
Return and repeat.
Pro Tip: Ladies that cannot perform a bodyweight pull-up can use an assisted pull-up machine. You could also ask your training partner to spot you or use a resistance band.
Check out our complete underhand pull-up guide here!
Cable Biceps Curl
Unlike the free weights, the cable keeps constant tension on your muscles throughout the range of motion, helping induce hypertrophy.
Steps:
Set the cable pulley at the lowest setting and attach a straight bar attachment.
Grab the bar with a shoulder-wide grip.
Keeping your elbows pinned, curl the bar to your shoulder level.
Rinse and repeat.
Pro Tip: Ensure the weight is engaged throughout the range of motion. The weight should not rerack at the bottom of the movement.
Check out our complete cable biceps curl guide here!
21s
This exercise is a must-do for women that have never experienced a biceps pump.
Steps:
Grab a barbell with a shoulder-wide underhand grip.
Keeping your elbows pinned, curl the bar until your forearms are parallel to the floor.
Repeat for seven reps.
After completing the seven reps, curl the bar to your shoulder level.
Slowly lower the bar until your forearms are parallel to the floor.
Repeat for seven reps, then lower the bar to the start position.
Perform seven full reps.
Pro Tip: Use an EZ bar to make this exercise easier on your wrists.
Check out our complete 21s guide here!
Incline Dumbbell Curl
This exercise eliminates momentum since you’ll be lying on an incline bench.
Steps:
Adjust the back of an incline bench at a 45-degree angle with the floor.
Lie with your back on the bench while holding a dumbbell in each hand with a neutral grip.
Curl the dumbbells to your shoulder level. Turn out your wrists during the eccentric motion.
Lower the weights.
Repeat.
Pro Tip: Lowering the back of the incline bench will make the exercise more challenging, whereas lifting it will make it easier.
Check out our complete incline dumbbell curl guide here!
Preacher Curl
Since the preacher curl involves keeping your arms on an incline bench, it allows optimal biceps brachii engagement. It is an excellent exercise to improve your biceps peaks.
Steps:
Place the back of your upper arms on the preacher curl bench.
Hold an EZ bar with a shoulder-wide grip.
Bend your elbows to curl the bar.
Slowly lower the bar to the start position.
Repeat for reps.
Pro Tip: Using a cable preacher curl machine helps keep constant tension on your biceps throughout the ROM.
Check out our complete preacher curl guide here!
Squatting Biceps Cable Curl
This exercise locks your elbows in place and removes the possibility of using momentum by swinging your torso.
Steps:
Set a cable pulley machine at the lowest position and attach a straight bar.
Grab the bar with a shoulder-wide underhand grip and take a step back.
Sit in a deep squat and place your elbows on the inside of your knees.
Curl the bar toward your head.
Slowly return to the start position.
Pro Tip: Keep your chest up throughout the exercise. Rounding your shoulders will limit your range of motion.
Overhead Cable Curl
Ladies, if you want to look dazzling while hitting the front double biceps pose, you must add the overhead cable curl to your exercise arsenal.
Steps:
Set the cable pulleys at the highest position and attach D-handle bars on both ends.
Grab the handles with an underhand grip, position yourself in the center of the machine, and assume a shoulder-wide stance.
Your arms should be extended at your sides at the starting position.
Keeping your elbows pinned, perform a biceps curl.
Rinse and repeat.
Pro Tip: Maintain the natural curvature of your spine throughout the range of motion. Rounding your back will throw you off balance during the set.
Check out our complete overhead cable curl guide here!
Diamond Push-Up
The diamond push-up is a bodyweight triceps exercise that works your triceps through its full range of motion.
Steps:
Get on all fours.
Place your hands together on the floor so your index fingers and thumbs touch. Your hands should form a triangle.
Extend your legs behind you.
Get into a push-up position.
Slowly lower your chest to the floor by bending your elbows until your chest touches your hands.
Pro Tip: Your body, from head to heels, should be in a straight line throughout the exercise. Lifting your hips or letting them drop will remove tension from your triceps.
Check out our complete diamond push-up guide here!
Cable Triceps Pushdown
The cable triceps pushdown is a staple in most triceps workouts, and for a good reason.
Steps:
Set the cable pulley at the highest position and attach a straight bar.
Grab the bar with a shoulder-wide overhand grip.
Extend your arms while keeping your elbows pinned to your sides.
Pause and contract your triceps at the bottom for optimal muscle fiber stimulation.
Repeat for reps.
Pro Tip: Use different grips, such as a straight bar, V-handle bar, and ropes, to train your triceps from different angles.
Check out our complete cable triceps pushdown guide here!
Overhead Triceps Extension
This exercise engages your lateral and long triceps head, helping develop a chiseled horseshoe muscle.
Steps:
Stand upright with a shoulder-wide stance.
Hold one end of the dumbbell with both hands and lift it overhead.
Keeping your elbows pinned, slowly lower the dumbbell until the other end touches the back of your neck.
Return to the start position.
Repeat for reps.
Pro Tip: Perform this exercise on a cable machine to keep constant tension on your triceps.
Check out our complete overhead triceps extension guide here!
EZ Bar Skull Crusher
The EZ bar skull crusher is an incredibly effective exercise to tone your arms and build strength.
Steps:
Lie supine (facing the ceiling) on a flat bench.
Hold an EZ bar with a narrow grip over your shoulders. Your arms should be perpendicular to the floor at the start position.
Keeping your lower arms pinned, bend your elbows so the bar is a few inches away from your forehead at the bottom.
Rinse and repeat.
Pro Tip: Beginners and those lifting heavy should perform this exercise with a spotter.
Check out our complete EZ bar skull crusher guide here!
Dumbbell Kickback
You must perform this exercise with a picture-perfect form for optimal triceps engagement.
Steps:
Grab a dumbbell in each hand with a neutral grip.
Slightly bend your knees and lower your torso toward the floor by bending your hips and pushing them back.
Lift your elbows above your sides. Pull back your shoulder blades and lift your shoulders to your ears.
The dumbbells should be next to your chest at the start position.
Extend your arms.
Pause and contract your triceps.
Slowly return to the start position.
Pro Tip: Do this exercise on one side if you are struggling to establish a mind-muscle connection in the bilateral variation.
Check out our complete dumbbell kickback guide here!
Reverse-Grip Cable Pressdown
Some exercisers find the reverse-grip cable press-down more effective at targeting the triceps than the conventional pushdown.
Steps:
Set a cable pulley at the highest position and attach a straight handle.
Grab the bar with an underhand grip.
Keep your elbows pinned slightly in front of your body and extend your arms.
Rinse and repeat.
Pro Tip: You could also use lifting straps if you have difficulty holding onto the bar with a reverse grip.
Check out our complete reverse-grip cable press-down guide here!
Close-Grip Bench Press
This compound (multi-joint) exercise primarily works the triceps. Use a weight that allows you to follow a full ROM and complete between 8-12 reps.
Steps:
Lie with your back on a bench.
Grab the bar just outside your chest width.
Unrack the bar and hold it over your chest.
Lower the bar to your chest by bending your elbows.
Explode to the start position.
Repeat for reps.
Pro Tip: Avoid flaring your elbows while performing this exercise, as it can put unnecessary strain on your shoulder rotator cuffs.
Check out our complete close-grip bench press guide here!
Dips
The parallel bar dips are an excellent exercise to target your triceps. Beginners could perform this exercise on a flat bench.
Steps:
Grab the parallel bars with a neutral grip.
Your arms should be extended at the starting position.
Slowly lower toward the floor while keeping your elbows close to your sides and maintaining an upright torso.
Your chest should be at your hand level at the bottom.
Repeat for reps.
Pro Tip: Avoid bending forward while performing this exercise, as it will result in pectoral muscle engagement.
Check out our complete dips guide here!
Tate Press
The Tate press is an underutilized exercise. However, its unique range of motion will help you tone your arms.
Steps:
Lie supine on a flat bench while holding a dumbbell in each hand using a neutral grip.
Your arms should be above your chest and perpendicular to the floor at the start position.
Turn your arms so your palms are facing forward.
The inside plates of the dumbbell should be touching each other. Your elbows should be pointing outward. This will be your starting position.
Initiate the movement by bending at your elbows and bringing the dumbbell inner plates toward your chest.
Touch the dumbbell to your chest at the bottom.
Return to the starting position.
Pro Tip: Ensure that the dumbbells are in contact throughout the range of motion.
Check out our complete Tate press guide here!
Cable Triceps Kickback
This is an excellent dumbbell kickback variation if you have trouble establishing a mind-muscle connection during the conventional exercise.
Steps:
Set the cable pulley at hip height and attach a D-handle bar.
Grab the handle with a neutral grip.
Step back and bend over so your torso is almost parallel to the floor.
Lift your elbow so your upper arm is parallel to the floor.
Extend your arm.
Pause and contract your triceps.
Repeat for recommended reps before switching sides.
Pro Tip: Holding onto the cable directly will help ensure better stability.
Check out our complete cable triceps kickback guide here!
Resistance Band Overhead Triceps Extension
You’re in for a surprise if you’ve never tried the resistance band overhead triceps extension before. Use a loop resistance band for this movement.
Steps:
Place one end of the loop resistance band around your right foot.
Wrap the other end around your right hand.
Bring your hand to your shoulder level and point your elbow toward the ceiling.
Keeping your elbow pinned, extend your arm.
Pause and contract your triceps.
Slowly lower to the start position.
Repeat for recommended reps before switching sides.
Pro Tip: Start with the lightest resistance band in your gym and focus on contracting your triceps at the top of the movement.
3 Effective Arm Workouts For Women
Given below are three arm workouts for women at different experience levels. These workouts will train your arms from different angles using various equipment to ensure overall growth.
Beginner Arm Workout For Women
The arm workouts for women in this article include four exercises each for the biceps and triceps. Although we have listed the biceps exercises first, you must start the workouts with your weaker muscle group. For example, ladies with lagging triceps should begin these workouts by training the back of their upper arms.
Exercise
Sets
Reps
Biceps Cable Curl
3
8-12
Preacher Curl
3
8-12
Dumbbell Hammer Curl
3
8-12
Overhead Cable Curl
3
8-12
Cable Triceps Pushdown
3
8-12
Dumbbell Kickback
3
8-12
Resistance Band Overhead Extension
3
8-12
Dips
3
8-12
Dumbbell-Only Arm Workout For Women
You can perform the following workout with just a pair of dumbbells. Keep your training intensity high by limiting your rest duration between exercises to 60-120 seconds. You must complete these workouts within 60 minutes.
Exercise
Sets
Reps
Dumbbell Biceps Curl
3
8-12
Incline Dumbbell Curl
3
8-12
Dumbbell Hammer Curl
3
8-12
Dumbbell Reverse Curl
3
8-12
Overhead Triceps Extension
3
8-12
Dumbbell Kickback
3
8-12
Dumbbell Skull Crusher
3
8-12
Tate Press
3
8-12
Advanced Arm Workout For Women
In this workout, you’ll use two advanced training techniques, supersets and dropsets.
#
Exercise
Sets
Reps
1
Barbell Biceps Curl
3
8-12
2
21s
3
21
3a
Machine Preacher Curl
3
8-12
3b
Underhand Pull-Up
3
8-12
4a
Reverse-Grip Triceps Extension
3
8-12
5
Tate Press
3
8-12
6a
Close-Grip Bench Press
3
8-12
6b
Diamond Push-Up
3
8-12
The machine preacher curl (3a) and underhand pull-up (3b) are super set exercises for the biceps. After performing 8-12 reps on the machine preacher curl, start doing the underhand pull-ups without stopping for rest. You are allowed a 60-120 second rest after completing the recommended reps for the underhand pull-up. Similarly, the close-grip bench press and diamond push-up are super sets for the triceps.
The reverse-grip triceps extension (4a) is a drop-set exercise. Perform 8-12 reps on this exercise, then immediately lower the weight on the stack and perform another set to failure without stopping for rest.
Wrapping Up
Whether you are a fitness enthusiast or a beginner, these three arm workouts for women can help you feel stronger, more confident, and ready to take on any challenge that comes your way.
Stick to these workouts for at least 12 weeks to allow them the time to work their magic. Feel free to tweak the workouts to fit your needs. However, you must progressively overload your muscles to ensure strength and muscle gains. Best of luck!
Partial Deadlifts vs. Full Deadlifts – Which One Should You Do?
Barbell back squats are often called the king of exercises. Entire workouts have been built around the back squat, including the classic old-school 20-rep squat routine. It’s safe to say that the squat is a VERY productive exercise for building muscle mass and strength.
All of that said, there are drawbacks to squats. For starters, you need a squat or power rack to perform heavy squats safely. Getting pinned under a heavy bar can cause severe injury. Barbell squats also require a high degree of technical proficiency to perform safely. An ugly squat is often a dangerous squat.
And then there is the whole “squats are functional” thing. While squatting (the movement) is highly functional, when was the last time you did a squat with a heavy weight on your back outside of the gym? Probably never, right?
All this means that the barbell deadlift could be the real king of exercises. You don’t need a rack to do them, and they teach you how to lift heavy weights off the floor, making them a REAL functional exercise. Plus, if you want to build real-world strength and useable muscle mass, the deadlift delivers.
That’s not to say that squats are bad, but deadlifts may be better.
All squats vs. deadlift arguments aside, there are several different types of deadlifts for you to choose from. In this article, we compare and contrast the partial and full deadlifts so you can decide which is the best one for you.
What is Partial Deadlift?
Block Pull / Ken Cooper
The partial deadlift involves starting your rep with the bar higher off the floor than usual. For full or conventional deadlifts, the standard bar height is nine inches. That’s because standard 45lbs/20kg Olympic bumper plates have a diameter of 18 inches.
With partial deadlifts, you raise the bar by placing it on blocks or in a power rack with the safety bars set at your preferred height. This reduces your range of motion and changes several aspects of the lift. Partial deadlifts are also known as block pulls and rack pulls, named after the equipment used to elevate the bar.
Powerlifters frequently use partial deadlifts as an assistance exercise to increase conventional deadlift performance. They also feature in strongman competitions where deadlifts often start from a higher position, e.g., the silver dollar deadlift. Partial deadlifts also offer benefits to bodybuilders and general exercisers.
Muscles Worked
The partial deadlift is a compound exercise involving multiple muscles and joints working together. From top to bottom, the main muscles tested and trained by partial deadlifts are:
Trapezius – upper back
Rhomboids – between the shoulder blades
Deltoids – shoulders
Latissimus dorsi – side of the upper back
Core – muscles of the midsection, including the abs and lower back
Biceps – front of the upper arm
Forearm flexors – gripping muscles
Gluteus maximus – back of the hips
Hamstrings – back of the thigh
Quadriceps – front of the thigh
Triceps surae – calf muscles
Needless to say, partial deadlifts are a very comprehensive exercise that works almost every muscle in your body. Do a few sets of bench presses, dips, or push-ups, and you can theoretically train your entire body with just two exercises.
How To Do Partial Deadlifts
Get the most from partial deadlifts while keeping your risk of injury to the minimum by following these step-by-step instructions!
Set your barbell in a power rack or on blocks so it’s between lower knee and mid-thigh height. The lower the bar, the more work your glutes and hamstrings have to do.
Stand close to the bar so it’s touching your legs. Your feet should be between hip to shoulder-width apart.
Hinge forward from your hips, bend your knees slightly, and grab the bar. Hold it using a shoulder-width double overhand or mixed grip. Flex your lats and upper back.
Brace your core, straighten your arms, and lift your chest. Take any tension out of the bar.
Drive your feet into the floor, push your hips forward, and stand up. Do not bend your arms or round your lower back. Take care not to lean back at the top of your rep.
Lower the bar back down under control, allow it to settle for a second or two, reset your core and grip, and repeat.
Tips:
Use gym chalk and/or lifting straps to reinforce your grip.
Wear shoes with flat soles and low heels for stability.
Use a weightlifting belt for support and safety.
This exercise works best with low reps and heavy weights.
Do not use a deadlift bar for this exercise, as doing so may damage it.
Partial Deadlifts – Pros
Not sure if partial deadlifts deserve a place in your workouts? Consider these advantages and benefits and then decide!
Better for tall and inflexible lifters
Bending down to deadlift a weight from the floor requires excellent hamstring flexibility. Tall people may also find bending over so far challenging. Because of this, some lifters end up rounding their lower backs during deadlifts, increasing their risk of injury.
Partial deadlifts start with the barbell raised, making it easier to reach if you are tall or inflexible. This means that partial deadlifts are often more lower back-friendly than deadlifts from the floor.
Lift heavier weights
Partial deadlifts involve a shorter range of motion than full deadlifts. Because of this, you should be able to lift heavier weights compared to conventional deadlifts. Lifting heavier weights will build more strength, especially in your upper back and grip.
Build a bigger back
Bodybuilders use partial deadlifts to increase back size and width. The partial deadlift involves every major upper, lower, and mid-back muscle, and using heavy weights is one of the best ways to increase back thickness and density.
Overcome your sticking points
Like most freeweight exercises, full deadlifts have sticking points. Some lifters struggle to break the bar away from the floor, while others get stuck at the midpoint of their rep and battle to lock out their hips.
Partial deadlifts allow you to work on your lockout, so you are more likely to be able to complete your conventional deadlift reps successfully.
Fatigue management
Full deadlifts are incredibly fatiguing. They challenge your entire body and central nervous system, especially if you do very low reps, e.g., 1-3 per set. Partial deadlifts are a little less taxing as the range of motion is less.
So, if you are feeling too tired to do full deadlifts, you may find that you can still perform partials. Alternatively, you can alternate between full and partial deadlifts if you want to avoid accumulating too much fatigue, e.g., because you deadlift twice a week.
Partial Deadlifts – Cons
While partial deadlifts are an effective exercise, there are a couple of drawbacks to consider, too:
Equipment
You’ll need pulling blocks, a power rack, or stacks of bumper plates to do partial deadlifts. If you cannot raise the bar off the floor, you won’t be able to do this exercise. In contrast, all you need for full deadlifts is a bar and weight plates.
You can lift more weight
While this is a pro, it can also be a con. Just because you can lift more weight doesn’t mean you should! Some lifters load up the partial deadlift and use way more weight than they can handle safely. This can lead to injury, especially to the lower back.
Not as functional
Most strenuous lifting activities start with a weight resting on the floor. Partial deadlifts begin with the weight raised, so you could become “weak off the floor” if you never do full deadlifts.
What is Full Deadlift?
The full or conventional deadlift is so-called because each rep starts with the weight resting on the floor. In other words, it’s a “dead” weight. When talking about deadlifts, most people are referring to full deadlifts rather than partials.
The deadlift is a popular exercise with all strength athletes and is the final lift contested in powerlifting events. Deadlifts also feature in most strongman competitions. Bodybuilders do deadlifts to build upper and lower body strength and muscle size. Even booty girls do deadlifts as it’s such an effective hip and butt-builder.
The current world record for the deadlift is 501kg/1,104.5lbs, held by strongman Hafþór Júlíus Björnsson. However, Eddie Hall’s 500kg lift is the heaviest ever in strongman competition.
Muscles Worked
Full deadlifts work the same muscles as partials. However, full deadlifts involve more lower-body engagement. This is because you must flex your knees and hips more to reach the floor.
The muscles tested and trained during full deadlifts are:
Trapezius
Rhomboids
Deltoids
Latissimus dorsi
Core
Biceps
Forearm flexors
Gluteus maximus*
Hamstrings*
Quadriceps*
Triceps surae
*Greater involvement compared to partial deadlifts.
How to do full deadlifts
Get the most from full deadlifts while minimizing the risk of injury by following these guidelines!
Place your barbell on the floor. Use standard 45lbs/20kg plates or raise the bar on blocks so it’s around nine inches off the floor.
Stand with your feet between hip and shoulder-width apart, toes under the bar. The bar should lightly touch your shins.
Lean forward and hold the bar with an overhand or mixed shoulder-width grip.
Straighten your arms, drop your hips, brace your core, and raise your chest. Pull the slack out of the bar. Flex your lats and press the bar toward your legs.
Drive your feet into the floor and stand up, pushing your hips forward as you rise. Make sure your hips do not come up faster than your shoulders.
Stand up straight but avoid leaning back.
Lower the bar under control back to the floor, allow it to settle, reset your core and grip, and repeat.
Learn more about perfecting your deadlift form here.
Tips:
If using a mixed grip, switch your hands around set by set to avoid muscle imbalances.
Deadlift in flat shoes or just your socks to maximize posterior chain engagement.
Do not allow your lower back to round during deadlifts, as doing so can cause severe injury.
Use chalk and/or straps to reinforce your grip.
Wear a weightlifting belt for safety and support.
Full Deadlifts – Pros
Are full deadlifts the best variation for you? Consider these benefits and then decide!
A very functional exercise
Full deadlifts teach you how to safely lift heavy objects from the floor. This is a common feat of strength that many people must perform daily, e.g., lifting kids, pets, grocery bags, etc. Full deadlifts develop functional or useful strength that can help you in the real world outside of the gym.
A total muscle builder and strengthener
Full deadlifts work almost every major muscle in your body – upper and lower. As such, they’re an excellent option for time-pressed exercisers who don’t have time for more convoluted workout plans.
So, whether you want more muscular legs, a broader back, or an unbreakable grip, full deadlifts will give you what you want.
A standardized lift
Providing you use Olympic bumper plates, all full deadlifts should be more or less identical and, therefore, comparable. So, if you lift 220lbs in Boston, you should have no problem repeating your lift in New York.
In contrast, partial deadlifts can start from almost any height, making it much harder to compare your performances. Starting with the bar at 12 inches feels very different to 15 or 18.
Lots of options and variations are available
Partial deadlifts are a variation of full deadlifts, and there are plenty more to choose from. Additional full deadlift variations include:
Paused deadlifts
Sumo deadlifts
Deficit deadlifts
Banded deadlifts
Single-leg deadlifts
Touch ‘n’ go deadlifts
Hack deadlifts
Snatch grip deadlifts
All these variations (as well as partial deadlifts) mean your deadlift workouts never need to be repetitive or boring.
Full Deadlifts – Cons
There are also a couple of drawbacks to full deadlifts to consider:
Increased lower back stress
Bending forward to reach a barbell on the floor puts a lot of stress on your lower back. This can be a problem for people suffering from lower back pain. This stress is highest for taller lifters and those with tight hamstrings.
Related: 3 Reasons Your Back Hurts After Performing Deadlifts
A complex exercise
Contrary to what you might think, full deadlifts are quite technical and require skill to perform safely. Common deadlift form faults include rounding the lower back, letting the hips rise faster than the shoulders, “squatting” the bar up, and lifting your heels.
Some lifters, especially beginners, may need help learning the deadlift. Given its potential to cause injury, the deadlift should not be taken lightly!
A very taxing exercise
The full deadlift is so demanding that some lifters only do a few sets a week. In contrast, others only train heavy deadlifts every 10-14 days. A heavy deadlift workout will take a lot out of your body, taxing not only your muscles but your central nervous system.
This could be a problem if you also need energy for other activities, e.g., a sport you’re training for.
Some people hate deadlifts!
Heavy, high-rep deadlifts are tough. It’s not uncommon to feel faint or sick after a set of deadlifts. But, of course, this demand is what makes deadlifts so effective. Still, for those of a less masochistic persuasion, the difficulty of deadlifting means they dread or hate doing deadlifts.
The good news is that deadlifts are NOT compulsory, and there are plenty of exercises you can do instead.
Partial Deadlifts vs. Full Deadlifts
So, now that you know a little more about partial and full deadlifts, let’s judge these exercises by a few different criteria:
Partial Deadlifts vs. Full Deadlifts: Strength
Partial and full deadlifts are both excellent strength-building exercises. They are ideal for low rep, heavy weight training, which is critical for building strength. However, because the movement/range of motion differs between these two exercises, so does the type of strength they develop.
Full deadlifts will develop full-range strength, particularly in your hamstrings and hips. They’re much more lower-body dominant. In contrast, partial deadlifts use a smaller range of motion and less lower-body engagement. They tend to emphasize the upper body more.
Therefore, you should choose the exercise that strengthens the muscles you want to develop – full deadlifts for the lower body and partials for your upper body.
Winner: It’s a draw!
Partial Deadlifts vs. Full Deadlifts: Hypertrophy
Both partial and full deadlifts are potent muscle builders. However, like building strength, each exercise tends to affect different parts of your body. Full deadlifts work your upper body and lower body reasonably equally, but partial deadlifts are more upper-body dominant.
Because of this, you must choose the right deadlift for the muscle groups you want to enlarge.
Winner: It’s a draw!
Partial Deadlifts vs. Full Deadlifts: Safety
While deadlifts can be performed safely, the loads and movements mean there is always a risk of injury, especially to the lower back. Biceps tears are also a problem during deadlifts, especially when using an alternating or mixed grip.
The reduced range of motion and more back-friendly starting position means that partial deadlifts are potentially safer than conventional deadlifts, especially for taller lifters and anyone with tight hamstrings.
Winner: Partial deadlifts!
Partial Deadlifts vs. Full Deadlifts: Ease of learning
The large range of motion and potentially awkward starting position means that full deadlifts can be hard for beginners. In contrast, the partial deadlift is harder to get wrong, as the bar is set at a more comfortable and reachable height.
However, most beginners should be able to learn either type of deadlift with proper instructions. In fact, the deadlift is a critical movement for all exercisers as it teaches you how to safely lift heavy objects off the floor, e.g., when picking dumbbells up off the floor to do curls.
Winner: Partial deadlift, albeit only just!
Partial Deadlifts vs. Full Deadlifts: Equipment
Full deadlifts are a very low-tech exercise. All you need is somewhere flat to stand, a barbell, and enough weight plates. You can do full deadlifts in a fancy gym, your garage, or even in your backyard.
In contrast, you’ll need something to rest the bar on for partial deadlifts, be that a power rack or pulling blocks. Because of this, you may not have the equipment you need to do partial deadlifts.
Winner: Full deadlifts!
Partial Deadlifts vs. Full Deadlifts: Long-term progression
With partial deadlifts, your primary source of long-term progression is adding weight to the bar. You CAN reduce the height of your barbell, which will make the lift more challenging. Still, unless you lower the bar a fraction of an inch at a time, this is not a viable option for long-term progression.
In contrast, while you can add weight the same way with full deadlifts, there are also many variations you can use to maintain your progress, such as deficit and snatch grip deadlifts.
Many of these variations are designed to boost your conventional deadlift performance. However, they probably won’t do much to improve your partial deadlift.
Winner: Full deadlift!
Partial Deadlifts vs. Full Deadlifts: Variety
As discussed above, partial deadlifts are already a variation of full deadlifts, and there are many more for you to try. Lifters do not tend to just do partial deadlifts and use other variations to keep their workouts fresh and productive.
In fact, powerlifters usually use partial deadlifts as an assistance or accessory exercise to improve their conventional deadlift lockout. Only strongmen compete in the partial deadlift.
Winner: Full deadlift!
Partial Deadlifts Vs. Full Deadlifts – Wrapping Up
Back in Victorian times, the deadlift was known as the health lift. It was considered one of the best exercises you could do for strength, endurance, fitness, and well-being. Nowadays, you are more likely to see exercisers doing leg presses than deadlifting, and the squat is arguably more popular than the deadlift.
However, in terms of bang for your buck, deadlifts are hard to beat. Very few exercises work as many muscles or are as functional as the deadlift. Sadly, though, because of prolonged sitting, many people are unsuited to deadlifts, and some gyms have even banned them.
So, are partial deadlifts better than full deadlifts, or is it the other way around? The truth is that both of these exercises are excellent, and either one would make a great addition to your lower body or back workouts.
Do full deadlifts for more of a full-body workout or partial deadlifts to emphasize your upper body.
Ultimately, any deadlift is a good deadlift, providing you perform it correctly, of course!
Read also: Romanian Deadlift Vs. Deadlift: Which One Should You Do?