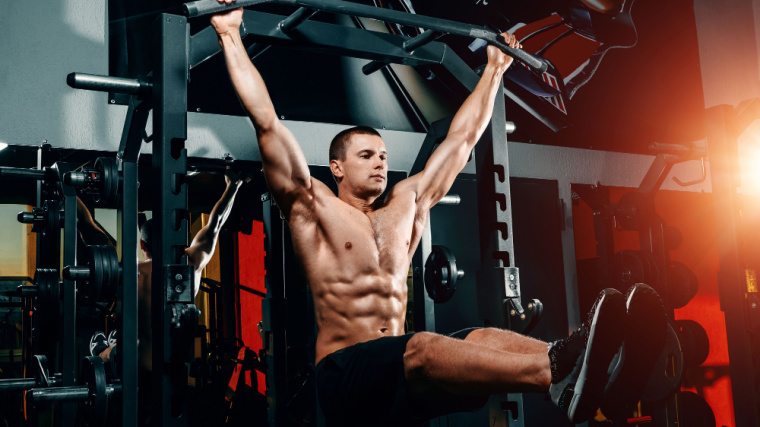
A strong midsection sits as the cornerstone of your training. Whether you’re looking to finally hit a 500-pound deadlift, pack on high-quality lean muscle, or even sharpen techniques for your sprint workouts, a solid core is crucial. The hanging leg raise is the perfect storm as it simultaneously smokes your abs while integrating an ever-important full-body brace.
Simplicity makes the hanging leg raise a potent tool. All you’ll need is a pull-up bar and your own body weight to get started. With that in mind, it does place the full onus on you to control your movements and get the absolute most out of each rep. Add the grip challenge of hanging onto the bar and you’ve got yourself one of the toughest ab exercises.
Mastering this technique puts you on the fast track to significant gains. Here is everything you need to know about the hanging leg raise, including some common mistakes to avoid and how to build up to your first full leg raise.
- How to Do the Hanging Leg Raise
- Hanging Leg Raise Press Variations
- Hanging Leg Raise Alternatives
- Benefits of the Hanging Leg Raise
- Muscles Worked by the Hanging Leg Raise
- Who Should Do the Hanging Leg Raise
- Common Hanging Leg Raise Mistakes
- Frequently Asked Questions
How to Do the Hanging Leg Raise
Kickstarting your core training is quite straightforward. Line up a pull-up bar and follow these steps to properly execute your hanging leg raise.
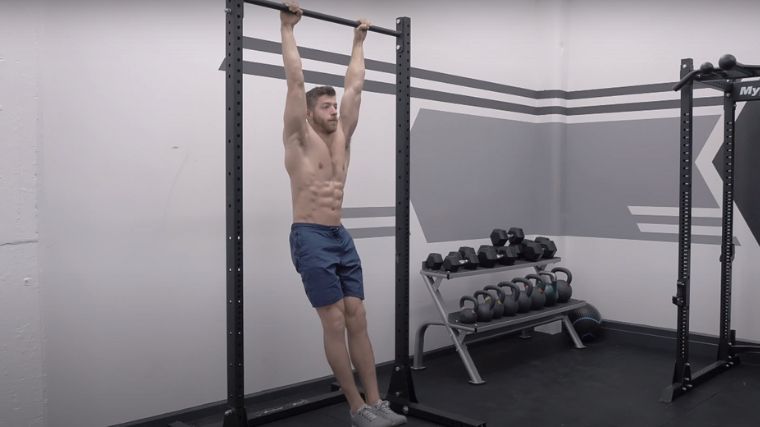
Step 1 — Grip
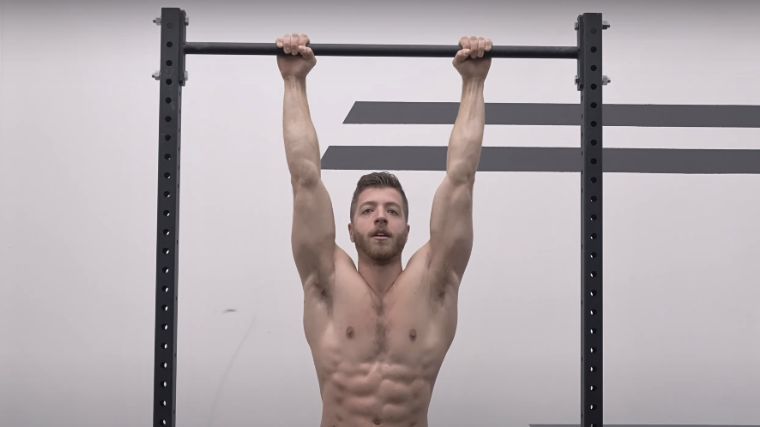
Set your hands on a pull-up bar about shoulder-width apart. Take a double overhand grip, letting your body hang completely still without any forward or backward movement. Select a height that allows you to completely dead hang without your feet reaching the floor.
Coach’s Tip: If you’re struggling to reach the bar by jumping, try setting up a plyometric box and using it to assist. Just make sure it isn’t in the way of your legs during the exercise itself.
Step 2 — Brace
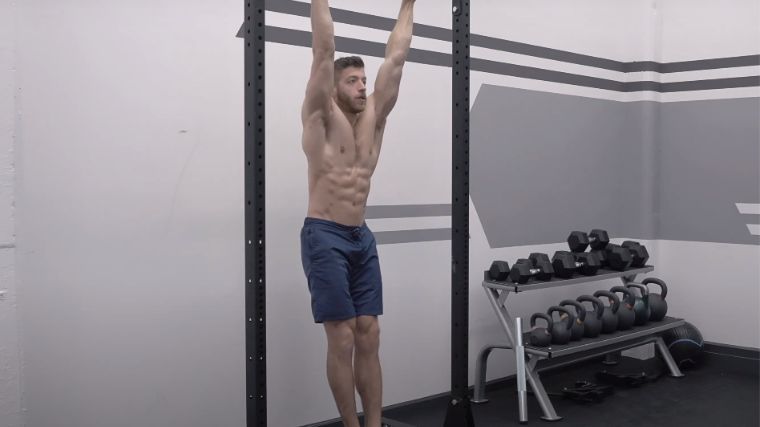
Stabilize yourself by generating full body tension. Squeeze your hands, engage your lats, flex your glutes, and lock your quads. Bear down your abdominal muscles to create a torso brace. You should now resemble a hanging hollow hold.
Coach’s Tip: Maintain your full body brace throughout the entire set. Resetting your body tension on each repetition adds body movement that threatens to pull you out of position.
Step 3 — Leg Raise
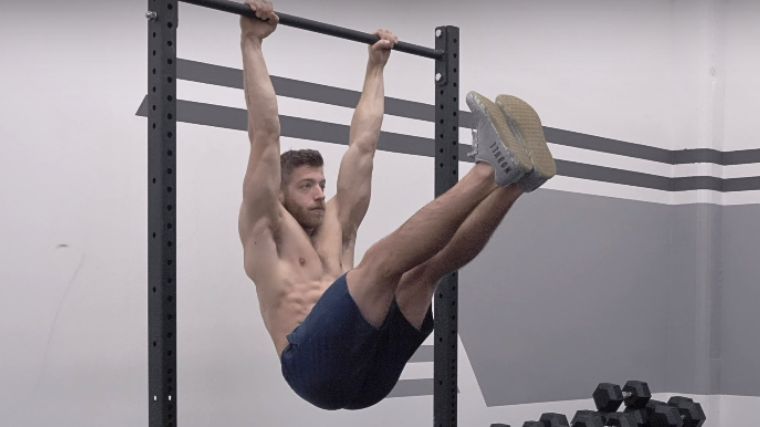
Once your position is stabilized, begin to raise your legs in front of your body. Maintain locked-out knees by keeping your quads tight. Continue raising your legs until they reach approximately 90 degrees of hip flexion. The bottom of your heels should be about parallel to the floor before you are done.
Coach’s Tip: Aim to keep your legs as straight as possible throughout the range of motion. However, a small amount of knee flexion is completely normal for most people.
Step 4 — Controlled Descent
Keep your abs tight and maintain your full body tension. Slowly lower your legs back to the starting position, avoiding momentum or undue swaying. Once your body makes a straight line from head to heels, you have completed one repetition. Repeat as many times as possible with good form to complete the set.
Coach’s Tip: Think about squeezing your ankles together throughout the range of motion to help maintain your body tension.
Hanging Leg Raise Variations
The hanging leg raise is a straightforward but physically challenging technique. Here are some helpful variations to provide options within your training. Hanging knee raises can also help you build the strength and stability you need to advance to your first full hanging leg raise.
Hanging Knee Raise
[Read More: 5 At-Home Workouts for Strength, Muscle Growth, Power, and More]
- Assume your normal hand position and full body brace for hanging leg raises.
- Begin the movement by raising your knees towards your chest, allowing a natural bend instead of trying to keep your legs completely straight.
- Raise your knees until your thighs are about parallel or higher to finish each repetition. Make sure to use your abdominal muscles to initiate and control this movement instead of your hip flexors or legs.
Alternating Hanging Leg Raise
[Read More: The Best Online Workout Programs for Coaching, Cardio, Value, and More]
- Set up in your normal hanging leg raise position.
- Establish full body tension, raising one leg to approximately 90 degrees while keeping the other locked out in its original position.
- Lower your leg back to the starting position and raise the opposite leg to 90 degrees. Repeat while alternating working sides to complete your set.
Hanging Windshield Wipers
[Read More: What Are Workout Splits and Which Is the Best One?]
- Brace your body in the same starting position as your hanging leg raise.
- Begin raising your legs towards the left or right of your body instead of straight ahead as you normally would.
- Continue raising your legs and rotate them across your body completing a circular motion. Control your descent towards the starting position on the opposite side.
- Alternate directions between repetitions for the duration of the set.
Hanging Leg Raise Alternatives
Once you’ve logged your time with the hanging leg raise, you might be looking for a slightly different angle. Try weaving some of these alternatives into your workouts for a similar yet unique challenge. These core exercises can help you build a strong foundation upon which to develop your hanging leg raises.
Hollow Body Hold
[Read More: The Best Full-Body Bodybuilding Workout for Beginner to Advanced Lifters]
- Lie on the ground flat on your back or dead hang from a pull-up bar.
- Establish full body tension by bracing your abdominals, flexing your lats and glutes, and locking your quads.
- Your legs should jut out ahead of your body slightly.
- Lock in this position for a timed duration.
Roman Chair Knee / Leg Raise
[Read More: Get Freakishly Strong With the 5×5 Workout Program]
- Get onto a Roman chair with your back flat against the pad and your arms locked at 90 degrees. If there are hand grips, squeeze them tight.
- Brace your body like you would preparing for a hanging leg raise.
- Draw your knees towards your chest, aiming to get 90 degrees or more of hip flexion. Control your descent for repetitions.
- Alternatively, perform with straight legs.
Assisted Dip Standing Curl
[Read More: The Ultimate 10-Week Powerbuilding Workout Routine for Mass and Strength]
- Place your hands on the knee pad of an assisted dip machine.
- Use your upper body to drive the pad down, locking out your elbows and holding this position.
- Maintain locked-out arms and slowly complete a standing abdominal crunch. Control your eccentric portion to safely return to the starting position.
Benefits of the Hanging Leg Raise
The hanging leg raise is a fabulous way to train your midsection, but it also helps to integrate full-body bracing and proprioception. Not to mention, the unique positioning that hanging leg raises place you in helps to train your hip flexor muscles, too. Remember, though, that this exercise should focus mostly on your abdominal muscles.
Abdominal Gains
The muscle that primarily controls this exercise is your rectus abdominis — what you think of when you’re wondering how to get abs and you picture a six-pack.
However, maintaining the control necessary to do your hanging leg raise effectively calls on your whole core (including the internal and external obliques and your transverse abdominis). This means you’ll get a strong core workout while also directly training your abs.
Full Body Brace
Although your abdominals are a huge part of your core and full body brace, there are many muscles that intertwine to stabilize your position. Your lats and upper back, quadriceps, and glutes all contribute to neutralizing any unnecessary sway during the hanging leg raise.
You’ll even improve grip strength, since you’ll need to hold onto the bar steadily throughout your reps. As you master this degree of muscular control, the same full body tension that makes your hanging leg raise effective also contributes to a number of other calisthenics or barbell exercises.
Rectus Femoris
One of your quadriceps muscles, your rectus femoris, also serves as one of your hip flexors. The quadriceps tend to get the best training from exercises like the back squat, front squat, or leg press, but the rectus femoris specifically needs something special.
Since it attaches above the hip and below the knee, one of those joints needs to be stationary to really nail your rectus femoris. The hanging leg raise uniquely helps target this hip flexor muscle by keeping your knees locked while flexing the hips.
Muscles Worked by the Hanging Leg Raise
The major muscles worked by your hanging leg raise certainly include your abdominals, but they hit the hip flexors as well. Finally, you’d be hard-pressed to miss the massive forearm pump you get after a few high-rep sets.
Core
Probably the most obvious and sought-after muscle group of your hanging leg raise is the core. Your abdominals and most muscles that connect to your torso are called upon to either control your body sway or flex your spine.

[Read More: Build a Titanic Torso with These Bodybuilding Chest & Back Workouts]
This includes the “core four” abdominal muscles (rectus abdominis, internal and external obliques, and the transverse abdominis), but also your lats, glutes, upper back, and adductors.
Hip Flexors
Even though they shouldn’t be your primary focus, your hip flexors will still get stronger with this movement. The rectus femoris in particular will get a lot of much-needed action here. The hanging leg raise keeps your knee locked as your hip flexes, producing a much more effective stimulus for the rectus femoris.
Forearms
While this is not a forearm exercise per se, it will still challenge your forearms quite effectively. In order to complete your hanging leg raise, you’ll need to hold your entire body weight on a pull-up bar.
Not only that, but your grip needs to combat any body sway that may occur during the set. The forearm muscles are primarily responsible for your hand squeeze and thus catch a huge degree of stimulus from your hanging leg raise.
Who Should Do the Hanging Leg Raise
The hanging leg raise is the jack of all trades for a ton of lifters. Bodybuilders, powerlifters, and even Olympic lifters can try weaving them into their training.
Bodybuilders
Bodybuilding requires you to present a chiseled, proportional physique on show day. Throughout your training, you’ll likely get a bunch of abdominal stimulation, but you’re not going to want to leave direct ab work out of the equation.

The hanging leg raise is the perfect choice to cap your bodybuilding routine. It helps target the abs (particularly your six-pack), and also integrates your core bracing and full body control. By doing all this without external load, you stand to keep your waist more on the trim side.
Powerlifters
Powerlifters are all about developing a strong, steady brace. Much of the main work you’ll be performing as a powerlifter involves barbells and dumbbells, which hit most (if not all) muscles throughout your session.
A good hanging leg raise fits right in here, integrating your abdominal training with full-body bracing. You’ll get a nice bit of shoulder and grip work along the way just trying to hold onto the bar. All of this translates well into bracing and holding the bar through your squat, bench press, and deadlift.
Olympic Lifters
To be a successful Olympic lifter, you have to stand up (literally) under a tremendous amount of spinal loading. Your core and grip strength must be impeccable. Your shoulders are also brought into this game of joint-stacking Jenga.
A hanging leg raise clearly helps improve your bracing ability, comfort under pressure, and a strong, stable shoulder position overhead.
Common Hanging Leg Raise Mistakes
The hanging leg raise can be a double-edged sword if you don’t do it right. While it provides huge benefits, it’s easily done wrong — which leaves a ton of gains on the table. Be sure to avoid using momentum, maintain full range of motion, and keep your legs as straight as you can.
Momentum
The key to a quality hanging leg raise is controlling your position the whole time. Your legs should raise because of abdominal muscle contraction, not momentum. The problem is that hanging from a bar and growing fatigue makes it easy to introduce unintentional leg swinging.
Remain diligent so your repetitions remain controlled abdominal contractions instead of letting momentum take over. If you do want to try a momentum-based movement with a similar profile, try out the toes-to-bar exercise.
Losing Range of Motion
Due to fatigue or lack of baseline strength or mobility, you may find yourself unable to get your legs raised fully through your desired range of motion. To stay tight, you may find yourself locking your core in place and neglecting too much of the bottom-end range of motion.
The best course of action here is to remain strict — give up a few repetitions if needed in order to keep everything perfectly executed. You want your legs getting all the way up to 90 degrees (parallel to the floor) every time.
Bent Knees
A defining part of the hanging leg raise is keeping your knees locked out. You have options to scale the difficulty; however, if you’re finding yourself consistently bending your knees on each repetition, you’re likely leaving gains on the table. That said, keep in mind that everyone’s body works differently — simply keep your legs as straight as they can go.

The straight leg position uses your own body to increase the challenge. If this isn’t working, try some of the variations or alternatives to build towards the hanging leg raise.
Raise Your Core Strength
If you want a stronger, more stable core and are able to hold onto a pull-up bar, you may want to give the hanging leg raise a try. You’ll be sure to increase strength in your core, improve your ability to brace, and build a seriously powerful grip in the process. When you’re aiming to boost your one-rep maxes, the hanging leg raise might just become your favorite accessory exercise.
FAQs
The hanging leg raise is a great tool to weave into nearly any training program. Here are some commonly asked questions to help fill in the gaps.
How often should I perform the hanging leg raise?
The hanging leg raise is a great exercise to integrate into your workout program. Like all muscle groups, your goal is to train your midsection hard with the hanging leg raise. In order to properly recover from a hard training session, try to give yourself 24 to 48 hours off to recover before training this move again.
When should I perform the hanging leg raise?
The hanging leg raise fits nicely into your day either at the beginning or end of a training session. Early in your workout, it helps cue or do your full body warm-up to prepare for some heavier lifts. Later in the workout, use it to fully target your abdominals and take the sets closer to failure.
How should I program the hanging leg raise?
The hanging leg raise is a calisthenics training or bodyweight exercise. It’s also very challenging at first depending on your baseline strength. Think of programming the hanging leg raise similar to a push-up or pull-up.
Start with as many repetitions as possible and take ample rest (around two to three minutes) between sets to build strength. Make it a goal to build your sets to around 10 to 15 repetitions before you fatigue. Integrate this move into warm-ups for smaller sets and the beginning of your ab workouts to push toward failure and really build strength.
Featured Image: Marko Aliaksandr / Shutterstock
The post How to Do Hanging Leg Raises for a Rock Solid Core appeared first on BarBend.