Tag: Back
Close Grip Lat Pulldown For a Cobra Back: Techniques, Benefits, and Variations
Close grip lat pulldown is a great back workout and here is a closer look at the exercise!
Close Grip Lat Pulldown is a variation of the lat pull down. In this exercise, you target your back differently compared to the traditional variation by keeping your hands and arms close together. Although the close grip lat pulldown primarily works your lats, you will experience a decent amount of bicep and middle back activation.
But why do we need close grip lat pulldown when we already have the orthodox exercise, you ask?
Since your back is the second largest muscle group (after your legs), you need to perform a plethora of exercises and variations to train it optimally and ensure overall development. So, do not be afraid of experimenting with several different hand positions and angles to maximize your back gains.
Due to its versatility, the close grip lat pulldown can be incorporated in your back, upper body, pull, and full-body workouts.
Next Read: The 6 Best Exercises for Annihilating Back Fat for Men and Women
Muscles Worked
Since the lat pulldown is a compound movement, it works multiple muscles, including:
Lats: No points for guessing here. As the name suggests, latissimus dorsi (lats) are the primary target muscles of the close grip lat pulldown.
Biceps: Although the lat pulldown is primarily for your back, secondary muscle recruitment, especially the biceps, is unavoidable.
Shoulders: If you follow the correct form (discussed below), you will experience shoulder recruitment at the top and bottom of the movement.
Upper Back: While the close grip lat pulldown is essentially for your lats (flat muscle covering the width of your middle and lower back), you cannot factor out upper back stimulation.
Abs: People who think there is no core engagement during the lat pulldown have never gone heavy on the exercise.
Check Out: Build A Thick and Wide Cobra Back With This Workout
Benefits
The close grip lat pulldown is an incredibly effective exercise for:
1. Building Bigger and Stronger Lats
Compared to the traditional lat pulldown, the close-grip version offers an increased range of motion as your elbows are relatively closer to your body throughout the exercise. Holding the bar with a close grip allows you to pull the bar slightly further than you could while holding the bar with a wider grip.
The increased range of motion maximizes your lat contraction at the bottom of each rep resulting in a higher degree of muscle tissue recruitment and stimulation. The additional workload helps build wider, bigger, and stronger lats.
Must Read: Isolation Vs. Compound Exercises: Strength, Weight Loss & More
2. Improving Your Posture
Our current lifestyle, especially with the onset of WFH, has us bent over our computer screens or phones for the majority of the day. This posture causes underuse of your lats and other muscles resulting in slouching, pain, and tension in your shoulders and back.
Close grip lat pulldown helps strengthen your posterior chain and reduces the chances of developing a hunch. The exercise can also help treat your pre-existing slouching posture.
Related: Top Tips & Stretches For Improved Posture With Don Saladino
3. Helping Build a V-Taper
Well-developed lats help carve the much sought-after V-taper. A solid V-taper amplifies the illusion of a small waist and broad shoulders, making you look bigger and stronger than you actually are IRL.
Watch: How To Truly Develop A Bodybuilding V-Taper
4. Great For Beginners
The lat pulldown is an easy exercise to perform. It is, for a reason, one of the first exercises a newbie learns to do when he joins a gym. The lat pulldown is a godsend for individuals who lack the upper body strength to do a pull-up.
How To Perform Close Grip Lat Pulldown
Step by step instructions of how to perform a close grip lat pulldown:
Attach a wide grip handle to the lat pulldown machine.
Adjust the thigh pad so that your legs fit snuggly under the cushion.
Grab the handle at slightly narrower than shoulder-width with a pronated (overhand) grip
Get into the starting position by unracking the weight and locking your legs under the thigh pad.
Start the movement by depressing your shoulder blades and flexing your elbows while extending the shoulders. Keep your chest raised and your back arched throughout the movement.
Pull the handle toward your body until your elbows are in line with your torso.
Bring the attachment as close to your upper chest as possible.
Pause and contract your lats at the bottom of the movement.
Return to the starting position with a slow and controlled motion.
Repeat for recommended reps.
Common Mistakes
Although the close grip lat pulldown is a fairly simple exercise, most lifters make the following mistakes:
1. Using Momentum
Many lifters make the mistake (read: sin) of utilizing momentum to lift the weight. If you look like a pendulum while performing the exercise, you are doing it wrong.
If you cannot move the weight without leaning back more than 20-degrees, you should drop the weight (and your ego). Swinging back and forth takes off the tension from the primary muscle (lats) and puts it on the helping muscles.
Also, when you are using more weight than you can handle, you will not be able to pause and contract your lats at the bottom of the movement, leaving gains on the table in the process.
Watch: When Ego Lifting Goes Wrong
2. Going Too Low
This mistake is mostly made by people who use relatively easy weight.
It is the mirror opposite of the first mistake mentioned above. Overdoing the range of motion takes away the tension from the target muscles and puts it on your joints.
As mentioned above, you should not be going below your upper chest level while performing the close grip lat pulldown. If the weight feels too easy, contact your lats for longer at the bottom of the movement, instead of overdoing the ROM.
3. Using Your Arms
We understand that it is virtually impossible to eliminate your arms from the exercise, but you need to have a strong mind-muscle connection so that your back gets the most work done.
If you feel your biceps are taking over the exercise and your back is underactive, you should consider using a false grip. In a false grip, you do not wrap your thumbs around the bar. It is also called a monkey grip.
Pro tip: Focus on pulling the bar towards your body using your elbows. Leading with your bis will leave you with nothing more than a bicep pump.
Related: Full Range Of Motion Vs Partials: Which Is The Way To Go?
4. Body Posture
Many lifters tend to round their backs as they bring the bar down. Hunching over the bar elevates the tension off your back and puts it on your shoulders.
While performing the close grip lat pulldown, ensure that your lower body is locked under the knee pads.
Pro tip: Do not place your feet flat on the floor. Keeping your heels raised ensures a better fit under the thigh pads.
Variations
“I know more exercise variations than I will ever need.” – No one ever
Utilizing exercise variations can help target your muscles differently and induce growth by shocking your CNS.
Here are some of the most effective close grip lat pulldown variations:
1. Underhand Close Grip Lat Pulldown
In this variation, you will be grabbing the bar with a supinated (palms facing you) instead of a pronated grip. The underhand close grip lat pulldown is great for targeting your lower lats.
Note: You might experience a higher degree of bicep recruitment in this variation.
Steps:
Sit facing a lat pulldown machine and grab the bar with an underhand grip.
Pull the bar towards your upper chest while leading through your elbows.
Keep your elbows as close to your body as possible while pulling the bar down.
Pause and squeeze the life out of your lats at the bottom of the movement.
Slowly return to the starting position and repeat for recommended reps.
Also Read: Chris Bumstead Back Workout For A Sprawling Christmas Tree
2. V-Bar Lat Pulldown
[embedded content]
The V-bar pull-down is commonly mistaken for the close grip lat pulldown. The neutral hand placement in this variation can aid in alleviating stress placed on your shoulders during the vertical pulling movement pattern.
Holding the bar with a hammer grip is an excellent option to improve the center of your back while still targeting your lats.
The V-handlebar lat pulldown variation brings your hands closer to each other and, hence, allows a larger range of motion and better contraction at the bottom of the movement.
Note: While performing this variation, you will have to lean back slightly more than normal to allow for a full range of motion.
Steps:
Attach a V-bar to the lat pulldown pulley.
Grab the handle with a neutral (palms facing each other) grip.
While keeping your chest raised and back arched, pull the bar down until it is a few inches away from your upper chest.
Pause and contract at the bottom.
Return to the starting position slowly and repeat for reps.
Must Read: Chris Bumstead Back Workout For A Sprawling Christmas Tree
3. Behind the Neck Lat Pulldown
Behind the neck variation of the lat pulldown is slightly harder to execute as compared to the traditional version, especially for people with a limited range of motion in their shoulders and rotator cuffs.
Most lifters who incorporate behind-the-neck lat pulldown in their back training routines report a better range of motion in their lats and a deeper contraction in their lats and middle back at the bottom of the movement.
Caution: The risk of injury is higher with behind-the-neck lat pulldowns. If you are a beginner, consider starting with a lighter weight and a higher number of reps.
Steps:
Attach a wide bar to the lat pulldown machine.
Sit with your back towards the lat pulldown machine and your lower back supported against the thigh pad.
Grab the bar with a wider than shoulder-width pronated grip.
Pull down the bar using your elbows until it nearly touches the back of your neck.
Pause and contract at the bottom.
Slowly return to the starting position and repeat for reps.
Tips:
Keep your head pointed forward slightly throughout the exercise.
Do not use momentum and bring the bar down too fast as it can lead to an injury.
Check Out: The Ultimate Guide to a Ripped Back
4. Single Arm Lat Pulldown
The single-arm lat pulldown is an incredibly effective unilateral exercise. The benefits of unilateral movement include:
Helps correct muscle imbalances
Improves core stabilization
Boosts sports performance
Reduces chances of an injury
Improves muscle recruitment and stimulation
Allows you to train around an injury
Improves mind-muscle connection
Develops motor skills
Steps:
Attach a D-handle to the lat pulldown pulley.
Reach up and grasp the handle with a neutral grip (palm facing in).
Keep your chest raised and your back arched throughout the movement.
With your working arm fully extended, lean back 10–15 degrees.
Squeeze your shoulder blades together, take a deep breath and pull the handle to your upper chest, focusing on the lats and pulling your elbow back and down.
Pause and contract at the bottom.
Slowly return to the starting position and repeat for reps.
Related: The Benefits Of Unilateral Training & Why It Matters
5. Pull-up
It does not matter who you are, what you do, or where you live, pull-ups should be a part of your training routine. No exercise comes close to helping you build a V-taper as the pull-up.
Steps:
Start with your hands on the bar approximately shoulder-width apart with your palms facing forward.
With arms extended above you, stick your chest out and curve your back slightly.
While breathing out, pull yourself up towards the bar using your back until the bar is at chest level.
Slowly lower yourself to the starting position.
Repeat for recommended repetitions.
Tip: If you are a beginner and cannot complete a bodyweight pull-up, you could use an assisted pull-up machine, a spotter, or a resistance band.
Next Read: These Machines Are Better Than Free Weights
Conclusion
When it comes to building a solid back, most lifters limit themselves to rows and deadlifts. The close grip lat pulldown is a great exercise to amp up your back and should be a part of your exercise arsenal.
At the same time, do not get stuck with a single exercise. Maximize your results and build a venomous cobra back by alternating between the variations mentioned in the article.
Which is your favorite back exercise? Let us know in the comments below. Also, be sure to follow Generation Iron on Facebook and Twitter.
Promoting Back Health With The Dumbbell Deadlift
The Influence of the Deadlift on Overall Health
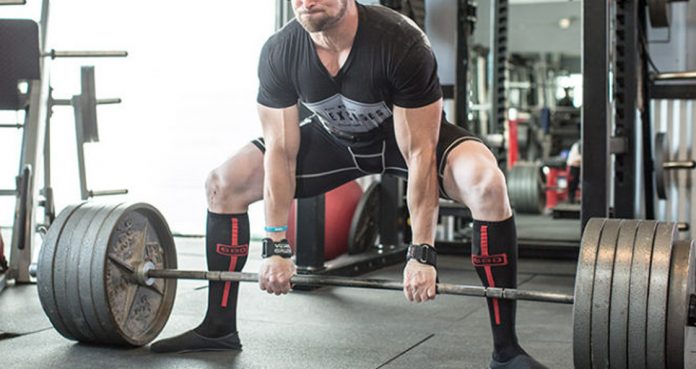
When it comes to fundamental resistance exercises, the deadlift is up there as one of the most essential.
For so many individuals, the back can be problematic – specifically the lower back. Pain is a fairly common occurrence which often result from weakness across a number of posterior chain muscles.
Often these vital posterior chain muscles are underused and neglected in day-to-day life and also during strength training.
In addition to this, sitting for prolonged periods and poor posture can contribute further to back problems and pain.
The deadlift effectively recruits and develops all muscles of the posterior chain – from the calves in the leg, right up to the traps in the upper back – and effectively reduce low back pain (1).
The deadlift places the greatest load on the lower back, glutes and hamstrings but requires a large degree of core engagement too (2).
Effectively strengthening all of these muscles and building lower back resilience can help to improve posture, reduce pain and eliminate problems.
The Benefit of Conjugate Training
Most individuals concentrate on conventional strength training which involves using a select number of heavy compound exercises to develop performance and enhance health.
While this method undoubtedly reaps reward in terms of strength and size gains, it may lead to over development of specific muscle groups and consequently lead to imbalances.
Research has suggested that muscle imbalances can increase the risk of sustaining an injury (3) – something that we all want to avoid.
There will undoubtedly be times in your training journey where it will be necessary to change your training styles and exercise selections.
For example, it may be necessary to do this as a method of working around an injury or for moving beyond a strength plateau.
One highly effective training method is conjugate training which incorporates an array of different exercises and styles in order to develop a more-rounded physique.
The varied nature of the workouts not only means that strength levels continue to rise but also that the risk of injury is substantially lower and promotes longevity.
Building Power with the Dumbbell Deadlift
A number of deadlift variations do put a lot of stress on the lower back, however, it is possible to save your back with dumbbell deadlifts.
The dumbbell deadlift is one of the greatest conjugate exercises around which has made a re-emergence in recent times having being made popular back in the 80’s.
Most recently, powerlifter and strongman Nick Best posted a training video on Instagram in which he pulls a 150 pound dumbbell deadlift.
It is no coincidence that Nick Best uses these methods and has won a powerlifting championship and still competes in World’s Strongest Man competitions – all while being over the age of 40.
When it comes to the dumbbell deadlift, many individuals view it as inferior to the barbell deadlift and believe that it is really for novices and lightweights.
However, the dumbbell deadlift and conjugate training have successfully been used over the years to successfully train both strongmen and powerlifters.
Many hardcore gyms have a range of heavy dumbbells (range up to as much as 250 pounds!) to make the dumbbell deadlift an extremely challenging, yet rewarding, exercise.
The dumbbell deadlift works particularly well as a finisher at the end of a tough leg workout – either singles or for reps.
Not only will you efficiently be building strength, it is also a fun way to end a session. In addition, if you have a training buddy, it can also provide some friendly competition to push you further.
Developing Range of Motion Through Dumbbell Deadlifts
Conjugate training exercises tend to work through a larger range of motion in comparison to traditional strength exercises.
Because the range is increased significantly, the weight that is being used should be reduced accordingly.
Avoid making the mistake of using the same amount of weight as you would with traditional training as this may lead to deviations in form and consequent injury.
The extended range of motion will not only improve strength (4) but will also promote joint health and prevent muscle tightness.
The dumbbell deadlift specifically will increase the strength and flexibility of the glutes, hamstrings and hips which are areas that typically tighten up with traditional style workouts.
There are two common methods of completing the dumbbell deadlift; either from a dead start or from the hang position.
The hang position is best when completing Romanian deadlifts which is a great variation that really hits the hamstrings hard.
To maximize the stress placed on the hamstrings, the legs should be kept relatively straight throughout the entirety of the exercise.
Remember to drive the chest up and engage all core musculature in order to prevent the back from rounding and protect the spine from injury.
Meanwhile, the dead start method involves an extended range of motion as the dumbbells must be pulled from and returned to the floor with each rep.
A conventional barbell deadlift will start with the bar at approximately shin-height as the weight plates lift the bar off the floor.
The dumbbells however will start down just above the ankles and force the performer to drop significantly deeper in order to to pick up the weight.
This extended range effectively targets the oblique muscles, glutes and hip musculature to a greater degree.
For true conjugate training, look to increase the range of motion as far as possible. It is possible to manipulate this by utilizing a number of different methods.
For example, create a deficit by standing on weight plates, utilize rep tempo variations or even consider looping mini-bands around the dumbbells and the ankles.
How to Perform the Dumbbell Deadlift
In addition to the clear range of motion differences between the two exercises, the positioning of the load is also different.
For the barbell deadlift, the load is placed to the front of the body whereas during the dumbbell deadlift, the weights are held in both hands and are positioned to the sides of the body.
Therefore, when performing the dumbbell deadlift, start by assuming a hip-width stance and place the dumbbells on the floor just outside the feet.
Push the chest up and pull the shoulder blades together before pushing the hips backwards and bending at the knees to bring you down toward the floor.
In this position, the hips should be higher than the knees and the back should remain flat.
Grip the dumbbells hard and ensure that the core is still engaged. Then, drive hard through your heels and rise up to standing, keeping the dumbbells tight to the body throughout.
Ensure you squeeze the glutes together tightly at the top of the movement. Reverse the entire movement so that the dumbbells return to the floor.
Dumbbell Deadlift Finishers
As mentioned, the dumbbell deadlift is a superb way to finish a workout. The following two finishers can easily be applied to the majority of strength-based training programs.
1) Max Effort (Deadlift) – 2 heavy sets of 20 reps
On training days which involve heavy barbell deadlifts, look to complete this finisher to hit the lower back and hamstrings.
There is little point in performing the exact same movement once again, therefore ensure that you use the RDL style with this finisher and not the dead start.
2) Max Effort (Squat) – 2 heavy sets of 10 reps (or less)
On training days involving heavy barbell squats, add in sets of heavy dumbbell deadlifts with a weight up to as much as 150 pounds.
If you are going heavier than 150 pounds, look to lessen the total number of reps to keep the risk of injury minimal and maintain form.
Sample Conjugate Training Program Using Dumbbell Deadlifts
Incorporating the dumbbell deadlift does not have to complicated. Here is how your max effort sessions for both the squat and deadlift may look.
Max Effort (Squat)
Exercise
Sets x Reps
Barbell Squat
5 sets / Working up to 1 Rep Max
Dumbbell Lunge
4 x 6 – 8
Banded Hamstring Curls
3 x 12 – 15
Ab Wheel Rollouts
3 x 12 – 15
Dumbbell Deadlift (Conventional)
2 x
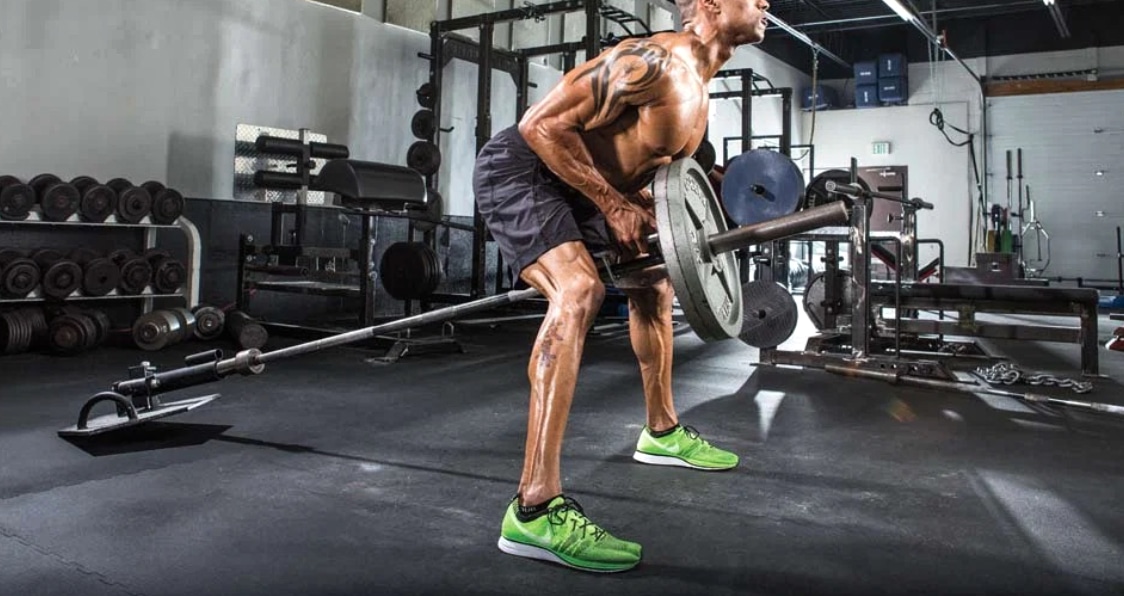
The Ultimate Landmine Row Guide: Benefits, How To, and Variations
The landmine row is a classic exercise to build a strong back.
The landmine row is an incredibly effective exercise to work your upper body. It is a compound exercise that can help you build strength and add muscle mass to your back.
Your back is the second largest muscle group (after legs). To train it optimally and ensure overall development, you need to perform a variety of exercises to ensure optimal muscle fiber recruitment.
Since you only need a barbell for the landmine rows, you could do it even in a bare-bone gym. The anchored barbell also allows you to get maximum contraction and muscle fiber recruitment in your back while performing the exercise.
What is a landmine?
If the information above has you sold on the benefits of landmine rows but has left you wondering if you would be walking blindfolded across a landmine-ridden field, do not fret. We have got you covered.
To set up a landmine row, you could:
Place a weight plate at one end of the barbell to anchor it to the floor.
Anchor the barbell in the corner of a wall or squat rack in your gym.
Use a piece of specialized equipment like a landmine tube.
Ask your training partner to step onto the other end of the barbell while you complete your set.
Must Read: How The Landmine Press Boosts Strength Training
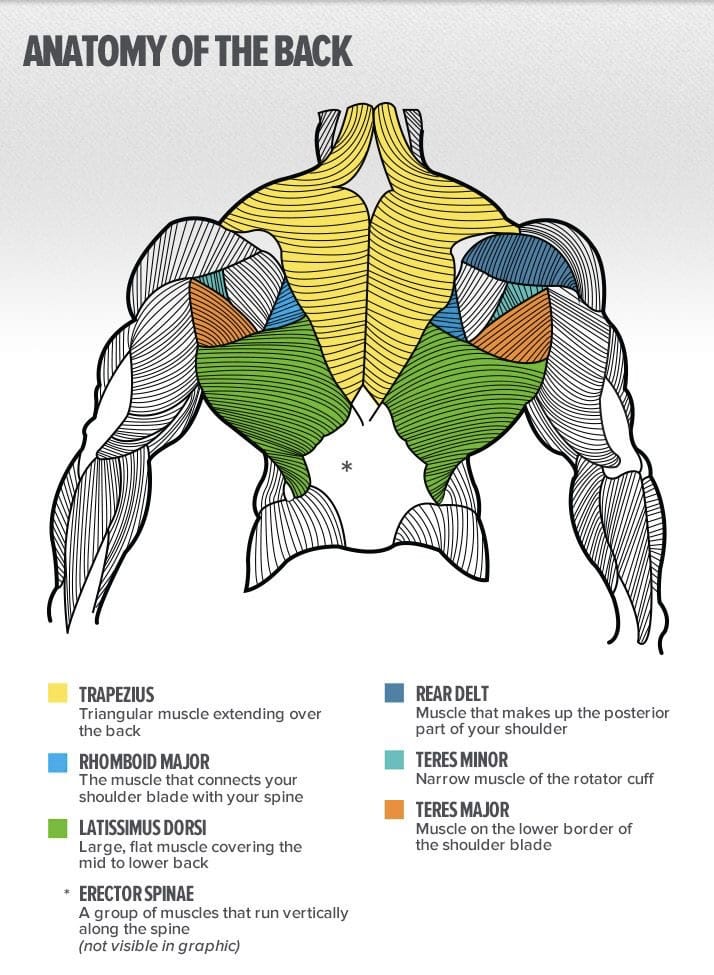
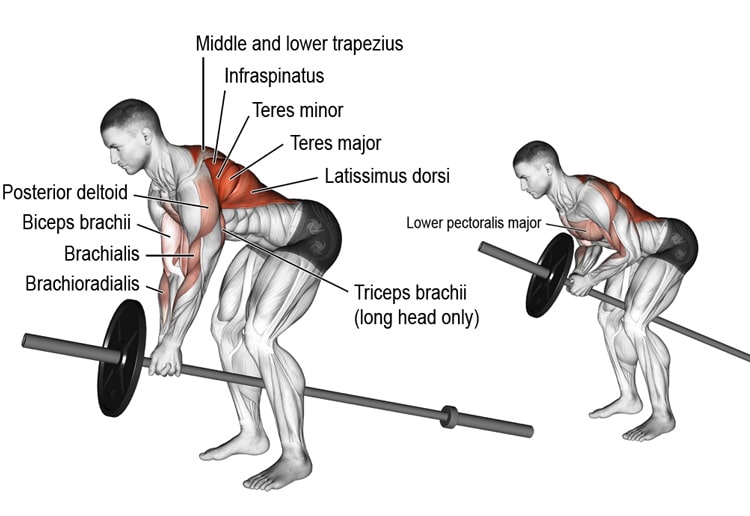
Muscles Worked
Since the landmine row is a compound (multi-joint) life, it engages multiple muscles, including:
Rhomboids
Teres Major & Teres Minor
Erector Spinae
Posterior Deltoid
Trapezius
Infraspinatus
Latissimus Dorsi
Brachialis
Brachioradialis
Biceps Brachii
Lower Pectoralis Major
Benefits
1. Allows a Bigger and Controlled Range of Motion
Since the barbell is anchored at one end while performing the landmine row, the other end moves at an angle. The angle of the bar allows you to apply force vertically and horizontally. You use a steady, controlled speed to move the barbell in a natural arc instead of in a straight line.
Since the bar follows a natural arc, you will feel more in control while performing the lift and might experience greater muscle fiber recruitment and better muscle pumps as you’ll be able to hold for longer at contraction points.
But why is that, you ask?
Because…
2. Changes in “Strength Curve“
The strength curve of an exercise refers to how “heavy” an exercise is at different points. While using a regular barbell, you will experience the same amount of force whether you are holding it one foot or five feet off the ground. The landmine, however, varies at different points.
When you first lift a landmine off the ground (do not try this in a war-infested zone), it is a horizontal movement, and so you are fighting against gravity – making the movement harder in the process.
However, as you go further up, the weight moves in an arc, increasing the slope. Meaning – Even though there is the same amount of weight on the bar, the higher the bar is, the “lighter” it will feel.
Related: How The Horizontal Row Enhances Solid Back Development
3. Great For Beginners
Since the landmine row has a pre-defined pattern of movement, it makes it easy for beginners to perform the exercise with the correct form. And because the bar moves in an arc, it increases your shoulder stabilizer muscle recruitment which can be very hard to achieve for a noob in exercises like the barbell or dumbbell row.
Check Out: 5 Tips For A Weight Room Beginner
4. Improves Muscle Balance and Stability
The landmine row can be easily adapted into a unilateral exercise which can help improve your muscle imbalances, core stability, and overall body balance.
Related: The Benefits Of Unilateral Training & Why It Matters
5. Reduces Chances of Injury
The landmine row is a great alternative for people with pre-existing back issues as it allows a greater degree of freedom to work around your injuries.
This exercise also places less pressure on your shoulders and spine as compared to the barbell or T-bar row.
Must Read: 4 Golden Rules You Need To Follow To Lift For Decades Injury-Free
Technique
This is how to perform the landmine row correctly:
Secure one end of a barbell in a corner or a landmine attachment.
Load appropriate weight on the free end.
Face away from the anchor point and stand near the shoulder of the other end.
Stand over the barbell with one foot on either side with a slightly wider than shoulder-width stance.
Bend down and grab the barbell with both hands.
Hinge at your lower back and push your hips back as you lower your upper torso until it is at a 30-40 degree angle with the floor.
Slightly bend your knees and keep your back straight. Maintain this position throughout the exercise.
Take a deep breath and brace your core.
Pull the barbell towards your chest while leading with your elbows.
Focus on pulling back your shoulder blades as you elevate the bar.
Pause and contract your lats at the top of the movement.
While exhaling, return to the starting position with a slow and controlled motion.
Repeat for recommended reps.
Pro Tip: You could also use a V-handle bar attachment in this exercise as it can help you get a better grip on the bar.
Common Mistakes
Here are some of the most common mistakes that lifters commit while performing the landmine row:
1. Bending Too Low
Many gym-goers overdo the movement by bending over way too much. Bending over too low has a couple of drawbacks:
You cannot lift heavy as your center of gravity is off. This is a major setback as optimal back training requires both volume and intensity.
Makes your lower back vulnerable to an injury.
On the other hand, some lifters do not bend over at all. You need to be at a 30-40 degree angle with the floor to train your target muscles effectively.
Related: 7 Common (But Lethal) Fitness Mistakes You Need To Avoid
2. Flairing Out Your Elbows
Bodybuilding requires optimal muscle fiber recruitment and annihilation that you can only achieve through a solid mind-muscle connection.
If you flair out your elbows while performing the landmine row, you will not be able to contract your shoulder blades and lats at the top of the movement. Keep your elbows as close to your body as possible to make the most of the exercise.
3. Incorrect Back Posture
You need to ensure that you maintain a neutral spine throughout the exercise. Most lifters either make the mistake of arching their back or worse – hunching over.
The most common reason for a bad form is excessive use of weight. If you cannot maintain a neutral spine or cannot bend over to the 30-40 degree mark, you should drop the weight (and your ego) and try again.
4. Not Trying New Things
Apart from trying advanced training techniques like dead stops, intraset stretching, and varied TuTs, the anchored barbell allows you to try many variations to train your back from different angles. This point is also a perfect segue into…
Variations
Trying different variations and alternatives of the landmine row is a great way to ensure you never hit a plateau. Here are some variations that you need to try in your next back workout:
1. Parallel One-Arm Landmine Row
Since unilateral exercises allow you to focus on one side at a time, they are a great alternative if you are dealing with muscle or strength imbalances.
Steps:
Anchor a barbell in a corner.
Stand on the right side of the barbell so that your left foot is a few inches away from the bar.
Assume a shoulder-width stance.
Hinge at your hips and bend over while maintaining a neutral spine until your torso is at a 30-40 degree angle with the floor.
Grab the shoulder of the barbell with your left hand and place your right elbow on your right knee to help stabilize your lower back and pelvis.
Take a deep breath and pull the bar towards your chest.
Pause and contract at the top of the movement.
Return to the starting position slowly while breathing out.
Repeat for recommended reps before switching sides.
2. Meadows Row
[embedded content]
This variation was made famous by the late, John Meadows. Although the Meadows row primarily targets your back, it also challenges one’s grip and indirectly targets the bicep.
Steps:
Position a barbell in a landmine attachment or the corner of a wall.
Stand at one end of the barbell so that your body is perpendicular to the bar.
Assume a split stance with the inside leg back and the outside leg forward.
Bend forward until your chest is just above parallel to the floor.
Grab the bar with a pronated grip.
Begin the movement by driving the elbow behind the body while retracting the shoulder blade.
Pause and contract your lat at the top of the movement.
Return to the starting position.
Repeat for recommended reps before switching sides.
Pro Tip: In the Parallel One-Arm landmine row and Meadows row, you could also use a bench to add variety to the exercise. Using a bench reduces your core engagement and allows you to focus on contracting your lats and shoulder blades during the movement.
3. Inverted Row
Inverted rows are one of those exercises that look super easy but will have you running on fumes by the time you are done with them – or they are done with you.
Steps:
Stand in front of a squat rack or Smith machine.
Set the bar at the desired setting. If you are a beginner, consider setting it at your waist height as it will allow your arms to fully extend while keeping your body off the floor.
Get under the bar and grab it with a pronated shoulder-width grip.
At the start of the movement, your body will be suspended or just off the floor, with your heels being the only body part in contact with the floor.
Contract your core and glutes and pull yourself up, leading with your chest.
Your body should remain in a straight line throughout the movement.
Pause and contract for a second at the top of the movement and ensure that your shoulder blades are retracted (imagine squeezing a small ball between the shoulder blades) before slowly lowering to the starting position, with your arms fully extended.
Repeat for recommended reps.
4. Seal Row
Seal row is an isolation exercise that will take your back gains to the next level.
Steps:
Elevate a flat bench by placing an aerobic step under each side.
The height of the bench should be adequate so that the weight plates do not touch the floor when your arms are fully extended.
Grab the bar with an overhand grip, slightly wider than shoulder-width apart.
Inhale and pull the bar towards your abdomen.
Pull the bar until it touches the underside of the bench.
Pause and contract your shoulder blades and lats at the top of the movement.
With control, lower the bar back to the starting position.
Repeat for recommended reps.
Related: T-Bar Row Your Way To A Cobra Back: How-To, Muscles Worked, and Variations
5. Pendlay Row
[embedded content]
Developed by Olympic weightlifting coach Glenn Pendlay, the Pendlay row is a bodybuilding exercise that activates muscle groups throughout your body—including your lats, rhomboids, biceps, glutes, hamstrings, and rear deltoids.
Steps:
Stand upright in front of a barbell with a shoulder-width stance.
Hinge at your hips and begin to bend your hips and knees to lower your body toward the barbell.
Grab the bar with an overhand grip and engage your back muscles by rotating your shoulders outward.
Maintain a flat back and keep your chin tucked throughout the movement (as if you were holding an egg under your chin).
Initiate the upward movement by squeezing your lats and pulling the barbell toward your lower chest. Keep your elbows as close to your body as possible.
Pause and contract your lats at the top of the movement.
While maintaining your rowing alignment, straighten your elbows and allow the barbell to travel back toward the floor until the weight plates contact the ground.
Pause for a second at the starting position.
Repeat for recommended repetitions.
Next Read: Annihilate Your Workout with These Landmine Exercises
Conclusion
The landmine row is an effective back builder and should be a part of every lifter’s exercise arsenal. Switching up your time under tension and rep tempos while performing the exercises mentioned above will give you enough variations that will keep you busy for a long time.
Which is your favorite back exercise? Let us know in the comments below. Also, be sure to follow Generation Iron on Facebook and Twitter.
Get A Bigger, Stronger Lower Back With These Top 4 Exercises
Building blocks of the game
Though it rarely gets any glory, any serious builder (or laborer for that matter) knows that the lower back is the alpha and omega when it comes to lifting heavy weights. As a former construction worker and bag thrower in the airline industry, I can tell you firsthand how important the lower back is in moving weights in a dynamic motion.
As bodybuilders we’re constantly doing compound movements and putting pressure on our lower back, when that starts to go we lose the stability we need to progress or even maintain. Nobody wants to be a victim, protect your bodybuilding investment with these 4 ways to strengthen your lower back.
Defense
There are two golden rules when it comes to protecting your lower back
-Keep your back straight
-Allow flexion in the bottom position of a lift, just know your limits.
-Keep good posture, even when you walk.
Offense
Now that we’ve got all of the precautions out of the way, let’s get at it. Some of the exercises below have been intentionally modified to concentrate on the lower back; they can also be modified to concentrate on the glutes.
Back raise with band
[embedded content]
What’s great about this exercise is that the band provides resistance on the way up as well as the way down. Increasing as the band stretches and decreasing as you go back to starting position. Do this movement at a controlled but swift speed as your lower back must be able to handle speed and weight in an isolation exercise if it’s going to be able to handle it at high bar speed. Feel free to add weights via kettlebell or dumbbell for extra resistance.
Deficit deadlift
[embedded content]
Besides making every part of your deadlift stronger, this exercise forces you to maintain body awareness and keep your back flat with an anteriorly tilted pelvis in the deficit position, you’ll become better at maintaining good lumbopelvic posture when deadlifting from the floor. This increased lumbopelvic control will make you less likely to get injured when pulling heavy. Start with low weights with a 1-2 inch deficit then slowly work your way up. FORM FORM FORM is everything in this exercise.
[/notdevice6
Single leg back extension
[embedded content]
Everyone has one side of their body that’s stronger than the other. The singe leg back extension is a good way for figuring it out. Concentrate on strengthening the deficit on either side for a solid healthy back.
GoodMornings
[embedded content]
It is known as a good morning because of the movement in the erector spinae which resembles the rise out of bed to stretch. The erector spinae muscles of the lower back work isometrically to keep the spine in an extended position while the hamstrings and gluteus maximus work isotonically to perform hip extension. Other muscles are involved in stabilizing weight on the back and maintaining balance.
Try to keep your knees straight as the straighter the knees, the more the hamstrings are stretched and stressed by the movement and this stretch involves them more as the hip extensors.
There you have it, the 4 exercise that will keep your lower back, healthy, fit, and strong and lead to massive gains in the process.
Be sure to follow Generation Iron on Facebook and Twitter.

Do Pull Ups Before Every Workout For Killer Arms
Start strong, end even stronger!
So it’s arm day. You’re going to do your usual workout, on your usual machines, with your usual enthusiasm, “This is hard but bearable, at least I can maintain”. But for those of you who are awake, or just tired of being asleep, we’ve got a quick fix to terrorize your arm day, and give it that well needed jolt it deserves.
The secret we are sharing here is to perform pullups before any other exercise during arm day. This will surely fire up those biceps, but also work to target other muscle groups to give you a well-rounded warmup and pump all at once. For those skeptical, this training program can be a game changer if you open your mind to it and commit to seeing big gains.
The program is broken into two sections, “A”, and “B”, and you attach it to the beginning of your arm day workout. Alternate days according to your workout. By following this instructions, you will really start to see great gains and something you can be proud of.
Program A: Do 50 pull-ups as fast as you can (strict as possible)
Program B: Do as many pull-ups as you can within 10 minutes
The Breakdown
While the workout is fairly straightforward there are common pitfalls you can make. Many builders get too overzealous and go too hard in the beginning. While this is admiral, the guts and glory approach can leave you with nothing in the tank to finish the set. You want to leave at least two bullets (pull-ups) in the chamber in order to get to your goal. Longevity is key here.
Another common mistake is staying with one grip. You can switch up grips as much as you’d like for this exercise and we recommend that you do. If you’re a pull-up God then go for it, bust out 50 under hands, strict.
For the rest of us, alternate your grip between underhand (biceps), neutral (palms facing each other; brachialis), and pronated (palms facing away from you: corachobrachialis).
You can also alternate between hand placements. Wide grip emphasize the shoulders as well as other back muscle, while the close grip involve the biceps more as they are in line with the shoulders, giving them slightly more stability.
If you’re feeling really froggy, try extreme close grips (triceps) or extreme wide grips to (traps) to really give you that superman feel. *Plus they look pretty cool when you’re doing them on the bar*
Note: This exercise tend to work best with builders who can do at least 8-10 strict pull-ups, so if you’re not there yet, you might want to concentrate on those first. If you’re doing 10-15 strict pull-ups or more you might want to add weight to get you to the 8-10 range. This will give you the endurance and strength gains you’re looking for.
Wrap Up
To be honest you can add this to the beginning or end of any upper body workout as it hits your lats, biceps, and shoulders in many different ways. Pullups are a great exercise to promote all sorts of crazy benefits especially when it comes to overall strength and added support. For whatever your respective sport may be, definitely consider adding pullups to your training program before arm day to enhance that much desired growth. Make this change and you won’t be disappointed with the results.
Let us know what you think in the comments below. Also, be sure to follow Generation Iron on Facebook, Twitter, and Instagram.

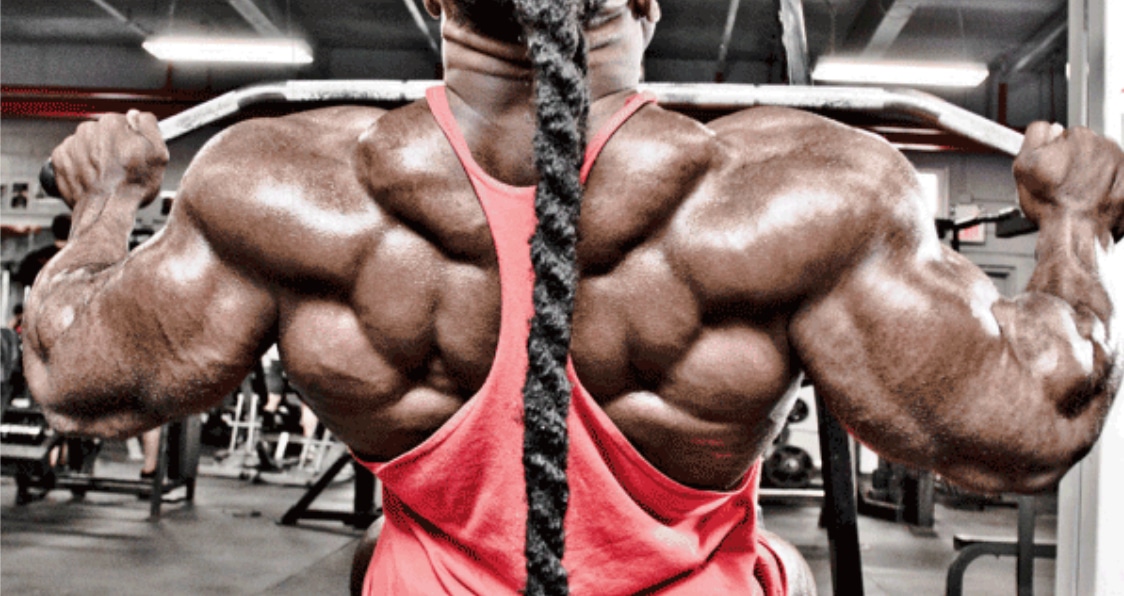
Moves to Build a Cobra Back
Training the Back for a V-Taper
If you’re wondering why is a chiseled back called a cobra back, it’s because the V-taper looks like the head of a cobra when a bodybuilder spreads out his lats.
A physique can’t be deemed complete and symmetrical without a V-taper. Building a cobra back isn’t easy and the workouts, if done right, can be as grueling and exhausting as the hardest of leg workouts.
Your back is the biggest muscle group after legs and developing it can take a lot of hard work, sweat, pain, and tears. A cobra back can make you look like a superhuman and gives you wings you could fly with.
Your back is a big muscle group and you need to target it from different angles to train it effectively. Each exercise targets the back in a different way and you need to perform a variety of moves to develop every muscle fiber in your back.
The overall development of the back needs a combination of compound and isolation exercises. We’ll break up the back into three major muscle groups and perform exercises to target each muscle.
Upper Back – Muscle Involved Rhomboids and Trapezius
Rhomboids
Breaking up the back into smaller muscle groups makes it easier to train and helps in building size and definition by focusing on any lagging parts. Rhomboids are placed at the top of your back right under your neck and at the sides of the posterior deltoids.
– Seal Rows
– Rope Face Pulls
– Incline Bench Dumbbell/Barbell Rows
You can best target the rhomboids by using isolation exercises. While performing the seal rows, bring the barbell to your chest and not your stomach. For the face pulls, hold and contract your back at the top and the bottom of the movement.
Trapezius
Some people like to train their trapezius muscles (or traps) on their shoulder day, but we will advise you to do so on your back day. Although rear delts too are a part of the back, we won’t train them in our back workouts.
– Barbell/DumbbellShrugs
– Behind the Back Cable Shrugs
Middle Backs – Lats (Latissimus Dorsi)
Most people in their back workouts train their lats and call it a day. All the rowing and pulling movements essentially target the latissimus dorsi (lats). The pulling movements help with adding size to your wings, and the rowing adds thickness to your middle back.
– Pull-Ups
– Lat Pulldowns
– Seated Cable Rows
– Dumbbell/Barbell Rows
Pull-ups are an essential for every back workout. In between your sets, stretch your lats by performing the lat spread pose. Posing between sets will rush more blood into your lats and will help you in establishing a better mind-muscle connection.
Lower Back – Thoracolumbar Fascia
Lower back is the smallest of the three muscle groups. A single exercise for the lower back in your back workout is enough to get the job done. It’s important to maintain a strict form while performing the lower back exercises.
– Weighted Hyperextensions
Use a small barbell for performing the hyperextensions and maintain a full range of motion. Performing this exercise to failure is the best way of getting the most out of it. After you hit failure, drop the barbell and do as many bodyweight reps as you can.
You Cannot Miss the Deadlifts
Deadlifts are a full body exercise and are essential to building a cobra back. Switch between high volume and low volume days while keeping the intensity high. Deadlifts are the mother of all back exercises and add size, width, and thickness to your back.
Who do you think has the best V-Taper in the bodybuilding world? Let us know in the comments below. Also, be sure to follow Generation Iron on Facebook and Twitter.
*Header image courtesy of Envato Elements.
5 Tips To Master The Sumo Deadlift
Master the Sumo Deadlifts with these Five Tips
Deadlifts are some of the most brutal exercises which train your complete body. There are many variations of the deadlifts which will keep you from getting bored of the exercise. Sumo deadlifts have a greater impact on your hips, glutes and posterior chain.
Due to the limited range of motion, this variation of the deadlifts can enable you to lift heavier weights as compared to the traditional deadlifts. The sumo deadlifts are great for people who have a stronger lower body.
Since you get into a squatter stance while lifting the weights, your lower body does more work in this variation as compared to the traditional deadlifts. Sumo deadlifts are an advanced exercise and you need to perform them correctly to get the most out of them.
1. Find a Stance Which Works For You
There are no hard or fast rules when it comes to the sumo deadlift stance. The stance will vary for people based on their height and mobility. Some people have a false notion that the wider your sumo deadlift stance, the better it is. Most people need a moderate sumo stance to lift heavy weights while maintaining the correct form.
The sumo deadlifts are harder at the bottom. It is harder to move the weights off the floor than it is to lock our your hips and back at the top of the movement. Take a stance which makes it easy for you to lift the weights off the ground.
2. Get Your Body Behind the Bar
Some people make the mistake of ducking out their toes, doing this automatically puts the bar an inch in front of them. On the other hand, some people stand on top of the bar which is not the best position to start either because the bar can bump into your knees on the concentric movement.
Standing right behind the bar with your shins touching the barbell is the best position to start the lift. Keeping your head and chest behind the bar at the start of the movement will help you in locking out your hips and knees at the top of the movement.
3. Point the Toes Out
Feet placement is where most people go wrong with the sumo deadlifts. You neither want your feet to be pointing all the way out nor should they be pointing straight ahead. You want the barbell to be as close to you as possible while performing the sumo deadlifts.
If you stand with your feet completely “ducked” out, the bar will be an inch in front of you which can make it harder to lift it off the ground. Turn your feet slightly out as doing this will make the lift shorter and easy.
4. Generate Torque and Push Your Hips Through
As mentioned above, the sumo deadlifts are the hardest at the bottom of the movement. You need to generate a lot of torque to crack the bar off the floor. Make sure you push your knees out so they don’t come in the way of locking out your knees.
If you’re a competitive powerlifter, you will need to stand with your knees and back locked out at the top of the movement. Drive your hips into the bar to finish with a smooth lockout. Some people make the mistake of overextending their lower back which can unlock their knees.
5. Hand Placement
The hand placement while performing the sumo deadlifts can be tricky. Some people like to have a wider than shoulder width grip while the others like to keep their hands close to each other. A shoulder-width hand placement can prove to be the most optimal.
Holding the bar too wide can put extra tension on your lower back while a close grip can make it hard for you to balance the bar.
What is your sumo deadlifts PR? Let us know in the comments below. Also, be sure to follow Generation Iron on Facebook and Twitter.

Build a Golden Era V-Taper with this Workout
Back Workout for Building a V-Taper
Aesthetics were the main focus of bodybuilding in the golden era. The advent of science and enhancement drugs took the battle from aesthetics to muscle mass and size. While the fads come and go, the golden era aesthetics will stay forever.
The love for the golden era V-taper and natural aesthetics has brought about starting the Classic Physique division in the Mr. Olympia competition. Nothing appeals more in a well-crafted physique than the good old V-taper and we’re here to help you build one.
Exercise 1 – Pull-ups – 50 Reps
We’ll be focusing on the old school exercises in this workout. We will start the workout with 50 pull-ups. Take as many sets as you need to complete the 50 pull-ups but try to hit failure with every set.
Exercise 2 – Superset
– Bent Over Barbell Rows – 3 Sets 20, 15, 10 Reps
– Seated Pulley Rows – 3 Sets 10, 15, 20 Reps
The rows build the thickness in the back while the pull-ups and pull-downs help in building wide lats. Use lifting accessories to eliminate the grip strength while performing the exercises as your grip is prone to give up before your back.
Focus on building a mind-muscle connection and contract your back with every single rep. While performing the seated rows, lean forward to give your lats a stretch, but don’t lean back and maintain an arched back while rowing towards your body.
Exercise 3 – T-Bar Rows – 4 Sets 15, 12, 10, 8 Reps
The T-bar rows are where it gets down and dirty. Go heavy on the rows while maintaining a strict form. If you don’t have a T-bar row machine at your gym, put a barbell in the landmine rows position and use a v-handlebar to row the barbell.
A good back workout should be as taxing as a brutal leg workout. Your back is the second biggest muscle group after your legs and building a v-taper will require you to put all you’ve got into every exercise.
Exercise 4 – Giant Set
– Pullovers – 3 Sets 15, 12, 10 Reps
– Front Facing Lat Pulldowns – 3 Sets 15, 12, 10 Reps
– Behind the Neck Lat Pulldowns – 3 Sets 15, 12, 10 Reps
The giant set will be focused on building the broad wings. In the first set, lie down across a flat bench and perform the first set with 15 reps. Don’t bend your elbows throughout the movement as doing so will recruit your pectoral muscles.
After the pullovers, we switch over to the front facing lat pulldowns and then move onto performing the behind the neck lat pulldowns. These three are the most effective exercises when it comes to building wings you could fly with.
Exercise 5 – Barbell Shrugs – 3 Sets 30, 20, 10 Reps
Trapezius muscles (or traps) are one of the most abused muscles when it comes to training them in the gym. Performing shrugs is fairly easy, all you need to do is stand with your feet shoulder width apart, grab a barbell, maintain a slight bend in your elbows and lift your shoulders to your ears.
Many people mess up by letting their egos get in the way and go too heavy on this exercise. Pause at the top of the movement and squeeze the living hell out of your traps with every rep.
Exercise 6 – Behind the Back Machine Shrugs – 3 Sets 10, 20, 30 Reps
We’re not leaving any stones unturned with this workout and will not settle for anything less than a golden era v-taper. The trapezius muscle is majorly on our backs and behind the back shrugs can help us train it efficiently.
Using a machine for this exercise puts constant tension on the muscle which a vanilla barbell can’t do. If you’ve put everything into this workout, by the end of the 30 reps, your back should be on fire.
Who do you think has the best V-taper? Let us know in the comments below. Also, be sure to follow Generation Iron on Facebook and Twitter.
*Header image courtesy of Envato Elements.
The Ultimate Lat Pulldown Guide: Technique, Benefits, and Variations
The lat pulldown machine is one of the most popular gym equipment. It has the glam and macho appeal that draws in the fitness newbies and experienced lifters alike.
Be it a motivational YouTube training video, or a snippet of Rocky Balboa training for a big fight, it will probably feature the star performing a set on the lat pull-down machine.
Almost every gym around the world has a lat pulldown machine, and yet most lifters fail to make the most of it. The ultimate lat pulldown guide will ensure you do not leave gains on the table.
Target muscle: Latissimus Dorsi
Synergists: Brachialis, Brachioradialis, Biceps Brachii, Teres Major, Posterior Deltoid, Infraspinatus, Teres Minor, Rhomboids, Levator Scapulae, Middle and Lower Trapezius, Pectoralis Minor
Mechanics: Compound
Force: Pull
Pull-up is an incredibly effective exercise for building upper body strength and muscle mass. But there is a catch. Performing a pull-up is no joke, and performing 30+ pull-ups in a workout will test your mettle.
Performing a pull-up will fire up every muscle fiber in your back, arms, and shoulders. While nailing this exercise could prove to be a lifesaver sometime in the future (if you find yourself hanging from a building or a chopper in the event of an alien invasion), most people usually give it a pass for its friendlier sibling – the lat pulldown.
1. Engages the same muscles as a pull-up
The lat-pulldown involves a similar movement to the pull-up, challenging your mid and upper-back muscles, trapezius, arms, and grip. The exercise is a god-send for beginners or people who cannot perform a bodyweight pull-up.
Next Read: 6 Badass Exercises You Can Do With A Pull-Up Bar
2. Puts you in the driver seat
The lat pulldown machine gives you more control over how much you lift and the rep tempo as compared to vanilla pull-ups. You could perform a new variation of the lat pull-down every week just by switching up rep tempos.
Check Out: How To Increase The Time Under Tension To Maximize Your Gains
3. One of the best ways to build a V-taper
Forget Red Bull, lat pull-downs give you wings that make you look like you can fly. It targets the latissimus dorsi – the large, flat muscles across your mid-back. A strong and wide back is also vital for a Superman chest. The more you work on your lat pull-downs, the better equipped you’ll be to go big on the bench press.
4. Constant tension on your working muscles
The cable-operated machine ensures constant tension on your muscles throughout the movement pattern – even on the eccentric part of the lift. Unlike the pull-ups, lat pulldowns also put less tension on the secondary muscle groups during a set.
Must Read: The Gym Machines You’re Probably Using Incorrectly
5. Can Help Improve Your Posture
By working the muscles in your back, lat pulldowns can improve your posture. You will rarely see a person with solid V-taper suffering from a bad posture. On top of this, lat pulldowns can improve your performance during other compound exercises that use your back muscles like pull-ups, deadlifts, and good mornings.
Related: Programming Vertical Pulling For Greater Back Gains
The lat pull-down machine is usually swamped – especially during rush hours at the gym. Listed below are the most common lat pulldown errors:
1. Partial reps
Partial reps are a sign that you have more weight on the cable than you can lift. If you cannot pull the bar down to your chin level, you are letting your ego get the better of you.
Once you have the bar at your chin level, you need to contract your lats and shoulder blades. If you cannot perform this step, you are leaving gains on the table.
Also, make sure you are not pulling the bar using your forearms. Focus on contracting and relaxing your lats as you move the weight. Tip: Activate your lats by pulling down from your armpits.
Related: Is This The Worst Case Of Ego Lifting?
2. Arching your back
While you might be able to lift a few extra pounds by arching your back as you pull the bar down, it can put unwanted tension on your lower back and expose you to an injury. Sit upright and keep your chest lifted while performing the exercise.
3. Pulling the bar down past your chest
This is a rookie mistake, and it can stem from both – lifting too light or heavy. Pulling the bar past your chest and almost in line with your stomach takes away almost all the tension from your lats and back. Keep your chest lifted and stop when you reach chin level.
4. Using momentum
Most lifters make the mistake of swinging back and forth while performing lat pulldowns. It is yet another case of ego lifting. While using a jerking motion might help you pull down the weight, it takes away the tension from the primary muscles and increases the odds of an injury.
Sit upright, keep your chest lifted throughout the exercise and perform the pulldown with control. Utilizing rep tempos and contracting your back with every rep ensures optimal muscle fiber recruitment.
Also Read: Lat Pulldown Vs Pull-Up: Which Is Better For Wide Lats?
[embedded content]
In bodybuilding, your results depend on how well you perform an exercise, and your diet and recovery programs. Follow the steps below to nail the first part of the equation:
Adjust the seat or thigh pads so that your upper thighs are tucked firmly under the pads. Place your feet flat on the floor.
Grab the bar with a wider than shoulder-width overhand grip.
While breathing out, pull the bar down until it is almost at your chin level.
Make sure your torso is stationary and you are not reclining back while lowering the bar.
Squeeze the shoulder blades together while maintaining square shoulders.
Return to the starting position with a slow and controlled motion as you exhale.
Do not lock out your elbows at the top of the movement. Keep the weight engaged, and do not let it crash into the racked plates.
Repeat for recommended repetitions.
Bored of the good old lat pulldown? Use these variations to keep your muscles guessing:
1. Underhand Lat Pull-down
Changing grips is a great way to add variety to the lat pulldown exercise.
Reversing your hand placement to a supinated (palms facing you) grip puts more tension on your biceps.
The underhand lat pull-down is a great variation if you are performing the exercise at the end of your back workout when your posterior muscle group is relatively fatigued.
Read: How The Underhand Lat Pulldown Can Give You Wing-Like Lats
2. Wide-Grip Lat Pull-down
Using a wide grip engages the latissimus dorsi to a higher degree compared to the shoulder-wide grip.
In this variation, you will pull the bar down to your upper chest, pause, and squeeze the life out of your lats.
Make sure you are keeping your torso upright and not reclining back while performing the movement.
3. Close-Grip Lat Pull-down
[embedded content]
In the close-grip lat pulldown variation, you will be holding the bar with a narrower than shoulder-width grip.
Embrace your core and pin back your shoulders as you pull the bar under your chin.
Squeeze your lats at the bottom of the movement.
Return to the starting position with a slow and controlled motion.
Repeat for recommended reps.
4. V-Bar Lat Pull-down
Cable-operated machines give you the liberty to swap the wide bar for several other attachments to target your back differently.
Replace the bar with a v-grip attachment.
Secure your legs under the thigh pads and maintain an upright torso throughout the movement.
While keeping your chest lifted, pull the v-grip attachment until your palms are a few inches away from your upper chest.
Pause and contract your lats at the bottom of the movement.
Return to the starting position with a controlled motion and repeat for recommended reps.
Read: V-Bar Pulldown – Exercise Guide
5. Behind the Neck Lat Pull-down
Behind the neck variation is probably the most advanced lat pulldown technique on the list.
Grab the bar with a slightly wider than shoulder-width overhand grip.
Straighten your body to a point where the cable and pull-down bar is directly above your spine, and tuck your head forward to allow the bar to be safely lowered.
Shrug your shoulder blades back to set your shoulders, this allows the tension to stay on your lats throughout the exercise.
Slowly lower the bar behind your head until it is at your ear level as you breathe out.
Squeeze your lats at the bottom of the movement.
Return to the starting position with a slow and controlled motion.
Repeat for recommended reps.
Depending on your experience level, you could use the following exercises to train your back optimally:
1. Pull-up
We are sure you are not surprised to find pull-ups on the list. Once you develop enough strength to perform pull-ups with the correct form, you should make them a constant in your back training regimen.
Stand on an aerobic stepper and grab the pull-bar with a slightly wider than shoulder-width grip.
Hang from the bar and bend at your knees so that your lower legs are parallel to the floor.
Pull yourself towards the roof while focusing on your back until your chin reaches the bar level.
Return to the starting position with a controlled motion.
Repeat for recommended reps.
2. Negative Pull-up
[embedded content]
If you are a beginner, negative pull-ups are a great exercise to build strength for the orthodox pull-ups. It involves performing only the lowering, or eccentric phase of an exercise.
Start by standing on a box or bench.
Jump high enough so your face it at the pull-up bar level and grab it with a shoulder-width grip.
Once you have gripped the bar, lower yourself as slowly as you can while focusing on your lats.
When you reach the bottom of the movement, release the bar and step back.
Step back onto the box and repeat for recommended reps.
Related: Use Negative Training For Positive Mass Gains
3. Unilateral Lat Pull-down
This variation of the lat-pull down works each side of your back individually. It is great for fixing muscle imbalances and improving symmetry. If you do not have access to a unilateral lat pulldown machine at your gym, you could use the standard lat pulldown machine with a D-bar handle attachment.
Hold the D-handle attachment with a neutral grip.
Rotate your palm as you pull the handle towards your chin.
Your palm should be facing you at the bottom of the movement.
Pause and contract your lat.
Slowly return to the starting position.
Repeat for recommended reps before switching hands.
Next Read: The Benefits Of Unilateral Training & Why It Matters
4. Straight Arm Lat Pull-down
[embedded content]
The straight arm lat pulldown is a great exercise for building a V-taper. It also avoids over-using your arms which is the case with the standard lat pull-downs.
Attach a wide-grip handle to a cable pulley.
Stand upright with a shoulder-width stance.
Grab the bar with a pronated (overhand) grip at shoulder-width and lean forward slightly by hinging at your hips.
Keep your elbows slightly bent throughout the movement and initiate the movement by depressing your shoulder blades and extending the shoulders.
Pull the bar to your thighs until your lats are fully contracted.
Return to the starting position with a slow and controlled movement.
Repeat for recommended reps.
Check Out: Mastering The Straight Arm Pulldown
5. Bent-Over Barbell Row
Bent-over barbell row work your lats and multiple back muscles.
Grab a barbell with a shoulder-width overhand grip.
Unrack the bar and stand upright.
Slowly lower your torso until your upper body is at a 60-degree angle with the floor.
Keep your knees slightly bent and maintain an arch in your back throughout the movement.
Lift the weight to your sternum, keeping your elbows tucked in and close to your body.
Contract your lats at the top of the movement.
Slowly return to the starting position.
Repeat for recommended repetitions.
Lat pulldown is suitable for lifters of all experience levels, and most gyms have the machine. While the lat pulldown is a part of most back training routines, it is essential to be following the correct form to get the most bang for your buck.
You should also try new variations and alternatives to keep your muscles guessing and avoid hitting a plateau. Things as small as switching up the number of reps, sets, and rep tempos can do the trick and get you that much sought-after V-taper.
Which is your favorite lat pulldown variation? Let us know in the comments below. Also, be sure to follow Generation Iron on Facebook, Twitter, and Instagram.
T-Bar Row Your Way To A Cobra Back: How-To, Muscles Worked, and Variations
Here is a way to build a huge back using different workouts!
If you are a bodybuilding fan, you probably have watched Pumping Iron – the critically-acclaimed bodybuilding documentary. If you don’t remember watching the movie, you certainly would have seen snippets of Arnold Schwarzenegger T-bar rowing to a monstrous V-taper.
Pumping Iron is a little too old-school for you? How about you check out its younger sibling – Generation Iron?
Bodybuilders have a saying; if you want your back to grow, you gotta row. If you want a V-taper, you need to maintain a balance between rowing and pulling back exercises. While horizontal pulling exercises (pull-up, pull-down) help in building a wide back, vertical pulling movements (t-bar row, cable row, dumbbell row) get you that much sought-after back thickness.
[embedded content]
How To Perform The T-Bar Row
Do not fret if you do not have access to a T-bar row machine at your gym. You could perform the exercise using a barbell. Follow these steps to make the most out of the T-bar row –
If you have access to a T-bar row machine:
Step onto a T-bar row platform and stand with one foot on either side of the bar.
Place your feet slightly wider than shoulder-width apart.
The remaining steps will be the same as the barbell T-bar rows described below.
If you do not have a T-bar row machine at your gym:
Place one end of a barbell into a corner.
Rest some weight plates or a heavy dumbbell on the hinged side to hold it down (landmine setup).
Load the opposite end of the bar with an appropriate weight.
Take position by standing with one foot on either side of the bar.
Hinge at your hips until your torso is at a 45-degree angle with the floor.
Hook a V-grip handle under the weighted end at the bar’s neck and grab it with both hands.
While maintaining the natural arch in your back, squeeze your shoulder blades together and pull the bar until the plates touch your chest.
Pause and contract your lats at the top of the movement.
Slowly return to the starting position.
Repeat for recommended reps.
Related: This Is How To Master The T-Bar Row For Massive Back Gains
Muscle Worked While Performing The T-Bar Row
The T-bar row might look easy but will test your mettle – they are one of Governator’s favorite exercises for a reason, after all. It is an overall upper body posterior muscle builder and will leave you exhausted by the last set. Here is the list of muscles worked:
Latissimus dorsi: It is the largest back muscle and is located on the sides of your back. Latissimus dorsi (aka lats) are responsible for shoulder extension and adduction.
Bicep brachial: Your biceps are your main elbow flexors, and you will be using them to perform T-bar rows.
Forearms: You need a strong grip to perform the exercise optimally. If you lack a solid grip, this exercise will help you build one over time.
Middle trapezius: It is the diamond-shaped muscle that covers much of your upper back. The middle trapezius (aka traps) is primarily responsible for the retraction of the shoulder girdle.
Rhomboids: Located under your mid-traps.
Posterior deltoids: Rear delts are responsible for horizontal extension and external rotation of the shoulder joint.
Erector spinae: It is the collective name for the small muscles that make up your lower back. The erector spinae works isometrically or statically during T-bar rows to hold your spine in a stable position and prevent your back from rounding.
Glutes, hamstrings, and quadriceps: You cannot exclude your lower body from the exercise (unless you are using the chest-supported T-bar machine). Your glutes and hamstrings contract to hold your hips in place while your quadriceps work hard to stabilize your knees.
Next Read: 4 Exercises to Alleviate Lower Back Pain
Benefits of the T-Bar Row
Making the T-bar row a constant in your back training entails the following benefits:
1. A Thick and Strong Back
Rowing movements help develop a thick back, and the T-bar row follows an optimal range of motion that recruits the maximal muscle fibers in your back.
The compound exercise is also a great strength builder and can aid in other pulling exercises such as pull-ups and deadlifts.
2. Improved Functional Strength
T-bar row works your entire posterior chain. Since it is a compound (multi-joint) movement, the T-bar row helps strengthen muscles that you use in your day-to-day and outdoor activities.
3. Better Core Stability
Since you spend all your time bent over while performing the exercise, it helps develop core stability and strength.
4. Better Posture
A wide and thick back (results of the t-bar) can help improve your posture. You will hardly ever see someone with a solid V-taper slouching or having a bad body posture.
5. Promotes Balance and Symmetry
The unilateral (single-arm) variations of the T-bar row can help improve muscle imbalances and strength. Performing the exercise on one side at a time can help focus on the muscle and improve your mind-muscle connection.
Also Read: 6 Ways To Improve Your Mind-Muscle Connection
6. Versatility
Different variations of the T-bar row allow you to use different hand positions and hence work your back from a variety of angles. The most common grips for T-bar include:
Close-neutral
Shoulder width-neutral
Wide-overhand
Narrow-underhand
On top of that, since most T-bar equipments have a plate-loading mechanism, you can use low denomination weights to increase your workload in small increments until you hit the right spot.
Common T-Bar Mistakes To Avoid
The T-bar row requires balance and core stability and leaves a lot of room for error. Here are the most common T-bar mistakes:
1. Using 45-Pound Weight Plates
Most people make the mistake of exclusively using 45lb weight plates on the T-bar machine. Using several smaller weight plater rather than a few big ones have the following benefits:
a) It helps follow a longer range of motion since the smaller plates have a smaller diameter compared to the 45lb plates.
b) Helps you nail the perfect weight by using smaller denominations.
Related: Full Range Of Motion Vs Partials: Which Is The Way To Go?
2. Maintaining Straight Legs
Locking out your legs and knees can cause back, knee, or hip injuries. Make sure that you have your knees slightly bent throughout the exercise as it gives you a solid base to hold yourself in place.
3. Rounding Your Lower Back
We cannot help but cringe when we see someone rounding their back while performing the T-bar row. Rounding your back during the lift leaves your spine vulnerable to injuries – and makes you look like a rookie!
4. Flexing Your Wrists
To lift heavier while performing the T-bar rows, many gym-goers flex their wrists. Not only does this not help, but it also puts unwarranted stress on your wrists and increases the odds of an injury. It can also cause your grip to fail prematurely.
Next Read: Build a Massive Back Like The Legend Dorian Yates
5. Flaring Your Elbows
Flaring your elbows out can cause your chest to cave in and limit your ability to contract your back muscles. Keep your elbows close to your body throughout the range of motion.
6. Pulling With Your Biceps
While there is no way to avoid bicep recruitment during the exercise, leading with your elbows will optimally engage your back and help you build a thick back. Pulling with your elbows also allows you to contract your back muscles efficiently.
7. Not Using Lifting Accessories
Many gym-goers leave gains on the table by not using lifting accessories. Accessories like weight lifting straps and belt can help improve your form, reduce the chances of an injury, and set you up for lifting heavier.
Check Out: 5 Lifting Accessories You Should Have In Your Gym Bag
T-Bar Row Variations and Alternatives
1. Chest Supported / Lying T-Bar Row
The chest-supported T-bar row is a great variation for beginners or people who have lower back issues.
Steps:
Load the T-bar machine with an appropriate weight.
Lie prone on the pad and grab the handles with an overhand grip.
Brace your core and pull the T-bar towards your chest.
Contract your shoulder blades and keep your elbows flared in throughout the movement.
Your upper back muscles and shoulder blades should be fully contracted at the top of the movement.
Slowly return to the starting position.
Repeat for recommended reps.
2. Barbell Row
Barbell rows are a staple in most back training routines. The barbell row is quite similar to the T-bar row with the main difference being that the barbell row allows you to move the weight through greater degrees of freedom.
Steps:
Stand upright and grab a barbell with a shoulder-width overhand grip.
Push your shoulders down and back while maintaining an exaggerated chest forward position.
Hinge at your hips and lower your torso until it is at a 60-degree angle with the floor.
Pull back your elbows while keeping them close to your body as you lift the bar towards your upper abdomen.
Pause and contract your lats at the top of the movement.
Return to the starting position with a slow and controlled motion.
Repeat for recommended reps.
3. Pendlay Row
[embedded content]
Pendlay rows are a great T-bar alternative, especially for powerlifters as it targets the exact opposite muscles of the bench press. It allows for greater stability when performing heavy presses.
Steps:
Unlike the orthodox barbell row, the starting position of the bar in the Pendlay row will be on the floor.
Stand with a shoulder-width grip and grab the bar with a pronated grip.
Get into position by pushing back your hips and lowering your torso until it is parallel to the floor.
Pull the bar towards your lower chest while keeping your elbows close to your sides.
Pause and contract your lats at the top of the movement.
Related: The Pendlay Row vs The Barbell Row
4. Meadows Row
[embedded content]
The Meadows row is named after the late bodybuilder, John Meadows. The Meadows row is a single-arm landmine row that allows a greater stretch at the bottom of the movement.
Steps:
Stand next to a barbell that is in a landmine setup or wedged into the corner of a wall.
Stand in a staggered stance with the leading foot perpendicular to the bar.
With your right foot as the leading foot, bend over at the waist, and grab the end of the bar with your left hand using an overhand grip.
Rest your right elbow on your thigh for support.
While keeping your elbow close to your body, pull up the bar until it is just outside your chest.
Pause and contract your lats at the top of the movement.
Slowly return to the starting position.
Repeat for recommended reps before switching sides.
Check Out: 5 Landmine Exercises For A Shredded Body
5. Seal Row
The seal row is an isolation variation of T-bar and barbell rows. The exercise locks your body in place, taking away the ability for you to heave the weight as you perform the lift.
Steps:
Elevate a flat bench by placing a couple of aerobic steps under it on both sides.
Lay on the bench in a face-down position. Keep your leg elevated and make sure your body is in a straight line throughout the movement.
Grab a barbell with an overhand grip.
While maintaining a stable core, lift the bar to your lower chest by pulling your elbows towards the roof.
The bar should hit the bottom of the flat bench at the top of the movement.
Pause and squeeze the life out of your lats at the top of the movement.
Lower the bar with a slow and controlled motion.
Repeat for recommended reps.
6. Inverted Row
[embedded content]
Inverter rows are one of the best bodyweight T-bar row alternatives. This exercise might look easy but will leave you begging for mercy when it is done with you.
Steps:
Stand in a squat rack or front of a Smith machine.
Set the bar at your waist height. This will allow your arms to fully extend while keeping your body off the floor.
Get under the bar and lie down on your back.
Reach up for the bar and grab it with an overhand grip. Your arms should be fully extended at this point.
Your body will be suspended or just off the floor, with your heels being the only thing in contact with the floor.
While keeping your core and glutes contracted, brace your lower back and keep your body in a straight line.
Pull yourself up until your chest touches the bar.
Keep your elbows close to your sides throughout the movement.
Pause and contract your lats at the top of the movement.
Slowly return to the starting position.
Repeat for recommended reps.
Next Read: Barbell Row VS Inverted Row, Which One Reigns Supreme?
7. Seated Close Grip Cable Row
For lifters who fancy themselves a cable exercise, you cannot go wrong with the seated close-grip cable rows:
Steps:
Grab a v-handle and sit back on the machine.
Maintain an upright torso throughout the exercise.
Sweep back with your elbows and pull the v-handle towards your naval/lower abdomen.
Pause and contract your lats at the top of the movement.
Slowly return to the starting position.
Repeat for reps.
Must-Try: Build A Thick and Wide Cobra Back With This Workout
Conclusion
If you want to carve a thick and wide back, the T-bar row is a must-have in your exercise arsenal. The compound exercise might take some time to master, but the dividends it will pay in the long run make the upfront investment worth it.
For people who do not have a T-bar machine at their gym, this article lists enough variations to ensure the development of your posterior muscles.
Which is your favorite T-bar row variation? Let us know in the comments below. Also, be sure to follow Generation Iron on Facebook, Twitter, and Instagram.