Tag: guide

6 Best SARM Companies + Websites & Sources
Ahoy, fellow fitness enthusiasts! The wild seas of the SARMs industry have seen quite the tempest in the past few years. With the FDA casting its watchful eye and the stormy winds of COVID rattling the sails, some SARM companies have walked the plank while others have emerged stronger, with new names and treasures in…
Standing Cable Chest Fly Exercise Guide: How To, Benefits, Muscles Worked, and Variations
A broad and muscular chest has been the symbol of masculinity since time immemorial. Chances are, they come up with the term ‘masculine’ to refer to an individual with a wide and thick chest.
Building an Arnold Schwarzenegger-like round and full chest is one of the top priorities for most guys that lift weights. It is no coincidence that Monday is international chest day. Consider yourself a very lucky man if there is no crowd on the chest training equipment in your gym on a Monday.
Although many lifters prefer the bench press for building muscle and strength, ask someone which exercise is their go-to for achieving a muscle-ripping chest pump or ending their workout on a high, and they’ll most likely reply with a resounding standing cable chest fly!
The standing cable chest fly is everything that the bench press isn’t. It is not intimidating, and you are not at risk of getting trapped under a heavy bar if you fail a rep; you don’t need a spotter, it helps maintain constant tension on your pecs throughout the range of motion, and leaves you with a sick muscle pump every time.
Whether you are a bodybuilder trying to improve your aesthetics or a powerlifter looking to improve your strength, you cannot go wrong with the standing cable chest fly. Besides your chest days, the cable chest fly can be an excellent addition to your push-day routines as it involves your chest, triceps, and anterior deltoids.
In this guide, we cover everything you need to know about the standing cable chest fly to get the best bang for your buck, including the correct training techniques, its benefits, the muscles worked, the most common mistakes, and its variations and alternatives.
What is a Standing Cable Chest Fly?
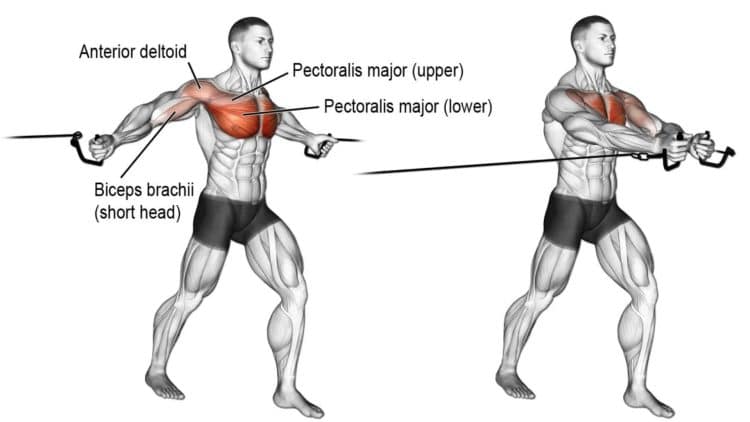
The standing cable chest fly is an isolation exercise that primarily targets the chest. However, since this exercise involves movement at the shoulder joint and elbows, it also engages the anterior deltoids and triceps.
The standing cable chest fly is an excellent exercise for most lifters, irrespective of their training experience. It can help newbies establish a better mind-muscle connection with their pecs, translating to better performance on compound movements, like the bench press and dips. Conversely, it can help advanced lifters warm up for their chest workouts or achieve maximal pectoral muscle fiber recruitment at the end of their training session without increasing their risk of injury.
Unlike free weight exercises, cables keep constant tension on your muscles throughout the range of motion, which can increase your time under tension and bias hypertrophy. Plus, since you must be standing upright while performing this exercise, it results in a greater core engagement than the barbell bench press, where you are lying on a bench.
How To Do a Standing Cable Chest Fly
Here is a step-by-step guide on how to perform the standing cable chest fly with a picture-perfect form:
Step 1: Adjust the Cable Pulley
You can choose between two pulley positions while performing the standing cable chest fly. The first position involves setting the pulley at chest level and attaching D-handle bars on each end. This position allows you to mimic the lying dumbbell chest fly motion and bias the inner and middle pecs.
The other option is the more popular choice and involves setting the pulleys at the highest setting. In this setup, you’ll press the handles diagonally toward the floor. The cable should be at 45 degrees throughout the range of motion. This setup biases the inner and middle, and lower pecs.
Pro Tip: I recommend setting the pulleys at the highest setting as it involves a unique angle of motion that you cannot mimic with free weights to train your pectoral muscles. For this reason, I’ll stick to the second setup for this demonstration.
Step 2: Take Your Position
Grab the D-handles with a neutral (palms facing each other) grip and position yourself in the center of the cable pulley machine. Now, take a big step forward and bring your hands to your chest level. Extend your arms to your sides so that your hands are in line with your chest while your elbows are slightly behind your torso.
You can use a staggered stance or place both your feet together. Since the former option involves a much larger surface area, it will provide better stability. The latter, on the other hand, is the optimal choice if you want more core engagement.
Pro Tip: Maintaining a slight bend in your knees throughout the exercise will give you a better base.
Step 3: Perform the Fly Motion
Lean forward slightly by bending at your hips to better isolate your pecs. Brace your core and initiate the movement by moving at the shoulder joint. Extend your elbows during the concentric phase for optimal chest muscle fiber stimulation. Your hands should be in front of your midsection or pelvis at the bottom of the range of motion.
Bringing the elbows together during concentrics shortens the pecs to their fully contracted position. On the flip side, keeping your elbows bent prevents your chest muscles from moving through their full range of motion, hindering their activation.
Pro Tip: Maintain a neutral back and a proud chest for maximal pectoral muscle engagement while performing this exercise.
Step 4: Pause and Contract at the Top
Hold the isometric contraction at the top of the range of motion for a second and squeeze your pecs as hard as possible. Your head and neck should be in line with your torso. Dropping your head back or pressing your chin into your upper pecs can be a bottleneck while contracting your pecs at the static contraction point at the top.
Pro Tip: Avoid touching your hands at the bottom of the range of motion or interlacing your fingers, as it will remove the tension from your pecs and put it on your anterior deltoids.
Step 5: Control the Eccentrics
Maintaining your torso in a straight line, slowly return your arms to the starting position while feeling your chest muscles engage. Pause at the bottom for a second before repeating this process for the recommended reps.
Pro Tip: You must focus on actively contracting your pecs throughout the range of motion. Slow down the rep tempo if you don’t feel your chest while performing this exercise.
Standing Cable Chest Fly Tips:
Avoid squeezing the handles too tight, as it can lead to forearm and biceps recruitment. Switch to a false (thumbless) grip if you feel too much arm engagement while performing this movement.
Your feet should be bolted to the floor throughout the exercise. Avoid moving your feet or tapping your heels, as it can take tension off your chest.
Avoid lowering your hands way too far behind your body during eccentrics. Contrary to what many people think, it doesn’t lead to greater muscle stimulation but can strain your shoulder joints.
Keep your core braced while performing the standing cable chest fly. This can help eliminate the possibility of employing momentum.
Optimize your breathing to maximize your performance. Breathe in during eccentrics and breathe out during concentrics. You must hold your breath during the isometric contraction at the top before breathing in again during the eccentric phase.
In This Exercise:
Target Muscle Group: Chest
Secondary Muscle Groups: Shoulders and Triceps
Type: Strength
Mechanics: Isolation
Equipment: Cables
Difficulty: Beginner
Best Rep Range:
Hypertrophy: 8-12
Strength: 1-5
Muscles Worked During Standing Cable Chest Fly
Here are the muscles worked during the standing cable chest fly:
Chest
The pectoralis major and pectoralis minor are the primary target muscle of this exercise. Your pecs are responsible for horizontal shoulder adduction, which involves bringing your arm inward toward your body. Since this is exactly what the standing cable chest fly does, maintaining a strict form on this lift will target only your chest.
You can target different areas of your chest on this exercise by changing your angle of pull. Moving your arms straight forward will target the inner and middle pecs. Performing this exercise diagonally from top to bottom will work your inner, middle, and lower pecs, and an upward diagonal movement will train your lower pecs.
Shoulders
Since most of the movement in this exercise is limited to the shoulder joint, it can lead to anterior deltoid engagement. Leaning forward excessively can lead to greater shoulder engagement than maintaining an upright torso.
Triceps
The elbow flexion during eccentrics and extension during concentrics can lead to triceps engagement. Avoid locking out your elbows and maintaining a slight bend in your arms if you feel too much triceps engagement at the top while performing this exercise.
Core
This exercise requires standing in the front and center of a cable pulley machine. You must resist the pull of the cables throughout the exercise, which will lead to core engagement. A staggered stance recruits your core to a lesser degree than a parallel stance.
Benefits of Standing Cable Chest Fly
Adding the standing cable chest fly to your exercise arsenal entails the following benefits:
Build a Bigger and Stronger Chest
While the muscle conditioning benefits of standing cable chest fly are well-known, many lifters assume that isolation exercises don’t lead to strength or muscle gains. However, nothing could be further from the truth.
Performing three to five sets of the standing cable chest fly in the 8-12 rep range will bias hypertrophy. On the other hand, lifting close to your one-rep max for three to six sets of one to five reps will help improve your upper body strength. [1]
Excellent For Lifters of All Experience Levels
Cable isolation exercises are beginner-friendly. They can help novice lifters develop a robust mind-muscle connection, which can carry over to compound exercises. On the other hand, experienced lifters can use this exercise to warm up or train their chest to failure.
Low Risk of Injury
Unlike the barbell bench press, where the bar can end up on your chest on a failed rep, hitting muscle failure on the cable chest fly won’t expose you to an injury. You can just let go of the handles in the middle of the rep without a worry in the world.
Cable and machines significantly lower the risk of injury while training. It is common to hear people getting injured training with dumbbells and barbells, but you’ll hardly ever come across someone who got injured training with cables.
Constant Tension
Cables keep constant tension on your muscles throughout the range of motion, which can help induce hypertrophy. Conversely, free weights remove the tension from your muscles and put it on your joints at multiple points throughout the exercise.
Time
Cable exercises take significantly less time than free-weight movements, making them an excellent choice for adding them to high-volume workouts. They are also great for folks that have limited time to train.
Common Mistakes While Performing Standing Cable Chest Fly
Avoid the following pitfalls to maximize your results and limit your risk of injury:
‘Pressing’ Instead of ‘Flying’
This is probably the most common mistake lifters make while performing the cable chest fly. They press the weight in front of their chest, using their triceps and shoulders. You must limit the chest fly movements to the shoulder joints, which helps focus on the pectoral muscles.
Move your arms in a sweeping motion while performing the standing cable chest fly. There is a time and place for the cable chest press, but this is not one of them. That said, feel free to do partial pressing reps to annihilate your chest after completing your full ROM flyes. According to a Journal of Strength and Conditioning Research study, “partial range of motion exercise is effective for facilitating muscle hypertrophy and function.” [2]
Do Not ‘Hug a Bear’
‘Hug a bear’ or ‘Hug a tree’ are the most popular cues given while trainers teach newbie lifters how to perform the standing cable chest fly. Here is my advice — don’t. Instead, you want to squeeze the bear’s head or the tree’s trunk between your elbows. Do this, and your chest pumps will be out of the world.
Lifting Too Heavy
Many lifters let their ego get the better of them while performing the standing cable chest fly. You don’t need to move the entire stack to get those inner chest striations. Keep your rep slow and controlled, and focus on contracting your pecs throughout the range of motion. Furthermore, going too heavy on this lift will lead to greater core engagement as you will have to fight the weight to maintain your position.
Moving Your Torso
You must keep an upright torso and avoid using momentum by swinging back and forth to maximize pectoral muscle stimulation. If you have to move your body to complete a rep, it is a sign that you are going a little too heavy.
Variations of Standing Cable Chest Fly
Here are the best standing cable chest fly variations to add to your training regimen. These exercises will train your chest from different angles, ensuring overall development.
Low Cable Chest Fly
I have covered the two most popular cable chest fly variations above — the high cable fly that involves setting the pulleys at the highest setting and the self-explanatory chest-level cable flyes. The former targets the inner, middle, and lower pecs, whereas the latter targets the inner and middle pecs.
The low cable chest fly is another popular cable chest fly variation that involves setting the cable pulleys at the lowest setting. In this exercise, your arms should be at 45 degrees at the starting position as you hold the D-handles at your sides. Then, you raise your hands toward the ceiling while extending your elbows until the handles are in front of your chest. The low cable chest fly biases the lower chest.
Pro Tip: Many lifters experience significant front delt engagement while performing this exercise. You must focus on contracting your pecs throughout the range of motion and use lighter weights to bias the lower pecs.
Cable Crossover
Some people use standing cable chest fly and cable crossover interchangeably. However, both exercises are different and involve a distinct range of motion. The range of motion of the cable crossover leads to great pectoral muscle fiber recruitment.
How To:
Set the cable pulleys at the highest setting.
Grab a handle in each hand with a neutral grip and step forward.
Extend your arms at your sides while maintaining a slight bend in your elbows.
Brace your core and bring your arms in front of your body while extending your elbows.
Your wrists must overlap at the top of the range of motion. Pause and contract your pecs at this position.
Return to the starting position.
Rinse and repeat.
Pro Tip: You should use a lighters weight on the cable crossover than the standing cable chest fly. Although the range of motion is slightly bigger in this exercise, it leads to much greater inner chest stimulation. Also, ensure that you crossover your hands in front of your midsection. Keeping your hands at your chest level will lead to a more significant anterior deltoid recruitment.
Check out our complete cable crossover guide here!
Single-Arm Cable Crossover
Unilateral exercises are incredibly effective at fixing muscle and strength imbalances. Since these movements involve working one side of your body at a time, it can lead to a better mind-muscle connection. Also, because this exercise requires only one pulley, it is an excellent cable fly variation for folks that work out during rush hours.
How To:
Set the cable pulley at the highest setting.
Attach a D-handle bar and grab it with a neutral grip.
Take a step to your side and hold your hand on your side at your chest level.
Place your non-working hand on your hip for stability.
Brace your core and bring your arms in front of your midsection while extending your elbow.
Pause and contract your chest.
Repeat for recommended reps before switching sides.
Pro Tip: Avoid stepping forward while performing this exercise, as the cable will brush your upper arm. Stand next to the cable pulley and take a small step to your side.
Alternatives of Standing Cable Chest Fly
Given below are some standing cable chest fly alternatives:
Dumbbell Fly
The dumbbell fly is a staple in most chest training regimens. It is one of the best free-weight exercises to target the inner pecs and build the covered striations. However, most people leave gains on the table by following an incorrect form.
How To:
Lie on your back on a flat bench. Maintain the natural curvature of your spine.
There should be enough gap between your lower back and the bench for your hand to pass through.
Hold a dumbbell in each hand with a neutral grip and hold them over your chest. Your arms should be at 90 degrees at the starting position.
Contract your pecs and slowly lower the dumbbells toward the floor. Your upper arms should be in line with your chest at the bottom, and your elbows should be slightly bent.
Reverse the motion to return to the starting position. Focus on flexing your pecs throughout the range of motion for optimal muscle fiber engagement.
Repeat for repetitions.
Pro Tip: Avoid keeping your arms straight during eccentrics, as it can strain your shoulder joints unnecessarily. Your upper arms shouldn’t break parallel at the bottom.
Check out our complete dumbbell fly guide here!
Pec Deck Fly
The pec deck fly is the darling of the bodybuilding community. Many lifters prefer it over the cables as it has a fixed movement trajectory and involves sitting against a back pad, which helps you better focus on your pecs and removes your core stabilizers from the equation.
How To:
Set the seat of the pec deck machine so that your chest is at the handle level. Place your back on the back pad.
Grab the handles at chest level. Your elbows should be slightly bent at the starting position.
Pull your shoulder blades back and down and maintain a proud chest.
Bring the handles in front of your chest while moving at the shoulder joint and extending your elbows.
Drive your elbows together at the top of the motion and contract your pecs as hard as possible.
Slowly return to the starting position.
Repeat for recommended reps.
Pro Tip: Many lifters tend to round their shoulders and drive their chin into their upper pecs while performing this exercise, especially during high-rep sets. However, it removes tension from your pectoral muscles and engages your anterior and medial deltoids and traps.
Check out our complete pec deck fly guide here!
Resistance Band Standing Cable Chest Fly
This standing cable chest fly alternative is excellent for folks that don’t have access to a cable pulley machine. You can do this in your garage gym or anywhere you can anchor a resistance band. However, I recommend using a squat rack and D-handle resistance bands for this exercise.
How To:
Securely attach a resistance band to each pole of a squat rack.
Grab the D-handles with a neutral grip.
Take a step forward and assume a staggered stance.
Extend your arms at your sides and bend your elbows slightly. The bands should be taut at this position, and you should feel tension in your pecs.
Maintaining an upright torso, bring your hands in front of your midsection while extending your elbows.
Pause and contract your pecs at the top of the range of motion.
Slowly return to the starting position.
Repeat for recommended reps.
Pro Tip: Performing this exercise by tying two resistance bands across a single pole will limit your range of motion as the bands will rub the sides of your arms throughout the range of motion.
Bodyweight Flyes
Although this is a bodyweight exercise, it comes with a steep learning curve. Bodyweight flyes, also known as barbell roll-out flyes, involve using two barbells and demand significant core strength. This exercise is best reserved for intermediate and advanced lifters.
How To:
Place two barbells on the floor parallel to each other.
Add a weight plate on the same end of both barbells. The other end should not have any weight.
Get on your knees between the barbells facing the weighted ends.
Grab the barbells below the collars and get into a push-up position.
The non-weighted ends should be right next to your feet.
Brace your core and slowly extend your arms outward.
Your chest should be in line with your upper arms at the bottom of the range of motion.
Reverse the movement while driving your elbows together.
Focus on contracting your pecs throughout the shoulder joint extension and flexion.
Pro Tip: Use 25-pound plates for this exercise. Using 45-pound plates will limit your range of motion as you won’t be able to bring your hands under your chest at the static contraction point at the top.
Check out our complete bodyweight fly guide here!
FAQs
Can I substitute the barbell bench press with the cable chest fly?
The barbell bench press is a compound (multi-joint) lift, whereas the cable chest fly is an isolation (single-joint) exercise. Compound exercises are great for building muscle mass and strength, whereas isolation lifts help improve muscle conditioning and fix imbalances.
Both types of exercises are essential for building a balanced physique, and you shouldn’t choose one over the other. Most conventional bodybuilding programs involve starting the workouts with the bench press and finishing with the cable chest fly.
Are standing cable chest fly and pec deck fly the same?
No. Although both exercises are isolation movements, the different angles of movement involved train your pecs differently. Many people make the mistake of using momentum on the standing cable chest fly by swinging their body back and forth. Plus, it involves your core for stabilization.
On the flip side, since you must be seated against a pad to perform the pec deck fly, it eliminates the use of momentum and disengages your core, allowing you to focus on your pectoral muscles. However, this doesn’t mean you should favor the pec deck over the cables in each workout. Incorporate both into your training regime to ensure overall development.
Why does the cable chest fly give a better chest pump than most other chest exercises?
Cables keep constant tension on your muscles throughout the range of motion. It accumulates to a greater time under tension, leading to better pumps. On the other hand, free-weight isolation lifts such as the dumbbell chest fly puts no demand on your chest at specific points during the range of motion.
Furthermore, cables allow you to work your chest in the horizontal plane while standing, which is virtually impossible with free weights. Most lifters experience better muscle pumps performing isolation exercises with cables than free-weight single-joint exercises.
Is the cable chest fly better than the cable crossover for chest development?
The cable crossover is a more extended version of the cable chest fly. While the cable chest fly ends when your hands are next to each other in front of your midsection, cable crossovers require you to stack your wrists on top of each other at the isometric hold at the top.
Some lifters favor the cable crossover as it helps them achieve greater pectoral muscle fiber recruitment. However, there is a lack of scientific evidence to prove if cable crossovers lead to better hypertrophic results.
Wrapping Up
The standing cable chest fly is an incredibly effective isolation exercise to build muscle size, strength, and conditioning in your pectoral muscles. By altering the pulley height, you can bias different areas of your chest while performing this exercise.
This guide has all the details you need to improve your form and maximize your results. Use the cable chest fly alternatives and variations listed in this article to add variety to your training regime and keep it interesting. So, what are you waiting for? Get to work on those coveted inner chest striations already. Best of luck!
References
Schoenfeld BJ, Grgic J, Van Every DW, Plotkin DL. Loading Recommendations for Muscle Strength, Hypertrophy, and Local Endurance: A Re-Examination of the Repetition Continuum. Sports (Basel). 2021 Feb 22;9(2):32. doi: 10.3390/sports9020032. PMID: 33671664; PMCID: PMC7927075.
Goto M, Maeda C, Hirayama T, Terada S, Nirengi S, Kurosawa Y, Nagano A, Hamaoka T. Partial Range of Motion Exercise Is Effective for Facilitating Muscle Hypertrophy and Function Through Sustained Intramuscular Hypoxia in Young Trained Men. J Strength Cond Res. 2019 May;33(5):1286-1294. doi: 10.1519/JSC.0000000000002051. PMID: 31034463.
Sit-Up Exercise Guide: How To, Benefits, Muscles Worked, and Variations
The sit-up is one of the most popular exercises. It is taught in school PT classes, done at home, and is a part of the most complex metabolic conditioning workouts. This versatile exercise works your midsection and can help build a shredded six-pack. Sit-ups can also improve your posture, core strength, and balance.
Most people have a love-hate relationship with sit-ups. They love the results but hate doing the exercise. Although sit-ups look easy, they will have you begging for mercy halfway through a set. They are especially difficult for beginners that lack abdominal strength and endurance. Furthermore, many exercisers find sit-ups boring.
That said, thanks to their effectiveness and results, sit-ups are a part of most training regimens, and this doesn’t appear to be changing any time soon.
Notably, sit-ups are often confused with their cousin — crunches. Both these exercises look similar to an untrained eye, and ‘sit-ups’ and ‘crunches’ are often used interchangeably. However, these exercises have significant differences.
The biggest difference between the two exercises is their range of motion. The crunch is roughly a quarter of the sit-up’s range of motion (ROM). While performing the crunch, your lower back is always in contact with the floor; in fact, your upper back, too, barely leaves the floor. However, as the name implies, the sit-up involves sitting upright at the top of the range of motion.
The sizeable difference in the ROM leads to the isolation of your abdominal muscles while performing the crunch. On the other hand, sit-ups stimulate multiple muscle groups, including the abs, hip flexors, hips, and lower back.
In this article, I take you over the fundamentals of the sit-up, the muscles worked during this exercise, its benefits, proper form, the most common mistakes, and the best variations and alternatives.
What is a Sit-Up?
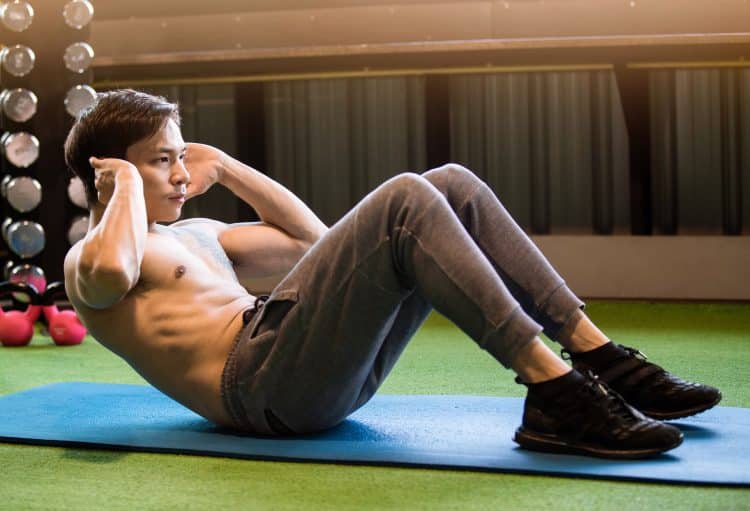
A shredded midriff and a six-pack are considered the epitome of fitness, and the sit-ups help you achieve just this. This exercise involves contracting your abs with every rep, which helps you develop a chiseled midsection. The sit-up is an isolation exercise that trains your abdominal muscles.
To perform a sit-up, lie supine and place your feet flat on the floor. While holding your hands at the side of your head, lift your torso off the floor by contracting your abs. Your upper body should be almost parallel to the floor at the top of the motion — anything between 12 and 1 ‘o clock is acceptable.
Since performing the sit-up requires no equipment, you can do it anywhere. As you gain more experience, you can make the exercise more challenging by incorporating additional resistance using a weighted vest or holding a dumbbell, weight plate, or kettlebell in front of your chest.
The sit-up primarily works the upper and middle abs. However, you can achieve better lower ab stimulation by performing this exercise on a decline bench. Conversely, beginners can perform this exercise on a stability ball, as it provides a little assistance at the bottom of the movement.
Muscles Worked During a Sit-Up
The sit-up works the following muscles:
Abs
Sit-ups work the rectus and transverse abdominis. The rectus abdominis is the long vertical muscle that runs down the front of your abdomen. It is also known as the six-pack. On the other hand, the transverse abdominis muscle wraps around the abdomen and provides stability and support to the spine and internal organs. The transverse abdominis plays a crucial role in core stability while performing sit-ups and other exercises.
Obliques
Sit-ups work the internal and external obliques. The external obliques are the fish-gill-like muscles at the side of the rectus abdominis and help with trunk rotation and bending movements. The internal obliques lie under the external obliques and also assist with trunk rotation and bending.
Hip Flexors
Hip flexors run along the front of your upper thigh. They are responsible for flexing the hip joint. Hip flexors engage during the sit-up’s concentric (upward) motion to lift the torso toward your thighs.
Hips
Your hips provide stability during the sit-ups. The hip joint flexion also allows you to move from a lying to a seated position. Strong hips will also help prevent lower back strain while performing the exercise.
Lower Back
Your lower back, especially the erector spinae, plays a crucial role by providing stability and maintaining proper spinal alignment while performing sit-ups. It helps you avoid rounding your lower back during the concentric motion.
Benefits of Sit-Ups
Here are the advantages of adding sit-ups to your training regimen:
Improved Core Strength
Performing sit-ups helps you build a stronger core, the benefits of which carry over to compound exercises. Furthermore, it improves your performance in daily activities, which helps you get done more quickly and effectively.
Boost in Athletic Performance
A strong core can help improve your athletic performance. Irrespective of your sport, sit-ups can improve your posture, stability, and form, which can boost your overall performance and results. It will also significantly delay the onset of fatigue.
Increase in Muscle Mass
Sit-ups can help build muscle mass and strength in the abdominal and hip muscles. This exercise can also be a valuable indicator of muscle loss. A 2016 study found that older women who could perform sit-ups were less likely to lose muscle mass with age. [1]
Improved Balance and Stability
Sit-ups help build a strong core, which improves your balance and stability. It can improve your performance in daily activities and other exercises. A stronger core can also help prevent falls in older adults.
Better Posture
Building a strong core helps keep your hips, spine, and shoulders in alignment, which helps promotes a better posture. Folks that have a desk job or spend the majority of their days sitting should make sit-ups a constant in their training regimen.
No Equipment
Sit-ups are a bodyweight exercise that you can do anywhere at your convenience. Plus, you can program this versatile exercise into most training regimens and use additional resistance for better results.
How To Do Sit-Up
This is how to perform the sit-up with the correct form:
Steps:
Lie supine on the floor. Bend your knees and plant your feet on the ground.
Hold your hands next to your ear.
Raise your torso off the floor by contracting your abs. Exhale sharply during the concentric movement.
Your torso should be perpendicular to the floor at the top of the movement.
Contract your abs as hard as possible.
Inhale as you slowly lower your torso to the floor.
Repeat for recommended reps.
Sit-Up Tips:
Your head should remain neutral throughout the range of motion. Bending your head during the concentric movement puts unnecessary strain on your neck.
Avoid interlacing your fingers behind your head as it increases your odds of bending your neck during the upward motion. Crossing your arms in front of your chest is a better alternative if you don’t prefer holding your hands next to your ears.
Exhale and contract your abs during the upward motion.
Keep your back straight throughout the range of motion. Rounding your back can strain your lower back.
Use an elevated surface to anchor your feet. This will help keep your feet planted on the floor and allow you to establish a better mind-muscle connection.
It is common for beginners to experience ab cramps while doing sit-ups. Stop the exercise if you experience cramps and stretch out your abs.
In This Exercise:
Target Muscle Group: Abs
Type: Strength
Mechanics: Isolation
Equipment: Bodyweight
Difficulty: Beginner
Best Rep Range: 8-12
Common Mistakes While Performing Sit-Up
These are some of the most common sit-up mistakes that you must avoid to maximize results and lower the risk of injury:
Using a Limited Range of Motion
Many people leave gains on the table by following an incorrect form and a restricted range of motion. Your back should be on the floor at the bottom, and it should be perpendicular to the floor at the top.
Using Momentum
Exercisers try to make this exercise easier by using momentum. Avoid throwing your arms toward your legs to lift your torso off the floor. Driving through your neck during the concentric motion can cause neck sprains.
Neck Strain
Sit-ups are a demanding exercise. You must keep your head, neck, and torso in a straight line throughout the exercise for optimal ab stimulation. Folks that interlace their fingers behind their necks or throw their heads forward during the concentric motion increase their odds of injury during the exercise.
Rounding Your Back at the Top
Think of your torso as a hardboard while doing sit-ups; it should move in a straight line. Rounding your back at the top of the motion causes unnecessary lower back strain. It will also hamper your form during the eccentric (lowering) motion.
Improper Breathing
Many people make the mistake of holding their breath while performing crunches. Breathing correctly while performing crunches can help amplify your results. Exhale sharply during the concentric motion and inhale during the eccentric motion.
Not Adding Variety To Your Training Regimen
Although crunches are a great exercise to build a shredded midriff, your training program must include exercises that train your torso from different angles for overall development. It will ensure you build a bulletproof midsection. This point is a perfect segue into…
Variations and Alternatives of Sit-Ups
Add the following sit-up variations and alternatives to your training regimen to build a shredded midsection:
Weighted Sit-Up
Weighted sit-ups are for advanced athletes. It involves holding additional resistance, such as a dumbbell, kettlebell, or weight plate, in front of your chest. The exercise form for this variation will remain the same as the conventional sit-up.
Pro Tip: Use an appropriate weight that allows you to keep your head and torso in a straight line throughout the range of motion. Using a weight that is too heavy can cause you to bend your head forward.
Stability Ball Sit-Up
Stability ball sit-ups are an excellent exercise for beginners as the exercise ball acts as a support at the bottom of the movement and delivers a pop that pushes you into the next rep.
Steps:
Sit upright on an exercise ball and plant your feet flat on the floor.
Hold your hands at your ear level and slide forward so your lower and middle back are on the exercise ball. Your shoulders should be hanging off the ball.
Exhale and contract your abs to lift your torso toward the ceiling.
Your torso should be perpendicular to the floor at the top.
Slowly return to the start position.
Rinse and repeat.
Pro Tip: Some trainers go down too fast during the eccentric motion to use the bounce from the ball to complete the next rep. However, this reduces the effectiveness of the exercise and increases your risk of lower back injury.
Reverse Crunch
Sit-ups and crunches work the upper and middle abs. On the other hand, reverse crunches focus on your lower abs. During a sit-up, your lower body remains steady while your upper body moves. The reverse is true for the reverse crunch.
Steps:
Lie with your back on the floor. Your body should be in a straight line at the starting position.
Place your hands under your hips for leverage.
Lift your feet off the floor so your heels are a few inches off the ground.
Pull your quads to your chest while bending your knees.
Your hips should be off the floor at the top.
Slowly return to the start position.
Repeat for recommended reps.
Pro Tip: Make this exercise more challenging by performing this exercise on an elevated platform, such as a flat bench. Let your feet touch the floor at the bottom of the movement for better abdominal stimulation.
Check out our complete reverse crunch guide!
V-Up
The V-up is a great exercise to build core strength, balance, stability, and coordination. This exercise targets your entire midsection, including your upper, middle, and lower abs.
Steps:
Lie flat on your back on the floor.
Extend your arms toward the ceiling so they are perpendicular to the floor. Simultaneously, raise your legs off the floor.
In a single motion, lift your legs toward the ceiling and bring your hands toward your feet.
Your body should resemble a “V” at the static contraction point at the top.
Slowly lower to the starting position.
Repeat for recommended reps.
Pro Tip: Experienced lifters can make this exercise more challenging by wearing ankle weights and holding a pair of dumbbells.
Check out our complete V-up guide!
Crunch
The crunch is the easier version of the sit-up and roughly involves a quarter of the sit-up’s range of motion. This exercise is a better option for people trying to maintain constant tension in their upper abs or undergoing rehabilitation.
Steps:
Lie supine on the floor. Bend your knees and plant your feet flat on the ground.
Hold your hands next to your ears.
Contract your core, and exhale as you lift only your head and shoulder blades off the ground.
Slowly lower to the starting position.
Repeat for reps.
Pro Tip: Like with sit-ups, you can perform crunches while holding onto weights or on a decline for greater abdominal stimulation.
Check out our complete crunch guide!
Bicycle Crunch
The bicycle crunch is one of the few ab exercises that simultaneously work your lower and upper body. This ab exercise is incredibly effective at working your lower and upper abs and obliques.
Steps:
Lie flat on the floor while facing the ceiling.
Hold your hands next to your ears and lift your legs off the floor.
Exhale as you bring your right knee to your chest while driving your left elbow to the knee.
Return to the starting position.
Repeat on the other side.
Alternate between sides for the recommended reps.
Pro Tip: Focus on your breathing to make the most of this exercise. Breathe out during the concentric motion and breathe in during the eccentric motion.
Check out our complete bicycle crunch guide!
Wrapping Up
The sit-up is a versatile beginner-friendly exercise that will help improve your core strength, balance, stability, and posture, boost your athletic performance and muscle mass, and can be done anywhere at your convenience.
Although sit-ups are a great exercise to work your midsection, your ab training routine should include a variety of movements to ensure overall development. Remember, building a six-pack requires patience, dedication, commitment, and a low body fat percentage. Nail each aspect of your training, diet, and recovery regimen, and your abs will rival those of Greek statues. Best of luck!
Related: Crunch and Sit-Up Alternatives
References
Abe T, Yaginuma Y, Fujita E, Thiebaud RS, Kawanishi M, Akamine T. Associations of sit-up ability with sarcopenia classification measures in Japanese older women. Interv Med Appl Sci. 2016 Dec;8(4):152-157. doi: 10.1556/1646.8.2016.4.7. PMID: 28180004; PMCID: PMC5283773.
Standing Dumbbell Fly Exercise Guide: How To, Benefits, Muscles Worked, and Variations
Close your eyes and think about an ideal free-weight chest workout. Chances are the training session includes the bench press, dumbbell press, dumbbell fly, and some variation of the incline or decline fly. All these exercises share something in common — they require a bench.
Busy folks that train during rush hours might not have the luxury of waiting for a bench. On the other hand, people that work in their minimal garage gyms might not have access to a bench.
Contrary to what most lifters think, you can train your pecs effectively without a bench with free weights; one of the best exercises to do this is the standing dumbbell fly.
Whether you don’t want to wait for your turn on the bench, don’t have a bench in your home gym, or want to try a new exercise to spark chest growth, the standing dumbbell fly has you covered.
The standing dumbbell fly is a versatile exercise that can be included in your chest, push, upper body, or full-body workouts. This movement demands decent core stability to perform correctly. Furthermore, going too heavy on the standing dumbbell fly can render the exercise ineffective.
You must follow a slow and controlled range of motion while using moderate weights to make the most of the standing dumbbell fly, making it an excellent exercise for beginners. It will also help improve your mind-muscle connection, which will carry over to other lifts.
In this article, we cover everything you need to learn about the standing dumbbell fly to make the most of this lift, including its benefits, the common mistakes, the muscles worked, how to perform correctly, and the best variations and alternatives.
What is a Standing Dumbbell Fly?
Developed pectoral muscles take your physique aesthetics to the next level. They add to your V-taper, draw eyes to your midsection, and improve your overall functionality. However, most lifters leave gains on the table during their chest workout as they chase weights and forget about using a full range of motion and contracting their muscles with each rep. The unique setup of the standing dumbbell fly fixes this. This exercise also improves your stability and balance. Furthermore, the range of motion of the standing dumbbell fly will make you strong enough to lift the love of your life in your arms.
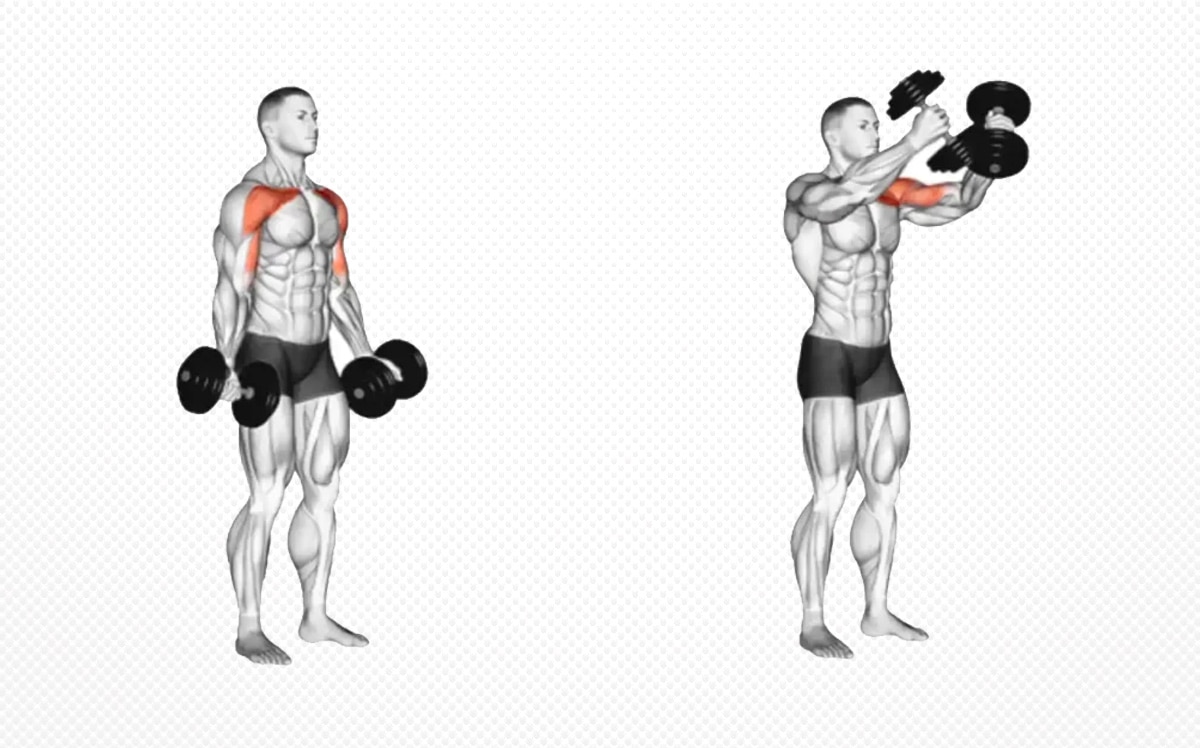
The standing dumbbell fly is a standing low to high cable fly variation. To perform a standing dumbbell fly, assume a hip-width stance while holding a dumbbell in each hand. Maintain an upright torso, push your chest out, and raise your hands to shoulder level while maintaining a slight bend in your elbows.
You could also turn this exercise into a unilateral movement by working one side of your body at a time. Unilateral exercises are incredibly effective at fixing muscle and strength imbalances. While doing the single-arm variation of this lift, keep your other hand on your hip or hold onto a dumbbell for better balance.
Muscles Worked During Standing Dumbbell Fly
The standing dumbbell fly works the following muscles:
Chest
The pectoralis muscle consists of two muscles, the pectoralis major and the pectoralis minor. The pectoralis major is a fan-shaped superficial muscle in the front of your chest wall. On the other hand, the pectoralis minor is triangular and located under the pectoralis major.
The standing dumbbell flys mainly target the pectoralis major, which helps with the adduction, or depression, of the arm and arm rotation forward about the axis of the body.
Shoulders
The standing dumbbell fly is an isolation exercise that restricts movement to the shoulder joint. Since this exercise involves movement in the sagittal plane, it results in anterior deltoid recruitment.
Biceps
This dumbbell fly variation involves maintaining a slight bend in your elbows throughout the range of motion. You might experience a slight biceps engagement during the movement’s concentric (upward) part while performing this exercise, especially while lifting heavy.
Benefits of Standing Dumbbell Fly
Adding the standing dumbbell fly to your exercise arsenal entails the following advantages:
Helps Build Muscle Mass
The standing dumbbell fly is an isolation exercise that can help build muscle mass and improve your conditioning. Perform 3-5 sets and 8-12 reps of this exercise once weekly using appropriate weight to induce hypertrophy. [1]
Beginner-Friendly
This dumbbell fly variation involves lifting light to moderate weights while focusing on your form, making it an excellent exercise for beginners. You must readjust your form if you don’t feel your chest muscles contracting with each rep. Use this exercise as an opportunity to polish your mind-muscle connection.
Variety
Most free-weight chest exercises require lying on a bench. The unique stimulus of the standing dumbbell flies can shock your muscles, sparking new muscle tissue growth. Plus, it is a versatile exercise that can be added as an accessory lift in most training programs. Since it requires only dumbbells, the standing dumbbell fly is incredibly convenient.
How To Do Standing Dumbbell Fly
This is how to perform the standing dumbbell fly with the correct form:
Steps:
Stand upright with a shoulder-wide stance.
Grab a dumbbell in each hand with a supinated (palms facing forward) grip.
Tuck your chin slightly, pull your shoulders back and down, and push out your chest.
Maintain a slight bend in your elbows and lift your arms toward the ceiling until your hands are at shoulder level.
Your hands should move toward the center line of your body during the upward motion and should be next to each other at the top.
Focus on contracting your pecs throughout the range of motion.
Pause and squeeze the life out of your chest at the top.
Slowly return to the starting position.
Repeat for recommended reps.
Standing Dumbbell Fly Tips:
Avoid touching the dumbbells at the top, as it will remove the tension from your chest and put it on your shoulders.
Keep your core and glutes braced throughout the range of motion for optimal stability and balance.
Many lifters make the mistake of extending their elbows at the bottom. Your elbows should be slightly bent throughout the ROM.
Breathe in during the concentric (upward) motion and exhale during the eccentric (downward) motion.
To prevent trapezius muscle activation, refrain from shrugging your shoulders as you lift your arms.
In This Exercise:
Target Muscle Group: Chest
Secondary Muscle Groups: Shoulders and Biceps
Type: Strength
Mechanics: Isolation
Equipment: Dumbbells
Difficulty: Beginner
Best Rep Range: 8-12
Common Mistakes While Performing Standing Dumbbell Fly
Avoid these lapses to make the most of the standing dumbbell fly:
Going Too Heavy
The standing dumbbell fly is an isolation exercise. Using heavier dumbbells than you can handle comfortably can remove tension from your pecs and put it on your shoulders and biceps. For optimal results on this lift, use a moderate weight and focus on contracting your pecs with every rep.
Leaning Forward
Many lifters tend to lean forward while performing this exercise. However, it can result in greater deltoid engagement and remove tension from your chest. You must maintain an upright torso and push your chest out to work your pecs.
Holding the Dumbbells Too Tight
Squeezing the dumbbell handles too hard can fire up your forearms and biceps. Additionally, since you’ll maintain a slight bend in your elbows, it can result in a biceps pump. Use a false (thumbless) grip if you feel excessive forearm engagement while performing this exercise.
Variations and Alternatives of Standing Dumbbell Fly
Add the following standing dumbbell fly variations and alternatives to your training regimen to build a full and round chest:
Standing Low To High Cable Fly
This chest movement is the closest alternative to the standing dumbbell fly exercise. The cables help keep constant tension on your muscles throughout the range of motion.
Steps:
Set the cable pulleys at the lowest setting and hook up a D-handle attachment.
Grab a handle in each hand, walk to the pulley machine’s center, and then take a step forward. The cable should be taut at the starting position.
Your hands should be at the sides of your thighs at the starting position.
While maintaining a slight bend in your elbows, lift your arms until your hands are at shoulder level.
Pause and contract your pecs throughout the range of motion.
Slowly return to the starting position.
Rinse and repeat.
Pro Tip: Slow down the exercise’s eccentric (lowering) motion for optimal pectoral engagement.
Pec Deck Fly
Since the pec deck fly machine follow a fixed movement path, it is a beginner-friendly chest exercise. The fixed movement trajectory allows you to focus on establishing a mind-muscle connection with your pectoral muscles and contracting them throughout the ROM.
Steps:
Set the seat of the pec deck machine at a height so that the machine handles are at shoulder level.
Grab the handles with a neutral (palms facing inward) grip.
Push out your chest slightly.
While maintaining a slight bend in your elbows, bring your hands together.
Pause and contract your pecs at the top.
Slowly return to the start position.
Pro Tip: Keep your shoulder blades pinched throughout the exercise. Rounded shoulders take tension off your pecs.
Check out our complete pec deck fly guide here!
Barbell Fly
Although this exercise requires barbells, it is a bodyweight movement. Besides annihilating your pecs, the barbell fly will engage your core and help improve your balance and stability.
Steps:
Place two barbells together on the floor.
Add a weight plate on the same end of both barbells.
Get into a push position while holding the barbells a few inches below their necks on the weighted sides.
The non-weighted ends of the bars should be between your feet.
Slowly roll out the bars and lower your chest as close to the floor as possible.
Pause at the bottom.
Bring the bars back to the starting position. Pause and contract your pecs at the top.
Repeat for reps.
Pro Tip: Place a weight plate on each side to keep the bars from rolling too far out. The weight plates on the floor will act as guard rails.
Check out our complete barbell fly guide here!
Flat Bench Dumbbell Fly
This is a staple exercise in most chest training routines. It helps develop your inner chest, giving it a fuller appearance.
Steps:
Lie supine on a flat bench while holding a dumbbell in each hand with a neutral grip.
Extend your arms so they are perpendicular to the floor.
While maintaining a slight bend in your elbows, lower your arms to your sides.
Pause at the bottom.
Explode back to the starting position. Contract your pecs at the top.
Rinse and repeat.
Pro Tip: Keep your rhomboids pinched together as if holding a pencil between them. This will improve your chest stimulation.
Check out our complete flat bench dumbbell fly guide here!
Incline Dumbbell Fly
The upper pecs are a lagging muscle group for most lifters. Not only does the incline dumbbell fly improve your upper shelves, but it also enhances your muscle separation.
Steps:
Set the back of an incline bench at a 45-degree angle with the floor.
Lie on the bench holding a dumbbell in each hand using a neutral grip.
Extend your arms so they are perpendicular to the floor.
While maintaining a slight bend in your elbows, slowly lower the bar toward the floor.
Return to the starting position.
Repeat for reps.
Pro Tip: Many lifters make the mistake of holding the dumbbells at an angle, which removes tension from their chest and puts in on their anterior deltoids. Your arms should be at a 90-degree with the floor for optimal chest engagement.
Check out our complete incline dumbbell fly guide here!
Wrapping Up
The standing dumbbell fly is an unorthodox exercise that can spark new growth in your chest. Perform 3-5 sets of 8-12 reps of this exercise with moderate weights to put you in the sweet spot for gaining muscle mass and conditioning.
You must follow a full range of motion to get optimal results. Furthermore, switch this exercise with the alternatives and variations mentioned in this article to target your pectoral muscles from different angles and fast-track your pectoral growth.
References
Krzysztofik M, Wilk M, Wojdała G, Gołaś A. Maximizing Muscle Hypertrophy: A Systematic Review of Advanced Resistance Training Techniques and Methods. Int J Environ Res Public Health. 2019 Dec 4;16(24):4897. doi: 10.3390/ijerph16244897. PMID: 31817252; PMCID: PMC6950543.
CrossFit Cluster Exercise Guide: How To, Benefits, Muscles Worked, and Variations
CrossFit is a unique sport. It involves beginner-friendly simple movements like the air squat, shoulder press, and kettlebell swings. On the flip side, it also incorporates demanding exercises such as rope climbs, pig flips, and Olympic lifts (clean and jerk and snatch) that get elite athletes on their knees.
Most CrossFit WODs (workout of the day) consist of circuits that combine two or more movements. The CrossFit cluster takes this a step further, merging the thruster with the clean into a single exercise.
Interestingly, the thruster is a combination of two exercises — the front squat and the push press. Adding the clean to the mix makes the cluster a blend of three compound (multi-joint) movements.
CrossFit has set itself apart by requiring its athletes to perform unique and challenging compound exercises that help you work your entire body in a short time. The cluster fits the bill perfectly.
In this article, we go over the fundamentals of the CrossFit cluster, and everything you need to know about it to master the movement, including its benefits, correct form, common mistakes, variations, and the muscles worked during this exercise.
What is a CrossFit Cluster?
A CrossFit cluster combines two exercises — the clean and the thruster. The compound exercise works your entire body. Most WODs have just the right amount of clusters as chippers or in a circuit to destroy you by the end of the workout.
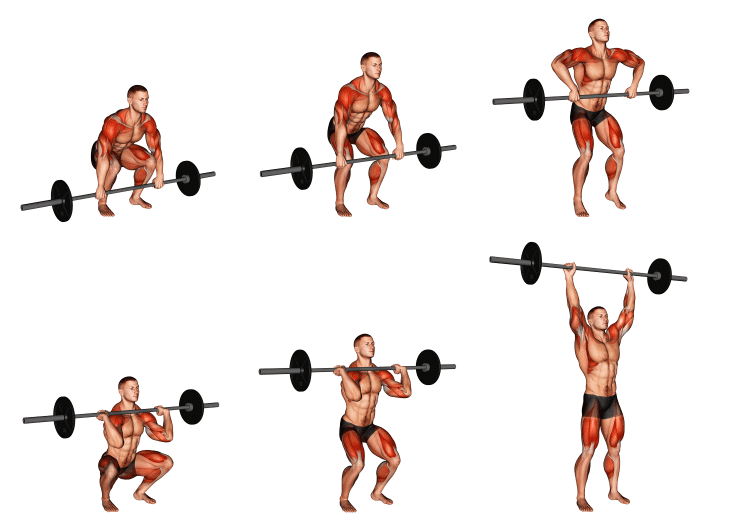
Each cluster begins from the ground. You must lift the bar to your hip height and catch it in the front rack position at the bottom of a squat. The rest of the movement is the same as the thruster. From the bottom of the front squat, stand up by extending your knees and driving through your midfoot. As you’re about to achieve full knee extension, use the momentum to drive the bar overhead and lock out your elbows. Return the bar to the front rack position.
In the thruster, you would go right into a squat after catching the bar and repeat for the recommended reps. However, you will return the bar to the floor with each rep while doing the cluster. Adding the cleans makes the cluster much more demanding than the thrusters.
You must follow the perfect form while performing the cluster to avoid unnecessary strain on your lower back. Lifting with a rounded back is one of the most common mistakes while doing this exercise.
Muscles Worked During CrossFit Cluster
The CrossFit cluster is a full-body exercise, recruiting almost every muscle fiber in your body. It is such an effective compound exercise that we think this section should be titled “Muscles not worked in a CrossFit Cluster.” Nonetheless, here are the muscles stimulated in this exercise:
Legs
The cluster works your quads during the initial lift off the floor; your glutes and hamstrings are activated as you get into the squat after catching the bar. This exercise is a complete leg builder that will help you add strength and size to your lower body.
Back
While performing the cluster, you’ll experience latissimus dorsi, rhomboids, teres major and minor, and trapezius muscle engagement. Since this is a hip-hinge movement, you’ll also feel lower back stimulation.
Shoulders
From pulling the bar off the floor and pressing it overhead, you’ll experience shoulder engagement. Cycle through the cluster reps, and you’ll feel a sick anterior and lateral deltoid pump.
Arms
The first half of the movement involves pulling the bar to the front rack, resulting in biceps engagement. The second half requires you to press the bar overhead, which will fire up your triceps.
Core
Performing a clean, especially while lifting heavier, requires a strong core. Your midriff and stabilizers will also be in action as you press the bar overhead and complete a lockout. Folks that lack a solid core will have trouble completing a heavy overhead lockout.
Benefits of CrossFit Cluster
Adding the cluster to your exercise arsenal entails the following benefits:
Boosts Your Skills
CrossFit involves a lot of skills. Most WODs involve a healthy chunk of high-skill weightlifting moves such as the Olympic lifts and gymnastics moves like handstand walks and ring muscle-ups.
The cluster helps you improve at Olympic lifts by incorporating the clean, front squat, and overhead press into a single movement. It will aid in improving your technique and get you better results faster.
Full-Body Exercise
The cluster is a full-body exercise that will help you build overall strength and muscle mass. This compound exercise will improve your functionality, making you better at other exercises and day-to-day activities.
The cluster will also improve your metabolic conditioning, boosting your performance in demanding workouts.
Helps Build Strength and Muscle Mass
The compound exercise will boost your strength and muscle mass. You must, however, program your workouts accordingly. Stay in the 1-5 rep range to focus on strength. On the other hand, the 8-12 range is optimal for hypertrophy. [1]
Enhances Endurance and Stamina
Perform high-rep sets of clusters, and you’d be gasping for breath. Adding cluster ladders to your WODs will help you build stamina and endurance, translating to better performance in demanding workouts.
Improves Coordination
There are several moving parts in the cluster. You need to clean the barbell off the floor, perform a squat, and then do an overhead press. Doing this exercise regularly will help improve your hand-eye coordination.
How To Do a CrossFit Cluster
The CrossFit cluster is a complex lift. You must dial in your technique to get the best bang for your buck. There will be a lot of tips and tricks, so pay close attention. Here is how to perform the cluster with the perfect form:
Steps:
Place a barbell against your shins and stand upright with a shoulder-wide stance.
Grab the bar using a shoulder-wide hook grip. Your hip crease should be below your knees crease. This will help you use your quads in the initial phase of the lift.
Your chest should be open, and you should look straight ahead while at the bottom of the lift.
Pull the bar to your hip level while keeping it close to your body by driving through your midfoot.
Pull the bar faster as it crosses your knees, and you stand upright by extending your knees.
The bar should make contact with your hips. At this point, lean back slightly, generate momentum by getting on your heels, and pull the bar toward your shoulders.
In one motion, jump your feet wide and get under the bar to catch it in the front rack position at the bottom of the squat.
Get out of the hole explosively by driving through your midfoot.
Press the bar overhead as you reach the top of the movement.
Move your head through your arms to achieve a lockout.
Lower the bar to a front rack position.
Repeat for reps.
CrossFit Cluster Tips
Pull the slack out of the bar at the bottom by pulling the bar slightly off the floor. This will help ensure a smooth upward movement.
You can skip jumping your feet out if you are comfortable with your initial stance and can use it to push the weight overhead.
Your elbows should trace over the bar in the initial part of the lift and drop below the bar as you catch it in a squat. This will help you keep control of the barbell.
Avoid rounding your back or looking down in the initial phase of the cluster, as it can put unnecessary strain on your neck.
Driving through your heels or toes will throw you off balance. Drive through your midfoot to maintain your center of gravity.
This Exercise:
Target Muscle Groups: Back, Legs, Shoulders, Arms, and Core
Type: Strength
Mechanics: Compound
Equipment: Barbell
Difficulty: Intermediate
Best Rep Range: 8-12 Reps
Common Mistakes While Performing a CrossFit Cluster
Stay clear of the following cluster errors for optimal gains and to avoid injuries:
Improper Form
Like all the other exercises, you only get better at the cluster with practice. Since this is a compound movement, lifters tend to make several mistakes initially. You must not yank the bar off the floor in the first half of the lift, as it can throw you off balance.
Keep your chin tucked and your eyes locked straight ahead throughout the exercise. Tilting your head toward the ceiling or the floor will again make the lift unstable. Plus, many lifters get on their toes too soon. You must wait for the bar to reach your hip level before using your feet to generate extra momentum.
Not Warming Up
The cluster is a full-body exercise, meaning a lot can go wrong while performing this exercise. Many people increase their odds of injury by not warming up before a workout. You must spend 10-15 minutes warming up before a training session for optimal performance.
Furthermore, compound lifts like the cluster require a decent amount of mobility. You must work on improving your flexibility and mobility to get better at the Olympic lifts.
Going Too Heavy
This is one of the most common mistakes lifters make while doing the cluster. Since this exercise is a combination of three lifts, many people load the bar with more weight than they can handle, assuming that they can muscle through the lift. However, letting your ego get the better of you jeopardizes your form and puts you at a greater risk of injury.
Variations and Alternatives of CrossFit Cluster
Use the following cluster variations and alternatives to add variety to your training regimen:
Dumbbell Cluster
This cluster variation uses dumbbells instead of a barbell. Although many lifters might think it is easier than the conventional cluster, it is not the case. The dumbbell cluster requires a different skill.
Steps:
Grab a dumbbell in each hand and stand upright with a shoulder-wide stance.
Push your hips back, hinge at your hips, and bend your knees to lower the dumbbells to your floor. Place the dumbbells on the outside of your feet at the starting position.
Lift the dumbbell to your knees by driving through your quads and midfoot.
Drive your hips forward and extend your knees as the dumbbells cross the knees.
Generate momentum by lifting your heels off the floor when the dumbbells reach your hip level.
Drop under the dumbbells and catch them over your shoulders.
Explode out of the hole and push the dumbbells overhead as you complete the movement.
Pro Tip: Ensure you’re using your quads to power off the floor by getting your hip crease below your knee crease at the bottom of the movement.
Thruster
The thruster is a great exercise to forge a more robust cluster. It is just like the cluster, minus the cleans while doing multiple reps.
Steps:
Take a shoulder-width stance and stand upright with a barbell against your shins.
Grab the bar at shoulder-width using a hook grip.
Clean the bar into a front rack and get into a squat.
Explode out of the hole by driving through your midfoot.
Press the bar overhead as you extend your knees.
Lower the bar into a front rack.
Perform a squat.
Repeat for recommended reps.
Pro Tip: Hold the bar in the front rack position using a full grip. Balancing the bar using only your fingers can make the lift unstable.
Clean
The clean is an Olympic lift, which needs a lot of practice to master. However, sticking with this exercise will make you better at most other CrossFit compound lifts, as it will help develop a stronger base.
Steps:
Stand with a shoulder-wide stance with a barbell placed against your shins.
Grab the bar with a hook grip.
Maintaining an open chest and flat back, pull the bar to your knees using your quads.
Drive your hips forward and extend your knees to bring the bar to your hip level.
From here, lift your heels off the floor to pull the bar toward the ceiling.
Get under the bar and catch the bar in a front rack position while jumping your feet out.
Stand upright.
Pro Tip: Drive your knees outward during the initial phase of the lift, as it will help engage your legs to generate power.
Front Squat
The next two exercises on the list are among the nine basic movements of CrossFit. The front squat is a compound exercise that primarily works your quads.
Steps:
Start with the bar in a front rack position with your hands slightly wider than shoulder-width apart.
Use a shoulder-wide stance and turn your toes slightly outward.
While maintaining an upright torso, lower into a squat and go as deep as possible.
Return to the starting position.
Repeat for reps.
Pro Tip: You must have decent upper body, overhead, hip, and lower body mobility to perform a front squat with an upright torso.
Push Press
The push press is a basic CrossFit movement that will help you build upper body strength and explosiveness.
Steps:
Start in the front rack position and a shoulder-width stance.
Drop into a shallow stance.
Extend your knees rapidly and push the barbell overhead while raising your heels off the floor.
Lock out your elbows at the top and drive your head through your arms.
Lower the bar to the front rack position.
Repeat.
Pro Tip: Your elbows should be under the bar at the starting position, as it will help you generate power.
Wrapping Up
CrossFit is a high-intensity sport that combines weightlifting, gymnastics, and cardio. Olympic weightlifting exercises form the basis of the CrossFit resistance training WODs and help work your entire body in a short time.
The CrossFit cluster is one of the most effective functional exercises to help you build strength, muscle, endurance, and balance. Use the cluster alternatives and variations listed in this article to take your WODs to the next level. Best of luck!
References
Krzysztofik M, Wilk M, Wojdała G, Gołaś A. Maximizing Muscle Hypertrophy: A Systematic Review of Advanced Resistance Training Techniques and Methods. Int J Environ Res Public Health. 2019 Dec 4;16(24):4897. doi: 10.3390/ijerph16244897. PMID: 31817252; PMCID: PMC6950543.
Intermittent Fasting and the Mediterranean Diet: Guide to Health and Longevity!
The concept of intermittent fasting is not new. It has been around for ages, with almost all cultures practicing it in one form or another. However, the term was coined by Anton Carlson and popularized by BBC broadcast journalist Dr. Michael Mosley’s TV documentary Eat Fast, Live Longer in 2012. [1]
On the other hand, Mediterranean fasting is a traditional diet that has existed for more than five thousand years. It entered the mainstream in the 1950s when people from the Mediterranean region were observed to have much better health than their Western counterparts.
Though widely different, intermittent fasting and the Mediterranean diet have unique benefits and complement each other in powerful ways. This article will take you through the science behind intermittent fasting and the Mediterranean diet and how combining these approaches can help you achieve optimal health and wellness.
What is Intermittent Fasting?
Intermittent fasting is a weight loss strategy that involves alternating between periods of eating and fasting. It’s not a diet in the traditional sense but rather an eating pattern that specifies when to eat instead of what to eat.
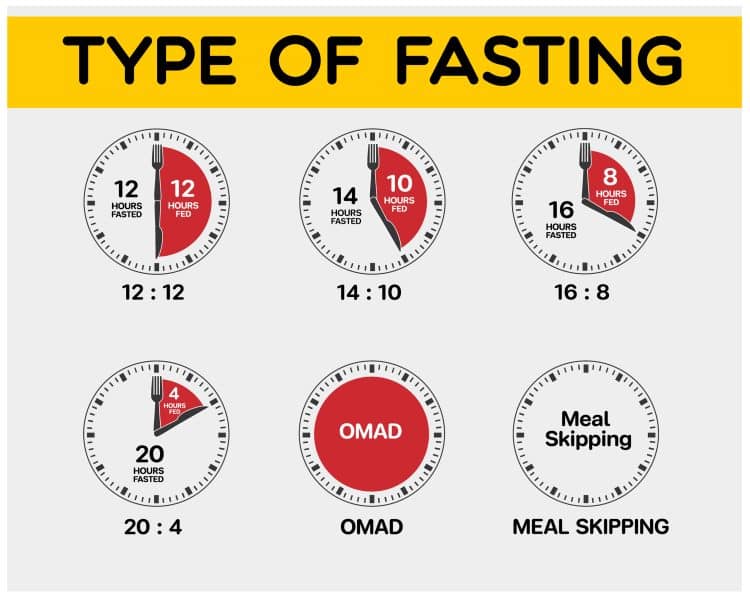
There are several intermittent fasting methods. Still, the most popular methods involve fasting for a set period, typically between 16–24 hours, followed by a period of eating.
Time-restricted feeding: You limit the eating window to certain hours, say 4–8 hours. For example, the famous 16/8 method involves fasting for sixteen hours and eating during the remaining eight hours.
Alternate day fasting: You fast every other day, meaning you eat your usual diet one day and restrict calories to around 500 the next day.
The 24-hour fast: You fast for twenty-four hours, consuming only water, black tea or coffee, sugar-free gum, or other sugar-free beverages.
The 5:2 fast: You eat normally five days a week (a relatively healthy, balanced diet) and restrict calories to 500 on the other two non-consecutive days.
Regardless of the method, intermittent fasting helps reduce overall calorie intake and promotes weight loss by burning stored fat for energy. Additionally, intermittent fasting offers numerous health benefits, notably improved insulin sensitivity, lowering your risk of developing type 2 diabetes. [2]
The fasting approach enhances brain function, boosts energy levels, and extends life. Moreover, it reduces inflammation, a critical factor in many chronic diseases such as heart disease, cancer, and Alzheimer’s. Studies have shown that fasting can stimulate the production of new brain cells and improve cognitive function. [3]
What is a Mediterranean Diet?
Otherwise called a heart-healthy diet, the Mediterranean diet emphasizes a plant-based diet with some seafood and healthy fats. Meat and dairy foods are generally consumed in small quantities.
As the name indicates, the diet is based on the traditional way of eating in the Mediterranean region. With a Mediterranean diet, you eat mostly fresh fruits and vegetables, whole grains, legumes, nuts, and healthy fats such as olive oil and fatty fish. The diet also comprises animal protein in the form of fish and seafood. However, dairy and poultry are consumed in moderation. Unlike most other diets, you can consume red wine in moderation.
The core of the Mediterranean diet is its balanced approach to eating. It emphasizes whole, unprocessed, nutrient-dense foods with fresh fruits and vegetables. Processed foods, sugary treats, and beverages have no place in the Mediterranean diet. Above all, a heart-healthy diet favors herbs and spices to flavor meals rather than salt.
Being primarily plant-based, the Mediterranean diet offers all the necessary vitamins, minerals, antioxidants, fiber, and phytonutrients. It is known for its anti-inflammatory and disease-fighting properties. Several studies have shown that the Mediterranean diet can reduce the risk of heart disease, stroke, type 2 diabetes, and certain cancers. [4] [5]
While the diet is not designed for weight loss, it also promotes weight loss. This is due to filling, high-fiber foods that keep you full for extended periods.
Can I Combine Intermittent Fasting and Mediterranean Diet?
The short answer is — yes! You can follow intermittent fasting and adopt a Mediterranean diet simultaneously. Incorporating a Mediterranean diet with intermittent fasting is a match made in heaven. The two dietary approaches complement each other rather perfectly.
Focus on consuming nutrient-dense, whole foods in line with your Mediterranean diet during your eating window. This ensures you get the necessary nutrients to support your health and well-being and maintain a healthy weight.
Intermittent fasting and the Mediterranean diet have several health benefits, including weight loss, improved insulin sensitivity, reduced inflammation, and increased longevity. It also helps improve your health and reduce your risk of chronic diseases.
The Mediterranean diet is rich in nutrients such as fiber, antioxidants, and healthy fats (including monounsaturated and omega-3 fatty acids). Though the diet involves more fat than other dietary approaches, it is high-density lipoprotein (HDL) cholesterol, aka good cholesterol, rather than low-density lipoprotein (LDL) cholesterol, or bad cholesterol.
Furthermore, with abundant plant-based foods, nuts, and extra virgin olive oil, the human body will absorb sufficient nutrients such as vitamin B12 and vitamin D, which affect weight loss. [6]
Which Intermittent Fasting Type Works Best with Mediterranean Diet?
Among the many types of intermittent fasting, 16:8 works best with the Mediterranean diet. It involves eating in an eight-hour window, followed by a 16-hour fast.
Reducing your eating window to eight hours gives you ample time to have a diet with diverse foods packed with nutrients. The best part is that you get to eat your favorite foods while also shedding excess weight.
How Does Intermittent Fasting Help the Mediterranean Diet?
Intermittent fasting is crucial in assisting the Mediterranean diet since it helps you adhere to it long-term, leading to improved health outcomes. Furthermore, with its definite eating and fasting windows, intermittent fasting promotes structure and discipline. This makes it easier to stick to the Mediterranean diet and curb cravings for unhealthy food.
While intermittent fasting helps, the success of the Mediterranean diet doesn’t depend on it. The diet is rich in nutrient-dense foods, including vegetables, fruits, whole grains, legumes, and healthy fats. Since it has no processed foods, it contains no added sugars, sodium, or saturated fats.
Furthermore, due to time-restricted eating, intermittent fasting can cut calorie consumption by as much as 60%.
Benefits of Mediterranean Diet and Intermittent Fasting
The Mediterranean diet has several benefits, including weight loss and a reduced risk of heart disease, stroke, cancer, and Alzheimer’s. And when combined with intermittent fasting, you can potentially enhance their health benefits.
Weight Loss
Here are the health benefits of combining the Mediterranean diet with intermittent fasting:
Studies show that combining these approaches can help you achieve greater weight loss and an improved body fat percentage than either practice alone. [7]
The Mediterranean diet is famous for being heart-healthy mainly due to its majorly plant-based nature. It helps prevent coronary artery disease and cardiovascular disease and boosts heart health in general. Similarly, intermittent fasting helps reduce cholesterol levels and blood pressure, preventing heart disease. By combining both approaches, it reduces the risk of heart disease.
The Mediterranean diet has long been linked with a reduced risk of Alzheimer’s and dementia. It also helps improve cognitive function and reduces inflammation. Intermittent fasting, on the other hand, reduces brain damage by generating new brain cells in response to stress. Combining both practices helps reduce the risk of age-related cognitive impairments such as dementia and Alzheimer’s. [8]
IF with a Mediterranean diet helps lower the risk of type 2 diabetes. Fasting can help improve insulin resistance, while the healthy Mediterranean diet helps regulate sugar.
Fasting and a healthy Mediterranean diet can help improve chronic conditions like cancer and neurodegenerative disorders.
How to Make Intermittent Fasting and the Mediterranean Diet Work for You
When combined with a Mediterranean diet, intermittent fasting is a powerful tool for promoting weight loss, improving cardiovascular health, and supporting cognitive function. Here are some tips for incorporating both into your lifestyle:
Eat Mediterranean-friendly foods during your eating window. Focus on consuming whole, nutrient-dense foods such as fruits, vegetables, whole grains, lean protein, and healthy fats.
Eat green, leafy plants every day. It can be in the form of salads or smoothies.
Extra virgin olive oil (EVOO) should be your fat of choice. It is rich in monounsaturated fatty acids and polyphenols. Ensure that the olive oil you use is of high quality.
Ensure that your protein comes from plants or seafood. Your daily protein should come from plants such as lentils, beans, peas, and nuts. In addition, you can add small quantities of fatty fish, like salmon, twice a week.
Use salt-free seasonings to flavor your food. Extra virgin olive oil, citrus, vinegar, herbs, and spices are enough to season your food without adding salt.
Start slowly if you are new to the Mediterranean diet or intermittent fasting. Gradually build up to longer periods of fasting and introduce more Mediterranean-based meals every day. For example, start with 12:12 fasting and work to longer fasting periods. The same goes for the Mediterranean diet. Start with one Mediterranean-inspired meal and slowly introduce more varieties.
Plan your meals so that you eat a more balanced diet. Ensure that you incorporate a variety of dishes to get all the nutrients.
Consider meal prepping or packing healthy snacks to take with you on the go. This helps avoid making less healthy choices when hunger strikes.
Regular exercise is an integral part of a healthy lifestyle. Add enough physical activity depending on your fasting periods.
Listen to your body. What works for others may not work for you. So, notice how your body responds and make changes accordingly.
Frequently Asked Questions
What is the fastest way to lose weight on an intermittent fasting diet?
One of the fastest ways to lose weight on intermittent fasting is to adopt a Mediterranean diet. With its emphasis on fresh, whole foods, the Mediterranean diet promotes slow and steady weight loss as long as you choose the right foods.
Who should not practice intermittent fasting?
Though highly effective, intermittent fasting is not for everyone. Avoid intermittent fasting if you are:
Pregnant or breastfeeding
Under 18 years of age
Susceptible to eating disorders
Underweight
Essentially, you must avoid intermittent fasting if you have high caloric needs.
Why am I not losing weight on a Mediterranean diet?
The Mediterranean diet comprises unprocessed whole foods, fresh fruits and vegetables, and healthy fats. However, you may not lose weight if you do not watch the portion sizes. It may also be because:
You are adding too much olive oil. One tablespoon of olive oil contains 120 calories.
You are making healthy swaps without considering the calories. Though healthy, foods like avocado, nuts, and olive oil are calorie dense.
You are consuming an excess of red wine. The Mediterranean diet encourages red wine consumption, but only one serving per day.
You are eating too many nuts. ¼ cups of nuts contain 150 to 200 calories.
You are not burning enough calories.
Can you skip breakfast on a Mediterranean diet?
You can skip breakfast on a Mediterranean diet, especially if you have type 2 diabetes. [9] Instead, you can indulge in a large Mediterranean-type lunch of fish, salad, and olive oil. According to researchers, it has the same effect on glucose levels as a low-fat diet. [10]
Wrapping Up
Intermittent fasting and the Mediterranean diet, though vastly different approaches, can complement each other. Together, they provide various health benefits, including weight loss, reduced risk of chronic diseases, improved heart and brain health, and increased longevity.
The Mediterranean diet is a rich source of nutrients and antioxidants. Intermittent fasting, on the other hand, reduces inflammation and improves insulin sensitivity. The combination of the Mediterranean diet and intermittent fasting offers a holistic approach to promoting health and wellness.
References
Bartholomew, C. L., Muhlestein, J. B., May, H. T., Le, V. T., Galenko, O., Garrett, K. D., Brunker, C., Hopkins, R. O., Carlquist, J. F., Knowlton, K. U., Anderson, J. L., Bailey, B. W., & Horne, B. D. (2021, September 3). Randomized controlled trial of once-per-week intermittent fasting for health improvement: the WONDERFUL trial. PubMed Central (PMC). https://doi.org/10.1093/ehjopen/oeab026
Yuan, X., Wang, J., Yang, S., Gao, M., Cao, L., Li, X., Hong, D., Tian, S., & Sun, C. (2022, March 24). Effect of Intermittent Fasting Diet on Glucose and Lipid Metabolism and Insulin Resistance in Patients with Impaired Glucose and Lipid Metabolism: A Systematic Review and Meta-Analysis. PubMed Central (PMC). https://doi.org/10.1155/2022/6999907
Gudden, J., Vasquez, A. A., & Bloemendaal, M. (2021, September 10). The Effects of Intermittent Fasting on Brain and Cognitive Function. PubMed Central (PMC). https://doi.org/10.3390/nu13093166
Widmer, R. J., Flammer, A. J., Lerman, L. O., & Lerman, A. (2014, October 15). “The Mediterranean Diet, its Components, and Cardiovascular Disease.” PubMed Central (PMC). https://doi.org/10.1016/j.amjmed.2014.10.014
Dontas, A. S., Zerefos, N. S., Panagiotakos, D. B., & Valis, D. A. (2007, March 1). Mediterranean diet and prevention of coronary heart disease in the elderly. PubMed Central (PMC). https://doi.org/10.2147/ciia.2007.2.1.109
Khosravi, Z. S., Kafeshani, M., Tavasoli, P., Zadeh, A. H., & Entezari, M. H. (2018, July 20). Effect of Vitamin D Supplementation on Weight Loss, Glycemic Indices, and Lipid Profile in Obese and Overweight Women: A Clinical Trial Study. PubMed Central (PMC). https://doi.org/10.4103/ijpvm.IJPVM_329_15
Panizza, C. E., Lim, U., Yonemori, K. M., Cassel, K. D., Wilkens, L. R., Harvie, M. N., Maskarinec, G., Delp, E. J., Lampe, J. W., Shepherd, J. A., Marchand, L. L., & Boushey, C. J. (2019, June 20). Effects of Intermittent Energy Restriction Combined with a Mediterranean Diet on Reducing Visceral Adiposity: A Randomized Active Comparator Pilot Study. PubMed Central (PMC). https://doi.org/10.3390/nu11061386
Yoon, G., & Song, J. (2019, April 5). Intermittent Fasting: a Promising Approach for Preventing Vascular Dementia. PubMed Central (PMC). https://doi.org/10.12997/jla.2019.8.1.1
Effect of breakfast skipping on diurnal variation of energy metabolism and blood glucose – PubMed. (2014, June 1). PubMed. https://doi.org/10.1016/j.orcp.2013.01.001
Fernemark, H., Jaredsson, C., Bunjaku, B., Rosenqvist, U., Nystrom, F. H., & Guldbrand, H. (2013, November 27). A Randomized Cross-Over Trial of the Postprandial Effects of Three Different Diets in Patients with Type 2 Diabetes. A Randomized Cross-Over Trial of the Postprandial Effects of Three Different Diets in Patients With Type 2 Diabetes | PLOS ONE. https://doi.org/10.1371/journal.pone.0079324
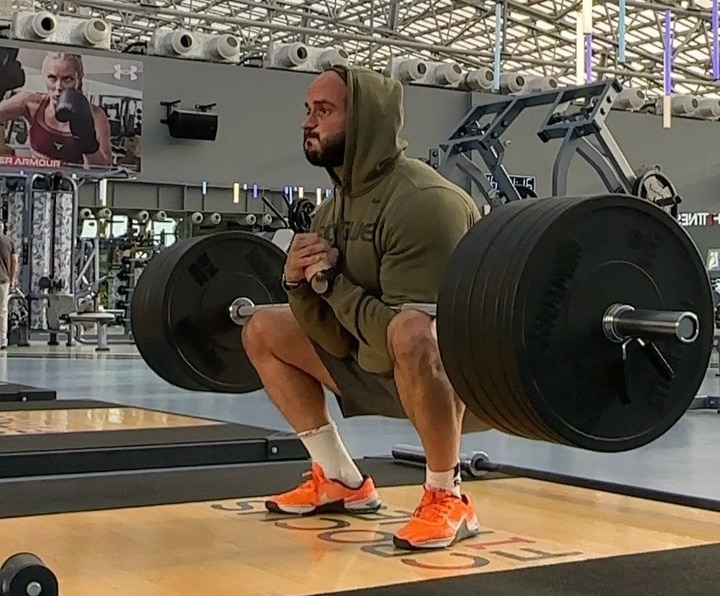
Zercher Deadlift Guide: How To, Benefits, Progression, Muscles Worked, and Variations
The Zercher deadlift is the Zercher squat’s sibling. These exercises are the namesake of the 1930s strongman Ed Zercher. Although the strongman originally invented the Zercher squat, his lifting techniques have touched the deadlift, and this unconventional exercise has been growing in popularity recently. The Zercher exercises involve holding the barbell in your elbow crooks….
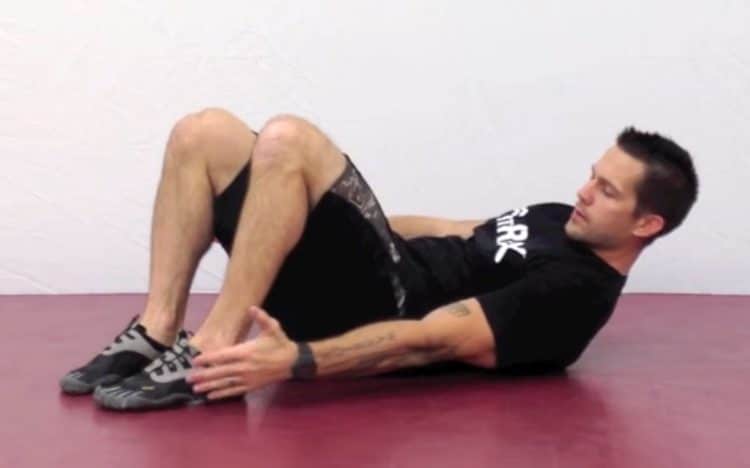
Penguin Taps Exercise Guide: How To, Benefits, Muscles Worked, and Variations
Don’t let the name of this exercise fool you. Penguins are cute; this exercise is not. The penguin taps exercise focuses on your midriff. The irony here is penguins are far from the most shredded animals. With that said, if you do their namesake exercise for long enough, you’ll have a magazine-cover-worthy midsection. The penguin…

Negative Bicep Curls: The Ultimate Guide to Revolutionizing Your Arm Routine
It’s all about perception. Negatives are not always bad. Sometimes, they can be better than the positives — the negative bicep curls are an excellent example.
The negative bicep curls are biceps curls in reverse, which can help you build chiseled guns. Most lifters assume that curling is the only way to build bigger arms. The negative bicep curl, however, flips this assumption on its head. While performing a negative bicep curl, a lifter focuses on uncurling the weight to build bigger arms.
Many lifters use momentum by swinging their torsos back and forth during the concentric (upward) motion of the negative bicep curl, which removes tension from the target muscle group and puts it on their shoulders and back. In the negative bicep curl, you focus on the eccentric (lowering) motion and use a slow and controlled motion, eliminating the use of momentum, leading to optimal muscle fiber stimulation and hypertrophy.
The negative bicep curls, also known as eccentric bicep curls, focus on recruiting your slow-twitch muscle fibers by increasing your time under tension during the lowering motion of the lift.
Our muscles consist of two types of muscles — fast and slow-twitch. The slow-twitch muscle fibers are endurance-based and engage in exercises with longer time under load. A negative dumbbell bicep curl set generally takes at least twice as long to complete as the conventional exercise.
In this article, we unlock the secrets of negative bicep curls, helping you build bigger, stronger, and more conditioned arms. We also dive into how to perform the negative bicep curls with the perfect form and tips to maximize results, their benefits, safety, and a sample biceps workout.
What are Negative Bicep Curls?
Negative biceps curls are an advanced strength training technique. To an untrained eye, it can be difficult to distinguish between negative bicep curls and conventional bicep curls since they look very similar.
The negative bicep curls differ from the standard curls mainly because of their rep tempo. While the conventional biceps curl follows a 1-1-1-0 rep tempo (one second on the concentric motion, a second’s pause at the top, one second on the eccentric motion, and no rest at the bottom), the negative bicep curls use a 1-1-3-0 rep tempo, where a lifter spend at least three seconds on the lowering motion.
There are two ways to perform the negative biceps curl. The first involves using a spotter who will help you during the concentric part of the lift. The spotter will take most of the weight during the curling motion to ensure your muscle are not fatigued and are fresh for the lowering motion. It’s almost as if your spotter will curl the weight, and you’ll only lower it.
The second method is more prominent as it doesn’t require a spotter. In this technique, you curl the weight as quickly as possible without using momentum and focusing on contracting your muscles. However, you’ll go as slow as possible during the eccentric motion to maximize muscle fiber engagement.
You could use the negative bicep curl training technique on almost every exercise that involves dumbbells, barbells, kettlebells, resistance bands, or machines. It is also suitable with different grips, such as supinated, pronated, or neutral.
How To Perform Negative Bicep Curls
This is how to perform the barbell negative biceps curl using the correct form:
Stand upright with a hip-width stance.
Grab a barbell with a supinated (underhand) shoulder-wide grip and hold it against your thighs.
Curl the barbell to your shoulders while keeping your elbows pinned to your sides.
Slowly lower the barbell to the starting position while only moving at your elbow joint.
The eccentric motion should take at least three seconds. However, you should aim for five seconds as you get better at this training technique.
Pause at the bottom for a second and spend one second on the concentric (upward) motion.
Repeat for recommended reps.
Benefits of Negative Bicep Curls
Here are the advantages of adding negative bicep curls to your exercise regimen:
Helps Build Muscle Mass and Strength
You can lift up to 40% heavier on the negative bicep curls while training with a spotter. Using such big weights will shock your muscles, which can help induce hypertrophy. Perform 8-12 reps if your goal is to build muscle mass. On the other hand, do 1-5 reps while focusing on your form to build strength. [1]
Break Through Strength and Muscle Plateaus
The negative curls are an incredibly effective advanced training technique for folks who have hit a strength or muscle plateau. The added training intensity will help spark new muscle tissue growth. You must also program the negative biceps curl into your training regimen to avoid hitting a plateau and keep making consistent gains.
Eliminates Momentum
The negative bicep curl requires you to lower the weights as slowly as possible, eliminating the possibility of using momentum. Following a strict form ensures optimal muscle fiber recruitment.
On the flip side, you’ll use a spotter during the concentric motion. Since you only have to do half of the usual work in this variation, it helps restrict the use of momentum. However, some people tend to curve their backs during the concentric motion for leverage, which can put undue stress on their backs, increasing the risk of injury.
If you’re not training with a spotter, you must curl the weight while maintaining an upright back and keeping your elbows pinned to your sides. Swinging your torso back and forth will result in secondary muscle recruitment.
Versatility
The negatives are a versatile training technique. You could use them in any dynamic exercise that uses eccentric and concentric motion, such as bicep curls, squats, bench presses, deadlifts, lunges, etc.
You could do it with any training equipment, including dumbbells, barbells, kettlebells, resistance bands, and machines using your preferred grip (overhand, underhand, or neutral). To sum it up, the possibilities of what you can achieve with negative bicep curls are limited only by your imagination.
Beginner-Friendly
Although negatives are technically an advanced training principle, they can also be used by beginners. Negatives involve focusing on the eccentric motion of a lift, meaning a lifter has to concentrate on only half of the range of motion. The limited ROM can help a beginner drill the movement. Furthermore, the longer time under tension will put your muscles under optimal hypertrophy conditions.
Lift Heavy
You can lift up to 40% heavier on the negative bicep curls than the conventional curling exercises; however, you must have a spotter to help you through the concentric motion. Ensure you do not bite off more than you can chew, as it can increase your odds of injury. The biceps curl is an isolation (single-joint) lift. Lifting more weights than you can handle can put your biceps tendons under significant stress, making them susceptible to tears.
Greater Time Under Tension
Negative bicep curls increase your time under tension by at least 30%. The longer time under load will lead to insane muscle pumps, as the target muscles are filled with blood and lactic acid. Blood also carries nutrients to the muscle tissues that can help build bigger and stronger muscles.
Less Fatigue
A 2015 study found that eccentric muscle actions cause less fatigue than concentric movements, especially at higher intensities. Additionally, eccentric movements are also more effective at building power. [2]
According to the findings of this study, performing negative biceps curls at the end of a workout when your muscles have started fatiguing can help step up your training intensity without exhausting your muscles.
Sample Negative Bicep Curl Workout (How To Program)
Although negatives are not as fatiguing as concentric-only movements, you shouldn’t overdo them. Limit your negative curl use to one exercise per workout to avoid overtraining your muscles. Given below is a sample biceps workout that includes an eccentric-only exercise:
In this workout, you’ll use the ‘negative’ advanced training principle on the machine preacher curl. Since this is a machine exercise, we recommend using a spotter to help you through the concentric motion.
Weights
Folks that generally lift 90 pounds on the machine preacher curl for 3-5 sets of 8-12 reps can go up to 125 pounds on the eccentric biceps curl sets. You must ensure that you have a spotter for the concentric movement.
Reps
Even though you’ll only be doing negatives on this exercise, you shouldn’t expect to complete eight reps for 3-5 sets while lifting 40% heavier. Aim to complete 3-5 negative-only reps on the machine preacher curl and spend 3-8 seconds on the lowering portion of the lift.
Tips For Negative Bicep Curls
Use these training tips to make the most of this advanced training technique:
Follow a Picture-Perfect Form
Irrespective of your training goal, whether you are lifting to build muscle mass, strength, or endurance, you must use a textbook form to get the best bang for your buck and reduce your risk of injury.
The negative bicep curls are an isolation exercise and limit movement to the elbow joint. Keep your elbows pinned to your sides while restricting the use of momentum. Maintaining a slight bend in your knees will also limit your lower body engagement.
Rep Tempo
The rep tempo is the main difference between the conventional bicep curls and the negatives. The standard bicep curl variations have a one-second eccentric motion, whereas negative-only exercises involve a three-second or longer eccentric time.
Experiment With Your Grip
Although most people use a supinated (palms facings the ceiling) grip while doing negative biceps curls, incorporating different grips, such as neutral and pronated (palms facing your body), can help improve your biceps stimulation.
How Often To Perform Negative Bicep Curls?
The negative bicep curls are an advanced training technique that can significantly strain your muscles, as they substantially bump up your training intensity. Performing negative curls in each workout for every exercise can lead to overtraining, which can stall your progress.
Your biceps are a small muscle group. We recommend limiting training your biceps to twice a week. Furthermore, you should restrict negative bicep curls to one exercise per training session.
As a rule, you must give your muscle at least 48 hours to recover between workouts. Additionally, since your guns are a supporting muscle group in your back workouts, you should have a 48-hour gap between your back and biceps workout.
Negative Biceps Curls Safety
Most exercisers lift significantly heavy on the negative biceps curl than their conventional bicep curl weight, considerably increasing their odds of injury.
You must adjust your training intensity while doing the negative biceps curl according to your experience level. Beginners should lift at most 20% of their normal curl weight and should only do so under expert supervision to ensure proper training form.
Individuals who exercise without a partner should also refrain from lifting more than 20% of their regular curl weight. Finally, experienced lifters must ensure they only use the eccentric-only advanced training technique once weekly in their biceps training regimen to avoid the risk of overtraining.
Wrapping Up
Contrary to what many people think, biceps training does much more than improve your physique aesthetics. Strong pythons can enhance your performance in compound movements like rows, deadlifts, and clean and jerk and improve your overall functionality.
Incorporating negative curls into your training regime can boost your upper arm strength and hypertrophy. Negative bicep curls are a versatile training technique that can be used in a variety of exercises.
You must, however, start light and work your way up gradually. There is nothing worse than pulling a muscle while trying to impress your gym crush. Now that you know everything there is to learn about the negative bicep curls, put together a training program, and begin curling. Best of luck!
References
Krzysztofik M, Wilk M, Wojdała G, Gołaś A. Maximizing Muscle Hypertrophy: A Systematic Review of Advanced Resistance Training Techniques and Methods. Int J Environ Res Public Health. 2019 Dec 4;16(24):4897. doi: 10.3390/ijerph16244897. PMID: 31817252; PMCID: PMC6950543.
Kelly SB, Brown LE, Hooker SP, Swan PD, Buman MP, Alvar BA, Black LE. Comparison of concentric and eccentric bench press repetitions to failure. J Strength Cond Res. 2015 Apr;29(4):1027-32. doi: 10.1519/JSC.0000000000000713. PMID: 25268291.
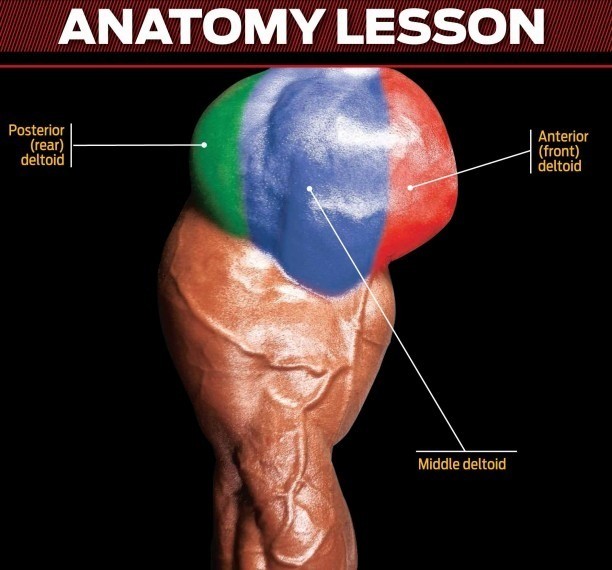
A Dozen Lateral Raise Variations for Wider Shoulders
Wide, defined shoulders are the trademark of a quality physique. They’ll make you look great, whether you’re wearing a tank top or a suit. Well-developed shoulders do more than give you an athletic look. They also enhance your posture, improve your athletic performance and reduce your risk of injury.
To develop width in your shoulders, you need to target the lateral head of the deltoid. The most effective way to do that is with the lateral raise, which moves the muscle through its full range of motion. There are many ways to do the exercise, some of which are more effective than others.
In this article, we examine a dozen different variations of the lateral raise. We’ll show you how to do them for optimal benefit and how to include the lateral raise into your shoulder training routine.
Shoulder Anatomy
The shoulder muscle consists of three heads, each with a different point of origin. That allows each of the three heads to have its own function and range of motion.
That is why you need to be doing specific exercises to target each of the three deltoid heads:
Our focus is on the lateral, or side, delts. So, let’s zoom in on the anatomy of that part of the shoulders.
The lateral head originates on the outer edge of the acromion process. This is where the shoulder blade, clavicle, and humerus (upper arm) join. The lateral head muscle fibers then run down the middle of the shoulder to insert into the deltoid tuberosity at the top of the upper arm. So, we could say the lateral delts make up the ‘meaty’ middle part of your shoulders.
The function of the lateral head is to raise the arms sideways. In technical terms, this is known as ‘lateral abduction of the humerus.’ This action contracts or shortens, bringing the muscle insertion to the origin.
The best exercises to develop the lateral head of the deltoid must follow the natural movement, which is to lift the arms up to the side from a position when the arms are alongside the torso to a point where they are perpendicular to the torso.
That leads us directly to the lateral raise.
Optimized Lateral Raise Form
Spend enough time in the gym, and you will see people doing the lateral raise in all sorts of ways. When we focus on the biomechanics of the muscle, though, we can identify some key form points. The first has to do with how high you should raise your arm.
The main goal of an exercise should be to take the muscle fibers from a point where they are fully extended (or lengthened) to the point when they are fully contracted (or shortened). That point of full contraction with the lateral delt is reached when you bring the arms up to a point where the arm is almost perpendicular.
However, you need to ensure that you keep the shoulder blade static and do not lift it. If the shoulder blade is allowed to rise during the movement (as when you shrug your shoulder blades), then the origin of the lateral deltoid moves away from the upper arm. This makes it hard to contract the muscle.
If you are used to bringing your arm up higher than a point where it is perpendicular to the torso, you should stop doing that. The range of motion of the lateral head is complete when the fibers are fully shortened and so fully contracted when you reach a point about 10-20 degrees less than perpendicular to the torso. If you come up any higher than this, you are actually taking the stress off the lateral head and reducing time under tension.
The start position of the lateral raise should see your arm right at your side. Many people begin with the hand in front of the torso. However, this slightly distorts the shoulder joint without any benefit to the lateral deltoid — it is already fully extended with your arm by your side.
Key Points:
Start with your arms by your side
Finish 10-20 degrees short of a perpendicular arm position
Do not shrug the shoulders — keep the shoulder blade static
12 Best Lateral Raise Exercises
The lateral raise is a simple movement that can be done with a wide range of training equipment, from cables to dumbbells and resistance bands. There are also angle variations that work the lateral delt slightly differently. Here are twelve ways to do this exercise to add width to your frame.
1. One-Arm Cable Lateral Raise
The one-arm cable lateral raise is my favorite lateral raise exercise. That’s because the cable resistance evens out the resistance curve. When you do the exercise with dumbbells, there is very little resistance at the start of the exercise and a whole lot of resistance at the top of the movement. With cables, however, there is a more even resistance curve, so you are challenged throughout the entire range of motion.
For maximum lateral deltoid engagement, set the height of the pulley to about the same height as your wrist in the start position. This means the cable will be perpendicular to the forearm in the first phase of the exercise. This angle makes the exercise hardest at the start of the exercise, where the muscle is strongest, and lightest at the end of the movement, where the muscle is weakest. This is known as early phase loading.
Steps:
Set the pulley on a cable machine to the height of your wrist.
Stand side on to the cable machine, about two feet away from the pulley.
Grab the pulley handle with your outside hand and assume a start position with your hand touching your outer thigh. Place your other hand on your hip and have your feet shoulder-width apart.
Pivot from the shoulder joint to bring your arm directly out to the side, stopping about 19 degrees short of a perpendicular position. Do not bend the elbow or lift the shoulder blade.
Lower under control and repeat.
2. Landmine Lateral Raise
The landmine lateral raise allows you to work the lateral delts through their full range of movement with the added benefits of greater core stability and grip strength development.
Steps:
Place an Olympic barbell into a landmine attachment and load a relatively light weight onto the bar.
Stand side-on to the bar with your feet shoulder-width apart and grab the bar with your closest hand.
Assume a starting position with your straightened arm in front of your torso.
Pivot from the shoulder joint to bring the bar up and out to the side to full arm extension.
Lower and repeat.
3. Dumbbell Side Lateral Raise
The dumbbell side lateral raise does an excellent job of moving the side deltoid through its full range of motion, from arms alongside the body position to up to a perpendicular position to the torso. Be sure to have your elbows slightly bent but locked in position throughout the exercise. The only movement should be through the shoulder joint. Don’t use a weight that is too heavy, or you’ll be forced to swing, and make sure you control the dumbbells all the way down to prevent momentum.
Steps:
Stand with your feet shoulder-width apart and a pair of dumbbells held at arm’s length.
In the starting position, the dumbbells should be touching your outer thighs with your elbows slightly bent.
Pivot from the shoulder to bring the arms out to just short of perpendicular to the torso.
Lower under control to the start position.
4. Machine Side Lateral Raise
If you are fortunate enough to train at a gym with a side lateral raise machine, you should definitely use it. This version helps you stay strict and keep your range of motion within the maximum muscle stimulation zone for an optimum time under tension. Keep the weight relatively light and focus on feeling the lateral delts burning.
Steps:
Sit on a side lateral machine facing the weight stack. Position the seat so your shoulder joint aligns with the machine’s pivot point. Place your elbows under the pads.
Keeping your spine neutral and your back up against the back pad, press up through the elbows to bring the pads up to a perpendicular position.
Lower under control and repeat.
5. Dumbbell Lateral Raise Hold
The lateral raise hold adds a three-second hold in the top position of the movement. This increases your time under tension, adding an isometric contraction element that will set your lateral delts on fire.
Steps:
Stand with your feet shoulder-width apart and a pair of dumbbells held at arm’s length.
In the starting position, the dumbbells should be touching your outer thighs with your elbows slightly bent.
Pivot from the elbow to bring the arms out to just short of perpendicular to the torso.
Hold this top position for a three-second count.
Lower under control to the start position.
6. Wall Press Lateral Raise
The wall press lateral raise is a strict version of the exercise that helps eliminate momentum and cheating. Press your non-working hand into the wall to stabilize the body.
Steps:
Stand side onto a wall with your inside hand pressing into it. Hold a dumbbell in the other hand alongside your thigh.
Pivot from the shoulder to bring your arm up and out to the side until it is just short of perpendicular to your torso (no higher).
Lower slowly, resisting the pull of gravity.
Stop at the end of the rep so that you do not allow momentum to carry you into the next rep.
7. Kneeling Lateral Raise
Because it eliminates the lower body from the movement, the kneeling lateral raise is a stricter version of the exercise than the standing lateral raise. If you tend to swing when you do the standing version, give the kneeling option a try.
Steps:
Grab a pair of dumbbells and kneel on the floor with the dumbbells at your sides.
Pivot from the shoulder to bring the arms out to just short of perpendicular to the torso. Maintain an upright position with a neutral spine.
Lower under control to the start position.
8. Y Raise
The Y Raise is a very strict version of the lateral raise that eliminates all potential for momentum. This is a popular shoulder rehab exercise when done with very light weights.
Steps:
Set the weight bench to a 45-degree angle and lie face down on it with a pair of dumbbells in your hands. Hang your arms down over the edge of the bench.
Keeping your arms straight, bring them out on an angle to form a ‘Y’ shape in the top position.
Lower under control and repeat.
9. Band Lateral Raise
The band lateral raise is a good option if you don’t have access to a cable machine or dumbbells. Choose a band that will allow you to do around 15 reps without cheating.
Steps:
Stand with your feet shoulder-width apart and a resistance band under your left midfoot. Hold the band with your right hand at your outer thigh. You want the band to be taut in this starting position.
Lift your right arm out to the side, stopping just short of perpendicular to your torso. Do not bend your elbow.
Lower the weight under control back to the starting position.
10. Lying Side Lateral Raise
The lying side lateral is a strict version of the lateral raise. It also provides early phase loading so that the exercise is easier at the beginning than at the end of the movement. This is the opposite resistance curve to the standing dumbbell lateral raise. That’s because the arm is perpendicular to gravity at the end of the movement.
Steps:
Lie on the floor on your side with your legs stacked and a light dumbbell in your upper hand. Hold the weight at arm’s length against your outer thigh. Place your other hand on the floor for support, or use it to cradle your head.
Pivot from the shoulder to bring your arm up to a position just short of being perpendicular to your torso. Keep the shoulder down, and do not bend the elbow.
Lower under control and repeat.
11. 1.5 Rep Lateral Raise
The 1.5 rep lateral raise ramps up the time under tension with the result that you’ll get a greater burn in the delts than the standard rep version. You may have to lighten the weight slightly to keep it strict. This version can be done with any variation of the lateral raise. The following guide uses the dumbbell version.
Steps:
Stand with your feet shoulder-width apart and a pair of dumbbells held at arm’s length.
In the starting position, the dumbbells should touch your outer thighs with your elbows slightly bent.
Pivot from the shoulder to bring the arms out to just short of perpendicular to the torso.
Lower under control halfway down.
Bring your arms back to the top position.
Lower to the start position.
12. Plate Lateral Raise
Don’t have dumbbells or a cable machine? No problem; you can still do the lateral raise with a pair of weight plates. Just make sure the weight is manageable enough that you can still resist the pull of gravity on the way down.
Steps:
Grab a pair of weight plates and stand with your feet shoulder-width apart. Hold the plates in front of your body at arm’s length with your palms facing you. You should have a slight bend in the elbows.
Keeping your arms locked, pivot from the shoulder joint to bring the plates out and up toward shoulder level.
As the plates come up, twist your wrists outward slightly.
Bring your arms up to just short of perpendicular to your torso.
Lower under control.
Shoulder Dumbbell Workout
Here’s a four-exercise workout that hits all three deltoid heads, allowing you to build both size and strength. In addition to the dumbbell side lateral raise, you’ll be doing:
Seated shoulder press for overall delt mass and power
Lying front deltoid press for the front delts
Rear delt flyes for the posterior delts
Here’s a form guide for these exercises:
Seated Shoulder Press
Grab a pair of dumbbells and sit on a bench with back support.
With your feet firmly planted on the floor, bring the weights up to shoulder level, with your palms facing forward. Your elbows should form a right angle. Keep your back slightly arched and your shoulder blades against the back pad.
Press the dumbbells directly overhead, stopping just short of lockout.
Lower under control and repeat.
Lying Front Deltoid Press
Set the pulleys on a double cable pulley machine at hip height while seated.
Position a bench about three feet in front of the machine.
Grab the handles with an underhand grip and sit on the bench.
From a starting position with your hands by your hips, scoop your arms up and forward to touch in front of your body.
Lower under control and repeat.
Rear Delt Flyes
Sit on the end of a bench with a pair of dumbbells in your hands.
Lean down to rest your chest on your thighs.
Bring the dumbbells together behind your legs, with your arms slightly bent..
Pivot from the shoulder joint to bring your arms out and up to shoulder level. Do not bend at the elbows.
Lower under control and repeat.
The Workout:
Exercise
Sets
Reps
Seated Shoulder Press
4
12,10,8,6
Lying Front Deltoid Press
6
30, 20, 15, 10
Dumbbell Side Lateral Raises
6
30, 20, 15, 10
Rear Delt Flyes
6
30, 20, 15, 10
The first exercise, the seated press, is your overall mass and strength builder. You should do four sets that are pyramided from 12 to 6. Add weight on each succeeding set. You should have a rep left in the tank’ on all but the last set of six, which should be an all-out max effort.
The next three exercises each target one of the three heads of the deltoids. The weight should be moderate, and the reps higher than an exercise that hits the entire muscle group. Ranging your reps from 30 to 10 allows you to work both the fast twitch and slow twitch muscle fibers for complete hypertrophy. You do not want to use a weight that you can do for less than 10 reps because it will probably lead to momentum and compromised form on these isolation-type movements.
You should perform this shoulder dumbbell workout twice weekly, allowing three days between sessions. That will provide enough time for the muscle to recover before the next bombardment!
It might seem that doing 22 sets is going overboard on a relatively small muscle group like the shoulders. We need to remember, however, that the deltoids are unique because of the separate origin points of the three heads. That, in effect, means that you are essentially working three different muscle groups in order to hit all three heads.
Wrap Up
The lateral raise is the only exercise you need to build awesome lateral deltoids. That’s because it moves the muscle head through its full range of motion. The biggest problem that I see with this exercise is people going too heavy. You need to use a weight that will still allow you to resist the pull of gravity on the way down. If you can’t, the weight is too heavy.
The best lateral raise variation is the one-arm cable lateral raise. If you’ve got access to a cable machine, I highly recommend using this as your standard movement. Then experiment with the 11 other versions to find the two or three that work best for you and rotate through them to add variety. Use a rep range between 10 and 30, keep it strict, and you’ll be rewarded with the wider, fuller shoulders that you’re aiming for.