Tag: Guides
GHD Exercise Guide: How To, Benefits, Muscles Worked, and Variations
Most people like to train their mirror muscles. What are those, you ask? These are the muscles that you can look at in the mirror while training them, such as the biceps, shoulders, chest, abs, and quadriceps. Looking at your pumped-up muscles in the mirror makes you want to train them more often.
On the other hand, since you cannot look at your posterior chain muscles, such as the back, glutes, hamstrings, and calves, it makes it more difficult to establish a mind-muscle connection with them. Since most people fail to achieve optimal muscle fiber stimulation and contraction while training their posterior chain muscles, it is usually a lagging muscle group for them.
That said, the posterior chain muscles, such as the glutes, back, and hamstrings are some of the biggest muscle groups in your body. Overlooking training them can lead to strength and muscle imbalances and increase your risk of injury.
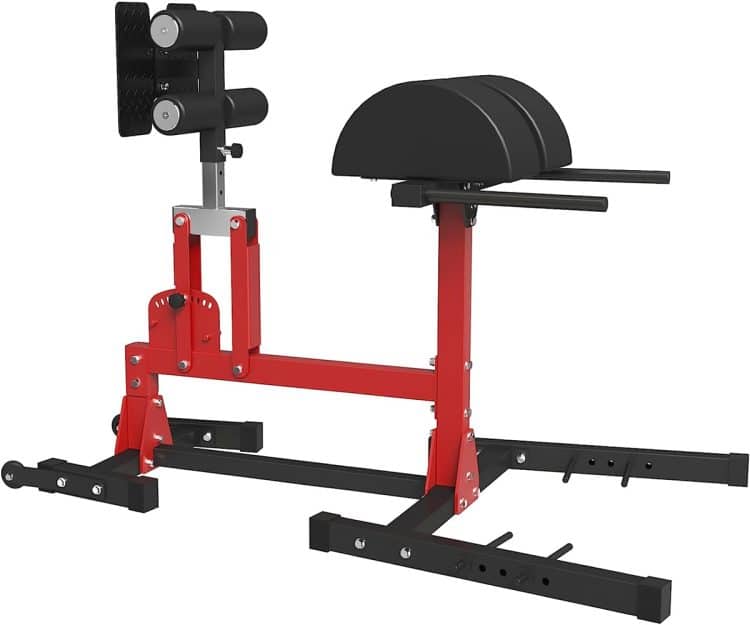
The GHD machine was developed to fix this issue. This ordinary-looking bench is one of the most versatile pieces of training equipment. An exerciser can perform several exercises on the GHD machine to improve their posterior chain.
Most people use ‘GHD’ glute-hamstring developer and ‘GHR’ glute-hamstring raise interchangeably. By making this mistake, these folks limit the possibilities of what they can achieve with this machine.
In this article, we go over everything you must know to make the most of the GHD machine, including the different exercises you can perform, the muscles worked, its benefits, common mistakes, and the best variations and alternatives. We have a lot to cover, so sit tight and read on.
What is GHD?
The glute-hamstring developer, popularly known as the GHD, is a hyperextension alternative. This isolation exercise builds endurance, strength, and muscle mass in the posterior chain (read: hamstrings, glutes, and lower back).
The GHD machine has become a mainstay in CrossFit gyms worldwide because of its effectiveness. The meteoric rise of CrossFit since 2014 has also led to the popularity of the GHD machine.
In contrast to the hyperextension machine, which usually has its thigh pads set at a 45-degree angle, the GHD machine has its pads parallel to the floor. This setup puts more demands on your posterior chain muscles.
Best GHD Exercises & How To Do Them
There are four main GHD machine exercises you must do to take your posterior chain gains to the next level. These exercises might look the same to an untrained eye. However, this guide will help you differentiate between them and learn the correct form to maximize results.
GHD Glute-Ham Raise (GHD Raise)
The GHD raise is one of the most popular GHD exercises, and it is the exercise most people are referring to while talking about GHDs. Glute-hamstring raises were allegedly developed by the Soviet Union weightlifting team to maximize their snatch and clean and jerk performance. As the name suggests, this exercise helps focus on the glutes and hamstrings.
How To Do the GHD Raise:
Mount the machine and place your knees on the support pads just shy of the center. Your hips should be over the pads at the bottom of the movement.
Hold onto the pads while you get into position.
Anchor your ankles between the foot pads.
Your lower legs should be parallel to the floor, and your torso should be 90 degrees with it.
Hold your hands in front of your chest and keep your back neutral throughout the exercise. This will be your starting position.
Take a deep breath, brace your core, and slowly lean your torso forward by extending your knees until it is parallel to the floor.
Breathe out sharply and flex your knees to return to the starting position.
Focus on contracting your glutes and hamstrings throughout the range of motion.
Repeat for the recommended reps.
Pro Tip: Your body, from the top of your knees to your head, should be in a straight line throughout the exercise. Avoid hinging your hips or rounding or overarching your back during this lift.
GHD Hip Extension
The GHD hip extension focuses on your glutes and is one of the best isolation exercises for folks with a lagging bum. You will also experience greater lower back engagement in this GHD variation.
How To Do the GHD Hip Extension:
Adjust the foot platform so that your hips are entirely off the support pads during the exercise.
Get on the GHD machine and place your feet between the foot pads.
Your feet should be pointing straight down during the exercise. Angling out your feet will put unnecessary strain on your adductors.
Cross your arms in front of your chest.
Lower your torso toward the floor so that your body is perpendicular to the floor, also known as the Superwoman position. Again, your hips should be off the pads. This will be your starting position.
Take a deep breath, brace your core, and lower your torso until it is almost perpendicular to the floor.
Contract your glutes and return to the starting position.
Rinse and repeat.
Pro Tip: Avoid breaking parallel during concentrics as it can remove tension from your glutes and put it on your lower back and hamstrings. Keep your shoulder blades pulled back and down and your chest proud throughout this exercise.
GHD Back Extension
The GHD back extension is a combination of the GHD raise and the GHD hip extension in that you will use the setup of the former, whereas you will follow the range of motion of the latter. That said, the focus of this exercise is your lower back. Your glutes and hamstrings will function as supporting muscles.
Since you’ll focus on your lower back in this exercise, you must round your back during eccentrics (lowering movement) and unfurl your back during concentrics.
How To Do the GHD Back Extension:
Adjust the foot pads so that the top of your hips is above the center of the pad.
Mount the GHD machine and place your ankles between the foot pads.
Cross your arms in front of your chest and get into a Superwoman position so your body is parallel to the floor.
Initiate the movement by tucking your chin into your upper chest.
Slowly round your back, one vertebra at a time, and lower your torso toward the floor.
Your belly should be wrapped around the top end of the pad at the bottom of the movement.
Reverse the movement to return to the starting position.
Squeeze your lower back during concentrics.
Keep the movement slow and controlled to avoid engaging your glutes and hamstrings.
Pro Tip: Compared to the hip extension, the back extension helps keep your hips static, putting more tension on your lower back.
GHD Hip and Back Extension
This is arguably the most complex GHD variation, as it combines everything you have learned up to now. You will experience greater glute and lower back engagement in this exercise, whereas your hamstrings will take a back seat.
Since this exercise has more moving parts than the previous GHD variations, you might need some time to master this exercise.
How To Do the GHD Hip and Back Extension:
Bring the foot pads close to the main support pads, as your hips should be clear of the pads during this exercise.
Get on the GHD machine and put your ankles between the foot pads.
With your arms crossed in front of your chest, assume the Superwoman position. Your hips should be clear off the pads, and your body should be in a straight line and parallel to the floor at the starting position.
Begin the movement by tucking your chin into your upper chest.
Slowly roll your shoulders, then your upper back, as you lower your torso toward the floor. Your upper body should be rounded and parallel to the floor at the bottom of the position.
At this position, arch your back and neutralize your spine.
Round your back again and reverse the motion by extending your hips to return to the starting position.
Contract your hips and lower back during concentrics.
Pro Tip: Since the last two exercises require rounding the spine, you should avoid using additional resistance on these GHD variations. Instead, focus on training the hips and lower back to failure by performing a hip number of reps.
Muscles Worked During GHD
All the four GHD variations explained above target the posterior chain. However, the primary and secondary working muscles vary for each exercise group. Here are the muscle groups worked with the GHD exercises:
Glutes & Hamstrings
The glutes and hamstrings are the primary target muscles of the GHD raises. The glutes are the biggest and strongest muscle in your body, and training them can improve your overall functionality and workout performance. The GHD machine is one of the best tools to develop your hamstrings.
Lower Back
Most exercises want you to avoid lower back engagement; the GHD is not one of them. Since the GHD exercises involve constant hip flexion and extension, you cannot escape lower back engagement, especially while doing a high number of reps.
Calves
Whether you are working above parallel (GHD raise) or in the lower half (hip and back extensions), you will achieve lower leg stimulation. You will experience your calves fire up to a greater degree in longer sets (more than 15 reps).
Given below is an overview of the primary and secondary muscles of the four GHD variations:
Exercise
Primary Target Muscles
Secondary Muscles
GHD Raise
Glutes and hamstrings
Lower back
GHD Hip Extension
Glutes
Lower back and hamstrings
GHD Back Extension
Lower back
Glutes and hamstrings
GHD Hip and Back Extension
Glutes and lower back
Hamstrings
Benefits of GHD
Adding the GHD machine to your training regimen entails the following benefits:
Builds Strength and Muscle Mass
The glute-hamstring developer can help you build stronger and more muscular glutes, hamstrings, and lower back. Adjust your training and volume to meet your objective.
Develop a Robust Posterior Chain
A strong posterior chain can improve your overall functionality, training, and athletic performance. Performing this exercise regularly can translate to better performance on compound movements that require posterior chain engagement.
Perfect For Exercisers of all Experience Levels
Since GHD exercises are isolation movements, they are easy to learn. That said, this machine is just as effective for advanced lifters as it is for newbies. Seasoned trainers can add to this exercise’s difficulty by using additional resistance.
Reduces Risk of Hamstring Injury
Research shows that adding eccentric-focused movements and isometric exercises can reduce your risk of injury during explosive movements [1]. People that deal with recurring posterior chain injuries should add this exercise to their exercise regimen after consulting their healthcare provider.
Common Mistakes While Performing GHD
Avoid committing the following errors to limit the risk of injury and get the best bang for your buck:
Replacing the GHD Machine with a Hyperextension Bench
Many people think that 45-degree hyperextension machines are the same as GHD machines. However, nothing could be further from the truth. The GHD machine is much more demanding on your hamstrings and glutes than the hyperextension bench.
Mixing Two GHD Movements
I cannot tell you how often I see people do GHD raises with a GHD hip extension setup. Remember, going all the way up, and all the way down is not always a good idea. You must get well-versed with the GHD variations to reduce your risk of injury.
Adding Weights Too Soon
Bodyweight versions of the GHD variations explained in this article are good enough for most people to build a strong and muscular posterior chain. You should only use additional resistance after you have drilled the movement.
Variations of GHD
Use the following GHD variations to add variety to your exercise regime:
Eccentric-Focused Glute-Ham Raise
You can use this technique in any of the four GHD variations mentioned in this article. In this exercise, you take three to five seconds on the eccentrics. Slowing down the negatives increases the time under tension, which leads to greater muscle stimulation [2]. Follow the same-old rep tempo during concentrics and the statics contraction points at the top and bottom.
Sorenson Hold
The Sorenson hold is an isometric GHD variation, meaning you hold the same position for a specific time. Think of the Sorenson hold as a plank for your glutes, hamstrings, and lower back.
How To:
Get in the same position as the GHD hip extension. Your hips should be clear of the pads.
Cross your arms in front of your chest.
Extend your hips and lower your torso so your body is parallel to the floor.
Hold this position for as long as possible. Aim for 30-60 seconds.
Repeat for recommended reps.
GHD Oblique Crunch
This GHD variation works your obliques and can help you develop shredded obliques and the coveted sex lines.
How To:
Adjust the foot pads of the GHD machine so that your hips rest on top of the pads.
Mount the GHD machine. Turn to your side so that your right shoulder is facing the ceiling. The side of your left hip should be on the left pad.
Secure your left foot between the foot pads and place your right foot on top of the pads.
Your body should be in a straight line and parallel to the floor at the starting position.
Lower your torso as low toward the floor as possible.
Return to the starting position.
Repeat for recommended reps before switching sides.
Alternatives of GHD
Here are some of the best alternatives to the GHD:
Nordic Curl
You could perform this exercise on a specialized Nordic curl or with a barbell. Since most people don’t have access to a Nordic curl bench, here is how to do this movement with a barbell.
How To:
Attach two-quarter plates on each end of a barbell and place them on the floor.
Kneel on the floor facing away from the bar and anchor your heels under it.
Your body, from your knees to your head, should be in a straight line at the starting position.
Hold your hands in front of your chest.
Slowly lower your torso toward the floor by leaning forward. Control the descent by contracting your hamstrings and glutes.
Break the fall with your hands.
Use your hands for a lift-off. Contract your glutes and hamstrings to return to the starting position.
Repeat for recommended reps.
Reverse Hyperextensions
This exercise flips the GHD hip extension on its head. Louie Simmons on Westside Barbell invented reverse hyperextension and a specialized machine for it. However, you can use a GHD machine for this exercise.
How To:
Stand facing the GHD machine.
Reach forward and grab the foot platform. Adjust the platform so your hips are hanging off the pads.
At the starting position, your body should be in a straight line and parallel to the floor.
Lower your legs toward the floor until they are a few inches from touching it.
Keeping your legs straight, extend your hips and raise your lower body as high toward the ceiling as possible.
Control the descent.
Repeat for recommended reps.
Good Morning
Good mornings are an incredibly effective exercise to work your posterior chain. Use a moderate weight on this exercise to limit the risk of injury.
How To:
Stand upright with a hip-width stance with a barbell across your shoulders.
Maintaining a slight bend in your knees, slowly lower your torso toward the floor while pushing your hips back. Keep your core braced throughout the exercise.
Your torso should be almost parallel to the floor at the bottom of the position.
Return to the starting position.
Romanian Deadlift
The Romanian deadlift is a compound full-body exercise to build overall strength and muscle mass. However, this exercise primarily targets the glutes, hamstrings, and lower back.
How To:
Stand straight with a shoulder-wide stance while holding a barbell against your thighs using an overhand grip.
Maintaining a slight bend in your knees, slowly lower the bar toward the floor by bending at your hips and pushing them back.
The bar should be below your knees at the bottom of the range of motion.
Pause at the bottom and contract your hamstrings and glutes.
Explode back to the starting position.
Rinse and repeat.
FAQs
Who should avoid the GHD raises?
Folks dealing with posterior chain or lower body injuries should avoid the GHD raises. That said, you should consult your healthcare provider before starting a new training or nutrition program, especially if you’re suffering from a health issue, are pregnant, or are under 18 years old.
Can I replace leg curls with GHD raises in my workout?
Leg curls and GHD raises are both isolation exercises that work the hamstrings. However, GHD also targets your glutes. On the other hand, the leg curl machine helps maintain constant tension on your hammies throughout the range of motion. Each machine has its unique benefits, and hence you should include both in your training regimen.
How often should I do the GHD raise?
Since GHD raises are an isolation exercise, they put incredible demand on your hamstrings. According to research, you must give your muscles at least 48 hours to recover between workouts. It will result in better strength and muscle gains and reduce your risk of injury and overtraining. [3]
Who should do the GHD exercises?
The GHD variations explained in this article are great for CrossFitters, Strongman athletes, Olympic weightlifters, bodybuilders, and even hobbyist exercisers. Building a strong posterior chain help virtually everyone.
Wrapping Up
The GHD machine is a versatile training equipment that can help build a stronger and more muscular posterior chain. It can also help develop a robust midline, using exercises like the GHD sit-ups and oblique crunches.
Folks with access to a GHD machine at their gym should add the four GHD exercises explained in this article to their training regimen. Adjust the programming and training frequency to meet your objectives. So, what are you waiting for? Get working on those glutes and hammies. Best of luck!
References
Jonhagen S, Nemeth G, Eriksson E. Hamstring Injuries in Sprinters: The Role of Concentric and Eccentric Hamstring Muscle Strength and Flexibility. The American Journal of Sports Medicine. 1994;22(2):262-266. doi:10.1177/036354659402200218
Burd NA, Andrews RJ, West DW, Little JP, Cochran AJ, Hector AJ, Cashaback JG, Gibala MJ, Potvin JR, Baker SK, Phillips SM. Muscle time under tension during resistance exercise stimulates differential muscle protein sub-fractional synthetic responses in men. J Physiol. 2012 Jan 15;590(2):351-62. doi: 10.1113/jphysiol.2011.221200. Epub 2011 Nov 21. PMID: 22106173; PMCID: PMC3285070.
Monteiro ER, Vingren JL, Corrêa Neto VG, Neves EB, Steele J, Novaes JS. Effects of Different Between Test Rest Intervals in Reproducibility of the 10-Repetition Maximum Load Test: A Pilot Study with Recreationally Resistance Trained Men. Int J Exerc Sci. 2019 Aug 1;12(4):932-940. PMID: 31523350; PMCID: PMC6719818.
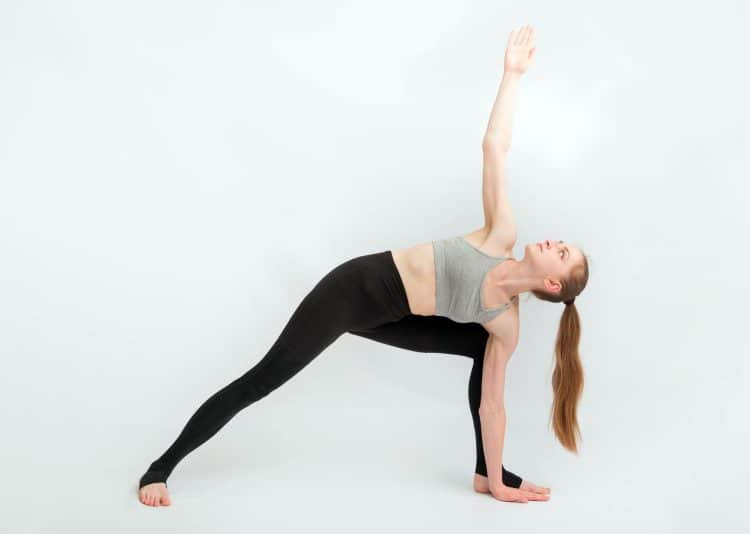
Triangle Pose Trikonasana – Benefits, Common Mistakes and Variations
While the names of some yoga poses are not as straightforward, triangle pose trikonasana is quite obvious. In the final stage of this closed hip posture, you can see how the body forms three triangular shapes. What you see is a product of the sanskrit meaning of “trikona”, meaning triangle.
Intended to stretch, strengthen, energize, and balance the body, triangle pose is a must-have posture, and one of the first that you’ll be introduced to in your yoga journey. Also being a lateral posture, you’re going to learn and experience movement in a plane of motion that most people neglect.
Triangle pose is both challenging, but a good learning posture, as you need to focus on keeping the hips still as the torso flexes to the side. If you’re ready to practice the triangle, grab and yoga block, and use this guide to master the execution of this staple posture.
Muscles Worked During Triangle Pose Trikonasana
Triangle pose is a total body exercise that starts from the feet and moves all the way up to the finger tips, involving so many muscles groups. Here are short descriptions of the muscles you can expect to improve during this stance.
Triangle Pose
Thighs and glutes
From stretching and activating the three rear-facing hamstring heads on the thighs to isometrically engaging the quads and recruiting the butt muscles, the triangle pose, is a lengthening and strengthening pose.
Core
The muscles in your middle body like the abdominals (sexy six pack muscles), the deeper abdominals, and obliques allow the bending, torso control, and twisting or rotational movement. Then you have the muscles that accompany the spine which play a big role in movement of your trunk in various directions.
You may look at the rotation involved in a triangle pose and imagine it so be easy, and it is when you don’t have to combine it with the specific position of the rest of your body. So you definitely need trunk mobility to do this exercise.
Shoulders
Requiring shoulder mobility to both support your weight with the bottom arm, and hold the top arm extended toward the sky, your deltoids, or shoulders benefit too.
How To Do The Triangle Pose
In the video demonstration below you’ll how to perform triangle pose, but also what not to do. We’ve also included a common mistakes section below for more detailed descriptions of bad habits to avoid in this pose.
Steps
Come into a wide stance, with your right foot pointing forward to the top of the mat, and the back foot turned inward to the left at a roughly 45-degree angle as shown in the video.
Keeping your legs straight, reach your right arm down and place your hand on the floor just outside the ankle. If you cannot, use a yoga block to rest your hand on.
Now rotate your chest to the left and extend your left arm straight up toward the sky. If done correctly, the both arms and wrists should form a straight line. Then just focus on enhancing the trunk rotation as you lift the chest. Actively engage the inner thighs by pulling them up and inward toward each other.
Come out of the pose by shifting back onto the rear foot, and lift up, changing the position of the arms, and transitioning to the same pose in the opposite direction.
Pro tip: A yoga block is a handy and very useful yoga training tool, especially during standing bend variations.
Watch the short video tutorial below to see the triangle pose.
Tip: Adjust your feet according to comfort, however, still keep the feet in opposite direction to keep the hips open.
Tips and more detailed instructions
Triangle pose may seem as though there’s not much too it. But there are many little intricacies or steps involved in the technique. If you need more detailed tips, tricks and instruction, check out the following written steps, and a short 3-minute video example below!
Start in a wide stance with the feet forward, and place your hands on your hips.
Squeeze your leg muscles, tense the core, and imagine pulling the spine straight up, not leaning back or forward.
Lift and externally rotate the right foot 90 degrees from the back foot without shifting your hips to the side.
Slide the hands up tp the ribs and inhale, feeling the midsection expand. Then exhale, focusing on moving the breath and torso upward.
Lean over sideways to the right foot, using your hands to help guide you in proper alignment. As you come down, it will likely feel more challenging to bring your hand to the floor. In this case, set up a yoga block to decrease the distance, and place your hand on it.
Push down into the block, with the other hand resting on your ribcage, arch your spine up in a rainbow shape, and keep your head and neck relaxed.
Move the hand from the ribcage and place the palm flat against the chest.
Rotate the head, neck, and collarbone up and draw your gaze in the same direction.
Then bring the hand from the chest into fully extended toward the ceiling.
To come out bring the arm to the hip, look down at the floor, bend the front knee slightly and push down as you stand up.
Hold your arms out like a bird, make your feet parallel, overlap one hand on the other, bend your knees, and either step or lightly hop the feet together.
Don’t forget to repeat for the opposite side.
This Exercise
Target muscle groups: Legs, glutes, hips, core, shoulders
Type: Yoga
Equipment: Mat, block
Difficulty: Beginner/Intermediate
Benefits of Triangle Pose
Incorporating various aspects of movement, the reward of these great poses is always more than the time and effort required. Here are the benefits of the triangle pose.
Train your functional abilities
Regardless of your age, it’s always good to maintain your physical abilities (e.g., balance, coordination, body awareness, multi-plane movement) but especially as you get older when these skills begin to decline, increasing risk of injuries, and decreasing quality of life. The body needs regular maintenance like anything that you expect to be there when you need it to.
We like that triangle pose forces you to consciously be aware of your body’s alignment, while having to focus on engaging your lower and upper body.
Stretching has numerous benefits
In grade school your gym class instructors probably didn’t explain the full benefits of stretching. However, it goes beyond just increasing flexibility.
In fact, it’s so beneficial, that people who stretch often experience immediate stress relief, due to undoing tension from tight muscles caused by under or overuse, injuries, or even mental stress, which makes us tense up without realizing it. This, in turn, could mean better sleep as you’ll feel more relaxed, as well as due to increased blood flow and circulation.
And, of course, if you want to perform your best in sports, training, etc, and avoid injuries during your favorite activities, then you need to stretch so your joints can move properly and your muscles can contract and lengthen to give you optimal strength, and ability.
Can relax your mind
Putting your electronics away and consciously focusing your efforts on doing something good for your body is a must in this day and age. With all the pressures, stresses, and artificial exposure, we really need to be thinking more about our health.
Getting in these beneficial poses that get us up off our butts (also wakes up our sleepy butt muscles) keeps our engines (body and mind) active and our juices flowing to support mental productivity, and physical longevity.
Common Mistakes During Triangle Pose
Here are the things to avoid in the triangle pose technique.
Your feet should be the same as half moon, and not like warrior, with the lead foot pointing to the top end of the mat, while the rear toes should face the left if you’re facing left, or the right, if your body is turned toward the right side of the mat.
The reason being is triangle pose is an open hip posture, and turning the feet inward closes the hip, like you’d do for warrior pose.
“Hip bumping”
The common hip bump cue doesn’t seem allow for the most efficiency when performing triangle pose. It places a lot of pressure on the hamstrings, and pinches the hips. Instead, follow the second video instructional provided under the “How to do triangle pose” section.
Not forming triangles
Too often will people attempt a pose with no technique, slopping over, placing their hands anywhere, bending the elbows, collapsing, and yeah, you get the point. Well, you won’t get the benefits this way, and you could actually do more harm by twisting the body in dangerous angles, and putting a lot of pressure on certain areas. Instead, keep everything strong, and follow the video demonstration above.
Variations Of Triangle Pose
The following poses are the most common triangle pose variations that vary in difficulty.
Extended triangle pose (utthita trikonasana)
The extended triangle pose keeps you here for a longer duration to really stretch and loosen the muscle fibers so essential in many yoga postures.
Steps
With your feet together, turn the right foot to the right side of the mat, and rotate the left foot only slightly to the right.
Inhale, then breath out, and bend toward the right foot from the hips and grab your right big toe with your right hand. Reach the left arm up vertical. Slowly gaze up at the left hand, and stay there as you take 4-6 slow and deep breaths.
Inhale, press the back heel into the floor, and come back into a standing position.
Now repeat to the left side, changing foot position to the opposite of the right side.
Bound triangle pose (baddha trikonasana)
You’ll surely get wrapped up in this pose, putting your flexibility to the test. It’s harder than the extended triangle stance, and a good way to challenge yourself. You should feel a strong link and connection, as one arm ties into the other, creating a solid lock.
Steps
Stand with your about shoulder width and half distance apart.
Turn the right foot so the toes point to the top of the mat, and keep the back foot at a 45-degree angle toward your left side.
Extend the arms out sideways like a bird, then breath in, exhale, and bend down laterally at the hips. Bring the right fingers to the inner middle part of the right foot. Keep the left arm straight up toward the ceiling.
Now move the left arm behind your back and place your left hand on the top of your right thigh. Lift the chest up toward the ceiling, and keep your gaze upward.
Inhale, then as you exhale, move deeper into the pose, and bring the right arm underneath and behind the right leg.
Clasp your right and left fingers together, turn the chest up, and gaze over the left shoulder.
Revolved triangle pose (parivrtta trikonasana)
A big benefit of these rotational poses is that they really open up the body to help improve mobility, flexibility, and circulation to areas that may not normally benefit from deep stretches.
Steps
Assume a similar stance to trikonasana poses with the right lead foot pointed to the back of the mat, and the back foot facing left, and slightly inward at a 45-degree angle.
Reach the left arm up to the sky, then square the hips toward the right foot.
Stretch your left arm forward while turning toward the right foot, and bring the left hand down on the floor to the right side of your right foot. Tip: Use a yoga block if you cannot reach all the way down to the floor.
Now shift your weight onto the back foot, and drop the left side of the hip down as you reach the right arm to the sky, and pull the shoulders back. Draw your gaze up to the right thumb. Tip: Use the left hand on the floor to help pull the left shoulder underneath for more rotation.
Stay for five deep breaths.
To come out, rotate your chest toward the floor.
Now from here, lift the left arm up while bringing the right arm down in a sort of windmill motion. Try to transition into an opposite side stance by changing the direction of your feet.
Then perform the same steps but now for the opposite side.
To leave the pose, inhale, come up with the arms held straight out to your sides, then exhale, and finish by turning to the top of the mat and bring the feet together.
Follow the video tutorial below to see this pose in action!
Half Moon Pose
Now that you’re cool with the triangle pose, we think you should give the half moon a try! Also called chandrasana, this posture adds more glute medius, and throws in the element of balance, as you have to lift the back leg.
Steps
Come into a front forward leaning lunge with the right foot in front, pointing straight forward, and back foot turned outward to the left.
Reach the left arm behind you and grab the back of the left leg/hip.
Reach the right arm to the floor and lean onto your finger tips, with the hand directly under the shoulder.
Rise up onto the front leg, and lift the rear leg up parallel to the floor. The lifted foot should be pointed to the left with the feet flexed by pulling the toes up toward the shin.
Root down into the floor with the standing leg by pressing with the four corners of your feet, and extend the bottom leg.
While looking down at the floor, extend the top arm vertical with the fingers pointing straight up toward the sky.
Now you can adjust your gaze to the side or look up at the top hand to challenge your balance further.
You’ll then perform the same technique but on the opposite leg.
FAQs
Is triangle pose safe? The triangle pose is safe for people who actively practice yoga, and are free from major or bothersome bodily injuries or limitations. We advise against practicing trikonasana if you have back or hips issues especially.
Wrapping Up
This yoga training guide should arm you with all the tips and tricks for performing an efficient triangle pose. The key to a good trikonasana technique is getting that lateral flexion without bumping the hips out to get down. Rather, utilize a yoga block, and do it the right way, developing patience as you learn proper movement mechanics and body posture to achieve a variety of poses.
Lat Pulldown Guide: Muscles Worked, How-To, Benefits, and Different Grips
If you want to build a stronger, more muscular upper back, lat pulldowns will help. Sure, pull-ups and chin-ups are more hardcore and “functional,” but lat pulldowns make it easier to target your muscles with laser-like precision. Small changes to your torso angle or hand width will affect the target muscles differently.
And speaking of your hands, should you do lat pulldowns with a wide, medium, narrow, parallel, overhand, or underhand grip? With so many options, it can be hard to know what’s best.
In this article, we explain how to do lat pulldowns correctly and how the different grips affect your muscles.
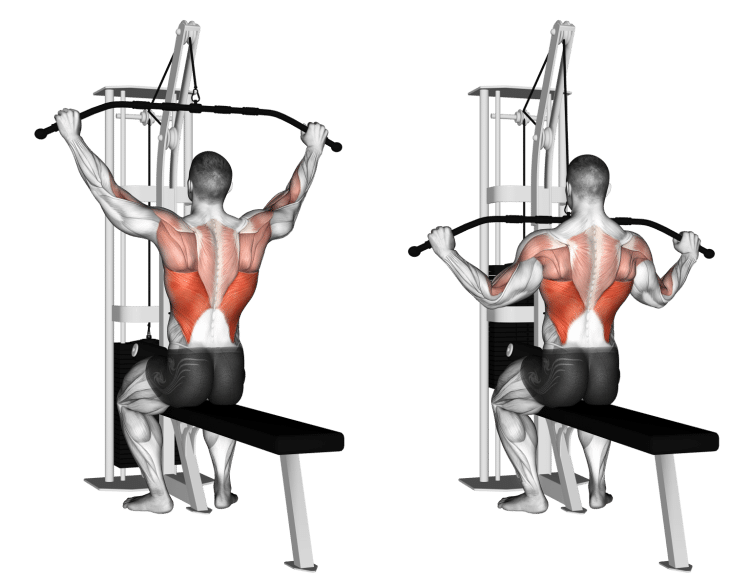
Lat Pulldowns – Muscles Worked
Contrary to popular opinion, the “lat” in lat pulldowns doesn’t refer to your latissimus dorsi muscle. Instead, it’s short for lateral, which is the plane of movement that your arms move in when you perform this exercise.
However, despite this naming confusion, lat pulldowns do indeed work your lats. That said, they aren’t working alone, and several other muscles are also involved:
Latissimus dorsi
Known as the lats for short, these muscles are located on the side of your upper back. Connecting your arms to your trunk, the lats are responsible for the adduction and extension of your shoulder joints. They also play a role in medial rotation. When well-developed, the lats look like muscular wings and are responsible for your upper back width.
The lats are the agonist or prime mover during lat pulldowns. However, using different grips and hand widths will allow you to emphasize different regions of this muscle.
Trapezius
The trapezius is the large diamond-shaped muscle that covers much of your mid-upper back. Known as the traps for short, there are three sets of fibers that make up this muscle – upper, middle, and lower. The middle and upper fibers are most active during lat pulldowns, as they work to pull your shoulders together and down. The upper traps are not very active during lat pulldowns.
Rhomboids
Located between your scapulae or shoulder blades, the rhomboids work with the mid-traps to pull your shoulders back and together. There are two pairs of rhomboid muscles – major and minor – and both are working during lat pulldowns.
Deltoids
The deltoids or delts are your main shoulder muscles. Like the traps, there are three sets of deltoid fibers, often referred to as heads – anterior (front), medial (middle), and posterior (rear). All three delt heads work together, but the posterior head is the most active during lat pulldowns.
Rotator cuff
The rotator cuff is a group of four small muscles that control and stabilize your shoulder joint. These muscles are the supraspinatus, infraspinatus, teres minor, and subscapularis. While you won’t be able to see or feel these muscles during lat pulldowns, you can be sure they’re actively engaged.
Biceps brachii
The biceps brachii, more commonly just called the biceps, is your primary elbow flexor and also supinates your forearm, i.e., turns your palm up. Located on the front of your upper arms, your biceps play a critical role in lat pulldowns. Using a supinated or palms-up grip puts your biceps in a stronger position, so you may find that grip allows you to use more weight.
Brachialis
The brachialis is like a mini-biceps, helping to flex your elbows. However, unlike the biceps brachii, this muscle plays no part in the supination of your forearm. As such, it’s equally involved regardless of what grip you use.
Brachioradialis
Brachioradialis is one of your main forearm/wrist flexors and plays a big part in your grip strength. If your hands start to fail before your lats, this muscle is a likely culprit. You can work around a weak grip by using lifting straps. However, it’s also a good idea to work on your grip strength so it is less of a limiting factor in your workouts.
Core
Core is the collective name for the muscles that make up your midsection. During lat pulldowns, you’ll need to use these muscles to stop the weight pulling your spine into hyperextension. The core muscles include the rectus abdominis, obliques, transverse abdominis, and erector spinae. However, the rectus abdominis is the most active.
How to Do Lat Pulldowns
There are several ways to do lat pulldowns, as outlined later in this article. However, the medium-width overhand grip is arguably the most common variation and the one most lifters should master before moving on to other options.
In addition, all types of lat pulldown share many of the same characteristics, so it makes sense to master this version first.
So, get more from lat pulldowns while keeping your risk of injury to a minimum by following these guidelines.
Attach a long bar to your lat pulldown machine.
Adjust the knee pad so that, when your feet are flat on the floor, it holds your legs in place.
Stand up and hold the bar with a pronated/overhand, slightly wider than shoulder-width grip.
Pull your shoulders down and back and sit down. Make sure your legs are held securely in place.
Lift your chest and arch your lower back slightly.
Leading with your elbows, bend your arms and pull the bar down to your upper chest. Do not flex your wrists.
Contract your lats as hard as possible at the mid-point of each rep.
Smoothly extend your arms and continue for the desired number of reps.
Pro Tips:
Make lat pulldowns even more effective with these handy performance tips, many of which can be applied to other lat pulldown variations:
Do not lean back or sway to pull the bar down. This takes tension away from the target muscles.
Squeeze and don’t jerk the weight down to minimize momentum and keep your muscles under tension for longer.
Pause at the midpoint of each rep to maximize lats activation and improve your mind-muscle connection.
Use a full range of motion to maximize muscle engagement.
Avoid using too much weight. Ego-lifting will make lat pulldowns less effective. Make sure you can feel the lats doing most of the work and not your biceps.
Pull to the front and not the back. Behind-the-neck lat pulldowns are harder on your shoulders and reduce lat engagement, making the exercise less effective but more risky.
Use a false or thumbless grip which tends to reduce biceps activation and lets you focus more on your lats.
Use lifting chalk to dry your hands, prevent slippage, and reinforce your grip.
Use lifting straps of your hands fail before your lats. However, you should also work on developing a stronger grip.
Lat Pulldown Benefits and Drawbacks
Not sure if lat pulldowns deserve a place in your workouts? Consider these benefits and then decide!
Very adjustable and accessible
Pull-ups and chin-ups are great, but you need to be strong enough to lift your body weight using just your arm and back muscles. This feat may be beyond the ability of many exercisers, either because they’re weak or heavy.
You can adjust the weight with lat pulldowns, so they are accessible to all levels of strength and experience, irrespective of body weight.
Very safe
Performed with good technique and an appropriate load, there is very little to go wrong with lat pulldowns, and accidents and injuries are rare. They’re very shoulder-friendly, and most people can find a grip that is both comfortable and effective.
Perfect for intensity-boosting drop sets
Most lat pulldown machines have selectorized weight stacks, so you can change the load quickly and easily. This makes them ideal for drop sets. Rep out to failure, reduce (or drop) the weight by 10-15%, and then rep out again. Do 2-4 drops to fully exhaust your muscles and stimulate maximal hypertrophy.
Widely available
Most gyms have at least one lat pulldown machine. As such, this is a very accessible exercise, and most gymgoers should be able to include it in their back workouts.
Plenty of variations to choose from
As you will see in the next section, there are numerous ways to perform lat pulldowns, each with a slightly different effect. Lat pulldowns need never be repetitive or boring.
While lat pulldowns are a mostly beneficial exercise, there are also a few drawbacks to consider:
Limited overload
The amount of weight available for lat pulldowns varies from machine to machine. If you are very strong, you may find that you can max out on the lat pulldown at your gym. When this happens, you should seek out a plate-loading lat pulldown machine or graduate to weighted pull-ups.
Using very heavy weights can be difficult
Getting into the correct lat pulldown starting position with a weight greater than your body weight can be a real challenge. You may find yourself dangling from the bar and unable to get your legs under the knee pads.
If this happens to you, you can ask a training partner to help you or may need to switch to pull-ups, where getting into the right starting position is considerably easier.
Equipment requirements
While most gyms have at least one lat pulldown machine, you probably won’t have space for one in your home gym. As such, most home exercisers cannot do lat pulldowns. However, you can replicate this exercise with resistance bands, or you can do pull-ups and chin-ups instead, using a resistance band for assistance if necessary.
10 Lat Pulldown Variations and Alternatives
Basic overhand medium-grip lat pulldowns are an excellent exercise, but if that’s all you ever do, you’ll soon get bored and hit a plateau. Changing your grip will affect the target muscles slightly differently and help you avoid training ruts.
Use these variations to customize your back workout and target the areas you want to develop. However, remember that the lats will always be the engine that drives your lat pulldowns, and any changes you make will only have a very small effect.
1. Overhand wide-grip lat pulldowns
Overhand wide-grip lat pulldowns are very popular with bodybuilders. They use this exercise to increase upper lat width, creating that highly prized V-shaped torso. On the downside, a wide grip is less efficient, so you won’t be able to lift as much weight. This means wide-grip lat pulldowns are good for muscle hypertrophy but less so for building strength.
Steps:
Attach a long bar to your lat pulldown machine.
Adjust the knee pad so that, when your feet are flat on the floor, it holds your legs in place.
Stand up and hold the bar with a pronated/overhand, wider than shoulder-width grip. Your arms should form a broad V-shape.
Pull your shoulders down and back and sit down. Make sure your legs are held securely in place.
Lift your chest and arch your lower back slightly.
Leading with your elbows, bend your arms and pull the bar down to your upper chest. Keep your wrists straight.
Smoothly extend your arms and continue for the desired number of reps.
Muscles targeted:
Latissimus dorsi (upper), trapezius, rhomboids, biceps, forearms, core.
Benefits:
Fill out your upper lats to make your back wider.
More challenging than most other lat pulldown variations.
Less weight is needed for an effective workout.
Tips:
Drive your elbows down, back, and in to maximize lat and mid-back engagement.
Keep your wrists straight.
Lift your chest up toward the bar.
2. Overhand close-grip lat pulldowns
You won’t see many people doing overhand close grip lat pulldowns because they’re hard and feel a little awkward. However, they involve a large range of motion, making them useful for developing lat flexibility. They hit your forearms hard and emphasize the lower fibers of your lats.
Steps:
Attach a bar to your lat pulldown machine.
Adjust the knee pad so that, when your feet are flat on the floor, it holds your legs in place.
Stand up and hold the bar with a pronated/overhand, slightly less shoulder-width grip.
Pull your shoulders down and back and sit down. Make sure your legs are held securely in place.
Lift your chest and arch your lower back slightly.
Leading with your elbows, bend your arms and pull the bar down to your upper chest. Tuck your elbows into your sides.
Contract your lats as hard as possible at the mid-point of each rep.
Smoothly extend your arms and continue for the desired number of reps.
Muscles targeted:
Latissimus dorsi (lower), trapezius, rhomboids, biceps, forearms, core.
Benefits:
An effective way to target the lower lats.
A challenging forearm workout.
Provides your lats with a deep, beneficial stretch.
Tips:
Keep your upper arms close to your sides as you pull down.
Drive your elbows back to maximize lat engagement.
Do not lean back, as doing so makes this exercise easier.
3. Neutral close-grip lat pulldowns
This popular exercise works in much the same way as #2 but is considerably easier on your wrists and more comfortable. The neutral or parallel close grip is also very strong, and most lifters can use more weight for this variation. Like overhand close-grip lat pulldowns, this exercise emphasizes your lower lats and also hits your mid-back.
Steps:
Attach a neutral grip bar to your lat pulldown machine.
Adjust the knee pad so that, when your feet are flat on the floor, it holds your legs in place.
Stand up and hold the bar with your palms facing inward.
Pull your shoulders down and back and sit down. Make sure your legs are held securely in place.
Lift your chest and arch your lower back slightly.
Leading with your elbows, bend your arms and pull the bar down to your upper chest. Tuck your elbows into your sides.
Contract your lats as hard as possible at the mid-point of each rep.
Smoothly extend your arms and continue for the desired number of reps.
Muscles targeted:
Latissimus dorsi (lower), trapezius, rhomboids, biceps, forearms, core.
Benefits:
A comfortable, joint-friendly grip.
Hits both the mid back and lower lats.
Develop back width and thickness simultaneously.
Tips:
Lean back slightly to increase mid-back engagement.
Use a little more weight than for conventional lat pulldowns.
Use lifting straps to reinforce your grip if necessary.
4. Reverse grip lat pulldowns
Using a reverse or supinated grip puts your biceps in their strongest position, so you should be able to use more weight or crank out more reps before hitting failure. On the downside, using a reverse grip slightly decreases lat engagement, but using more weight or doing more reps should cancel out this deficit.
Steps:
Attach a straight bar to your lat pulldown machine.
Adjust the knee pad so that, when your feet are flat on the floor, it holds your legs in place.
Stand up and hold the bar with a slightly less than shoulder-width underhand grip.
Pull your shoulders down and back and sit down. Make sure your legs are held securely in place.
Lift your chest and arch your lower back slightly.
Leading with your elbows, bend your arms and pull the bar down to your upper chest. Tuck your elbows into your sides.
Contract your lats as hard as possible at the mid-point of each rep.
Smoothly extend your arms and continue for the desired number of reps.
Muscles targeted:
Latissimus dorsi (lower), biceps, trapezius, rhomboids, forearms, core.
Benefits:
An excellent biceps and back exercise.
Good for building strength.
A useful precursor to bodyweight chin-ups.
Tips:
Keep your forearms parallel throughout.
Drive your elbows down and back to maximize lat engagement.
Use a little more weight, as this is a strong grip and arm position.
5. Neutral wide grip lat pulldown
Wide grip pulldowns are typically done using a straight bar and a pronated grip. While effective, this puts your arms in a mechanically disadvantageous position, limiting the weight you can use and the number of reps you can perform. Using a wide neutral grip bar makes for a more comfortable workout and puts your biceps in a stronger position. However, not all gyms have such a bar.
Steps:
Attach a long parallel grip bar to your lat pulldown machine.
Adjust the knee pad so that, when your feet are flat on the floor, it holds your legs in place.
Stand up and hold the bar with your palms facing inward.
Pull your shoulders down and back and sit down. Make sure your legs are held securely in place.
Lift your chest and arch your lower back slightly.
Leading with your elbows, bend your arms and pull the bar down to your upper chest. Tuck your elbows into your sides.
Smoothly extend your arms and continue for the desired number of reps.
Muscles targeted:
Latissimus dorsi (upper), biceps, trapezius, rhomboids, forearms, core.
Benefits:
A strong, comfortable grip.
Allows you to lift more weight and/or do more reps.
An excellent biceps workout.
Tips:
Pull your elbows down and into your sides to maximize lat engagement.
Keep your chest up throughout.
Pause at the bottom of each rep and flex your lats hard.
6. Cable crossover lat pulldowns
What’s wider than wide-grip lat pulldowns? This exercise! Cable crossover lat pulldowns involve pulling in from the sides, which really hits your upper lats. It’s not unusual to feel this exercise directly beneath your armpits. Use this move to fill in your lat gaps and build the ultimate V-taper.
Steps:
Stand between the uppermost handles of a cable crossover machine and take one in each hand. Kneel in the middle of the machine with your arms outstretched to form a Y-shape.
Lift your chest and pull your shoulders down and back.
Bend your arms and pull your elbows into your sides.
Extend your arms and repeat.
Continue for the desired number of reps.
Muscles targeted:
Latissimus dorsi (upper), trapezius, rhomboids, biceps, forearms, core.
Benefits:
One of the best exercises for wider upper lats.
Very shoulder-friendly.
An excellent back workout finisher.
Tips:
Pause at the midpoint of each rep to hammer your upper lats.
Keep your arms out level with your torso.
Lift your chest to increase upper back engagement.
7. Single-arm lat pulldowns
While it’s common to have one arm stronger than the other, big left-to-right strength imbalances can affect both your appearance and your upper body function. Single-arm lat pulldowns are a simple way to fix such imbalances and are also an excellent method for improving your mind-muscle connection, not to mention your lateral core strength.
Steps:
Attach a long D-shaped handle to your lat pulldown machine.
Adjust the knee pad so that, when your feet are flat on the floor, it holds your legs in place.
Stand up and hold the handle with one hand.
Pull your shoulders down and back and sit down. Make sure your legs are held securely in place.
Lift your chest and arch your lower back slightly.
Leading with your elbow, bend your arm and pull the handle down to your shoulder. Tuck your elbow into your side.
Smoothly extend your arm and continue for the desired number of reps.
Switch arms and do the same number of reps on the other side.
Muscles targeted:
Latissimus dorsi, trapezius, rhomboids, biceps, forearms, core.
Benefits:
An effective fix for left-to-right strength imbalances.
Good for enhancing your mind-muscle connection.
Delivers an excellent oblique workout.
Tips:
Keep your shoulders and hips level throughout.
Pull your elbow in close to your side to maximize lat engagement.
Use an overhand, neutral, or underhand grip as preferred. Alternatively, let your wrists rotate naturally as you pull down.
8. Straight arm pulldowns
Every lat pulldown variation discussed so far works the biceps as much as the lats. In contrast, straight arm pulldowns involve no elbow movement, and your biceps are left out of the exercise. Straight arm pulldowns are one of the few lat isolation exercises and are ideal for warming up or finishing off your lats.
Steps:
Attach a straight bar to a lat pulldown machine.
Hold the bar with an overhand, slightly wider than shoulder-width grip. Brace your core and pull your shoulders back and down.
With straight arms, step back to tension the cable. Lean forward slightly from your hips.
Without bending your elbows, push the bar down to your thighs.
Raise your arms and repeat.
Muscles targeted:
Latissimus dorsi (lower), trapezius, rhomboids, core.
Benefits:
One of a few lat isolation exercises.
Perfect for pre- and post-exhaust supersets.
This is an excellent exercise for swimmers and anyone whose sport involves throwing.
Tips:
Keep your chest up, core tight, and lower back slightly arched.
Use as big a range of motion as possible without letting the weights touch down.
Experiment with different grip widths to see which you prefer.
9. Resistance band pulldowns
Home exercisers are often unable to do lat pulldowns. After all, not everyone can fit a lat pulldown machine in their home gym, and chin-ups and pull-ups may be out of the question. The good news is that you can replicate all of the previous exercises using a resistance band and a suitable anchor.
Just ensure that your resistance band is in good condition and won’t snap mid-rep, and your anchor is strong enough and won’t fail. Getting hit in the face by a resistance band is no laughing matter!
Armed with your resistance band, you should have no problem recreating your favorite pulldown exercise and working your lats at home.
10. Pull-ups and chin-ups
If you are very strong or don’t have access to a lat pulldown machine, pull-ups and chin-ups could be your next best option. Yes, you’ll need to up your game and lift your entire body weight with just your arms, but that will only enhance your muscle and strength gains. Pull-ups and chin-ups might be low-tech, but they’re very high-effect and offer a lot of bang for your workout buck.
Steps:
Hang from an overhead bar using a wider-than-shoulder-width overhand grip (pull-ups) or a narrower-than-shoulder-width underhand grip (chin-ups).
Pull your shoulders back and down and brace your core. Bend your legs so your feet are clear of the floor.
Starting with straight arms, bend your elbows and pull your chin up and over your bar.
Smoothly lower yourself back down and repeat.
Muscles targeted:
Latissimus dorsi, trapezius, rhomboids, biceps, forearms, core.
Benefits:
Minimal equipment required so ideal for home and outdoor workouts.
A very functional pulling exercise.
A good test of relative strength.
Tips:
Don’t swing, kick, or kip, as doing so takes work away from your target muscles.
Think about lifting your chest and not your chin up to the bar to increase muscle recruitment.
Use a resistance band to make these exercises easier or a weighted vest to make them more challenging.
Lat Pulldown Guide FAQs
Do you have a question about lat pulldowns or back training in general? No problem, because we’ve got the answers.
1. What is an easy way to remember which lat pulldown exercise works which muscles?
With ten different lat pulldown variations and alternatives, it would be easy to forget which one works which muscles. However, there are a couple of ways to make all this information easier to remember.
As a general rule, the wider your grip, the more upper lat activation there will be. Think wide grip for wide lats. In contrast, a narrower grip tends to hit your lower lats more. Exercises that involve more pulling in than pulling down emphasize your middle back, i.e., mid-traps and rhomboids.
Keeping this in mind, you should have no problem identifying which part of your lats you are working on.
2. How many reps and sets should I do to build bigger lats?
Contrary to popular belief, you can build bigger muscles with almost any rep range – from as low as five to 30 reps or more. The main proviso is that you must train your muscles to within a couple of reps of failure to make them grow. This contrasts the 6-12 rep range that was once the standard recommendation for hypertrophy training.
That said, sets of 6-12 are arguably more time-efficient than sets of 30 or more, so use your best judgment when deciding how many reps to do.
Regarding sets, two to four should be sufficient for most people, especially if you are doing several back exercises in a row. If you feel you need more than four sets to fatigue your lats, you are either stopping your sets too soon before failure or resting too long between efforts.
3. How many times a week should I train my back?
While some lifters can get good results from one back workout per week, most people will make better progress if they train their backs twice a week, e.g., Monday and Thursday. This provides a good balance between work and recovery.
However, this doesn’t mean you should do the same back workout each time you train – that would soon become boring. Instead, create two different back programs to keep your workouts interesting and productive.
For example:
#
Workout one
Workout two
Exercise
Sets x reps
Exercise
Sets x reps
1
Deadlifts
4 x 4-6
Pendlay rows
4 x 4-6
2
Wide-grip lat pulldown
3 x 8-10
Close-grip lat pulldowns
3 x 8-10
3
Single-arm rows
3 x 10-12
Seated cable rows
3 x 10-12
4
Straight arm pulldowns
3 x 15-20
Dumbbell pullovers
3 x 15-20
5
Face pulls
3 x 15-20
Band pull-aparts
3 x 15-20
4. How much wider will wide-grip lat pulldowns make my back?
Unfortunately, this is one of those questions we cannot answer. That’s because your ultimate muscle shape and size are determined by several factors, including your genetics, muscle origin and insertion points, training history, attention to diet, rest, and recovery, and your commitment and motivation.
Even if we knew all these things, we don’t have a crystal ball and cannot see into the future!
So, all we can say is if you train hard, eat right, get plenty of sleep, and don’t quit, you can significantly increase your back width. Build your workouts around lat pulldowns and pull-ups, and you’ll be heading in the right direction.
5. What are the best exercises for building a thicker upper back?
While lat pulldowns are great for building back width, rows build upper back thickness. There are lots of effective rowing exercises, including:
Bent-over barbell rows
T-bar rows
Cable rows
Inverted rows
Single-arm dumbbell rows
Chest-supported rows
Kroc rows
Pendlay rows
Meadows rows
Yates rows
With so many different exercises to choose from, you should have no problem finding the perfect rows for your needs and goals. Combine vertical and horizontal pulling exercises to build a back that’s both wide AND thick.
Lat Pulldown Guide – Wrapping Up
Lat pulldowns deserve a place in everybody’s back workout. Regardless of which variation you perform, this popular exercise will help you develop a broader, stronger, more muscular upper back. You can emphasize your lower lats with close grip lat pulldown variations or spread your wings with a wide grip. Most lifters should do both.
However, wide lats are only part of what makes an impressive back; you also need thickness, which is where rows come in. Combine vertical and horizontal pulling exercises to build an impressive 3D back that looks good from every angle.

Hero Pose Virasana: Technique Tips, Common Mistakes, and Variations
The hero pose virasana is a basic sitting variation, suitable lotus pose alternative for meditative practice, and heck of a quad stretch, especially when you recline the posture in supta virasana. You’ve seen babies sit this way, so how hard could it be? Well, if you hardly stretch or sit in various legs crossed positions, it can be very painful or impossible. A lack of quad tissue flexibility, as well as in the ankles and feet, will be the first things you’ll notice when conforming to this pose.
But if you can’t get the hero pose on the first try, use the simple tricks and progressions in this guide. Then when you need something more challenging we have that too!
What Is Hero Pose Virasana?
While some poses are downright difficult and complex, the hero pose is a basic style of sitting on your butt with your knees on and floor and feet bent back next to the hips. That’s not to say it’s easy, because you cannot have the flexibility of a mummy and expect to sit right down in this pose. But it shouldn’t take long to master either.
Taken from its sangskrit definition, vira meaning “hero”, and asana meaning “posture” or “seat”, hero pose is usually combined with supta virasana, or the reclined (Facing up) variation that lengthens the stretch in the anterior thigh quadriceps muscles.
However, beginners may first need to put on the training wheels to condition their quads, shins, ankles, and feet for the full pose. In virasana, the weight of your body combined with full knee flexion and ankle extension can be painful, especially at first. But you can go at it gradually, using the techniques discussed in the tips and variations sections in this guide. From there, the hero pose can be used to transition in and out of other poses.
Muscles Involved In Hero Pose Virasana
The hero pose is more of a relaxed sitting position but there are some muscle strengthening benefits. Although the stretch in the quadriceps is the real advantage here.
Quadriceps
If you haven’t stretched your quads in ages, you’ll immediately know while getting down into the hero pose. While virasana is said to strengthen the legs and feet, we see it affecting the quads mostly. The hero pose places the front thigh in a stretched angle by closing the knees, and sitting between the feet.
Your quadriceps, while previously thought to have four muscles (hence “quad”) actually consists of five individual heads. These anterior upper leg muscles support knee extension, and hip flexion. They are major muscles in all athletic movements, while supporting posture and the walking process.
Now that you know the primary muscle in this pose, let’s go over the virasana technique.
How To Do Hero Pose Virasana
Few poses are as simple in terms of technique than virasana. It’s literally a sitting position that we’ve all done as a baby, and if a baby could do it well… there’s no excuse. You may need to work on other stretches before you can perform this pose though, because if you’re not bendy, it won’t be possible.
Below are the basic steps to performing hero pose, and you’ll also find a video demonstration with progressions.
Steps
Start by sitting on the your mat with your legs extended in front of you.
Bend your right leg and pull the heel into the right side of your buttock. Then do the same with your left leg. The toes should be pointing behind you, and the knees close together.
Place your hands palms up on your thighs, touching the pointer fingers and thumbs. Keep your spine tall, and elbows softly bent.
To leave virasana, place both hands on the left side and straighten the right leg in front of you. The bring the hands over to the right side, and straighten the left leg.
Check out the below video demonstration to see how virasana is done!
Read also: Half Moon Pose Ardha Chandrasana – Benefits, Common Mistakes, and Variations
Tips
If you cannot sit all the way down on the floor, place a cushion (bolster), yoga block, or rolled up towel under your butt. This decreases the degree of knee flexion, and hence the pain and discomfort commonly experienced during hero pose.
You can also wedge a cushion or bolster between your knees and under your shins, if more comfort is needed.
A little discomfort is normal an necessary when you’re trying to master a pose. However, extreme pain and discomfort are not.
Progress to the reclining supta for a deeper and more intense stretch.
The knees should be together as explained in the common mistakes section.
Benefits of Hero Pose Virasana
It looks so simple, how could a common sitting position be beneficial? There are some good reasons to practice this pose.
Great daily postural reminder
Many of us have bad posture, which can be due to tight, shortened muscles or the fact that we view our devices in non ergonomic positions that cause us to slump and move our heads forward.
Yoga practice is a good way to remind yourself to sit up straight, and use good posture. That’s because these poses require technique, and if we consciously know that, we’ll create an internal checklist to ensure we’re doing it correctly.
Having good posture makes us look more attractive, helps us to breathe better, have less fatigue, and prevent injuries, especially when weight training. So the more good posture practice, the better.
Alternative to lotus
For the same reason we sit in powerful positions like lotus pose, the hero pose is a good alternative sitting position for meditation. Virasana is not quite as challenging to master, and it can help to build your flexibility and leg strength to help you sit longer.
Stretches the lower body
An obvious benefit of hero pose is that some areas remain in a stretched positions such as the quads, ankles, feet, and also the knees. This is a just a good way to keep your muscles flexible and healthy, pain free in other poses and loose, which creates a healthy moving body and supports good posture.
Common Mistakes During Hero Pose Virasana
Such a simple exercise, how could you mess up the hero pose? There are some minor things you should avoid when practicing this technique.
Forcing the legs back/ not using props
Done incorrectly, you could bend or twist something the wrong way or put too much pressure on the knees and ankles. If you cannot do the hero pose safely, it’s better to place a cushion under your butt. This way you create more room for your joints to move safely.
It’s normal to experience a little discomfort in some poses, but there’s a difference between progression and poor strategy.
Pulling the knees apart
Part of proper hero pose technique is keeping the knees together to ensure you maximize the stretch in the legs, and proper and safe alignment of the joints. It may be tempting to pull the knees apart if if feels better, however, we do not recommend doing that. You should, instead use a bolster to prop yourself up and train the knees to be in the right alignment.
Dropping your posture
Another reason we highly recommend using a bolster or cushion if you cannot do hero pose yet, is that it will help you maintain good posture. This will develop a good habit for when you’re ready to do the unassisted version of hero pose.
Bad posture or hunching over is not good for the energy and strength of the pose, as you should be focusing on maintaining a tall, upright spine and strong core. Relax the shoulders, and keep the torso neutral.
Variations of Hero Pose Virasana
For the following variations, we’ll start you off with some easier techniques to help you get into position. Then when you’re very comfortable with virasana, you can aim higher and attempt the more challenging poses.
Hero pose with cushion
Virasana can be impossible for some people when just starting out. To help, you can place a yoga block or symmetrical cushion under your butt, and between your feet. This way, you don’t need as much knee flexion, and you can gradually improve flexibility in the muscles involved in hero pose.
Hero pose with feet crossed
Another progression, you can cross the top of one foot over the bottom of the other foot, and sit back on your feet. This will feel a bit easier if you struggle to get the feet next to your thighs.
Supta virasana
Also called the reclined hero pose, supta virasana is a supine position lying on your back. You should feel extra stretch in your quadriceps, and even more when the arms are extended overhead.
Steps
From virasana, place your palms on the floor behind your hips roughly shoulder width apart, with the fingers pointing forward.
Now slowly drop down onto your forearms, one arm at a time, keeping the elbows directly under the shoulders. Stay here for a few breaths.
If you’re able, lie on your back and straighten the arms next to your body.
For a more intense posture, simply reach the arms back overhead.
Stay there for a few moments, breathing in and out.
To come out, bring the arms forward, gently grab the heels, tuck your chin, and lift up onto your elbows. Then you can sit up in virasana.
If you’d like to counter this pose, you can fold forward, dropping face down on your thighs, while extending the arms back and rest them against the bottom of your feet.
Pro tip: As demonstrated in the primary video example provided in this guide, use the combination of a yoga block and bolster as a training technique for supta virasana.
Downward facing hero pose adho mukha virasana
You can also bend forward into a version of child’s pose, reaching the arms forward and dropping your head toward the floor yo accentuate the stretch in your thighs.
Steps
From virasana, reach your hands up toward the sky.
Then bend forward at the hips, and bring your palms to the floor. Breath in, exhale, and push your hands further forward.
To come out, walk your hands back until you’re sitting upright.
Watch at the 00:56 mark for a demonstration of adho mukha virasana.
Lotus pose
This is the pose famously known around the world and the most symbolic of meditative practice. It more advanced than the hero pose, hence why the latter is a viable substitute, although not perfectly easy or painless either.
Lotus requires more time and practice, and it can also be more risky for the knees if done carelessly. If you’d like to learn this foundational pose, check out our full lotus pose guide.
Steps
Note: Only attempt this pose if you have an advanced level of mobility in the hips, healthy knees, and prior yoga practice.
Start with your legs extended in front of you while seated on your mat.
Then, bend your right leg, and cradle it in your arms, gently swaying it from side to side.
Place the right foot into the left hip bone.
Now bend your left leg, then use your hands to pull your left foot over your right leg, and tuck it into the right side of your hip.
Let your knees drop to the mat, rest your hands palms up on your knees while touching the thumbs and pointer fingers together, and gently close your eyes. Focus on your breath and maintain a tall spine.
Reset your legs by extending them forward, then repeat the same steps but switch the position of your legs. For example, this time you’ll bend and cradle the left leg first. Then you’ll bring the right foot over the left leg to finish the lotus pose.
FAQs
Who should stay away from hero pose? We don’t recommend the hero pose for people with pre existing knee and ankle issues as virasana places a lot of pressure on these joints.
Wrapping Up
You don’t need to be a yoga genius or possess super powers to master the hero pose. It’s among foundational beginner poses that requires a little cooperation from your quads, and feet. The virasana technique is not so easy that anyone can do it, but this kneeling asana can be achieved via progressive methods, and a little tolerance to minor discomfort as your muscle tissues expand and you become more flexible.
Then you can reward yourself by sitting in this posture for relaxation sessions, and pushing for more advanced poses.
Standing Cable Fly Guide: Muscles Worked, How-To, Benefits, and Alternatives
Common gym lore says that if you want to build a massive, sculpted chest, the bench press is the way to go. This is why so many bodybuilding pec workouts start with the bench press. Push-ups are also popular, and dumbbell bench presses and the chest press machine aren’t far behind.
However, despite using different training implements, each of those movements is almost identical. So, if you build your workouts around compound pushing exercises, you’re basically repeating the same move over and over again.
This is not only boring but could make your training less effective than it ought to be.
For this reason, any well-designed chest workout should combine compound pressing exercises like the bench press with isolation movements such as crossovers and flys. This will allow you to hit different parts of your chest, ensuring you develop better-shaped pecs. Switching movements also helps to make your workouts more interesting.
But which supplementary chest exercises should you use? After all, there are plenty to choose from.
In this article, we discuss the benefits of the standing cable fly, explaining how to perform this great exercise and the alternatives you can also use to sculpt the perfect chest.
Standing Cable Fly – Muscles Worked
Standing cable flys are an isolation exercise, which means movement occurs only at one joint – the shoulder. However, despite this, the standing cable fly still involves several important muscles.
These include:
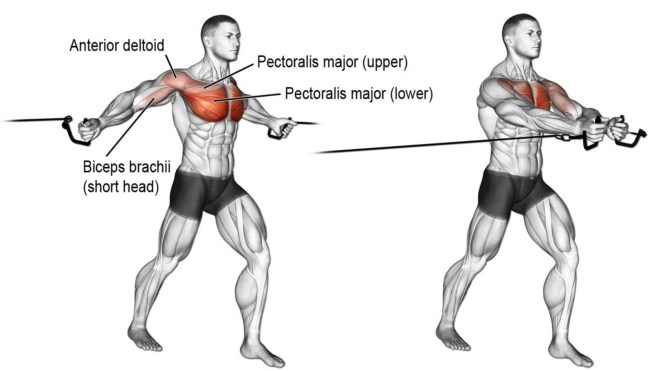
Pectoralis major
Known as the pecs for short, this large fan-shaped muscle makes up most of your chest mass. The pecs consist of three groups of fibers or heads: clavicular (upper), sternal (mid), and costal/abdominal (lower).
Together, the three pec heads are responsible for horizontal flexion and adduction of your shoulder joint. They are also medial rotators. All three heads play a part in standing cable flys; however, the sternal or middle portion is the most active.
Pectoralis minor
The Pectoralis minor is located beneath the upper part of pectoralis major. It works in conjunction with pec major to horizontally flex and protract your shoulder joint. While pec minor is largely out of sight, it still contributes to the shape and size of your chest.
Anterior deltoids
The deltoids are your most significant shoulder muscles. Like the pecs, they are separated into three heads: anterior (front), medial (middle), and posterior (rear). All three deltoid heads are involved in standing cable flys, but the anterior head is the most active.
Serratus anterior
Serratus anterior is located to the side of your upper chest. Its primary function is keeping your scapulae or shoulder blades flat against your rib cage. As such, it’s an essential stabilizer of the shoulder girdle. A well-developed serratus anterior can add a lot to your upper body aesthetics, especially when you’re lean.
Core
With no bench to support you, you’ll need to use your muscles to stabilize your spine and stop your body from moving backward as you move your arms. Core is the collective term for the muscles of your midsection, including the rectus abdominis, obliques, and transverse abdominis. During standing cable flys, you use your core to brace your lumbar spine, preventing unwanted movement.
Biceps and triceps
Standing cable flys involve little or no movement of your elbows. All of the action should occur at your shoulder joints. That said, you’ll still need to use your biceps and triceps to hold your arms rigid. However, they should be working isometrically, i.e., generating force without producing movement.
How to Do Standing Cable Flys
Get more from standing cable flys while keeping your risk of injury to a minimum by following these guidelines:
Attach D-shaped handles to an adjustable cable machine set to around mid-chest height.
Take a handle in each hand and, with your arms slightly bent but rigid, take a step forward to tension the cables, arms extended somewhat behind you. Brace your core.
Adopt a staggered stance for balance and brace your core to stabilize your torso.
Keeping your body upright, bring your arms forward so your hands meet at chest level in front of you. Do not bend your elbows or lean forward at the waist.
Open your arms and return to the starting position, making sure to stretch your chest.
Continue for the prescribed number of reps.
Pro Tips:
This exercise works best with light to moderate weights and medium to high reps, e.g., 12-20 per set.
Pause at the start and midpoint of each rep to maximally engage your pecs.
Move smoothly and deliberately to avoid momentum and keep the tension on the target muscles.
Imagine you are “hugging a tree” to reinforce the correct exercise technique.
Switch leading legs set by set to avoid developing muscle imbalances.
Standing Cable Fly Benefits and Drawbacks
Not sure if standing cable flys are worthy of a place in your workouts? Consider these benefits and then decide!
A very safe exercise
Unlike barbell and dumbbell bench presses, there are no weights to drop on your chest during standing cable flys. As such, you can take your sets to failure with no fear of getting crushed under a heavy load. This means standing cable flys are ideal for solo exercisers.
Shoulder-friendly
With no bench behind your shoulder blades, your arms are free to move naturally and without putting unnecessary stress on your shoulder joints. If bench presses bother your shoulders, you may find that standing cable flys are more comfortable and forgiving.
Perfect for drop sets
Most cable machines have a selectorized weight stack, so you can change the load quickly and easily. This means that standing cable flys are perfect for muscle-building, pump-inducing drop sets. Rep out to failure, reduce the weight by 10-20%, and then rep out again. Repeat several more times until your pecs are thoroughly fatigued.
An excellent chest finisher
Standing cable flys are one of the best exercises for bringing your chest workout to a satisfying end. After bench presses, dips, and chest presses, your triceps will probably be more fatigued than your pecs. With less triceps involvement, you should find that you can still pump out a couple good sets of cable flys to ensure your chest muscles are completely exhausted.
While standing cable flys are a mostly beneficial exercise, there are also a few drawbacks to consider:
It can be tricky for beginners to learn
With no bench for support and the movement all but unguided, beginners may find this exercise tricky to learn. Their arms may not follow the correct movement path, and they may also find it hard to avoid using one arm more than the other. For this reason, some beginners will prefer a less challenging chest isolation exercise, such as pec deck flys.
Not suitable for heavy weights
Using heavy weights will invariably lead to cheating, as you’ll probably need to lean into the exercise to avoid falling backward. This takes tension away from the target muscles, making standing cable flys less effective.
Save the heavy loads for the multi-joint compound exercises in your workouts. Instead, stick to light to moderate weights and medium to high reps with standing cable flys, which reduce the need to cheat.
7 Standing Cable Fly Variations and Alternatives
Standing cable flys are a highly effective chest exercise, but that doesn’t mean you need to do them all the time. There are several variations and alternatives you can use to keep your workouts productive and interesting:
1. Cable crossovers
Cable crossovers and cable flys are easy to confuse as they’re very similar. However, where standing cable flys involve a horizontal arm movement, cable crossovers feature a diagonal motion, either going from high to low or low to high. This allows you to emphasize your upper or lower chest as preferred.
Steps:
Attach D-shaped handles to an adjustable cable machine set to around head height.
Take a handle in each hand and, with your arms slightly bent but rigid, take a step forward to tension the cables, arms extended somewhat behind you. Brace your core.
Adopt a staggered stance for balance and brace your core to stabilize your torso.
Keeping your body upright, bring your arms forward and down so your hands meet in front of your hips. Do not bend your elbows or lean forward at the waist.
Open your arms and raise your hands to about shoulder height, making sure to stretch your chest.
Continue for the prescribed number of reps.
Muscles targeted: Pectoralis major, anterior deltoids.
Benefits:
Hits a different part of the chest compared with standing cable flys.
A very effective lower/inner pec exercise.
Safe and shoulder-friendly.
Tips:
Do this exercise with a single cable to work one side of your chest at a time.
Use a resistance band if no cable machine is available.
You can also do this exercise with a low-to-high movement to work your upper/inner chest.
2. Supine cable fly
One of the biggest disadvantages of standing cable flys is that your core and balance can limit your performance. Lying on an exercise bench means you won’t need to worry about your abs failing before your pecs, so you’ll be able to use more weight and push your muscles closer to failure.
Steps:
Place a bench in the center of a cable crossover machine. Attach a D-shaped handle to the low pulleys.
Take a handle in each hand and sit on the end of the bench. Lean back and extend your arms so they’re vertical, elbows slightly bent but rigid.
Open your arms and lower the handles down and out to the side, getting a good stretch in your pecs.
Squeeze your arms up and together so your hands meet above your chest.
Continue for the prescribed number of reps.
Muscles targeted: Pectoralis major, anterior deltoids.
Benefits:
You should be able to lift more weight or do more reps than with standing cable flys.
More back support, so a good choice for lifters with back pain/injuries.
An excellent mid-chest exercise.
Tips:
Pause at the top of each rep and squeeze your pecs for maximal muscle recruitment.
Use a stability ball instead of a bench if preferred.
You can also do this exercise on an incline bench to work your upper chest.
3. Dumbbell fly
You don’t have to limit yourself to using a cable machine for flys. In fact, dumbbells can be just as effective and may be more accessible and convenient, especially if you train at home. Muscle tension does tend to drop off as your hands come together, but despite this, dumbbell flys are still a good pec builder.
Steps:
Lie on an exercise bench with a dumbbell in each hand. Press the weights up and hold them at arm’s length above your chest. Turn your palms inward, i.e., a neutral grip.
With slightly bent but rigid elbows, open your arms and lower the weights down and out to your sides. Get a stretch in your pecs but do not hyperextend your shoulders.
Squeeze the weight up and together, and then repeat.
Muscles targeted: Pectoralis major, anterior deltoids.
Benefits:
Less equipment-dependent than standing cable flys.
An excellent old-school chest sculpting exercise.
An ideal addition to home chest workouts.
Tips:
Use an incline bench to target your upper pecs or a decline bench to work your lower pecs.
Take care not to lower the weights too far, as doing so could lead to shoulder pain.
No bench? You can also do this exercise on a stability ball.
4. Pec deck machine
Beginners often find it hard to control their arms and follow the correct movement path during standing cable flys. The pec deck machine guides your limbs, so you are free to focus entirely on pounding your pecs into submission. This is an excellent no-brainer alternative to standing cable flys.
Steps:
Adjust the machine seat height so that, when you sit on it, your upper arms are parallel to the floor.
Sit on the machine, grip the handles, and press your forearms against the pads.
Squeeze your elbows together so they meet in front of your chest.
Open your arms, get a stretch in your pecs, and repeat.
Muscles targeted: Pectoralis major, anterior deltoids.
Benefits:
An excellent exercise for beginners.
Works great for drop sets.
Your movements are guided by the machine, leaving you free to focus on pushing your pecs to their limit.
Tips:
Press with your elbows, not your hands or forearms, to maximize chest recruitment.
Pause at the midpoint of each rep to maximize pec engagement.
Do not let the weights touch down between reps, as doing so takes tension off your chest.
5. Towel slide fly
You don’t need a cable machine or dumbbells to do flys – a towel and your body weight will suffice. That said, this is a very challenging exercise, especially for beginners and those with a larger-than-average build.
Steps:
Adopt the push-up position with your hands resting on two towels or slider pads. Brace your core.
Keeping your arms slightly bent but rigid, open your arms and slide your hands outward, lowering your chest down to within an inch of the floor.
Squeeze your hands together and return to the starting position.
That’s one rep – how many more can you do?!
https://www.youtube.com/watch?v=wnZOLlxN4hs?feature=share
Muscles targeted: Pectoralis major, anterior deltoids, core.
Benefits:
A very challenging bodyweight pec exercise.
Minimal equipment required, so ideal for home workouts.
Provides a great core workout as you train your chest.
Tips:
Do this exercise while kneeling to make it easier.
This exercise works best when performed on a smooth floor, e.g., tiles or polished wood.
You can also do this exercise using revolving dumbbells or core wheels instead of a towel.
6. Ring/TRX fly
Gymnastic ring and suspension/TRX training are very popular at the moment. Using straps and handles will add a lot to your bodyweight workouts, making them more challenging and effective. Ring/TRX flys are an excellent exercise that can be modified to suit almost any strength and fitness level.
Steps:
Attach your rings/TRX to an overhead anchor. Hold the handles and stand between them, arms extended in front of you. Adopt a split stance.
Open your arms and lower your body forward. Use your front leg more or less to adjust the difficulty of the exercise.
Squeeze your arms back together and repeat.
Muscles targeted: Pectoralis major, anterior deltoids, core.
Benefits:
Less friction to overcome than with towel flys, so potentially easier to perform.
An excellent supplement to other bodyweight chest exercises, such as push-ups and dips.
A very functional, core-centric bodyweight chest exercise.
Tips:
Bend your legs and rest on your knees to make this exercise easier.
Shorten your straps to raise your body and take weight off your arms.
You can also do this exercise on your toes and in the push-up position, which is VERY challenging!
7. Supine Svend press
The supine Svend press is a straightforward yet effective exercise that combines chest presses with flys. This creates a unique contraction in your pecs without using a cable machine or dumbbells. In fact, all you need to do this exercise is a single weight plate, so it’s ideal for home workouts.
Steps:
Hold a weight plate between the palms of your hands and lie on an exercise bench. Push your palms together as hard as you can.
Press the weight up to arm’s length, maintaining the inward pressure with your hands.
Lower the weight back to your chest and repeat.
Muscles targeted: Pectoralis major, anterior deltoids, triceps.
Benefits:
An effective exercise even when done with light weights.
Far more effective than standing Svend presses.
Very joint-friendly as you don’t need to use heavy loads.
Tips:
You can also do this exercise with two dumbbells instead of a weight plate, i.e., close-grip dumbbell bench presses.
No bench? No problem! Do this exercise on the floor or using a stability ball.
The harder you press your hands together, the more effective this exercise becomes.
Standing Cable Fly Guide FAQs
Do you have a question about standing cable flys? No sweat because we’ve got the answers!
1. How many sets and reps of standing cable flys should I do?
Most people should be able to fully fatigue their pecs in 2-4 sets of standing cable flys. If you feel like you need to do more than this, you are a) resting too long between sets or b) not getting close enough to failure.
Remember too that standing cable flys are not the best stand-alone chest exercise, and are best done as part of a more comprehensive chest workout, i.e.,:
Bench press 3 x 6-8
Incline dumbbell press 3 x 10-12
Chest press machine 3 x 10-12
Standing cable fly 3 x 15-20
Regarding reps, standing cable flys work best with light to moderate weights and medium to high reps. As such, you’ll probably get the best results from doing 12-20 reps per set, although you can go as high as 30 reps and still build muscle.
2. I feel some of these exercises in my shoulders more than my chest. Is this normal?
The pecs and anterior deltoids always work together as they have shared functions. That said, exercises like standing cable flys and dumbbell flys are predominately chest exercises, and the anterior deltoids should be working as synergists or helpers.
If you feel your shoulders more than your chest, you may need to work on your mind-muscle connection. Try using less weight and flexing your pecs more purposely.
Be more mindful of your pecs, imagining them contracting and growing with every rep you perform. Flexing your pecs before a set of standing cable flys will also help fire up your chest and reinforce the mind-muscle connection.
3. Aren’t compound exercises enough to build a bigger chest?
Compound exercises are great for building basic mass and strength. However, while some only need bench presses, push-ups, and dips to build picture-perfect pecs, others require additional exercises to maximize pec size and shape.
So, by all means, try the compound-only route to building your best-ever chest, but if you are unhappy with your progress, add some isolation training to see if it helps.
4. I train at home and don’t have access to a cable machine; what exercises can I do instead of standing cable flys?
There are several ways you can isolate your pecs at home without a cable machine. For starters, you can use resistance bands to replicate most cable exercises, including flys and crossovers. You can also do TRX, dumbbell, and towel flys.
While having access to a cable machine makes chest isolation training very convenient, it’s not the only way to emphasize and shape your pecs.
5. Standing cable flys hurt my shoulders – what gives?
Standing cable flys are usually pretty shoulder-friendly, but if they hurt your joints, you may be using too much weight, extending your arms too far behind you, or have a pre-existing shoulder injury.
As with all exercises, if you feel unusual pain when you’re doing this movement, you should check your form, reduce the weight, and skip it entirely if the discomfort persists.
Wrapping Up
Most lifters LOVE bench presses and start each training week with what is arguably the most popular bodybuilding exercise in the world. However, as great as bench presses are, they’re not the only or even the best way to build awesome pecs.
Isolation exercises like flys and crossovers allow you to focus on your pecs with 100% accuracy, pushing your muscles to their limit in complete safety.
There are plenty of pec isolation exercises to choose from, but the standing cable fly is one of the best.
Add them to your next pec workout and take your chest development to a whole new level!
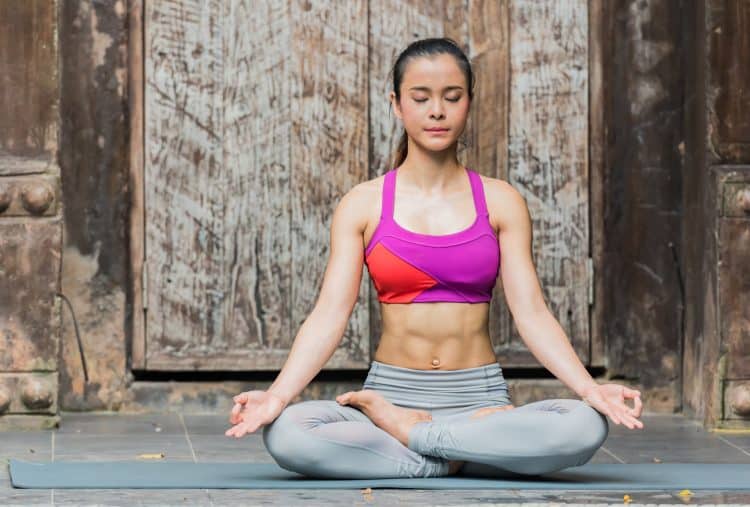
Lotus Pose Padmasana Guide: Benefits, Common Mistakes, and Variations
Easily the most iconic meditation posture, recognized in film and TV, and part of rich ancient Asian tradition, just about everyone has tried some form or variation of lotus pose, whether making a joke out of it or genuine relaxation practice. But, laughing aside, most people would get a slice of humble pie after an honest attempt at the true lotus pose padmasana!
There are said to be many advantages of lotus pose like increasing flexibility, improving posture, easing menstrual symptoms, and migraines, mental relaxation, and awakening kundalini energy. But beneath the surface (pun surface) hides a beautiful representation of the lotus flower.
Let’s deep dive into the origins of padmasana, how it works, common mistakes to avoid, variations, and more.
What is The Lotus Pose?
We observe and practice for the benefits, but do we know about the history behind many classic poses, especially one as famous as the lotus pose? Padmasana, in Sanskrit, is derived from two parts, padma (meaning lotus), and sana (seat or throne meaning).
You may know of the lotus flower, or would recognize this sacred aquatic plant and powerful religious symbol from Buddhist and Hindu culture, where it’s commonly used as a pedestal for divine deities. But it makes more sense once you understand the angelic daily life cycle of a lotus. Deep rooted in mud, the lotus submerges in river water nightly, only to resurrect into a beautiful bloom the next morning. Hence its popular symbolic associations with rebirth and spiritual enlightenment.
But resilience is another word that comes to mind, considering the seemingly unfavorable environmental conditions, yet the strong will to revive each day, with each petal appearing as beautiful and strong as the day prior.
It’s no wonder the lotus is a foundational pose, that is believed to have many physical and mental benefits.
Anatomy of The Lotus Pose/Muscles Worked
(Proper) Lotus pose is a combination of sufficient hip flexion, external thigh rotation, and horizontal abduction. In other words, the thigh needs to be elevated high enough, with adequate outward rotation to safely and comfortably place the legs and feet in the lotus position.
Normally, the hips externally rotate about 60 degrees. In the lotus pose, more rotation is required. When mobility is less than what’s needed, people compensate by rotating and placing dangerous pressure on this knee joint.
So there needs to be a strong ability in the hips, with flexible quadriceps. This can be achieved with enough time, and consistency.
How To Do Lotus Pose (Ardha Padmasana)
Now we’ll get to the good stuff… find a yoga mat and go through a few practice steps before crossing over to the more advanced lotus pose variation. We’ll do this part in sections, starting with a basic legs crossed position, moving to a half lotus, and finally the lotus of all lotuses!
Below you’ll find written step-by-step instructions, with a video tutorial afterward. Also, check out the common mistakes section to avoid crucial technique dont’s.
Note: Before attempting lotus pose, ensure that you have sufficient lower body flexibility, healthy knees and ankles, and recent experience practicing similar techniques regularly. Padmasana is an intermediate to advanced posture, and bad technique can be costly for the knee joint.
It’s also important to note that there are slight variations of lotus pose, however, the general technique should remain the same for the safety of the joints.
Steps
Before attempting the full lotus pose, see if you can first perform the basic crossed legs and half lotus variations without pain or discomfort. If you can, then proceed to carefully try the full lotus, but only if you have sufficient hip mobility to comfortably slide your feet onto the hips without forcing or pulling the shins up.
Basic crossed legs posture
Start from seated on your mat with both legs straightened in front of you.
Then, come into a basic crossed legs pose, or sukhasana with your palms on your knees and eyes closed. Keep your spine tall.
Stay here then switch the position of your legs and repeat.
If you are comfortable in this position, you’re ready for the half lotus or Ardha padmasana. Straighten your legs in front of you and continue with step 4.
Half lotus
Grab the right leg, and cradle it in your arms close to your chest. Gently swing the leg from side to side which will help open up the hips before going full lotus.
From here, place your right heel on your left pelvic bone.
Sit in this pose with your hands on your knees and eyes closed for a few moments. Switch legs, bringing the opposite leg to the pelvis first. Do you feel okay to proceed with a more intense technique aka, full lotus? If so, you can proceed to the next steps.
Full lotus padmasana pose technique
Restart by extending your legs in front of you.
Then, bend your right leg, and cradle it in your arms, gently swaying it from side to side.
Place the right foot into the left hip bone.
Now bend your left leg, then use your hands to pull your left foot over your right leg, and tuck it into the right side of your hip.
Let your knees drop to the mat, rest your hands palms up on your knees while touching the thumbs and pointer fingers together, and gently close your eyes. Focus on your breath and maintain a tall spine.
Reset your legs by extending them forward, then repeat the same steps but switch the position of your legs. For example, this time you’ll bend and cradle the left leg first. Then you’ll bring the right foot over the left leg to finish the lotus pose.
Here’s another way to perform lotus pose that involves deeper preparation.
Tips
The full lotus is very challenging if you don’t have very good flexibility. Do not expect to get it in day, one week, one month, or in some cases, one year or more.
Remember the role of the two major joints involved in the lotus pose. The hips are capable of rotation while the knees only flex and extend. The knees are at greater risk of injury in this pose if improper form is used.
Close the knee joint by fully bending your leg so that the calf is flat against the hamstrings. This will help protect the knees by keeping it more stable, while ensuring only the hips rotate.
Gently scoop the heels from underneath and set them in position on the hips.
If your knees cannot naturally drop to the floor, do not force them down. Be patient and allow the tissue in your lower body to loosen up and stretch.
Never use jerky or rough movements when performing the lotus pose. Be very gentle and patient as you’re assisting your feet to the hips.
As gently as you came into the pose, should you while coming out of it too.
Benefits of Lotus Pose Padmasana
Let’s take a look at why an ancient, pre hatha yoga posture would still be relevant today. Of course, it’s also important to remember that lotus is a form of meditation, which has many science proven benefits in itself.
Stretch multiple points
In the lotus posture, many points receive a deep stretch from the muscles in your feet, to the ankles, knees, quadriceps muscles, hips, groin, and the torso, with good posture. Stretching increases flexibility, and hence elasticity in the muscles which helps with healthy joint movement, and prevents injuries (1).
Calm your thoughts
Some stress is healthy but when it becomes chronic, so often does our mental and physical suffering. Meditation, and redirecting our focus is a crucial part of reducing the harmful effects of negative associations, reducing emotional fluctuation, and we all need it in some form. Especially with the pressures of modern lifestyles and culture (2).
Helps reduce and prevent disease risk
To extend on the previous benefit, yoga and exercise has been shown to improve disease or health risk factors. Studies published by National Library of Medicine conclude that there’s no doubt yoga improves stress, anxiety, and depression, while being a suitable complementary medicine (3, 4). But the advantages are two fold, as mental techniques contribute to the physical and mental improvements (5).
Reinforce discipline to live a healthier, more aware lifestyle
It’s easy to become overwhelmed with distractions that should take us less time in our daily lives. Yoga practice can make us more mindful and help us to be more in tune with our thoughts, bodies, and decisions (6). And chances are, if you have the discipline to follow a routine, it will carry over into other things that will help you to become better all around.
Many fun and challenging variations
The exciting thing about the lotus pose is that it doesn’t stop there… in fact, for someone who cannot get into the pose, the progressions can be a rewarding journey in themselves. But then you have more advanced variations like the ones included later on in this guide. As you progress, it’s also normal to build more strength and mental fitness as well.
Common Mistakes During Lotus Pose
When it comes to exercise, some bad habits are easily fixable and not likely to cause harm. But when it comes to flexing your body in more difficult positions, you must be especially careful to do it right Here are some things you must avoid during lotus pose.
Forcing the leg and foot into position
A proper lotus pose is only possible with sufficient hip mobility and ignoring this fact is a crucial mistake. When movement in the thigh is limited during the lotus pose, two ways that people try to fix it is pulling the foot up or pushing the knee down. The problem here is the knees are not made for such a degree of external rotation beyond 40 degrees.
The hips are a ball and socket joint with greater movement capability, while the knee bends and straightens. Don’t mess that up!
Bad form causes shearing forces on the knee which can damage the meniscus (soft cartilage in the knee that act as shock absorbers, and help stabilize the knee joint) and ligaments.
Solution: Practice gradual techniques to free up tension in the hips, and improve movement in the horizontal plane. You should also focus on closing the knee joint, making it less vulnerable to potentially damaging forces.
Variations of Lotus Pose Padmasana
There are plenty of lotus pose variations to keep you busy, including the preparatory and more advanced postures. Here are some of the more popular alternatives to the lotus pose padmasana.
Reclining lotus pose (supta padmasana)
The opposite of your hidden lotus, supta padmasana is performed on your back. And most people will want to try this variation before covering up their pose.
Steps
Sit at the front of your mat in padmasana.
Place your hands on the mat behind your hips, then bend your elbows and gently drop down on your forearms like in a reverse plank. Sit in this position for a few moments to ensure you’re comfortable.
Then slowly walk your hands toward your knees, and lie flat on your back with your arms by your sides and palms on the floor.
Now reach your arms overhead, and rest the top of the forearms and knuckles on the ground, but keep your elbows slightly bent.
Relax here and consciously breathe in and out.
To come out, bring your arms back down by your sides with the palms next to your hips. Tuck your chin into your chest, lift back up onto your forearms, then sit up in padmasana.
Now change your legs position and repeat.
Hidden lotus pose (gupta padmasana)
Try this concealed lotus pose variation that’ll force your hips to stay opened up. Many people also learn that changing the position of the same position suits them better. In this case, a prone position may enhance how the stretch feels in your entire back.
Steps
Begin in padmasana pose at the back end of your yoga mat.
Then place your hands on the mat and use your arms to lift up onto your knees. Walk your hands forward until your palms are directly under your shoulders like in a push-up on your knees position.
Now walk your hands forward and gently lower your chest, stomach, and hips to the floor. Then reach your arms overhead and rest your palms on the floor. Try to consciously press your pelvis down into the mat.
Stay here for a few conscious, relaxed breaths.
To leave the pose, bend your arms and place your palms on the floor next to your chest like the bottom of a push-up.
Push yourself up, then walk your hands back, and gently return to the sitting padmasana.
Now do it again but change the position of your legs.
Tip: You can also place your hands behind your back as shown in the video example.
Fish pose with lotus legs
If done correctly, the fish pose will give you an amazing stretch through the upper body and neck, while offering potential benefits of inversion (hanging your head upside down) like improved blood flow to the brain, and enhanced cognitive functioning. But the basic fish pose doesn’t stretch out the hips and groin like adding a lotus pose.
Steps
Start on your back with your body fully lengthened.
Bring your legs into lotus, then drop them to the floor.
Now lift your chest, arch your back, tilt your head back, and gently rest the top of your head on the floor. You can grab onto your hips as shown in the video example below.
Reverse the process by lying flat, raising your knees up, taking your feet off the hips one at a time, and straightening your legs out in front of you.
Lay there for a moment, then bring the legs back into lotus, switching legs this time, and repeat the previous steps.
Check out our full write up on fish pose matsyasana.
Floating lotus pose (Utplutih)
If you have good upper body strength, then you should absolutely try the floating variation. What it will do over the other variations is activate your chest, shoulders, and triceps, while calling on your core to produce more strength and stability. But there are mental benefits too, as you’ll have to trust yourself, have confidence in your abilities, and develop patience.
Note: Utplutih is a more advanced pose, and it can be very challenging. The video provided below shows a few progressions before attempting the full lotus pose. You can also find some technique tips following the written instructions.
Steps
Start in the sitting lotus position on your mat, with an upright posture.
Squeeze and activate your legs and flex your feet for better control.
Then straighten your arms and place your hands on the mat beside your upper thighs. Spread your fingers out, and feel where you will be most balanced. Emphasize pressing with the thumbs and pointer fingers.
Activate your delts, and the prominent muscles of your lateral torso like the lats and serratus anterior.
Now round your back slightly, then draw your abdomen in and up.
Inhale, then lift your body up off the ground. Press your hands down into the floor, maintain a solid position, look down at the tip of your nose, and take 10 big breaths.
Exhale, and slowly lower your butt to the floor in padmasana.
You can then swap the position of your legs and repeat the pose.
Tips
Mental focus is just as important here. Remain calm, breathe, take your time, and feel connected to the pose.
Remember most of this pose is a result of your core muscle engagement.
If the utplutih is too advanced for you, cross your legs normally (not lotus), and practice the floating pose while keeping your feet in contact with the floor, akin to an assisted version.
The half lotus pose, keeping only one foot on the floor, is another progression before the full floating variation.
FAQs
When is lotus pose best avoided? We do not recommend lotus pose for people with knee and ankle injuries or issues, or who are pregnant.
Can beginners try the lotus pose? It depends on your level of flexibility. Lotus pose is a more advanced posture that requires a great degree of hip mobility. Most beginners should start with a basic crossed leg sitting position, then progress to a half lotus, and finally the full lotus.
Wrapping Up
Through adversity and resilience sprouts a beautiful result, of which the lotus plant exemplifies that authenticity. Both a symbol and physical manifestation of grounding, expansion, death, re-emergence, resilience and beauty, so too is what the lotus pose represents.
While a more advanced position, you’ll also learn patience and persistence, but don’t forget to also enjoy the process as you learn one of the most foundational poses.
Resources
Amin DJ, Goodman M. The effects of selected asanas in Iyengar yoga on flexibility: pilot study. J Bodyw Mov Ther. 2014 Jul;18(3):399-404. doi: 10.1016/j.jbmt.2013.11.008. Epub 2013 Nov 8. PMID: 25042310.
Woodyard C. Exploring the therapeutic effects of yoga and its ability to increase quality of life. Int J Yoga. 2011 Jul;4(2):49-54. doi: 10.4103/0973-6131.85485. PMID: 22022122; PMCID: PMC3193654.
Shohani M, Badfar G, Nasirkandy MP, Kaikhavani S, Rahmati S, Modmeli Y, Soleymani A, Azami M. The Effect of Yoga on Stress, Anxiety, and Depression in Women. Int J Prev Med. 2018 Feb 21;9:21. doi: 10.4103/ijpvm.IJPVM_242_16. PMID: 29541436; PMCID: PMC5843960.
Bridges L, Sharma M. The Efficacy of Yoga as a Form of Treatment for Depression. J Evid Based Complementary Altern Med. 2017 Oct;22(4):1017-1028. doi: 10.1177/2156587217715927. Epub 2017 Jun 30. PMID: 28664775; PMCID: PMC5871291.
Goldsby TL, Goldsby ME, McWalters M, Mills PJ. Effects of Singing Bowl Sound Meditation on Mood, Tension, and Well-being: An Observational Study. J Evid Based Complementary Altern Med. 2017 Jul;22(3):401-406. doi: 10.1177/2156587216668109. Epub 2016 Sep 30. PMID: 27694559; PMCID: PMC5871151.
Yoga – benefits beyond the mat. Harvard Health. (2021, September 8).
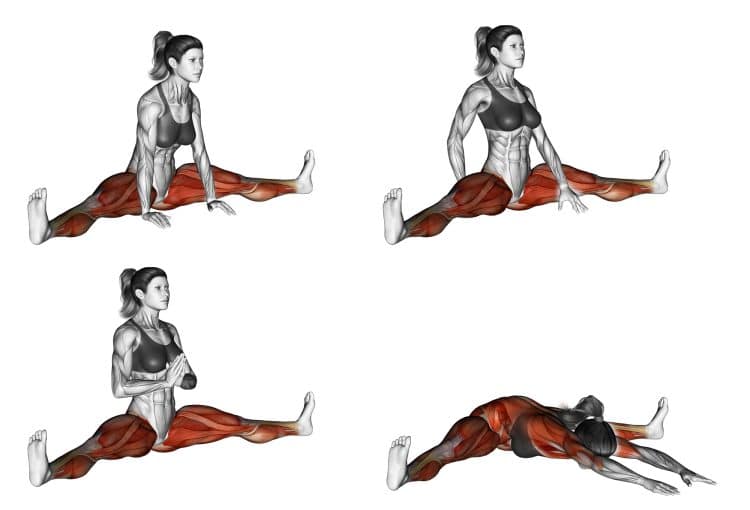
Spread Leg Forward Fold Upavistha Konasana — Benefits, Common Mistakes, and Variations
This one’s a throwback to gym class days when you were instructed to sit, spread your legs wide, and reach as far forward as you could for ten to twenty seconds. And you probably got pretty good at it with enough repetition, but once free from that school requirement, most of us said goodbye and good riddance! (no more torture). But wisdom is power, and those body aches and tight muscles aren’t going to relieve themselves…
Spread leg forward fold or Upavistha Konasana, is a fundamental pose that will benefit your entire body, and there’s an easy technique to progress into the full forward fold that we’ll show you in this guide. Plus learn key form tips and progress with some handpicked advanced variations.
Muscles Involved During Spread Leg Forward Fold Upavistha Konasana
“Spread”, “leg”, “fold”… sounds like a whole lot of stretching going on, for various muscles. In fact, you can easily modify Upavistha Konasana to give yourself a major stretch in the posterior chain from the heels all the way through the trunk, and releasing tension in the neck.
Here’s a short anatomical lesson on the muscles stretched and strengthened in this pose.
Thighs
During spread leg forward fold, proper technique will activate the thighs, hips, and groin, giving them a nice stretch along the way. You’ll also get the adductors that draw the thigh inward. Keeping these muscles loose is a good way to maintain mobility in the lower body, and prevent hard injuries and muscle pulls.
Erector spinae
Elongating the torso, and stretching out the lower back is a big part of the seated forward fold. In fact, to exaggerate this benefit, you can grab the toes, giving you more room to move your upper body.
How to do Spread Leg Forward Fold Upavistha Konasana
For such a simple looking exercise, there are a lot of important steps that you can’t miss when setting up and executing this yoga technique. This is to ensure your body is in a comfortable, supportive, and ergonomic position.
Below are written steps as well as a very detailed, and appropriate video demonstration of the spread leg forward fold upavistha konasana.
Steps
Gently sit on your mat, with your knees bent, feet flat on the floor, and arms relaxed over your legs.
Then straighten your legs out in front of you, and spread them out wide.
Use your hands and gently adjust your glutes by pulling them out to ensure you’re able to maintain an upright posture and lengthened torso without limitation.
Flex your feet by pulling the toes back toward your ankle, and press the heels into the ground.
Now place your fingertips behind your butt on the floor, and pull the shoulder blades slightly toward each other, and down. Then lift your chest up.
Hold this position and feel a nice stretch throughout your body.
If you’re ready for a bigger stretch, place your hands in front of you on the floor, then slowly walk your hands forward as much as you comfortably can.
Now allow your upper body to sink down toward the floor to accentuate the stretch. But remember to maintain a lengthened back, not simply hunching over.
From here, if you do not have the flexibility to descend further, you can use a yoga bolster and/or stacked blankets for support.
Gently, lie your head down, looking to either side, and rest your elbows on the floor with your palms facing up.
Let your entire body relax and sink into the cushions, allowing your arms to also become heavy.
Bring awareness to your groin, feeling the wide position of your legs, while allowing your lower body to sink down into the floor.
Slowly breathe in and out.
Stay here for about 5 minutes.
To come out of the pose, turn your hands over onto your palms, then slowly sit up, walking your hands back toward you for support.
Before you finish the pose, and if you’re comfortable, from the sitting position, place the bolster/blankets on one leg, and lie your head down to that one side for 3-5 minutes. Repeat on the other side.
You’ve now performed the spread leg forward fold!
Check out the soothing demonstration of this yoga technique via the video tutorial provided below.
Tips
You can use a bolster, blankets, and yoga blocks for support as you gradually increase flexibility.
Holding straps around your feet is another great training tool that helps reinforce proper form, and train for improved flexibility.
Never push your body to the point of pain or discomfort. Many yoga poses require great flexibility, and joint mobility but the body needs time, progress, and persistence to achieve deep stretches.
Benefits of Spread Leg Forward Fold Upavistha Konasana
A phenomenal activity that we should all fit in our routines, spread leg forward fold has benefits that go well beyond an amazing body stretch. Here are other reasons why this pose can improve your mind and body.
Stretch your groin, hips, and back
From the spread leg forward fold you can emphasize the point of stretch. Reaching straight forward you’ll focus on stretching the torso and lower back. But you could change direction, leaning into either side, and increase the stretch in your hamstrings.
Stretching your lower back is helpful in preventing injuries by enhancing mobility, while the hamstrings are highly injury prone, and stretching is non-negotiable if you’re highly active. Plus, most people sit a lot, which affects the hips and legs.
Reduce and improve body stress, anxiety, and pain
For the same reason as above, stretching gives us relief from muscles that are overused, not used enough, or that have been injured. Nowadays, our butts are glued to our seats for hours on end, which can lock everything up, and that’s when you start to have issues with hips, knees, etc.
Well, stretching can do a lot to counteract that. In fact, one study on Spanish logistics workers found that implementing a stretching routine in the workplace effectively helped with bodily pain, exhaustion, while reducing anxiety, and improving mental and general health (1). It was seen as a potential low cost way to improve well-being in the workplace.
Additionally, as the above video example pointed out, this pose could potentially improve health situations common in women such as regulating menstruation. Although, we cannot make this claim definitely.
Fight smartphone posture
We’re wreaking havocs on our necks with our phones, laptops and tablets, maintaining terrible forward head posture. It’s said the average human heads weigh on average 5 kilograms or 11 pounds. That’s pretty heavy, and not fair to our necks and spine.
Performing daily stretching and yoga techniques is one of the best ways to hold ourselves accountable for bad posture. Because if we’re making the effort to maintain healthy bodies, then good posture should go along with that.
Additionally, there’s research that could support the positive effects of stretching and core exercises on posture and alignment (2).
Common Mistakes When Performing Spread Leg Forward Fold Upavistha Konasana
These common mistakes are counterproductive to achieving a proper spread leg forward fold pose.
Rounding your back
There are few instances where it’s good to round your back, like the cat pose, for example. However, the goal of upavistha konasana is lengthening the spine by reaching forward, and keeping the back straight. If you notice your back rounding, use assistance such as a bolster, block, or blankets, and slowly lower yourself, focusing on good form.
Rolling your feet forward
Throughout this pose, your feet and knees should be pointed up toward the ceiling. Rolling them forward could place too much pressure on your knees.
Forcing it too quickly
The spread leg forward fold appeals to beginners because it seems so simple and straightforward (pun intended). And as mentioned, most of us have done it at some point. However, if you don’t stretch these muscles regularly, you will be surprised at how bad your flexibility is. So don’t try to rush it just because you used to do it in grade school. Your muscles and body still need time to open up and adjust.
Variations of Spread Leg Forward Fold Upavistha Konasana
The sitting wide leg fold over is a nice pre-requisite for twist and standing fold over poses. Here are some alternatives we’d choose that are similar in nature.
Strap assisted spread leg forward fold
There are a few different ways that you can ease into a full forward leg spread. Many people may not have the flexibility to do it as shown in the primary example provided in this guide. So, you can actually wrap some short straps, belts, or similar under the bottoms of your feet while in a wide leg seated position, grab onto the ends, and gradually pull yourself closer.
This is actually a great form training technique, that reinforces keeping the legs grounded, shoulders down, and chest up. Remember, ground down with the legs, and lift up with the chest. Go as far down as you comfortably can, as your hamstring and back flexibility allows. Make sure to keep the legs pressed firmly into the floor, and use a blanket under your butt to modify the range of motion.
Spread leg forward fold holding toes
The advantage of grabbing your toes instead of reaching your arms forward is that you can get more range of motion. If you have the flexibility, you can lower your chest and chin to touch the floor, enhancing the stretch and activating more core.
Steps
With the legs spread wide, reach your arms toward your feet and grab the toes.
Hinge forward at the hips, slowly lower your chest toward the floor, and gently rest the front of your torso and chin to the ground if your flexibility enables you to do so. Your toes and kneecaps should be pointing toward the ceiling.
Hold here to get a good stretch, then you can reset, and repeat a few more times.
Spread leg parivrtta (revolving)
Getting some rotation in the pose is going to help open up the chest, and work the rotational oblique muscles of the core. This technique is also commonly performed standing on both feet, but it’s beneficial both ways.
Steps
From a spread leg seated position, inhale, and raise your arms overhead.
Exhale, bend sideways down to either leg and use the same side hand to grab the lower foot. Use the top hand to grab the top part of the foot.
Rotate your upper body toward the ceiling as far as you can, fixing your gaze up. Focus on breathing in and out.
Inhale, free your hands, and slowly come up to an upright position. Exhale and bring your arms down.
Repeat the prior steps on the other side, performing everything in reverse.
Seated forward bend
A basic pose in hatha yoga, the primary difference between seated forward bend and spread leg forward fold is the former is performed with the feet together in front of you. Also referred to as Paschimottanasana, this pose provides a stretch from neck to heels, and it’s just as mentally relaxing.
Steps
Sit on a yoga mat with your legs straight out in front of you and feet close together. Flex your toes back toward your shins.
Inhale, raise both arms overhead and stretch them toward the sky.
Exhale, bend forward from the hips, and reach as far forward as you can without straining or pain. If you’re flexibility allows, grip one wrist with the opposite hand past the bottom of your feet. Or, grab where you’re able to on your lower legs.
Stretch your spine forward, and rest your face and torso on the top of your legs. Make sure to breath in and out in this position.
From here, extend the arms forward, slowly sit up and inhale. Then, exhale and drop your arms down.
Urdhva upavistha konasana upward facing wide angle pose (Variation B)
Now you’ll get to focus on balance, total body stability, core strength, and flexibility. Keep in mind, there are more detailed examples of this upright seated wide legged pose, but for simplicity, we included the basic form steps with a video explanation and demonstration.
Variation B will teach you contrasting styles in muscle activation and relaxation, improving functional skills, and making you a more capable human!
Steps
Start in a sitting position with your knees propped up and feet flat on the floor.
Then come into a baddha konasana by opening your hips, and pressing the bottoms of your feet together close to your body.
Now hook your pointer, and middle fingers underneath your big toes, and grab the tops with your thumbs.
Inhale, pull the shoulders back and lift your feet up. From here, find balance on your sitting bones. Keep a straight spine.
Slowly straighten your legs up toward the sky, and out wide. If you must, keep the legs bent until you gain more flexibility in the future. In this position, make sure your tailbone is straight and not tucked under.
Hold this position for as long as you comfortably can.
Bend your legs, and bring your feet back together like in the starting position.
Now slowly straighten your legs our in front of you one side at a time. You’ve finished this version of a spread leg pose!
Wide legged forward bend prasarita padottanasana
The sitting fold over has a special place in a yoga stretching routine, but if you want more functional benefits, you should try it standing. We have an entire guide on this pose, that explains the benefits, and shows some cool variations.
Choose a surface where your feet will not slide.
From a standing position, spread your feet apart into a wide stance, creating roughly 4-5 feet of space in between. You want a wide stance but not so wide that you lose stability and balance.
Point your toes forward or slightly inward to activate the inner thighs and glutes, keep your legs straight and engaged, and focus your weight on your outer feet. Place your hands on your hips.
Now hinge forward at the hips, and lower your torso until your upper body is roughly parallel to the floor. Make sure to keep your back straight. Then, slowly stand up straight.
Repeat step 4, but now stretch your arms down to the floor and touch it with your fingertips.
Walk your hands back until your fingers and toes are in line, and press your palms flat on the floor.
Lift your head up and gently stretch toward the sky.
Then drop your head and body down toward the floor, while bending your elbows. Try to relax your upper body.
Gently rest the crown of your head on the floor. Hold this position for a few seconds, trying not to exceed 10 seconds at first.
Now come up onto your fingers, walk your hands forward, and bring your hands on your hips, one at time, then slowly stand up in the starting position.
Related: How to do fish pose Matsyasana
Wrapping Up
Back then you probably thought it was a useless technique, but little did you know such a simple technique could do so much good for your body. Granted, we probably accumulate the most bodily tension as we mature and face adult life, which is more reason for us to get deeper into these types of intense stretches, and yoga exercises.
Spread leg forward fold upavistha konasana is a nice entry level, all-around pose for the posterior chain, anterior body, hips, core, spine, and neck muscles. And it’s very safe to do, so long as you be patient, don’t force what won’t go, and use proper progressions as included in this guide under the variations section.
References
Montero-Marín J, Asún S, Estrada-Marcén N, Romero R, Asún R. Efectividad de un programa de estiramientos sobre los niveles de ansiedad de los trabajadores de una plataforma logística: un estudio controlado aleatorizado [Effectiveness of a stretching program on anxiety levels of workers in a logistic platform: a randomized controlled study]. Aten Primaria. 2013 Aug-Sep;45(7):376-83. Spanish. doi: 10.1016/j.aprim.2013.03.002. Epub 2013 Jun 12. PMID: 23764394; PMCID: PMC6985483.
Kim D, Cho M, Park Y, Yang Y. Effect of an exercise program for posture correction on musculoskeletal pain. J Phys Ther Sci. 2015 Jun;27(6):1791-4. doi: 10.1589/jpts.27.1791. Epub 2015 Jun 30. PMID: 26180322; PMCID: PMC4499985.
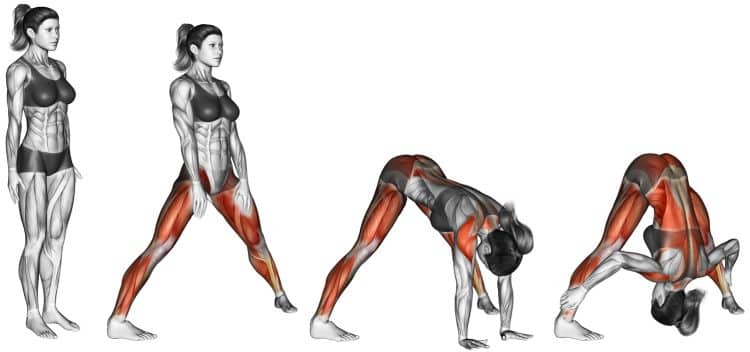
Wide Legged Forward Bend Prasarita Padottanasana – Muscles Worked, Benefits, Common Mistakes, and Variations
One of yoga’s many fold poses, the sangskrit name prasarita padottanasana describes five elements of the wide legged forward bend:
“Prasarita” – Spread
“Pada” – Foot/leg
“Ut” – Intense
“Tan” – To stretch
“Asana” – Pose
Putting the sequence into action, the yogi takes a wide, straddle stance which requires foot and thigh strength, hip flexibility, and core strength. Moving up the chain, the hips hinge the upper body forward, until the torso is inverted or folded over, and the head is upside down.
Wide legged forward fold is a common yoga pose, and it benefits everything from the feet (strengthening), to the head (increased blood flow to the brain which may yield some benefits).
In this guide, we detail how to perform this pose, with a short video demonstration, tips, common mistakes to avoid, and some arm variations.
Muscles Worked During Wide Legged Forward Bend
While wide legged forward bend isn’t working muscles to increase their strength and size (primarily although you may get a little of that), you can expect a phenomenal stretch, and to recruit muscles in a way they’re not usually.
Hamstrings
The most obvious muscles stretched during a forward bend are the hamstrings. On the back part of your upper leg strung between the hips and thighs, most ham stretches involve hinging the hips forward, to really lengthen the three sections of fibers that make up this muscle group.
Your hamstrings are athletic muscles, that can help us to perform explosive movements, acting as a rubber band being stretched, and released. They’re also key to the gait or walking cycle.
Glutes
Butt muscles that form a large portion of the hips, you have a large maximus, smaller medius, and smallest minimus muscle in your backside. Maximus is the largest, strongest, and most notable, creating most of what is your hips size and shape. Consequently, the role of maximus is controlling movements at the hip such as extension, and external rotation of the thigh.
Abdominal core muscles
You may not realize it, but when you hinge forward at the hips, and stand back up after the wide legged forward bend, your core muscles have to step into decelerate the descent, and extend the spine, respectively. It’s your deeper core muscles, transverse abdominis that stabilize the spine, while the erector spinae muscles by the spine, stand you up from a bent over position.
How To Do Wide Legged Forward Bend
Considered a beginner yoga pose, for many who attempt it for the first time, there’s nothing beginner about it. But the key is having the right setup, being patient, listening to your body, and keeping at it.
Before you thrust yourself into the wide legged forward bend, we recommend checking out the short video demonstration below, and using the written instructions below for reference and tips.
Steps
Note: The first four steps are to prepare your body for the full movement.
Choose a surface where your feet will not slide.
From a standing position, spread your feet apart into a wide stance, creating roughly 4-5 feet of space in between. You want a wide stance but not so wide that you lose stability and balance.
Point your toes forward or slightly inward to activate the inner thighs and glutes, keep your legs straight and engaged, and focus your weight on your outer feet. Place your hands on your hips.
Now hinge forward at the hips, and lower your torso until your upper body is roughly parallel to the floor. Make sure to keep your back straight. Then, slowly stand up straight.
Repeat step 4, but now stretch your arms down to the floor and touch it with your fingertips.
Walk your hands back until your fingers and toes are in line, and press your palms flat on the floor.
Lift your head up and gently stretch toward the sky.
Then drop your head and body down toward the floor, while bending your elbows. Try to relax your upper body.
Gently rest the crown of your head on the floor. Hold this position for a few seconds, trying not to exceed 10 seconds at first.
Now come up onto your fingers, walk your hands forward, and bring your hands on your hips, one at time, then slowly stand up in the starting position.
Tips
Make sure to perform this pose on an appropriate, non-slip surface, such as a yoga mat. Do not try it using socks on a slick floor, as it’s very difficult, and is not good for the groin, and knees.
If you’re not ready to rest your head on the floor in the full wide legged forward bend pose, then simply use your arms to keep your head up, and practice being in this position.
If your head touches the floor too easily, narrow your stance a little.
You can bend your knees slightly if you have tight hamstrings.
Do not try to rush the process. The body usually takes time to open up so that you can move into deeper positions.
You can also use yoga blocks under your hands to help decrease the range of motion, if you can’t reach the floor just yet, or if its uncomfortable.
This Exercise
Target Muscle Group: Hamstrings, glutes, core
Type: Yoga
Mechanics: Isolation
Equipment: Yoga mat
Difficulty: Intermediate
Benefits of Wide Legged Forward Bend
There are the most obvious and then there are some of the not so obvious benefits of folding yoga poses. Let’s see what they are…
Target your thigh and adductor muscles
One of the poses that involves a forward hip hinge, wide legged forward bend favors a hamstrings and adductors stretch. If you play sports or are regularly involved in resistance training or other activities, it’ll benefit you to keep these muscles loose and active. You’ll also help prevent injuries, and the hamstrings are so important for mobility.
Stretch the neck, back and shoulders too!
We hold lots of tension in our necks, shoulders, and backs, especially being slumped over in front of our devices for most hours of the day. Stretching is helping to reduce the long term negative effects of muscle tightness from prolonged inactivity.
Potential benefits of inverted position
It’s important to note that evidence for the potential benefits of inversion training are not conclusive.
However, hanging upside down does create changes in blood flow which may enhance circulation to the brain. Many believe this can enhance cognitive performance. Inversion type training does decompress the spine though, which is said to create more space between the vertebra, allowing better disk hydration and hence greater spine mobility and reduced risk of injury.
The advantages may extend further though, reaching as deep as the lymphatic system, possibly helping to drain the body of toxins. This process is said to only be able to occur via the movement of muscles, and breathing.
Build patience and mental fortitude
One of the most valuable tools in life is patience. The rewarding things require patience, and mental grit. Wide legged forward bend isn’t just picking up a dumbbell and doing a barbell curl, or sitting down in a squat or performing a push-up.
It requires a bit of many things to be able to maintain a wide stance, bend forward, and set your head on the floor. And for many, it won’t be possible the first few attempts.
Common Mistakes During Wide Legged Forward Bend
Here are some common mistakes that may make for a frustrating or painful experience attempting the wide legged forward bend.
Not spreading your feet wide enough
While it is called the forward fold, most people are not contortionists and will need to spread their feet wide enough to reach their head to the ground. Two to three and even four foot of distance between your feet won’t cut it for most. It’s perfectly normal to have a very wide stance, that way you can decrease the distance your head needs to travel.
But… if you’re just starting out, you could assume a narrower stance, and it’s fine if the head cannot yet touch the floor. Give your hips time to open up and then you can get lower and lower.
Forcing yourself into the pose
Forcing the body to do something is hardly ever recommended. In this case, you can pull tight muscles, or increase risk of injuries in the future.
A common and wise piece of yoga advice is to take it slow, and allow your body to open up when it’s ready. That’s why you’ll typically see professionals perform warmup steps before attempting the full pose. With that said, this pose requires decent flexibility.
Variations of Wide Legged Forward Bend
While the basic wide legged forward bend is a phenomenal practice to get into, here are some fun variations to try and challenge yourself while getting additional benefits.
Wide legged forward bend with hands behind your back
It’ll require more balance, and core control, but it’s just one progression that’ll prove you’re ready for something more challenging. Most people should be able to easily reach behind their body and interlock their fingers. It’ll give you a sweet stretch in the delts too!
Steps
Get into a wide stance as explained in the original instructions.
Bring your arms behind your body and interlock your fingers with the palms facing each other.
Slowly drop your torso under control, and then gently rest your head on the floor. If you cannot yet, place an object such as a yoga block between your feet to rest your head on and reduce the range of motion.
Grabbing your toes
For this variation, you’ll grab your big toes with your pointer fingers on each side as you’re dropping into the folded position resting on your head.
Steps
In your straddle stance, hinge forward at the hips, and hook your pointer fingers over and around your big toes.
Keep your elbows bent, pointed up, and try to squeeze your shoulders blades together. Hold this position for the desired time.
With rotation
Like wringing out a wet rag, including a twist in the forward bend will stretch out your oblique muscles that help us to rotate, and bend laterally. It’s also a good technique to help maintain coordination and mobility in the upper body.
Steps
From a bent over position, extend one arm toward the floor and place your palm flat directly in the center between your feet.
Now rotate your torso in the opposite direction of your arm, and reach the free arm straight up toward the sky with the fingers straight.
Now bring the top arm down and switch positions with the other arm, placing your arm in the exact same spot. Then reach up in the opposite direction with the free arm. Repeat for 3-5 repetitions.
Holding the opposite leg
Challenge flexible endurance and stretch your torso by gripping the opposite leg and holding for a static count.
Steps
From the forward fold position, grab your right ankle with your left hand, and bend the right arm behind your lower back. Breathe in, and then breath out as you release and change sides.
Now grab the left ankle with the right hand, and place your left arm behind your back. Hold, and repeat by alternating sides.
Seated forward bend pose
Otherwise called Paschimottanasana, the seated forward fold pose trains a similar technique but with the inversion.
Steps
Sit on the floor with your legs stretched out in front of you. Sit up tall, and pull your toes in toward you.
Inhale, and reach both arms overhead, then exhale and bend forward at the hips.
Reach toward your toes. Stop where you’re able too. If you’re flexible enough, grab one wrist with the other hand and your arms in front of the bottom of your feet.
If you’re flexibility allows, lie face down on your your shins.
Unlock your grip, and with both arms extended past your feet, inhale and sit up to the original position.
Exhale and lower the arms.
That’s the seated forward bend yoga pose.
Here’s a progression technique that you can do if you cannot perform the full pose yet. Use a strap of some type to wrap around the balls of your feet, and slowly try to stretch forward, grabbing the straps closer to your feet as you reach forward.
Wrapping Up
While yoga should incorporate various elements of mental and physical fitness, the wide legged forward bend is a swift and much needed change up from your usual exercises. Combining inversion, stretch, and strength, it’s a pose you should hang-up for the next day and bring it out because of the range of benefits it offers.
Toes to Bar Exercise Guide: How To, Benefits, Muscles Worked, and Variations
A shredded midsection is the symbol of peak fitness. Although many people aspire to develop a well-defined six-pack that could rival the sculpted Greek statues, it usually remains that — an aspiration.
The benefits of a strong core extend beyond aesthetics. A strong core can improve your balance and functionality, which can boost your performance in compound exercises and daily tasks. Plus, it can improve your posture and reduce the risk of lower back pain and injury.
Most people avoid training their abs because they find the orthodox ab exercises, such as crunches and leg raises, boring and redundant. You have come to the right place if you’re looking for a challenging exercise that requires skill, strength, and endurance. Toes to bar is a compound exercise that primarily works your abs and also engages your arms, shoulders, lats, glutes, and hip flexors.
Toes to bar (TTB) is a gymnastics exercise and a mainstay in many CrossFit workouts. It is an extended and advanced version of the hanging leg raise. That said, performing the TTB requires significantly more core strength and practice.
In this article, we go over the basics of TTB, its benefits, muscles worked, correct exercise form, most common mistakes, and the best variations and alternatives to add to your training regimen.
What is a Toes to Bar?
Toes to bar involve lifting your feet to an overhead bar. Simple, right? Wrong. TTBs are more challenging than hanging leg raises, and depending on your experience level, it might take a long time to drill the movement.
Since the TTB is a compound movement, it helps improve your overall anterior chain strength. Plus, TTBs performed with a flawless form look dope. It is also an excellent way to show off your core strength.
There are two main toes to bar variations:
Strict Toes to Bar
The strict TTB is one of the most difficult abdominal exercises. It is generally included in a workout to test an exerciser’s midline strength. Save this TTB variation for after you’ve mastered the kipping TTB. Besides core strength, the strict TTB demands decent hip flexor, gluteal, and hamstring mobility.
Kipping Toes to Bar
The kipping TTB is a popular ab exercise in gymnastics and CrossFit workouts. As the name suggests, it involves using a kipping motion that makes touching your toes to the bar a little easier. On the other hand, the strict TTB involves touching the overhead bar with your toes while keeping your torso parallel to the floor.
Muscles Worked During Toes to Bar
Toes to bar works the following muscles:
Abs
The TTB primarily targets your abs. It engages the rectus and transverse abdominis and will leave you with a sick ab pump. The rectus abdominis runs along the front of your abdomen and is commonly known as the “six-pack.” Conversely, the transverse abdominis wraps around your trunk from front to back.
Hip Flexors
Hip flexors are located on the front of your upper thighs. These muscles are involved in flexing the hips and bringing the knee closer to the chest. Weak hip flexors can make it more challenging to complete a TTB.
Arms
Your grip and forearm strength are crucial factors that can dictate your performance in toes to bar. Plus, you might experience biceps recruitment during more extended TTB sets, which involve holding on to the bar for longer.
Lats
Your lats kick in as soon as you hang on to the pull-up bar. Furthermore, the kipping TTB variation can lead to greater lat engagement as you cycle between the hollow and arch positions.
Glutes and Hamstrings
You need good glutes and hamstring mobility to perform the TTB with optimal form. The glutes and hamstrings also help control the movement during the exercise’s eccentric (lowering) part.
Notably, the kipping toes to bar variation increases the demand on the grip, shoulder, and back.
Benefits of Toes to Bar
Adding the TTB to your training regimen entails the following advantages:
Build a Strong and Shredded Core
TTB is a challenging abdominal exercise that will help build a stronger and chiseled core. To avoid swinging between reps, you must keep your core contracted throughout the exercise. TTB will also strengthen your stabilizers, improving your overall balance and boosting your performance in compound exercises and everyday functioning.
Boosts Muscle Coordination
A TTB involves several moving parts. You must hang onto a pull-up bar, generate momentum by kipping, raise your toes to the bar, return to the start position, and repeat this process for the recommended reps. Adding TTB to your workouts will improve your muscle coordination, which will carry over to other exercises.
Improves Posture
Toes to bar strengthen your abdominal muscles and lower back, which can contribute to a better posture. Core exercises are a must for folks who spend most of their day sitting or hunched over their phones or computer screens.
Read also: Toes To Bar Workout Progression Routine
How To Do Toes to Bar
The TTB is a complex exercise, and you must master several steps to perform this movement correctly. Below I’ll take you over the kipping toes to bar step-by-step instructions that require a cyclical, ballistic motion.
Step 1: Grab an Overhead Bar
Jump and grab onto a pull-up bar with a slightly wider than shoulder-width overhand grip. You can use a hook (fingers over the thumb) or reverse hook grip (thumb over the index fingernail) on the bar.
Pro Tip: Avoid using a false grip on the bar. A thumbless grip will make it harder to hold onto the bar during the kipping motion.
Step 2: Generate a Kip
Kipping involves alternating between an arch and a hollow position to generate momentum. Initiate the kip by driving your head and chest forward and extending your legs behind you. Immediately kick your legs in front of your body as you push on the bar and bring your body behind it to get into a “hollow” position.
Pro Tip: Beginners can perform two to three kips to generate enough momentum before raising their legs.
Step 3: Raise Your Legs in the Hollow Position and Flick the Bar
After generating momentum and getting into a hollow position, contract your abs, lats, shoulder blades, glutes, and quads, and raise your legs toward the ceiling. Your toes should hit the bar at the top of the movement. Keep your head neutral throughout the range of motion, and look at the bar during the concentric (upward) phase of the lift. Looking ahead during the upward motion will make lifting your legs more difficult.
Pro Tip: Instead of locking out your knees and keeping your legs straight during the concentric motion, you could break it into two parts. First, bend your knees and bring your quads to your chest. Finish the movement by extending your knees and touching the bar with your toes. This technique is also known as the tuck-and-flick method.
Step 4: Return to the Extended Arch Position
After flicking the bar, lower your legs by extending your spine. Push your legs behind you and your torso forward to immediately enter the arched position. Use the momentum to get into the hollow position. Repeat for recommended reps.
Pro Tip: The eccentric motion of the tuck-and-flick method involves returning your legs to your chest and extending your knees as your legs move below your waist. Many exercisers find the tuck-and-flick method more convenient while stringing bigger sets.
Toes to Bar Tips:
It is common for beginners to experience ab cramps while performing TTBs. Stop your set and stretch out your abs if you experience the same.
Master the kipping TTB before trying the strict TTB.
Before attempting the kipping TTB, drill your kipping form. Perform three sets of 10 kips in alternate workouts until you have command over the exercise.
Use CrossFit grips to avoid ripping your hands on the pull-up bar. Remember, you are as strong as your grip on this exercise.
Advanced trainers can perform this exercise on gymnastic rings. The unstable rings lead to greater core and stabilizer recruitment.
In This Exercise:
Target Muscle Group: Abs
Type: Strength
Mechanics: Compound
Equipment: Bodyweight
Difficulty: Intermediate
Best Rep Range: 10-15
Common Mistakes While Performing Toes to Bar
Avoid the following toes to bar mistakes to get the best bang for your buck and limit your risk of injury:
Incorrect Hand Position
Most people fail to kip consistently and complete a TTB because of incorrect hand placement. Grabbing the bar too close will make touching your toes to the bar more difficult, whereas taking a snatch grip on the bar will lead to uncontrollable swinging. Grab the bar just outside shoulder-width for optimal range of motion.
Keeping Your Shoulders Under The Bar
Many rookies try to do a TTB while keeping their shoulders under the bar. Although you might be able to complete one TTB, you’ll likely not be able to control the eccentric motion, which will lead to uncontrollable swinging.
Not Using a Kip
In continuation with the previous point, strict TTB is significantly more difficult than the kipping variation. You must master kipping before attempting toes to bar. Begin the kip by pretending to perform a straight-arm pushdown and pull your torso behind the pull-up bar.
Banging Your Toes Into The Pull-Up Bar
Avoid banging your toes into the bar at the top of the motion. Many exercisers end up with bruised toes due to kicking the bar too hard. Bring your toes over the bar, or touch it lightly; this will get easier as you gain more experience.
Slowing the Eccentric Motion
Many trainers make the mistake of controlling the descent, which can break their momentum. You want to use the momentum from the eccentric motion to power your kip and the next rep. That said, you must control the eccentric motion on the strict TTB.
Variations and Alternatives of Toes to Bar
The following TTB variations and alternatives will help add variety to your training regimen:
Hanging Leg Raise
The hanging leg raise is an excellent progression exercise for the TTB.
Steps:
Hang onto a pull-up bar with a shoulder-wide overhand grip.
Brace your core and glutes, and lift your legs toward the ceiling until they are at least parallel to the floor. Keep your knees locked out throughout the range of motion.
Pause and contract your abs at the top.
Slowly return to the start position.
Repeat for recommended reps.
Pro Tip: Incorporating kipping into this exercise can help drill the TTB movement. Get into the arched position during the eccentric motion and a hollow position during the concentric lift.
Check out our complete hanging leg raise guide here!
Lying Leg Raise
Perform the lying leg raise on an elevated platform like a flat bench to mimic the arched position of the TTB.
Steps:
Lie supine with your hips on the edge of a flat bench. Your leg should be extended and parallel to the floor.
Hold the bench at your ear level for stability.
Keeping your legs straight, raise your lower body toward the ceiling until it is at a 90-degree angle with your torso.
Lower your legs toward the floor until your feet are a few inches off the floor.
Rinse and repeat.
Pro Tip: As you gain more experience, touch your knees to your head at the top of the movement. Progressing to this stage can take a long time as it requires significant core strength and flexibility.
Check out our complete lying leg raise guide here!
Knees To Elbow
Knees to elbow is the middle ground between the hanging leg raise and the toes to bar. This exercise involves touching your elbows with your knees.
Steps:
Grab onto a pull-up bar with a shoulder-wide grip.
Contract your abs, glutes, and quads.
Raise your quads to your chest by flexing your hips.
Bend your knees and touch your elbows at the top of the motion.
Return to the starting position.
Pro Tip: Kipping can make the exercise easier and help cycle through reps faster.
Hanging L-Sit
The hanging L-sit might look easy, but it requires a strong core. This exercise will improve your core and grip strength, which will translate to a better performance on the toes to bar.
Steps:
Hang onto a pull-up bar with a shoulder-wide pronated grip.
Keeping your elbows and knees locked, raise your legs until they are parallel to the floor.
Hold the position for as long as possible.
Pro Tip: Experienced exercisers can perform L-sit pull-ups. This variation will help build a stronger core, resulting in better lower body control during TTB.
Check out our complete L-sit guide here!
Controlled GHD Sit-Up
GHD sit-ups will help you build a robust midline. However, we will limit the extension on this exercise since we are using it as a TTB progression.
Steps:
Sit at the edge of the GHD pads and place your ankles between the foot pads.
Your torso should be perpendicular to the floor at the start position.
Hold your hands in front of your chest.
Contract your abs and slowly lean backward.
Your torso should at least break parallel to the floor at the bottom of the movement.
Return to the starting position.
Repeat for recommended reps.
Pro Tip: More experienced athletes can use the full range of motion and touch the floor with their fingers at the bottom.
Related: 9 Toes-to-Bar (TTB) Alternatives To Revamp Your Core
Wrapping Up
Toes to bar is a compound exercise that requires decent core strength and kipping practice. Mastering this exercise will help build a stronger core, boost your endurance, and bless you with sculpted abs.
So swing, reach, and touch your toes to the bar with fierce determination, knowing that every rep brings you closer to an extraordinary transformation. Each TTB will hurt, but it will all be worth it in the end.
Best of luck!
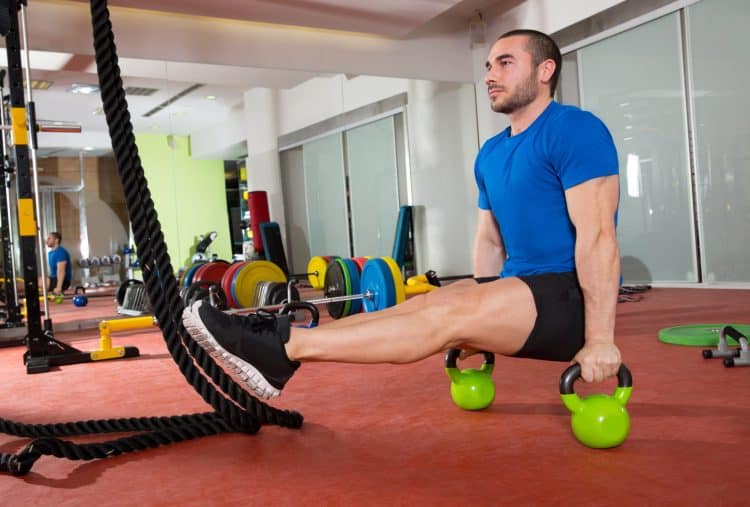
L-Sit Exercise Guide: How To, Benefits, Muscles Worked, and Variations
Some exercises look super easy, but when you try them, you fail to get even in the correct position; the L-sit is one of them.
The L-sit is a classic gymnastic movement that will set your core on fire. On the outside, the L-sit looks very easy. You sit on the floor, plant your hands next to your hips, and lift your hips and legs off the ground. However, this is easier said than done.
Beginners that do not have a gymnastics background will most likely find themselves grinding their teeth while they fail to lift themselves off the floor. I have had newbie exercisers tell me they are anatomically unfit to do the L-sit because they have a long torso and short arms. You might experience the same thing.
However, most people falter at doing the L-sit not because of their body mechanics but because of an incorrect form or a lack of core strength.
Since the L-sit is a bodyweight exercise, most people think that they should be able to do it from the get-go. This, however, is not the case. Like most gymnastic exercises, you will be better off starting with an L-sit progression plan.
In this article, we dive deep into the L-sit and cover its fundamentals, an effective progression plan; the muscles worked during an L-sit, its benefits, proper form, the most common mistakes, and the best variations and alternatives.
What is a L-Sit?
L Sit With Kettlebells
The L-sit is an isometric exercise that improves your core strength and balance. Isometric exercises involve static muscle contraction without visible movement in the joint’s angle. The L-sit is a fundamental gymnastic exercise that grew popular thanks to CrossFit. This exercise is also very popular in the calisthenics circuit.
Besides the conventional L-sit, CrossFit WODs (workout of the day) include several variations of this exercise, including L-sit bar pull-ups and L-sit ring pull-ups. The conventional L-sit demands decent core and hip flexor strength. On the other hand, the pull-up variations also engage most of your upper body, including the biceps, lats, traps, rhomboids, and teres major and minor.
Beginners should start practicing this exercise by placing their hands on an elevated object, such as yoga blocks, or perform this exercise on parallettes or parallel bars. If you still cannot perform this exercise, use the progression exercises listed in this article to build the required core strength.
Muscles Worked During L-Sit
The L-sit works the following muscles:
Abs: The core is the primary target muscle of the L-sit. This exercise requires you to keep your core contracted, resulting in a rectus and transverse abdominal recruitment.
Hip Flexors: These muscles run along the front of your upper thigh. You must engage your hip flexors to keep your legs parallel to the floor throughout the exercise.
Glutes and Quads: This exercise involves keeping your glutes and quads contracted to maintain a stable position.
Triceps: You’ll experience triceps stimulation as soon as you lock out your elbows and lift yourself off the floor. Furthermore, pointing your fingers behind you will engage your biceps.
Shoulders: The L-sit involves actively pushing into the floor, which will result in a sick deltoid pump. You will also experience trapezius muscle stimulation as this exercise requires pushing your shoulders back and down.
Benefits of L-Sit
Adding the L-sit to your training regimen entails the following benefits:
Build a Solid Core and Six-Pack
L-sits can help you build abs of steel. Holding your legs parallel to the floor while extended in the air will work muscles in your core that you didn’t know existed. A strong core can also improve your performance in compound exercise and daily functioning.
Enhance Stability and Balance
A strong core translates to robust stabilizer muscles, which can significantly improve your stability. The L-sit also improves your balance and performance in handstands, push-ups, toes-to-bar, deadlifts, and barbell squats.
Improve Posture
The L-sit strengthens the muscles responsible for maintaining an upright and stable spine, which can help improve your posture. This is an excellent exercise for people that spend most of their day sitting.
Boost Hip Flexor Strength
The hip flexors help bring the knee closer to the chest, meaning they are used in activities such as walking, running, jumping, and kicking. Since the L-sit involves holding your legs parallel to the floor, it engages and strengthens your hip flexors.
How To Do L-Sit
This is how to perform the L-sit with the correct form:
Steps:
Sit upright on the floor with your legs extended in front of you.
Place your hands on the floor next to your hips. Spread your hands and curl your fingers slightly so that your fingertips are pushing into the floor.
Straighten your arms and lock out your elbows. Simultaneously engage your lats and push your shoulders back and down.
Push your palms into the floor, engage your core, and lift your hips and legs off the floor. Your legs should be parallel to the floor throughout the exercise.
Your body should resemble an “L” at the top of the exercise.
Hold the position for as long as possible or a specific time.
Return to the starting position.
Repeat for the desired number of sets.
L-Sit Tips:
Keep your quads and glutes contracted and your toes pointed throughout the exercise.
Place your hands on yoga blocks if you have trouble pushing yourself off the floor.
Spreading your hands and pushing your fingertips and palms into the floor will help you maintain your balance.
Maintain an upright torso while pushing yourself off the floor. Bending forward will make lifting your legs off the floor more difficult.
Advanced exercises can wear a weighted vest to make this exercise harder.
In This Exercise:
Target Muscle Group: Abs
Type: Strength
Mechanics: Isometric
Equipment: Bodyweight
Difficulty: Intermediate
Best Rep Range: 30-60 seconds
L-Sit Progression Exercises
Use the following L-Sit progression exercises if you lack the strength to perform the conventional variation of the exercise:
Step 1: Boat Hold
The boat hold is an excellent core exercise that is suitable for trainers of all experience levels. It will help you build the foundational strength for L-sits.
Steps:
Sit upright on the floor and extend your legs in front of you.
Cross your arms in front of your chest.
Engage your core and tilt your torso backward. Anything between 1 to 2 o’clock will work.
Lift your legs off the floor while keeping your knees locked out.
Hold this position for as long as possible.
Pro Tip: If you have trouble maintaining your torso in position, place your hands next to your hips on the floor.
Step 2: Elevation
This L-sit progression exercise involves using an elevated platform, such as yoga blocks or parallettes. Furthermore, you will focus on lifting your hips off the floor while keeping your heels grounded.
Steps:
Sit on the floor with your legs extended and place parallettes on each side of your hips.
Grab the bars with an overhand grip. Your elbows will be bent at this position.
Extend your elbows while pushing your shoulders back and down. You must lock out your elbows at the top, and your hips should be off the floor.
Your heels should be the only point of contact with the floor.
Slowly return to the starting position.
Repeat for 15-20 reps.
Pro Tip: Avoid using your legs to push yourself into a lockout position. Conversely, beginners can bend their knees slightly and push their heels into the floor to generate force.
Step 3: Alternating Leg Lift
In this L-sit progression exercise, you’ll focus on the lockout and lifting one leg at a time.
Steps:
Sit upright on the floor and extend your legs in front of you.
Place your hands on your hip side.
Push your shoulders down and back, and extend your elbows. Your hips should be off the floor at this point. Your heels should be the only point of contact with the floor.
Contract your abs and lift your left leg off the floor until it is parallel to the floor.
Return your left leg to the floor and repeat with the right leg.
Alternate between sides for the recommended reps.
Pro Tip: As you get better at this exercise, lift your legs as high as possible without bending your knees. Hold for a five-second count before lowering your legs to the floor.
Step 4: Tuck Sits (on an elevated platform)
Tuck sits can be incredibly effective in building the required core strength and confidence to perform the L-sit. This is also the first exercise where we bring together most of what we’ve learned up to this point.
Steps:
Sit upright on the floor and extend your legs in front of you.
Bend your knees and plant your heels on the floor as close to your hips as possible.
Place your hands on the sides of your hips.
Push your shoulders back and down and extend your elbows to lift your hips off the floor.
Pull your quads to your chest as you lift your hips off the floor.
Hold for as long as possible.
Pro Tip: Holding your legs close to your chest is easier than maintaining straight legs. You can also use an elevated platform for this exercise if you have difficulty doing it on the ground.
Step 5: Tuck-Sit to L-Sit (on an elevated platform)
We push into the next gear with this L-sit progression exercise. This exercise begins in the tuck sit position and requires you to work into a full L-sit.
Steps:
Follow the steps mentioned above to get into a tuck-sit position.
While keeping your back straight, extend your legs until they are parallel to the floor.
You might lose balance as you extend your legs. In this case, pull your legs back to your chest.
Hold the L-sit position for as long as possible.
Pro Tip: Use elevated platforms for this exercise if you cannot do it on the floor. Performing this exercise on an elevated platform will ensure you have enough space to pull your legs into your chest without having your feet touch the floor.
Step 6: L-Sit
After you have spent enough time practicing the tuck-sit (step four) and tuck-sit to L-sit (step five), the conventional L-sit will be the natural next step. Use the steps mentioned in the “How To Do L-Sit” section to perform the L-sit.
Common Mistakes While Performing L-Sit
Avoid making the following mistakes while performing the L-sit to get the best bang for your buck:
Rounding Back
This is one of the most common mistakes exercisers commit while performing the L-sit. You must avoid hunching your back as you extend your elbows to lift your hips off the floor. Rounding your back makes it harder to lift your legs off the floor.
Skipping Warm-Up
Since the L-sit is a bodyweight exercise, many people skip warming up their bodies, which can hamper their performance. Before doing this exercise, you must spend 5-10 minutes warming up your wrists, arms, shoulders, abs, glutes, hamstrings, and legs to ensure you’re primed to hold this position for as long as possible.
Not Locking Out Your Elbows and Pushing Your Shoulder Back and Down
Maintaining soft elbows while performing the L-sit is a rookie mistake. You must lock out your elbows to ensure optimal stability and balance. Soft elbows usually lead to the rounding of the back. Also, you must push your shoulders back and down to gain an optimal height to lift your legs off the floor comfortably.
Variations and Alternatives of L-Sit
Add the following L-sit variations and alternatives to your training regimen to build a shredded midsection:
L-Sit Pull-Up
After mastering the L-sit, you can progress to the L-sit pull-up for an additional challenge. Most people tend to use their legs to perform a pull-up; however, since you’ll be holding your legs in front of you in this variation, this exercise is much more difficult than the conventional pull-up.
Steps:
Stand under a pull-up bar.
Grab the pull-up bar with a shoulder-wide grip.
Lift your legs until they are parallel to the floor.
Perform a pull-up while holding this position until your chin is over the bar.
Return to the starting position.
Repeat for recommended reps.
Pro Tip: Beginners can perform hanging L-sit until they develop the core strength to perform a pull-up.
L-Sit Pull-Up on Rings
Since you can pull your head between the rings, this exercise is a little easier than the L-sit pull-up on a pull-up bar, where you must pull your body at an angle. However, performing it on the rings requires more core stability.
Steps:
Jump and grab the gymnastic rings with a neutral (palms facing each other) grip.
Lift your legs until they are parallel to the floor.
While keeping your core contracted, perform a pull-up.
Return to the start position.
Repeat for reps.
Pro Tip: Keep your shoulders pulled back and down while performing pull-ups.
Plank
You need a strong core to perform the L-sit. Planks are an incredibly effective beginner-friendly exercise to build the requisite core strength.
Steps:
Get on all fours on the floor.
Place your elbows under your shoulders and plant your forearms on the floor. Your forearms should be parallel to each other.
Extend your legs behind you.
Your body should be in a straight line from head to toe.
Hold this position for as long as possible.
Pro Tip: As you get more experienced, make this exercise more difficult by wearing a weighted vest or placing a weight plate on your back.
Check out our complete plank guide!
Hollow Body Hold
Hollow body hold is an excellent exercise to build core strength. It is used widely in CrossFit gyms to improve your kipping pull-up mechanics.
Steps:
Lie supine on the floor. Extend your arms over your head.
Contract your abs and lift your legs off the floor. Simultaneously lift your shoulders and arms toward the ceiling.
Your hips and lower body should be the only point of contact with the floor.
Hold the position for as long as possible.
Pro Tip: Focus on actively pushing your arms and legs toward the ceiling throughout the exercise.
Check out our complete hollow hold guide!
Toes-To-Bar
Performing toes-to-bar requires significant core strength. You must keep your core engaged throughout the exercise to avoid swinging between reps.
Steps:
Grab a pull-up bar with an overhand shoulder-wide grip.
Lock out your elbows.
Press on the bar using your lats; this will pull your torso behind the bar.
Simultaneously lean back slightly and raise your legs toward the pull-up bar.
Touch your toes to the bar.
Lower your legs to the starting position.
Repeat for recommended reps.
Pro Tip: Perform a kip to stabilize your body and generate momentum to raise your toes to the bar.
Wrapping Up
The L-sit is an isometric exercise that will help you build a strong core, strengthen your stabilizers, improve your balance and posture, and boost hip flexor strength. Mastering this exercise is a must if you are into gymnastics or CrossFit.
The five beginner-friendly progression exercises listed in this article are excellent movements to work toward an L-sit. Perform the variations thrice weekly, and you should be able to perform a picture-perfect L-sit by the end of six weeks. Best of luck!
- 1
- 2