Tag: Legs
Cable Pull Through – Benefits, Muscles Worked, and Alternatives
There are many benefits and alternatives to cable pull-throughs!
Cable pull-through is one of the most underutilized exercises for posterior chain development. Not only does it help with your glute and ham development, but it also improves muscular endurance, hip flexion, and extension mechanics, helps with muscle imbalances, corrective routines, and can be a great warm-up exercise.
The cable pull-through (aka glute pull-through) is a compound exercise that primarily works your hamstrings, gluteus maximus, and lower-back muscles.
Cable-pull through is a hip-hinge functional movement and should be an indispensable part of your training routine. These movements help you perform essential activities such as picking things up off the ground. They also assist in keeping your hips mobile and strengthen muscles that can prevent lower back pain.
The exercise can be highly beneficial for a fitness rookie for balance in the frontal plane and posterior chain (hamstring, glute, calves) muscle recruitment.
Related: The Most Effective Compound Exercises For All Levels of Experience
Cable Pull Through Exercise Details
Target muscle: Hamstrings, Gluteus Maximus
Synergists: Erector Spinae, Hamstrings, Adductor Magnus, Soleus
Mechanics: Compound
Force: Pull
Benefits of Cable Pull Through
1. Reinforces the Hip Hinge
If you are a beginner, cable pull-through is a great exercise to learn and reinforce proper hip flexion and hinging patterning necessary for advanced lifts like the deadlift.
The added tension in the eccentric phase due to the use of a cable can provide neurological and motor patterning feedback to help increase a lifter’s understanding of what hamstring flexion and extension should feel like.
Check Out: How These Hinge Exercises Can Boost Hip Strength
2. Glute and Hamstring Hypertrophy
Since cable pull-through requires the use of a cable pulley, it increases time under tension, eccentric muscle damage, and overall muscular activation of your glutes and hamstrings.
3. Cable Pulley is a God-send
The cable pull-through can be a deadlift substitute. You might find the perfect resistance on a pulley machine faster than on a barbell while performing the deadlift since a pulley offers a wide range of resistance options.
On top of that, cable pull-through give you a better way to monitor your progress and isolate your working muscles.
4. Muscle Annihilation
While performing the cable pull-through, your target muscles are under constant tension. It aids with establishing a mind-muscle connection and muscular hypertrophy.
The degree of muscle fiber recruitment while performing the cable pulley pull-through can be altered by switching up the time under tension.
Related: The Importance of Mind-Muscle Connection To See Huge Gains
5. A Great Posterior Chain Exercise
Cable pull-through is one of the most reliable posterior chain exercises.
While exercises like the leg curl isolate your hams, cable pull-through helps train your butt, hamstrings, and lower back effectively and at the same time.
6. Cable Pull-Through is Lower Back-Friendly
While performing the exercise, the rope handles stay close to your center of gravity, which means you are less likely to round your back and end up putting unnecessary stress on your lower back.
Must Read: 4 Exercises to Alleviate Lower Back Pain
Muscles Worked While Performing Cable Pull Through
Cable pull-through works the posterior chain muscles, especially around your hips. These muscles are responsible for generating most of your lifting, running, and jumping power.
The cable pull-through target muscles consist of:
1. Gluteus Maximus
The gluteus maximus is the main extensor muscle of the hip. It is the largest and outermost of the three gluteal muscles and makes up a large part of the shape and appearance of each side of the hips. The gluteus maximus is the large muscle driving the powerful hip extension of cable pull through.
2. Hamstrings
Along with your glutes, your hamstrings play a vital role in hip extension and flexion. There are three muscles in the hamstring group; biceps femoris, semimembranosus, and semitendinosus. The hams are involved in explosive lower body movements such as sprinting and jumping.
3. Erector Spinae
The erector spinae run up both sides of your back and are responsible for extending your spine. It is formed of 3 muscles (spinalis, longissimus, and Iliocostalis muscles), and its fibers run more or less vertically throughout the lumbar, thoracic, and cervical regions. These muscles are also important for maintaining posture.
4. Core
The cable pull-through works the muscles of your midsection, including rectus abdominis, obliques, and transverse abdominis. These muscles stabilize your spine and prevent your lower back from rounding.
Next Read: Build a Rock-Solid Core With These Exercises
5. Iliopsoas
The iliopsoas is the primary hip flexor. It consists of major and minor psoas muscles and the iliacus muscle that forms the iliopsoas musculotendinous unit (IPMU). The muscles can function in isolation to stabilize the pelvis and lumbar spine during hip movement and support flexion of the trunk.
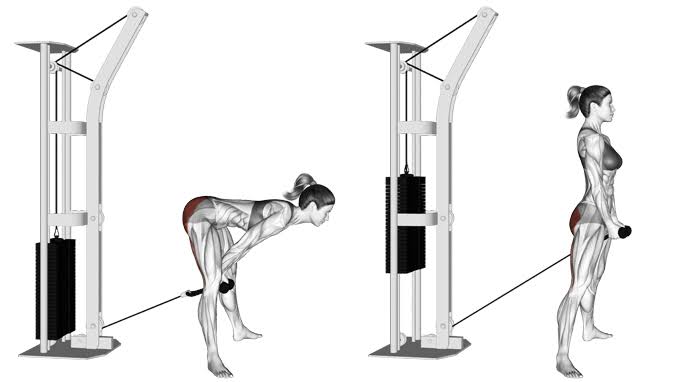
How To Perform A Cable Pull Through With Perfect Form
[embedded content]
Most people leave gains on the table by performing the exercise with an incorrect technique. Here is how to perform the cable pull-through:
1. Secure a cable attachment to the pulley and adjust it to the lowest height setting on the cable machine.
2. Face away from the cable machine and reach between your legs to grab the rope handles with a neutral grip (palms facing each other).
3. Take a step forward to engage the weight. Make sure you are far enough from the pulley so that the weight remains off the stack at the bottom of the movement while performing the exercise.
4. Stand with an upright torso, feet slightly wider than hip-width apart, and a slight bend in your knees.
5. Your shoulders should be directly over your feet with a neutral head and neck position.
6. Keep your chin tucked throughout the movement, as if you are trying to hold an egg under your chin.
7. Pre-tension your shoulders and hips, and engage your core.
8. Keep your arms straight and elbows locked out throughout the lift.
9. Without letting your toes lift off the floor, hinge at your hips until you feel a stretch in the back of your legs while maintaining a neutral spine. At the bottom of the movement, your lower arms should be between your thighs and hands behind your knees. At this point, your upper body should be at a 45-degree angle with the floor.
10. While maintaining a neutral spine, return to the starting position by driving your heels into the floor. As you rise, squeeze your glutes and thrust your hips forward.
11. Pause and contract your glutes and hams at the top of the movement.
12. Repeat for the recommended repetitions.
Cable Pull Through Tips
Avoid using your back and focus on pulling with your glutes and hamstrings.
Do not hyperextend your lower back upon standing. Your body should be in a straight line at the top of the movement.
Start with light to moderate weight and increase as you become more proficient with the exercise.
Who Should Perform the Cable Pull Through
The cable pull-through can be especially beneficial for:
1. Strenght and Power Athletes
The hip-hinge exercise can help in improving glute activation, muscle hypertrophy, and maintaining proper hip flexion and hamstring flexibility if performed with a full range of motion. All these benefits can add to a strength or power athlete’s performance matrix.
Related: Full Range Of Motion Vs Partials: Which Is The Way To Go?
2. Functional Fitness and Bodybuilding
The cable pull-through can help add glute training volume for increased muscle hypertrophy, endurance and improve muscle activation. The glutes are involved in almost every functional fitness movement and exercise (running, squatting, pulling, jumping, etc.), making this movement pattern a great one to reinforce and strengthen with the cable pull through.
Must Read: Top Exercises To Increase Hip Mobility To Improve Performance
3. General Fitness
The isolated range of motion of the exercise helps fitness rookies understand the proper position and muscle activation for advanced exercises like deadlifts and good mornings.
Ideal Sets, Reps, and Programming for Cable Pull Through
You are not making the most of the cable pull-through if you limit yourself to three sets of 10 reps while performing the lift. You should program the exercise depending on your goals. Here is a quick rundown on the sets and reps you should be performing based on different goals:
I) General Fitness
If your main objective is to build muscular strength, you should perform lower reps for more sets.
4-6 sets of 5-8 repetitions, resting 1-2 minutes between sets
II) Muscle Hypertrophy
Most bodybuilding enthusiasts would fair the best by targeting muscle hypertrophy while performing the cable pull-through. The set and rep range mentioned below will perform the best for glute development.
4-6 sets of 8-12 reps, resting 60-90 seconds between sets
Pro tip: Using tempos and isometric holds can increase time under tension (TuT) and muscle fiber recruitment.
Related: Struggling to Build Muscle? Here’s Why Your Muscle Fiber Type is Important
III) Muscle Endurance
Some lifters (especially athletes) might want to train for muscular endurance. In such cases, higher rep ranges and shorter rest periods between sets is the way to go.
2-3 sets of 15+ repetitions (at least 45-60 seconds under tension), resting 30-60 seconds between sets
Cable Pull Through Alternatives
Although cable pull-through is an incredibly effective exercise to improve your posterior chain muscles, you can always use a little variety in your workouts. Here are five alternatives and variations you can use to ensure you never hit a plateau:
1. Hyperextension
[embedded content]
Also known as the 45-degree back extensions, most people know this lift as a lower back exercise. Hyperextension is a complete posterior chain exercise. Contrary to popular opinion, the goal while performing this exercise should be to minimize lower back movement and maximize movement at the hip. In other words, the goal is a hip extension, and that’s probably what the exercise should be called.
Steps:
Adjust the pad so that it is right below your pelvic bone.
Turn your feet out 45-degrees as it winds the hips up into external rotation which makes your glutes work harder.
Cross your arms over your chest and lower your torso towards the floor until you feel a strain in your hamstrings.
Round your upper back and maintain this form throughout the exercise.
Raise your upper body explosively until you are almost parallel to the floor.
Slowly return to the starting position and repeat for reps.
2. Reverse Deficit Lunge
[embedded content]
Most people consider lunges to be a quadriceps exercise. But if you lunge backward, you will feel a higher degree of glute and hamstring muscle fiber recruitment. Want to take your glute and hams activation a step further? Use a 6″ box to perform the deficit variation.
Steps:
Stand on a 6″ platform with a shoulder-width stance while holding a dumbbell in each hand.
Take a giant step back.
Keep your front shin and torso upright, bend your legs, and lower your rear knee down to within an inch of the floor.
Using the ball of your back foot, push off your back leg and bring your feet back together on the platform.
Perform the recommended reps with the same leading leg before switching sides.
3. Kettlebell Swing
[embedded content]
The kettlebell swing is probably the closest cable pull-through alternative there is. The kettlebell swing is a more explosive exercise as compared to the cable pull-through and focuses on increasing muscle power. On the other hand, there is a constant tension on your posterior chain muscles while performing the cable pull-through which is not the case with the kettlebell swing.
Steps:
Stand upright with a shoulder-width stance.
Hold a kettlebell in front of your body with both hands, arms straight.
With a slight bend in your knees and a flat back, hinge at your hips and swing the kettlebell back through your legs.
Use that momentum to stand and swing the kettlebell out in front of your body until it is parallel to the floor.
Thrust your hips forward, and engage your glutes and core as you stand up straight.
When the kettlebell hits shoulder height, your knees should be straight and glutes contracted in a full hip extension.
Allow the kettlebell to swing back down through your legs.
Repeat for recommended reps.
4. Romanian Deadlift
[embedded content]
Romanian deadlifts are one of the purest hip-hinge movements and should be a part of every lifter’s exercise arsenal. This variation of the standard deadlift focuses primarily on your hamstrings, building flexibility, strength, and power.
Steps:
Stand with an upright torso with your feet placed under your shoulders.
Use an overhand grip to hold the bar at hip level.
Draw your shoulders back and keep your spine straight.
Push your hips back as you slowly lower the bar toward your feet.
Press your hips forward to come into a standing position with the barbell in front of your thighs.
5. Barbell Hip Thrust
[embedded content]
Oh, so you do not have a cable pulley machine at your gym? No problem!
The barbell hip thrust will get you a glute and ham pump, unlike anything you have ever experienced before.
Steps:
Place a loaded barbell parallel to a flat bench.
Sit on the floor with your back up against the bench. Roll the barbell over your hips until the barbell rests in the crease of your hips.
With your upper back against the bench, lift your hips slights off the floor.
Squeeze your glutes and push your feet into the ground as you begin the upward hip thrust.
Continue contracting your glutes as you push your hips toward the ceiling to achieve full hip extension.
Pause and squeeze the life out of your hams and glutes at the top of the movement.
Slowly return to the starting position and repeat for reps.
Conclusion
Whether you are a powerlifter, bodybuilder, or just want a better-looking rear-end, the cable pull-through should be a part of your lower body workout regimen.
Use the variations, alternatives, and different set and rep range combinations laid out in the article to keep your posterior chain muscles guessing and avoid hitting a plateau.
Which is your favorite hamstring exercise? Let us know in the comments below. Also, be sure to follow Generation Iron on Facebook, Twitter, and Instagram.
The Ultimate Workout for Building Shredded Hamstrings
Build Mass and Definition in Your Hamstrings
Most people have a love-hate relationship with training legs. They love to hate training their legs. Shredded legs are what separate the men from the boys. If you think building quads is hard, wait until you get serious about training your hamstrings.
Hamstrings are hard to develop since they are at the back of your legs. It’s hard to develop a mind-muscle connection with the hamstrings as you can’t see them in the mirror. Get ready to go through the most brutal hams workout of your life.
Exercise 1 – Wide Stance Squats – 3 Sets – 12, 10, 8 Reps
Squats are the king of all the leg exercises and we won’t miss utilizing it in our hams workout. Maintain a wider than shoulder width stance while performing the squats as it helps in recruiting hamstrings more than the quads.
Hip extensions help in activating the hamstrings, meaning your hams are most active as you straighten your legs and extend your hips. The wider the stance you take, the deeper your hips will flex resulting in exaggerating your hip extension and recruiting your hams.
Exercise 2 – Superset
– Leg Press – 3 Sets 30, 20, 10 Reps
– Good Mornings – 3 Sets 10, 20, 30 Reps
While performing the leg presses, place your feet at the top edge of the platform and keep the back support at a 60-degree angle. Keeping your feet at the top of the platform recruits your hams while placing them at the bottom activates your quads.
After performing 30 reps on the leg press, perform 10 reps on the good mornings. Keep your back arched and a slight bend in your knees while performing the good mornings. Don’t try to go too heavy on this exercise as it can lead to recruiting the lower back.
Exercise 3 – Lying Leg Curls – 6 Sets 30, 20, 10, 10, 20, 30 Reps
Lyings leg curls are for the legs what the preacher curls are for the biceps. Think of your hams as biceps and contract and squeeze them with every rep. By the end of the six sets, your hams should be filled with lactic acid and asking for mercy.
Change your feet placement on the pad with every set. Start the exercise with your feet placed wide apart on the pads. With every set, bring your feet closer and on the last set, your feet should be joined. The change in feet placement will work your hamstring from every angle.
Exercise 4 – Dumbbell Stiff Legged Deadlifts – 3 Sets 12, 10, 8 Reps
Dumbbell stiff legged deadlifts are a compound exercise and help in building muscle mass and strength. Keep your knees bent throughout the exercise and pause and squeeze your hams at the bottom of the movement.
Performing the Romanian deadlifts with dumbbells instead of a barbell gives you better leverage and can help with activating your hamstrings. Place your toes on a quarter plate to increase the leverage further by increasing the range of motion.
Exercise 5 – Superset
– Barbell Hip Thrusts – 3 Sets 20, 15, 10 Reps
– Glute Ham Hyperextensions – 3 Sets 10, 15, 20 Reps
The barbell hips thrusts and GHD target the hams and the glutes and can improve the separation between the muscles. Keep your feet shoulder width apart, maintain a full range of motion and pause at the top of the movement while performing the barbell hip thrusts.
Glute ham hyperextensions have been brought into the spotlight by CrossFit athletes. If you don’t have a GHD table at your gym, lie down on a flat bench and ask someone to sit on your calves. You could also perform this exercise on a lat pull-down machine by placing your knees on the seat and inserting your ankles between the seat and the pads.
Do you train your hamstrings and quads on the same day? Let us know in the comments below. Also, be sure to follow Generation Iron on Facebook and Twitter.
*Header image courtesy of Envato Elements.
The Ultimate Hamstrings Workout
Follow This Workout For Shredded Hamstrings
Hamstrings are one of the weakest muscle groups for most people. It is hard to establish a mind-muscle connection with your hamstrings since they are at the back of your legs and you can’t see them in the mirror while training.
Hamstrings are one of the most stubborn muscles groups. If you have genetically weak hamstrings or are lagging in the department, you need to show them some extra love. Muscular hamstrings can significantly add to the size of your legs.
Leg Curls – 3 Sets 15 Reps
Starting with an isolation exercise is a good idea as it pre-exhausts your muscles. By pre-exhausting your muscles you can achieve the same result while lifting relatively lighter weights.
Using a cable leg curl machine helps you in maintaining constant tension on your hamstrings throughout the movement. You don’t need to go super heavy while performing this exercise. Pause and squeeze your hams at the top of the movement.
2. Romanian Deadlifts – 3 Sets 10 Reps
Romanian deadlifts are a compound exercise and will help you in building strength and size in your hamstrings. This exercise is different from the orthodox deadlifts as these primarily target your hamstrings, while the normal deadlifts target your back.
Keep a slight bend in your knees while performing the Romanian deadlifts. Think of your hams as chains used for lowering and lifting your back. Push back your hips while lowering the weights so all the tension is placed on your hamstrings.
3. GHD Hyperextensions – 3 Sets 15 Reps
GHD hyperextensions are an exercise brought into the limelight by CrossFit. Maintaining a full range of motion is key to performing this exercise. If you find the bodyweight version of this exercise to be easy, use weights to add resistance.
If you don’t have an access to a GHD bench at your gym, you can use a flat bench for this exercise. Place your knees at the top of the bench and ask someone to sit on your calves while you perform the exercise.
4. Jefferson Squats – 3 Sets 12 Reps
[embedded content]
You have been missing out on a lot if you’ve never tried this exercise. Jefferson squats will set your hams and glutes on fire. The Jefferson squats might look a little awkward at first, but you will dig the results.
It is a wide-stance deadlift where you hold the barbell between your legs with one hand in front of your body and one hand behind it. The better you become at doing Jeffersons, the more proficient you will be at squatting.
5. Good Mornings – 3 Sets 12 Reps
Good mornings are an excellent finishing exercise for your hamstrings. Most people make the mistake of going too heavy on this exercise. Use weights you can handle while keeping constant tension on your hams.
Maintain a slight bend in your knees and an arch in your back. Push back your hips on the way down and squeeze your hams at the bottom of the movement. Don’t rest by standing upright. Maintain constant tension by stopping a couple of inches from the starting point.
Who do you think has the best hamstrings? Let us know in the comments below. Also, be sure to follow Generation Iron on Facebook and Twitter.
The 4 Effective Leg Building Exercises Which No One Does
Build Monster Legs With These Exercises
A pair of shredded legs is what separates the men from the boys. Most people stick to the same exercises while training their legs and leave gains on the table. All leg exercises aren’t created equal. Some exercises target your wheels better than the others.
A normal leg training session consists of squats, leg presses, extensions, and curls. While there is nothing wrong with these exercises, there are some exercises which can help you in changing your routine and build size and definition in your legs.
Performing the same exercises over and over again can make you hit a plateau. Adding new exercises to your workouts will shock your muscles and will help you in breaking the plateau. Every exercise targets your muscles in a different way which is great for ensuring an overall muscle development.
Platz Hack Squats
The legendary Tom Platz had one of the nastiest legs in the bodybuilding history. He came up with this variation of the hack squats. The Platz hack squats target your outer quad sweep and the teardrop in your quads.
Stand with your heels joined together and your toes pointing outwards. Perform a squat while pushing your knees down and forward. Your heels will come off the base as you squat. As you start pressing up, push onto the outer part of your feet. Doing this will transfer the tension onto the outer quad sweep.
Sissy Squats
Sissy squats have been around since the 1960s, but chances are you’re hearing about them for the first time. Don’t let the name of the exercise fool you. The sissy squats are a great finisher and will fill your quads with lactic acid.
If you’re performing this exercise for the first time, hold onto a squat rack around the hip level or slightly higher. Take a shoulder-width stance and slowly start to lower yourself by bending your knees and pushing them down and forward.
Your back will fall backward while you’re on the descent. Your heels will come off the ground as your knees go down. At the bottom of the movement, your quads should be at least parallel to the floor. Return to the starting position and repeat for reps.
Good Mornings
Good mornings are a compound (multi-joint) exercise which works your hamstrings. Most people make the mistake of going too heavy on this exercise. Good mornings are an exercise which requires a mind-muscle connection.
Stand with a barbell placed across the rear of your shoulders. Keep a slight bend in your knees and an arch in your back throughout the exercise. Push your hips back as you bend your back until it is almost parallel to the floor. Think of your hamstrings as chains used to lower and lift your back.
Step-Ups
Step-ups are a unilateral functional exercise which helps you in training one leg at a time. If you have a weaker leg, unilateral exercises can help you fix this problem as the stronger leg can’t compensate for the weaker one.
Step-ups have many variations and can be adjusted according to your fitness level. Hold a dumbbell in each hand and use your right leg to step onto a knee-to-hip high platform. Bring your left leg up and stand on the platform, then step back with left leg to return to the floor. Both your feet should be on the floor after you step back. Repeat the movement with your left leg and alternate between your legs for the desired reps.
Which day of the week do you train your legs? Let us know in the comments below. Also, be sure to follow Generation Iron on Facebook and Twitter.
Follow This Leg Busting Workout For Monster Gains
Follow This Leg Busting Workout For Monster Gains
Shredded legs are what separate the men from the boys. Leg day can prove to be the most brutal workout for most people. Limping around after a good leg workout is normal. Legs are one-half of your body and training them can be hard and exhausting.
Look around your gym and you’ll surely see people with muscular upper bodies and tiny legs. Leg days also happen to be the most skipped workouts around the world. We can’t make you love your leg workouts, but we can surely get you results.
1. Squats – 3 Sets – 12, 10, 8 Reps
Squats are a complete leg builder. You can’t expect to build muscle mass in your legs without doing this exercise. Squats are a compound (multi joint) exercise which builds size and strength in your legs. This exercise will also make you stronger at other exercises.
Start your workouts with 12 reps, with every set increase the weights and reduce the number of reps. Make sure you have a complete ‘ass to the grass’ range of motion. Performing partial reps won’t do anything for your legs.
2. Leg Press – 3 Sets – 12, 10, 8 Reps
Leg Press can be incredibly efficient in building size and definition in your legs. This exercise helps you train your legs from different angles by changing your feet position on the platform. Placing your feet high on the platforms train your hamstrings and the lower feet position will train your quads.
Close and wide feet placement targets your outer and inner quad sweep respectively. Leg press is also the most abused equipment in the gym. People load it up with more weights than they can handle. Use appropriate weights and maintain a full range of motion.
3. Leg Extensions – 3 Sets – 20, 15, 12 Reps
Leg extensions are an isolation exercise and help focus on your quads. This exercise helps in maintaining tension on your quads throughout the motion. Establish a mind-muscle connection with your legs and squeeze the hell out of them at the top of the movement.
You don’t need to go super heavy during this exercise. Keep the motion slow and deliberate and target muscle failure at the end of every set. You should be doing both compound and isolation exercises to make the most of your leg workouts.
4. Romanian Deadlifts – 3 Sets – 12, 10, 8 Reps
This exercise targets your hamstrings. Hamstrings can be a little harder to train since you can’t see them in the mirror and it can be a little harder to establish a mind-muscle connection with them. Keep your back arches and maintain a slight bend in your knees throughout this exercise.
During Romanian deadlifts, think of your hamstrings as chains being used to lift and lower your upper body. Using more weights than you can handle can shift the tension from your hams to your back, defeating the entire purpose of this exercise.
5. Leg Curls – 3 Sets – 20, 15, 12 Reps
Legs curls are one of the most effective hamstring exercises. This is an isolation exercise where the entire focus is on your hams. Maintain a mind-muscle connection with your hams throughout this exercise and keep your reps slow and deliberate.
Since your knees are the only joints working during this exercise, going too fast can increase your chances of an injury. Squeeze your hamstrings at the top of the movement and follow a complete range of motion.
6. Standing Calf Raises – 5 Sets – 20, 15, 10 Reps
You need to treat your calves just like any other muscle group. Doing three sets at the end of a leg workout won’t do any good for your calves. Standing calf raises target your gastrocnemius muscle which is the long head of the calves.
If you don’t have a standing calf machine at your gym, you can utilize the smith machine. Just like with all the other exercises, maintain a full range of motion and squeeze your calves at the top of the movement.
7. Seated Calf Raises – 5 Sets – 20, 15, 10 Reps
Most people have tiny calves because they don’t train them well enough. You need to be doing both the standing and the seated versions of the calf raises to train them optimally. The seated calf raises train the short head of the calves known as soleus.
You can try different feet placement to train your calves from different angles. Keeping your toes together and heels apart will target the outer head of your calves and placing your heels together and toes apart will train the inner head.
Which is your favorite leg exercise? Let us know in the comments below. Also, be sure to follow Generation Iron on Facebook and Twitter.
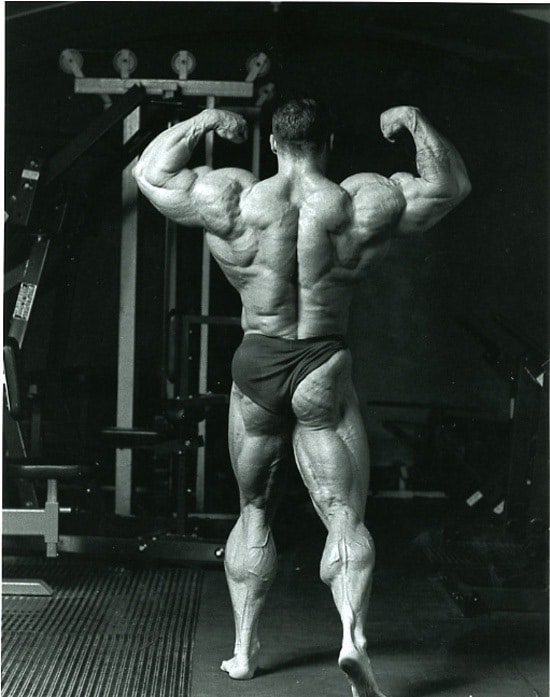
Build Monstrous Calves With This Insane Dorian Yates Workout
The Dorian Yates Workout For Monster Calves.
Calves are one of the most stubborn muscle groups. After years of unsuccessfully training their calves, many lifters come to the conclusion that you are either born with great calves or you are not. There isn’t much you can do about them in the gym.
Before you blame your ancestors for your pencil calves, you should know that there is more than just genetics holding you back from developing your lower legs. If you want to transform your calves into full-grown bulls, you should seek advice from someone who walks the talk, and no one else fits the bill better than the 6X Mr. Olympia, Dorian Yates.
It would be safe to say that Dorian Yates changed the face of bodybuilding forever. He overshadowed his competition (the likes of bodybuilding legends such as Flex Wheeler, Kevin Levrone, and Shawn Ray) with his monstrous size and razor-sharp conditioning.
If you haven’t already, Watch: Dorian Yates: The Original Mass Monster
Dorian Yates Stats
Weight: 255 – 265lbs (115.7 – 120.2kg)
Height: 5’10” (177.5cm)
Arms: 20″
Chest: 56″
Waist: 38″
Calves: 20″
D.o.B: 19 April 1962
Birthplace: Walmley, The Royal Town of Sutton Coldfield, United Kingdom
Alias: The Shadow, The British Bulldog, The Beast of Britain
Next Read: Build a Massive Back Like The Legend Dorian Yates
The Dorian Yates Legacy
According to Dorian, he gets calf training tips requests by the dozens every day. In this article, we will be revealing the secrets to the colossal calves that helped Yates win six Sandows.
Why should you listen to Dorian Yates, you ask?
Dorian has won 15 out of the 17 contests over his Pro league career. Also, the two losses were second-place finishes in:
His pro debut
His Mr. Olympia debut in ’91
And if you just skimmed through Yate’s stats, let us remind you – the guy has 20-inch calves. Most lifters do not have arms that big.
The Shadow’s giant calves helped him outdo his competition. Yates could use them in almost any pose to exert an advantage over his challengers. If you were to make a list of the 15 best calves in the history of bodybuilding – Dorian Yates would absolutely feature in the top 3.
There aren’t many pictures of Dorian Yates online (suiting for his nickname – “The Shadow”), but the ones that you can find will leave no doubts in your mind that his calves had a life of their own.
Yates had adopted a widely discredited training system (at the time) – high-intensity training (HIT) and made it his own. While training in the Dungeon, he revolutionized workout splits and body-part routines.
Check Out: Dorian Yates Still Looks Jacked at Age 58
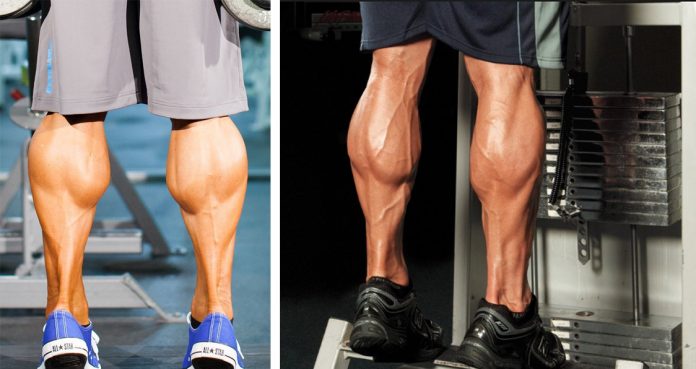
The Calf Anatomy
To make the most of your calf workouts and to carve the lower legs of your dreams, you need to know the ins and outs of your calves. A little anatomy knowledge can take you a long way in developing muscular cows, or you could quit this article right here and be the subject of the next viral “skipped leg day” meme.
Your calf consists of two muscles: gastrocnemius and soleus. The soleus is the smaller muscle and lies underneath the gastrocnemius. The gastrocnemius, on the other hand, is the muscle that most people picture in their head when you say the word “calf“. It’s the heart-shaped muscle that contracts at the top of your lower leg, and it works to push the foot downward. It also assists in bending your knee.
Must Read: Dorian Yates’ ‘Blood & Guts’ Style Workout For Serious Growth
Training Approaches
Both calf muscles require different training approaches for optimal muscle recruitment and stimulation.
Soleus – Standing movements (knees extended) because the soleus attaches below the knee. Eg – seated calf raises.
Gastrocnemius – Seated movement (knees bent) since the gastrocnemius attaches above the knee. Eg – standing calf raises.
Since the soleus lies under the gastrocnemius, you will have to train the gastrocnemius at the beginning of your calf workout if you want massive and shapely calves.
We understand seated calf raises are more convenient, and you might feel a better pump while performing them, but they are also the reason you are not seeing an improvement in your lower legs.
Watch: ‘Dorian Yates: The Original Mass Monster’ Clip – Inside The Hardcore Dungeon That Was Temple Gym
Dorian Yates Calf Training Principles
1. KISS
Before you kiss your personal trainer on the mouth, KISS – keep it simple, silly.
Dorian Yates kept his calf workouts fairly simple. According to him, most lifters make the mistake of thinking that the muscle tissue in their calves differs in biological composition from that of other muscles.
Remember – skeletal muscle is skeletal muscle, no matter where it is in your body. If you want it to grow, you need to achieve muscular hypertrophy.
Related: Dorian Yates Says Weight Training Is Best Way To Get In Shape
2. Treat Your Calves Like Any Other Muscle Group
If your legs are lagging compared to other muscle groups, revalue your lower body training and get it in line with your other workouts.
For most bodybuilders, hypertrophy is best achieved through heavy and intense training.
Watch: Dorian Yates Reveals Facts About His Post-Bodybuilding Depression
3. Train Your Calves at the End of Your Leg Workout
While most bros will tell you to train your lagging calves at the beginning of your leg workout, Dorian Yates takes a different approach. Yates likes to fatigue his calves as quickly and efficiently as possible.
So, instead of training his lower legs on a separate day than legs, when the calves are at full strength, he works them last on leg day, when they have already been pre-exhausted by an annihilating thigh workout.
When the time comes to hit his calves, all that’s needed to finish the job are two exercises, but more on this later.
Watch: Dorian Yates Gets Real About The Crazy Steroids In The 90s
4. Have a Solid Mind-Muscle Connection
Just going through the motions for the sake of it is not going to cut it. For optimal muscle stimulation, you need to squeeze the life out of your calves at the top of every repetition.
If you cannot feel a pump in your calves while performing an exercise, following these steps should help:
Lower the weight and focus on contracting your calves.
Look at your calves in the mirror while performing an exercise.
Have your training partner tap on your calves gently while you do the standing calf raise. (You could do it yourself while doing the seated calf raise).
Perform a couple of unilateral warm-up sets.
Watch: The Best Dorian Yates Bodybuilding Motivation Video Of All Time
Most Common Calf Training Mistakes
1. Stick To Your Normal Rep Ranges
Usually, gym-goers try to annihilate their calves by performing 25-30 reps on every set. The high-rep theory is a concept out of the broscience Bible and does not hold water.
Your calves are already conditioned to high reps since you use them all day long to walk, and your chances of shocking them into growing through high rep training are bleak. To force a muscle to grow, it must be taken to total fatigue through heavy, low reps. Focus on exhausting your calves in 10-12 reps.
Check Out: Epic! This Dorian Yates Video Shows How Hard 6-Time Olympia Champ Trained!
2. Stick to the Basics
Many lifters try to make the most of their calf workouts by using different heel and toe placements. They use an “A” feet placement (toes pointed inward and heels outward) for training their outer calves and a “V” formation (heels pointed inward and toes outward) for hitting the inner calves.
According to The Shadow, the best way to train your calves is to keep your toes pointed straight ahead. Since calves have a relatively short range of motion, you must use all of it.
Watch: Insanely Massive Dorian Yates At 1996 German Grand Prix
3. Less is More
Dorian Yates is the king of intensity. At his peak, he only performed two exercises in his calf workout. But unlike most lifters who treat their calves as accessory muscles, Yates’ workouts were so hard that he could not go beyond the two exercises.
Check Out: Dorian Yates: “A World Without Steroids Would be Great”
4. Ego Lifting
Since calf raises have a small range of motion, most lifters let their egos get the better of them during lower leg training. They load more weight plates than they can handle and end up bouncing on their knees. If you have to use momentum, you are doing it all wrong.
If you cannot move your heels more than a couple of inches without using momentum, you should drop the weight and focus on lowering your heels to the bottom until it is only a few inches off the floor and raise them all the way to the top. At the top of the movement, you should look like a ballerina on her toes.
Must Watch: Dorian Yates Discusses Steroids With Joe Rogan
5. Not Stretching
Dorian Yates relied on stretching to get the best bang for his buck. Benefits of stretching include:
According to research, stretching between sets can help increase your flexibility.
Improves your range of motion.
Improves your performance during your workouts.
As per a study, stretching can help increase blood flow to your muscles.
Reduces chances of injuries.
After every set of every exercise, Yates stretches out the muscle and lets it relax. He says that if he did not stretch his calves between sets, they would cramp up so severely that he would not be able to finish his workouts.
Watch: Dorian Yates Calls His Career-Ending Injury A “Blessing In Disguise” | GI Vault
Dorian Yates Calf Workout
The Shadow kept it simple when it came to his workouts. Ready for the big reveal? You might want to sit down for this one. Here it goes:
1. Standing Calf Raise: 2 sets of 10-12 reps
2. Seated Calf Raise: 1 set of 10-12 reps
Boom! You weren’t expecting this, were you?
From the lead-up to this section, you might have guessed that Dorian did not do more than 10 sets of calf exercises, but just three sets? To be honest, we were just as shocked when we learned about this calf workout.
According to Dorian Yates, together, these two exercises chisel your calves with those deep, rocky strata and jutting promontories that indicate total development. Adding other movements, sets and reps is superfluous and may even amount to overtraining.
Related: Throwback: Dorian Yates Does The Most Intense Calf Training Ever!
Dorian Yates Calf Training Guide
1. Standing Calf Raise: 2 sets of 10-12 reps
Dorian Yates usually goes heavier on the standing calf raise, so he likes to start his calf workouts with this exercise. He does only one warm-up set of 10-12 reps and follows that with one all-out failure set of 10 reps, plus one or two forces reps in the end.
Yes, you heard it right. One out of the two sets is a warm-up set.
“I always work the bigger muscle, the gastrocnemius, first with standing calf raises. Then I do seated calf raises for the soleus. Once the gastrocnemius is fatigued, it’s easier to hit the soleus more directly.” – Dorian Yates
Steps:
Secure your shoulders under the pads of a standing calf raise machine. Place the balls of your feet at the edge of the elevated footrest.
If you do not have access to a standing calf machine at your gym, you could use a Smith machine by placing an aerobic step under the Smith machine bar.
Keep your legs straight, with just a very slight bend in your knees, and press your heels down toward the floor to stretch your calves.
Your heels should be only a few inches away from the floor at the bottom of the movement.
Raise your heels by contracting the calf muscles to rise as high as you can on the balls of your feet.
Pause and contract your calves at the top of the movement.
Lower back to the starting position with a slow and controlled motion.
Repeat for recommended reps.
2. Seated Calf Raise: 1 set of 10-12 reps
Dorian Yates does not feel that a warm-up set is necessary on the seated calf raises, so he performs one all-out set for 10 reps, plus one or two more forced reps at the end.
Steps:
Take a seat on the calf machine and place the balls of your feet on the platform with your toes pointed forward.
Position the base of quads under the knee pad and allow your hands to rest on top.
Extend at your ankles and release the safety bar.
Lower your heels until the calves are fully stretched and your heels are only a few inches away from the floor.
Extend the ankles and lift your heels as high as you can without using momentum or a bouncing motion.
Pause and contract your calves at the top of the movement.
Slowly return to the starting position.
Repeat for recommended repetitions.
Remember: It took Yates nearly 10 years to evolve to his one-main-set-per-exercise strategy. Beginners and intermediates should perform two or three sets per exercise.
Conclusion
We know what you are thinking. Just two exercises and three sets in the name of calf training?
That is Dorian Yates’ intensity for you.
There is a lesson to be learned through this training routine. The 80/20 principle applies to your workouts as well. 80% of the output results from 20% of all inputs. So, stop wasting your time performing 15 sets in your calf workouts and focus on doing six sets of the Dorian Yates calf workout well.
Who do you think has better calves than Dorian Yates? Let us know in the comments below. Also, be sure to follow Generation Iron on Facebook, Twitter, and Instagram.

The Best Way To Build Your Butt
Best Butt Building Exercises
Turning a flat butt into a round and muscular butt can take some time and effort. Running on the treadmill or spending some time on other cardio equipment isn’t going to budge the needle for you if you’re looking to transform your rear.
If you want to build a peach emoji ? like butt, you need to switch between the compound (multi-joint) and isolation (single-joint) exercises. If your glutes are lagging as compared to the other muscle groups, you should dedicate entire workouts to training your butt.
1. Squats
Squats are an overall leg building exercise. While performing the squats and every other glute building exercise, you need to make sure you go deep. Ass to the grass is the way to go while performing the butt building exercises.
Going below parallel on the squats will target your butt effectively. Pausing at the bottom of the movement for a couple of seconds will fill your rear with lactic acid. Put more focus on your glutes by not locking out your knees at the top of the movement.
2. Donkey Kickbacks
Donkey Kickbacks are an excellent isolation exercise for building muscle mass in your glutes. If the bodyweight version of the kickbacks feels easy, you can add resistance by using weights.
Get into a kneeling push-up position on an exercise mat. The bend of your knee should create a 90-degree angle between your calf and hamstring. Exhale and lift your right leg until your hamstring is in line with your back. Return back to the starting position and repeat for the left leg.
3. Lunges
Lunges target your glutes and quads and can help in building muscle definition. You can try the standing, alternating or walking lunges to target your glutes. Bulgarian split squats are another variation of the lunges which can help you in developing your butt.
Start with holding dumbbells on each side. Bring your right leg forward and perform a lunge so your right knee is only an inch away from the ground. At the bottom of the movement, your right calf, and left quad should be parallel to the floor. At the same time, your left calf and right quad should be parallel to each other. Return to the starting position and repeat for the left leg.
4. Hip Thrusters
Hip thrusters are one of the most underutilized exercises when it comes to glute training. Most people make the mistake of going through the motions while performing this exercise. You should pause and squeeze your glutes at the top of the movement to get the best results.
Lie with your upper back at the side of a flat bench and place a barbell on your quads. Your feet should be flat on the floor. Your butt should be an inch away from the floor at the bottom of the movement. Your back, glutes, and hamstrings should be in a straight line at the top of the movement.
5. Dumbbell Sumo Squats
Using dumbbells while performing the sumo squats help you in increasing your range of motion. Stand on an elevated platform like the aerobic steps or a couple of benches to further increase your range of motion.
Hold a dumbbell between your legs and perform a squat without bending your back. Pause for a couple of seconds at the bottom of the movement and don’t lock out your knees at the top to target your glutes efficiently.
Which are your favorite glutes exercise? Let us know in the comments below. Also, be sure to follow Generation Iron on Facebook and Twitter.
*Header image courtesy of Envato Elements.
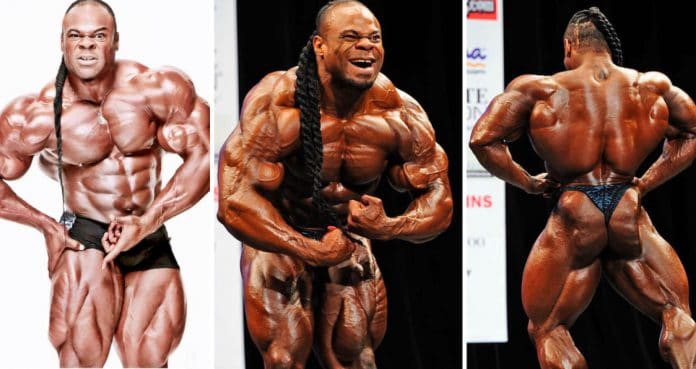
Kai Greene Leg Workout For Massive Wheels
Kai Greene Leg Workout Routine
Kai Greene is one of the most widely recognized bodybuilders of our time. His mind-blowing physique, inspirational words, incredible artwork, trademark hairdo (and infamous grapefruit video) have earned him fans all over the world.
Kai Greene Stats
Full Name: Kai Greene
Weight
Height
Year Of Birth
317 lbs.
5’8’’
1975
Arms
Chest
Thights
22″
58″
33″
Kai Greene made his Mr. Olympia debut in 2009 and competed in the world’s most prestigious bodybuilding contest until 2014. Kai Greene’s Mr. Olympia track record:
2009 – 4th place
2010 – 7th place
2011 – 3rd place
2012 – 2nd place
2013 – 2nd place
2014 – 2nd place
Related: Is Kai Greene Challenging Phil Heath In Recent Tweet?
For four years in a row (2011-14), Kai Greene came close (but not close enough) to conquering the throne. Some fans consider Greene a part of the “uncrowned Mr. Olympia” club accompanying bodybuilding legends like Flex Wheeler, Kevin Levrone, and Shaun Ray.
The Predator’s legs are one of the biggest reasons behind his success on stage. Greene’s vastus medialus (quad teardrop) striations are unmatched, hams in perfect symmetry with quads, and his calves have a life of their own.
But before we dive into Kai Greene’s leg workout, let’s get to know him a little better. Shall we?
Also Read: TOP 6 UNCROWNED BODYBUILDERS OF ALL TIME
The Kai Greene Story
Born and raised in Brooklyn, New York, Greene had a tough childhood. After being orphaned at 6-years-old, he spent most of his youth in foster homes.
Throughout his younger years, Kai struggled to find a place in the community. The ensuing feeling of being an outcast turned Greene into a trouble child. His regular misconducts put him at risk of being kicked out from both his school and foster home.
Finding The Anchor
Weight training came as Kai Greene’s saving grace. Greene started training at the age of 13 and used the gym as an escape from all his problems.
Kai’s 7th grade English teacher realized his bodybuilding potential and started encouraging him to compete in teen bodybuilding shows. This little push was all Kai needed to turn his life around.
It did not take Kai Greene too long to realize that he had great bodybuilding genetics. He was growing faster than others his age and was beating kids older than him at bodybuilding competitions.
Check Out: Decoding Genetics: Check If You Have Bodybuilding Genetics
The Predator Was Born
Over the next five years, Kai Greene competed in various unofficial teen bodybuilding shows. Since Greene was bigger and more jacked than other teenagers his age, he dominated every contest he entered.
By the time Mr. Getting It Done turned 19, he had earned his Pro card in a natural bodybuilding federation, the 1994 NGA American Nationals. The early and quick success made Kai realize that he could make it big in bodybuilding, and make it big, he did.
Kai Greene & His Haitus
Since 2014, Kai Greene fans have been complaining about his absence from the Olympia stage. But hardly do they know, this is not the first time Kai has taken a break from competing.
Kai’s first show as an IFBB Pro was the 1999 World Championships in Slovakia. Although Greene placed 4th, he was not satisfied with his performance.
Determined to work on his weaknesses and sculpt one of the greatest physiques of all time, Kai Greene went back to the drawing board and took four years away from the competitive circuit.
Related: Kai Greene Meets With Universal Execs During Olympia Week
Kai Greene Leg Workout
Because of his size and appearance, many people expect Kai Greene’s workouts to consist of lifting heavy, grunting, and cursing throughout the workout. But, the reality is different.
Kai Greene Workout Principles
It does not matter if Kai is training legs, arms, or back. He swears by the following training principles:
1. Form Is King
Let’s do an activity. It will be worth it, we promise.
Set a five-minute timer, log onto YouTube, and watch (at 2X speed) as many Kai Greene training videos as you can.
Now here is what you need to do – note down every time Kai compromises on his form in favor of lifting heavy. At the end of the five minutes, you will probably have – zero entries.
“The weight is a tool. Do you focus on the hammer or the nail? You better focus on the thing you’re trying to hit.”
2. Mind-Muscle Connection
If you see Kai Greene pose, you would know that he can move each fiber in his body at will. The control he has over his muscles is incredible. Kai’s movements are precise, contractions are hard, and each rep is harmonious with the next.
Bodybuilding is not about lifting as heavy as you can. To sculpt your dream body, you need to contract your muscles and visualize your goal physique with every rep to ensure maximum muscle fiber recruitment.
This technique was first made famous by Arnold Schwarzenegger. If you do not feel a muscle pump by the end of an exercise, you would be better off dropping the weight (and your ego) and trying again.
Next Read: The Importance of Mind-Muscle Connection To See Huge Gains
3. Warm-Up
Kai Greene spends 15-20 minutes warming up before every workout. Benefits of warming up include:
Improves flexibility.
Enhances performance.
Less muscle tension and pain.
Improved range of motion.
Increased blood flow and oxygen.
Lower risk of injury.
Mr. Getting It Done believes that his relatively long warm-up routine gets him in the right mindset to train and improves his focus. According to him, he gets more alert, aware, and his neurological connections get sharper.
Related: Follow This Insane Pro Warm-Up Routine For Ultimate Gains
4. Volume is Key
The Predator uses a lot of sets and reps in his workouts. He does not leave the gym unless he has annihilated his muscles. You will be doing up to four sets of eight different exercises and completing 12-20 reps in each, so get ready for the Kai Greene leg workout.
5. Take Your Time
Take your focus off the clock and put it where it should be – on your lower body. You are not in a race against time here. Take as long as you need between sets. Do not begin the next set until you are properly rested.
Kai Greene Leg Training Routine
Kai Greene’s monster truck wheels are a result of years of hard work and consistency. His leg workouts include a combination of advanced training principles and a variety of exercises to train his lower body from different angles.
The Predator’s legs are one of his strengths, but it was not always this way. He has been training for over 20 years with a focus on sculpting the perfect pair of wheels. Greene is presently working on adding more detail to his upper legs and making them rounder.
1. Superset
Glute Kick-Back: 4 sets 20 reps
Hip Abductor: 4 sets 20 reps
Kai Greene trains in a specific order that addresses body parts from weakest to strongest. He believes that it helps him build better muscular symmetry.
Greene starts his leg workouts with glutes and then transitions to training his calves, then hams because, according to him, that is the order of needed improvement. He trains his quads in the end because they are superior to other parts of his legs.
2. Superset
Standing Calf Raise: 4 sets 20 reps
Seated Calf Raise: 4 sets 20 reps
There are no accessory muscles on Mr. Getting It Done’s training program. Kai performs four sets each of standing and seated calf raises. While the standing variation trains the gastrocnemius, seated calf raises are optimal for training the soleus muscle.
Kai Greene uses the standing calf raise machine for the first leg of the superset. If you do not have access to a standing calf raise machine at your gym, you could use a smith machine with an aerobic stepper or a leg press machine for the exercise.
While performing calf exercises, you need to make sure you are following a full range of motion. Your heels should only be a couple of inches away from the floor at the bottom of the movement. On the other hand, at the top of the movement, you should look like a ballerina on her toes.
Related: 10 Reasons Why You’ll Never Have Big Calves
3. Superset
Jefferson Squat: 4 sets 20 reps
Hip Adductor: 4 sets 20 reps
Kai Greene played a big role in bringing back the Jefferson squat.
Named after circus strongman Charles Jefferson (1863-1911), the unique squat variation can help increase leg strength, size, core stability, and build power in multiple planes of movement.
How To Perform Jefferson Squat:
Stand over a barbell, facing one of the weighted ends with the bar between your legs. Your front foot should be facing forwards, and your rear foot rotated 90 degrees outwards.
Place your feet at a distance so that as you go down into your squat, your knees are directly above your ankles.
Squat down over the bar and grab it using a mixed grip with one hand behind you and one in front of you.
Drive down into the ground through your feet and stand tall, bringing the barbell straight up between your legs.
Return to the starting position with a slow and controlled motion.
Repeat for recommended reps.
4. Unilateral Standing Leg Curl: 4 sets 20 reps
Unilateral standing leg curl is an incredibly effective exercise to target your hams individually. It is especially beneficial for people whose hams are lagging their quads, glutes, and calves.
Standing leg curls can also limit the use of momentum and jerking motions. Keep your toes pointed throughout the exercise to ensure maximal hamstring muscle fiber recruitment.
5. Lying Leg Curl: 4 sets 20 reps
Kai Greene likes to think about his hams as piano wires throughout the entire range of motion. You do not want to be moving the weight primarily focusing on your shins or lower body. At the top of the movement, focus on squeezing your hams.
Lying leg curl can do for your hams what bicep curls do for your biceps. Perform the exercise with a slow and controlled movement, and you will feel every fiber of your hamstring working.
The Predator does not limit his workouts to a pre-defined number of sets. If he feels that he was not focused during the first couple of sets, he makes up for it by performing couple more sets of the exercise.
Remember – bodybuilding is not about going through the motions. Your goal should be muscle annihilation.
6. Barbell Stiff-Legged Deadlift: 4 sets failure
For the barbell stiff-legged deadlift, Kai Greene uses relatively lightweight. To put maximum tension on his hamstrings, he turns his toes in and points his heels outwards (forming an “A” with his feet) while performing the lift.
The Predator maintains a slight bend in his back throughout the exercise and uses his hamstrings and glutes to move the weight.
If you cannot perform the movement with a 2:1:2:1 rep tempo (two seconds on the way down, a second’s pause at the bottom, two seconds on the way up, and a second’s pause at the top), and have to jerk your body up and down to punch out the reps, you are probably going too heavy.
7. Squat: 5 sets 20 reps
No, this is not a typo. Kai Greene gets to the squat rack at the end of his leg workout. Since you will be fatigued at this point in your workout, you need to make sure you are not compromising on your form.
Mr. Getting It Done maintains total control for the entire set and length of each rep. Rather than dropping down and blasting up, Kai focuses on feeling every inch of the rep and tries to intensify the contraction on his legs.
8. Leg Press: 5 sets 20 reps
Unlike most lifters, Kai Greene does not like to go super heavy on the leg press machine. While fitness noobs focus on locking out their knees and squeezing their quads at the top of the movement, Greene tries to contract his legs throughout the entire rep.
If you can only move the weight a few inches while performing the leg press, it is a sign you have more weight on the machine than you can handle.
Wrapping Up
The next time you hear fitness gurus talking about why Kai Greene cannot make a comeback, remind yourself that the guy in question here has no qualms taking four years off if he believes he can bring a better package to the stage. Should you be doubting his commitment and ability? They don’t call him Mr. Getting It Done for nothing.
Who, according to you, has the best legs in the fitness industry? Let us know in the comments below. Also, be sure to follow Generation Iron on Facebook, Twitter, and Instagram.
Set Your Calves on Fire with This Workout
Set Your Calves on Fire with This Workout
Calves can be one of the most stubborn muscle groups. Most people treat their calves as accessory muscles and throw in a couple of exercises to train them at the end of their workouts. It’s going to take much more if you want to turn your calves into bulls.
You need to train your calves like all your other muscle groups and hit them from all the angles. Your calves are made up of gastrocnemius and soleus muscles which can be targeted with different exercises.
The standing (knees extended) calf exercises work the gastrocnemius muscle while the sitting (knees bent) exercises target the shorter soleus muscle. You need to constantly shock your calves by switching the intensity, volume, and exercises.
Changing your feet placement while performing the calf exercises can also spark new gains. Performing the exercises with a normal foot placement (parallel) targets the medial calves.
Keeping your toes together and heels facing outwards will work the outer calves. If you want to target your inner calves, you should keep your heels together and toes facing outwards.
Calves Blaster Workout
Standing Calf Raises – 3 Sets 30 Reps
A complete range of motion is one of the most important aspects of training calves. Many people make the mistake of overloading the machine and can only move the weights a few inches. You should try to go as deep as you can so your heels are almost touching the floor.
At the top of the movement, your feet should look like a Ballerina standing on her toes. Contract your calves at full extension with every rep. Your calves should have a muscle-ripping pump by the end of this set.
Seated Calf Raises (Changing Feet Placements) – 3 Sets 10-10-10 Reps
Since your knees are bent in the seated calf raises this exercise targets the soleus muscle. In this exercise, you’ll be changing your feet placement to target the three heads of your calves.
Start the exercise with a neutral foot placement and perform 10 reps. Rack the weights and switch your foot placement so your toes are pointing inwards. After completing 10 reps, point your toes outwards and complete the last 10 reps.
Leg Press Calf Raises – 3 Sets 10 Reps
Leg press calf raises are a great exercise as they isolate your calves. You should be able to have a better range of motion in this exercise as this is one of the few calf exercises where your feet will be placed higher than your upper body. This foot placement can give your toes leverage to extend more than the other calf exercises.
Since you’ll only be doing 10 reps on this exercise, you should try going heavier without compromising your form. Use rep tempos and take three seconds to lower the weights, and hold the weight at the bottom for a second. Take two seconds to extend your feet and hold for three seconds at the top of the movement.
Single Leg Standing Smith Machine Calf Raises – 3 Sets 15 Reps
Unilateral exercises are a great way to bring up lagging muscle groups as it gets easier to establish a mind-muscle connection. Training one side of a muscle group at a time also helps in fixing muscle imbalances.
Stand on your right foot at the edge of an aerobics exercise step or a weight plate with your left foot elevated. Perform the 15 reps on the right leg and then switch to your left leg.
Donkey Calf Raises – 3 Sets 20 Reps
Donkey calf raises were one of Arnold’s favorite exercises to train his calves. If you don’t have a donkey calf raise machine at your gym, bend over on a raised platform and ask someone to sit on your back.
Since your knees are bent in the donkey calf raises, they target your soleus muscle. By the end of this exercise and this workout, your calves should be filled with lactic acid and blood and should be begging you for mercy.
Which is your favorite calf exercise? Let us know in the comments below. Also, be sure to follow Generation Iron on Facebook and Twitter.
*Header image courtesy of Envato Elements.
The Definitive Guide to the Push-Pull Legs Routine
What In The World Is The Push Pull Legs Routine? The Push-Pull Legs routine is nothing but an advanced weightlifting program that consists of three types of exercises: Push Exercise Pull Exercise Legs Exercise 1) Push Workouts The push exercises that are a part of this exercise routine put emphasis on your upper body muscles […]
The post The Definitive Guide to the Push-Pull Legs Routine appeared first on What Steroids.