Tag: Romanian Deadlift
Deadlift Muscles Worked: Your Guide to REAL King of Exercises!
We’ve said it before, and we’ll say it again – the deadlift is probably THE most productive exercise you can do with a barbell. Sure, squats are often called the king of exercises, but that title may be somewhat undeserved. In many ways, deadlifts are better and may even deserve a bigger place in your workouts.
In this article, we explain what’s so good about the deadlift, reveal the muscles involved, and discuss some of the best deadlift variations.
What’s So Good About Deadlifts, Anyway?
Before you start typing a comment in defense of squats, it’s important to stress that they’re an excellent exercise, and everyone who lifts should include squats in their workouts. However, as great as squats undeniably are, deadlifts also deserve a place in your workouts.
You don’t have to choose between these two awesome exercises, and most people should do both.
However, there are several compelling reasons for putting a little more energy into deadlifts. These include:
A truly functional exercise
Functional training is an often-misused term. Some people use it to describe overly complicated exercises that are basically circus skills, like doing biceps curls while balancing on a stability ball or single-leg squats with your eyes closed.
In reality, functional training is something that improves your performance of everyday or athletic activities outside of the gym.
There are very few exercises more functional than deadlifts. After all, they teach you how to lift heavy objects off the floor using your legs and back, and hopefully without hurting yourself.
Given how many people injure their lower backs when lifting grocery bags, suitcases, their kids, etc., learning and mastering the deadlift should be compulsory.
An almost full-body exercise
As you’ll learn in the next section, the deadlift involves virtually every muscle in your body. From your feet to your hands via everything in between, the deadlift is the epitome of a full-body exercise. In fact, the only muscles that don’t get much of a workout are your pecs. That shortfall is easily remedied by supersetting some push-ups between sets of deadlifts.
So, whether you are short on time or just want to get the biggest bang for your workout buck, deadlifts are a must.
A very accessible exercise
In a world of complicated workout machines and convoluted exercises, the deadlift is a breath of fresh air. All you need to do deadlifts is a barbell, some weights, and a bit of space. As such, even home exercisers can do deadlifts, which may not be the case for squats, where a squat rack is usually required.
While good deadlift technique is critical, the movement is pretty natural, and most lifters can pick it up relatively quickly. As such, lifters of all ages, abilities, and genders can and should do deadlifts.
Easier to judge a successful lift
If you watch a lot of videos on YouTube, you’d be forgiven for thinking that shouldering a heavy weight and then twitching your knees counts as a good squat. People are claiming successful lifts when they are clearly a long way from hitting parallel – the accepted standard for squat depth.
There is much less room for interpretation with deadlifts. The exercise starts with the weight resting on the floor and ends when standing upright. You either lift it or you don’t – there are no degrees of success. Judging a good deadlift is simple, and it’s a very hard exercise to cheat.
Failure IS an option
Squatting to failure is a risky endeavor – even in a squat or power rack. Getting stuck under a heavy bar can cause catastrophic knee, hip, or back injuries. Athletic careers have ended as a result of failed squats.
In contrast, being unable to complete a deadlift is far less risky. You can simply let go of the bar or lower it quickly back to the floor with no mess and no fuss. As such, the deadlift is suitable for intense solo training.
Build a butt you can be proud of
Prolonged periods of sitting mean many people have weak, flaccid glutes. Underdeveloped glutes are a leading cause of lower back pain and, let’s be honest, not all that nice to look at!
The deadlift is one of the best glute-centric exercises around. In fact, they’re great for your entire posterior chain, which is the collective term for the muscles on the back of your body. A strong posterior chain is critical for locomotion (running, walking, jumping) and many other athletic and everyday activities. So, if you want a butt you can be proud of, you’d better start deadlifting.
Personal satisfaction
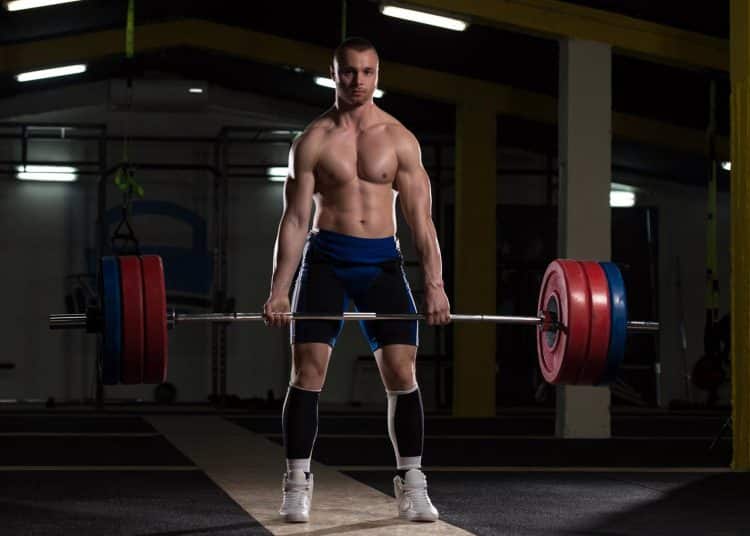
The deadlift can be a brutally challenging exercise, but that’s also what makes it so satisfying to perform. You get behind the bar, bend down and grip it, drive your feet into the floor, and pulling with every fiber of your being, you lift it off the floor. It’s a battle of wills – you against mean old Mr. Gravity!
If you are successful, you’ll feel great, experiencing a wave of satisfaction that’s hard to describe and highly addictive. If you fail, you’ll be more determined to beat the weight next time.
While you might never break any deadlifting records, you can always compete against yourself for a new one-repetition maximum, and even small weight increases deserve celebration.
The deadlift really is one of the most productive things you can do with a barbell, and whatever you are training for, deadlifts will probably help you get there faster.
Muscles Worked During Deadlifts
It’s no exaggeration to say that deadlifts are a full-body exercise. In fact, the list of muscles not involved in deadlifts is very short (yes, we’re talking about you, pecs!).
That said, some muscles work harder than others, getting the most stimulation from deadlifts. The main muscle movers and shakers during deadlifts are:
Latissimus dorsi
Deadlifts are often described as a back exercise. While they are much more than this, deadlifts will give you a broader, thicker upper back. That’s because you must use your latissimus dorsi or lats to keep the bar pressed against your legs and stop it from swinging away from you. Performed alongside pull-ups and rows, deadlifts will help you develop a show-stopping back.
Trapezius
Known as the traps for short, this is a large diamond-shaped muscle that covers much of your upper back. The traps have three sets of fibers – upper, middle, and lower. All three groups of fibers are involved in deadlifts, but the upper and middle fibers are the most active. Heavy deadlifts will help you develop thick, high traps and get you “yoked.”
Rhomboids
The rhomboids are located between your shoulder blades and work with your middle trap fibers to keep your shoulder girdle retracted or pulled back. Strong mid-traps and rhomboids give your upper back its thickness and are also good for your posture.
Gluteus maximus
Known as the glutes for short, this is the largest and potentially strongest muscle in the human body. Responsible for hip extension, the glutes are the engine that drives your deadlift. The glutes are basically your butt.
Hamstrings
Located on the backs of your thighs, the hamstrings work with your glutes to extend your hips and are also involved in knee flexion. There are three muscles in the hamstring group – semimembranosus, semitendinosus, and biceps femoris. Deadlifts are a very hamstring-centric exercise.
Quadriceps
Contrary to popular opinion, the quadriceps are strongly involved in deadlifts – or at least they should be. The quads extend your knees and are most active at the start of each rep; weak quads can stop you from breaking the weight away from the floor. The four quadriceps muscles are vastus lateralis, vastus intermedius, vastus medialis, and rectus femoris.
Hip abductors and adductors
Your knees should not cave in or fall outward during deadlifts. Doing so would limit your performance and increase your risk of injury. The hip abductors (outer hips and thighs) and the adductors (inner thighs) work to stabilize your hips and prevent unwanted knee movement. The hip abductors are gluteus minimus, gluteus medius, and the tensor fascia latae, while the hip adductors are longus, brevis, and magnus.
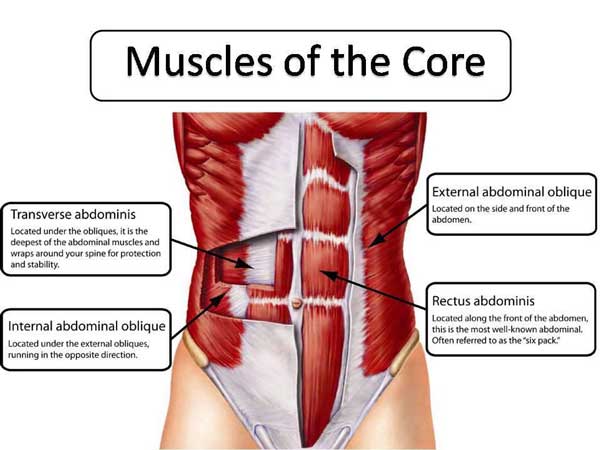
Core
The core is the collective term for the muscles that encircle your midsection. During deadlifts, these muscles act like a weightlifting belt to support and stabilize your lumbar spine.
The muscles of the core include the rectus abdominis, obliques, transverse abdominis, diaphragm, and pelvic floor. Contracting these muscles to prevent movement of the lumbar spine is called bracing, which is critical for safe deadlifting.
Erector spinae
Deadlifts are a very back-centric exercise. In fact, there isn’t a muscle in your back that isn’t working during deadlifts. The erector spinae is a group of three muscles that runs up both sides of your spine. Each one is subdivided into three sections. During deadlifts, the erector spinae must work hard to stop your spine from flexing or rounding.
Biceps
It’s bad form to try and bend your elbows during deadlifts, and doing so can cause serious injuries. However, you’ll need to use your biceps to stop your elbows from hyperextending, so they’ll still be under a lot of tension. This is especially true if you use a mixed grip, and your supinated (palms forward) biceps will be working especially hard.
Triceps
Surprisingly, the triceps play a significant role during deadlifts. Working with your lats, you must use the long head of your triceps to keep the bar pressed back against your legs. As such, if you have any kind of triceps weakness, you’ll feel this small but essential muscle working overtime.
Deltoids
The deltoids are your main shoulder muscles. There are three groups of fibers, called heads, that make up the deltoids – anterior (front), medial (middle), and posterior (rear). The posterior deltoids are the most active during deadlifts, although the other two heads are also involved.
Forearms
A big deadlift requires strong forearms. After all, these muscles are responsible for your grip, and if you cannot maintain your hold on the bar, you won’t be able to lift it. You could use lifting straps to reinforce your grip, but anything more than a liberal application of gym chalk is considered cheating by many people.
Using a mixed grip can help improve your hold on the bar, but you may need to work on your hand strength if you want to deadlift bigger weights.
Deadlifts Variations and Muscle Activation
There are several different types of deadlift you can use to add variety to your workouts. Each one uses many of the same muscles as conventional deadlifts. However, they often emphasize some muscles more than others and have a slightly different training effect.
This the following information to help you choose the best deadlift for your training goals:
1. Romanian deadlift
Deadlifts are so-called because you’re lifting a dead weight from the floor. That said, Romanian deadlifts start with the weight at hip height, and it never touches the ground. As such, it’s not really a deadlift.
However, the name has stuck, and the Romanian deadlift is a very popular exercise. This variation all but removes your quadriceps from the movement and focuses on the muscles of your posterior chain, i.e., the glutes, hamstrings, and lower back.
Read more about Romanian deadlifts here.
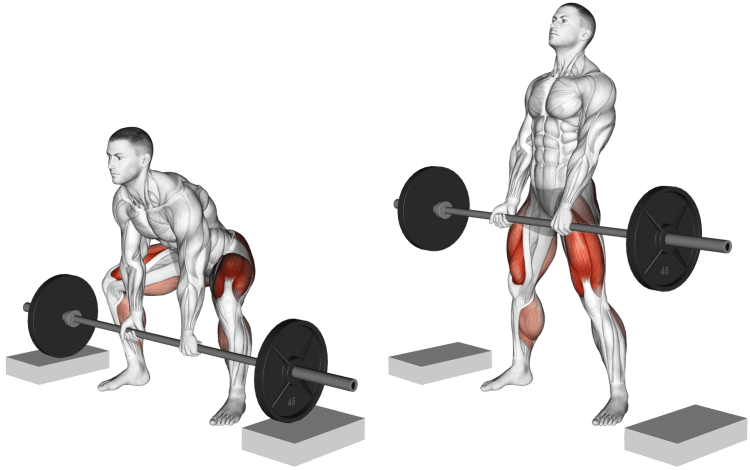
2. Deficit deadlift
The deficit deadlift involves standing on a low platform or a bumper plate or two. This puts you in a lower starting position, increasing your range of motion. With a deeper bend in your knees and hips, deficit deadlifts involve more quadriceps and glutes engagement and increase your strength off the floor.
Learn how to do deficit deadlifts here.
3. Sumo deadlift
Sumo deadlifts are performed with a wider-than-shoulder-width stance and a more upright torso. This increases glute and quadriceps activation and also uses the hip abductors and adductors more. A lot of powerlifters use sumo deadlifts as they find it lets them lift heavier weights with less low back stress.
Read all about sumo deadlifts here.
4. Trap bar deadlift
A trap bar or hex bar is a specialist barbell that allows you to stand between the weights. This shifts the load closer to your base of support, taking stress off your lower back. However, this change makes trap bar deadlifts more quad-dominant than conventional deadlifts, so this exercise often feels more like a squat than a deadlift. As such, it’s sometimes called a squat lift.
You can read more about trap bar deadlifts here.
5. Dumbbell deadlift
No trap bar? No problem! You can simulate trap bar deadlifts with a pair of dumbbells. Like trap bar deadlifts, the weight is next to you instead of in front of you, putting more stress on your quadriceps and less on your lower back. However, most people find this exercise awkward with heavy weights as the dumbbells tend to swing in against the legs.
Learn how to do dumbbell deadlifts here.
6. Jefferson deadlift
The Jefferson deadlift is like a cross between a lunge and a conventional deadlift. You perform this exercise standing astride your barbell. Jefferson deadlifts use your quadriceps, abductors, and adductors more than regular deadlifts. They also allow you to maintain a more upright posture, which may be a little more lower back-friendly.
Discover the secret to Jefferson deadlifts in this article.
7. Deadlift with bands or chains
Deadlifting against bands or chains increases the load as you approach lockout. This deloads your quadriceps and puts more tension on your glutes and hamstrings. Powerlifters use band and chain deadlifts to strengthen their lockout. This is also an excellent way to take pressure off your lumbar spine while still putting plenty of tension through your muscles.
Read more about deadlifts with bands or chains here.
8. Rack pulls
Rack pulls are a partial deadlift where each rep starts with the bar at about knee height. The bar is raised in a power rack or on blocks. The partial range of motion allows you to lift heavier weights and focus on the top part of each rep, strengthening your lock out. Rack pulls emphasize your glutes, hamstrings, and upper back.
Learn how to do rack pulls here.
9. Snatch grip deadlift
Most deadlift variations feature a shoulder-width grip. However, with snatch grip deadlifts, your hands are much wider apart, which increases your range of motion and also forces you to use your upper back more. As such, using a snatch grip for your deadlifts increases trap and rhomboid engagement and also uses your glutes and hamstrings more.
Find out more about snatch grip deadlifts here.
10. Suitcase deadlift
Most deadlift variations are bilateral, meaning they use both arms and legs at the same time. The suitcase deadlift is unilateral or one-sided. Holding the weight with one hand will force you to use your core more to keep your torso upright. So, as well as being an effective leg and back exercise, this move will also hammer your lateral core muscles. You can do suitcase deadlifts with a dumbbell, kettlebell, or barbell gripped in the middle.
Learn how to do suitcase deadlifts here.
FAQs
Do you have a question about deadlift anatomy or deadlifts in general? No problem, because we’ve got the answers!
1. Are deadlifts safe?
Deadlifts are a reasonably safe exercise, provided you perform them correctly. This means you avoid rounding your lower back, keep your core braced, and don’t try to lift more weight than you can handle. You won’t get pinned under a heavy bar if you cannot complete your rep, so you won’t need spotters or a squat rack.
However, because of the magnitude of the loads involved in the deadlift, muscle strains are not uncommon, and poor form could result in potentially serious lower back injuries.
Trump Junior Deadlift
2. Are deadlifts a leg exercise or a back exercise?
You may have noticed that some programs include deadlifts for legs, while others put them into back workouts. While this may seem confusing or contradictory, both approaches are correct.
Looking at the hips down, you can see the deadlift is a powerful leg exercise that targets the glutes, hamstrings, and, to a lesser degree, the quads. In contrast, the lats, traps, and rhomboids are also very active, so it’s an upper-body exercise, too.
As such, you can do deadlifts in your leg or back workouts – they’re fine in both situations.
That said, if you want to do deadlifts for your back but also want to include them in your leg workouts, you should probably use different variations to avoid doing the same movement twice in one week, e.g., something like rack pulls for your back and Romanian deadlifts for legs.
Doing the same type of deadlift twice per week will probably lead to overtraining.
3. Do I need to wear a belt for deadlifts?
While a lot of lifters wear a lifting belt for deadlifts, they are not compulsory. Wearing a belt allows you to generate more intra-abdominal pressure as your abs will have something to push and brace against. This may allow you to lift heavier weights more safely.
However, if you are training with sub-maximal loads, you should have no problem bracing your abs without the extra support afforded by a weightlifting belt.
So, use a belt if you want to push your limits in the deadlift, but go belt-free if you plan on keeping things light. Finally, remember that a belt doesn’t protect you from bad form or the dangers of trying to lift too much weight. People who wear belts get injured, too!
4. Do you have any good deadlift programs for novice powerlifters?
We sure do! This nine-week program is designed to slowly but surely increase your deadlift one-repetition maximum. It uses several progression methods and accessory exercises to turn you from a novice powerlifter into a deadlifting machine. It’ll also add bulk to your back and posterior chain.
Run through it once, deload for a week, and run it again to see your deadlift 1RM record crumble.
5. My grip is weak – can I use lifting straps for deadlifts?
While you can use lifting straps to bolster a weak grip, doing so will not fix your problem and actually could make matters worse. The more you use straps, the more reliant on them you’ll become, and the weaker your grip will get.
Instead, make it your mission to improve your grip by a) NOT using straps for anything other than your heaviest deadlift sets and b) adding dedicated forearm and grip training to your routine.
You can’t ignore a weakness and hope it’ll get better by itself. Instead, you need to focus on it and work it so it catches up with the rest of your body. While this can be humbling at first, in a few months, your weak grip could become one of your strongest assets and will improve your performance in any exercises that involve your hands, including rows, pull-ups, and even bench presses.
6. Deadlifting with a mixed vs. double overhand grip – what’s the difference?
Using a mixed grip, where one palm faces forward, and the other faces backward, stops the bar from rolling out of your hands. This gives you a more solid grip on the bar and should help you lift heavier weights.
However, using a mixed grip is hard on your supinated (palms forward) biceps and could cause muscle tears. Using the same mixed grip could also lead to muscle imbalances.
For these reasons, if you do choose to use a mixed grip, make sure you switch your hands around set by set. This will probably feel weird initially, and one side will invariably be stronger than the other, but it’s the best way to avoid imbalances and injuries. You should also endeavor to use a double overhand grip for lighter loads, switching to a mixed grip only when needed.
A good deadlift requires a stable platform. Soft-soled sneakers with raised heels compress when loaded and push your weight forward onto your toes, making you much less stable. Taking off your shoes and lifting barefoot or wearing flat, uncushioned minimalist athletic shoes ensures your feet won’t move during your reps.
Powerlifters wear very thin shoes called deadlift slippers to ensure their feet are as flat and low to the ground as possible.
All that said, if you are deadlifting light to moderate weights for general fitness, you probably don’t need to resort to going barefoot or minimalist shoes. But, if you have a tendency to fall forward during deadlifts, flat-soled shoes could be the solution.
More on Deadlifts:
Closing thoughts
From bodybuilders to fitness models to powerlifters to runners to moms to athletes – deadlifts are good for everybody’s body. It’s no surprise that Victorian physical culturists used to call deadlifts the health lift. Even back then, the experts of the day recognized the benefits of this potent lift.
Some coaches and trainers will be quick to tell you that the deadlift is dangerous and it could hurt your back. However, this is only half-true. A poorly performed deadlift can undoubtedly be a back-wrecker. But, done correctly, very few exercises can strengthen your back like deadlifts can.
Squats deserve their title of the king of exercises, but deadlifts are every bit as valuable. So, include both these exercises in your workouts, and enjoy all the benefits that they offer; there is no need to choose between them.
The Best Anti-Core Exercises for Increased Lumbar Stability
When most people talk about core training or working out in general, they tend to mean exercises that involve movement. For the core, that means things like crunches, sit-ups, hanging leg raises, Russian twists, side bends, etc.
These exercises usually feature a concentric or shortening phase followed by an eccentric or lengthening phase. After all, what goes up, must come down, right?
However, in many instances, the core muscles work isometrically, generating force without changing length. They contract to prevent unwanted movement, which is what the term core stability means.
Training to prevent movement might seem kinda odd. Still, it’s actually critical for various sports and activities in and out of the gym. For example, squats and deadlifts require incredible levels of static core stability, as do overhead barbell presses, push-ups, and barbell curls.
Fitness experts call these static core strengtheners anti-core exercises. The anti refers to how the core muscles work to prevent movement rather than cause it.
Whether you are training for improved aesthetics, better performance, weight loss, or health, anti-core exercises deserve a place in your workouts. If nothing else, preventing unwanted movement of your lumbar spine could help stop lower back injuries.
In this article, we reveal the best anti-core exercises.
Core Anatomy Basics
Core is the collective term for the muscles that encircle your midsection. Some fitness folk also like to include other muscles in the core, such as the glutes and lats, but that just confuses matters. So, for the purposes of this article, the core is the muscles in and around the abdominal region.
The primary muscles that make up the core are:
Rectus abdominis
Located on the front of your abdomen, the rectus abdominis is the large, flat muscle that, when you are lean, has that unique six-pack appearance. The rectus abdominis is responsible for the flexion of your spine and also contributes to lateral flexion.
In anti-core terms, the rectus abdominus prevents extension and lateral flexion of the spine.
Obliques
The obliques are essentially your waist muscles. There are two sets of obliques on each side of your abdomen – internal and external. They work together to rotate and laterally flex your spine.
In anti-core terms, the obliques prevent rotation as well as initiating it.
Transverse abdominis
Known as the TVA for short, this muscle surrounds your abdominal contents like a corset or weightlifting belt. It contracts inward to increase intra-abdominal pressure, stabilizing your spine from within.
If prizes were being given for the most critical anti-core muscle, the TVA would be a shoo-in for the gold medal!
Erector spinae
Erector spinae is a group of muscles that run up either side of your spine, including the
iliocostalis, longissimus, and spinalis, each of which can be subdivided into three further sections. The erector spinae are responsible for extending your spine as well as lateral flexion.
In anti-core terms, the erector spinae prevents flexion and lateral flexion.
Movements of the spine
The spine is a column of 33 individual bones called vertebrae. It’s divided into five sections:
Cervical spine – your neck – made up of 7 vertebrae
Thoracic spine – your upper back – made up of 12 vertebrae
Lumbar spine – your lower back – made up of 5 vertebrae
Sacrum – part of your pelvis – made up of 5 immovable/fused vertebrae
Coccyx – your “tailbone” – made up of 4 immovable/fused vertebrae
The cervical, thoracic, and lumbar vertebrae are separated by intervertebral discs, which are sections of tough fibrous cartilage. These discs absorb shock and compress to allow movement.
Speaking of which, the spine is capable of four main movements:
Flexion, i.e., bending forward
Extension, i.e., bending backward
Lateral flexion, i.e., bending sideways
Rotation, i.e., twisting
Movements can also be combined, e.g., flexion with rotation during a twisting crunch.
As such, there are four groups of anti-core exercises, each one designed to prevent one (or more) of these movements. For example, anti-extension exercises emphasize the rectus abdominis, while anti-rotation exercises emphasize the obliques. However, all anti-core exercises involve the transverse abdominis.
Benefits and Drawbacks of Anti-Core Exercises
Not sure if you need to include anti-core exercises in your workouts? Consider these benefits and then decide!
Very functional
Functional training is a very misused term. Many people confuse functional training with technically demanding exercises involving a lot of balance, e.g., squats on a stability ball or curls while slacklining. While these are impressive feats, they’re not examples of real functional training.
In contrast, functional training means doing exercises that have a carry-over to your life outside of the gym, i.e., they improve how you function.
Anti-core exercises train your midsection in a very functional way. People often have to use their core muscles this way during their daily lives, in the gym, or on the sports field. Anti-core exercises will have a significant carry-over to your everyday life.
Spine-friendly
Like any joint, the spine is prone to wear and tear. If you do a lot of crunches, sit-ups, Russian twists, etc., you can cause stress to both the vertebrae and intervertebral discs, and these structures can become worn and damaged.
By their very nature, anti-core exercises involve no movement, so there will much less stress on your vertebrae, spinous ligaments, or discs. In fact, anti-core exercises should not cause lower back stress or pain of any sort – done correctly, of course!
Easy to learn
With no movements to think about, most anti-core exercises are very straightforward and easy to learn. You just have to keep still and prevent movement. That’s not to say these exercises are easy – far from it. However, from a technical performance perspective, the learning curve for most anti-core exercises is pretty short.
While anti-core exercises are mostly beneficial and safe, there are also a few drawbacks to consider:
Usually done for time instead of reps
Many anti-core exercises are held for a predetermined time, e.g., 30 seconds. This means you’ll need to use a timer or be able to see a clock with a second hand. Also, some people prefer to pump out reps, and keeping still may be less appealing.
Elevated blood pressure
Isometric anti-core exercises can cause a short-term increase in blood pressure (1). This is because the muscles are contracted, which reduces blood flow. This should be no issue for people with healthy blood pressure but could be problematic for anyone with hypertension.
This problem can be reduced by never holding your breath during anti-core exercises. Breath-holding can have a significant effect on blood pressure.
Speak to your doctor if you have high blood pressure before doing any of the exercises in this article.
Five Best Anti-Flexion Core Exercises
Anti-flexion exercises emphasize your erector spinae muscles. These exercises are good for improving your posture and protecting your lower back from pain and injuries.
1. Back extension hold
Anti-flexion exercises don’t come much simpler than the back extension hold. Done for time, this exercise teaches you to use your back muscles to resist the pull of gravity. Back extension holds are an excellent stepping stone onto more demanding exercises and is ideal for beginners.
Steps:
Mount your back extension machine (45-degree or horizontal) and get into the mid-point of the exercise so your body is straight. Brace your core and engage your glutes and hamstrings.
Without holding your breath, maintain your position for as long as possible.
Yes, all that shaking is perfectly normal.
Relax, rest a moment, and repeat.
Muscles targeted:
Erector spinae, core, gluteus maximus, hamstrings.
Benefits:
Very easy to learn.
Very accessible as most gyms have a back-extension machine.
Easy to progress/regress by altering the time of each hold.
Tips:
Work up to holding for 2-3 minutes per rep.
Make this exercise harder by holding a weight to your chest or using resistance bands.
Keep your knees slightly bent throughout for comfort and safety.
2. Cobra Superman hold
No back-extension machine? No problem! You can work on your anti-flexion strength with this straightforward floor exercise. On the downside, it can be a little uncomfortable, so make sure you use a mat to avoid any unnecessary pain.
Steps:
Lie on the floor on your front and place your hands on your temples.
Lift your head, chest, arms, legs, and feet a few inches off the floor so you’re balancing on your abdomen and hips only.
Hold this position for as long as possible.
Muscles targeted:
Erector spinae, gluteus maximus, hamstrings, core, trapezius, rhomboids, deltoids.
Benefits:
An ideal exercise for home workouts.
No equipment required.
Good for improving spine mobility.
Tips:
Place a folded mat under your hips for comfort.
Take care not to hyperextend your spine.
Do not hold your breath.
3. Dual kettlebell front rack carry
While stationary exercises like back extension and Superman/cobra holds are effective, they don’t teach you to stabilize your spine during movement. As such, they’re good preparatory exercises but also need to be progressed. Dual kettlebell front rack carries train you to resist flexion while moving your legs, so they’re much more functional.
Steps:
Rack and hold two kettlebells on your shoulders. Pull your shoulders down and back, and brace your core. Look straight ahead.
Keeping your torso upright, walk around your training area until you start to tire.
Lower the weights to the floor, rest, and repeat.
Muscles targeted:
Erector spinae, gluteus maximus, hamstrings, core, trapezius, rhomboids, deltoids.
Benefits:
A highly functional exercise.
Good for integrating your core with your upper and lower body.
An excellent general strength and conditioning exercise.
Tips:
Use dumbbells instead of kettlebells if preferred.
Use gym chalk to stop your hands from slipping.
Use one weight only to add anti-lateral flexion to this exercise.
4. Romanian deadlift
While most people do RDLs to strengthen their glutes and hamstrings, it’s actually a very effective anti-flexion exercise. However, you need to be able to resist flexion in isolation first, e.g., with back extension holds, before attempting this exercise.
Steps:
Hold a barbell with an overhand, shoulder-width grip. Stand with your feet between shoulder and hip-width apart, knees slightly bent.
Brace your core and pull your shoulders down and back.
Hinging from your hips, lean forward and lower the bar down the fronts of your legs. Do NOT round your lower back.
Drive your hips forward, stand up straight, and repeat.
Muscles targeted:
Erector spinae, gluteus maximus, hamstrings, core, trapezius, rhomboids, deltoids, forearms.
Benefits:
An excellent exercise for your entire posterior chain.
Easy to scale by adding or subtracting weight.
A proven way to learn how to hip hinge, which is a prerequisite for many more demanding exercises, such as kettlebell swings and power cleans.
Tips:
Remove your shoes to keep your heels on the floor and your weight toward the back of your feet.
Use chalk or lifting straps to reinforce your grip.
Keep your chest up and your lower back slightly but tightly arched throughout.
Related: Romanian Deadlifts (RDLs) Guide
5. Deadlift
The barbell deadlift is one of the best bang-for-your-buck exercises you can do. Working a large percentage of the muscles in your body, deadlifts have the potential to build muscle size and strength like no other. However, the key to a good deadlift is keeping your spine extended, which is what also makes them an excellent anti-flexion exercise.
Steps:
Place a loaded barbell on the floor. Ideally, the bar should be about mid-shin height.
Stand with your toes under the bar, feet between shoulder and hip-width apart.
Bend down and hold the barbell with an overhand or mixed shoulder-width grip.
Straighten your arms, drop your hips, and lift your chest. Brace your core and pull your shoulders back and down.
Drive your feet into the floor and stand up, ensuring your hips don’t rise faster than the bar.
Push your hips back, bend your legs, and lower the weight back to the floor.
Allow it to settle for a couple of seconds, reset your core and grip, and repeat.
Muscles targeted:
Erector spinae, gluteus maximus, hamstrings, quadriceps, core, trapezius, rhomboids, deltoids, forearms.
Benefits:
One of the most productive barbell exercises you can do.
Teaches you how to lift heavy objects off the floor safely.
A very time-efficient exercise that trains multiple muscle groups at the same time.
Tips:
Place your barbell on blocks or in a power rack if you tend to round your back when deadlifting from the floor.
Do NOT bounce the bar off the floor. Instead, allow the weight to “go dead” between reps for safety and best results.
Experiment with an overhand and mixed grip to see which you prefer.
Related: 9 Weeks to a Bigger Deadlift Program
Five Best Anti-Extension Core Exercises
Anti-extension exercises target your rectus abdominis. Working on your anti-extension strength will lessen the likelihood of hyperextending your spine during athletic and everyday activities.
1. Plank
The plank is the original anti-extension core exercise. With roots in yoga and Pilates, this exercise has been around for centuries. However, despite being so common, many people do this exercise incorrectly. Don’t be one of them!
Steps:
Kneel down and rest your forearms on the floor. Your elbows should be under your shoulders, lower arms parallel. Brace your core and pull your shoulders back and down.
Walk your feet out and back to form a straight line with your shoulders and hips.
Hold this position for the required duration. However, do not hold your breath.
Muscles targeted:
Rectus abdominus, core, hip flexors.
Benefits:
No equipment required.
An excellent preparatory exercise for more advanced movements.
An easy exercise to progress or regress.
Tips:
Try to increase muscle tension instead of holding for excessively long durations.
Bend your legs and rest on your knees to make this exercise easier.
Rest your forearms on a stability ball to make this exercise more challenging.
Related: Plank Progressions and Variations for Stronger Abs
2. Dead bug
Dead bugs teach you to resist extension while moving your arms and legs, which is how your core muscles often have to work in nature. This is a highly functional anti-core move that’s suitable for all levels of exerciser.
Steps:
Lie on your back with your legs bent and arms extended up toward the ceiling. Brace your core and press your lower back into the floor.
Extend your left arm and right leg and lower them to the floor. Keep your lower back pressed down.
Return to the starting position and repeat on the opposite side.
Continue alternating arms/legs for the duration of your set.
Muscles targeted:
Rectus abdominus, core, hip flexors.
Benefits:
A very lower back-friendly exercise.
A very functional anti-extension core exercise.
No equipment required, so ideal for home workouts.
Tips:
Make this exercise easier by only lowering your arms OR legs.
Make it more challenging by lowering both arms and legs together.
Increase the intensity of this exercise by holding dumbbells or a medicine ball.
3. Overhead Pallof press
The Pallof press was invented by Bostonian physical therapist John Pallof. Unlike many anti-core exercises, this one uses weights to overload your muscles. As such, it can be progressed just like any other strength-training exercise, i.e., by increasing the load. Unlike the traditional anti-rotation Pallof press, this is an anti-extension exercise.
Steps:
Attach a rope handle to a high pulley. Grab the handle and then turn your back to the cable machine. Hold your hands at shoulder height. Brace your core and adopt a split stance for balance.
Without leaning forward or backward, raise your arms above your head. Note how the tension on your core increases as you extend your arms.
Lower your hands back to your shoulders and repeat.
Muscles targeted:
Rectus abdominis, core, pectoralis major, latissimus dorsi, deltoids.
Benefits:
Can be made as easy or as challenging as required by adjusting the weight.
Teaches you how to integrate your upper and lower body with your core.
A good exercise for improving shoulder mobility and stability.
Tips:
The narrower/closer your feet are, the more challenging this exercise becomes.
You can also do this exercise with a resistance band.
Experiment with different height cables to see what works best for you.
4. Rollout
Rollouts are like a moving plank. As you extend your arms, the tension on your core increases dramatically, and you’ll have to work harder to prevent lumbar spine extension. Rollouts also provide an intense lat workout. An ab roller is an excellent investment!
Steps:
Kneel down and hold your roller with an overhand grip. Place the roller on the floor in front of your knees. Brace your core and pull your shoulders back and down.
Push the roller out in front of you and lower your chest and abdomen down to the floor. Do not allow your lower back to extend.
Using your abs and lats, pull the roller back up to your legs.
That’s one rep – keep going!
Muscles targeted:
Rectus abdominus, core, latissimus dorsi, triceps.
Benefits:
A low-tech exercise that’s ideal for home workouts.
Can be modified to suit most levels of exerciser.
A challenging, effective anti-extension core exercise.
Tips:
Do this exercise from standing for a more intense workout.
Don’t extend your arms so far to make this exercise less challenging.
No ab roller? No problem! You can also do this exercise with a barbell.
Related: Rollouts: Benefits, Technique, And Alternatives
5. Extended plank
Planks are an excellent exercise. However, if you can do them for over a minute or two, they probably aren’t challenging enough to increase core strength. This variation takes your hands and feet further apart to make them much more demanding.
Steps:
Firstly, lie on your back with your arms stretched out to the side. Make marks on the floor with your fingertips to determine your “wingspan.”
Next, place your feet on one mark and your hands on the other. This is your extended plank position.
Brace your core and hold the extended plank position for as long as possible, taking care not to hyperextend your lumber spine or hold your breath.
Muscles targeted:
Rectus abdominus, core, hip flexors.
Benefits:
No equipment required.
A much more challenging way to do planks.
An excellent anti-extension move for advanced exercisers.
Tips:
Shorten the distance between markers if you cannot do this exercise correctly, or you can feel it in your lower back.
Ensure your hands are dry and won’t slip to avoid accidentally face-planting the floor.
This is a very challenging core exercise, so proceed with caution.
Five Best Anti-Lateral Flexion Core Exercises
Anti-lateral flexion exercises strengthen your obliques, rectus abdominis, and erector spinae muscles, albeit one side at a time. Improving your ability to resist lateral flexion will ensure you can keep your torso upright when dealing with unilateral or unbalanced loads.
1. Side plank
The side plank is an excellent introduction to anti-lateral flexion exercises. It’s a little harder than front planks but just as simple to learn. This exercise is popular in group workout classes for a reason!
Steps:
Lie on your side and rest on your forearm. Your body and legs should be straight. Brace your core.
Lift your hips off the floor and hold them up for the required duration.
Lower your hips back to the floor, roll over, and repeat on the opposite side.
Muscles targeted:
Obliques, rectus abdominus, erector spinae, deltoids.
Benefits:
No equipment required, so ideal for home workouts.
Easy to learn and master, so perfect for novice exercisers.
An excellent preparatory exercise for more demanding anti-lateral flexion movements.
Tips:
Rest your elbow on a folded exercise mat or foam pad for comfort.
Bend your legs to make this exercise easier.
You can also do this exercise with your supporting arm extended:
2. Single-arm farmer’s walk
Exercises don’t come much more functional than the single-arm farmer’s walk. However, despite its simplicity, this exercise can be extremely challenging. All you need is a single dumbbell, kettlebell, or heavy bag, so this exercise is ideal for home workouts.
Steps:
Hold a heavy weight in one hand, arm by your side. Brace your core and make sure your hips and shoulders are level.
Without leaning sideways, go for a walk around your training area.
On completion, lower the weight to the floor, swap hands, and repeat.
Muscles targeted:
Obliques, rectus abdominus, erector spinae, forearms.
Benefits:
A highly functional core.
Can be modified for all levels of strength by increasing or reducing the weight.
An excellent way to develop a stronger, more enduring grip.
Tips:
Chalk your hands or use lifting straps to reinforce your grip if necessary.
Walk in zigzags to destabilize the weight and make this exercise more demanding.
Take care not to lean sideways or shrug your shoulders during this exercise.
3. Single-arm waiter’s walk
The single-arm waiter’s walk is similar to the farmer’s walk, but the weight is held overhead and not down by your side. This increases the stability demand of this exercise. Take care not to go too heavy too soon with this exercise; it’s harder than it looks!
Steps:
Lift and hold a single dumbbell or kettlebell overhead. Brace your core and engage your shoulders and upper back to stabilize the load.
Without leaning sideways, go for a walk around your training area.
On completion, lower the weight to the floor, swap sides, and repeat.
Muscles targeted:
Obliques, rectus abdominus, erector spinae, deltoids.
Benefits:
A challenging and effective anti-lateral flexion exercise.
Builds stronger, more stable shoulders.
Can be modified for all levels of strength by increasing or reducing the weight.
Tips:
Chalk your hands or use lifting straps to reinforce your grip if necessary.
Walk in zigzags to destabilize the weight and make this exercise more demanding.
Take care not to lean sideways or shrug your shoulders during this exercise.
4. Single-arm overhead press
Overhead presses are great for building bigger shoulders and triceps. However, when you switch from using both arms to just one, they become an excellent ant-lateral flexion exercise. Requiring just one weight, this anti-core move is ideal for home workouts.
Steps:
Hold a dumbbell or kettlebell in one hand at shoulder height. Stand with your feet shoulder-width apart and brace your core. Make sure your hips and shoulders are level.
Without leaning sideways, press your weight up and overhead to arm’s length.
Lower the weight back to your shoulder and repeat.
Switch hands and do the same number of reps with your other arm.
Muscles targeted:
Obliques, rectus abdominus, erector spinae, deltoids.
Benefits:
A very functional upper-body and core exercise.
An excellent way to identify and fix left-to-right strength imbalances.
A very accessible, practical exercise.
Tips:
Do this exercise in front of a mirror to ensure you’re keeping your shoulders level.
Use less weight than you would for a two-handed overhead press.
You can also do this exercise with a barbell, which is an exercise called the javelin press:
5. Suitcase deadlift
The suitcase deadlift is so-called because it’s the same technique you’d use to pick up a single bag at the airport. This awesome exercise teaches you how to maintain a neutral and stable spine while generating force with your legs.
Steps:
Place a kettlebell or dumbbell on the floor and then stand sideways on to it. The handle should run parallel to your feet.
Squat down and grab the handle with a neutral or palms-in grip.
Pull your shoulders down and back, brace your core, and look straight ahead.
Drive your feet into the floor and stand up straight, taking care not to lean sideways.
Lower the weight back to the flood and repeat.
Turn around and do the same number of reps on the opposite side.
Muscles targeted:
Obliques, rectus abdominus, erector spinae, gluteus maximus, hamstrings, forearms.
Benefits:
A high degree of crossover with activities outside of the gym.
An effective and functional anti-lateral flexion exercise.
An excellent deadlift assistance exercise.
Tips:
Use gym chalk or lifting straps to stop your hands from slipping.
Do this exercise in front of a mirror to ensure your torso, hips, and shoulders are straight.
Experiment with your stance width to see what works best for you.
Five Best Anti-Rotation Core Exercises
Anti-rotation exercises target your obliques. Having stronger obliques will help you prevent unwanted twisting during activities like running, kicking, and throwing. Anti-rotation is especially important during contralateral activities where you use one arm and the opposite leg, e.g., running.
1. Bird-dogs
Bird-dogs are one of the most basic anti-rotation exercises around. Ideal for beginners, this exercise teaches you how to stabilize your core as you move your arms and legs. Bird-dogs are also an excellent muscle activation exercise and are perfect for warm-ups.
Steps:
Kneel on all fours with your shoulders over your hands and your hips over your knees.
Brace your core and set your shoulders down and back.
Keeping your hips and shoulders level, extend your right arm and left leg.
Lower them back to the floor and repeat.
On completion of your set, swap sides and do the same number of reps with the opposite arm and leg. Or, if preferred, you can use an alternating arm and leg action.
Muscles targeted:
Obliques, rectus abdominis, gluteus maximus, hamstrings, deltoids, erector spinae.
Benefits:
An excellent exercise for lower back pain sufferers.
A great movement for beginners.
No equipment required, so ideal for home workouts.
Tips:
Kneel on a folded exercise mat for comfort.
Use ankle/wrist weights to make this exercise more challenging.
You can also do this exercise in a high plank position like this:
2. Pallof press
The Pallof press is one of the most widely-performed anti-rotation core exercises. Popular with almost every type of exerciser, it’s safe to say that this move delivers. If you’ve never done Pallof presses before, you are in for a treat, but if you’re already doing them, you should definitely continue!
Steps:
Attach a D-shaped handle to a cable machine set to mid-chest height.
Stand side-on to the pulley and hold the handle on both hands. Your feet should be about shoulder-width apart, with your knees slightly bent. Brace your core.
Pull your hands into your chest and step away from the machine to load the cable.
Without moving your hips or shoulders, extend your arms out in front of you. Feel how the tension on your muscles increases as you straighten your arms.
Bend your arms and return your hands to your chest.
Repeat for the required number of reps and then switch sides.
Muscles targeted:
Obliques, rectus abdominis, erector spinae, pectoralis major, deltoids, triceps,
Benefits:
An ideal exercise for beginners.
A very spine-friendly anti-core exercise.
Very scalable – just adjust the load to reflect your current strength.
Tips:
You can also do this exercise with a resistance band.
Vary the height of your arms to work your core from different angles.
Try doing Pallof presses in a half-kneeling position for variety, like this:
3. Single-leg Romanian deadlift
While regular Romanian deadlifts are an excellent anti-flexion exercise, switching to one leg/one arm means you’ll also have to work hard to prevent twisting. This exercise is also great for improving balance and stability and is ideal for runners and other athletes.
Steps:
Stand with your feet together and a dumbbell or kettlebell in your left hand. Shift your weight over onto your right foot. Brace your core and pull your shoulders back and down.
Hinge forward from your hips and lower the weight down the front of your leg. Extend your left leg out behind you for balance.
Stand back up and repeat.
Rest a moment and then do the same number of reps on the opposite leg, remembering to switch hands, too.
Muscles targeted:
Obliques, hamstrings, gluteus maximus, rectus abdominis, erector spinae.
Benefits:
A time-efficient way to train your core and lower body simultaneously.
An excellent exercise for better balance and coordination.
Easier on your lower back than two-legged Romanian deadlifts.
Tips:
Rest your non-working foot lightly on the floor for balance if needed, i.e., B-stance or kickstand RDLs.
Try holding the weight in the same hand rather than the opposite hand. This is considerably more demanding.
Do this exercise next to a wall or handrail for balance if required.
Related: Why the Single Leg Romanian Deadlift Deserves to Be the Hero of Your Workout
4. Renegade row
Renegade rows are among the most challenging anti-rotation exercises, even with light to moderate weights. However, if you’ve mastered Pallof presses and can do bird-dogs in your sleep, this is the exercise you’ve been waiting for!
Steps:
With a dumbbell in each hand, squat down, and place them on the floor.
Walk your feet out into the push-up position. Brace your core and tense your legs.
Bend one arm and row your dumbbell up and into your lower ribs.
Lower the weight back to the floor, switch arms, and repeat.
Alternate arms for the required number of reps.
Muscles targeted:
Obliques, rectus abdominus, latissimus dorsi, biceps, triceps, deltoids, erector spinae.
Benefits:
A total core exercise that teaches you to stabilize your core as you move your arms and legs.
A time-efficient conditioning exercise that burns lots of calories.
A challenging movement that’s ideal for intermediate and advanced exercisers.
Tips:
Wear a weighted vest to make this exercise even harder.
Use hexagonal dumbbells for increased stability and safety.
Combine renegade rows with push-ups for a complete upper-body and core workout:
Related: Renegade Rows Guide
5. Single-arm cable chest press
While the single-arm chest press is not an especially good exercise for your pecs, it is an excellent anti-rotation core exercise. It teaches you how to integrate your core with your upper and lower body.
Steps:
Attach a D-shaped handle to a chest-high cable machine. Hold the handle and turn your back on the machine so the cable runs outside your arm. Adopt a split stance for balance. Brace your core.
Keeping your hips and shoulders stationary, push your arm forward and out to full extension.
Bend your arm, bring the handle back to your chest, and repeat.
Switch sides and do the same number of reps with the other arm.
Muscles targeted:
Obliques, rectus abdominus, pectoralis major, deltoids, triceps, erector spinae.
Benefits:
A very lower back-friendly anti-rotation exercise.
Infinitely scalable by increasing or reducing the weight.
Suitable for beginner, intermediate, and advanced exercisers.
Tips:
Press up at an incline to change the feel of this exercise.
Do this exercise with your feet together to challenge your core and balance more.
Do this exercise with a resistance band or in a half-kneeling position:
Anti-Core Exercises – FAQs
Do you have a question about anti-core exercises? No problem, because we’ve got the answers!
1. How many reps and sets should I do?
There is no magic number of reps you should use to train your core. You will make progress whether you do 10 or 30 reps per set. That said, lower reps are generally more time-efficient, so it’s worth choosing exercises that are demanding enough to fatigue your muscles relatively quickly, e.g., between 12-20. Wherever possible, avoid very high-rep sets, e.g., 50.
In terms of sets, 3-5 should be sufficient for most people. If you can do more, the chances are that you a) aren’t getting close enough to failure or b) are resting too long between efforts.
2. How often should I do anti-core exercises?
It’s generally accepted that it takes 48-72 hours for a muscle or muscle group to recover from a workout. As such, you should aim to do anti-core exercises 2-3 times per week on non-consecutive days, e.g., Monday and Thursday, or Monday, Wednesday, and Friday. This provides a good balance between work and recovery.
Training your core more often, i.e., daily, won’t necessarily produce better results, and could even lead to overtraining.
3. Will anti-core exercises give me a six-pack?
While doing anti-core exercises will develop your six-pack muscle (the rectus abdominis) and other critical core muscles, you won’t be able to see them until your body fat percentage is low enough. This usually means under ten percent for men and 15 percent for women.
It’s true what they say – six-pack abs are made in the kitchen, and your diet will determine if your abs and core muscles are visible.
4. Are anti-core exercises safe?
Because they involve minimal movement, most anti-core exercises are very safe. As long as you brace and stabilize your spine correctly, there should be very little stress on your intervertebral discs or spinous ligaments, so many are even okay for folk who suffer from back pain.
That said, exercises that involve additional movements, e.g., suitcase deadlifts and single-arm overhead presses, are somewhat riskier than static exercises like planks and side planks.
However, if performed correctly and with appropriate loads, there is a very low risk of injury with most anti-core exercises.
5. Do I have to do anti-core exercises – aren’t regular core exercises enough?
While all core exercises are beneficial, anti-core exercises are often more functional. That’s because you often need to use these muscles to prevent unwanted movement of your lumbar spine, e.g., during deadlifts, push-ups, and overhead presses.
If your core is strong, you may not need to do a lot of anti-core training. However, if your lumbar spine lacks the stability it needs, then anti-core exercises are a must.
Wrapping Up
Whether you’re training for performance, aesthetics, or health, your workouts should include anti-core exercises. Anti-core exercises teach you how to stabilize your lumbar spine, which will protect you from lower back injury.
A more stable spine will also let you do more reps with heavier loads, making the rest of your workout more effective.
With 20 anti-core exercises to choose from, you have more than enough options to keep you busy and progressing for years to come. Include anti-core exercises in all your midsection workouts for best results.
References:
Hanson P, Nagle F. Isometric Exercise: Cardiovascular Responses in Normal and Cardiac Populations. Cardiol Clin. 1987 May;5(2):157-70. PMID: 2884033. https://pubmed.ncbi.nlm.nih.gov/2884033
Block Pulls Guide: Muscles Worked, How-To, Benefits, and Alternatives
If you only had the time and energy to perform one exercise per workout, the deadlift would probably be your best choice. Deadlifts work almost every major muscle on the back of your body and several on the front, too. They build real-world functional strength and, frankly, make you look and feel like a badass.
Combine deadlifts with an upper-body push, such as push-ups, dips, or bench presses, and you can get a full-body workout from just two exercises.
Deadlifts are AWESOME!
That said, deadlifting from the floor is not easy, especially when you’re tall or inflexible. Also, doing nothing but conventional deadlifts will eventually get boring, even if you love what Victorian physical culturalists used to call the health lift.
Thankfully, there is more than one way to deadlift, and block pulls, aka partial deadlifts, are a great alternative to regular deadlifts.
We reveal why and how to do this excellent exercise and provide you with a few equally effective alternatives to try.
Block Pulls – Muscles Worked
Block pulls are a compound exercise, meaning they involve several joints and multiple muscles working together. In fact, block pulls use so many muscles that they’re virtually a full-body exercise.
Block Pulls Muscles Worked
The main muscles (listed from top to bottom) trained during block pulls are:
Trapezius
The trapezius, or traps for short, is the large diamond-shaped muscle of your upper back. It consists of three groups of fibers – upper, middle, and lower. The upper and middle fibers are the most active during block pulls. Block pulls are very effective for building bigger, thicker traps.
Rhomboids
Located between the shoulder blades, the rhomboids work with your middle traps to pull your shoulders back and together.
Deltoids
The deltoids are your shoulder muscles. Like the trapezius, the deltoids are made up of three groups of fibers called heads – anterior (front), medial (middle), and posterior (rear). All three deltoid heads are working during deadlifts, but the posterior delts are the most active.
Biceps brachii
Located on the front of your upper arm, your biceps flex your elbows. However, in block pulls, their job is to stop your elbows from hyperextending.
Forearm flexors
Block pulls are a very grip-centric exercise. Gripping the bar involves lots of lower arm muscles, which are collectively called the forearm flexors. If you want bigger, more powerful forearms and a vice-like grip, block pulls are sure to help.
Latissimus dorsi
Located on the sides of your torso, the latissimus dorsi, or lats for short, give your upper back its width. Well-developed lats look like wings! You use your lats to keep the bar pressed in toward your legs during block pulls. Bodybuilders do this exercise to develop a thicker, more powerful-looking back.
Erector spinae
Erector spinae is the collective name for the muscles that run up either side of your spine. During block pulls, you use these muscles to prevent your back from rounding. Rack pulls will give you a more muscular lower back.
Core
Core is the name given to the muscles of your midsection, including your rectus abdominis, obliques, and transverse abdominis. Together, these muscles contract inward to create intra-abdominal pressure to support and stabilize your lumbar spine. Wearing a weightlifting belt allows you to produce even more intra-abdominal pressure.
Gluteus maximus
Known as the glutes for short, this is the largest and most powerful muscle in the human body. The glutes extend your hips, which is the main lower body movement during block pulls. If you want a bigger butt, block pulls will help!
Hamstrings
Located on the backs of your thighs, the hamstrings work with your glutes to extend your hips during block pulls. However, the range of motion is relatively small, so if you want to work your hammies harder, you should also include exercises like leg curls and Romanian deadlifts in your lower body workouts.
Quadriceps
Block pulls start with your knees bent and end with your knees extended. This means they involve your quadriceps as well as your hamstrings and glutes. However, quads engagement is quite low because the range of motion at your knees is relatively small.
How to Do Block Pulls
Get more from block pulls while keeping your risk of injury to a minimum by following these guidelines:
Place your barbell on blocks so it’s between lower knee and mid-thigh height. The lower the blocks, the more you’ll need to use your glutes and hamstrings to lift the weight.
Stand behind the barbell with your feet between shoulder and hip-width apart. Your feet should be under the bar.
Grip the bar with a double overhand or mixed shoulder-width grip.
Straighten your arms, brace your core, and pull your shoulders back and down. Engage your lats by pressing the barbell toward your legs.
Without rounding your lower back, drive your feet into the floor and stand up.
Lock out your hips and knees, taking care not to lean back at the top of your rep. Leaning back increases your risk of injury.
Lower the bar back to the blocks, let it settle for a second or two, reset your core and grip, and repeat.
Pro Tips:
Use chalk and/or lifting straps for a stronger grip.
If you use a mixed grip, make sure you switch hands set by set to avoid muscle imbalances.
Use lower blocks to work your glutes and hamstrings more or higher blocks to emphasize your upper back.
Wear flat shoes or go barefooted to prevent your weight from shifting forward onto your toes.
Use a weightlifting belt when training with heavy loads.
Block Pulls Benefits and Drawbacks
Not sure if block pulls deserve a place in your workouts? Consider these benefits and then decide!
Better for tall or inflexible lifters
Conventional deadlifts start with the weights on the floor and the bar about nine inches above the deck. Reaching down to grab the bar requires good flexibility, especially if you are taller than average. As such, some people end up rounding their lower backs during deadlifts, and that’s a recipe for injury.
A rounded lower back is a weak lower back and puts tremendous pressure on the intervertebral discs and ligaments of the lumbar spine. Starting with the bar on blocks means you don’t have to lean so far forward, so there is less chance of rounding. This means that block pulls are more lower back-friendly than off-the-floor deadlifts, especially for tall or inflexible lifters.
Boost your lockout strength
Full deadlifts, like most compound freeweight exercises, have sticking points. Some lifters get stuck trying to break the bar away from the floor, while others get stuck at the midway point. Rack pulls allow you to focus on your lockout. For this reason, powerlifters use block pulls as a deadlift accessory exercise to boost their full deadlift performance.
Fatigue management
Full deadlifts can be exhausting. Because of this, some lifters only deadlift once a week or even less often when using maximal weights. Block pulls are a little less fatiguing, so you should be able to do them more often or in conjunction with regular deadlifts. For example, you could alternate block pulls with conventional deadlifts workout by workout if you want to train your posterior chain twice a week.
Build a more muscular back
Few exercises have the potential to build back size like rack pulls can. Pushing the bar back toward your legs maximizes lat engagement while keeping your shoulders back and down hits your traps and rhomboids. Stopping your lumbar spine from rounding will thicken and strengthen your lower back muscles. In short, rack pulls are a total back builder.
While block pulls are a mostly beneficial exercise, there are also a few drawbacks to consider:
Equipment
While most gyms have barbells and weight plates for deadlifts, lifting blocks are not as common. As such, you may not have access to the equipment you need to do block pulls. However, there are alternatives to this exercise, which we have detailed below.
Less functional than full deadlifts
A functional exercise mirrors the demands of daily living or a sport. Deadlifts from the floor are a very functional exercise, as many lifting movements start with the weight resting on the deck, e.g., picking up your kids, a pet, or grocery bags.
However, block pulls start with a weight resting above the floor, so they may not be as functional as regular deadlifts. That said, they work the same muscles as regular deadlifts, so block pulls will still enhance your functional strength, albeit to a somewhat lesser degree.
Lift heavier weights
Block pulls have a smaller range of motion than conventional deadlifts, so most people can use heavier weights for them. While lifting more weight can be a good thing, it could be a drawback, too.
Some lifters load block pulls with way more weight than they can handle safely. This can lead to injury, especially to the lower back.
7 Block Pulls Variations and Alternatives
Block pulls are a highly effective compound exercise, but that doesn’t mean you need to do them all the time. There are several variations and alternatives you can use to keep your workouts productive and interesting:
1. Rack pulls
No suitable lifting blocks? No problem! You can also do partial deadlifts using a power rack. This exercise looks and feels very similar to block pulls, and as most gyms have a suitable power rack, they may be more accessible for some lifters. However, do not do this exercise with a deadlift bar, as doing so will damage it. In contrast, block pulls will not damage a deadlift bar.
Steps:
Place your barbell on the safety pins of a power rack so it’s between lower knee and mid-thigh height.
Stand behind the barbell with your feet between shoulder and hip-width apart. Your feet should be under the bar.
Grip the bar with a double overhand or mixed shoulder-width grip.
Straighten your arms, brace your core, and pull your shoulders back and down. Engage your lats by pressing the barbell toward your legs.
Without rounding your lower back, drive your feet into the floor and stand up.
Lock out your hips and knees, taking care not to lean back at the top of your rep.
Lower the bar back to safety pins, let it settle for a second or two, reset your core and grip, and repeat. Do not bounce your bar off the pins, as doing so could damage the bar and the power rack.
Muscles Targeted:
Primary: Latissimus dorsi, trapezius, rhomboids, gluteus maximus, hamstrings, erector spinae, core.
Secondary: Biceps, forearm flexors, quadriceps.
Benefits:
More accessible than block pulls for some lifters.
Easier to adjust the height of the bar, as most power racks are drilled with one-inch holes.
An excellent total back and posterior chain exercise.
Tips:
Try a lower starting point to emphasize your glutes and hamstrings or a higher one to emphasize your back.
Use a mixed or double overhand grip as preferred.
Use lifting straps and/or chalk to prevent your hands from slipping on the bar.
Related: The Ultimate Guide to Rack Pulls
2. Paused deadlifts
Like block pulls, paused deadlifts are designed to improve your mid-rep strength and boost your lockout. However, as an extra advantage, you don’t need any additional equipment to do them. Paused deadlifts are another common powerlifting accessory exercise.
Steps:
Place your barbell on the floor and stand with your toes beneath it, feet between shoulder and hip-width apart.
Grab the bar using an overhand or mixed grip, hands shoulder-width apart.
Straighten your arms, brace your core, set your shoulders, and drop your hips down below your shoulders. Take the slack out of the bar.
Drive your feet into the floor and stand up, pausing as the bar reaches about knee height. Hold this position for 1-3 seconds.
Push your hips forward and stand fully upright.
Lower the bar back to the floor, reset your core and grip, and repeat.
Muscles Targeted:
Primary: Latissimus dorsi, trapezius, rhomboids, gluteus maximus, hamstrings, erector spinae, core.
Secondary: Biceps, forearm flexors, quadriceps.
Benefits:
A very accessible exercise as no extra equipment is required.
An effective way to strengthen your deadlift lock out.
A good way to make light weights feel heavier.
Tips:
The longer you pause, the harder this exercise becomes.
Vary the height of the pause to change the effect and feel of this exercise.
Use less weight than normal, as this exercise is much more demanding than full deadlifts or block pulls.
3. Deadlifts with chains
Chains are another way to overload the top part of the deadlift movement. Doing deadlifts with chains is a type of training called accommodating resistance. As well as overloading the upper range of motion, using bands or chains teaches you to lift more explosively and develops your ability to use power to blast through your sticking points.
Steps:
Load your barbell and attach your chains.
Place your barbell on the floor and stand with your toes beneath it, feet between shoulder and hip-width apart.
Grab the bar using an overhand or mixed grip, hands shoulder-width apart.
Straighten your arms, brace your core, set your shoulders, and drop your hips down below your shoulders. Take the slack out of the bar.
Drive your feet into the floor and stand up. Do not lean back, as doing so increases your risk of injury.
Lower the bar back to the floor, reset your core and grip, and repeat.
Muscles Targeted:
Primary: Latissimus dorsi, trapezius, rhomboids, gluteus maximus, hamstrings, erector spinae, core.
Secondary: Biceps, forearm flexors, quadriceps.
Benefits:
A very movement-specific deadlift accessory exercise.
An excellent way to overload the top part of your deadlift.
An effective exercise for developing deadlift speed and power.
Tips:
This exercise works best when done for low reps, e.g., 3-5.
Start with light chains, as this exercise can be very challenging.
No chains? You can also use strong bands for accommodating resistance training.
4. Trap bar block pulls
Because the load is in front of your base of support, barbell deadlifts have a tendency to pull you forward onto your toes. This increases the shearing force on your lumbar spine. Shearing force isn’t a problem for some lifters but can be a deadlift deal breaker for those with pre-existing back pain. Trap or hex bar block pulls allow you to keep your torso more upright, making them far more lower back-friendly.
Steps:
Load up your trap bar and place it on blocks.
Stand between the handles, feet about shoulder-width apart.
Grip the handles, straighten your arms, pull your shoulders down and back, and brace your core.
Drive your feet into the floor and stand up straight.
Lower the weights back to the blocks, allow them to settle, and then repeat.
Muscles Targeted:
Primary: Latissimus dorsi, trapezius, rhomboids, gluteus maximus, quadriceps, hamstrings, erector spinae, core.
Secondary: Biceps, forearm flexors.
Benefits:
More quadriceps engagement than regular block pulls.
Much less lower back stress.
The parallel grip makes trap bar deadlifts more biceps and shoulder-friendly.
Tips:
Adjust the height of your blocks to change the effect of this exercise.
You can also do this exercise in a power rack, i.e., trap bar rack pulls.
Experiment with the width of your stance to see what feels best.
5. Snatch grip deadlift
Lifters often do block pulls to overload their upper back muscles. Using a wider-than-shoulder width or snatch grip also increases upper back engagement but requires no additional equipment. As an added advantage, this exercise increases off-the-floor strength and explosiveness.
Steps:
Place your barbell on the floor and stand with your toes beneath it, feet between shoulder and hip-width apart.
Grab the bar using an overhand, wider than shoulder-width grip.
Straighten your arms, brace your core, set your shoulders, and drop your hips down below your shoulders. Take the slack out of the bar.
Drive your feet into the floor and stand up. Do not lean back, as doing so increases your risk of injury.
Lower the bar back to the floor, reset your core and grip, and repeat.
Muscles Targeted:
Primary: Latissimus dorsi, trapezius, rhomboids, gluteus maximus, quadriceps, hamstrings, erector spinae, core.
Secondary: Biceps, forearm flexors.
Benefits:
A very effective upper-back builder.
A precursor for doing Olympic snatches.
A great upper trap and mid-back strengthening exercise.
Tips:
The wider your hands, the more challenging this exercise becomes.
Use a hook grip to prevent your hands from slipping.
You can also do this exercise off blocks or power rack safety pins, like this:
6. Romanian deadlifts
Like block pulls, Romanian deadlifts emphasize the top of the deadlift movement. However, performed with semi-straight legs, Romanian deadlifts are more glute and hamstring-dominant than block pulls. Romanian deadlifts are arguably one of the best posterior chain exercises around.
Steps:
Hold a barbell in front of your thighs using a double overhand or mixed grip.
Stand with your feet hip-width apart, knees slightly bent but rigid.
Brace your core and set your shoulders back and down.
Push your hips back and hinge forward, lowering the bar down the fronts of your thighs to below your knees.
Drive your hips forward and stand back up.
Muscles Targeted:
Primary: Gluteus maximus, hamstrings, core, latissimus dorsi, trapezius, rhomboids.
Secondary: Forearms, biceps.
Benefits:
More glute and hamstring-centric than block pulls.
No additional equipment is required.
A very functional posterior chain exercise.
Tips:
Adjust your range of motion according to your flexibility.
Do NOT round your lower back!
Keep your neck long and your chin tucked in to avoid cervical spine stress.
7. Kettlebell block pull
Most deadlift variations revolve around barbells. However, you can also deadlift other heavy objects, including sandbags, dumbbells, and kettlebells. The kettlebell block pull is an especially useful exercise for home lifters.
Steps:
Place your kettlebell on a block and stand astride it, toes pointing slightly outward.
Grip the handle with an overhand, narrow grip.
Straighten your arms, pull your shoulders down and back, brace your core, and lower your hips below your shoulders.
Drive your feet into the floor and stand up straight.
Lower the kettlebell back down to your block and repeat.
Muscles Targeted:
Primary: Gluteus maximus, hamstrings, core, latissimus dorsi, trapezius, rhomboids.
Secondary: Forearms, biceps.
Benefits:
A very accessible block pull variation.
Minimal lower back stress.
An excellent block pull option for home exercisers.
Tips:
Experiment with the height of your block.
Push your knees outward to increase glute engagement.
You can also do this exercise with a single dumbbell standing on end.
Block Pulls FAQs
Do you have a question about block pulls or posterior chain training in general? No worries, because we’ve got the answers!
1. How many times a week can I do block pulls?
Most lifters should be able to do block pulls twice a week, e.g., Monday and Thursday. This will allow adequate time for rest, recovery, and muscle growth. However, if you train very heavy (90%+ of your 1RM) or perform a high volume of sets per session, once a week may be all you can recover from. Doing block pulls more often could result in overtraining.
Adjust your training frequency based on your progress, and if you’re feeling tired or burnt out, you probably need to do block pulls less rather than more often.
2. Are block pulls safe?
Compared to conventional deadlifts from the floor, block pulls should be somewhat safer. The shorter range of motion and higher starting position means less low back stress. However, these benefits will soon vanish if you use too much weight or poor technique.
So, block pulls are pretty safe, but only if performed correctly and with appropriate loads.
3. How many reps and set should I do for block pulls?
Your rep scheme depends on your training goal. To build strength, you must lift heavy weights for low reps, typically in the 1-5 range. For muscle building, you need to do moderate to high reps (6-30) using lighter loads. However, to build muscle, you also need to take your sets to within a couple of reps of failure.
Regarding sets, provided you train hard enough, you should be able to fatigue your muscles in 2-4 sets. If you feel you need to do many more, you are either not training hard enough or are resting too long between sets. That said, strength-specific workouts often involve more sets than hypertrophy programs, e.g., six sets of three reps.
Check out this guide to learn more about effective program design.
4. Are deadlifts the only way to train the posterior chain
While deadlifts and block pulls are an effective way to develop your posterior chain, they’re not the only way to train this critical area. Other exercises you can do include:
Kettlebell swings
45-degree back extensions
Barbell hip thrusts
Good mornings
Read about these and other exercises in this article.
5. Are block pulls part of powerlifting?
While block pulls are not an official part of competitive powerlifting, powerlifters often do them as an assistance exercise to improve their lockout strength. However, variations of the block pull, such as the silver dollar deadlift, often feature in strongman competitions.
Because of the raised bar height and shorter range of motion, partial deadlift weights are almost always significantly higher than full deadlifts.
Image via @sirseaningtoniii Instagram
Block Pulls – Wrapping Up
Deadlifts are one of the most productive exercises you can do with a barbell. They’re functional as they replicate several everyday and sporting movements and are great for building full-body muscle and strength.
However, there is no law saying that you have to deadlift from the floor. In fact, if you are tall or inflexible, you may find that doing so leads to injuries.
Block pulls raise the bar to a more mechanically advantageous height, so you don’t have to bend over so far to reach it. In addition, they provide a way to train the upper part of your deadlift more, which may help you blast past your sticking points.
Whether you are an experienced deadlifter or a novice, block pulls are a very beneficial exercise, so try ‘em – you’re gonna like ‘em!

The Romanian Deadlift: Muscles Involved, Benefits, Variations, Tips, and Exercise Steps
These tips and insights will make you a Romanian Deadlift master!
The Romanian deadlift (RDL) is at first glance just a conventional deadlift with a few small differences. Well, it is but these minor changes are significant enough that the exercise is more popular than ever.
But, it’s also effective for building a phenomenal physique and lots of full-body strength too…
Now, the Romanian deadlift is a functional movement which will carry over to athletic performance as well, so the benefits reach far beyond just aesthetics and power. But being a perfect posterior chain exercise, the RDL is a do-it-all movement.
So, we want you to get the best out of your workouts and that means familiarizing yourself with the Romanian Deadlift so that you can maximize your results.
Here’s some great important information about the Romanian Deadlift that we think you can benefit from. But first, we’ll start with how the RDL got its actual name…
RDL Origin
The Romanian deadlift admittedly has a name that creates a sense of curiosity about its origins. So, to answer the question… the RDL was named after a very accomplished Romanian weightlifter named Nicolae “Nicu” Vlad.
Apparently, a few American weightlifters spotted Vlad doing his version of the “deadlift” and named the lift after him since he was from Romania.
But, the RDL is technically not a deadlift since it not lifted off the ground, which makes the name a bit confusing.
Muscles Involved
Like previously mentioned, the RDL works the entire posterior chain (Backside of the body) of muscles. But there are also muscles which receive a lot of stimulation due to their assistance in the exercise.
A study showed hamstring activity to be very high during the RDL and this is a main target muscle. (1)
But, overall the rear muscles are worked pretty equally.
The muscles involved include:
Back (Rhomboids, Latissimus Dorsi, Trapezius and Erector Spinae)
Legs (Quadriceps, Hamstrings, and calves)
Gluteus Maximus
Core (Abdominals, Obliques)
Hip flexors
Biceps
Forearms
Benefits
There are numerous benefits to doing the Romanian deadlift.
From muscle and strength building to functionality and overall performance… the RDL is an excellent movement.
If you play sports, you need a strong posterior chain plus hip extension/flexion for pretty much all athletic movements (Jumping, running, bending, etc). But, fitness competitors and even people rehabbing from injury can benefit from the RDL. (2)
Now, another benefit is that you can learn hip flexion and extension independent of spine flexion. (3)
Variations
The beauty of weight training is that there is something for everyone. Some people may not have the mobility to train with barbells and so dumbbells can offer a great alternative. But, the Smith machine and even a trap bar can be very beneficial as an effective training method.
Here are the popular variations:
Dumbbell Romanian deadlift
Single-leg Romanian deadlift
Smith machine Romanian Deadlift
Trap bar Romanian deadlift
All of these variations have their own unique benefits.
Dumbbells – The dumbbell deadlift is a very effective variation for the RDL because it develops balance, stabilization, a freer range of motion, and motor control. (4)
Single-leg deadlift – This variation is ideal for unilateral (Affecting one side) development and being able to isolate each muscle is great for several reasons… (5)
Unilateral benefits:
Correct muscle imbalances
Increase core strength
Improve Balance
Rehabilitation
Smith machine deadlift – This variation is great for people who don’t quite have good balance or who prefer to only have to focus on moving the weight. There’s not much stabilization required and you can safely use heavy weights too.
Trap bar deadlift – The trap bar deadlift is very beneficial because it lessens the stress on your spine by allowing you to pull closer to your center of gravity and allows you to move through a more natural range of movement. (6, 7)
But, the grip placement is also different since it’s more like when training with dumbbells.
Training Tips
Since the Romanian deadlift varies in certain aspects from the conventional deadlift, it’s important to know how to execute the movement.
So, here are some tips for your training days to ensure you get the results you’re looking for…
Form
Keep your knees slightly bent during the exercise and your back should be straight while slightly arched. Then, keep your shoulders back and down.
You want to keep the weight as close to your body as possible and positioning yourself correctly will ensure this.
The movement
You can start the RDL with the bar on the ground or on a power rack. But make sure the bar is set high on the rack so you can start closer to the top of the movement.
Now, the deadlift isn’t technically a “deadlift,” which implies you’re pulling the bar from off of the ground. And the movement involves no contact with the ground except for the initial lift-off.
On the concentric (Positive) phase of the movement, you want to push upward through your heels and midfoot. But then you want to thrust your hips forward halfway through the movement to complete the lift in an erect position.
The hips are doing a lot in the RDL and even more so than with conventional DL where the quads are more heavily involved.
Range of motion
This is where the Romanian deadlift really differs from the Standard deadlift.
Instead of lowering the bar all the way down until it touches the floor, you’ll lower the bar to about mid-calf level with the RDL. This keeps constant tension on the posterior chain of muscles (Especially the hamstrings and glutes).
Then, you’ll come all of the way up until you’re erect as you would with a standard deadlift.
Sets/Reps
The Romanian deadlift is not much different than a conventional deadlift training structure. However, the RDL is not quite as taxing on the body, and therefore you can generally do a little more.
And of course, sets/reps schemes vary based on training experience. But, warming up and doing a pyramid up in weight is recommended to get the joints and nervous system conditioned for more intense sets with heavier weights.
Beginner – If you’re a beginner, it’s best to do about 3 sets with good form and light to moderate weight. This will help you stay injury-free and develop the best form possible. Reps should stay at around 10-15 until more advanced.
Intermediate – If you’re an intermediate lifter, go with 3-4 sets and train with more moderate to moderate/heavy resistance loads.
Intermediate lifters can train heavier and with lower rep ranges of 8-10 but it’s best to mix it up sometimes with higher reps.
Advanced – If you’re more advanced, then you likely know your body by now and can get away with more sets and more volume. So, 4 sets with heavier resistance loads should be completely appropriate for sufficient stimulus.
Advanced lifters have an advantage when it comes to training because they know their bodies very well. So, anywhere from 6 reps and up is perfectly fine, in combination in varying rep ranges.
Exercise Steps
If you want to experience all that the Romanian deadlift has to offer, then you’re going to need to know how to do it effectively.
It’s not like a regular deadlift regarding the focus of the movement and like mentioned before, the differences are notable.
So, here’s a quick step by step guide…
Start with the barbell on the floor or elevated on a power rack. If on a rack, start in a higher position at about mid-thigh level or even slightly higher.
Grip the bar at a shoulder-width or slightly wider position.
Arch your back and slightly bend your knees.
If starting from the floor, stick your butt out and keep your upper legs slightly above parallel to the floor. Now, push through your heels and midfoot while extending the hips until you’re standing straight.
If starting from the rack, bend your knees slightly and extend your hips upward to lift the weight off the bars until you’re standing straight.
Slowly lower the bar to mid-calf level by focusing on hip flexion while keeping your back arched.
Extend through your hips while keeping the pressure of the weight in your heels until you’re standing straight. Your shoulders should be down and back.
Then, you can repeat this movement as desired for repetitions.
Sample Workout Routine:
Warm up with 2 sets of progressive RDL’s at about 30 and 60% of your one-rep max before doing your working sets.
Romanian deadlift
3 sets x 10-12 reps
(Rest 60 seconds in between sets)
Lying hamstring curls
2 x 10-12
(Rest 30-45 seconds in between sets)
Alternating lunges
3 sets x 10-12 reps
(Rest 45 seconds in between sets)
Leg press calf raises
3 sets x 15 reps
(Rest 30 seconds in between sets)
Wrapping Up
The Romanian deadlift is a must for overall posterior chain development. It’s also an excellent variation and/or alternative to the conventional deadlift depending on your training goals.
But, it’s important to learn and develop proper technique while implementing progressive resistance to experience maximum results.
Now, since there are several variations, feel free to experiment to find what works best for you. There’s no one best method of training when doing the Romanian deadlift as long as the movement stays the same.
…We hoped you enjoyed this useful information about the much popular Romanian Deadlift and now you have everything you need to make some serious gains!
For more news and updates, follow Generation Iron on Facebook, Twitter, and Instagram.
References:
1– McAllister, Matt J.; Hammond, Kelley G.; Schilling, Brian K.; Ferreria, Lucas C.; Reed, Jacob P.; Weiss, Lawrence W. (2014-6). Muscle activation during various hamstring exercises. Journal of Strength and Conditioning Research. 28 (6): 1573–1580. doi:10.1519/JSC.0000000000000302. ISSN 1533-4287. PMID 24149748.
2– Deane, Russell S.; Chow, John W.; Tillman, Mark D.; Fournier, Kim A. (2005-8). Effects of hip flexor training on sprint, shuttle run, and vertical jump performance. Journal of Strength and Conditioning Research. 19 (3): 615–621. doi:10.1519/14974.1. ISSN 1064-8011. PMID 16095411
3–ACE – ProSource™: January 2016 – ACE Technique Series: Romanian Deadlift.
4–Free weights or machines? Choose what’s right for you
5–The Benefits of Unilateral Training
6–UCSB Science Line. scienceline.ucsb.edu.
7–Biomechanics of Safe Lifting. ergo.human.cornell.edu.
Header image courtesy of Envato Elements