Tag: stretches

The Best 15 Arm and Upper Body Stretches Before a Workout
Time is a precious commodity and something that shouldn’t be wasted. After all, no matter how rich or famous you are, you cannot buy or win back the time you spend. Because of this, many of us are looking for time-saving hacks so we have more available for the activities we enjoy.
Regarding exercise, you could make your workouts more time-efficient by eliminating redundant exercises, focusing on more compound movements, or using time-saving training methods like drop sets and myo-reps.
However, the one place you should not try and save time is your warm-up. Cutting your warm-up short could make your workouts less productive and might even increase your risk of injury.
Like an old rugby coach used to say to me, if you don’t have time to warm up, you don’t have time to work out.
That doesn’t mean you need a long warm-up to prepare for your workout, but you should never skimp on this critical part of your training.
In this article, we reveal the 15 best arm and upper body stretches before a workout.
The Benefits of Warming Up
It’s all too easy to overlook the importance of warming up when you don’t know the benefits. After all, this is time you could otherwise spend on your workout. So, before you skip your next one, let’s explore the main benefits of warming up.
1. Activation of the nervous system
Muscles are controlled by nerves, which work a lot like electrical wires. To generate maximum force, your nervous system must fire impulses powerfully and quickly to the target muscles. Warming up increases nerve impulse speed and strength, leading to better muscle contractions and improved workout performance.
2. Increased blood flow and oxygen delivery
Even during anaerobic activities like HIIT and strength training, your muscles demand lots of blood and oxygen. Warming up open your blood vessels and increases blood flow to the target muscles. This promotes tissue oxygenation and the efficient removal of waste products. Better-oxygenated muscles are more resistant to fatigue and recover faster between sets.
3. Increased tissue temperature
It should be no surprise that warming up makes you feel warm. However, this will not just make you feel more comfortable on a cold day. Warm muscles contract, relax, and stretch more readily, leading to more efficient movements and increased muscle elasticity.
4. More mobile joints
A joint is where two bones come together. Joints are lubricated and nourished with a substance called synovial fluid, which is produced on demand. Warming up will increase lubrication within the joint, which, in turn, increases mobility and range of motion. Your joints should also feel more comfortable after a warm-up, especially if you spend a lot of time sitting or have joint issues, such as osteoarthritis.
5. Injury prevention
While we cannot guarantee that warming up will prevent all future workout injuries, it will probably lower your chances of getting hurt. Warming up prepares your muscles and joints for the activities you are about to do, making them less of a shock to the system.
6. Improved mental preparation and focus
Warming up helps you get your “head in the game,” so you can put more mental energy into your workout. You can perform mental rehearsals, fine-tune your mind-muscle connection, get yourself psyched up, and otherwise prepare your brain for what you are about to do. Your mindset can have a significant impact on your workout performance.
7. Reduced muscle stiffness
Are you still sore and stiff after your last workout? It’s a common problem. The good news is that warming up can help reduce your “workout hangover,” so your movements are more comfortable and fluid. However, if your muscles are always sore, that could indicate you are training too hard, and not paying enough attention to rest and recovery.
Read also: How to Warm Up for Strength Training
How to Warm-Up
Before we reveal the best arm and upper body warm-up stretches, let’s take a look at how they fit into a general warm-up.
Your warm-up should match the demands of your upcoming workout. For example, warming up for a jog should be different from getting ready for an intense back workout. Nevertheless, most warm-ups follow a similar structure, even if the activities or duration of each stage differs.
The most commonly accepted stages of a general warm-up are:
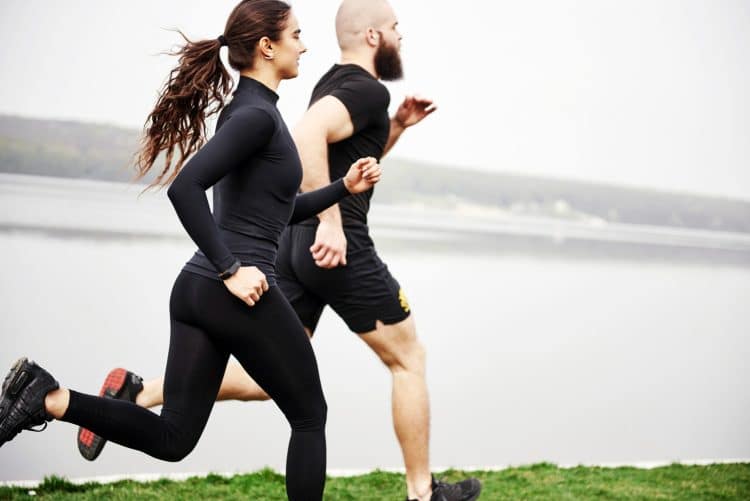
1. Pulse raiser
This is the part of your warm-up that makes you feel warm. It involves doing several minutes of progressive cardio to gradually raise your heart rate and body temperature. Start at a leisurely pace or low intensity and increase it over a few minutes, for example:
Walk for 2 minutes
Jog for 3 minutes
Run for 5 minutes
This progressive pulse raiser eases you into your workout, ensuring that you feel comfortable throughout. It boosts tissue temperature and blood flow, so your muscles receive plenty of oxygen. Additionally, the pulse raiser prepares your muscles and joints for the following warm-up stages.
2. Mobility exercises
While your cardio pulse raiser can potentially increase synovial fluid production and joint mobility, some specific exercises will also be beneficial. Joint mobility exercises involve taking a joint or joints through a progressively larger range of motion.
Examples include:
Shallow progressing to deeper squats and lunges
Ankle circles
Waist twists and side bends
Wrist circles
Shoulder shrugs
After performing these exercises, your joints should move smoothly and more comfortably.
3. Dynamic stretches
When most people think of stretching, static stretches, such as touching and holding your toes to stretch the hamstrings, are what spring to mind. While static stretches have their place, dynamic stretches are usually more useful for warm-ups.
As the name suggests, dynamic stretches involve movement. So, instead of holding a stretched position, you move in and out of the stretch for repetitions.
The benefits of dynamic stretching include the following:
Maintenance/increase of muscle temperature and blood flow
Maintenance/increase of heart and breathing rate
Increased motor unit activation for enhanced strength and power
Increased functional flexibility and range of motion
Increased synovial fluid production for more mobile joints
Rehearsal of the movements you’ll perform during your workout
In contrast, static stretches tend to cause your muscles to cool down and relax, making them better suited for after training.
Choose dynamic stretches that match the demands of your workout, focusing on the muscles you’ll be targeting. For example, if you’re readying yourself for a chest workout, you should not spend much time dynamically stretching your legs.
You can still use static stretches in your warm-up, but you should only do a few, and hold them for just 15-30 seconds so you don’t start to cool down, and your muscles don’t become too relaxed. Some of the best upper body warm-up exercises are static stretches, e.g., the overhead triceps stretch.
4. Ramping
Now that you’re warm and mobile, you might be tempted to jump straight into your workout. While such enthusiasm is commendable, it’s usually better to build up gradually your intended intensity level.
This process is called ramping.
While ramping may seem unnecessary, it can be a very valuable part of the warm-up and primes your muscles and nervous system to optimize your workout performance.
A) Ramping for cardio
For cardio workouts, the first few minutes will be more comfortable and effective if you gradually increase your speed and heart rate. These few extra minutes give your heart and lunges time to “catch up” with your legs, improving exercise comfort and efficiency. Starting slower should also lead to a faster finish.
For example, if you are planning on running at 8 MPH, you might jog at 5 MPH for 1-2 minutes, run at 6.5 MPH for 1-2 minutes, and then begin your workout.
B) Ramping for strength training
In strength training warm-ups, ramping typically involves doing a few progressively heavier sets of your main exercises to get your muscles and nervous system ready for the challenges to follow:
For example:
10 reps x 20kg/45 pounds
7 reps x 40kg/90 pounds
5 reps x 60kg/135 pounds
2 reps x 80kg/175 pounds
10 reps x 100kg/222 pounds – your first work set
Your workout weights should determine the length of your ramp. If you are lifting heavy, you’ll need more ramp sets to prepare. But, for lighter workouts, 1-2 sets should suffice.
However, each ramped set should still feel relatively easy. Note how the rep count in the example decreases as the weight increases. This allows your muscles to become accustomed to the increasing load while avoiding unnecessary fatigue.
How Long Do You Need to Spend Warming Up?
The length of your warm-up depends on several extrinsic and intrinsic factors. Consider the following when planning your warm-up routine:
The intensity of your upcoming workout: The harder you plan on training, the longer your warm-up should be. Easier workouts typically need shorter warm-ups.
Recent activity levels: Prior physical activity may mean you feel warm already, e.g., you walked or cycled to the gym. However, if you’ve been inactive, a longer warm-up may be necessary.
Your age: Older exercisers often take longer to warm up, while younger people usually feel ready to train sooner.
Ambient temperature: The warmer your training environment, the faster your internal temperature will rise. As such, you may not need to warm up for as long in a hot gym or on a warm day.
Previous injuries: Warming up can help relieve the discomfort of previously injured joints and muscles. Spend longer on your warm-up if you have old aches and pains that need more care and attention.
Bottom line: Spend as long on your warm-up as necessary. This could be as little as five minutes for an easy workout or 20-30 minutes if you have something more intense planned. Adjust the duration according to your training needs and goals.
Top 15 Arm and Upper Body Stretches Before Workouts
Stretching your arms and upper body before a workout can help improve flexibility, reduce the risk of injury, and enhance your performance. Here are 15 of the best arm and upper body stretches for your pre-workout warm-up routine:
1. Arm circles
Muscles targeted: Deltoids.
You can’t train your upper body without using your shoulders. This combined stretch and mobility exercise will lubricate your shoulder joints and heat up the surrounding muscles. This is an excellent place to start any upper body warm-up.
Steps:
Standing in good posture, extend your arms to your sides to form a T-shape.
Make small clockwise circles with your arms. Increase the size of the circles gradually.
Switch to a counterclockwise movement and repeat.
Do 8-15 circles in each direction.
2. Arm swings
Muscles targeted: Deltoids.
This exercise takes your shoulders and arms through a larger range of motion than #1. As such, it’s a good exercise for progressing your warm-up, or can be a viable alternative if you are already feeling warm and ready to train.
Stand with your feet shoulder-width apart, knees slightly bent.
Swing your arms forward in large circles for 15-30 seconds.
Switch directions and repeat for a further 15-30 seconds.
Try to brush your biceps with your ears with each rep.
You can also circle one arm at a time.
3. Overhead triceps stretch
Muscles targeted: Triceps, deltoids.
Contrary to its name, this is more than just a triceps stretch – it’ll also loosen and mobilize your shoulders. Do this exercise before any upper body movement, especially those that involve raising your arms overhead.
Steps:
Extend one arm overhead, bend your arm, and reach your hand down between your shoulder blades.
Use your other hand to gently push your elbow back until you feel a stretch in the back of your upper arm. Hold for 10-15 seconds and then release.
Switch sides and repeat.
4. Cow face arms
Muscles targeted: Triceps, deltoids.
Cow face arms is a yoga stretch that follows on nicely from the previous overhead triceps stretch. However, it is more intense and requires good initial mobility and flexibility. But, if you can do it without straining, you’ll be rewarded with a deep triceps and deltoid stretch that really opens up your entire upper body.
Steps:
Reach one arm straight overhead and the other out to the side.
Bend both elbows and bring your hands together, with one hand behind your back and the other behind your head.
Clasp your hands together and hold the stretch for about 15-30 seconds.
Switch sides and repeat.
Use a strap if you cannot reach one hand with the other.
5. Cross-body arm stretch
Muscles targeted: Triceps, deltoids, upper back.
This exercise feels really good after a long day sitting at your desk or driving. It’s also a little less challenging than exercises #3 & 4, so it may be a better option for people with tight shoulders or shortened triceps.
Place your left hand on your right shoulder.
Use your right hand to gently pull your left arm closer to your body.
Hold the stretch for 15-30 seconds on each arm, then switch sides.
6. Bicep Stretch
Muscles targeted: Biceps, forearms.
The biceps are notoriously hard to stretch. And yet, tight biceps can be a real problem and are prone to injury, especially during any exercise that utilizes a mixed grip. This exercise stretches the biceps and forearms simultaneously, making it an excellent twofer.
Steps:
Extend one arm straight out in front of you and turn your palm to face up.
Use your other hand to gently pull back your fingers and stretch the biceps and forearms. Keep your arm straight.
Hold the stretch for 15-30 seconds on each arm, then swap sides.
7. Kneeling wrist flexor stretch
Target muscles: Forearm and finger flexors.
Lots of typing and gripping can cause tight forearm and hand muscles. This can cause several painful conditions, including stenographer’s or trigger finger and carpal tunnel syndrome. This exercise gets tough with your tight forearms and provides them with a deep stretch.
Steps:
Kneel down and place your fingertips on the floor with your palms facing away from you.
Press your palms into the floor and, with straight arms, gently sit back onto your haunches. Keep pressing your palms into the floor.
Hold the stretch for about 15-30 seconds, and then relax.
8. Kneeling wrist extensor stretch
Target muscles: Forearm extensors.
Most skeletal muscles are arranged in pairs across joints. Where one muscle flexes or bends a joint, an opposing muscle flexes or bends it. This exercise stretches your forearm extensors, which are responsible for bending your wrists backward.
Steps:
Kneel down on all fours with the backs of your hands on the floor, finger tips turned inward and touching.
Keeping your arms straight, rock your shoulders over to the left to feel a stretch in the back of your forearm and wrist. Hold for 15-30 seconds.
Ease your weight over to the right and hold for a further 15-30 seconds.
9. Wrist rolls
Target muscles: Forearm flexors and extensors, wrists.
Where exercises #7 & 8 stretch your wrist flexors and extensors, this movement mobilizes your wrist joints. Stiff, painful wrists are a common problem, especially for those lifters who do heavy bench presses but do not wear wrist wraps.
Steps:
Clasp your hands together in front of your chest, elbows bent.
Roll your wrists around in a clockwise motion for 8-15 reps.
Switch directions and repeat for a similar duration.
10. Doorway chest stretch
Target muscles: Pectoralis major, deltoids.
Tight pecs are common among exercisers. Endless sets of bench presses and push-ups combined with hunching over a desk or steering wheel mean that most exercises experience at least some chest tightness. This simple stretch is the perfect antidote to tight pecs.
Steps:
Stand in an open doorway and place your forearms on the door frame with your elbows at a 90-degree angle. Adopt a staggered stance.
Lean forward to create a gentle stretch in your chest and shoulders.
Hold the stretch for about 15-30 seconds.
12. Kneeling lat stretch
Target muscles: Latissimus dorsi.
Like the pecs, the lats are also often tight. This can make pull-ups, lat pulldowns, and overhead presses difficult as it restricts your range of motion. Tight lats also promote medial rotation of the upper arms, which can contribute to a so-called desk hunch. This exercise is one of the most effective ways to loosen up your lats.
Steps:
Kneel on the floor facing a bench or chair. Place your hands on the bench with your palms down and fingers pointing forward.
Keeping your elbows straight, ease your hips back and lower your chest down between your arms.
Hold the stretch for 15-30 seconds.
13. Stick ‘em ups
Target muscles: Deltoids, latissimus dorsi.
If the kneeling lat stretch discussed above is a little too static for your liking, you should try stick ‘em ups. This exercise is so-called because you look a little like a prisoner raising their arms in surrender.
Steps:
Raise your arms overhead with your palms facing forward.
Bend your elbows and lower your hands to your shoulders. Keep your shoulders and arms back.
Reach overhead again and repeat 8-15 times using a slow, controlled tempo.
This exercise also increases upper back and posterior deltoid activation.
14. Chest press to row
Target muscles: Deltoids, trapezius, rhomboids, pecroalis major.
Where exercise #13 stretches and mobilizes your upper body in the vertical plane, this exercise works in the horizontal plane. This is an excellent preparatory movement for any chest or back workout.
Steps:
Extend your arms in front of you, palms facing the floor.
Bend your arms and pull your elbows back to open your chest.
Press your arms forward and round your upper back to stretch between your shoulder blades.
Alternate between these two positions for 8-15 smooth, controlled reps.
15. Fist clench and release
Target muscles: Finger flexors and extensors.
The fingers are one of the body parts that very few people bother to warm up. However, that could be a mistake, given how hard they have to work. Nearly every exercise you do involves your fingers and grip, and there are lots of muscles and bones that will benefit from warming up. This simple exercise will get the job done.
Steps:
Extend your arms in front of you or hold them down by your sides.
Make a fist with both hands and hold them tightly closed for a few seconds, feeling the tension in your forearms and wrists.
Open your hands and spread your fingers as wide as possible.
Alternate between this clenching and releasing motion for about 8-15 repetitions.
FAQs
Do you have a question about doing arm and upper body stretches before a workout or warming up in general? No problem, because we’ve got the answers!
1. Why should I do arm and upper body stretches before a workout?
Warming up your muscles with arm and upper body stretches will help prevent injuries, improve your range of motion for more comfortable movements, and make your workout more productive. They will only take a few minutes but can add a lot of value to your training.
2. How long should I hold each stretch during my warm-up routine?
The aim of your warm-up routine is to prepare your muscles and joints for the workout to follow. As such, you should hold static stretches for 15-30 seconds and do 8-15 of most dynamic movements. Doing less won’t be as beneficial, while doing more is largely a waste of your valuable time.
The key to a good warm-up is doing as much as you need but no more. Save your energy for the main part of your workout.
3. Are these stretches suitable for all fitness levels?
Stretching is good for everybody’s body! Young, old, beginner, or experienced, almost all of these stretches are suitable for all fitness levels. That said, if you find a particular exercise difficult or uncomfortable, choose one that suits you better.
4. How do I know which stretches to include in my warm-up routine?
With 15 different exercises to choose from, it could be hard to decide which ones to do. You certainly don’t need to do all of them! So, just pick 3-5 that cover your main upper body muscles and joints. That should be sufficient for most people. Stick with favorites and exercises that you find the most comfortable. That way, you won’t be tempted to skip them.
5. Will these stretches help prevent shoulder and upper body injuries?
Hopefully! Unfortunately, it’s impossible to categorically say that stretching before a workout will stop you from getting injured, as exercisers get hurt all the time. However, the effects of warming up should minimize your injury risk.
As warming up takes only a few minutes, and an injury could cost you weeks or months of lost training, it makes sense to spend a few minutes preparing your muscles and joints for your workout just in case it helps.
6. Will these stretches improve my overall flexibility and range of motion?
While these stretches will improve your flexibility and ROM, you’ll get better results from a) mainly doing static stretches and b) holding those stretches for longer. This is called developmental stretching, and its main purpose is to develop or improve your flexibility.
However, long, stationary stretches are not really suitable for a warm-up and are best performed during your cooldown. Long static stretches lower your core and muscle temperature and are too relaxing for a warm-up.
7. Are these stretches suitable for strength training and cardio workouts?
Yes indeed! You can use the exercises in this article to prepare your muscles and joints for cardio or strength workouts. You can also do them before sports or any other strenuous physical activity, e.g., splitting logs, clearing snow, or gardening. Some people like to include warm-up exercises in their morning routine to help them wake up and feel more mobile.
More Useful Stretches:
Closing Thoughts
Skipping your warm-up is tempting when you’re eager to dive into your workouts, but time spent on a proper warm-up is time well spent. The benefits go beyond just getting pumped up for training, and a good warm-up is like a pep talk for your muscles, ensuring they’re ready to perform at their best!
From getting our nerves firing for stronger muscle contractions to boosting blood flow for well-oxygenated muscles, a good warm-up sets the stage for an awesome workout. In addition, the stretches and exercises in this article will improve flexibility, reduce stiffness, and help ease your aches and pains. Just make sure you customize your warm-up to match your workout plan, age, and how you’re feeling that day.
So, show your body some love by making warm-ups a priority. It only takes a few minutes but will pay off big time by boosting workout performance and helping you stay injury-free.
Warm Up: The 12 Best Leg Stretches Before a Workout
A good workout starts with a thorough warm-up, or at least it should. Warming up prepares your muscles and joints for what you’re about to do, improving performance while possibly lowering your risk of injury.
We say possibly because you may still get injured even if you warm up (1). Sometimes, injuries happen no matter how well you prepare your body. Luck, it seems, plays a part.
That said, warming up doesn’t take long, and the time saved by not warming up could cost you months of lost training if you suffer an otherwise avoidable injury. Think of warming up like the safety belt in your car – you hope you don’t need it, but you will be glad you put it on if you’re involved in an accident.
Of course, there is a right way and a wrong way to warm up. Static or stationary stretches are generally not a good idea because they can lower your force production potential when held for extended periods (2). Instead, you should build your warm-up around dynamic or moving stretches.
In this article, we reveal the 12 best dynamic lower body stretches to do before a workout.
How to Warm-Up
Before we reveal the 12 best leg stretches to do before a workout, let’s take a moment to look at how they fit into a general warm-up.
Your warm-up should match the demands of the activity you are about to do. For example, a warm-up for jogging should be different from how you prepare your body for an intense leg workout. However, most warm-ups include the same stages, even if what you do or how long you spend on each stage differs.
The generally accepted stages of a warm-up are:
Pulse raiser
The pulse raiser is the part of a warm-up that makes you warm and involves several minutes of cardio. Ideally, you should start at a leisurely pace/level of intensity, and increase it over several minutes, e.g.:
Walk 2 minutes
Jog 3 minutes
Run 5 minutes
This progressive pulse raiser eases you into your workout, so you feel very comfortable throughout. It increases general tissue temperature and blood flow, ensuring your muscles are well-oxygenated. The pulse raiser also prepares your body for the next stage of your warm-up.
Mobility exercises
Now you are feeling a little warmer, it’s time to focus on your joints. A joint is where two or more bones come together to form a union, e.g., your hips, shoulders, and knees.
Mobility exercises improve your range of motion and reduce joint friction, wear, and tear by increasing the production of synovial fluid. This substance lubricates your joints and nourishes the articular surfaces at the ends of your bones, specifically the hyaline cartilage.
A few minutes of mobility exercises can help your joints feel more supple, making your workout more comfortable. Examples of joint mobility exercises include:
Wrist rolls
Shoulder rolls and shrugs
Waist twists and side bends
Shallow progressing to deeper squats
Ankle rolls
Your warm-up should focus mainly on the joints you are about to use in your workout. So, if it’s leg day, spend most of your time working on your ankles, knees, hips, and lower back, and not your upper body.
Dynamic stretches
When it comes to stretching, most people think of static stretches, such as touching and then holding the toes to stretch the hamstrings. While there is nothing inherently wrong with static stretches, dynamic stretches are more appropriate for warming up.
As their name implies, dynamic stretches involve movement. So, instead of holding a stretched position for a set time, you move in and out of the stretch for reps. The benefits of static stretching include the following:
Maintenance/increase of muscle temperature and blood flow.
Maintenance/increase of heart and breathing rate.
Increased motor unit activation for increased strength and power.
Improved functional flexibility and range of motion.
Increased synovial fluid production for more mobile joints.
Replicating the movements you are about to do in your workout.
In contrast, static stretches tend to have many of the opposite effects, which is why they are better suited to your cooldown.
As with your mobility exercises, your choice of dynamic stretches should match the demands of your workout. Focus your energies on the muscles you are about to train. For example, if you are preparing for a chest workout, there is no need to spend much time dynamically stretching your legs.
Ramping
Now you are warm and mobile, you may be tempted to jump straight into your workout. While such enthusiasm is admirable, you may want to build up gradually to your intended intensity level. This is called ramping.
For example, if you plan on running a fast 5k, you’ll probably find your performance is better if you build up to your maximum speed over a couple of minutes. This allows you to practice your running technique and iron out any faults. Starting slower will also probably mean you finish faster.
In strength training, ramping usually involves doing a few progressively heavier sets of your main exercises to prepare your muscles for whatever challenges await them. For example:
10 reps x 20kg/45 pounds
7 reps x 40kg/90 pounds
5 reps x 60kg/135 pounds
2 reps x 80kg/175 pounds
10 reps 100kg/222 pounds – first work set
The heavier your training weights, the longer your ramp needs to be. However, each one should be a submaximal effort and feel relatively easy. Note how the rep count in the example decreases as the weight increases. This ensures you acclimate your muscles to the load while avoiding unnecessary fatigue.
Read more about warming up for strength training here.
Warming up takes time, but it’s time well spent. A thorough warm-up can be the difference between a good workout and a great one!
How long should a warm-up last?
Warming up is a gradual process that takes you from sedentary to ready to train. While these is no one-size-fits-all duration for warm-ups, the time you need to get ready will depend on several factors, including:
The intensity of your coming workout – the harder you plan on training, the longer you’ll need to warm up. Easier workouts usually need shorter warm-ups.
Recent activity levels – you’ll probably need to warm up longer if you’ve been physically inactive.
Your age – older exercisers often benefit from longer warm-ups, whereas younger exercises usually feel ready to train sooner.
Ambient temperature – you’ll warm up faster if your training environment is also warm.
Previous injuries – previously injured joints and muscles often feel better after a thorough warm-up.
So, warming up should take as long as necessary. This might be as little as five minutes for an easy workout or 20-30 minutes for something more intense. Adjust the length of your warm-up according to your training needs and goals.
The 12 Best Leg Stretches Before a Workout
Now you know the components of an effective warm-up, here is a list of 12 of the best dynamic leg stretches to do before your next leg workout.
You don’t need to do all of these exercises. Instead, pick the ones most relevant to your workout. 2-4 should be sufficient for most people. Keep your movements smooth and controlled, gently increasing your range of motion as you feel your muscles begin to lengthen.
Related: Upper Body Warm-Up You Should Be Doing Before Every Workout
1. Forward and back leg swings
Muscles targeted: Hamstrings, gluteus maximus, hip flexors.
Hours spent sitting at your desk or in your car can leave you with tight hips and hamstrings. This simple exercise will warm up these muscles and prepare your legs for more demanding activities. This is an excellent preparatory exercise for all lower-body workouts, both strength and cardio.
Steps:
Stand sideways onto a wall or handrail and hold it for balance. Bend your knees slightly for balance. Brace your core and look straight ahead.
Starting with your outermost leg, swing it forward and back from your hip. Keep your hips and shoulders stationary – no twisting.
Continue for 10-20 reps, gradually increasing height as your muscles relax.
On completion, turn around and swap legs. Repeat on the other side for the same number of reps.
2. Lateral leg swings
Muscles targeted: Hamstrings, gluteus maximus, hip flexors, abductors, adductors.
Many exercisers are stuck in the sagittal plane, meaning their workouts involve mostly forward and backward movements. However, in sports and life outside the gym, activities often occur in the transverse and frontal planes, meaning rotational and sideways. This exercise is similar to #1 but takes you out of that overused sagittal plane. This is an excellent warm-up for athletes and anyone who practices functional strength training, where transverse and frontal plane movements are common.
Steps:
Stand facing a wall or handrail. Place your hands on it for balance and support.
Raise one leg out to the side and then swing it in front of you so it crosses your other leg. Allow your hips to rotate as you swing your leg.
Swing your leg back out and repeat.
Continue for 10-20 reps, increasing your range of motion as you feel your muscles relax.
Switch sides and repeat.
3. Dynamic calf stretch (quadruped calf pumps)
Muscles targeted: Gastrocnemius, soleus, hamstrings.
While you may feel this exercise in your hamstrings if they are tight, it’s actually one of the best ways to prepare your calves for an intense workout. They’re not only ideal before calf raises but also an excellent exercise if your workout involves running or jumping. Calf strains can take a long time to heal, and this exercise could help prevent one.
Steps:
Adopt the push-up position with your hands and feet roughly shoulder-width apart. Brace your core. Lift your hips so your body resembles an inverted V.
Keeping your arms straight, alternately lower your heels toward the ground and then push up onto the balls of your feet.
Continue for 10-20 reps per calf, increasing your range of motion as you feel your muscles relax.
You can also do this exercise with your hands against a wall. This puts less stress on your arms and shoulders, although the range of motion at your ankles will be shorter.
4. Squat-to-stand
Muscles targeted: Hamstrings, gluteus maximus, adductors.
The squat-to-stand stretch, also known as bootstrappers, is a great way to get your entire lower body ready for a leg workout. However, it is quite challenging, so you should put it toward the end of your warm-up so your body is ready for it. This exercise could help you squat deeper and jump higher.
Steps:
Stand with your feet about shoulder-width apart, knees slightly bent.
Hinge forward from your hips and reach down to grab your toes.
Bend your knees and descend into a deep squat. Use your elbows to pry your knees apart and open your hips. Lift your chest and pull your butt down toward your ankles.
Keeping hold of your toes, lift your hips and push your butt up toward the ceiling.
Smoothly alternate between these two positions 5-10 times, increasing your range of motion as your muscles start to loosen up.
Pause at the top and bottom of each rep for a few seconds to maximize the benefits of this exercise.
Muscles targeted: Gluteus maximus, hip abductors, hip rotators.
Your hips can perform a wide range of movements. However, when it comes to stretching them, most people ignore hip rotation. Let’s fix that with this simple yet effective dynamic hip stretch. Whatever leg workout you are doing, your hips will feel better after this exercise.
Steps:
Stand with your feet together and your arms at your sides.
Bend one leg and push your knee out as you raise your foot toward your groin.
Grab your foot and shin, gently pulling it up and in.
Release your foot, switch sides, and repeat.
Alternate legs for 12-20 reps per side.
Do this exercise on the spot or while walking forward as preferred.
6. Dynamic side lunge
Muscles targeted: Gluteus maximus, abductors, adductors.
Like exercise #4, the squat-to-stand, this exercise works a lot of different lower body to deliver a time-efficient warm-up. It’s an excellent way to prepare your legs for squats and lunges and is especially useful for athletes involved in lateral movement sports, such as soccer, football, basketball, and hockey.
Steps:
Stand with your feet together and arms by your sides.
Take a large step out to your left, bend your left knee, and lower your hips back and down toward the floor.
Push off your left leg and bring your feet back together.
Repeat on the opposite side.
Alternate legs for 10-20 reps per side.
7. Heels to buttocks
Muscles targeted: Quadriceps.
Whatever leg workout you are doing, the quadriceps are probably involved. This group of four powerful muscles is often tight and will definitely benefit from some extra care and attention. This exercise is one of a few that dynamically stretches the quads in relative isolation. It’s also a good hamstring activation drill.
Steps:
Stand with your feet together and arms by your sides.
Bend one leg and bring your foot up toward your butt. Grab your foot with one or both hands and gently pull it closer in.
Release your foot and repeat with the other leg.
You can do this exercise on the spot or while walking forward as preferred.
Alternate legs for 10-20 reps per side.
8. Walking knee grab
Muscles targeted: Gluteus maximus, hamstrings.
The glutes are the largest and one of the strongest muscles in the human body. It’s incredibly hard-working and involved in most lower body movements, both as a prime mover and stabilizer. This exercise takes your hips into a flexed position, providing your glutes with a brief but welcome stretch.
Steps:
Stand with your feet together and arms by your sides.
Bend your leg and lift your knee toward your chest.
Grab your shin and gently pull your leg in and up to get a deeper stretch.
Release your leg, switch, and repeat 10-20 times per leg.
You can do this exercise on the spot or while walking as preferred.
Rise up onto tiptoe on your supporting leg to warm-up your calves and make this exercise even more dynamic.
9. Walking toe swipe
Muscles targeted: Hamstrings, gastrocnemius, gluteus maximus.
The walking toe swipe is an excellent exercise for anyone preparing for a locomotive workout, i.e., one that features walking or running. Not only is it an effective dynamic stretch, but it will also help fire up the muscles in your supporting leg.
Steps:
Stand with your feet together and your arms by your sides.
Take a step forward and, with your knee straight, pull your toes upward.
Hinge down from your hips and bring your arms forward to brush your foot.
Step forward, stand up, and switch legs.
Continue alternating legs for 10-20 reps per side.
10. Spider-Man lunges
Muscles targeted: Gluteus maximus, hamstrings, hip adductors, calves.
Of all the Marvel superheroes, Spider-Man is arguably the most athletic and agile. His ability to swing from webs and climb walls mean he’s got more in common with an Olympic gymnast than an eight-legged creepy-crawly! While this exercise won’t turn you into a superhero, it will help you develop marvelous hip mobility!
Steps:
Adopt the push-up position with your arms and legs straight. Brace your core.
Bend one leg and place your foot on the floor just outside your hand.
Ease your hips toward the floor to get a deeper stretch.
Return your leg to the starting position and repeat on the other side.
Alternate legs for 10-20 reps per side.
11. Dynamic 90/90 stretch
Muscles targeted: Gluteus maximus, abductors, adductors, hip rotators
Tight hips can hurt your workout and athletic performance in many ways. As well as reducing your range of motion, e.g., squat depth or stride length, tight hips are more prone to acute injury and chronic wear and tear. This exercise is a great way to stretch and mobilize your hips.
Steps:
Sit on the floor with your legs bent to 90 degrees and feet flat. Your torso should be upright and in good posture.
Roll your knees to the side and lower them to the floor. Turn your upper body toward your leading leg and lean forward slightly to deepen the stretch.
Return to the starting position and repeat to the other side.
Alternate legs for 6-10 reps per side.
Place your hands on the floor and use them for assistance if required.
12. Scorpion stretch
Muscles targeted: Hip flexors, quadriceps, rectus abdominis.
The scorpion stretch is one of those exercises that looks incredibly tricky but is actually relatively easy. However, it still provides an excellent dynamic stretch for the front of your hips and thighs while mobilizing your spine. That said, if you have a history of back pain, you may want to take it easy with this stretch or skip it entirely.
Steps:
Lie on your front with your arms stretched out to your sides to form a T-shape.
Bend one leg and cross it behind you toward your opposite hand. Keep your shoulders down, but lift and rotate your hips as much as necessary.
Return to the starting position and repeat.
Alternate legs for 5-10 reps per side.
Leg Stretches Before a Workout – FAQs
1. Why is warming up essential before a workout?
Warming up prepares your muscles and joints for the workout to follow, enhancing your performance while lowering the risk of injury. While injuries can still occur, a good warm-up can reduce the risk, making it a vital part of any exercise routine.
2. What is the difference between dynamic and ballistic stretches?
Both dynamic and ballistic stretches involve movement so they’re easy to confuse. However, where dynamic stretches are done smoothly and with control, ballistic stretches are done much faster.
Ballistic stretches are common in sports where movements are performed explosively, such as soccer and martial arts. However, for most exercisers, the risks of ballistic stretching outweigh their benefits.
You can read more about the pros and cons of ballistic stretching here.
3. How should I structure my warm-up routine?
An effective warm-up should consist of several stages: a pulse raiser involving cardio to increase tissue temperature and blood flow, mobility exercises to improve joint range of motion, dynamic stretches replicating workout movements, and ramped sets to gradually prepare your muscles for your main training session.
Work your way through all four stages spending as much time as necessary in each one. Adapt your warm-up to match the demands of your workout, tailoring each stage to your unique requirements.
4. How long should my warm-up last?
The ideal warm-up duration depends on various factors, including the intensity of your workout, recent activity levels, age, training venue temperature, and injury history. Most warm-ups last between five and 20 to 30 minutes.
Adjust the duration based on your training needs and goals. Warm up until you feel ready to train and avoid doing more than necessary, as your time and energy will probably be better used in your workout.
5. Are dynamic stretches good for improving flexibility?
Yes indeed! Contrary to popular opinion, dynamic stretches can help improve your flexibility (3). This is especially true when they are performed before a workout e.g., for a deeper squat. That said, while dynamic stretching is effective for improving flexibility, static stretching still has a place in a well-rounded flexibility program.
Combining dynamic and static stretching with other mobility exercises like foam rolling can lead to greater flexibility increases in less time.
Wrapping Up
An old rugby coach once told me that if you don’t have time to warm up, you don’t have time to work out. Not warming up can hurt your training performance, making your workout less effective, and could even lead to injuries. Skipping your warm-up might save you a few minutes but could cost you months in less productive workouts and injuries.
As warming up will add time to your training session, it makes sense to use the best tools for the job. Regarding stretching, that means dynamic stretches. Dynamic stretches offer many advantages over static stretches, including greater time efficiency and specificity.
Build your lower body warm-ups around the 12 exercises described above. Two to four stretches should be all you need to get ready for your next workout. Pick the exercises that best replicate the movements in your program.
References:
Fradkin AJ, Gabbe BJ, Cameron PA. Does warming up prevent injury in sports? The evidence from randomized controlled trials? J Sci Med Sport. 2006 Jun;9(3):214-20. doi: 10.1016/j.jsams.2006.03.026. Epub 2006 May 6. PMID: 16679062.
Nelson AG, Kokkonen J, Arnall DA. Acute muscle stretching inhibits muscle strength endurance performance. J Strength Cond Res. 2005 May;19(2):338-43. doi: 10.1519/R-15894.1. PMID: 15903372.
Egan AD, Cramer JT, Massey LL, Marek SM. Acute effects of static stretching on peak torque and mean power output in National Collegiate Athletic Association Division I women’s basketball players. J Strength Cond Res. 2006 Nov;20(4):778-82. doi: 10.1519/R-18575.1. PMID: 17194244.
The 9 Best Morning Stretches for Men
Most exercisers have heard the expression “use it or lose it” many times. These five little words describe how your fitness and strength quickly decrease if you discontinue training. While your body will barely register a break of a week or two, skip the gym for three weeks or more, and your muscles will shrink, and you’ll lose strength and conditioning.
Take a long enough break, and your body will eventually end up back where you started – weak and out of shape. Sadly, you cannot store fitness.
The concept of use it or lose also applies to flexibility, which describes the range of movement at a joint or joints. In the same way that your muscles weaken from lack of use, they can also get shorter and tighter. This is especially true for sedentary people who spend long periods sitting.
Tight muscles can have an adverse effect on your performance and appearance. They’re less contractile, pull you into poor posture, and are more prone to injury.
Poor flexibility can even hurt your muscle-building gains. For example, tight pecs will stop you from using such a big range of movement during your chest workout, making your training less effective. Tight quads and hammies will prevent you from squatting to parallel and beyond, robbing you of the leg gains you crave.
The good news is that flexibility is very trainable, and you can restore lost muscle elasticity in less than 15 minutes a day.
In this article, we reveal the best stretches for men, presented to you in an easy-to-follow morning routine.
The Nine Best Morning Stretches for Men
These are the most important stretches for men. Do each one for 30-60 seconds to create a morning stretching routine that takes about 15 minutes to complete. If any of these exercises feel particularly difficult, find time to repeat them elsewhere during your day, as those are the muscles probably that need your attention.
1. Standing arms overhead stretch
Muscles targeted: Latissimus dorsi, deltoids, pectoralis major.
Every good workout starts with a warm-up, and this stretching routine is no different. This simple stretch is designed to gently wake up your muscles and loosen up your upper body. Use this time to get your head in the game, practice your breathing, and prepare yourself for the stretches that follow.
Steps:
Stand with your feet together, arms by your sides. Your legs should be straight but not locked.
Interlace your fingers. Gently pull your shoulders down and back and engage your core.
Raise your arms above your head so your biceps are next to your ears. Press the palms of your hands up toward the ceiling.
Hold this position for 30-60 seconds, and then slowly lower your arms and relax.
Tips:
Sway gently from side to side to increase the stretch.
Plant your feet firmly, and imagine you are pushing the floor away with your legs.
Take care not to overextend your lower back.
2. Cat/cow
Muscles targeted: Upper and lower back.
Cat/cow is a classic yoga exercise that’s great for mobilizing your entire spine. Having just woken up, your back may feel stiff, a problem made worse by prolonged sitting. This exercise gets your lumbar, thoracic, and cervical spine moving, leaving your back feeling flexible and mobile.
Steps:
Kneel on all fours with your arms straight, shoulders over your hands, and hips over your knees. Pull your shoulders down and back and engage your core.
Lift the middle of your back up toward the ceiling as you lower your head down toward the floor. Imagine you are an angry cat.
Next, lift your head and tailbone while lowering your abdomen down toward the floor, like a milk-laden cow.
Slowly and smoothly alternate between these two positions for 30-60 seconds or 6-12 reps.
Tips:
Kneel on a folded exercise mat for comfort.
Exhale as your flex your spine, and inhale as you lift your chest.
Make sure your fingers are pointing forward and your elbows are rotated backward and into your sides for best results.
3. Low lunge
Muscles targeted: Hip flexors, rectus abdominis.
The low lunge is designed to stretch the front of your hips and abs. These muscles are often tight because of prolonged sitting. Also known as a runner’s lunge, this exercise is good for everyone, especially athletes, and will help make your hips feel looser and more mobile.
Steps:
Kneel on the floor and take a step forward so your front shin is vertical. Pull your shoulders back and down and engage your core.
Ease your weight forward to extend your hip. Move your rear knee further back to achieve a deeper stretch.
Keep your torso upright and even lean back slightly to lengthen your abs more.
Hold for 30-60 seconds, and then switch sides.
Tips:
Place your rear knee on a folded exercise mat or foam pad for comfort.
Link your hands behind your hips to open your chest and increase the stretch.
Do not twist your pelvis, as doing so makes this stretch less effective.
4. Seated adductor stretch
Muscles targeted: Adductor longus, brevis, and magnus.
The adductors are your inner thigh and groin muscles. Adductor/groin strains are very common, especially among athletes. Prolonged sitting puts these critical muscles into a chronically shortened position, which is why most men have tight adductors and hips.
Steps:
Sit on the floor in good posture. Bend your legs and place the soles of your feet together. Lightly grip your ankles and rest your elbows on your knees.
Using your elbows for assistance, gently press your knees out and down toward the floor.
Hold for 30-60 seconds and then release.
Tips:
Sit on a raised platform, e.g., a yoga block, if you cannot keep your lower back straight.
Hinge forward from your hips to increase the stretch.
Keep your chest up and open throughout; do not slouch.
5. Supine figure-four stretch
Muscles targeted: Gluteus maximus, piriformis, hip adductors.
The stretch hits your glutes and outer hips and thighs. These areas are notoriously hard to stretch, and tightness in this region can cause hip and knee dysfunction. This is a common site of tightness for runners and active people, as these muscles often have to act as stabilizers.
Steps:
Lie on your back with your legs bent and feet flat on the floor.
Cross your left ankle over your right knee.
Hold on behind your right knee and gently pull it toward you.
Hold for 30-60 seconds, and then relax.
Switch sides and repeat.
Tips:
Keep your head and shoulders on the floor throughout.
Push your knee outward to open your hips and intensify the stretch.
Don’t worry if this exercise is hard – that’s perfectly normal!
6. Assisted hamstring stretch
Muscles targeted: Hamstrings.
If there is one muscle you can almost guarantee will be tight in most men, it’s the hamstrings. This long, powerful muscle group is often kept in a flexed, shortened position, invariable leading to tightness. Spend extra time on your hamstrings if you cannot get your leg vertical during the following exercise.
Steps:
Lie on your back with your legs bent. Loop a belt, yoga strap, or resistance band over one foot and straighten your leg.
Use your arms to gently pull your leg up until you feel a stretch in the hamstrings at the back of your thigh.
Relax and hold for 30-60 seconds.
Switch legs and repeat.
Tips:
Rest your head on a pillow for comfort.
No strap? Clasp your hands around the back of your knee instead.
Bend your knee slightly to make this exercise a little easier.
7. Prone quadriceps stretch
Muscles targeted: Quadriceps, hip flexors.
Most quadriceps stretches involve standing on one leg. While can be effective, your balance may determine how well you are able to stretch your quads. This exercise requires no such balance and ensures your hips and thighs remain in optimal alignment.
Steps:
Lie on your front with your legs straight and your head resting on your folded arms.
Bend one leg and reach back to grip your ankle.
Gently pull your foot into your butt and hold for 30-60 seconds.
Relax, release, and swap legs.
Tips:
Wrap a belt or yoga strap around your ankle if you cannot reach it comfortably.
Place a folded mat under your hips for comfort.
Do not hold into your toes or foot, as this puts unnecessary strain on your ankle joint.
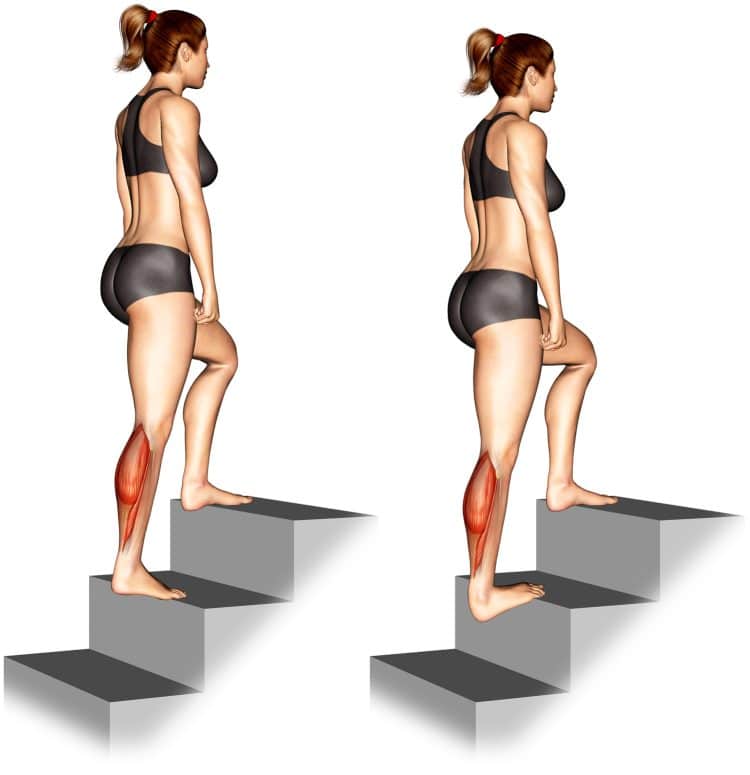
8. Standing calf stretch
Muscles targeted: Gastrocnemius, soleus.
Tight calves can have a profound effect on how you walk and run and can even contribute to knee, hip, and lower back pain. The good news is that the calves are also one of the easiest muscles to stretch, and all you need is a step to do it!
Steps:
Stand with the balls of your feet on the edge of a stable step. Use your arms for balance as required.
Keeping your legs straight, lower your heels down below the edge of the step to get a good stretch in your calves.
Hold for 30-60 seconds, and then relax.
Tips:
Shift your weight onto one leg to stretch one calf at a time.
Bend your knees slightly to emphasize your soleus or lower calf.
Turn your foot in or out to hit the different heads of your calf muscles.
9. Doorway chest stretch
Muscles targeted: Pectoralis major, anterior deltoids.
Like the hamstrings, most people have tight pecs – especially men. All that bench pressing and sitting at a desk means the pecs or often short, which can wreak havoc on your shoulder health and posture. So, if you’ve only got a few minutes to stretch, you should spend that time on your hammies and pecs. This will fix two of the most common flexibility problem areas.
Steps:
Stand in an open doorway. Place your forearms and elbows on the vertical frames, upper arms parallel to the floor.
Adopt a staggered stance.
Pulling your shoulders down and back, push your chest between your arms to stretch your chest.
Hold for 30-60 seconds, and then relax.
Tips:
You can also do this exercise in the corner of a room if no doorway is available.
Raise and lower your arms to hit different parts of your chest.
Stretch one side at a time to detect and fix left-to-right flexibility imbalances.
Stretching Guidelines and Tips for Men
Stretching is good for everybody’s body, but it’s especially critical for men. Women tend to be more flexible than men because a) their bodies produce more of the hormone relaxin, which enhances muscle elasticity, and b) they’re more likely to have done dance, gymnastics, or yoga, all of which promote flexibility.
With less elastin and an athletic history focused more on strength than suppleness, men tend to suffer from muscle tightness more than women. Poor flexibility is then made worse by prolonged sitting and other sedentary activities.
Because they’ve got poor flexibility, men are often reticent to stretch. That’s why you won’t see many guys stretching at your local gym. No man wants to be seen struggling to touch his toes!
And that’s where the morning stretches in this article come in; you can do them at home, working on your flexibility in private and comfort.
But you must stretch correctly to get the most from your new morning routine. Like lifting weights, there is a right way and a wrong way to perform any stretching exercise. Invariably, the right way produces rapid results, while the wrong way is a waste of time and energy.
Follow these guidelines to get the most from every stretch you do.
1. Ease into each stretch
Because of sensory organs called muscle spindles, when you stretch a muscle too quickly, its initial response is to contract and shorten. This is a self-preservation mechanism designed to prevent overstretching and injury.
However, if you stretch slowly, those same spindles tell your muscles to relax and lengthen.
To avoid triggering the so-called stretch-shortening reflex, you must ease into each stretch and then wait for the muscle to relax. After 10-20 seconds, you’ll feel the tension leave your muscles so you can stretch a little further.
Repeat this stretch/wait/relax/stretch sequence several times for optimal results.
2. Breathe slow, quiet, and deep
While you probably don’t need to be told to breathe, how you inhale and exhale can determine how effective your stretches are. To maximize flexibility, you need to work with your parasympathetic nervous system, which is responsible for energy conservation and relaxation.
Rapid, shallow breathing sends stress signals to your muscles, readying them for activity. It fires up your sympathetic nervous system, which is linked to energy expenditure. As a result, your muscles tighten up and are less receptive to stretching.
In contrast, slow, quiet, deep breaths tell your muscles that it’s okay to relax, making your stretches more effective. Breathe in for 4-6 seconds and out for the same. Focus on breathing into your abdomen and not your chest. Nasal and not mouth breathing may also help promote relaxation.
3. Don’t bounce or jerk
While you might have seen athletes warming up with bouncy, jerky ballistic stretches, these have no place in your morning flexibility routine. Ballistic stretches are somewhat dangerous and won’t do much for muscle relaxation or long-term flexibility. Instead, they trigger the stretch-shortening reflex discussed in point number one.
So, no bouncing or jerking while you stretch. Instead, make your movements slow, smooth, and deliberate.
4. Ease off if your muscles shake or burn
Bodybuilders like to say, “no pain, no gain,” but the opposite is true when it comes to stretching. Forcing your muscles to stretch further than comfortable will make them contract and tighten up.
Shaking or burning suggests you have extended your muscles beyond their current limit and should ease off to avoid injury.
5. Don’t forget about your posture
It’s all too easy to put all your focus on the muscles you are stretching and completely forget about all your other muscles and joints. For example, you can slouch while stretching your hamstrings or push your head forward while working on your pecs.
While most of your attention SHOULD be on the muscle you’re stretching, don’t forget about the rest of your body. Make sure your posture is as good as it can be. In most cases, this will make your stretches even more effective.
6. Visualize your muscles lengthening
Exercisers often talk about the importance of the mind-muscle connection. This is the term used to describe the ability to feel what muscles you are exercising. Visualizing your muscles working can help strengthen the mind-muscle connection, often resulting in better workouts and faster progress.
You can use the same technique to enhance your flexibility. Imagine you’re your muscles relaxing and lengthening like warmed clay. Picture your relaxed breaths traveling into the muscle you’re stretching. See the tension leaving your muscles so you can ease into a deeper stretch.
While these techniques will take practice to master, combined with your controlled breathing, they’ll make stretching much more effective.
7. Be consistent
Your muscles will soon shorten if you don’t stretch them regularly. Your body is incredibly adaptive, and spending long periods sitting will make your muscles tighten up. Sit in a chair for four hours straight, and you’ll feel these muscle-shortening effects for yourself.
So, if you want to improve your flexibility and stop being so tight, you need to commit to regular stretching. Not a couple of times a week, but every day.
Adopting a morning stretching routine is one of the best ways to do this, as it will soon become a habit and something you do automatically, like brushing your teeth or having breakfast. So, stretch every day to fix your flexibility.
Related: Seven Tips for More Consistent Workouts
Morning Stretches FAQs
Do you have a question about morning stretches for men or flexibility training in general? No problem, because we’ve got the answers!
1. Do I need to warm up before my morning stretching routine?
Providing you don’t stretch too far too fast, you probably don’t need to warm up before doing this morning mobility routine. Just start off gently and only increase the stretch as your muscles begin to relax.
Also, the order of the stretches is such that each one prepares you for what comes next. Finally, ease off if any of the stretches feel uncomfortable or painful.
That said, if you’ve got time to do a few minutes of light cardio before stretching, it certainly won’t do you any harm, as warm muscles usually stretch more readily.
2. Do I need to do all nine stretches in my morning routine?
Between them, these nine stretches target all your major muscle groups. However, it’s common for some muscles to be tighter than others, while some muscle groups may already be sufficiently flexible.
If you can’t feel a stretch, this suggests that the target muscle is as flexible as it needs to be, so you can probably skip it for now. However, do all the stretches occasionally to determine if anything has tightened up.
3. Do I have to do all these stretches in one go?
While this morning stretching routine should take no more than 15 minutes to complete, we understand that may be too long for some people, especially if you are rushing to get ready for work or school.
If you cannot find a spare 15 minutes to complete this routine, consider breaking it into thirds and doing it throughout your day. For example, do the first three exercises on rising, the next three when you get home from work, and the final three before bed.
Alternatively, you could do one stretch every hour or so to break up your working day.
While these approaches may not be quite as effective as a morning stretching routine, any stretching is better than none.
4. Can I do this routine more than once a day?
Providing you don’t go too aggressively, you can stretch several times a day without ill effects. In fact, the more often you stretch, the quicker your flexibility will improve. So, if you’ve got the time, feel free to stretch two or three times per day.
Alternatively, you could run through the routine once and then pepper your day with short bouts of stretching to keep on top of your flexibility training. This is a good option for desk warriors who tighten up as their workday progresses.
5. Can I stretch for longer than 30-60 seconds?
By all means, hold your stretches for longer, e.g., 2-3 minutes. However, you may find it more comfortable if you work in sets and reps, e.g., stretch for 30 seconds, relax for a breath or two, and repeat 4-6 times. This is usually more enjoyable than staying in the same position for a long time. However, you should endeavor to stretch a little deeper each time as your muscles lengthen and relax.
Related: Calories Burned Stretching Calculator
Wrapping Up
Some fitness experts believe that stretching is a waste of time. They’re quick to suggest it has no measurable effect on performance or risk of injury.
However, decades of anecdotal evidence suggests that regular stretching can be incredibly beneficial, especially for people who spend a lot of time locked into a fixed position, e.g., office workers. Not only that, it feels good!
Tight muscles often feel tender and painful, and the obvious antidote is to stretch more.
So, don’t worry about the naysayers; stretching will invariably do more good than harm, and it’s definitely not a waste of time. In fact, in terms of posture, mobility, and joint health, it’s probably one of the best things you can do.
Calves Stretch Guide: How-To, Calves Anatomy, Benefits, and Variations
Whether you like it or not, stretching is part of the body’s necessary maintenance routine. It alleviates stress, keeps our muscles and surrounding tissues healthy, prevents avoidable injuries, and allows us to move every day, even in our older years. Tight muscles are a problem, and today we want to focus on the calves stretch. These rear-facing lower leg muscles are both key performance and postural muscles that take a lot of abuse. Or not, for the average couch potato. Doesn’t matter, both are good candidates for regular stretching.
This guide demonstrates the very best calf stretches to improve your range of motion, alleviate and prevent common foot problems, and stop injuries due to high-intensity activities.
Muscles Involved During Calves Stretch
Let’s talk about what makes up these smaller leg muscles, and how they work.
Calves
Slapped on the posterior lower leg and threaded through the knee and ankle joints, the calf muscle fibers are divided into two heads – gastrocnemius, and soleus. The former is the larger, more visible, and also the stronger calf, while the soleus is a longer, and flatter muscle underneath the gastrocnemius.
The gastrocnemius and soleus fuse together at the lower leg to form what’s known as the achilles tendon, which connects the calves to the heel.
What do the calves do for us?
When you flex a muscle, it’s performing the function in which it was designed. For the calves, that is plantarflexion of the foot and ankle. We do this when pressing the gas pedal in a car, or when standing on our tiptoes to reach something above us.
Consequently, calves are heavily involved in physical performance, contributing to explosive movements like running and jumping. Calves, especially the soleus, is important for helping us to stand upright.
And because the calves are so active, we need to give them adequate stretching to keep them mobile, flexible, and strong enough to endure what we put them through.
How To Do The Calves Stretch
A calf stretch done wrong can be less forgiving than stretches for other muscle groups. That’s because the ankle and foot area, while strong, can easily be overstressed. So we’re going to show you a basic calf stretch from a step, but also consider the variations offered too.
Before stretching any muscle, it’s best to warm up with light intensity technique to drive blood in the area, and make it more pliable. Otherwise, stretching a cold muscle could cause harm. A few minutes of running in place, or a brisk walk are sufficient, according to the American Academy of Orthopedic Surgeons.
Note: We only recommend this stretch for people with healthy ankles, and feet, and good balance, and coordination. Jumping straight into a deep calf stretch using your body weight, with incorrect form, can stress everything from the achilles tendon, to the ankle, and even the fascia tissue in your feet.
Also, make sure to use a stable, safe object to do calves stretches, like a staircase, doorstep, cement platform, bench, etc.
Steps
Step up on a raised platform with both legs. You can hold onto an object for balance, and to have better control over the stretch and prevent injuries.
Now slide either foot back until the heel is hanging off the edge of the step, and keep the other, non-working foot where it is, flat on the platform.
Keeping the rear leg straight, slowly drop the heel down a few inches, while bending the front leg. You should feel a nice stretch in the calf of the back leg.
Hold for about 10-20 seconds, reset, and do it again a few more times.
Here’s a quick video example of the calves stretch from a platform.
Tips
Don’t lean your full weight onto the calf being stretched. The goal is to drop the heel, and use your body to control the resistance, only applying enough force to stretch the calves without feeling strain in the joints and foot.
You can use a thick book or yoga block, which will allow your heel to touch the floor, and reduce the force applied to your ankles and feet.
As you can see from the video example, keeping the non-working foot on the platform, rather stretching both calves at the same time allows you more control over how much force is applied to the stretch. Reducing your body weight load, and preventing overstressing the ankles and feet.
This Exercise:
Target Muscle Group: Gastrocnemius, soleus
Type: Stretch
Mechanics: Isolation
Equipment: Step
Difficulty: Beginner
Benefits of Calves Stretch
Stretching is something we should all be doing, and while the calves may be ignored compared to other muscles, they’re just as, if not more important because they bear our weight. Let’s discuss the benefits of stretching your calves frequently.
Keep performing
As explained in the muscles involved during calves stretch section, your calves are performance muscles. Sprinting, running long distances, and lifting heavy on your feet punishes the calves too. But calves also assist in the gait or walking cycle, and support standing posture. So keeping them healthy, functional, and able to fully contract is key to longevity, and staving off injuries because physical performance is very demanding on the lower body.
Speaking of injuries…
Prevent injuries
Tight calf muscles are most commonly caused by overuse or lots of physical activity. Although underuse, improper warmup, and other causes exist. But overuse without proper maintenance can run you into injuries from tightness that affects lower body function. So if you’re someone who runs and plays sports you should be stretching the calves regularly.
Not to mention, you may benefit from increased blood flow to a muscle, which could reduce muscle soreness. But it could also be what helps improve certain foot conditions…
Possibly improve common foot and lower leg issues
When you stretch the calves, you’re also stretching the foot. This is said to be one thing you can do to improve common foot conditions such as plantar fasciitis (affects the thick tissue connecting heel bone to toes causing pain and discomfort).
Another common stiff area in need of being stretched is the achilles tendon, especially when someone develops achilles tendinitis. This tendon is formed by the two calf muscles and helps connect to the heel bone. It’s also the largest tendon in the human body. Recruited during walking, running, jumping, etc, achilles tendon experiences a lot of wear. Tight calves can also affect the achilles tendon.
The American Academy of Orthopaedic Surgeons recommends calf stretches to help alleviate minor achilles tendon issues.
Common Mistakes When Performing Calves Stretch
Bad calves stretch technique is dangerous and it can sideline you for a while, or cause ongoing issues in the ankle and foot. Follow these tips to help keep those problems in the rearview mirror.
Placing all your weight into the stretch
Unlike a calf raise exercise, you don’t actually want all your weight on the foot and ankle. In fact, this will force the calf muscles to contract in order to resist your body weight load. And it’s a lot of stress on the ankles and feet. It’s better to stretch one calf at a time, so you can use the stationary, non-working foot to help control the depth of stretch in the working calf. This is a much safer, and healthier way to stretch the calves.
Rushing the stretch
Due to the nature of a calves stretch, it’s not one you want to rush through, although the variation can make a big difference too. But we’re talking about the variation from a step or platform where the heel hangs off the edge and your weight is on the ankles, creating unequal force distribution.
Many people notice the same discomfort and pain when they do weighted calf raises too heavy, and too quickly. Drop the ankle, feel a little stretch, and don’t overdo it.
Being unbalanced
You don’t want to be unstable while doing calf stretches as the lack of control can be dangerous for the joints. It’s better to hold onto something for support if you cannot maintain balance without it.
Variations of The Calves Stretch
All calves stretch variations can be useful, and you may prefer one over the other. But we also included the following calves stretches that are unique in their own way, and, are top notch!
Runners stretch
Commonly called the runner’s stretch for obvious reasons, it’s a good technique for most people. It offers a solid, stable stretch with equal weight balance, and you can have more control, pushing as little or hard during the stretch.
Steps
Find a wall or similar, and place your palms against it, spaced roughly shoulder width apart, and elbows slightly bent. Stand with your feet far enough back, about 12 inches or so from the wall.
Now slide one foot back about 6-12 inches behind the other in a split stance, and keep both feet flat on the ground. Keep your toes pointed straight forward towards the wall.
Now push into the wall, and feel the stretch on the calf of the rear foot. Keep the front leg bent and the rear leg mostly extended.
Hold for 10-20 seconds, rest a few seconds, and do it two more times.
Switch your foot position, bringing the rear foot forward, and sliding the other one back. Repeat.
Pro tip: Bend both knees together to emphasize the stretch in your soleus calf muscle, which also benefits the achilles tendon.
Calf stretch on a slant board
A good choice for those with plantar fascitis, and other common foot issues, stretching the calf on a slant board creates equal weight distribution, it’s more stable, and allows you to better control the intensity of the stretch.
Steps
Step your heel at the base of the slant board and lie your foot flat against it with the toes pointing forward.
Move the other foot forward to increase the stretch in your calf.
Hold for 10-20 seconds, relax, and repeat a few more times, then switch legs.
Calf stretch sitting down with legs extended
If you want to stretch your calves with less resistance, in a more relaxed position, you can sit on the floor with legs extended, and use a belt, leash, or resistance band to pull against your toes, and stretch the calves.
Make sure to relax your ankle, and pull for a few seconds at a time. Lean into the stretch to include your hamstrings too.
Calf foam rolls
One way that you probably didn’t expect to loosen up the calves is using a foam roller. You’ll create healthier fascia, and calf muscles.
Steps
Sit on the floor and lay a foam roller where your legs will be. Extend both legs and rest your calves on the foam roller.
Now place your hands on the floor, and use your arms to lift your butt off the ground.
Use your arms to move your body forward and back, rolling the roller up and down your calves.
Roll for about a minute, rest, and do it again for another minute.
Pro tip: For a more intense calf massage, cross one leg over the other and repeat steps above.
FAQs
How many sets should I do? There’s no sure answer to this. It really depends on how much time you have, how many times per day you stretch a muscle, how long you’ve been stretching, and the length of each set or number of seconds you hold a stretch.
If stretching once a day, two-three sets x 20-30 second stretches should be plenty.
But you could also do more sets and shorter stretch durations. Find what works best for you, but try not to overdo it.
What is the most convenient calf stretch?Out of the many variations, we’d say the runner’s stretch is the simplest and most convenient. You don’t need any aids or tools, and it is safe on the joints and more supported with the feet flat on the ground, not stressing the ankles and feet.
Wrapping Up
It’s as simple as that. Warm up with a brisk walk, then get to stretching, or stretch your calves after your physical activities. You’ll ensure that your calves, ankles and feet stay up to health. Plus, calves stretching requires a very small time commitment, and no equipment (for some variations).
Just be sure to go slow, don’t force anything, and be consistent. These are key to effective stretching, and avoiding worse problems due to bad technique.
This guide is a detailed resource that explains and demonstrates proper calves stretching, with tips that you don’t want to skip over.
The Best Quadratus Lumborum Exercises and Stretches
When it comes to core and lower back training, most people focus on the well-known muscles, like the rectus abdominis, obliques, transverse abdominis, and erector spinae. This makes a lot of sense as these muscles are the biggest and usually the most visible. Exercisers often know these muscles by name and use carefully-chosen exercises to target them.
However, delve a little deeper, and you’ll find many other muscles that are every bit as important. While you usually can’t see these muscles, they’re always working in the background, providing aid and support.
In some instances, tightness or weakness in these lesser-known muscles can cause pain and dysfunction. After all, a chain is only as strong as its weakest link. For example, a weak rotator cuff can wreak havoc on your shoulder joint.
In this article, we examine the role of the quadratus lumborum muscle and reveal the best stretching and strengthening exercises for this unsung hero of the lower back.
Quadratus Lumborum Anatomy
The quadratus lumborum, or QL for short, is a deep back muscle. That means it lies beneath other muscles, including the lats and paraspinal muscles. QL is a large, flat muscle located between the iliac crest of your upper pelvis and your 12th (lowermost) ribs.
There are two QL muscles – left and right – that can work independently as well as together.
The functions of the quadratus lumborum are:
Lateral flexion of the spine – bending sideways.
Extension of the spine – bending backward.
Stabilizing the spine – preventing unwanted movement.
QL tightness can affect your lower back and pull your spine sideways, putting undue stress on your hips, lumbar spine, and intervertebral disks. In contrast, a weak QL can reduce lumbar spine and hip complex stability, increasing your risk of injury.
7 Best Quadratus Lumborum Stretches
Do you feel like you’re being pulled sideways? Do you have pain in one side of your lower back? Are your hips uneven heights? If so, your QL could be tight. Use these stretches to restore your QL to its ideal resting length.
1. Standing QL stretch
The standing QL stretch is probably the most basic way to lengthen your quadratus lumborum. Requiring no equipment and minimal space, it’s the ideal stretch for home exercisers. You can also do this exercise after long periods of sitting to release any accumulated QL muscle tension.
Steps:
Standing tall, cross your left foot over your right foot.
Raise your left arm above your head.
Lean your upper body over to the side, gently pushing your hips in the opposite direction to intensify the stretch.
Hold for 30-60 seconds, and then relax.
Repeat on the opposite side.
Muscles Targeted:
Primary: Quadratus lumborum, latissimus dorsi, obliques.
Secondary: Erector spinae, rectus abdominis.
Benefits:
An easy exercise to learn.
Very spine-friendly.
Provides a welcome lat stretch as well as elongating your QL muscle.
Tips:
Note any left-to-right flexibility imbalances and spend more time on the side that feels tightest.
Keep your hips and shoulders square to maximize the effect of this stretch.
You can also do this exercise standing next to a wall for support:
2. Gate pose
Gate pose is a yoga exercise for your QL, lats, lower back, abs, and hips. It’s an effective way to stretch and relax all the muscles on one side of your body. Because there are two sets of QL muscles, it’s quite likely that you will find that one side is tighter than the other. If this is the case, spend more time stretching the side that feels most restricted.
Steps:
Kneel down so you’re in good posture, with your torso upright and shoulders down and back.
Move one foot out and away to the side so your leg is straight. Engage your core and glutes.
Next, slide your hand down your outstretched leg while simultaneously raising your other arm above your head.
Lean over as far as is comfortable, taking care not to twist your shoulders or hips.
Hold this position for 30-60 seconds, and then slowly relax.
Swap sides and repeat.
Muscles Targeted:
Primary: Quadratus lumborum, latissimus dorsi, obliques.
Secondary: Erector spinae, rectus abdominis, adductors.
Benefits:
A very comfortable stretch.
Easy to modify based on your current flexibility level.
Quite relaxing and an excellent way to ease tension in your lower back and hips.
Tips:
Kneel on a folded mat for comfort.
Increase the stretch as you exhale and feel your muscles relaxing.
Gently ease your open armpit backward to deepen the stretch.
3. Triangle pose
The triangle pose is another yoga stretch that involves multiple lateral chain muscles, including your QL. The advantage of this pose is that you do it standing, which leads to a deeper quadratus lumborum stretch. However, it’s also a more challenging exercise, so make sure you master the gate pose before trying it.
Steps:
Stand with your feet slightly wider than shoulder-width apart. Your right foot should face forward, while your left foot should be turned out at a slight angle.
Raise your arms so they’re parallel to the floor, palms facing down.
Hinge at your right hip and lower your right hand down your right leg.
Simultaneously extend your left arm up toward the ceiling.
Hold this position for 30-60 seconds.
Switch sides and repeat.
Muscles Targeted:
Primary: Quadratus lumborum, latissimus dorsi, obliques.
Secondary: Erector spinae, rectus abdominis, adductors.
Benefits:
Provides a deep stretch for your QL and other waist and lower back muscles.
Performed standing, so no mat required.
Good for developing full-body positional awareness and balance.
Tips:
Experiment with the width of your stance to see what feels most comfortable.
Place your lowermost hand on a raised surface, i.e., a yoga block, to take the stress off your lower back.
Do this stretch on a non-slip surface, preferably barefoot, for stability and safety.
4. Seated QL stretch
Muscle tightness can strike at any time, but it’s most often caused by prolonged sitting, e.g., while you’re at work. Standing up and stretching is not always convenient – your boss may get upset! The good news is that you can stretch your QL without leaving your desk.
Steps:
Sit on the edge of your chair with your legs bent to 90 degrees, your shins vertical, and your feet planted firmly on the ground. Get into a good, upright posture.
Raise your right arm above your head and gently lean over to the left. Keep both sides of your butt on your chair.
Hold for 30-60 seconds, and then swap sides.
Muscles Targeted:
Primary: Quadratus lumborum, latissimus dorsi, obliques.
Secondary: Erector spinae, rectus abdominis.
Benefits:
An excellent exercise for office workers.
An ideal stretch for beginners.
An easy exercise for those with less mobility, e.g., older or chair-bound.
Tips:
This exercise works best on a chair without wheels.
You can also do this exercise while sitting on a bench or stool.
Sit on the floor with your legs crossed if you wish:
5. Child’s pose
Child’s pose gently eases your spine into a flexed position, stretching your quadratus lumborum and other lower back muscles. This exercise is excellent for releasing tension from your posterior chain. It is ideal for people with mild lower back tightness or pain. A few minutes in child’s pose is a great way to cool down after your workout.
Steps:
Kneel on all fours with your arms straight and shoulders above your hands. Your knees should be below your hips.
Ease your butt back and sit on your heels.
Lower your chest down toward the floor while keeping your arms extended in front of you.
Remain in this position for 1-5 minutes, going deeper as you feel your muscles relax.
Walk your fingers further away from you to deepen the stretch. You can also place your hands on yoga blocks.
Muscles Targeted:
Primary: Quadratus lumborum, erector spinae, latissimus dorsi.
Secondary: Gluteus maximus.
Benefits:
A gentle stretch for your QL and lower back.
A very relaxing, calming exercise.
An ideal exercise for cooldowns.
Tips:
Kneel on a folded mat for comfort.
Breathe slowly through your nose to maximize relaxation.
Experiment with different knee positions to find what’s most comfortable.
6. Knees-to-chest stretch
The knees-to-chest exercise provides a gentle stretch for your quadratus lumborum and other lower back muscles. Using your arms means you can increase the depth of the stretch as you feel your muscles start to relax.
Steps:
Lie on your back with your legs bent and feet close to your butt.
Lift your legs and hold on to the backs of your thighs.
Gently pull your knees toward your chest.
Hold for 30-60 seconds, and then relax.
Muscles Targeted:
Primary: Quadratus lumborum, erector spinae, latissimus dorsi.
Secondary: Gluteus maximus.
Benefits:
A gentle, relaxing stretch.
An ideal stretch for deconditioned exercisers.
Excellent for easing lower back tension and stress.
Tips:
Keep your shoulders and upper back on the floor.
Rest your head on a pillow or yoga block for comfort.
You can also do this exercise by lifting one leg at a time:
7. Dynamic standing QL stretch
Static stretches are great for easing muscle tension and increasing flexibility. Still, they tend to put your muscles to sleep and reduce contractility. As such, static stretches are ideal for cooldowns but less useful for warm-ups. This dynamic stretch won’t deactivate your muscles and is an excellent way to prepare your QL for your upcoming workout.
Steps:
Stand with your feet about shoulder-width apart, knees slightly bent. Hold your arms down by your sides.
Without twisting your hips or shoulders, lean to the left and stretch your hand down the outside of your leg.
Stand upright and repeat for 10-15 reps.
Switch sides and do the same number of reps on the right.
Muscles Targeted:
Primary: Quadratus lumborum, erector spinae, rectus abdominis.
Secondary: Hip abductors.
Benefits:
An excellent warm-up exercise.
Good for mobilizing your lower back before more intense activities.
An easy exercise to learn and ideal for novices and less fit people.
Tips:
Keep your knees slightly bent throughout.
Take care not to twist your hips or shoulders.
You can also do this exercise in an alternating fashion.
7 Best Quadratus Lumborum Strengthening Exercises
Weak quadratus lumborum muscles can increase your risk of back pain and injury. You need strong QLs to stabilize your lumber spine and prevent unwanted lateral movements.
While most people should train both sides of their QL, you may find that one side is weaker than the other. In this case, do an extra few reps or sets for the weaker side so it can catch up with the stronger side.
1. Bird dog
Bird dogs are a useful exercise that works your glutes, core, shoulders, and upper back. It’s also an effective quadratus lumborum strengthener. During this exercise, you must use your QL to stabilize your lumbar spine, which is one of its most critical functions.
Steps:
Kneel on all fours with your arms straight and shoulders above your hands. Your knees should be below your hips. Brace your core.
Extend one arm forward and your opposite leg backward until they’re parallel to the floor.
Return to the starting position and repeat on the other side.
Alternate arms/legs for a desired number of reps.
Muscles Targeted:
Primary: Rectus abdominus, transverse abdominus, quadratus lumborum, erector spinae, gluteus maximus.
Secondary: Hamstrings, deltoids.
Benefits:
A very spine-friendly exercise.
Teaches you how to brace your core while moving your arms and legs.
A great way to warm up before more demanding activities.
Tips:
Kneel on a folded mat for comfort.
Take care not to arch your lower back, as doing so increases your risk of injury.
Keep your core braced throughout.
2. 45-degree back extensions
This exercise provides a great way to overload your lower back and QL to make them stronger. However, to avoid injury, you must keep your spine in a neutral position, i.e., do not allow it to round. 45-degree back extensions are also an awesome glute and hamstring builder.
Steps:
Climb aboard the 45-degree back extension machine. Place your hips against the leg pad and your feet on the footplate. Bend your knees slightly.
Lean as far forward as your flexibility allows and without rounding your lower back.
Push your hips forward and raise your upper body back up so your shoulders, hips, and feet form a straight line.
That’s one rep – keep going!
Muscles Targeted:
Primary: Erector spinae, quadratus lumborum, gluteus maximus, hamstrings.
Secondary: N/A.
Benefits:
An effective way to overload your lower back muscles.
A very accessible exercise as most gyms have a 45-degree back extension machine.
A proven glute and lower back developer.
Tips:
Make this exercise harder by bolding a barbell in your hands or a weight plate across your chest.
You can also do this leg using one leg at a time to increase the overload on your glutes and hamstrings.
No 45-degree back extension machine? No problem – you can also do this exercise with your hips resting on a stability ball:
3. Side plank
Everyone knows that side planks work the obliques. But they’re also an excellent exercise for your quadratus lumborum. Best of all, because they’re isometric or static, they put very little stress on your spine, so they’re ideal for back pain sufferers.
Steps:
Lie on your side and rest on your lowermost forearm and elbow. Brace your core.
Lift your hips off the floor so your body is straight.
Hold this position for the required duration.
Lower your hips to the floor, roll over, and repeat on the other side.
Muscles Targeted:
Primary: Obliques, quadratus lumborum, rectus abdominis, erector spinae.
Secondary: Deltoids, hip abductors.
Benefits:
A very lower-back-friendly core exercise.
Good for increasing lateral stability and strength.
Do this exercise anywhere and anytime, as no equipment is required.
Tips:
Do not hold your breath during this exercise.
Rest your elbow/forearm on a folded exercise mat or foam pad for comfort.
Push your hips up toward the ceiling to maximally engage your QL and obliques.
4. Dumbbell side bend
The great thing about dumbbell side bends is that you can increase or decrease the weight to suit your fitness and how many reps you want to do. Use light weights for high reps to improve your endurance or heavy weights for low reps to build strength. With this exercise, you are the boss!
Steps:
Hold a dumbbell in one hand, arm down by your side.
Stand with your feet shoulder-width apart, knees slightly bent. Brace your core.
Lean sideways and lower the dumbbell down the outside of your leg.
Stand up straight and repeat.
Do the same number of reps on both sides.
Muscles Targeted:
Primary: Obliques, quadratus lumborum, rectus abdominis, erector spinae.
Secondary: Forearms.
Benefits:
An excellent way to overload your lateral chain muscles.
An accessible exercise as all you need is a single dumbbell.
A great exercise for building more muscular abs, a tighter waist, and a stronger lower back.
Tips:
Do NOT use two dumbbells, as doing so make the exercise much less effective.
Keep your hips and shoulders square throughout.
Use lifting straps if your grip fatigues before your core.
5. Single-arm farmer’s walk
Farmer’s walks are a popular conditioning exercise. It’s also one of the events often contested in strongman competitions. However, done using a single dumbbell or kettlebell, the farmer’s walk is also a tremendous quadratus lumborum exercise. Carrying an offset load forces you to use your QL to stabilize your lumber spine. Think of single-arm farmer’s walks as a moving side plank.
Steps:
Stand side-on to a dumbbell or kettlebell.
Squat down and grab your weight with the closest hand. Pull your shoulders down and back, and brace your core.
Stand up straight and then go for a walk around your training area.
Continue for the desired duration or until your grip starts to fail.
Lower the weight to the floor, swap sides, and repeat.
Muscles Targeted:
Primary: Obliques, quadratus lumborum, rectus abdominus, erector spinae, forearms.
Secondary: Upper traps, calves.
Benefits:
A highly functional exercise.
A great way to build a stronger grip and core.
An excellent calorie burner and cardio finisher.
Tips:
Keep your hips and shoulders level throughout your set.
Do this exercise with any heavy implement, including a barbell.
You can also do this exercise with your weight above your head – the waiter’s walk:
6. Kettlebell suitcase deadlift
No space to do farmer’s walks? We hear you! The good news is that you can get all the benefits of farmer’s walks without taking a single step. Suitcase deadlifts work in much the same way, but you do them on the spot. This is an ideal exercise for anyone who works out in a small gym.
Steps:
Stand side-on to a kettlebell. Your feet should be roughly shoulder-width apart.
Squat down and grab your weight with the closest hand. Pull your shoulders down and back, and brace your core.
Drive your feet into the floor and stand up, taking care not to round your lower back or allow your hips to rise faster than your shoulders. Do not lean to the side or twist your hips or shoulders.
Lower the weight back to the floor, reset your core, and repeat.
Continue for the desired number of reps, and then swap sides.
Muscles Targeted:
Primary: Quadriceps, hamstrings, gluteus maximus, obliques, quadratus lumborum, forearms.
Secondary: Upper traps, biceps.
Benefits:
A very functional core, forearm, and lower body exercise.
A great way to fix left-to-right strength imbalances.
A home gym-friendly alternative to conventional deadlifts.
Tips:
Use gym chalk on your hands to stop them from slipping.
You can also do this exercise with a dumbbell or barbell.
Place your kettlebell on a raised platform if you find it hard to bend over and reach the floor without rounding your lower back.
7. Medicine ball rotational slam
Most quadratus lumborum exercises are performed slowly and smoothly. While that’s fine for building endurance and strength, it’s less useful for developing muscle power, which is your ability to generate force quickly and is an integral part of most sports. Power training should be part of your workouts if you’re an athlete. Medicine ball rotational slams are one way to build a more powerful QL.
Steps:
Stand with your feet shoulder-width apart, knees slightly bent. Hold a medicine ball in front of you. Brace your core and set your shoulders.
Raise your arms above your head and, using a twisting motion, throw the ball down at the floor to the outside of one foot.
Catch the ball as it bounces, lift it up, and hurl it down to the other side.
Continue for the desired number of reps.
Muscles Targeted:
Primary: Rectus abdominis, obliques, quadratus lumborum, latissimus dorsi.
Secondary: Deltoids, hip flexors.
Benefits:
An explosive exercise for building core rotational power.
A fun, satisfying workout.
An excellent stress reliever.
Tips:
Do not use a gel-filled medicine ball, as they’re prone to splitting.
Rise up onto your toes and put your entire body into each throw.
Wind up each throw using a circular arm action to increase core and QL engagement.
FAQs
Do you have a question about quadratus lumborum stretching or strengthening exercises? No problem, because we’ve got the answers!
1. How do I isolate my QL muscle?
Whether you are stretching or strengthening, you cannot isolate the quadratus lumborum. Invariably, it works in conjunction with several other muscles, including your obliques, rectus abdominis, and erector spinae.
So, when you try to stretch or strengthen your QLs, you’ll also be working other muscles. This is no bad thing, as that’s how the QL works in nature – with other muscles and never alone.
2. How long should I hold QL stretches for?
The time you hold a stretch depends on what you are trying to achieve. For example, if you are stretching to maintain your current flexibility, you only need to hold a stretch for 15-20 seconds. This should be enough to prevent your flexibility from decreasing.
However, if you want to improve your flexibility, you need to hold your stretches for longer, usually 30-60 seconds. During this time, you should try to increase the depth of your stretch as you feel your muscles relax.
You don’t need to choose between these two durations. You may have one QL tighter than the other, so you could do short maintenance stretches on one side and longer developmental stretches on the other to fix the imbalance.
3. Will training my QL make my waist thicker?
The quadratus lumborum is a relatively long, slender muscle. As such, while training it will produce some hypertrophy or growth, it won’t make your waist thicker. If anything, a better-developed QL with give you a tighter waist.
Too much body fat is a far more common reason for having a thick waist. Too much muscle mass around the midsection is rarely a problem.
4. Some of these QL exercises hurt my back – what gives?
The quadratus lumborum muscles are located on the sides of your lower back. As such, overstretching can cause lower back pain. Also, exercises that affect your QL invariably involve your lower back.
If any of these exercises hurt, you should stop immediately, check that you are doing them correctly, and gently try again. Should the pain persist, skip the movement that bothers you can try something else.
Finally, if you’re still experiencing QL or lower back pain, get it checked out by a medical professional, as it could require treatment. Never train through pain, as that will probably make it worse.
5. Do I really need to stretch or strengthen my QL?
When it comes to prehab and rehab stretching and strengthening, you should choose your exercises based on your needs. For example, if your QL feels tight, limits your lateral movements, or causes pain, stretching could help. In contrast, if you lack lateral stability, you probably need to strengthen your QL.
However, if you have no such issues, you may not need to spend time on your QL. It’s probably getting sufficient indirect work from the rest of the exercises in your training program.
Wrapping Up
While the quadratus lumborum is a lesser-known back muscle, it’s still important. A weak QL can cause lumbar instability and dysfunction. In contrast, a tight QL can affect your posture and cause pain.
Thankfully, stretching and strengthening the QL is relatively simple, and the exercises for both of these purposes are simple and easy to perform. Many can be done at home as they require no special equipment.
But before you head off to stretch or strengthen your QL, you need to understand that it may not need any extra work. If you have no noticeable tightness or weakness in this area, your QL is probably strong and flexible enough.
That said, if you do need to pay more attention to your quadratus lumborum, you now know the best exercises to use.
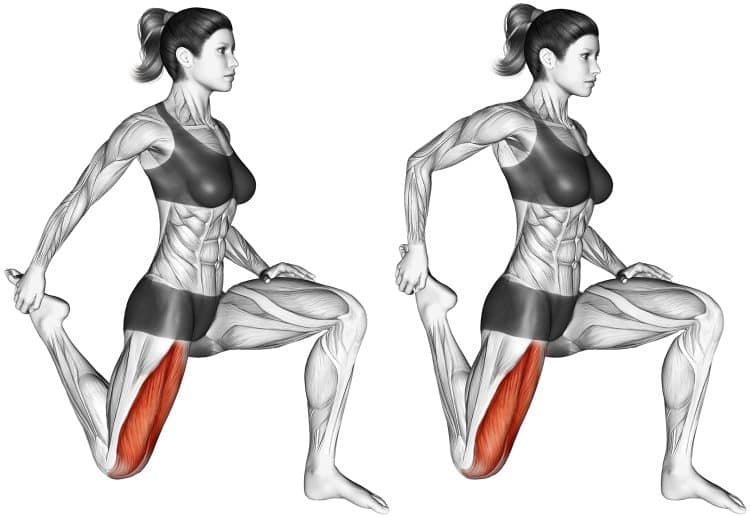
Quadriceps Stretch Guide: How-To, Muscles Involved, Benefits, and Variations
Pesty tight quads can wreak havoc not just on the front thigh but the effects can also be felt in the lower back, knees, and even the hip flexors. It’s an issue that many of us ignore but the good news is the quadriceps stretch is one way to prevent, combat, and reverse those ailing pains and aches.
Consisting of five individual muscles, the quadriceps are a complex, yet powerful muscle group crucial for performance, posture, and well-being. So you don’t want to be caught with stiff quads, and it’s even more imperative with our modern minimally active lifestyles.
Check out our prime quadriceps example, and the best variations for all experience levels.
Muscles Involved During Quadriceps Stretches
While not a muscle-building or strengthening exercise, the goal of quadriceps stretch is to create healthier and more functional leg muscles. Here’s some anatomy on the quadriceps thigh muscles.
Quadriceps
The quadriceps is a significant muscle group covering the front part of your upper leg between the hips and knees. Although, the quad fibers cross both of the aformentioned joints, of which the quads muscle group performs functions such as knee extension and hip flexion.
It was previously believed that the quadriceps was made up of four individual heads, hence the word ‘quad’. However, more recently, a fifth muscle was identified as part of the quadriceps.
Five quad muscles
Rectus femoris
Vastus lateralis
Vastus medialis
Vastus intermedius
Tensor of the vastus intermedius
How To Do The Quadriceps Stretch
While it may appear easy in a video instructional, or seem simple in your mind, the quadriceps stretch is actually a little challenging, but worth the effort.
Below we’ll show you one version of the quadriceps stretch, but keep in mind there are several ways to achieve a nice stretch in your anterior thigh muscles.
Steps
Drop down on your knees and keep your body tall and upright (tall kneeling position).
Keep one knee down, then bring the other leg forward at a 90-degree angle, and plant your foot flat on the floor.
Reach behind and grab your rear foot, then pull it into your butt. Keep your body upright, and don’t lean forward. Hold this position for 10 seconds, then relax and repeat a few more times. You should feel a nice stretch in your quadriceps!
Don’t forget to alternate your leg position, and make sure to stretch both sides equally.
Watch the following video example to see a demonstration of the quadriceps stretch.
Tips
Use a looped resistance band, belt, or similar object if flexibility is an issue.
Try to keep your body upright or only slightly leaned forward, but do not lean too far forward.
If this variation doesn’t suit you, try some of the other variations.
This Exercise
Target Muscle Group/s: Quadriceps
Type: Stretch
Mechanics: Isolation
Equipment: Cushioned surface, exercise mat
Difficulty: Beginner/Intermediate
Benefits of Quadriceps Stretch
Stretching, in general, has many proven benefits. In fact, it’s necessary that we all do some form of stretching.
Reverse tight quads from prolonged sitting
With our modern, tech heavy lifestyles, we do more sitting than ever before. Too much and we risk the quads becoming tight and even shortened. This can cause injuries, and will most certainly affect maximal physical performance.
Prevent or fix lower back and knee pain
Tense front thigh muscles can cause lower back as well as knee pain. In fact, not stretching often causes many issues that people have, but they never realize what’s causing it. Better to stretch regularly to stave off future problems.
Avoid or correct muscle imbalances
You probably didn’t know that tight quads can weaken the opposite hamstring muscles on the rear thigh, creating muscle imbalances that affect both function and appearance. This will also ramp up the chance of injury, and limit mobility. You may also notice discomfort in your hips like tightness and pain.
Stronger legs
Muscle tightness can lead to muscle weakness. When it comes to the quadriceps it’s not only the quads that are affected but so are the hamstrings on the rear thigh.
Maintain healthy posture
Tight muscles can limit our ability to maintain a good posture for obvious reasons. It limits our natural range of movement, and how we move and perform. The muscles in our bodies flex and move the joints, allowing us to move.
Drawbacks of Quadriceps Stretch
Here are some potential negatives of the quadriceps stretch.
More challenging than meets the eye
Even people who exercise regularly may underestimate the quads stretch. In fact, if it’s not something you do often, get down on the floor and try it… not so easy eh? That’s because the quads stretch requires a little balance, and flexibility. It may even feel a little painful, if you have tight quads, or do the movement on a hard surface.
Of course, as suggested, you can also use a looped resistance band, which is always handy to have around anyway!
Should follow warm-up activities
While it’s shouldn’t be a huge deal, we do always recommend warming up your muscles before stretching. That means 5-10 minutes of light activity such as walking at a decent pace, or doing your workout first before stretching. This could be an inconvenience for those who want to hop right into stretching.
Common Mistakes When Performing Quadriceps Stretch
There are lots of things you can do wrong when performing a quadriceps stretch. Here are some quick tips on technique dont’s.
Stretching cold quads
Many health publications agree that it’s better to stretch a muscle, especially intensively, following warmup activities (1, 2). A cold muscle that’s suddenly and intensely stretched could cause injury. So it’s better to do some walking, or workout first, then stretch your quads.
Pulling the leg out
While it may not be dangerous, and you’ll still stretch the quads, it’s better to pull the leg straight back, not out sideways to your body. You’ll also get a deeper stretch in the meatier part of the quads this way, and it’s just the recommend technique.
Arching your lower back
While you may get the same depth of stretch if you arch your back, this just places a lot of unnecessary stress on your lower back. It may not be intentional, but you want to avoid doing this.
Not stretching evenly
You should take stretching seriously, as you would other forms of training techniques. That means you should aim to stretch each leg with the same pressure, and duration. So, if you stretch one side for twenty seconds, make sure to do the same on the other side. And apply an equal amount of pressure.
Bounce stretching
Also known as ballistic stretching, we don’t recommend bouncy, jerking stretch motions for the quads, or any muscle. There’s too much injury risk and it’s not necessary for general stretching. Instead, static stretching is a better option, pulling the muscle into a stretched position, and holding it there (3).
Quadriceps Stretch Variations
If you don’t like the quadriceps variation shown as the primary example for this guide, or if you like to change things up, check out these other options.
We also included this top 5 quads stretch video below that demonstrates and explains many of the variations in this section.
Standing Quadriceps Stretch
Perhaps the most popular variation, the standing quadriceps stretch is also the most convenient. It’s a great way to stretch between workout sets, while you’re moving about, after a run, or during sports play. You can do it wherever you’re standing, which we can’t say about the following quad stretch exercises.
Steps
Stand up straight with your feet close together. You can hold onto something for balance support, if needed.
Lift one foot up behind you and grab it with the same side hand. You should be standing on one leg.
Pull straight back and feel the stretch in your quads!
Switch and repeat.
Side Lying Quadriceps Stretch
If balance is a problem, or you just prefer to stretch in a more relaxed position without thinking, the side lying quads stretch is best. It basically replicates the standing quads stretch except you’re on the floor now.
Steps
Grab a foam roller, pillow, or something to rest your head on for neck support.
Lie on your side with your head propped up, and bottom arm in a comfortable position, not laying on it.
Bend the top leg, reach back and grab your foot and pull it back.
Turn to the other side and so the same thing.
Prone Quads Stretch
This time we’re going face down to get a soothing thigh stretch. Sometimes, changing your body position can be therapeutic in itself, encouraging regular stretching, or being the preferred quadriceps stretch method.
Steps
Grab a light resistance band, belt, dog leash, sheet, or something similar that’s long enough to wrap around your foot while holding the other end in a prone position.
Get down on your knees, then loop the band around the top of one foot. Hold the other end of the band in the same side hand, then as you lie face down, pull the band over your shoulder and hold it there.
Pull the band to stretch your quads, using both hands if needed. Hold the position for 10 seconds, relax, and repeat a few more times.
Repeat the previous steps on the other leg, wrapping the band around the opposite foot.
Make sure to alternate sides to stretch both legs.
Quads Wall / Couch Stretch
To hit more of the rectus femoris quad muscle, this hip flexor stretch commonly performed against the wall or on a bench height object works great.
Steps
Set up in front of an object about level with the lower part of your butt. A bench, stacked mats, couch, box or even a wall can work.
Assume a half kneeling position with one knee on the floor and the same side foot propped up on the object. Place your other leg in front of you with your foot flat on the ground.
Keep your body tall and upright, and simply feel the stretch. The closer your knee is to the object, the more pronounced the stretch in your anterior thigh.
Wrapping Up
If you read through this training guide, you’re probably in need of a good quadriceps stretch. But you’ve also learned about the benefits, what causes tight quads, side effects of tense thigh muscles, and how to maximize the stretch to become a healthier and more functional individual.
Stretching is a non-negotiable form of body maintenance and we all need more of it to keep doing what we enjoy whether that’s performing, or maintaining physical mobility.
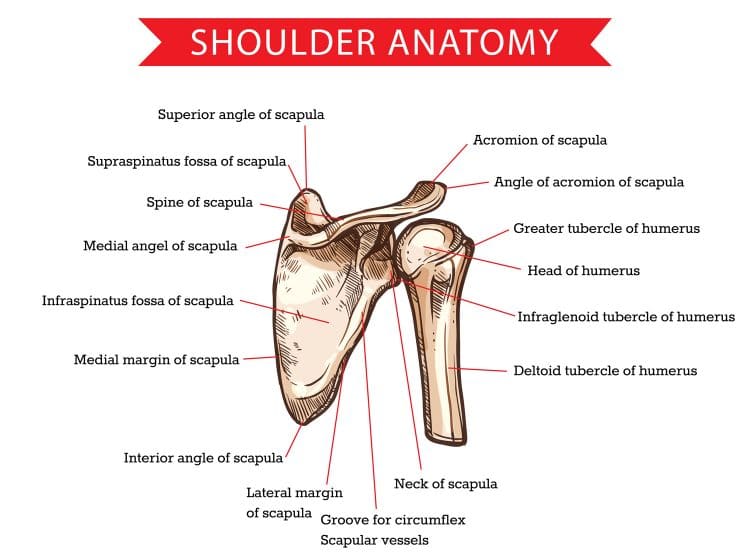
The Best Supraspinatus Stretching and Strengthening Exercises
Few things will disrupt your workouts like shoulder pain. Painful shoulders can stop you from training your upper body and even interfere with your lower body workouts. Benching and squatting with bad shoulders is especially unpleasant.
Painful shoulders can also affect your ability to perform everyday tasks, from brushing your teeth to pulling on your favorite T-shirt. And sleeping on your side when your shoulders hurt? Forget about it!
And yet, despite being so debilitating, a lot of lifters pound their joints with constant abuse and only worry about the health of their shoulders when they start to go wrong. Needless to say, if you have chronic shoulder pain, you have already neglected them for too long.
The good news is that it’s never too late to start working on your shoulder health, and many types of shoulder pain can be treated with targeted stretching and strengthening exercises.
In this article, we reveal the best stretching and strengthening exercises for the supraspinatus muscle, which is part of your rotator cuff.
Please Note: This article is for educational and informational purposes only. It should not be used for diagnosing or treating health problems or diseases. Those seeking medical advice should consult with a licensed physician.
Supraspinatus Anatomy Basics
The supraspinatus is one of four muscles that make up your rotator cuff. The other three muscles as the subscapularis, infraspinatus, and teres minor. The rotator cuff is found interior to (beneath) your deltoids and is responsible for stabilizing and controlling your shoulder joint.
Supraspinatus is located below the trapezius and toward the rear scapular region. It originates from the supraspinous fossa of the scapular and inserts onto the greater tubercle of the humerus. Its name reveals its position, and the supraspinatus lies along the superior (supra-) spine (-spinatus) of the scapula or shoulder blade.
During shoulder movements, the supraspinatus helps stabilize the head of the humerus in the glenoid fossa or socket. It also plays a role in the abduction of the arm and assists the medial deltoid in raising your arm up and away from the midline of your body.
Many rotator cuff injuries start with problems affecting the supraspinatus. As such, strengthening and stretching this muscle may help prevent future shoulder pain and may be necessary for rehabbing existing injuries – with medical supervision, of course!
5 Best Supraspinatus Stretches
A tight supraspinatus can cause shoulder pain and dysfunction. Common causes of supraspinatus tightness include using a keyboard for a long time, especially without supporting your arms, driving long distances, and repetitive overhead movements, such as painting a ceiling, swimming, or strength training.
Muscle tightness impedes blood flow, leading to an accumulation of waste products within the muscle, causing tension and pain.
Use the following exercises to stretch your supraspinatus and restore it to its correct resting length.
1. Pendulum stretch
The supraspinatus is located toward the rear of your shoulder. As such, pulling your arm forward will provide this muscle with a beneficial stretch. The pendulum stretch is good for your entire shoulder complex, especially the posterior compartment. This exercise is often part of rotator cuff rehab and prehab prescriptions.
Steps:
Rest one arm on a bench or chair and lean forward so your upper body is just above parallel to the floor.
Let your other arm hang down from your shoulder.
Keep your shoulder and arm relaxed and gently circle clockwise, counterclockwise, forward, and back.
Continue for 30-60 seconds, and then swap arms.
Muscles targeted:
Supraspinatus, posterior deltoid, rhomboids, trapezius.
Benefits:
A gentle, decompressing exercise for the entire posterior shoulder region.
Good for increasing general shoulder mobility.
Increases blood flow and synovial fluid production to ease shoulder pain and enhance healing.
Tips:
Increase your range of movement as your shoulder loosens up.
You can also do this exercise while holding a light dumbbell to achieve a deeper stretch.
Keep your neck and lower back neutral for comfort and safety.
2. Cross-body arm stretch
The cross-body arm stretch is a passive exercise that elongates your supraspinatus and other posterior shoulder and arm muscles. Pull gently to avoid overstretching your muscles and causing more harm than good. Constant pressure is always better than jerky movements.
Steps:
Seated or standing, place one hand on your opposite shoulder and lightly grip your arm just above your elbow joint.
Pull your arm across your body until you feel a mild stretch in the back of your shoulder.
Hold for 30-60 seconds, and then relax.
Repeat on the opposite aide for the same duration.
Muscles targeted:
Supraspinatus, posterior deltoid, rhomboids, trapezius, triceps.
Benefits:
A very convenient exercise that you can do almost anywhere and anytime.
A very gentle exercise that’s ideal for anyone suffering from shoulder pain.
A useful shoulder cool-down exercise.
Tips:
Do this stretch to break up long periods of sitting.
Increase the depth of the stretch as you feel your muscles relax.
Raise or lower your elbow to seek out areas of tightness.
3. Seated table slide
Prolonged sitting is one of the worst things you can do for your shoulder health. The longer you remain in a fixed position, e.g., while working at a computer, the tighter your muscles become. The good news is that you can release your shoulders and stretch your supraspinatus without leaving your desk.
Steps:
Sit at a table or desk.
Place a small towel on your desk and place your hand on it so your palm faces downward.
Lean forward and slide the towel as far away from you as possible.
Hold the deepest comfortable stretch for 30-60 seconds, and then relax.
Sit back up, swap sides, and repeat.
Muscles targeted:
Supraspinatus, deltoids, latissimus dorsi, triceps, trapezius, rhomboids.
Benefits:
An excellent way to break up long periods of sitting.
A deep yet relaxing upper body stretch.
Very good for improving posture and releasing tension from your shoulders.
Tips:
Move your chair backward if your desk is not big enough to get a full stretch.
You can also do this exercise with both arms at the same time.
Do this exercise standing at a kitchen countertop.
4. Arm behind the back supraspinatus stretch
This exercise is quite intense, so ease into it and don’t stretch too far too fast. However, the position of your arm means you’ll get a deep stretch in your supraspinatus, medial deltoid, and upper traps. Use your non-working arm to increase the depth of the stretch.
Steps:
Place the arm you want to stretch behind your back. Grip your wrist with your other hand.
Gently pull your arm across to increase the depth of the stretch.
Hold for 30-60 seconds, and then relax.
Swap sides and repeat.
Muscles targeted:
Supraspinatus, deltoids, trapezius.
Benefits:
You can use your free arm to get a deeper, more intense stretch.
One of a few stretches to take your upper arm into adduction.
A good way to preferentially target the supraspinatus.
Tips:
Make sure you keep your shoulders down and relaxed throughout.
Tilt your head to the side you are pulling to increase the depth of the stretch.
Hold a towel or band behind you if you find gripping your wrist uncomfortable.
5. Seated hug shoulder stretch
The great thing about this simple stretch is that you can do it at your desk, while sitting in your car in traffic, or during a TV ad break. As such, you can do it anytime you feel your shoulders or upper back starting to tighten up. Do it whenever you want to release some tension but can’t get up and move around to do more complex stretches.
Steps:
Cross your arms over your chest like you are hugging yourself. Put your hands on your upper back. It doesn’t matter which hand is uppermost.
Walk your fingers toward the middle of your upper back to increase the stretch.
Hold for 30-60 seconds, and then relax.
Muscles targeted:
Supraspinatus, deltoids, trapezius, rhomboids.
Benefits:
A very accessible exercise that’s ideal for beginners.
Feels good!
Great for releasing tension from your upper back and shoulders.
Tips:
Raise or lower your elbows to seek out and treat areas of tightness.
Walk your hands further around your back as your muscles begin to relax.
Visualize spreading your shoulder blades to achieve a deeper stretch.
5 Best Supraspinatus Strengthening Exercises
A chain is only as strong as its weakest link, and for many lifters, their weakest link is the rotator cuff. This small but crucial group of muscles takes a lot of abuse and can easily become inflamed and damaged. Torn rotator cuffs can take months, if not years, to heal.
Needless to say, prevention is better than cure, and building a resilient rotator cuff could save you a lot of missed workouts.
Use the following exercises to beef up your supraspinatus. While this won’t add a lot to your physique, it will help keep you in the gym and out of your doctor’s office.
1. Side lying lateral raise
One of the main functions of the supraspinatus is the initiation of upper arm abduction. In other words, it’s the muscle that gets your arm moving away from your body. As your arm starts to move, the more powerful medial deltoids take over. This exercise puts more stress on the supraspinatus than it does on the medial delts.
Steps:
Lie on your side so your hips and shoulders are square. Hold a light dumbbell in your uppermost hand. Bend your elbow slightly, but then keep it rigid throughout.
Lift your arm up until it’s vertical.
Lower your arm and repeat.
Roll over and do the same number of reps on the opposite side.
Muscles targeted:
Supraspinatus, medial deltoid.
Benefits:
An effective way to strengthen the supraspinatus.
An excellent shoulder rehab/prehab exercise.
Low-tech but high-effect exercise that’s ideal for home use.
Tips:
Go light – this exercise is not suitable for heavy weights.
Use a single weight plate, water jug, wrist weight, etc., instead of a dumbbell.
You can also do this exercise on a slightly inclined bench if that’s more comfortable.
2. Behind the Back Single-Arm Cable lateral raise
Cable lateral raises put your deltoids under near-constant tension, making them potentially more effective than the same exercise done with dumbbells. But, as an added benefit, they also stress your supraspinatus more. Doing cable lateral raises behind the back is even more effective because it loads your supraspinatus more and uses a larger range of motion.
Steps:
Attach a D-shaped handle to a low pulley machine. Stand sideways onto the weight stack and pick up the handle. Hold it in your furthest hand so the cable runs behind your legs.
Bend your knees slightly, brace your core, and pull your shoulder back and down. Your elbow should be slightly bent but rigid.
Raise your arm up and away from your side until your arm is roughly parallel to the floor.
Lower your arm, taking your hand a little way behind you to increase the range of motion.
Do the desired number of reps and then swap sides.
Muscles targeted:
Supraspinatus, medial deltoids.
Benefits:
An effective way to develop your deltoids and supraspinatus simultaneously.
A very shoulder-friendly exercise.
Even more tension on the target muscles compared to dumbbell lateral raises.
Tips:
Use a light weight and move slowly with control to target the supraspinatus.
Do not raise your arm above shoulder height, as doing so could increase your risk of impingement.
Keep your thumb pointing forward throughout. Do not rotate your wrists or rotate your arm inward, as doing so could hurt your shoulder joint.
3. Resistance band lateral raise
The great thing about resistance band lateral raises is that you can do them almost anywhere – even at home. As such, they’re the perfect prehab/rehab exercise, and you can do them without adding extra time to your existing workouts. So keep a set of bands nearby so you can pump out a set of lateral raises whenever you have a few minutes spare.
Steps:
Stand on the middle of your resistance band and hold an end/handle in each hand. Bend your knees slightly, brace your core, and set your shoulders. Your arms should be slightly bent but rigid.
Raise your arms up and out to the sides to form a T-shape.
Lower your arms and repeat.
Muscles targeted:
Supraspinatus, medial deltoids.
Benefits:
A very accessible and convenient exercise for home workouts.
Joint-friendly and comfortable.
Easy to progress or regress by changing the length/strength of your band.
Tips:
You can also do this exercise by using one arm at a time.
Do this exercise seated if you want to put less pressure on your muscles.
Cross the bands so that the tension comes onto your muscles sooner.
4. Full can raises
Full can raises are a traditional supraspinatus exercise often prescribed by physical therapists. It provides a strengthening and mobilizing effect for the entire shoulder complex, especially the rear of the shoulders and the rotator cuff. Like all rotator cuff exercises, this move works best when done slowly and smoothly with light weights.
Steps:
Stand with your feet about shoulder-width apart, knees slightly bent.
Hold a dumbbell in each hand and, with your arms straight but not locked, hold them against your thighs with your thumbs pointing forward. Brace your core and pull your shoulders down and back.
Raise your arms forward and up to form a V-shape above your head.
Slowly and smoothly lower your arms and repeat.
Muscles targeted:
Supraspinatus, deltoids, trapezius, rhomboids.
Benefits:
A simple yet effective exercise.
An ideal warm-up before more demanding upper body exercises.
A great way to improve shoulder mobility and stability.
Tips:
Only raise your arms as high as your mobility/pain allows. Do not force your arms up if they don’t want to go that high.
You can also do this exercise with a resistance band instead of dumbbells.
Place a mini band around your wrists to increase supraspinatus activation, like this:
5. BOSU push-up
The supraspinatus is responsible for upper arm abduction but also plays a crucial role in shoulder joint stabilization. While all supraspinatus exercises will increase joint stability, using an unstable surface is arguably the best way to develop this function. Doing push-ups on a BOSU balance trainer is a great way to challenge and develop your shoulder stability.
Steps:
Place your BOSU on the floor, curved side down. Squat down and grip the side edges of the BOSU with your thumbs pointing forward.
Walk your feet out and back so your legs are straight. Brace your core and contract your legs.
Bend your arms and lower your chest down to within an inch of the top of the BOSU. Work hard to keep your hands level. However, some shaking is normal.
Push yourself back up and then repeat.
Muscles targeted:
Pectoralis major, deltoids, triceps, rotator cuff, core.
Benefits:
A very functional rotator cuff exercise.
A great way to identify and fix strength imbalances.
Makes regular floor push-ups feel much easier.
Tips:
Bend your legs and rest on your knees to make this exercise easier.
Wear a weight vest or raise your feet to make it harder.
No BOSU? No problem! You can also use a medicine ball, stability ball, or balance board:
Supraspinatus Exercises – FAQs
Do you have a question about the best exercises for stretching and strengthening your supraspinatus? No worries because we’ve got the answers!
1. Will training my supraspinatus muscle give me bigger shoulders?
The supraspinatus is a small muscle that lies beneath several much bigger muscle. As such, you’ll never see it, and developing it won’t add anything to your physique. But before you dismiss supraspinatus training altogether, it’s important to stress that this little muscle has a significant impact on what exercises you can and cannot do and how well you perform those exercises.
For example, a weak or painful supraspinatus could prevent you from doing overhead presses or bench presses. It could make barbell back squats uncomfortable or even affect your ability to do biceps curls.
So, while training your supraspinatus won’t directly make your shoulders bigger, it will indirectly influence your ability to build muscle.
2. How do I know if my supraspinatus is weak?
The most common way to determine if your supraspinatus is weak is with the empty can test.
Raise your arm to the side and rotate your shoulder internally so your thumb points downward. Next, a training partner should gently push down on your outstretched hand. If you are unable to keep your arm up against mild to moderate pressure, your supraspinatus is probably weak and requires strengthening.
3. What should I do if I have sudden pain in my shoulder during training?
Acute or sudden pain could indicate that you have strained a muscle or sprained a ligament. In either case, you should stop what you’re doing to prevent things from worsening.
Depending on the severity of the injury, you may also need to use RICE (Rest, Ice, Compression, and Elevation) to speed up recovery.
Do not return to training until the pain has subsided. If the pain is severe, or lasts more than a couple of days, get it checked out by a sports injury doctor. You may still be able to work out, but you must avoid aggravating the injured area.
Train around the injury and not through it! This will probably mean not training your upper body for a few days or even a week or two. Some lower body exercises may also be off-limits, such as barbell squats and deadlifts.
Once the pain begins to subside, you can start gently stretching, mobilizing, and strengthening the area with, for example, the exercises in this article.
4. How do I know if my supraspinatus is tight?
The easiest way to determine if your supraspinatus is tight is to do some of the stretching exercises from this article and see how they feel. If you don’t feel much tension during the stretches, your supraspinatus is probably as flexible as it needs to be. However, if the area feels uncomfortable or tight, you probably need to stretch more often.
5. What is the difference between maintenance and developmental stretching?
Maintenance and developmental refer to the duration of each stretch. For example, if you have good flexibility and just want to preserve or maintain it, you should hold each stretch for 10-20 seconds. That will be sufficient to prevent your muscles from shortening.
However, if your flexibility needs developing or improving, you’ll need to stretch for longer, typically 30-60 seconds. During this time, you’ll feel your muscles relax so you can ease into a deeper stretch.
Choose the right type of stretching for your goals. You will probably find that some muscles need stretching more than others. For example, it’s common to have tight hamstrings, pecs, and lats, while the triceps, biceps, and calves are usually naturally flexible. Of course, this pattern varies from person to person.
Program your stretches based on what you need to work on. Spend more time on the tightest muscles and less time on those that are sufficiently flexible.
Supraspinatus Exercises – Wrapping Up
There are over 600 muscles in the human body, and each one plays a critical role in how your body functions. Some muscles, like the gluteus maximus, are large and weigh several pounds. Others, like the supraspinatus, are much smaller and only weigh a few ounces.
However, muscle size does not determine importance, and in many cases, it’s the smallest muscles that need the most care and attention.
So, don’t let your supraspinatus become the weak link that holds you back. Instead, stretch and strengthen this small but critical muscle so your shoulders remain stable, strong, and pain-free.