Tag: Training Exercises
Bodybuilding School: How to Flex Your Triceps
There isn’t a bodybuilder alive who doesn’t want bigger, more muscular arms. However, that often means they spend too much time training their biceps and not enough time on their triceps.
This is a mistake!
While the biceps might be the most famous muscle in the human body, the triceps are actually the largest upper arm muscle. Neglecting the triceps can have a significant impact on the size and shape of your arm.
In addition, while everyone can throw up an arm and do a reasonable biceps pose, fewer people can pull off a good triceps flex. Again, that’s a shame because well-developed triceps also deserve their moment in the sun.
In this article, we reveal why you need to learn to flex your triceps and the best triceps poses for showcasing your horseshoes.
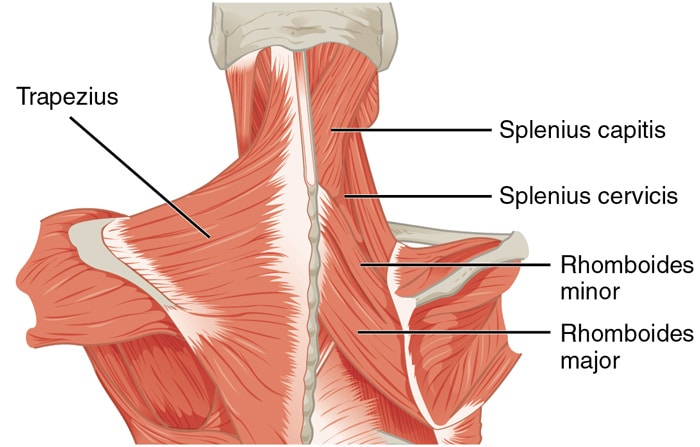
Triceps Anatomy Basics
Knowing a little more about how the triceps function may help you flex them better. After all, if you know where they are and what they do, you should find it a little easier to visualize and control them.
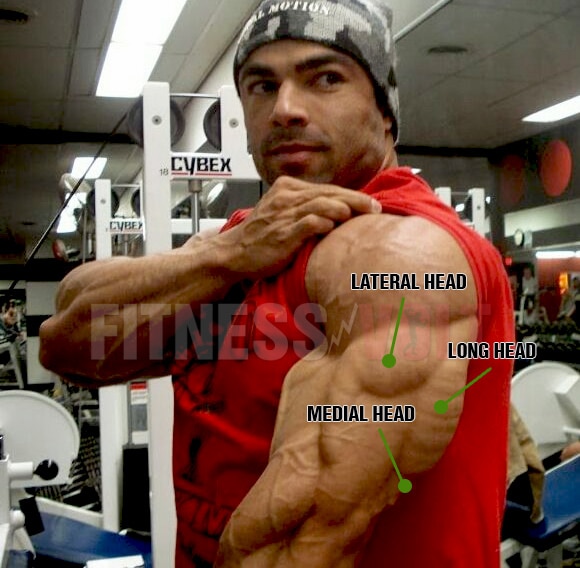
So, the full name of the triceps is triceps brachii, which means three-headed arm muscle. This is because the triceps have three origins that come together at a single origin point. All three heads work together, but each one can be emphasized by altering the position of your arm.
The three triceps heads are:
Lateral head – best worked with your arms by your side, e.g., dips.
Long head – best worked with the arms overhead, e.g., French presses.
Medial head – best worked with an underhand grip, e.g., reverse grip triceps pushdowns.
The main role of the triceps is to extend or straighten your elbows. However, the long head also crosses your shoulder joint, so it’s partly responsible for shoulder extension, too.
How to Flex Your Triceps
Now you know why you need to flex your triceps, it’s time to move on to the “how” part of this article. But before we do, remember the following rules of effective posing:
Warm-up
Contrary to what you might think, flexing your triceps can be strenuous. Make sure you warm up your triceps before flexing them to avoid injury. Bodybuilders tend to practice posing after their workouts when their muscles are warm and pumped. Pumping out a few push-ups should be enough to warm up your triceps and get them ready to flex.
Flex hard
Flexing is a form of isometric training. Isometrics involves contracting your muscles against an immovable object. In this case, that’s the tension generated by an opposing limb or muscle group.
The more intensely you flex your triceps, the more they’ll pop, so squeeze your triceps like your life depends on it. Your muscles should feel fatigued by the end of your posing session, and they may even shake while you’re working them.
Use your mind, not just your muscles
The exercises in the next section tell you how to flex your triceps, but this should be more than a physical process. So, don’t just bend or straighten your arms to contract your triceps, but also put your mind in the muscle and visualize it flexing. This will reinforce that all-important mind-muscle connection.
Seek honest feedback
Even if you flex in front of a mirror, you may not be hitting your triceps poses correctly. Seek feedback from someone who can tell you if your triceps look their best. A small change in the position of your arm can make your poses look even more impressive, so let them guide you to improve your performance.
If you don’t have someone to give you feedback, video yourself instead, ensuring the lighting is favorable and that you move around so you can see your physique from all available angles. Use this feedback to improve your performance.
Practice, practice, and practice some more!
No one got good at posing without practicing. While the occasional triceps flex won’t do you any harm, it probably won’t do you any good, either. So, commit to flexing your triceps several times a day, several days a week. Only through repetition will you get any benefits from flexing your triceps.
Try flexing your triceps between sets
One of the best times to flex your triceps is when you are training them. Or, more specifically, between sets of triceps training. This reinforces the mind-muscle connection, makes the most of the fact your muscles and joints are warm, and will give you an even better pump.
And anyway, what else are you gonna do between sets? Flexing is a much better use of your time than texting or social media scrolling.
The Six Best Ways to Flex Your Triceps
There are several different ways to flex your triceps. Depending on your genetics, you may find that one or several make your triceps look their best. Try them all to see what works for you.
And remember, if a triceps pose doesn’t look as good as you’d hoped, this suggests that the head it showcases is not as well developed as it could be. Use this feedback to design your next triceps training plan.
1. Side triceps pose
The side triceps pose is one of eight mandatory bodybuilding poses that all competitive bodybuilders must perform. It’s one of the most straightforward ways to show off your triceps. As well as showcasing your triceps, it also emphasizes your deltoids and pecs.
To do the side triceps pose, put one arm down by your side and then reach behind your back with your other arm and grip your wrist. Next, extend your elbow and press your upper arm into your side to push your triceps outward.
If you’ve done this pose correctly, your triceps will look much larger than usual, and the long head of your triceps should really stand out.
2. Single-arm triceps flex
This isn’t an official bodybuilding pose, although you may see some bodybuilders do it during the pose-off. Rather, this exercise is an excellent way to work on your mind-muscle connection and make sure the fibers of your triceps are firing together.
To do this triceps flex, just extend your arm down by your side and straighten your elbow as hard as possible. Then, push your arm backward to hit the long head of your triceps a little more. Ramp up the muscle tension by flexing your wrist to bring out your forearm muscles.
3. Double front triceps flex
This pose lets you show off your deltoids, triceps, and forearms at the same time. It not only makes your triceps look thicker, but it’ll also highlight the striations in your shoulders. Flexing your wrists will also bring out your lower arms.
Stand with your arms by your sides. Clench your hands and point your thumbs down toward the floor to make your forearms pop. Rotate your arms inward and then straighten your arms as hard as possible to flex your triceps. This ensures that the lateral head is at its most visible.
4. Double rear triceps flex
While most pushing exercises work your chest and triceps together, when it comes to flexing, the back and triceps are a great pairing. This flex is awesome for showing off your entire rear body, including the traps, lats, rear delts, and, of course, those all-important triceps.
Stand with your arms extended out to the side at about 45 degrees. Straighten your elbows, flex your triceps, and push your arms and shoulders back. Squeeze the entire back of your body hard to make your muscles stand out.
5. Cross-body chest and triceps pose
You’ll need good muscular development to pull off this pose. But if you’ve got the arms and chest for it, it’s certainly a unique way to flex your triceps. This pose was originally popularized by the one and only Arnold Schwarzenegger and has been copied by many bodybuilders.
To do it, stand side-on to your audience and raise your arms so they’re slightly different heights. Keeping your arms slightly bent, flex your chest, biceps, and triceps to really inflate your entire upper body.
Needless to say, this pose requires excellent muscle control, so be prepared to practice.
6. Static triceps pushdown
If you are struggling to flex your triceps without resistance to press against, this is the exercise for you. Holding the bottom position of a triceps pushdown makes it much easier to engage your triceps and practice flexing them.
Do a set of cable pushdowns as usual but then, on the last rep, pause with your arms straight and extend your elbows and shoulders so you feel your triceps contracting. Squeeze so hard that there is a danger that you might cramp up. Hold for 10-15 seconds, and then relax.
Try to replicate this sensation whenever you flex your triceps. Experiment with different grips and handles to see which positions allow you to flex your triceps the hardest. A rope handle is especially effective for this exercise.
The Benefits of Flexing Your Triceps
Flexing your triceps might seem like a pointless endeavor. Still, it could actually be quite beneficial and improve your performance and appearance. Here are the top reasons for working on your triceps flexing.
Improved mind-muscle connection
Bodybuilders often talk about the mind-muscle connection and its importance for effective workouts. This is no myth, and establishing a better link between your brain and your muscles can have a profound effect on your training and performance.
You cannot expect to build a muscle you cannot control properly. Also, the more mental force you can direct into a muscle, the more powerfully it will contract. Can’t feel your lats during lat pulldowns? You’ll never build a big back until you can. The same is true for your triceps.
Flexing forges a stronger link between your mind and your muscles. The sooner you learn how to contract your triceps, the more productive your workouts will become.
See how your triceps training is progressing
While big arms look great, shape also matters. Think about a bodybuilder’s arms and the arms of someone who is overweight. Both potentially share the same circumference, but they look entirely different.
Flexing your triceps will reveal the shape of your muscles or the lack of it if you are carrying too much body fat. If you can’t see the outline of the three heads when you flex your triceps, you should take this as an indicator that it’s time to stop bulking and start cutting.
Better photos
If you like sharing photos on social media, you undoubtedly want to look your best. Learning to flex your triceps will make your arms look bigger and better conditioned than just letting them hang relaxed at your sides.
Sure, you could improve triceps separation with some sneaky photoshopping, but that often comes out looking fake. Flexing your triceps will save you time and ensure your arms look their best naturally.
Andrew Jacked Posing Tips From Wheeler Milo – (Image: Andrew Jacked/YouTube)
For competition
Pro bodybuilders know that competitions are not won and lost in the gym but on stage. Presentation matters, and it’s not always the biggest guy who carries away the trophy. As their next competition approaches, savvy bodybuilders spend increasing amounts of time working on their poses. Posing is a skill that all bodybuilders need to master.
You need more than a good double biceps, lat spread, and side pec pose to win a bodybuilding show. You also need to be able to flex the hell out of your triceps if you want to stand on the podium.
How to Flex Your Triceps – Closing Thoughts
While you need to do more than flex your triceps to make them grow, practicing some triceps poses certainly won’t hurt your arm development. Flexing will reinforce your mind-muscle connection, which will, in turn, make your workouts more productive. Flexing your triceps for photos will make them more Instagram-worthy.
The great thing about triceps flexing is that you can do it anywhere and anytime. Warm up with a few easy push-ups, and then get to work.
Pay as much attention to your triceps as you do your biceps, and you’ll be well on your way to building arms you can be proud of!
Bicep Curl Drop Set: Pump Your Guns and Maximize Muscle Gain!
The biceps are arguably the most loved muscle group. It is common to hear people skip leg days, but you’ll never hear of anyone missing arm day. Although the biceps curl ranks high on every lifter’s favorite exercise list, only a few have guns worth showing off.
The biceps is a small muscle group, and most lifters rely on curls (an isolation exercise) to add inches to their arms. Nonetheless, only a few succeed.
Usually, exercisers oscillate between doing too little and too much in their arms training regimen. While the first technique lacks training intensity to spark new muscle tissue growth, the latter leads to overtraining. Furthermore, both these techniques lead to a training plateau.
This is where the drop sets come in. Drop sets help increase your training intensity by adding more sets and reps to your training regimen, helping ignite new muscle growth and break through plateaus. Drop sets boost muscle growth by significantly enhancing your target muscle’s time under tension.
To build biceps that surpass people’s imagination, you must put in the work that most people cannot fathom. The bicep curl drop set is a step in the right direction.
The drop set is an advanced training technique that is not for the faint of heart. “Muscle-ripping pump” is a popular term in training jargon. Most lifters throw it around like it’s nobody’s business. The truth is that most trainers have never experienced a “muscle-ripping pump,” unless that is, they try the drop set.
In this article, we go over everything you need to learn about the biceps curl drop set to build bigger and stronger pythons, including the definition, step-by-step instructions, sample biceps drop set workout, its benefits, and tips to make the most of them.
What is a Drop Set?
A drop set is an advanced resistance training technique that helps spark hypertrophy by shocking your muscles through an uptick in training intensity. In a drop set, you perform an exercise with an appropriate weight for the desired number of repetitions, then lighten the load by 10–30% and perform another set to failure without pausing for rest between sets.
The number of reps you will perform will depend on your training objectives. Research has shown that performing 1-3 sets of 8-12 reps of an exercise with an appropriate weight is optimal for building muscle mass. On the other hand, 3-5 sets of 1-5 reps are ideal for building strength. [1]
Training for muscle failure in two non-stop sets fills your muscles with blood and lactic acid, which stretches the fascia and supplies your muscle fibers with the required nutrients for muscle growth.
You could also do a double drop set to take your muscle pumps to the next level. A double drop set involves dropping weights twice in the same set. To do a double drop set, complete a set to failure, lighten the load by 10-30%, and do another set; complete the round by doing another set after reducing the load by 10-30%.
Here is a sample barbell biceps curl double drop set using 95 pounds:
Set 1: 12 reps [95 pounds]
Set 2: Failure (8-12 reps) [85 pounds]
Set 3: Failure (8-12 reps) [65 pounds]
While performing a drop set, you must ensure that you’re following a picture-perfect form. Using momentum or a sleazy form increases your risk of injury as your muscles are already fatigued. You must stop your set as soon as you notice your form slipping.
How to Perform a Biceps Curl Drop Set
The drop set technique can be used for any biceps curl exercise. For the sake of this article, we’ll consider the dumbbell biceps curl. Drop sets require more logistical planning than traditional dumbbell curl sets. Hence, you must ensure that you already have everything you need by your side before you begin the drop set. Stopping to look for weights drops your training intensity and will hamper your muscle-building potential.
Use the following pointers to incorporate the biceps curl into your training schedule:
Choose The Weight
Most lifters are confused about the weights they should be lifting on the biceps curl drop set. While some people bite off more than they can chew, exposing themselves to an injury, others undersell themselves, leaving gains on the table.
As a rule of thumb, you should start your drop set with a weight that allows you to complete 8-12 reps of an exercise with the perfect form. Then, you must not lighten the load by more than 30% for the drop set to ensure optimal small-twitch muscle fiber stimulation. You must choose a weight that allows you to complete 8-12 reps in the drop sets.
For example, if you perform the first set of a dumbbell bicep curl with 45-pound dumbbells, you can only drop the weight to 30 pounds for the drop set. You can then use 20-pound dumbbells for the double-drop set.
Decreasing the weight in small increments (5-10%) can limit the number of repetitions you can perform. You must, however, ensure that you fail in the 8-12 rep range to induce hypertrophy and improve your muscle endurance.
Setup
Many lifters make the mistake of starting the bicep curl drop set without the proper engagement. While doing the dumbbell bicep curl drop set, you should have the 2-3 sets of dumbbells you will use around you and in your reach before starting the exercise.
Looking for dumbbells for your drop sets in the middle of your set will hamper your training intensity. If you wait too long between sets, you’ll end up recruiting your fast-twitch muscle fibers instead of the slow-twitch fibers, beating the purpose of this advanced training technique.
Plan
To make the most of drop sets, you must program them into your workouts strategically. Plan your workouts a week in advance so that you don’t end up using drop sets more than once in a workout and twice a week. Using this training technique too frequently can result in overtraining, increasing your risk of injury and leading you to a plateau.
Training Experience
The ‘advanced’ in advance resistance training technique exists for a reason. Beginners must resist the temptation of using drop sets in their workouts. Furthermore, you should only use it in exercises you have mastered. Experimenting with drop sets in a lift you are still learning increases your risk of injury.
Sample Bicep Curl Drop Set Workout
Given below is a biceps workout that involves a superset of dumbbell biceps curls:
In this workout, we have programmed the drop sets at the end to end the workout on a high. Start with the heaviest dumbbells and do as many reps as possible. Without resting between sets, switch to lighter dumbbells and curl to failure. Lighten the weights again, and work to failure without stopping for rest.
Benefits of Drop Set
Adding the drop set advanced training technique to your exercise regimen entails the following advantages:
Helps Build Muscle Mass
A 2018 study found that drop sets delivered more muscle gains by stimulating slow-twitch muscle fiber growth than the conventional sets during a six-week resistance training protocol. [2]
Drop sets are an incredibly versatile training principle. You could use them in any workout and for any exercise. You can do a drop set at the start of a workout to pre-exhaust your muscles, in the middle of the workout, or at the end to finish your training session with a mind-numbing pump.
Drop sets fill your muscles with blood and lactic acid, which stretches the fascia around the muscle and delivers the required nutrients to the muscle tissue for growth.
Improves Muscle Endurance
Our muscles consist of two types of muscle fibers — slow and fast-twitch. Although conventional strength training exercises are great for engaging fast-twitch muscle fibers, they do little to nothing for the slow-twitch fibers. The slow-twitch muscle fibers are endurance-based, meaning they require a greater time under tension than the fast-twitch fibers to fire up, and this is exactly what the drop sets deliver.
A study published in The Journal of Sports Medicine and Physical Fitness found that a single set of drop set can lead to better muscle gains than three sets of a conventional resistance training exercise. [3]
Time Effective
Drop sets are a great way to get a lot of work done in a short period. Folks that have hit a plateau and need to up their training volume but cannot afford to spend another 30-45 minutes in the gym should turn to drop sets.
Most drop sets take 15-20 seconds to complete. Lifters that generally do 15 sets in a workout can boost their training volume by 20% just by doing three drop sets of an exercise. Not to mention the insane training intensity that can be achieved using this training principle.
Bicep Curl Drop Set Tips
Here are some bicep curl drop set tips to get the best bang for your buck:
Exercise Type
Prefer doing drop sets in isolation exercises like the biceps curl that focus on a single muscle group. Since compound exercises have multiple moving parts, the risk of injury is significantly higher while doing drop sets.
Lifters tend to compromise on their form on compound lifts like the squat when fatigue starts to set in, increasing their odds of injury. It is easier to bail on a bicep curl drop set rep than to get out of a squat mid-rep.
Sets
You should not do drop sets for more than one exercise in a workout, as it can cause muscle overexertion, increasing your risk of injury. Furthermore, avoid doing more than double drop sets at a time.
Notably, ‘run the rack’ is another advanced training technique that is growing in popularity and involves lightening the load until you lift the lightest weight on the rack. It is a drop set variation that should be reserved for advanced athletes. The high volume and intensity of multiple drop sets can result in a lousy form and an unprecedented strain on your muscles, multiplying your injury odds.
Frequency
Since drop sets are so effective in delivering a muscle pump, many lifters tend to overdo them, increasing overtraining risk. Overtraining affects your central nervous system, and depending on your genetics and recovery program, it might take you months to come out of this phase.
You must limit drop set use to one exercise per workout. Furthermore, avoid performing drop sets more than twice weekly to allow your muscle enough time to recover from your high-intensity workouts.
Are Bicep Curl Drop Sets Safe?
Drop sets are an advanced resistance training technique and should not be used by newbies and rookie lifters. As you start incorporating drop sets into your training regimen, it should be done under an expert’s supervision to minimize the risk of injury.
You must then choose an appropriate weight and exercise for the drop set. Use a weight you can control for 8-12 reps per set and an exercise you have mastered. Doing drop sets on an unfamiliar exercise puts you in a delicate position, and a slight misstep can lead to an injury.
Wrapping Up
The bicep curl drop set is an advanced resistance training technique that will push your limits and challenge your muscles like never before. It will increase your training intensity by increasing the time under tension, helping you avoid and break through a training plateau.
Rookie lifters should start with the conventional drop sets, whereas more advanced lifters can utilize the double drop sets to fill their guns with blood and lactic acid. Finally, you must strategically program the drop sets into your biceps training routine. Doing too much too soon can lead to overtraining, which can stall your growth.
References
Krzysztofik M, Wilk M, Wojdała G, Gołaś A. Maximizing Muscle Hypertrophy: A Systematic Review of Advanced Resistance Training Techniques and Methods. Int J Environ Res Public Health. 2019 Dec 4;16(24):4897. doi: 10.3390/ijerph16244897. PMID: 31817252; PMCID: PMC6950543.
Fink J, Schoenfeld BJ, Kikuchi N, Nakazato K. Effects of drop set resistance training on acute stress indicators and long-term muscle hypertrophy and strength. J Sports Med Phys Fitness. 2018 May;58(5):597-605. doi: 10.23736/S0022-4707.17.06838-4. Epub 2017 Apr 26. PMID: 28474868.
Fink, Julius & Schoenfeld, Brad & Kikuchi, Naoki & Nakazato, Koichi. (2017). Effects of drop set resistance training on acute stress indicators and long-term muscle hypertrophy and strength. The Journal of sports medicine and physical fitness. 58. 10.23736/S0022-4707.17.06838-4.

Shoulder Pain When Doing Overhead Triceps Extensions? Possible Causes and Solutions
The overhead triceps extension, also known as the French press, is one of the best ways to target the long head of your triceps. Hitting this triceps head means putting your arms into flexion, and the best way to do this is to raise them overhead.
Overhead triceps extensions take the target muscles through a large range of motion and provide the triceps with a deep stretch at the bottom of each rep. If you are serious about developing horseshoe triceps, overhead extensions are an excellent option.
However, this exercise has a downside: it can also cause shoulder pain. Pain in the stabilizing muscles is only to be expected and nothing to worry about. In contrast, joint pain could indicate that something more serious is wrong and needs fixing.
In this article, we reveal the possible causes of shoulder pain while doing overhead triceps extensions and how to prevent it.
Causes of Shoulder Pain During Overhead Triceps Extensions
There are several reasons that overhead triceps extensions can cause shoulder pain. Some are easy to fix, while others are less so. Some causes of shoulder pain may require rest or medical attention.
Seated Dumbbell Overhead Triceps Extensions
Use the following information to determine why overhead triceps extensions hurt your shoulders.
Poor mobility
Overhead triceps extensions involve raising your arms so your biceps are next to your ears. This requires above-average shoulder joint mobility, and your lats, pecs, and delts must also be flexible.
Tight muscles or immobile joints mean you’ll have to strain to get your arms into the correct position for overhead triceps extensions. Needless to say, if this is difficult for you to do, shoulder pain may be the result.
Related: Five-Minute Mobility Workout for Lifters
Improper technique
Many lifters turn overhead triceps extensions into a bastardized behind-the-neck overhead press. This may be because they lack the mobility necessary to get into the right position, are using too much weight, or simply don’t know any better.
There are two ways to perform most exercises – the right and the wrong way. The right way is generally safe, comfortable, and keeps the tension on the target muscles. The wrong way compromises your joints, takes stress off the target muscles, and is more likely to cause injuries.
Overhead triceps extensions are quite an unforgiving exercise, and even small technical errors can cause pain in all the wrong places.
Poor posture
Posture is the alignment of your joints, and it can be good or bad. Bad posture, such as rounded shoulders or slouching, makes it much harder to get into the correct position to do overhead triceps extensions safely.
This poor posture means you’ll need to change your technique to perform the exercise. Invariably, this puts more stress on your shoulders than it does your triceps.
Using too much weight
Overhead triceps extensions are an isolation or single-joint exercise. Once your upper arms are next to your head, only your elbows should move. Such a strict movement means you won’t be able to lift a lot of weight. As a result, overhead triceps extensions work best with light to moderate loads and medium to high reps.
However, despite this, some exercisers try to use very heavy weights with overhead triceps extensions, which puts a lot of stress on all the muscles and joints involved, including the shoulders.
An underlying shoulder problem
Shoulder problems are common among bodybuilders and weightlifters. The shoulder is a very hard-working joint and is involved in virtually every upper-body exercise you perform. As such, many lifters have chronic shoulder problems, such as bursitis, tendonitis, strains, and sprains.
While you might be able to do some exercises without pain, the overhead triceps extension involves an awkward arm position. Because of this, they may aggravate any existing shoulder injuries.
Not warming up properly
Warming up is crucial as it prepares your body for the workout and exercises you are about to perform. Overhead triceps extensions need a thorough warm-up because of the position of your arms. Not warming up could mean your shoulders feel stiff and immobile, which could cause pain if you force your upper arms up and next to your ears.
Poor shoulder stability and strength
While overhead triceps extensions are undoubtedly an arm exercise, you need strong, stable shoulders to keep your biceps next to your ears. Weak deltoids or unstable joints could cause shoulder pain, despite not targeting them directly.
Lack of shoulder muscle endurance could also mean your deltoids fatigue before your arms, and you’ll feel them burning painfully toward the end of your set.
Overhead triceps extensions don’t suit your body type
Exercise is good for everybody’s body. However, because of biomechanical differences such as shoulder width and arm length, not all exercises suit all lifters. Despite warming up, using good form, and lifting a sensible weight, overhead triceps extensions may still hurt your shoulders.
It’s not the exercise’s fault, but your genetics. Don’t worry, though; there are other ways to train your triceps long head.
How to Prevent Pain When Doing Overhead Triceps Extensions
Now that you know the possible causes of shoulder pain when doing overhead triceps extensions, here are some strategies to avoid it.
Warm up properly
Warming up increases tissue temperature, blood flow, joint mobility, and muscle flexibility. These things make getting your upper arms into the correct position to do overhead triceps extensions easier, reducing the risk of shoulder pain.
Focus on your shoulders, upper back, and elbows when preparing for overhead triceps extensions.
A warm-up for strength training should include the following:
Pulse raiser (light cardio)
Joint mobility
Dynamic flexibility
Movement prep/practice reps
Read more about warming up for strength training here.
Stretch your lats and pecs
It’s generally best to avoid statically stretching muscles before training them. Static stretches can reduce force production and make you weaker. However, with overhead triceps extensions, stretching your pectoralis major and latissimus dorsi should make achieving and maintaining the correct arm position easier.
Don’t worry about losing strength for your workout, as these muscles are not directly involved in overhead triceps extensions.
Check out this article to learn more about stretching your pecs and this article to discover the best exercises for stretching your lats.
Practice and perfect your technique
While overhead triceps aren’t the most technical bodybuilding exercise, they’re not the simplest, either. If you are new to this movement or have picked up some bad habits and don’t do them as cleanly as you should, it’s time to start practicing and mastering your form.
Do this exercise with a light dumbbell to ensure you are performing it correctly. Use a mirror or training partner for feedback. Also, consider videoing yourself for a post-set analysis. Do practice sets before your main workout and a few more before or after your other workouts so you can work on your form.
Fix whatever technical errors you spot to reduce your risk of shoulder pain.
Try using different training implements
There is more than one way to do overhead triceps extensions. Dumbbells might be the most common, but you may find cable or barbell overhead triceps extensions more common. You can also use an EZ bar or a “triceps bomber” bar, which has parallel grips.
All these options put your hands and upper arms in a slightly different position, which may be more comfortable for your shoulders.
Cable Overhead Triceps Extensions
Use lighter weights and a slower tempo
If heavy weights hurt your shoulders, but light weights don’t challenge your triceps enough, try doing your reps more slowly. So, instead of the usual one-second up/one-second down tempo most lifters use, try a 2:2 or 3:3 tempo.
Lifting and lowering more slowly makes light weights feel heavier while taking stress off your joints.
You don’t have to lift heavy weights to fatigue your muscles; a slower tempo and light weights can be just as challenging.
Strengthen your rotator cuff
Overhead triceps extensions require strong rotator cuff muscles to stabilize your shoulder joint. The rotator cuff is the collective name for the small muscles beneath your deltoids.
The muscles that make up your rotator cuff are:
These muscles are often weak and the cause of many shoulder problems. Strengthen your rotator cuff by performing cable or resistance band internal and external rotations.
Fix your posture
Poor posture, especially a slouched upper back and rounded shoulders, makes it impossible to get your arms into the correct position to do overhead triceps extensions. Trying to do this exercise when you’ve got bad posture puts a lot of stress on the shoulders.
Pronged sitting and too much time using screens mean that many people have poor posture.
It’s beyond the scope of this article to tell you how to fix your posture, but stretching your chest and strengthening your upper back with face pulls and band pull-aparts will help. Mobilizing your thoracic spine will also be beneficial.
Get any underlying shoulder problems diagnosed
If your shoulders hurt despite using these tips, you may have an underlying joint, tendon, or muscle problem that needs diagnosing and fixing. While muscle pain in the areas you are training is normal, pain in nearby muscles and joints is not.
Pain is your body’s way of saying something is wrong, and it’s best not to ignore it. Training through pain is a great way to make minor injuries worse.
If overhead triceps extensions hurt your shoulders, stop doing them and find out the source of your pain.
Use alternative exercises
While overhead triceps extensions are an effective exercise, they aren’t the only way to target the triceps long head. There are other exercises that are just as effective but put much less stress on your shoulders.
Good options include:
Take overhead triceps extensions out of your workouts and do any of these shoulder-friendly arm exercises instead.
Frequently Asked Questions
Do you have a question about shoulder pain and overhead triceps extensions? That’s okay because we’ve got the answers!
1. I had sudden shoulder pain during overhead triceps extensions. What should I do?
Sudden onset or acute pain suggests you may have strained a muscle or sprained a ligament. In either case, you should stop what you’re doing to avoid making your injury worse.
Depending on the severity of the damage, you may also need to use RICE (Rest, Ice, Compression, and Elevation) to promote recovery.
Do not return to training until the pain has subsided. If the pain is severe, get it checked out by a medical professional. You can still work out, but you must avoid aggravating the injured area. Train around the injury and not through it!
2. Are overhead triceps extensions safe?
Overhead triceps are not the riskiest triceps exercise, but nor are they the safest. They tend to place a lot of stress on the shoulder joint and can be uncomfortable. However, providing you have stable, mobile shoulders, and perform them with good form, it would be an exaggeration to say that overhead triceps extensions are dangerous.
3. Do I even need to train my long triceps head separately?
While isolating any of the three triceps heads is impossible, you can emphasize each one by altering the position of your upper arm. Bodybuilders often do this to create the perfect horseshoe-shaped triceps.
However, suppose you are a recreational lifter who doesn’t care about developing a championship-ready physique. In that case, you probably don’t need to train the long head separately. General triceps training will most likely give you the results you want.
4. Can I do overhead triceps extensions even though they hurt my shoulders?
Just because you can do something doesn’t mean you should! Pain is your body’s way of telling you to stop and that something is wrong. Training through pain is a good way to turn a minor injury into something more significant.
If overhead triceps extensions hurt your shoulders, try to determine the cause of the problem and then apply the solutions outlined in this article. And remember, the overhead triceps extension is NOT compulsory, and there are plenty of other exercises you can do that are far more shoulder-friendly.
5. Are single-arm triceps extensions safer or better than the two-armed version?
We all respond to exercises differently, and you may find that single-arm overhead triceps extensions are more comfortable than the regular version. Try them and see! They involve a very similar movement, but using one arm at a time means you may be able to position your shoulder at a more forgiving angle. You can also use your free arm for stability and support.
Closing Thoughts
Just because overhead triceps extensions are effective for building muscle doesn’t mean you have to do them. If they bother your shoulders, you should seek alternatives. After all, there are plenty of similarly effective exercises that target the long head of your triceps.
However, if overhead triceps extensions hurt your shoulders, it may not be the fault of the exercise. For example, your shoulder pain could be the result of poor posture, inadequate mobility, a weak rotator cuff, or using too much weight.
Fix these problems, and you may find that overhead triceps extensions no longer cause discomfort.
Remember, though, you should avoid training through pain. Don’t ignore it, as it could be an indicator that something is wrong. The pain could get worse if you fail to do something about it.
Read also:
The 10 Best Forearm Exercises for Arm Wrestling
While strength matters in arm wrestling, technique matters, too. There are several tricks you can use to beat a stronger opponent, such as moving your hand higher up their fingers and thumb to maximize your leverage while weakening theirs. This is called climbing.
But, at its heart, arm wrestling is a test of strength, and arm wrestlers often have very muscular arms and forearms. Most pros train with weights to develop the strength they need to beat their opponents and minimize their risk of injury.
In this article, we reveal the best forearm exercises for arm wrestling.
Arm Wrestling History
Arm wrestling (also spelled armwrestling) is an ancient strength sport. Evidence shows that arm wrestling was practiced in Egypt and Greece over 2,000 years ago. In America, native Americans did a type of arm wrestling, and on seeing it, settlers called it Indian wrestling. Arm wrestling was also popular in Spain, Japan, Cuba, Russia, Norway, and many others.
However, what started as an informal and spontaneous activity eventually became a professional sport. Pro arm wrestlers are now viewed as legitimate athletes.
Organized national and international arm-wrestling bouts started gaining popularity in the early 1950s. Like boxing, there are now several governing bodies, including the World Armwrestling Federation (WAF), The International Armwrestling Federation (IAF), and the World Wristwrestling Championship (WWC).
Despite being a legitime sport governed by rules, a lot of people enjoy casual arm wrestling and like to test their strength against friends and acquaintances. Informal bouts often happen in barrooms, with the loser having to buy the beers.
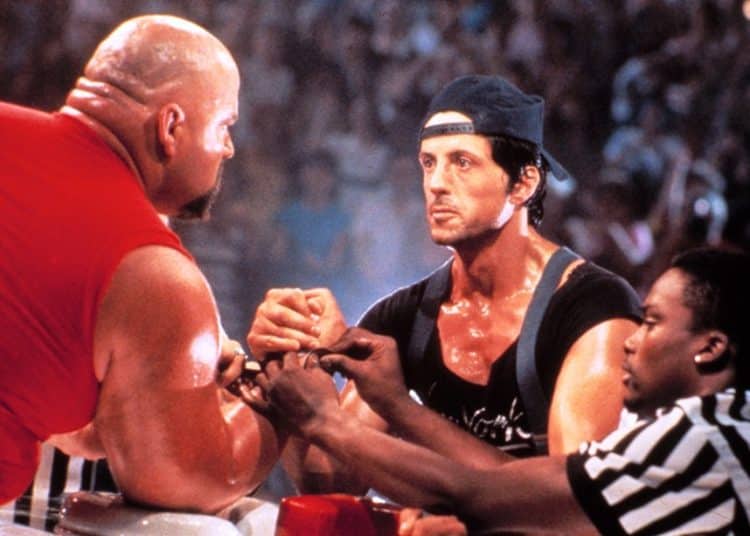
Arm wrestling has also been featured in movies, most notably Over the Top with Sylvester Stallone.
The 10 Best Forearm Exercises for Arm Wrestling
Build the strength you need to pin your opponents with the ten best forearm exercises for arm wrestling!
1. Barbell wrist curls
Wrist curls are a cornerstone of arm wrestling forearm training. They strengthen the muscles you need to use to top-roll your opponent so their palm is turned upward. This is a weak position which makes it easier to push their arm downward. Most pro arm wrestlers do plenty of wrist curls.
Steps:
Sit on an exercise bench and lean forward so your forearms rest at the top and your wrists are free to move. Hold a barbell in your supinated (upturned) hands.
Extend your wrists and lower the bar down toward the floor. Open your hands and let the bar roll down your fingers.
Next, close your fingers and curl the weight upward. Finally, flex your wrist as far as possible to maximally engage the target muscles.
Continue for the desired number of repetitions.
Muscles Targeted:
Forearm flexors.
Benefits:
A very arm wrestling-specific forearm exercise.
A good exercise for increasing forearm size.
Increases forearm and wrist flexibility as well as strength.
Tips:
Do this exercise with a light load for high reps to build endurance and heavier weights and lower reps for strength.
Lower the weight slowly and then lift it quickly to make this exercise more effective.
You can also do this exercise with dumbbells or just one dumbbell to train one forearm at a time.
2. Cable wrist curl
While there is nothing wrong with barbell wrist curls, they have an uneven strength curve, making some parts of the exercise harder than others. Using a cable machine keeps the target muscles under near-constant tension, which may mean this is a more effective, efficient way to wrist curls.
Steps:
Place an exercise bench in front of a cable machine and attach a straight bar to the lowest pulley.
Sit on the bench, and grab the handle with an underhand grip. Rest your forearms on your legs so your wrists are just past your knees.
Extend your wrists and lower the bar down toward the floor. Open your hands and let the bar roll down your fingers.
Next, close your fingers and curl the bar upward. Finally, flex your wrist as far as possible to maximally engage the target muscles.
Continue for the desired number of repetitions.
Muscles Targeted:
Forearm flexors.
Benefits:
More even tension on the target muscles compared to freeweight wrist curls.
Quick and easy to change the weights.
You can adjust the loading angle by moving the bench closer or further away from the pulley.
Tips:
You can also do this exercise with a single D-shaped handle and train one arm at a time.
Rep out to failure, lower the weight by 15-20%, and then rep out again to improve endurance, build muscle, and get a great pump. This is called a drop set.
Use a thick bar to challenge your grip more.
3. Behind-the-back wrist curls
No bench? No problem! You can get a great forearm workout with a barbell and some space to stand. This old-school exercise will pump up your forearms in seconds and build a cast-iron grip.
Steps:
Hold a barbell behind your back with your palms facing away from you.
Flex your wrists and curl the bar out and away from your body.
Pause with your forearms flexed for 1-3 seconds.
Lower the weight and repeat.
Muscles Targeted:
Forearm flexors.
Benefits:
A convenient exercise for home lifters.
A good movement for heavier weights and low reps.
A very effective old-school forearm and grip exercise.
Tips:
Use gym chalk to stop the bar from slipping out of your hands.
Use a thick bar to challenge your grip and develop more muscular forearms.
End your set with a 15-30 second dead hold to fully exhaust your forearms.
4. Single-arm hammer curls
Pulling your forearm toward your chest increases your leverage while decreasing your opponent’s. Once your arm is close to your body, you should find it easier to press the other guy’s arm down and pin it. Single-arm hammer curls are very arm wrestling specific and deserve a place in your arm-wrestling workouts.
Steps:
Hold a dumbbell in one hand, arm by your side, palm facing your leg.
Stand with your feet shoulder-width apart and your knees slightly bent. Brace your core and pull your shoulders down and back.
Bend your arm and curl the weight up to your shoulder. Do not rotate your wrist. Instead, maintain your neutral or thumbs-up grip.
Lower the dumbbell and repeat.
Switch sides and do the same number of reps on the other side.
Muscles Targeted:
Biceps, brachialis, brachioradialis.
Benefits:
A very effective exercise for arm wrestling.
Identify and fix left-to-right strength imbalances.
A great way to build stronger, more muscular upper and lower arms.
Tips:
Use a thumbless grip to increase forearm engagement.
Use clip-on fat grips to work your forearms even more.
Pause for 1-3 seconds at the top of each rep for a more challenging workout.
Use your non-working arm to perform a few end-of-set forced reps.
5. Sledgehammer pronation and supination
Some arm-wrestling techniques involve twisting your opponent’s wrist. As such, you must strengthen the muscles responsible for pronating and supinating your forearm. Strength in these muscles will also make it harder for your opponent to gain the upper hand and turn your wrist.
Steps:
Hold a sledgehammer about a quarter to a third of the way down the handle. Bend your arm to 90 degrees and tuck your upper arm into your side.
Keeping your upper arm stationary, slowly turn the sledgehammer clockwise and then counterclockwise through about 90 degrees in each direction.
Continue until your forearms begin to burn and get pumped.
Muscles Targeted:
Biceps, pronators, supinators.
Benefits:
One of the best ways to train pronation and supination at the same time.
Easy to scale by moving your hand up or down the handle.
A low-tech but high-effect grip and forearm exercise.
Tips:
The further your hand is from the head of the sledgehammer, the more challenging this exercise becomes.
Use a light sledgehammer, as this exercise is more strenuous than it looks. 7-10 pounds should be sufficient for most people.
No sledgehammer? Load one end of an adjustable dumbbell bar and use that instead.
6. Towel wringing
While you can train your forearms for arm wrestling in a gym, you can also get a productive workout at home. This exercise works your grip and forearms using nothing but a water-logged towel. However, don’t let the simplicity of this exercise fool you into thinking it’s easy – it’s actually a beast!
Steps:
Dunk a towel in a bowl or bucket of water.
Remove the towel from the water and grip one end in both hands.
Twisting your hands, wring the water out of the first section of towel, move your hands down a few inches, and then wring it out again.
Continue down the length of the towel until you have wrung out as much water as you can.
Rest a moment, re-dunk the towel, and repeat.
Muscles Targeted:
Forearm flexors and extensors.
Benefits:
An excellent exercise for home workouts.
Very joint-friendly.
A great way to increase grip and forearm strength simultaneously.
Tips:
The thicker the towel, the more challenging this exercise becomes.
Don’t use your best towels for this exercise, as they may rip.
Reverse hand positions/wringing directions to ensure that you train both arms equally.
7. Wrist roller
The wrist roller is an old-school forearm and grip exercise that’s perfect for arm wrestling. While you can use it with heavy weights for low reps to build strength, it’s better for developing endurance so your muscles can cope with the demands of a lengthy arm-wrestling bout.
Steps:
Start with the cord unraveled and the weight resting on the floor. Hold the handle with an overhand grip.
Raise your arms in front of you, and then start rolling your wrists to wrap the cord around the handle. Use an alternating hand action, and try to wrap as much cord as possible per wrist turn.
Continue until you have done the desired number of reps or the weight reaches the handle.
Slowly lower the weight back down to the floor – no dropping!
Muscles Targeted:
Forearm flexors and extensors.
Benefits:
A low-tech exercise that’s ideal for home workouts.
Wrist rollers are widely available and cheap to buy.
Easy to modify by adding or subtracting weight plates.
Tips:
Alternate between rolling your wrists forward (flexion) and backward (extension) to train the muscles on both sides of your forearms equally.
Lower your arms and hold the handle in front of your hips to take pressure off your shoulders.
Make your own wrist roller for just a few dollars – instructions here.
8. Towel pull-up
While towel pull-ups might not be an obvious exercise for arm wrestling, they’re actually an excellent choice. Towel pull-ups not only strengthen your forearms, but they’ll also build a vice-like grip, battering-ram biceps, and rock-hard lats, which are all muscles used during arm wrestling. Simply switching from regular pull-ups to this variation will help make you a stronger, more successful arm wrestler.
Steps:
Hang two gym towels over your pull-up bar.
Grip the ends of the towels and squeeze them tightly together.
Hang with your arms straight, shoulders down and back, and core braced.
Bend your arms and pull your shoulders up toward your hands.
Descend under control and repeat.
Muscles Targeted:
Biceps, forearm flexors, latissimus dorsi.
Benefits:
A total upper body/arm/grip workout for arm wrestlers.
Builds bigger, stronger forearms.
An easy exercise to add to your regular back workout.
Tips:
Wear a weighted vest to make this exercise more challenging.
Thicker towels make this exercise more grip-centric.
Just hang from the towels to build a stronger grip and muscular forearms if you cannot do pull-ups.
9. Hand grippers
Hand grippers are ideal for those times you want to work on your grip and forearms but don’t have time to go to the gym or do a full workout. Keep a hand gripper at home so you can train while watching TV or in your desk drawer at work so you can sneak in a set between phone calls. Buy heavy-duty hand grippers to ensure your workout is as effective as possible.
Steps:
Wrap all four fingers and your thumb around the hand gripper.
Squeeze it closed and then hold for a few seconds.
Slowly relax your hand and then repeat.
Muscles Targeted:
Forearm flexors.
Benefits:
Highly portable, so you can train your grip anywhere and anytime.
Hand grippers are available in a wide range of closing strengths, so they’re ideal for all levels and abilities.
Hand grippers are cheap and widely available.
Tips:
Buy grippers that you can only just close. Easy-to-close hand grippers are of limited value.
Make sure you balance your hand gripper training with a few sets of finger extensions to balance your muscular development (see below).
Resist the temptation to use your hand grippers every day. This could lead to overuse injuries, such as tendonitis. Include a few rest days on your arm-wrestling forearm workouts.
10. Finger extensions
Most arm wrestling exercises focus on your forearm flexors. This makes sense, given how important these muscles are. However, you must also work on your finger extensors to ensure that the muscles that open your hands are strong and well-developed. Imbalances between flexors and extensors can lead to injuries. The good news is that training your finger extensors is easy and requires no special equipment.
Steps:
With your fingers straight and together, take a large rubber band and loop it around your fingertips and thumb. A standard stationary-type band should suffice.
Open your hand and spread your fingers and thumb apart as far as possible.
Slowly close your hand and repeat.
Muscles Targeted:
Forearm extensors
Benefits:
A good exercise for promoting recovery.
Helps to prevent muscle imbalances.
Simple and easy to do – anywhere and anytime.
Tips:
Do one set of finger extensions for every few sets of forearm and hand flexion you perform.
Use a wide band so it stays in place and doesn’t slip off your fingers.
Loop the band around each finger to make your workout harder and make sure the band remains in place.
Keep a finger extension band in your pocket so you can do a set whenever you have a few minutes spare.
FAQs
Do you have a question about forearm exercises for arm wrestling? No worries because we’ve got the answers!
1. Will more muscular forearms make me a better arm wrestler?
Almost every great arm wrestler has big biceps and thick forearms. This is not a coincidence! However, the guy with the most muscular arms is not always the winner, and technique is also important. The small, skilled wrestler can often beat someone bigger but less experienced.
So, work on your forearm and arm strength, but don’t underestimate the importance of learning how to arm wrestle properly. Practice your skills by arm wrestling against a range of opponents.
2. How often should I train my forearms for arm wrestling?
While it may be tempting to train your forearms every day, you’ll probably get better results if you limit yourself to 2-3 intense workouts per week. This will provide plenty of time for recovery and muscle growth while reducing the risk of overuse injuries.
Build each workout around a few different exercises, so you hit your muscles from all the available angles, e.g.,
Single-arm hammer curls – 3 sets of 6-10 reps
Barbell wrist curls – 3 sets of 10-15 reps
Sledgehammer supination/pronation – 3 sets of 15-20 reps
Choose different exercises for your next workout.
3. What is the best rep range for arm wrestling training?
Arm wrestlers need to be strong, powerful, and have good endurance so they’re ready for every type of bout and opponent. For example, being fast and explosive may help you win an arm-wrestling bout quickly. Still, you also need endurance in case the battle lasts longer than you expected.
As such, you should train your muscles with different rep ranges to ensure you are ready for all the demands you are likely to face. This means:
Power – 3-5 reps with heavy weights lifted quickly
Strength – 4-6 reps with heavy weights lifted slowly
Size – 8-12 reps with moderate weights*
Endurance – 15-20+ reps with light weights
*Optional
Use a variety of exercises and rep ranges in your workouts to ensure you have all the tools you need to dominate at the arm-wrestling table. There is no point in being strong if your muscles are tired in 10 seconds. Similarly, unlimited endurance won’t help you if you get pinned straight away by stronger opponents.
4. Do I need to train any other muscles besides my forearms?
While strong forearms are a must for successful arm wrestling, there are other muscles that also deserve your attention. After all, arm wrestling involves your entire upper body, not just your lower arms.
So, make sure you also train your chest, shoulders, back, biceps, triceps, and core in your quest to become an unbeatable arm wrestler.
You should also train your legs simply to ensure your body is well-proportioned and balanced. Friends don’t let friends skip leg day, even if they are arm wrestlers.
5. Are arm wrestlers strong?
Arm wrestlers are very strong, but that strength is often specific to their chosen activity. For example, a powerful arm wrestler may not be a good bench presser or deadlifter. Arm wrestlers also tend not to be as muscular as bodybuilders.
There are exceptions, such as Larry Wheels, who excels in many different strength sports, including powerlifting, strongman, and arm wrestling.
However, as Wheels himself knows, size is not everything in arm wrestling, and smaller, more experienced competitors can sometimes beat much bigger opponents.
6. Is arm wrestling dangerous?
Any activity that tests maximal strength can be dangerous – including arm wrestling. Most arm-wrestling injuries affect the soft tissues and include ligament sprains and muscle strains. However, humerus (forearm bone) fractures also occur from time to time (1).
These injuries can be to the wrist, forearm, elbow, upper arm, or shoulder. Chronic overuse injuries are probably more common than acute injuries, although the latter tend to be more serious. Strength training can reduce the risk of injury by ensuring the structures of the body are up to the demands of arm wrestling.
You should also warm up before arm wrestling, stretch and mobilize your wrists, elbows, and shoulders between workouts and bouts, and use recovery tools such as massage guns, foam rolling, ice, and trigger point therapy to stop minor aches and pains turning into more serious problems.
Also, be wary of arm wrestling too often, wrestling against much stronger opponents, not using good technique, or not submitting once you know you’ve lost a bout, all of which increase your risk of injury.
More Forearm Exercises:
Wrapping Up
Arm wrestling is a popular activity and sport. Some people are naturally good arm wrestlers, while others need to work at it.
There is more to arm wrestling than just gripping your opponent’s hand and trying to push it down. There are several techniques and tricks you can use to improve your chances of success. Arm wrestling is a skill, and it’s worth becoming a student of the game if you want to get better.
That said, arm wrestling is a strength sport, and training your forearms will help you become a better arm wrestler. Building more muscular forearms could also protect you from injury.
So, train your forearms, as well as the rest of your upper body, and you’ll soon be king of the arm-wrestling table!
References:
1 – Moloney DP, Feeley I, Hughes AJ, Merghani K, Sheehan E, Kennedy M. Injuries associated with arm wrestling: A narrative review. J Clin Orthop Trauma. 2021 Apr 20;18:30-37. doi: 10.1016/j.jcot.2021.04.010. Erratum in: J Clin Orthop Trauma. 2021 Jul 30;20:101539. PMID: 33996446; PMCID: PMC8091050.
Leg Press Variations for Powerful Quadriceps
While the squat remains the number one exercise for building powerful quads, the leg press is right up there. The leg press is a terrific alternative exercise if you can’t do squats due to your structure, mechanics, or inherent weaknesses. And, if you can squat, following it with a few sets of heavy leg presses will help you build power and mass in your quads.
In this article, we will uncover several leg press variations that will allow you to better target your quads for power. Most of these changes involve your foot positioning. As you’re about to discover, where you put your feet on the platform can make all the difference when it comes to targeting different muscle groups.
Leg Press Muscles Worked
The leg press is a compound exercise because it operates through two joints — the knee and hips. You are performing hip flexion when you lower the weight to bring your knees back. Then, when you push back to the start position, you perform knee extension.
Leg Press Muscles Worked
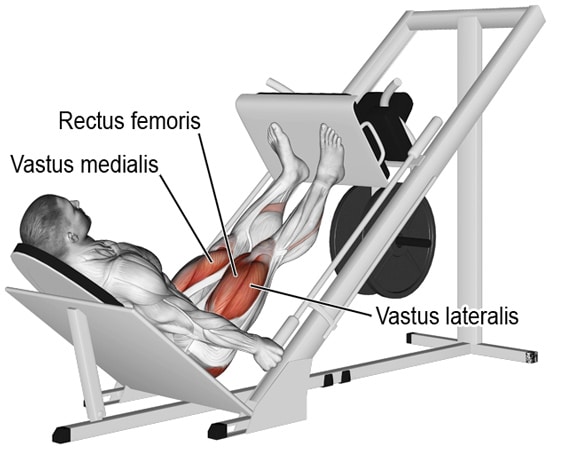
The leg press mainly works the quadriceps, which is a four-headed muscle group. These four muscles are:
Rectus femoris: This is the only quad muscle that crosses the hip joint. It originates at the base of the spine, running down the front of the quads to attach to the kneecap. This muscle plays a part in knee extension and hip flexion. A wider leg press stance will put more focus on the rectus femoris.
Vastus lateralis: It originates at the top of the upper leg bone (femur) and runs down the outside of the quads to attach to the kneecap. A wide stance will better activate this muscle.
Vastus intermedius: This muscle runs down the middle of the quads, from the top of the femur to the kneecap.
Vastus medialis: This muscle lies on the inner side of the quads, again running from the femur to the kneecap. Adopting a narrow leg press stance will maximally engage the vastus medialis.
The other muscles engaged when you do the leg press are the glutes, calves, and hamstrings.
Leg Press Benefits
Before we delve into the variations that will allow you to ramp up the intensity on the leg press, let’s consider three reasons why adding this exercise to your leg day workout in the first place makes sense.
Stable Environment
A major benefit of the leg press is that it allows you to work your legs in a stable environment. When you do exercises such as squats and lunges that don’t lock you into a fixed movement pattern, many things can go wrong, especially when working with heavy weights.
Built-in Safety
Because your back is supported when doing the leg press, you can concentrate 100% of your focus and energy on pressing the weight. The machine also has a built-in safety mechanism; with a simple twist of the handles, you can activate the locks that secure the weights in place. That means you can go extra heavy on this exercise without needing a spotter.
Greater Quad Focus
Your range of motion for the leg press is typically shorter than if you were doing squats. If you’re trying to develop quad mass and power, that’s actually a good thing. That’s because it keeps the focus on your quads rather than transferring it to your glutes and hamstrings.
Which Type of Leg Press Should You Use?
There are two types of leg press machines commonly found in gyms:
Horizontal
45-degree
With a horizontal leg press, you push your legs directly out in front of you. On the other hand, the 45-degree version has you pressing your legs at an angle.
So, which is best?
There is no definitive answer to this question. At this stage, no studies have directly compared the effectiveness of the two versions of the exercise in terms of building quad power. However, we can be informed by simple physics on this subject.
When doing the 45-degree leg press, the weight you load on the machine is spread out over the diagonal plane of the leg press machine. This creates a wide moment arm, which is the distance between the line of action and the pivot point, which in this case is the hip joint. The wider the moment arm, the lower the force needed to lift the weight.
But when you do the horizontal leg press, the weight is spread out directly in front of your hips, creating a shorter moment arm. A shorter moment arm means you’ll need more force to lift the weight.
That’s why you’ll find it harder to light the same weight on the horizontal leg press than on the 45-degree leg press.
As a general guide, you should be able to lift about 30% more weight on the 45-degree leg press. But simply being able to lift more weight will not make your quads stronger if the physics of the machine have made it easier.
The fact that it’s easier to lift a weight on the 45-degree leg press doesn’t mean that you should only use the horizontal machine. But if you’ve got access to both machines, you should compensate when using the 45-degree machine by adding extra weight to make up for the longer moment arm. If you don’t, you won’t be pushing your weight limit, and you’re likely to plateau your quad power.
Leg Press Form Tips
Whether using a horizontal or a 45-degree leg press machine, ensure that your lower back and glutes are pressed hard against the pads.
Do not use a weight that is too heavy. This will restrict your range of movement. Don’t be that guy who loads up seven or eight 45s on each side and then moves just a few inches.
Slow down. When you go too fast, your knees tend to cave in, and you may even bounce the weight using momentum at the bottom.
Don’t lock your knees at the top of the rep. Stopping just short of lock-out keeps the tension on your quads.
Consciously think about keeping the weight evenly distributed between both legs.
Should Your Knees Go Over Your Toes?
The knees-over-toes debate is usually associated with the squat, But the same applies to the leg press. For decades, lifters were told not to allow their knees to track over the toes because it would damage the knee joint. Recent research, however, has thrown that argument out the window.
One study showed that allowing your knees to track over your toes during the squat led to significantly improved activation of the vastus medialis head of the quadriceps. This part of the quads is often known as the ‘teardrop’ because of its appearance on a developed bodybuilder with low body fat levels. Furthermore, there was no adverse effect on the knee joint reported. [1]
It should be noted that this study specifically looked at the muscle stimulation of the quads during the squat. It is reasonable to speculate that the same thing applies to the leg press but, to date, there are no studies specifically testing the leg press in this regard.
The leg press foot platform is generally a large area. That gives you the freedom to vary your foot placement from very wide to very narrow. Where you choose to palace your feet on the platform will work your muscles differently. Here’s an overview of the different foot placements and what areas each one targets:
1. High & Wide
When you place your feet high and wide on the platform, you will target your hamstrings. You want to place your legs as high and wide on the platform as possible without your hips coming off the seat pad. Your toes should actually be off the edge of the platform’s top and angled outward. To accentuate the hamstrings, push your heels into the platform on the descent.
In the high and wide position, your feet should be about one and a half times your hip width.
2. Low & Close
Putting your feet low and close together on the platform will emphasize your quads. Your heels should be almost, but not quite, hanging off the bottom of the platform, with your feet about six inches apart.
When pressing, think of pushing your quads out and over your knees. Think also about keeping the weight distributed over the balls of your feet. This position is going to really blow up your quads, but only if you go deep on the descent. So don’t let your ego get in the way of a full range of motion.
As we’ve seen, the more your knees can track over your toes, the greater the quad activation, especially on the vastus medialis head. One way to increase this effect is to wear elevated-heel weightlifting shoes when doing the narrow stance leg press. This is especially beneficial if you have poor ankle flexibility and find your heel coming off the platform in the bottom position of the leg press.
3. Neutral
A neutral stance is where your feet will naturally go on the platform if you’re not thinking about it. Find your most comfortable position with your feet hip distance apart. This position will provide an even distribution across the quads, glutes, and hamstrings.
A neutral foot placement will help you lift the most weight. Focus on a slow descent, bringing your knees down to the outside of your shoulders, and then push the heels through the platform on the ascent. Drive your lower back into the seat pad the whole time.
4. Heels Elevated
An adaptation of the neutral position may place extra emphasis on the quads. This involves wearing weightlifting shoes with elevated heels. The increased angle this creates puts more load on the vastus medialis quad muscle that runs into the knee joint.
5. Toes Elevated
To assume a toes elevated position, you need to place a pair of small weight plates or a squat wedge under your toes on the foot platform. Your feet should otherwise be in a neutral stance. This will shift the emphasis to your hamstrings.
Single Leg Press
The single-leg press allows you to work each quad independently. It helps correct quad strength imbalance, where one leg is stronger than the other.
When you do the two-legged leg press, your dominant side will take a disproportionate percentage of the weight. Doing the single-leg press forces each leg to carry its own weight, which will eventually help balance the strength between your quads.
Place your foot low and inside hip width to target the quads with the single-leg press. Place the other foot firmly on the ground. Unrack the weight and slowly bring the platform back toward you. Concentrate on the knee traveling back and out as you descend. This will lengthen your range of motion so that you don’t hit your knee into your ribcage.
Come back until your leg forms a right angle at the knee, and then push your heel into the platform to return to the start position. Don’t lock out at the top but move smoothly into the next rep.
Do not allow your heel to lift off during the descent. If you do, you’ll transfer the force from your quad to your knee. You must also not allow your hips to roll up off the pad in the bottom position.
A Leg Press Workout For Power Quads
Now that we’ve identified the best ways to do the leg press to target the quads, we can put them together to create a mini quad workout on the leg press machine. We’ll be doing the following three leg press variations:
Neutral-stance leg press
Low and close stance leg press
Single-leg press
The first two exercises will be done as a mechanical drop set. This is when you do a drop set without changing the weight by shifting your foot position. We’ll start with the low and close stance version, as this is the one that most directly targets the quads. After pumping out eight reps, you quickly rack the weight and shift to a neutral stance. Then immediately unrack and do another eight reps.
Because you’re strongest in the neutral stance, following a set of narrow stance reps with eight more neutral stance reps will tap deep into your quad’s strength reserves, allowing you to eke out every ounce of benefit from the set. The key to getting the most out of a mechanical drop set like this is minimizing the downtime between the two phases — it should only take a few seconds.
Once you’ve completed your 16 reps on the mechanical drop set, get out of the machine, shake your legs out, and then take half the weight off the machine. Now get straight back on and start pumping out single-leg presses. This transition should take you less than 30 seconds.
Your goal is to get 16 reps on each leg on the single-leg press. At that point, your quads will be on fire. Rest for two minutes, and then do the whole thing over again. Work up to doing three total sets. Here’s what it will look like:
Set One:
Narrow-stance leg press: 8 reps
Neutral stance leg press: 8 reps
Single-leg press (right leg): 16 reps
Single-leg press (left leg): 16 reps
Rest for two minutes and then repeat for another two sets.
Wrap Up
The leg press is an effective quad power and mass builder. You can target different areas of your upper legs depending on where you place your feet on the platform. The best way to target your quads is with a low, narrow stance. You can target the quads even more by elevating your heels using weightlifting shoes.
The next best foot stance to hit the quads is the neutral stance. This is also the version you can lift the most weight with. Our final quad-centric leg press move for power is the single-leg press with a low stance.
Combine these three exercises into a killer mechanical drop set followed by a unilateral quad isolation workout. You can either do this as the first part of your quad workout and follow it up with leg extensions and lunges or, if you’re game, do four sets of squats first and then jump into your leg press workout.
Just don’t expect to be able to walk the next day!
References
Escamilla, R. F., Fleisig, G. S., Zheng, N., Lander, J. E., Barrentine, S. W., Andrews, J. R., & Bergemann, B. W. (2001). Effects of technique variations on knee biomechanics during the squat and leg press. Medicine and Science in Sports and Exercise, 33(9), 1552-1566.
The 10 Best Middle Back Exercises for Strength, Mass, and Better Posture
Take a look at most bodybuilding back workouts, and you’ll see an abundance of lat pulldown and pull-up exercises. That’s good news because these vertical pulling exercises are responsible for building upper back width.In fact, if you want a classic torso V-taper, pull-ups and pulldowns are all but compulsory.However, if you want a back that wide AND thick, you need more than vertical pulls. You need to include horizontal pulling exercises in your workouts, too. These hit your middle back more than your lats.A strong middle back will add a lot to your physique, increase your strength in the big lifts – even the bench press – and improve your posture. For these reasons, the best back workouts usually include as many horizontal pulling exercises as they do vertical.In this article, we reveal the best exercises for building up this critical muscle group. Middle Back Anatomy and Functions While you don’t need to be an expert in anatomy to build an impressive physique, knowing a little about the muscles of the human body can help you choose the best exercises for your workouts.When talking about the middle back, we’re actually referring to the muscles located across and between your scapulae or shoulder blades.These muscles are (1):Rhomboids The rhomboids connect your scapulae to your thoracic spine. There are two rhomboids: major (largest) and minor (smallest). They come as a pair – left and right. The rhomboids are not large muscles, but they are powerful and play an important part in the shape of your upper back and how it functions. For example, they play a vital role in stabilizing your shoulder blades and keeping them pressed flat against your ribcage.Trapezius Known as the traps for short, this is the large kite-shaped muscle of your upper back. It goes from the base of your skull down to the middle part of your spine and spans out toward your shoulders.The trapezius is made up of three sets of fibers – upper, middle, and lower. Each set of fibers has a different function.The upper traps pull your shoulders upward in a movement called elevation of the shoulder girdle. In contrast, the lower traps pull your shoulders downward, which is a movement called depression of the shoulder girdle.However, it’s the mid-traps that work with the rhomboids and are the main topic of this article. The mid-traps, working in conjunction with your rhomboids, pull your shoulder back and together in a movement called shoulder girdle retraction.Posterior deltoidsThe posterior or rear deltoids are NOT part of your middle back, but it’s almost impossible to train your mid-traps and rhomboids without working the muscles at the back of your shoulders. The rear delts are involved in horizontal shoulder extension and external rotation, which are two movements that happen during many mid-back exercises.As such, if you are training your middle back, you are probably working your posterior deltoids, too. This is no bad thing because a weak upper back is usually accompanied by underdeveloped rear deltoids.So, your mid back is actually two muscles working together – the mid-traps and rhomboids. When these muscles contract, they pull your shoulders together. This movement is a necessary part of many exercises, including rows, deadlifts, and even bench presses. It’s also important for your posture. Why is Your Middle Back Weak? Many people, including hardcore exercisers, have a weak upper back. This often manifests as poor posture, a rounded upper back during deadlifts or difficulty fully engaging the mid-traps and rhomboids. Poor bench press performance is often caused by an underdeveloped middle back.Common causes of upper back weakness include:Prolonged sittingSitting for a long time, especially if you hunch over a keyboard or screen, can stretch and weaken your upper back. As most people are habitual slouchers, it’s no wonder that so many people have a weak upper back.Not doing enough upper back trainingMonday is national chest training day, but when is national back training day? A lot of lifters spend far more time training their chests than they do their back, which makes muscle imbalances and weaknesses all but unavoidable.Read also: How to do the middle back stretch.Doing too many of the wrong back exercises and not enough of the right onesMost back exercises fall into one of two groups – vertical pulls or horizontal pulls. Ideally, you should do an equal amount of both types of exercise. But, if your middle back is weak, you should do more horizontal pulling than vertical pulling. Many back workouts involve too much vertical pulling, and that leaves the middle back underdeveloped.A poor mind-muscle connection It’s almost impossible to develop a muscle if you can’t feel it working. This is called your mind-muscle connection. Some people “lose touch” with their muscles and cannot feel them working or control them properly. So, even if you’re doing the right exercises, they may not produce the results you want.A good mind-muscle connection means you can control your muscles at will, and every exercise you perform will become much more effective (2).The good news is that you can fix your mind-muscle connection – find out how here.The 10 Best Middle Back Exercises Do you want to develop an impressive middle back but aren’t sure where to start? These are the ten best exercises for your mid-traps and rhomboids!1. Bent-over barbell row The bent-over barbell row is a somewhat controversial exercise, with some coaches saying that it’s best avoided. However, done with good form and not too much weight, the bent-over barbell row is an excellent middle-back exercise and can be performed safely by most people.Barbell Bent Over RowSteps:Grip and hold a barbell with an overhand, wider-than-shoulder-width grip. Pull your shoulders down and back, brace your core and bend your knees slightly.Hinge forward from the hips and lean over until your upper body is almost parallel to the floor. Let your arms hang straight down from your shoulders.Without using your legs or back, bend your arms and row the bar up and into your chest. Pull your shoulders back and keep your elbows level with your shoulders.Extend your arms and repeat.Muscles targeted:Primary: Middle trapezius, rhomboids, posterior deltoids.Secondary: Biceps, latissimus dorsi, erector spinae.Benefits:An excellent total back builder.A very accessible exercise – all you need is a barbell and weights.Small changes to the angle of your back will change the feel and effect of this exercise.Tips:Keep your lower back arched throughout to protect your spine and maximize middle back engagement.Lead with your elbows and pull the bar to your chest to emphasize the mid-traps and rhomboids.Keep your wrists straight throughout.2. Seal row If bent-over rows bother your lower back, or you prefer to work your upper body in isolation from your legs, then seal row is the exercise for you. You’ll need a tall bench for this mid-back builder, but in return, you’ll be able to push your mid-back to the limit without having to worry about your lower back at all.Steps:Place a flat bench on blocks or stacks to bumper plates so that your hands are a few inches away from the floor when you lie down on it.Lie face down on the bench and grip a barbell or dumbbells. Pull your shoulders down and back.Bend your arms and pull the bar up and into the bench level with your abdomen.Extend your arms, lower the weight, and repeat.You can also do this exercise on a slightly angled bench to hit your lower traps a little more, i.e., incline seal rows.Muscles targeted:Primary: Middle trapezius, rhomboids, posterior deltoids.Secondary: Biceps, latissimus dorsi.Benefits:A very back-friendly exercise.Can be done using a barbell or dumbbells as preferred.An effective way to target your middle back.Tips:Shrug your shoulder back at the start of each rep to fully engage your middle back.Lead with your elbows to maximize mid-back engagement.Use dumbbells to increase your range of motion.3. Seated chest-supported cable row The great thing about cable exercises is that they let you keep your muscles under near-constant tension, so you get a better workout in less time. This lower-back-friendly exercise is a very effective middle-back movement. It is ideal for beginner and advanced lifters alike.Steps:Attach a rope handle to a low cable. Alternatively, you can use D-shaped handles on an extended strap.Adjust an incline bench to about 70 degrees and place it in front of the cable machine, with the back of the bench facing the pulley.Sit on the bench with your chest against the backrest. Grip the handles and extend your arms.Pull your shoulders down and back, and brace your core.Bend your arms and pull the handles in toward your lower ribs. Lead with your elbows, keep your wrists straight, and squeeze your shoulders together to maximize upper-back engagement.Smoothly extend your arms, let your shoulders shrug forward to stretch your middle back, retract your shoulders again, and repeat.Muscles targeted:Primary: Middle trapezius, rhomboids, posterior deltoids.Secondary: Biceps, latissimus dorsi.Benefits:No lower back strain to worry about.Your back muscles are under near-constant tension.Cable machine exercises are ideal for drop sets.Tips:Adjust the angle of the bench to hit different parts of your mid-back. The more inclined the bench, the more lower trap and lat engagement there will be. An upright bench focuses more on your mid-traps and rhomboids.Keep your wrists straight and lead with your elbows.Shrug your shoulders back and together to maximize mid-back engagement.4. Pendlay row Pendlay rows are named after legendary powerlifting and weightlifting coach Glen Pendlay. Also known as dead-stop rows, this barbell exercise is popular with Olympic weightlifters, who often use it to fix any upper and mid-back weakness. The dead stop between reps means you should be able to perform this exercise with moderate to heavy weights in relative comfort.Steps:Start with your barbell on the floor. Stand with your feet about hip to shoulder-width apart, toes under the bar.Bend your knees slightly, hinge forward from the hips, and bend over until your upper body is parallel to the floor.Grab the barbell with an overhand, slightly wider than shoulder-width grip. Tuck your chin in and lengthen your neck; do not lift your head to look forward or allow your lower back to round.Brace your core, draw your shoulders down and back, and pull the bar up into your abdomen. Keep your upper arms tucked in close to your sides. Your upper body should remain stationary throughout.Lower the barbell back down the floor and let it settle, reset your core, and repeat.Muscles targeted:Primary: Middle trapezius, rhomboids, posterior deltoids.Secondary: Biceps, latissimus dorsi, erector spinae. Benefits:A convenient exercise, as most gyms have a suitable barbell.Provides a brief pause between reps so you can reset your grip and core, do more reps, or use a heavier-than-usual weight.An excellent exercise for powerlifters, weightlifters, and strongman competitors.Tips:You can also do this exercise using dumbbells instead of a barbell.Raise the weight on blocks if you cannot maintain a neutral spine.Use lifting straps if you are training with heavy weights.5. Horizontal row You don’t need to use weights to train your middle back. In fact, there are a couple of great bodyweight exercises that are every bit as effective. Horizontal rows, also known as inverted rows, body rows, and Australian pull-ups, are a very convenient way to train your middle back without gym equipment.Steps:Set a bar to about waist height. Make sure the bar will not move. You can use a barbell in a squat rack or a Smith machine.Sit on the floor beneath the bar and hold it with an overhand, slightly wider than shoulder-width grip.Lean back so your arms are straight, brace your core, and pull your shoulders down and back.Lift your hips, so your weight is supported on your heels and hands only. Make sure your body is straight – from your heels to your shoulders.Keeping your body properly aligned, bend your arms and pull your chest up to the bar. Keep your wrists straight and focus on leading with your elbows. Squeeze your shoulders together at the top of the rep.Slowly and smoothly extend your elbows and return to the starting position, keeping your body straight the whole time.Muscles targeted:Primary: Middle trapezius, rhomboids, posterior deltoids.Secondary: Biceps, latissimus dorsi.Benefits:No equipment required, so ideal for home exercisers.Easy to scale by raising or lowering the height of the bar.Very lower back friendly.Tips:Use a suspension trainer or gymnastic rings for variety.Bend your legs and put your feet flat on the floor for an easier workout.Rest a weight plate on your hips for a more intense workout.6. Renegade row The renegade row is a combination middle back and core exercise. You can even combine it with push-ups to make it a total upper body builder. Be warned; this exercise is more strenuous than it looks, so don’t go too heavy too soon!Renegade RowsSteps:Hold a dumbbell in each hand. You can also use kettlebells. Squat down and place the weights on the floor, so they’re roughly shoulder-width apart.Brace your abs and walk your feet out and back into the push-up position. Your body should form a straight line. Keep your wrists straight, and do not allow them to collapse.Move your feet out so that they are wider than shoulder-width apart to increase balance and stability. Look straight down at the floor to ensure your neck is neutral.Keeping one arm straight, bend the other arm and row the weight up and into your lower ribs. Do NOT allow your hips or shoulders to twist.Lower the weight back to the floor, swap sides, and repeat. Alternate arms for the duration of your set, keeping your core braced throughout.You can also do this exercise with your legs bent and knees resting on the floor to take pressure off your core.Muscles targeted:Primary: Middle trapezius, rhomboids, posterior deltoids.Secondary: Biceps, latissimus dorsi, core.Benefits:Works well with light dumbbells.A very comprehensive upper-body exercise.Great for home exercisers, as so little equipment is required.Tips:Use hex-shaped dumbbells if available, as they’re more stable and less likely to roll.Wear a weighted vest to make this exercise harder.Do a push-up between rows to develop your chest as well as your back.7. Dumbbell rear delt row The dumbbell rear delt row does more than work your posterior deltoids; it also hits your mid-traps and rhomboids. The great thing about this exercise is that you don’t need a lot of weight to do it, so it’s ideal for home exercisers and anyone without access to heavy dumbbells.Steps:Sit on the end of an exercise bench with a dumbbell in each hand. Hinge forward from the hips and lower your chest toward your legs. Let your arms hang down from your shoulders. Rotate your wrists so that your hands are in the pronated or palms-down position.Leading with your elbows, pull the weights up and out so your upper arms are perpendicular to your upper body. Keep your wrists straight, and pull your shoulders down and back.Extend your arms and repeat.Muscles targeted:Primary: Middle trapezius, rhomboids, posterior deltoids.Secondary: Biceps.Benefits:Very little strain on your lower back.This exercise works well with light dumbbells.An accessible exercise that’s suitable for home and gym use.Tips:Use a chair if no bench is available.You can also do this exercise standing and by leaning over.Think about driving your elbows back to maximize middle-back engagement.8. Band pull-aparts The band pull-apart is arguably the most convenient way to train your middle back at home. This is a hugely effective posture exercise, and everyone who lifts weights should do band pull-aparts a few times per week. Do this exercise between sets of bench presses or during your upper body warm-ups. Alternatively, do sets of pull-aparts to break up long periods of sitting.Steps:Hold your resistance band with an overhand, shoulder-width grip. Raise your arms in front of you so your hands are roughly level with your shoulders. Pull your shoulders down and back.Open your arms and stretch the band out across your chest.Return to the starting position and repeat.You can work your rhomboids from different angles by changing the angle of your arms and stretching the band diagonally across your chest, not just horizontally.Muscles targeted:Primary: Mid-traps, rhomboids, posterior deltoids.Secondary: N/A.Benefits:A very shoulder-friendly exercise.You can do band pull-aparts anywhere and at any time.One of the best posture exercises around.Tips: Do this exercise seated or standing as preferred.Try to accumulate 100 reps every day to fix your posture and keep your shoulders healthy.Include band pull-aparts in all your upper body warm-ups to activate and engage your upper back.9. Face pulls Face pulls are so-called because, when you do them, you look like you are going to stick your thumbs in your ears and waggle your fingers like a rude kid! Don’t let this peculiar name or image put you off; the face pull is an excellent mid-back exercise. It’s also fantastic for your posterior deltoids.Cable Face PullsSteps:Attach a rope handle to a cable pulley set to about chest height.Stand with your feet hip-width apart and grab both sides of the handle using a neutral grip. Place one foot in front of the other for balance if necessary.Keeping your elbows level with your shoulders, bend your arms and pull the rope toward your face, contracting your rear deltoids as you pull the ends of the handle apart.Straighten your arms and repeat for the desired number of reps.Muscles targeted:Primary: Middle trapezius, rhomboids, posterior deltoids.Secondary: Biceps.Benefits:A very lower back and shoulder-friendly exercise.Very accessible, as most gyms have a suitable cable machine.Perfect for intensity-boosting drop sets.Tips:Imagine you are trying to poke your thumbs in your ears to maximize upper back engagement.Use a resistance band if you don’t have access to a cable machine.Pull the ends of the handles apart as well as back to work your back even more effectively.10. Reverse pec deck fly Reverse pec deck flys are often viewed as a read deltoid exercise, but they’re much more than that. They’re also a very effective way to target your middle back. With no weights to balance, this exercise leaves you free to focus on pushing your mid-traps and rhomboids to their limit. They’re also an excellent exercise for intensity-boosting drop sets.Steps:Sit on the pec deck machine with your chest against the pad. Reach out and grab the handles. Extend, but do not fully straighten your arms. Your hands should be level with or just below your shoulders.Open your arms and draw the handles out and back until your arms form a T-shape with your body.Return to the starting position, stopping just short of letting the weights touch down, and repeat.Muscles targeted:Primary: Middle trapezius, rhomboids, posterior deltoids.Secondary: N/A.Benefits:No need to stabilize your upper body – the machine does it for you.An excellent exercise for beginners.Very lower back friendly.Tips:Experiment with a neutral and pronated grip to see which one you prefer.Lift your chest and pull your shoulders down and back to maximize mid-trap and rhomboid engagement.On reaching failure, lower the weight by 15-20% and crank out a few more reps to increase the intensity of your workouts.Frequently Asked QuestionsDo you have a question about middle-back training or back workouts in general? No sweat because we’ve got the answers!1. What is the best way to bring my mid-back up to the same level as my lats, shoulders, and chest?If your mid-back is weak, you must prioritize it in your workouts. Train your mid-traps and rhomboids twice per week, e.g., Monday and Thursday, and work them first in your back workouts, i.e., before your lats. Also, consider doing less lat training to give your mid-back a chance to “catch up.”Also, become more mid-back-aware, and pull your shoulders down and back during almost every other exercise you perform, even your arms and legs. This will help strengthen that all-important mind-muscle connection.Once you are happy with your middle back development, maintain it by doing an equal amount of horizontal pulling and pushing training. In other words, for every set of chest training, do a set of rows or similar.2. I can’t feel my middle back working – is this normal?A lack of sensation on your middle back is common and normal, and suggests that you have a weak mind-muscle connection. The good news is that this is relatively easy to fix, although it will take a while to reconnect your brain and back.Ways to do this include:Training your middle back more often.Practicing pulling your shoulders back and together several times a day, especially before training.Adding mid-rep pauses to rows and other mid-back exercises.Doing your reps more slowly and with less weight so you can emphasize retraction.In time, you should notice that you can feel your muscle back working more, indicating your mind-muscle connection is getting stronger.3. What sets and reps should I use for my middle back workouts?Your rep range is goal and exercise-dependent. To build strength, you must lift heavy weights for low reps, i.e., 1-5. Of course, such heavy loads are not practical for some middle-back exercises, such as horizontal rows or band pull-aparts.To build muscle, you can use light to moderate weights and do anywhere from 6-35 reps per set.Generally, the lower end of the scale is best for compound exercises. In contrast, the higher end is more suitable for isolation or single-joint movements.When training for hypertrophy or muscle growth, ensure that you take your sets to within 1-3 reps of failure. Easier sets will not trigger much muscle growth.4. How many times a week should I train my middle back?Twice a week is an excellent place to start for most people. This provides a good balance between work and recovery.For example, you could train your back on Monday and Thursday, leaving plenty of time for the rest of your body and recovery. One workout per week probably won’t be enough to produce good results, but will probably be sufficient to maintain muscle mass and strength.5. How many sets should I do per week for my middle back?The accepted number of sets per muscle group per week is 10-20. Beginners and older exercisers should do 10-14, while younger and more advanced exercisers can work up to 15-20. However, more sets will not necessarily produce better results.These sets should be evenly spread over your workouts. For example, if you want to do 15 sets for your back per week, you could do three workouts, each consisting of five sets for the target muscle.6. Why isn’t my mid-back growing?Your body will respond to your workouts unless you are doing something wrong. Common reasons for not achieving muscle growth include:Failing to consume enough protein – you need between 0.7 to 1.0 grams per pound of body weight.Not training hard enough – you must train to within 1-3 reps of failure.Not training often enough – once a week or less won’t cut it!Skipping too many workouts – even the best middle back exercises and workouts will not work if you don’t do them. You MUST be consistent.Training too hard, long, or often – your body has a limited capacity for recovery. If you work out hard seven days a week, your muscles won’t have the time or energy needed for growth.Not getting enough sleep – your muscles do most of their growing when you’re sleeping. So, you need 6-8 hours per night, and not just at weekends!It’s not been long enough – it takes time for your body to start responding to your workouts. If you’ve only been training for a few weeks, you probably won’t see many changes yet. So be patient and stick with it.7. Got a good mid-back workout for me to try?Sure do! Do this workout twice a week on non-consecutive days, e.g., Tuesday and Friday. But, before you begin, spend a few minutes warming up by doing some light cardio followed by dynamic mobility and flexibility exercises for your shoulders, elbows, and upper back.#Exercise SetsRepsRecovery1Pendlay rows44-63 minutes2Seal row36-82 minutes3Reverse pec deck fly310-1290 seconds4Face pulls212-1560 seconds5Band pull-apart215-2060 secondsMiddle Back Exercises – Final Thoughts It’s easy to neglect your middle back. After all, you can’t see it, so there is less of an incentive to train it. However, the mid-traps and rhomboids play a crucial role in your posture, shoulder stability, and upper back thickness. If you want to look and perform at your best, you MUST train your middle back as hard and as often as you train your lats, chest, and deltoids.Use the exercises and tips in this article to build a mid-back you can be proud of.More Back Exercises:References: 1. KenHub: Back Muscle Anatomy https://my.clevelandclinic.org/health/body/21632-back-muscles2. PubMed: Importance of Mind-Muscle Connection During Progressive Resistance Training https://pubmed.ncbi.nlm.nih.gov/26700744/
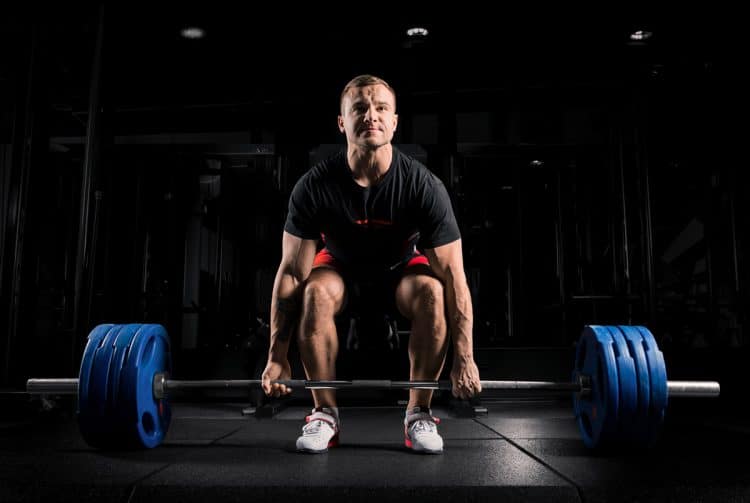
The 13 Best Pull Exercises
Whether you’re following the push/pull/legs workout or doing any other kind of training split, it’s usually best to do the same number of pulling and pushing exercises. This will ensure that both sides of your body and all the associated muscle groups are developed equally. Doing the same amount of pushing and pulling could also…