Tag: Exercise Guides

How to Do the Barbell Wrist Curl to Build Those Forearms
Forearms — the calves of your upper body. The forearms are one of the most underrated muscles, often because they can be so darn difficult to grow. But because of this, forearms often … Read more
The post How to Do the Barbell Wrist Curl to Build Those Forearms appeared first on BarBend.
How to Do the Deadlift for Muscle, Raw Strength, and Power
Of all the exercises out there, few engage as many muscles and reinforce proper movement like the deadlift. You have — at least, we hope — have heard of this exercise. If you … Read more
The post How to Do the Deadlift for Muscle, Raw Strength, and Power appeared first on BarBend.
The Best Beginner Workout Plan To Start Your Fitness Journey
Nothing worth having comes easy. This is as true in your career as it is in the gym — the latter of which can be extremely daunting if you’ve never been before. If … Read more
The post The Best Beginner Workout Plan To Start Your Fitness Journey appeared first on BarBend.
How To Do The Deficit Deadlift To Enhance Your Pulling Power
Stripped to its foundation, the deadlift is as straightforward an exercise that exists. Simply approach the bar and pick it up off the floor. This lack of flash doesn’t make the deadlift any … Read more
The post How To Do The Deficit Deadlift To Enhance Your Pulling Power appeared first on BarBend.
How to Do the Bench Press — Benefits, Variations, Common Mistakes, and More
Everyone loves the bench press. It’s the international hallmark of lifting weights — if you’ve ever mentioned to someone during a conversation that you like to hit the gym, there’s a solid chance … Read more
The post How to Do the Bench Press — Benefits, Variations, Common Mistakes, and More appeared first on BarBend.

Hands To Feet Pose (Pada Hastasana): Benefits, Mistakes, and Variations
“Can you touch your toes?”… an age old question and popular benchmark for assessing basic flexibility. Instantly exposing tight hamstrings, and poor mobility from the waist up, it can be a wakeup call for some! Hands to feet pose pada hastasana goes a little further than uttanasana, or the basic forward bend. The idea is […]
The post Hands To Feet Pose (Pada Hastasana): Benefits, Mistakes, and Variations appeared first on Fitness Volt.
How To Do The Adductor Stretch – Muscles, Benefits, Common Mistakes, and Variations
The adductor stretch is a simple floor exercise for the inner thigh muscles that draw the legs toward the body’s midline. While a lengthening activity rather than a muscle builder or strengthening movement, this inverted split is supposed to support healthy adductor function and keep the legs on the right track during your compound lifts (e.g., squat, lunges, etc).
Akin to the red-headed stepchild in the thigh muscle family, the adductors typically go unnoticed unless someone’s in skimpies or tight leggings where they’re bulging out and touching the upper legs together. Nonetheless, they deserve just as much attention as the more popular quadriceps, hamstrings, and glutes.
This is your know it all guide on the basic lying adductor stretch, with progressive variations too.
Muscles Worked In The Adductor Stretch
This guide is all about the inner thigh adductor muscles, therefore, we’ve described their anatomy in great detail below.
Thigh adductors
Your adductors are inner thigh muscles primarily tasked with pulling the legs toward each other, and beyond (Not to be confused with the abductors that pull the legs apart). While there’s conflicting information on the number of adductor muscles, there’s said to be one for each day of the week.
The adductors include:
Adductor brevis
Adductor longus
Adductor magnus
Adductor minimus
Pectineus
Gracilis
Obturator externus
Note: The glute medius (one of the butt muscles) also plays a role in leg adduction.
Forming the shape of the medial thigh, adductors originate at the pelvis, travel along the inner and rear femur, and just one adductor, gracilis, crosses and acts on the knee joint. Your adductors also stabilize the pelvis when standing, and support hip flexion.
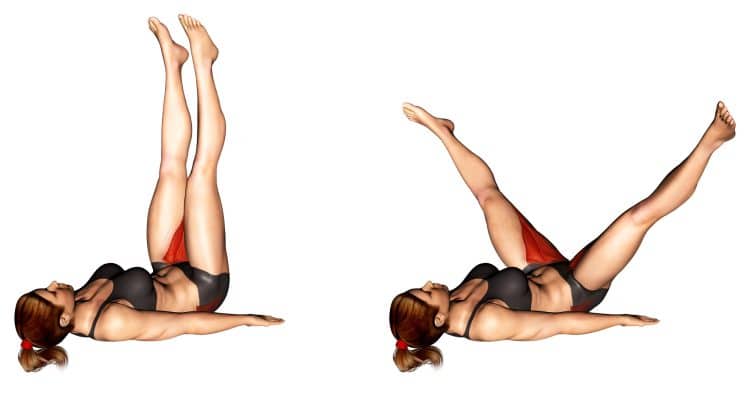
How To Do The Adductor Stretch
As simple as they come, stretching your inner thigh adductor muscles is convenient and time efficient. You can do it upon waking, while you’re watching a show, or during your yoga routine.
Warmup
Before intense stretching of any muscle, it’s important that you warm up to create better pliability in the fiber, which, in turn, prevents pulling a tight, cold muscle. You can achieve this by walking at a brisk pace for several minutes, doing a little body weight resistance exercise, etc.
Now let’s go over the adductor stretch steps!
Steps
Lie on your back and relax your arms down by your sides.
Extend your legs vertical towards the sky.
Engage your core for stability.
Slowly spread your legs apart until you feel a stretch in the inner thighs.
Hold for 20-30 seconds and repeat 3-5 more times.
Tips
Keep your knees bent if you don’t have the flexibility to keep them straight.
Use your hands to gently pull your legs further apart for a deeper stretch.
While there’s a way to do it right, there’s actually no way to do this stretch wrong, so long as you’re feeling an even stretch in your inner thighs, and doing it safely.
Make sure to also include exercises that specifically strengthen the adductor muscles for an overall healthy and highly functional lower body.
Benefits of Adductor Stretch
The adductors are important muscles for movement, lifting, and physical activities. There are certain benefits to taking a few minutes to get loosened up.
Sustain healthy movement patterns
Because they’re so important for stabilizing the pelvis, supporting optimal hip function, and knee alignment, tight adductors can affect your biomechanics in various movements, while also causing knee, groin, and lower back pain. For example, during a squat, tight inner thighs can also cause the leg to collapse inward which is what we don’t want.
It’s also important to note that the adductors are predominantly type I muscle fibers, which can tend to shorten when exposed to chronic stress.
And according to information from The National Library of Medicine, inadequate stretching of the adductors is a risk factor for adductor strain, groin injury, and pain (1). Therefore, poor inner thigh maintenance can also sideline you, and affect your progress.
Prevent pulls and injuries
While the previous benefit also touched on this topic, it needs to be mentioned with separate points.
Because the muscles create joint movement, increasing the flexibility of any muscle will allow your joints to function like they’re supposed to. When tight muscles perform explosive actions, they are more prone to strains, tears, and injuries.
One 2020 study found that athletes with asymmetric thigh adductor strength are at increased risk of incurring groin injuries (2).
Whether you’re an active individual or not, the body still requires regular maintenance. Younger people especially may get away with not stretching and jumping right into physical activity, but it’s not a good long term habit because wear, and the effects of aging can catch up with anyone.
Increase hip flexibility
Imposing its anatomical role on the hips, stretching your adductors is going to contribute to good posture. You’ll also experience better movement in various stretches and resistance exercises. The increased range of motion will allow you to loosen up your other muscles too.
Variations of Adductor Stretch
There are countless ways to stretch the adductors, and it’s actually important that you hit them from a variety of angles for most benefit. However, we simply cannot list all of the variations, but we will show you the ones we like, and that are most commonly recommended.
Adductor stretch/lying split against a wall
An assisted version of the adductor stretch, you’ll lie on your back, with your bottom and heels pressed up against the wall, and legs in an inverted split position. We recommend wearing socks for this one as you’ll slide your feet down the wall toward the floor as they spread apart into the stretch.
Aim for 20-30 seconds in the stretch position, and do 3-5 rounds.
Pro Tip: Try turning your feet in and out to feel the stretch differently.
Strap assisted adductor stretch
While lying on your back you can utilize a strap to pull your legs further into a stretch. This is a common technique used when you cannot effectively use your arms to help stretch a body part.
Wide stance adductor stretch
Standing variations are highly recommended because you have more possibilities, freedom of movement, angles, and weight control to increase or decrease the intensity of the stretch. It also keeps the hips in extension which is going to allow a better full stretch of the inner leg.
Not to mention, it’s great for those who do not have the flexibility to perform other common adductor stretch variations.
Now let’s go over the technique…
Steps
Stand with your feet wider than shoulder width.
Take a step forward with either foot so that one leg is slightly in front of the other.
Now bend the front leg and come into a side lunge until you feel a stretch in the opposite leg adductor muscles. The key here is keeping the non-lunging leg straight. Tense your quad to help keep the knee extended.
Hold this position for 20-30 seconds and gently deepen the stretch if needed.
Then make sure to do the same for the opposite side.
Pro Tip: Experiment with shifting your upper in various directions to feel a stretch in a different part of the inner thighs. Since we’re all unique and different, you’ll have to
Butterfly pose
Everyone knows this popular adductor stretch exercise as it’s one of the most commonly used in physical activity classes (e.g., martial arts, physical education, etc). However, while it is straightforward, and no doubt effective, the one drawback of the butterfly position is that it’s not going to stretch all of the adductors. You also need some flexibility to do it too.
So while it is simple and convenient if you’re already sitting, make sure to also combine it with some of the other stretches that you’ll find in this guide.
Steps
Sit on the floor with your legs straight.
Bend your legs and press the bottoms of both feet together. Grab onto the ankles and rest your elbows on your inner thighs. You don’t need to pull the feet toward your groin.
Allow the knees to drop down. Use the forearms to gently push the legs deeper into a stretch. Don’t force it if there’s discomfort.
Pro Tip: When you feel flexible enough, pull your feet closer to your groin to enhance the stretch in your adductors.
Kneeling adductor stretch
Another very common method to stretch the adductors is to kneel down and use the ground to open up the muscles. From here, you can actually experiment a little, shifting your weight to achieve a stretch in the inside thighs.
Steps
Get down on your knees, and extend either leg out to the side so that your inner foot is on the ground. In this position, only one knee should be on the ground.
Move the knee slightly out so that it’s not directly below the hip.
Place your hands on the floor in front of you and lean forward, keeping your back straight.
Use your muscles to level your hips.
Now rock forward and back. You should feel a nice stretch on the inner thigh of the extended leg.
Watch the half kneeling adductor stretch in 11 seconds!
Spread leg forward fold Upavistha Konasana
A much more intense stretch than anything mentioned, the full expression of a seated forward fold requires intense flexibility and mobility. But you’ll also get a ridiculous stretch in the inner thighs. There are a lot of details in setting up and performing this technique but it’s worth it!
Steps
Start by sitting on your mat, with the knees bent, feet flat on the floor, and arms resting over your legs.
Straighten your legs out in front of you, and spread them out wide.
Use your hands and gently adjust your glutes by pulling them out to ensure you’re able to maintain an upright posture and lengthened torso without limitation.
Flex your feet by pulling the toes back toward your ankle, and press the heels into the ground.
Now place your fingertips behind your butt on the floor, and pull the shoulder blades slightly toward each other, and down. Then lift your chest up.
Hold the stretch.
If you’re ready for a deeper stretch, place your hands in front of you on the floor, then slowly walk your hands forward as much as you comfortably can.
Now allow your upper body to sink down toward the floor to accentuate the stretch. But remember to maintain a lengthened back, not slouching over.
From here, if you do not have the flexibility to descend further, you can use a yoga bolster and/or stacked blankets for support.
Gently, lie your head down, looking to either side, and rest your elbows on the floor with your palms facing up.
Let your entire body relax and sink into the cushions, allowing your arms to also become heavy.
Bring awareness to your groin, feeling the wide position of your legs, while allowing your lower body to sink down into the floor.
Stay here for 5 minutes.
To come out of the pose, turn your hands over onto your palms, then slowly sit up, walking your hands back toward you for support.
Before you finish the pose, and if you’re comfortable, from the sitting position, place the bolster/blankets on one leg, and lie your head down to that one side for 3-5 minutes. Repeat on the other side.
Wrapping Up
The adductor stretch isn’t shy about making its intentions known. It’s a direct, forward approach for unlocking a tight groin in seconds by implementing an upside down split to target those inner adductors with laser precision. Make sure to combine this stretch with the other variations to ensure no adductor gets left out, and remember that you don’t need to be perfect as everyone has to start somewhere. Go as far as you comfortably can, and give your knees permission to bend a little!
How to Crescent Moon Anjaneyasana Pose: Benefits and Variations
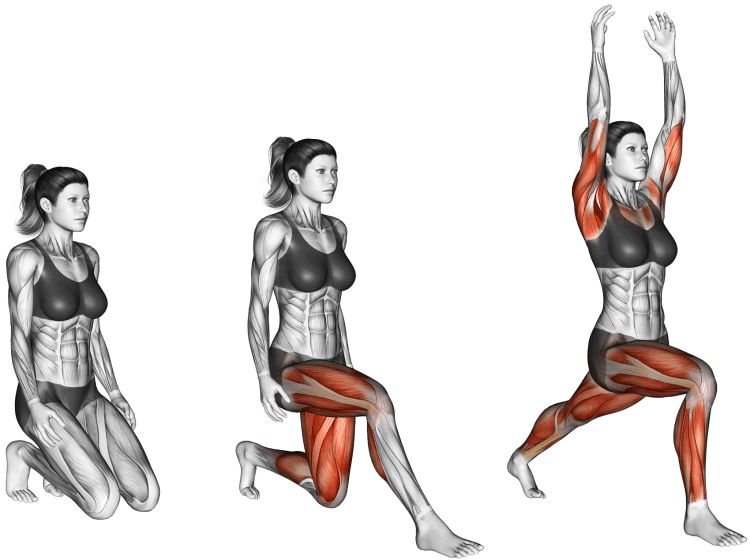
A statuesque-like pose resembling that of Warrior I (But without the mythical backstory and a little more detailed), crescent moon pose is a half-kneeling, low lunge backbend that exposes the front side of the body. The pros to this type of pose? Counteract the stressful effects of bad postural habits, free up the posterior thigh muscles, and produce isometric strength gains in the lower body.
Let’s take a more in-depth look at this novice posture that punches above its weight class in terms of the benefits you can expect.
Muscles Worked During Crescent Moon Pose
It’s true that many yoga postures including the crescent moon pose stretch and strengthen muscles that you’ve probably never seen or heard of. Although you’ll certainly feel it working the larger more obvious body parts too.
Quads, hamstrings, glutes, and calves
Both a lower body strengthening and stretching exercise, the crescent moon pose is based on a stationary lunge and depends on static muscle tension in the thighs, butt, calves, and even the feet. When we bend and extend the hips, knees, and ankles, it’s these leg muscles that make it possible. Inversely, your joints and hip muscles benefit when you train the lower body.
Hip flexors
Crescent moon pose is similar to specific hip flexor stretch techniques. These muscles help bend the thigh at the hip, such as lifting the knee toward the chest. Psoas major and iliacus are the superstar hip flexors that everyone hears about because they play the biggest role in hip flexion along with rectus femoris thigh muscle.
Tight flexors can cause problems with your movement and can be caused by too much sitting or overuse during activities.
Core
Good luck trying to perform any meaningful activity without a solid core…. consisting of abs, obliques, back, hips, and pelvic floor, these muscles are like bodyguards for your spine and pelvis. Protecting and stabilizing these delicate yet crucial areas, your spine is guarded against excessive load, while your body can more efficiently transfer force from the upper and lower body.
How To Do Crescent Moon Pose
If you can nail the crescent moon pose technique you’ll see many of the benefits talked about in a later section in this guide. Make sure to follow along carefully and pay attention to the details as this posture is a weight bearing exercise. Therefore, we want you to maintain healthy joints while building strength and conditioning your body from head to toe.
Check out the step by step instructions and video example we provided below.
Steps
Stand at the top of the mat in mountain pose.
Inhale, then bring your left foot back and come into a deep split, or lunge stance. The front shin should be vertical, with the knee over the ankle. The heel should be directly above the ball of your foot.
Slowly drop the left knee to the floor in a half kneeling position.
Lean forward, place your hands or finger tips on the floor on either side of the lead foot, then straighten the back leg.
Find your balance, square the hips to the floor, and drop the left knee back down on the mat. Flatten the top of your foot on the floor by untucking the toes, to stretch the front of the ankle and foot.
From here, shift the pelvis down and forward, and lengthen the core for a nice full body stretch. Keep your gaze forward.
Then bring your hands up on the right thigh, and gently reverse the the head, neck and shoulders back away from the front knee, to stretch and open up the front of the body.
Next, bring your hands behind your back, interlock your fingers, and move deeper into the stretch.
Finish the pose by reaching both arms up toward the sky angled slightly back with the head, neck and shoulders. If you can, lift the knee up and straighten the leg. Focus on lengthening the spine, and inhale.
To come out, exhale, and bring the arms back down.
Switch your legs to the opposite stance, this time with the left foot forward, and repeat all the steps.
Tips
In a standard lunge, it’s generally recommended to keep the front shin vertical, not allowing it to move forward over the toes, for the safety of the knee joint. However, keeping the back knee down in crescent moon pose diverts the weight load, allowing you to more carefully control and deepen the stretch by letting the knee move forward.
Use a folded blanket or something to cushion your knees if needed.
Place two yoga blocks on either side of the lead foot to elevate your hands if you find it difficult to reach your palms down to the floor. Although, you only need to bring your fingertips down.
Bring both on the inside of the front foot rather than on either side for a slight modification.
Avoid leaning your weight onto your knee. Instead let the pelvis and thigh bear most of the weight load. This will also help you to stay in the pose longer, which means faster benefits.
You could also begin the pose from a tall kneeling position and then step the right foot forward, rather than starting in mountain pose and stepping the left foot back into a lunge stance.
Bring awareness to lengthening the torso by drawing the tailbone down as you stretch upwards.
Close your eyes to challenge your balance
7 Benefits of Crescent Moon Pose
The best part of doing any exercise are the potential benefits that you can get from them. Otherwise, why would we do them? There are many worthwhile advantages of crescent moon pose including enhancing your performing under the sheets too!
Exposes the frontside
Modern technology/lifestyle habits are bad news for our bodies. Many people are minimally active and couple that with burying our heads in the latest entertainment everyday, and things start hurting!
You can help counter the negative effects of tech neck, and poor posture by stretching your body in the opposite direction. Aside from opening up the shoulders and chest, crescent moon stretches the stomach which is a source of stress and anxiety. Having a slouched posture also increases fatigue, so we want to avoid and undo this as much as possible.
Stretches the groin and hamstrings
The goal as with most poses is to find the best way to stretch certain muscles. Crescent moon pose does this from a low lunge stance, separating the legs and using the pelvis to intensify lengthening the under leg fibers and groin area. The obvious side effect of focused stretching is enabling full range of motion in the joints, and preventing injuries.
Strengthens the joints
Athletic activity and overall well-being are highly dependent on the health and mobility of your ankles, knees, and hips. Because if you sustain an injury to any of these joints, it could affect your ability to be on your feet. Unlike when a minor trauma occurs to the wrist elbow, or shoulder (You can still walk). So it’s important to train not just the muscles, but to strengthen our joints too with safe techniques.
May reinforce bedroom performance
While we’ll refrain from too many mischievous references here, you may have heard of “doing kegals” to help you last longer in the bedroom. Well, the idea is to strengthen the canopy-like muscles that form a “floor” at the lower pelvis. These muscles and tissues keep the reproductive organs in place, while also supporting their natural functions. A weak pelvic floor can disrupt your body’s natural ability to control bowels and bladder.
Conditions the body
When you perform intentional weight bearing exercises or poses like crescent moon, you’re maintaining the integrity of your muscles and joints, while also strengthening the bones too. Its a form of isometric resistance activity which is going to benefit people of all ages, especially the elderly population who are at greater risk of bone loss, and subsequent life threatening injuries.
Burns calories
Challenging your balance on the feet, recruiting the major leg muscles, and testing your flexibility seems like a decent recipe for burning calories. Which is what need to happen so you can start peeling off layers of body fat. Of course, you’ll need to combine crescent moon pose with higher intensity activities and adhere to calories in vs calories out model. But getting up and moving is a good way to combat weight gain, stress, and mobility issues.
Need a fat loss checklist? Here are the top 20 weight loss tips to achieve your ideal body.
Retains important skills
As our bodies age, we start to notice things that we didn’t in our youth, like pains, tightness in areas, involuntary cracking, and you get the point. It’s even more imperative to get more involved with healthy exercise routines to ensure everything stays up to maintenance. We can keep those fine movement skills, while giving the body the movement it needs.
Common Mistakes During Crescent Moon Pose
We can spot bad form right off the bad. Check to see if you’re making these form mistakes that will reduce the potency of crescent moon pose.
Not using a mat or cushion
A simple yoga mat may not be enough and anything less will certainly not suffice. If you’re trying to do this pose with minimal knee protection it’s going to be painful and less effective. So, we strongly encourage using a folded blanket or cushion of some type.
Keeping the rear thigh vertical
You won’t achieve much in the way of stretching (important part of crescent moon pose) if your back thigh is vertical, with the hip directly over the knee. You need to move the back knee away from the front foot so that you can achieve the best stretch.
Variations of Crescent Moon Pose
Try these similarly performed crescent moon pose variation to unlock some additional benefits.
Crescent moon hands to knee
As a progression, and to just simply stretch the hip flexors, and groin, stay in a tall half kneeling pose with your hands interlocked on the front thigh.
Crescent moon with yoga blocks
As mentioned in the tips section under the primary crescent moon video demonstration, set up two blocks on either side of the front foot to help you flatten your palms against a surface.
Crescent moon deep hamstring stretch
You’re only going to do one thing different for this variation. While you’re in a forward lunge with your hands on the floor and rear near to the floor, simply extend the front leg in front of you. This will place you in a better position to stretch the length of hamstrings.
Warrior I (Virabhadrasana I)
Warrior I represents the first of three poses based on the tale of a mythical warrior Virabhadra, sent to seek revenge for a family offense. It’s not complex like more advanced postures, but still carries many benefits on its shoulders!
Steps
Standing at the front of your mat in mountain pose, step the left foot behind you in a lunge stance.
Turn the back (left) foot slightly counterclockwise at a 45-degree angle to the lead foot.
Straighten your legs then try to make your hips parallel to the edge of the mat in front of you. You’ll need to push the left hip slight forward and bring the right hip slightly back. Grab your hips for support and guidance. Note: The hips won’t be perfectly square or parallel to the top of the mat and that’s perfectly normal.
Inhale, then as you breathe out, bend the front (right) knee and descend into a partial lunge. Lead with the hips. If you don’t feel much of a stretch, you may need to move the lead foot slightly forward.
Keep the back leg straight.
Lift the arms overhead, and focus on squeezing the legs toward each other, but don’t move the feet. Bring your gaze up. Take several deep breaths and hold for at least 20 seconds.
Bring the feet back together in the original starting stance. Then, switch the position of your legs, bringing the right foot back and leaving the left foot near the top of the mat.
Repeat steps 2-5!
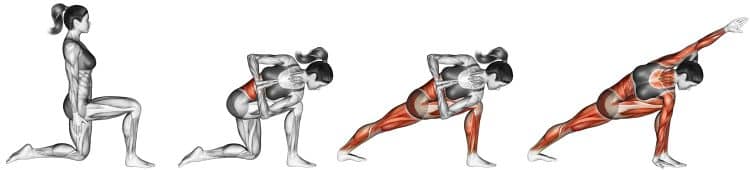
Revolved side angle pose parivrtta parsvakonasana
Possessing many of the same benefits as crescent moon pose, parivrtta parsvakonasana puts a topspin on the lunge pose to activate the lateral muscles, and train you in an uncommon plane of movement. Give it a try with the provided instructions below!
Steps
Come into a wide lunge stance with the right foot forward, and left foot behind.
Extend the left arm and fingers toward the sky.
Spin the left shoulder inward toward to create length.
Bend the front (right) leg and slowly dip into a lunge, then bend the back knee and lower it down to the ground.
Tuck the tailbone in to round the lower back, then bring the left shoulder onto the outside of the right leg so the rear deltoid is against the front of the knee.
If possible, place your left hand on the floor to the outside of your right foot with fingers facing the same direction as your toes.
Straighten the back leg, and bring your left foot flat on the floor for stability. Press the right knee and left arm together.
Twist from the floor, and turn your upper body clockwise, while moving the head with it.
Now extend the right arm back behind your head, exposing your right armpit, with your hand open and palm facing down to the floor, and the outer hand angled slightly down. Keep the tailbone tucked.
Breath in, feeling length in the spine, and exhale, deepening the twist. Stay for roughly five breaths and maintain a strong technique, keeping the right leg and left shoulder solidly pressed together.
To repeat on the opposite side, fix your gaze on the floor for balance, stabilize the hips and pelvis, and press up from the legs.
Then in a fluid movement, turn your feet in the opposite direction, while moving the arms in a windmill motion until the left arm is down by your left side, and the right arm is extended overhead.
The you’ll repeat all of the prior steps to do the same thing on this side.
Wrapping Up
If you’re on the yoga journey make sure to get yourself involved with the crescent moon pose. For a novice pose it yields a high return of daily benefits that cannot be overstated. Besides the more obvious benefits, crescent moon teaches you to be detailed in your movements, and helps retain essential motor skills. Then when you’re ready for more, take it up a notch with more difficult variations.
Revolved Side Angle Pose (Parivrtta Parsvakonasana) – Benefits, Mistakes, and Variations
Revolved side angle pose parivrtta parsvakonasana displays a multiple-phase technique that combines a static lunge, core strength, hip hinge, and upper body rotation. Nearly a fully functional pose, it also requires lots of stability, a powerful center and pelvic floor, patience, and awareness, rooting down through the ground, and redirecting energy towards the sky.
Don’t be intimidated as a block, and form modifications are allowed if you don’t yet have the capabilities to perform a full-on revolved side angle pose. It’s a pre-requisite position for more advanced versions such as bound, which is demonstrated below.
In this guide, you’ll learn the benefits, common mistakes, and variations of revolved side angle pose parivrtta parsvakonasana.
Muscles Involved Parivrtta Parsvakonasana
The revolves side angle pose is a multi-muscle pose, requiring contribution from the entire body. While we can’t name every small muscle in the human anatomy, you can have an idea of the primary muscles that make this pose possible.
Legs – First and foremost we can see that the legs take much of the load, statically contracting in a lunge position at the commencement of the technique, although they’re less tensed during the heart of the pose.
Core – Made for bending movements, you’ll need a flexible torso, as well as functional obliques to perform the twisting component of the revolved side angle pose.
Arms and delts – The triceps, delts, and even the chest muscles, to a lesser degree help form a stable, unmovable base to support proper alignment, and upper body performance. A strong foundation is everything!
Pelvic floor muscles – Found between the tailbone and pelvis, these muscles support healthy functioning of the bladder, and bowels, as well as the vagina and uterus. Preventing incontinence, and playing a much appreciated role in sexual function, many can benefit from doing exercises that strengthens these muscles.
Back – The back is a major area containing several muscles that contribute to unique functions involving the rear torso, head, neck, shoulders, arms, and even legs. Each phase of revolved side angle pose requires performance from the upper posterior chain.
How to Do Revolved Side Angle Pose Parivrtta Parsvakonasana
Target muscles: Pelvic floor, legs, core, shoulders
Type: Yoga
Equipment: Yoga mat, block
Difficulty: Intermediate
While it’s tempting to replicate without prior knowledge, there are several connecting parts, and cues that go into perfecting the revolved side angle pose. As a result, we included chronological steps, and a master level video demonstration if you prefer to see the process.
Note: The provided video tutorial is short and sweet, getting right to the pose, however, we recommend easing into it by going through a proper warmup routine, rather than jumping right in. Therefore, it’s not the ideal beginner pose for someone without much experience in similar postures.
Steps
Assume a wide split leg stance with the left heel near the back of the mat and the right foot roughly four feet in front of the left foot near the front of the mat. Keep both feet pointed forward in the same direction.
Raise the left arm vertical overhead with the fingers pointed at the ceiling and rotate the shoulder inward to create length.
Exhale, bend the front (right) leg and slowly lower into a lunge, then bend the back knee and bring it down to the ground.
Tuck and pull the tailbone in to round the lower back, then bring the left shoulder onto the outside of the right leg, with the rear deltoid pressing onto the front of the knee.
If you can, place your left hand on the floor to the outside of your right foot with fingers facing the same direction as your toes.
Then straighten the back leg out, and bring your left foot flat on the floor for stability. Press the right knee and left arm together.
Twist from the floor, and turn your upper body clockwise, while moving the head with it.
Now extend the right arm back behind your head, exposing your right armpit, with your hand open and palm facing down to the floor, and the outer hand angled slightly down. Keep the tailbone tucked.
Breath in, feeling length in the spine, and exhale, deepening the twist. Stay for roughly five breaths and maintain a strong technique, keeping the right leg and left shoulder solidly pressed together.
To repeat on the opposite side, fix your gaze on the floor for balance, stabilize the hips and pelvis, and press up from the legs.
Then in a fluid movement, turn your feet in the opposite direction, while moving the arms in a windmill motion until the left arm is down by your left side, and the right arm is extended overhead.
The you’ll repeat all of the prior steps to do the same thing on this side.
While it’s possible to perform an exercise via following written instructions, we also included the video demonstration for visual learners.
Tips
We recommend using a yoga mat to protect your knees and prevent slipping.
If it’s too difficult to place your hand on the floor, use a yoga block to shorten the distance.
While revolved side angle pose is usually performed with the back foot flat on the floor, you can stay on your toes is the former is too challenging.
Take your time, and feel each step of the pose, making sense of the movements and muscles that take you from one position to the next.
Make sure to deep breathe in and out.
It’s acceptable to get some rounding in the back.
If you’d like a more detailed demonstration of revolved side angle pose, including a more extensive warmup process (Recommended), we included one for you courtesy of Yoga With Adriene.
6 Benefits of Revolved Side Angle Pose Parivrtta Parsvakonasana
Learning about the potential benefits of a pose can be as exciting as learning the technique itself. Especially postures that help to strengthen the sexual pelvic floor muscles! These are our favorite benefits of the revolved side angle pose.
Strengthen your joints
Weight bearing exercises strengthen muscles as well as the joints, and the revolved side angle pose asks a lot from the knees and ankles as your weight shifts onto the front leg, both during the initial lunge, and the remaining phases. But it’s best left to those with healthy and strong joints.
Reinforces your pelvic floor and get sexual benefits
We know we caught your attention with this one… and yes, you’ll be happy to know that there could be sexual benefits from performing the side angle pose. In this stance, you’ll double down on the (sphincter) muscles that help control your urinal flow, bowel movements, and the pleasurable feelings during sex (1). But don’t worry, you can still do your kegals…
A functional pose
We can say for a fact that side angle pose strengthens balance, flexibility, stability, mobility, coordination, and mental strength. You need to be patient, aware, and focused to get down into this posture, maintain proper alignment, and then come out of it, and smoothly transition to the same technique on the opposite side.
Opens chest and shoulders
An added benefit is that we get to stretch out the chest and shoulders. Many of us spend a lot of time sitting, hunched over which can cause problems in our anterior torso, like thoracic outlet syndrome. We can’t stress how imperative it is to routinely stretch and open up the chest, and shoulder muscles.
Reduce stress and improve digestion
Without a doubt, stress reduction supports a healthy digestive system. Yoga is one method of meditative practice that’s as good for the mind as it is the body. Both due to the belly breathing which stimulates the parasympathetic nervous system, and doing a routine that requires, patience, focus, and diverts attention away from common daily stressors.
Build stamina
It takes stamina and endurance to remain in a lunge, and then incorporate a strong twist and overhead arm action. You can burn a few additional calories in the process, which could contribute to your weight loss journey.
Common Mistakes
Try to avoid these habits that make for a less productive technique.
Bending the front knee
The front knee should remain over the ankle, and not moved forward past the toes. Once you’re setup in a lunge, fortify that position, ground down, stabilize your pelvis, and establish a strong base.
Compressing your torso
Upon establishing the shoulder into the knee, you can have roundness in the back. But the twist should create length in the spine and open up the chest and shoulders. Think of stacking the shoulders, and creating a straight line through both arms.
Variations of Revolved Side Angle Pose Parivrtta Parsvakonasana
Try these crazy good variations, including several assisted versions and more challenging techniques to help you wring (pun intended) out more benefits with the revolved side angle poses.
Knee down
While the front foot is planted for support, you have the option to keep the rear knee on the ground or extend the leg. The latter is more difficult especially combining the twist, and it’s a real challenge for the pelvis. Leave the knee down to help assist you, train the twist there, then when you’re ready try to do it with a straight back leg.
Heel lifted
Placing less pressure on the knee, and also making the exercise is a little easier, like the knee down variation, stay on your toes, rather than dropping your back foot flat on the floor.
With a yoga block
We always recommend having a yoga block handy, because it’s light weight, soft, and so useful in training range of motion. It’s perfectly reasonable to use a block to help you progress and gently stretch deeper into poses.
Revolved triangle pose
The revolved triangle pose is similar in many ways to the revolved side angle technique, except the leg are straight and hips open, whereas the latter is closed hip.
Steps
Assume a similar stance to trikonasana poses with the right lead foot pointed to the back of the mat, and the back foot facing left, and slightly inward at a 45-degree angle.
Reach the left arm up to the sky, then square the hips toward the right foot.
Stretch your left arm forward while turning toward the right foot, and bring the left hand down on the floor to the right side of your right foot. Tip: Use a yoga block if you cannot reach all the way down to the floor.
Now shift your weight onto the back foot, and drop the left side of the hip down as you reach the right arm to the sky, and pull the shoulders back. Draw your gaze up to the right thumb. Tip: Use the left hand on the floor to help pull the left shoulder underneath for more rotation.
Stay for five deep breaths.
To come out, rotate your chest toward the floor.
Now from here, lift the left arm up while bringing the right arm down in a sort of windmill motion. Try to transition into an opposite side stance by changing the direction of your feet.
Then perform the same steps but now for the opposite side.
To leave the pose, inhale, come up with the arms held straight out to your sides, then exhale, and finish by turning to the top of the mat and bring the feet together.
Bound revolved side angle pose (baddha parivrtta parsvakonasana)
Bound variation hits you with a very difficult trio of movement that includes lunging, twisting, and binding. But it’s possible if you’re familiar with revolved techniques, and forward folding poses.
To do it:
Come into a front lunge, and bring the opposite shoulder onto the lead knee. Wrap that arm under the leg, then reach behind your back with the other arm and grab the bottom hand. If you’re very flexible you can grab the wrist of your other arm.
You can follow the full video for preparatory poses or fast forward to 3:20 minute mark for the bound variation.
FAQS
Are there potential risks when performing revolved side angle pose? Before practicing yoga poses, you should understand the risks involved with weight bearing activities, and first assess your physical condition to ensure your safety. Prior or current injuries should be considered before attempting the revolved side angle pose.
Wrapping Up
That’s a wrap, lunge, twist, and bound (variation) … the revolved side angle Parivrtta Parsvakonasana is a sweet posture that should absolutely be included in your posing. Incorporating various elements of movement, with the body grounded but challenged, it’s foundational in branching out to other techniques.
You can also use it as a patience-building technique and stress relieving exercise that could improve your digestive health, while increasing blood flow, and providing several health benefits too.
Use this guide to form your revolved side angle, and make sure to try the awesome variations too!
Standing Cable Chest Fly Exercise Guide: How To, Benefits, Muscles Worked, and Variations
A broad and muscular chest has been the symbol of masculinity since time immemorial. Chances are, they come up with the term ‘masculine’ to refer to an individual with a wide and thick chest.
Building an Arnold Schwarzenegger-like round and full chest is one of the top priorities for most guys that lift weights. It is no coincidence that Monday is international chest day. Consider yourself a very lucky man if there is no crowd on the chest training equipment in your gym on a Monday.
Although many lifters prefer the bench press for building muscle and strength, ask someone which exercise is their go-to for achieving a muscle-ripping chest pump or ending their workout on a high, and they’ll most likely reply with a resounding standing cable chest fly!
The standing cable chest fly is everything that the bench press isn’t. It is not intimidating, and you are not at risk of getting trapped under a heavy bar if you fail a rep; you don’t need a spotter, it helps maintain constant tension on your pecs throughout the range of motion, and leaves you with a sick muscle pump every time.
Whether you are a bodybuilder trying to improve your aesthetics or a powerlifter looking to improve your strength, you cannot go wrong with the standing cable chest fly. Besides your chest days, the cable chest fly can be an excellent addition to your push-day routines as it involves your chest, triceps, and anterior deltoids.
In this guide, we cover everything you need to know about the standing cable chest fly to get the best bang for your buck, including the correct training techniques, its benefits, the muscles worked, the most common mistakes, and its variations and alternatives.
What is a Standing Cable Chest Fly?
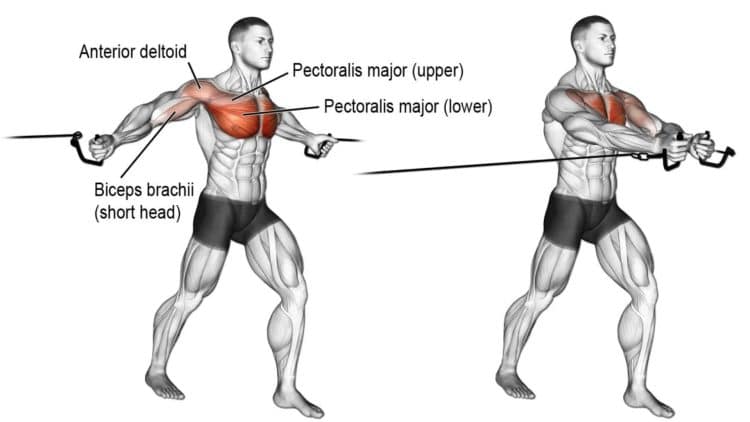
The standing cable chest fly is an isolation exercise that primarily targets the chest. However, since this exercise involves movement at the shoulder joint and elbows, it also engages the anterior deltoids and triceps.
The standing cable chest fly is an excellent exercise for most lifters, irrespective of their training experience. It can help newbies establish a better mind-muscle connection with their pecs, translating to better performance on compound movements, like the bench press and dips. Conversely, it can help advanced lifters warm up for their chest workouts or achieve maximal pectoral muscle fiber recruitment at the end of their training session without increasing their risk of injury.
Unlike free weight exercises, cables keep constant tension on your muscles throughout the range of motion, which can increase your time under tension and bias hypertrophy. Plus, since you must be standing upright while performing this exercise, it results in a greater core engagement than the barbell bench press, where you are lying on a bench.
How To Do a Standing Cable Chest Fly
Here is a step-by-step guide on how to perform the standing cable chest fly with a picture-perfect form:
Step 1: Adjust the Cable Pulley
You can choose between two pulley positions while performing the standing cable chest fly. The first position involves setting the pulley at chest level and attaching D-handle bars on each end. This position allows you to mimic the lying dumbbell chest fly motion and bias the inner and middle pecs.
The other option is the more popular choice and involves setting the pulleys at the highest setting. In this setup, you’ll press the handles diagonally toward the floor. The cable should be at 45 degrees throughout the range of motion. This setup biases the inner and middle, and lower pecs.
Pro Tip: I recommend setting the pulleys at the highest setting as it involves a unique angle of motion that you cannot mimic with free weights to train your pectoral muscles. For this reason, I’ll stick to the second setup for this demonstration.
Step 2: Take Your Position
Grab the D-handles with a neutral (palms facing each other) grip and position yourself in the center of the cable pulley machine. Now, take a big step forward and bring your hands to your chest level. Extend your arms to your sides so that your hands are in line with your chest while your elbows are slightly behind your torso.
You can use a staggered stance or place both your feet together. Since the former option involves a much larger surface area, it will provide better stability. The latter, on the other hand, is the optimal choice if you want more core engagement.
Pro Tip: Maintaining a slight bend in your knees throughout the exercise will give you a better base.
Step 3: Perform the Fly Motion
Lean forward slightly by bending at your hips to better isolate your pecs. Brace your core and initiate the movement by moving at the shoulder joint. Extend your elbows during the concentric phase for optimal chest muscle fiber stimulation. Your hands should be in front of your midsection or pelvis at the bottom of the range of motion.
Bringing the elbows together during concentrics shortens the pecs to their fully contracted position. On the flip side, keeping your elbows bent prevents your chest muscles from moving through their full range of motion, hindering their activation.
Pro Tip: Maintain a neutral back and a proud chest for maximal pectoral muscle engagement while performing this exercise.
Step 4: Pause and Contract at the Top
Hold the isometric contraction at the top of the range of motion for a second and squeeze your pecs as hard as possible. Your head and neck should be in line with your torso. Dropping your head back or pressing your chin into your upper pecs can be a bottleneck while contracting your pecs at the static contraction point at the top.
Pro Tip: Avoid touching your hands at the bottom of the range of motion or interlacing your fingers, as it will remove the tension from your pecs and put it on your anterior deltoids.
Step 5: Control the Eccentrics
Maintaining your torso in a straight line, slowly return your arms to the starting position while feeling your chest muscles engage. Pause at the bottom for a second before repeating this process for the recommended reps.
Pro Tip: You must focus on actively contracting your pecs throughout the range of motion. Slow down the rep tempo if you don’t feel your chest while performing this exercise.
Standing Cable Chest Fly Tips:
Avoid squeezing the handles too tight, as it can lead to forearm and biceps recruitment. Switch to a false (thumbless) grip if you feel too much arm engagement while performing this movement.
Your feet should be bolted to the floor throughout the exercise. Avoid moving your feet or tapping your heels, as it can take tension off your chest.
Avoid lowering your hands way too far behind your body during eccentrics. Contrary to what many people think, it doesn’t lead to greater muscle stimulation but can strain your shoulder joints.
Keep your core braced while performing the standing cable chest fly. This can help eliminate the possibility of employing momentum.
Optimize your breathing to maximize your performance. Breathe in during eccentrics and breathe out during concentrics. You must hold your breath during the isometric contraction at the top before breathing in again during the eccentric phase.
In This Exercise:
Target Muscle Group: Chest
Secondary Muscle Groups: Shoulders and Triceps
Type: Strength
Mechanics: Isolation
Equipment: Cables
Difficulty: Beginner
Best Rep Range:
Hypertrophy: 8-12
Strength: 1-5
Muscles Worked During Standing Cable Chest Fly
Here are the muscles worked during the standing cable chest fly:
Chest
The pectoralis major and pectoralis minor are the primary target muscle of this exercise. Your pecs are responsible for horizontal shoulder adduction, which involves bringing your arm inward toward your body. Since this is exactly what the standing cable chest fly does, maintaining a strict form on this lift will target only your chest.
You can target different areas of your chest on this exercise by changing your angle of pull. Moving your arms straight forward will target the inner and middle pecs. Performing this exercise diagonally from top to bottom will work your inner, middle, and lower pecs, and an upward diagonal movement will train your lower pecs.
Shoulders
Since most of the movement in this exercise is limited to the shoulder joint, it can lead to anterior deltoid engagement. Leaning forward excessively can lead to greater shoulder engagement than maintaining an upright torso.
Triceps
The elbow flexion during eccentrics and extension during concentrics can lead to triceps engagement. Avoid locking out your elbows and maintaining a slight bend in your arms if you feel too much triceps engagement at the top while performing this exercise.
Core
This exercise requires standing in the front and center of a cable pulley machine. You must resist the pull of the cables throughout the exercise, which will lead to core engagement. A staggered stance recruits your core to a lesser degree than a parallel stance.
Benefits of Standing Cable Chest Fly
Adding the standing cable chest fly to your exercise arsenal entails the following benefits:
Build a Bigger and Stronger Chest
While the muscle conditioning benefits of standing cable chest fly are well-known, many lifters assume that isolation exercises don’t lead to strength or muscle gains. However, nothing could be further from the truth.
Performing three to five sets of the standing cable chest fly in the 8-12 rep range will bias hypertrophy. On the other hand, lifting close to your one-rep max for three to six sets of one to five reps will help improve your upper body strength. [1]
Excellent For Lifters of All Experience Levels
Cable isolation exercises are beginner-friendly. They can help novice lifters develop a robust mind-muscle connection, which can carry over to compound exercises. On the other hand, experienced lifters can use this exercise to warm up or train their chest to failure.
Low Risk of Injury
Unlike the barbell bench press, where the bar can end up on your chest on a failed rep, hitting muscle failure on the cable chest fly won’t expose you to an injury. You can just let go of the handles in the middle of the rep without a worry in the world.
Cable and machines significantly lower the risk of injury while training. It is common to hear people getting injured training with dumbbells and barbells, but you’ll hardly ever come across someone who got injured training with cables.
Constant Tension
Cables keep constant tension on your muscles throughout the range of motion, which can help induce hypertrophy. Conversely, free weights remove the tension from your muscles and put it on your joints at multiple points throughout the exercise.
Time
Cable exercises take significantly less time than free-weight movements, making them an excellent choice for adding them to high-volume workouts. They are also great for folks that have limited time to train.
Common Mistakes While Performing Standing Cable Chest Fly
Avoid the following pitfalls to maximize your results and limit your risk of injury:
‘Pressing’ Instead of ‘Flying’
This is probably the most common mistake lifters make while performing the cable chest fly. They press the weight in front of their chest, using their triceps and shoulders. You must limit the chest fly movements to the shoulder joints, which helps focus on the pectoral muscles.
Move your arms in a sweeping motion while performing the standing cable chest fly. There is a time and place for the cable chest press, but this is not one of them. That said, feel free to do partial pressing reps to annihilate your chest after completing your full ROM flyes. According to a Journal of Strength and Conditioning Research study, “partial range of motion exercise is effective for facilitating muscle hypertrophy and function.” [2]
Do Not ‘Hug a Bear’
‘Hug a bear’ or ‘Hug a tree’ are the most popular cues given while trainers teach newbie lifters how to perform the standing cable chest fly. Here is my advice — don’t. Instead, you want to squeeze the bear’s head or the tree’s trunk between your elbows. Do this, and your chest pumps will be out of the world.
Lifting Too Heavy
Many lifters let their ego get the better of them while performing the standing cable chest fly. You don’t need to move the entire stack to get those inner chest striations. Keep your rep slow and controlled, and focus on contracting your pecs throughout the range of motion. Furthermore, going too heavy on this lift will lead to greater core engagement as you will have to fight the weight to maintain your position.
Moving Your Torso
You must keep an upright torso and avoid using momentum by swinging back and forth to maximize pectoral muscle stimulation. If you have to move your body to complete a rep, it is a sign that you are going a little too heavy.
Variations of Standing Cable Chest Fly
Here are the best standing cable chest fly variations to add to your training regimen. These exercises will train your chest from different angles, ensuring overall development.
Low Cable Chest Fly
I have covered the two most popular cable chest fly variations above — the high cable fly that involves setting the pulleys at the highest setting and the self-explanatory chest-level cable flyes. The former targets the inner, middle, and lower pecs, whereas the latter targets the inner and middle pecs.
The low cable chest fly is another popular cable chest fly variation that involves setting the cable pulleys at the lowest setting. In this exercise, your arms should be at 45 degrees at the starting position as you hold the D-handles at your sides. Then, you raise your hands toward the ceiling while extending your elbows until the handles are in front of your chest. The low cable chest fly biases the lower chest.
Pro Tip: Many lifters experience significant front delt engagement while performing this exercise. You must focus on contracting your pecs throughout the range of motion and use lighter weights to bias the lower pecs.
Cable Crossover
Some people use standing cable chest fly and cable crossover interchangeably. However, both exercises are different and involve a distinct range of motion. The range of motion of the cable crossover leads to great pectoral muscle fiber recruitment.
How To:
Set the cable pulleys at the highest setting.
Grab a handle in each hand with a neutral grip and step forward.
Extend your arms at your sides while maintaining a slight bend in your elbows.
Brace your core and bring your arms in front of your body while extending your elbows.
Your wrists must overlap at the top of the range of motion. Pause and contract your pecs at this position.
Return to the starting position.
Rinse and repeat.
Pro Tip: You should use a lighters weight on the cable crossover than the standing cable chest fly. Although the range of motion is slightly bigger in this exercise, it leads to much greater inner chest stimulation. Also, ensure that you crossover your hands in front of your midsection. Keeping your hands at your chest level will lead to a more significant anterior deltoid recruitment.
Check out our complete cable crossover guide here!
Single-Arm Cable Crossover
Unilateral exercises are incredibly effective at fixing muscle and strength imbalances. Since these movements involve working one side of your body at a time, it can lead to a better mind-muscle connection. Also, because this exercise requires only one pulley, it is an excellent cable fly variation for folks that work out during rush hours.
How To:
Set the cable pulley at the highest setting.
Attach a D-handle bar and grab it with a neutral grip.
Take a step to your side and hold your hand on your side at your chest level.
Place your non-working hand on your hip for stability.
Brace your core and bring your arms in front of your midsection while extending your elbow.
Pause and contract your chest.
Repeat for recommended reps before switching sides.
Pro Tip: Avoid stepping forward while performing this exercise, as the cable will brush your upper arm. Stand next to the cable pulley and take a small step to your side.
Alternatives of Standing Cable Chest Fly
Given below are some standing cable chest fly alternatives:
Dumbbell Fly
The dumbbell fly is a staple in most chest training regimens. It is one of the best free-weight exercises to target the inner pecs and build the covered striations. However, most people leave gains on the table by following an incorrect form.
How To:
Lie on your back on a flat bench. Maintain the natural curvature of your spine.
There should be enough gap between your lower back and the bench for your hand to pass through.
Hold a dumbbell in each hand with a neutral grip and hold them over your chest. Your arms should be at 90 degrees at the starting position.
Contract your pecs and slowly lower the dumbbells toward the floor. Your upper arms should be in line with your chest at the bottom, and your elbows should be slightly bent.
Reverse the motion to return to the starting position. Focus on flexing your pecs throughout the range of motion for optimal muscle fiber engagement.
Repeat for repetitions.
Pro Tip: Avoid keeping your arms straight during eccentrics, as it can strain your shoulder joints unnecessarily. Your upper arms shouldn’t break parallel at the bottom.
Check out our complete dumbbell fly guide here!
Pec Deck Fly
The pec deck fly is the darling of the bodybuilding community. Many lifters prefer it over the cables as it has a fixed movement trajectory and involves sitting against a back pad, which helps you better focus on your pecs and removes your core stabilizers from the equation.
How To:
Set the seat of the pec deck machine so that your chest is at the handle level. Place your back on the back pad.
Grab the handles at chest level. Your elbows should be slightly bent at the starting position.
Pull your shoulder blades back and down and maintain a proud chest.
Bring the handles in front of your chest while moving at the shoulder joint and extending your elbows.
Drive your elbows together at the top of the motion and contract your pecs as hard as possible.
Slowly return to the starting position.
Repeat for recommended reps.
Pro Tip: Many lifters tend to round their shoulders and drive their chin into their upper pecs while performing this exercise, especially during high-rep sets. However, it removes tension from your pectoral muscles and engages your anterior and medial deltoids and traps.
Check out our complete pec deck fly guide here!
Resistance Band Standing Cable Chest Fly
This standing cable chest fly alternative is excellent for folks that don’t have access to a cable pulley machine. You can do this in your garage gym or anywhere you can anchor a resistance band. However, I recommend using a squat rack and D-handle resistance bands for this exercise.
How To:
Securely attach a resistance band to each pole of a squat rack.
Grab the D-handles with a neutral grip.
Take a step forward and assume a staggered stance.
Extend your arms at your sides and bend your elbows slightly. The bands should be taut at this position, and you should feel tension in your pecs.
Maintaining an upright torso, bring your hands in front of your midsection while extending your elbows.
Pause and contract your pecs at the top of the range of motion.
Slowly return to the starting position.
Repeat for recommended reps.
Pro Tip: Performing this exercise by tying two resistance bands across a single pole will limit your range of motion as the bands will rub the sides of your arms throughout the range of motion.
Bodyweight Flyes
Although this is a bodyweight exercise, it comes with a steep learning curve. Bodyweight flyes, also known as barbell roll-out flyes, involve using two barbells and demand significant core strength. This exercise is best reserved for intermediate and advanced lifters.
How To:
Place two barbells on the floor parallel to each other.
Add a weight plate on the same end of both barbells. The other end should not have any weight.
Get on your knees between the barbells facing the weighted ends.
Grab the barbells below the collars and get into a push-up position.
The non-weighted ends should be right next to your feet.
Brace your core and slowly extend your arms outward.
Your chest should be in line with your upper arms at the bottom of the range of motion.
Reverse the movement while driving your elbows together.
Focus on contracting your pecs throughout the shoulder joint extension and flexion.
Pro Tip: Use 25-pound plates for this exercise. Using 45-pound plates will limit your range of motion as you won’t be able to bring your hands under your chest at the static contraction point at the top.
Check out our complete bodyweight fly guide here!
FAQs
Can I substitute the barbell bench press with the cable chest fly?
The barbell bench press is a compound (multi-joint) lift, whereas the cable chest fly is an isolation (single-joint) exercise. Compound exercises are great for building muscle mass and strength, whereas isolation lifts help improve muscle conditioning and fix imbalances.
Both types of exercises are essential for building a balanced physique, and you shouldn’t choose one over the other. Most conventional bodybuilding programs involve starting the workouts with the bench press and finishing with the cable chest fly.
Are standing cable chest fly and pec deck fly the same?
No. Although both exercises are isolation movements, the different angles of movement involved train your pecs differently. Many people make the mistake of using momentum on the standing cable chest fly by swinging their body back and forth. Plus, it involves your core for stabilization.
On the flip side, since you must be seated against a pad to perform the pec deck fly, it eliminates the use of momentum and disengages your core, allowing you to focus on your pectoral muscles. However, this doesn’t mean you should favor the pec deck over the cables in each workout. Incorporate both into your training regime to ensure overall development.
Why does the cable chest fly give a better chest pump than most other chest exercises?
Cables keep constant tension on your muscles throughout the range of motion. It accumulates to a greater time under tension, leading to better pumps. On the other hand, free-weight isolation lifts such as the dumbbell chest fly puts no demand on your chest at specific points during the range of motion.
Furthermore, cables allow you to work your chest in the horizontal plane while standing, which is virtually impossible with free weights. Most lifters experience better muscle pumps performing isolation exercises with cables than free-weight single-joint exercises.
Is the cable chest fly better than the cable crossover for chest development?
The cable crossover is a more extended version of the cable chest fly. While the cable chest fly ends when your hands are next to each other in front of your midsection, cable crossovers require you to stack your wrists on top of each other at the isometric hold at the top.
Some lifters favor the cable crossover as it helps them achieve greater pectoral muscle fiber recruitment. However, there is a lack of scientific evidence to prove if cable crossovers lead to better hypertrophic results.
Wrapping Up
The standing cable chest fly is an incredibly effective isolation exercise to build muscle size, strength, and conditioning in your pectoral muscles. By altering the pulley height, you can bias different areas of your chest while performing this exercise.
This guide has all the details you need to improve your form and maximize your results. Use the cable chest fly alternatives and variations listed in this article to add variety to your training regime and keep it interesting. So, what are you waiting for? Get to work on those coveted inner chest striations already. Best of luck!
References
Schoenfeld BJ, Grgic J, Van Every DW, Plotkin DL. Loading Recommendations for Muscle Strength, Hypertrophy, and Local Endurance: A Re-Examination of the Repetition Continuum. Sports (Basel). 2021 Feb 22;9(2):32. doi: 10.3390/sports9020032. PMID: 33671664; PMCID: PMC7927075.
Goto M, Maeda C, Hirayama T, Terada S, Nirengi S, Kurosawa Y, Nagano A, Hamaoka T. Partial Range of Motion Exercise Is Effective for Facilitating Muscle Hypertrophy and Function Through Sustained Intramuscular Hypoxia in Young Trained Men. J Strength Cond Res. 2019 May;33(5):1286-1294. doi: 10.1519/JSC.0000000000002051. PMID: 31034463.