Tag: exercise
Block Pulls Guide: Muscles Worked, How-To, Benefits, and Alternatives
If you only had the time and energy to perform one exercise per workout, the deadlift would probably be your best choice. Deadlifts work almost every major muscle on the back of your body and several on the front, too. They build real-world functional strength and, frankly, make you look and feel like a badass.
Combine deadlifts with an upper-body push, such as push-ups, dips, or bench presses, and you can get a full-body workout from just two exercises.
Deadlifts are AWESOME!
That said, deadlifting from the floor is not easy, especially when you’re tall or inflexible. Also, doing nothing but conventional deadlifts will eventually get boring, even if you love what Victorian physical culturalists used to call the health lift.
Thankfully, there is more than one way to deadlift, and block pulls, aka partial deadlifts, are a great alternative to regular deadlifts.
We reveal why and how to do this excellent exercise and provide you with a few equally effective alternatives to try.
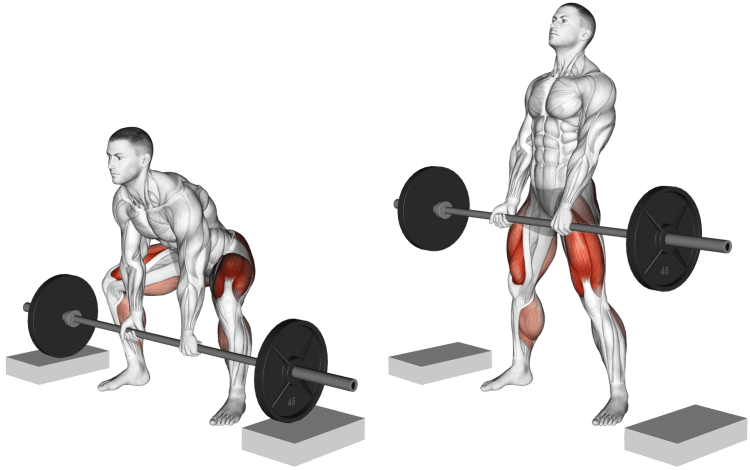
Block Pulls – Muscles Worked
Block pulls are a compound exercise, meaning they involve several joints and multiple muscles working together. In fact, block pulls use so many muscles that they’re virtually a full-body exercise.
Block Pulls Muscles Worked
The main muscles (listed from top to bottom) trained during block pulls are:
Trapezius
The trapezius, or traps for short, is the large diamond-shaped muscle of your upper back. It consists of three groups of fibers – upper, middle, and lower. The upper and middle fibers are the most active during block pulls. Block pulls are very effective for building bigger, thicker traps.
Rhomboids
Located between the shoulder blades, the rhomboids work with your middle traps to pull your shoulders back and together.
Deltoids
The deltoids are your shoulder muscles. Like the trapezius, the deltoids are made up of three groups of fibers called heads – anterior (front), medial (middle), and posterior (rear). All three deltoid heads are working during deadlifts, but the posterior delts are the most active.
Biceps brachii
Located on the front of your upper arm, your biceps flex your elbows. However, in block pulls, their job is to stop your elbows from hyperextending.
Forearm flexors
Block pulls are a very grip-centric exercise. Gripping the bar involves lots of lower arm muscles, which are collectively called the forearm flexors. If you want bigger, more powerful forearms and a vice-like grip, block pulls are sure to help.
Latissimus dorsi
Located on the sides of your torso, the latissimus dorsi, or lats for short, give your upper back its width. Well-developed lats look like wings! You use your lats to keep the bar pressed in toward your legs during block pulls. Bodybuilders do this exercise to develop a thicker, more powerful-looking back.
Erector spinae
Erector spinae is the collective name for the muscles that run up either side of your spine. During block pulls, you use these muscles to prevent your back from rounding. Rack pulls will give you a more muscular lower back.
Core
Core is the name given to the muscles of your midsection, including your rectus abdominis, obliques, and transverse abdominis. Together, these muscles contract inward to create intra-abdominal pressure to support and stabilize your lumbar spine. Wearing a weightlifting belt allows you to produce even more intra-abdominal pressure.
Gluteus maximus
Known as the glutes for short, this is the largest and most powerful muscle in the human body. The glutes extend your hips, which is the main lower body movement during block pulls. If you want a bigger butt, block pulls will help!
Hamstrings
Located on the backs of your thighs, the hamstrings work with your glutes to extend your hips during block pulls. However, the range of motion is relatively small, so if you want to work your hammies harder, you should also include exercises like leg curls and Romanian deadlifts in your lower body workouts.
Quadriceps
Block pulls start with your knees bent and end with your knees extended. This means they involve your quadriceps as well as your hamstrings and glutes. However, quads engagement is quite low because the range of motion at your knees is relatively small.
How to Do Block Pulls
Get more from block pulls while keeping your risk of injury to a minimum by following these guidelines:
Place your barbell on blocks so it’s between lower knee and mid-thigh height. The lower the blocks, the more you’ll need to use your glutes and hamstrings to lift the weight.
Stand behind the barbell with your feet between shoulder and hip-width apart. Your feet should be under the bar.
Grip the bar with a double overhand or mixed shoulder-width grip.
Straighten your arms, brace your core, and pull your shoulders back and down. Engage your lats by pressing the barbell toward your legs.
Without rounding your lower back, drive your feet into the floor and stand up.
Lock out your hips and knees, taking care not to lean back at the top of your rep. Leaning back increases your risk of injury.
Lower the bar back to the blocks, let it settle for a second or two, reset your core and grip, and repeat.
Pro Tips:
Use chalk and/or lifting straps for a stronger grip.
If you use a mixed grip, make sure you switch hands set by set to avoid muscle imbalances.
Use lower blocks to work your glutes and hamstrings more or higher blocks to emphasize your upper back.
Wear flat shoes or go barefooted to prevent your weight from shifting forward onto your toes.
Use a weightlifting belt when training with heavy loads.
Block Pulls Benefits and Drawbacks
Not sure if block pulls deserve a place in your workouts? Consider these benefits and then decide!
Better for tall or inflexible lifters
Conventional deadlifts start with the weights on the floor and the bar about nine inches above the deck. Reaching down to grab the bar requires good flexibility, especially if you are taller than average. As such, some people end up rounding their lower backs during deadlifts, and that’s a recipe for injury.
A rounded lower back is a weak lower back and puts tremendous pressure on the intervertebral discs and ligaments of the lumbar spine. Starting with the bar on blocks means you don’t have to lean so far forward, so there is less chance of rounding. This means that block pulls are more lower back-friendly than off-the-floor deadlifts, especially for tall or inflexible lifters.
Boost your lockout strength
Full deadlifts, like most compound freeweight exercises, have sticking points. Some lifters get stuck trying to break the bar away from the floor, while others get stuck at the midway point. Rack pulls allow you to focus on your lockout. For this reason, powerlifters use block pulls as a deadlift accessory exercise to boost their full deadlift performance.
Fatigue management
Full deadlifts can be exhausting. Because of this, some lifters only deadlift once a week or even less often when using maximal weights. Block pulls are a little less fatiguing, so you should be able to do them more often or in conjunction with regular deadlifts. For example, you could alternate block pulls with conventional deadlifts workout by workout if you want to train your posterior chain twice a week.
Build a more muscular back
Few exercises have the potential to build back size like rack pulls can. Pushing the bar back toward your legs maximizes lat engagement while keeping your shoulders back and down hits your traps and rhomboids. Stopping your lumbar spine from rounding will thicken and strengthen your lower back muscles. In short, rack pulls are a total back builder.
While block pulls are a mostly beneficial exercise, there are also a few drawbacks to consider:
Equipment
While most gyms have barbells and weight plates for deadlifts, lifting blocks are not as common. As such, you may not have access to the equipment you need to do block pulls. However, there are alternatives to this exercise, which we have detailed below.
Less functional than full deadlifts
A functional exercise mirrors the demands of daily living or a sport. Deadlifts from the floor are a very functional exercise, as many lifting movements start with the weight resting on the deck, e.g., picking up your kids, a pet, or grocery bags.
However, block pulls start with a weight resting above the floor, so they may not be as functional as regular deadlifts. That said, they work the same muscles as regular deadlifts, so block pulls will still enhance your functional strength, albeit to a somewhat lesser degree.
Lift heavier weights
Block pulls have a smaller range of motion than conventional deadlifts, so most people can use heavier weights for them. While lifting more weight can be a good thing, it could be a drawback, too.
Some lifters load block pulls with way more weight than they can handle safely. This can lead to injury, especially to the lower back.
7 Block Pulls Variations and Alternatives
Block pulls are a highly effective compound exercise, but that doesn’t mean you need to do them all the time. There are several variations and alternatives you can use to keep your workouts productive and interesting:
1. Rack pulls
No suitable lifting blocks? No problem! You can also do partial deadlifts using a power rack. This exercise looks and feels very similar to block pulls, and as most gyms have a suitable power rack, they may be more accessible for some lifters. However, do not do this exercise with a deadlift bar, as doing so will damage it. In contrast, block pulls will not damage a deadlift bar.
Steps:
Place your barbell on the safety pins of a power rack so it’s between lower knee and mid-thigh height.
Stand behind the barbell with your feet between shoulder and hip-width apart. Your feet should be under the bar.
Grip the bar with a double overhand or mixed shoulder-width grip.
Straighten your arms, brace your core, and pull your shoulders back and down. Engage your lats by pressing the barbell toward your legs.
Without rounding your lower back, drive your feet into the floor and stand up.
Lock out your hips and knees, taking care not to lean back at the top of your rep.
Lower the bar back to safety pins, let it settle for a second or two, reset your core and grip, and repeat. Do not bounce your bar off the pins, as doing so could damage the bar and the power rack.
Muscles Targeted:
Primary: Latissimus dorsi, trapezius, rhomboids, gluteus maximus, hamstrings, erector spinae, core.
Secondary: Biceps, forearm flexors, quadriceps.
Benefits:
More accessible than block pulls for some lifters.
Easier to adjust the height of the bar, as most power racks are drilled with one-inch holes.
An excellent total back and posterior chain exercise.
Tips:
Try a lower starting point to emphasize your glutes and hamstrings or a higher one to emphasize your back.
Use a mixed or double overhand grip as preferred.
Use lifting straps and/or chalk to prevent your hands from slipping on the bar.
Related: The Ultimate Guide to Rack Pulls
2. Paused deadlifts
Like block pulls, paused deadlifts are designed to improve your mid-rep strength and boost your lockout. However, as an extra advantage, you don’t need any additional equipment to do them. Paused deadlifts are another common powerlifting accessory exercise.
Steps:
Place your barbell on the floor and stand with your toes beneath it, feet between shoulder and hip-width apart.
Grab the bar using an overhand or mixed grip, hands shoulder-width apart.
Straighten your arms, brace your core, set your shoulders, and drop your hips down below your shoulders. Take the slack out of the bar.
Drive your feet into the floor and stand up, pausing as the bar reaches about knee height. Hold this position for 1-3 seconds.
Push your hips forward and stand fully upright.
Lower the bar back to the floor, reset your core and grip, and repeat.
Muscles Targeted:
Primary: Latissimus dorsi, trapezius, rhomboids, gluteus maximus, hamstrings, erector spinae, core.
Secondary: Biceps, forearm flexors, quadriceps.
Benefits:
A very accessible exercise as no extra equipment is required.
An effective way to strengthen your deadlift lock out.
A good way to make light weights feel heavier.
Tips:
The longer you pause, the harder this exercise becomes.
Vary the height of the pause to change the effect and feel of this exercise.
Use less weight than normal, as this exercise is much more demanding than full deadlifts or block pulls.
3. Deadlifts with chains
Chains are another way to overload the top part of the deadlift movement. Doing deadlifts with chains is a type of training called accommodating resistance. As well as overloading the upper range of motion, using bands or chains teaches you to lift more explosively and develops your ability to use power to blast through your sticking points.
Steps:
Load your barbell and attach your chains.
Place your barbell on the floor and stand with your toes beneath it, feet between shoulder and hip-width apart.
Grab the bar using an overhand or mixed grip, hands shoulder-width apart.
Straighten your arms, brace your core, set your shoulders, and drop your hips down below your shoulders. Take the slack out of the bar.
Drive your feet into the floor and stand up. Do not lean back, as doing so increases your risk of injury.
Lower the bar back to the floor, reset your core and grip, and repeat.
Muscles Targeted:
Primary: Latissimus dorsi, trapezius, rhomboids, gluteus maximus, hamstrings, erector spinae, core.
Secondary: Biceps, forearm flexors, quadriceps.
Benefits:
A very movement-specific deadlift accessory exercise.
An excellent way to overload the top part of your deadlift.
An effective exercise for developing deadlift speed and power.
Tips:
This exercise works best when done for low reps, e.g., 3-5.
Start with light chains, as this exercise can be very challenging.
No chains? You can also use strong bands for accommodating resistance training.
4. Trap bar block pulls
Because the load is in front of your base of support, barbell deadlifts have a tendency to pull you forward onto your toes. This increases the shearing force on your lumbar spine. Shearing force isn’t a problem for some lifters but can be a deadlift deal breaker for those with pre-existing back pain. Trap or hex bar block pulls allow you to keep your torso more upright, making them far more lower back-friendly.
Steps:
Load up your trap bar and place it on blocks.
Stand between the handles, feet about shoulder-width apart.
Grip the handles, straighten your arms, pull your shoulders down and back, and brace your core.
Drive your feet into the floor and stand up straight.
Lower the weights back to the blocks, allow them to settle, and then repeat.
Muscles Targeted:
Primary: Latissimus dorsi, trapezius, rhomboids, gluteus maximus, quadriceps, hamstrings, erector spinae, core.
Secondary: Biceps, forearm flexors.
Benefits:
More quadriceps engagement than regular block pulls.
Much less lower back stress.
The parallel grip makes trap bar deadlifts more biceps and shoulder-friendly.
Tips:
Adjust the height of your blocks to change the effect of this exercise.
You can also do this exercise in a power rack, i.e., trap bar rack pulls.
Experiment with the width of your stance to see what feels best.
5. Snatch grip deadlift
Lifters often do block pulls to overload their upper back muscles. Using a wider-than-shoulder width or snatch grip also increases upper back engagement but requires no additional equipment. As an added advantage, this exercise increases off-the-floor strength and explosiveness.
Steps:
Place your barbell on the floor and stand with your toes beneath it, feet between shoulder and hip-width apart.
Grab the bar using an overhand, wider than shoulder-width grip.
Straighten your arms, brace your core, set your shoulders, and drop your hips down below your shoulders. Take the slack out of the bar.
Drive your feet into the floor and stand up. Do not lean back, as doing so increases your risk of injury.
Lower the bar back to the floor, reset your core and grip, and repeat.
Muscles Targeted:
Primary: Latissimus dorsi, trapezius, rhomboids, gluteus maximus, quadriceps, hamstrings, erector spinae, core.
Secondary: Biceps, forearm flexors.
Benefits:
A very effective upper-back builder.
A precursor for doing Olympic snatches.
A great upper trap and mid-back strengthening exercise.
Tips:
The wider your hands, the more challenging this exercise becomes.
Use a hook grip to prevent your hands from slipping.
You can also do this exercise off blocks or power rack safety pins, like this:
6. Romanian deadlifts
Like block pulls, Romanian deadlifts emphasize the top of the deadlift movement. However, performed with semi-straight legs, Romanian deadlifts are more glute and hamstring-dominant than block pulls. Romanian deadlifts are arguably one of the best posterior chain exercises around.
Steps:
Hold a barbell in front of your thighs using a double overhand or mixed grip.
Stand with your feet hip-width apart, knees slightly bent but rigid.
Brace your core and set your shoulders back and down.
Push your hips back and hinge forward, lowering the bar down the fronts of your thighs to below your knees.
Drive your hips forward and stand back up.
Muscles Targeted:
Primary: Gluteus maximus, hamstrings, core, latissimus dorsi, trapezius, rhomboids.
Secondary: Forearms, biceps.
Benefits:
More glute and hamstring-centric than block pulls.
No additional equipment is required.
A very functional posterior chain exercise.
Tips:
Adjust your range of motion according to your flexibility.
Do NOT round your lower back!
Keep your neck long and your chin tucked in to avoid cervical spine stress.
7. Kettlebell block pull
Most deadlift variations revolve around barbells. However, you can also deadlift other heavy objects, including sandbags, dumbbells, and kettlebells. The kettlebell block pull is an especially useful exercise for home lifters.
Steps:
Place your kettlebell on a block and stand astride it, toes pointing slightly outward.
Grip the handle with an overhand, narrow grip.
Straighten your arms, pull your shoulders down and back, brace your core, and lower your hips below your shoulders.
Drive your feet into the floor and stand up straight.
Lower the kettlebell back down to your block and repeat.
Muscles Targeted:
Primary: Gluteus maximus, hamstrings, core, latissimus dorsi, trapezius, rhomboids.
Secondary: Forearms, biceps.
Benefits:
A very accessible block pull variation.
Minimal lower back stress.
An excellent block pull option for home exercisers.
Tips:
Experiment with the height of your block.
Push your knees outward to increase glute engagement.
You can also do this exercise with a single dumbbell standing on end.
Block Pulls FAQs
Do you have a question about block pulls or posterior chain training in general? No worries, because we’ve got the answers!
1. How many times a week can I do block pulls?
Most lifters should be able to do block pulls twice a week, e.g., Monday and Thursday. This will allow adequate time for rest, recovery, and muscle growth. However, if you train very heavy (90%+ of your 1RM) or perform a high volume of sets per session, once a week may be all you can recover from. Doing block pulls more often could result in overtraining.
Adjust your training frequency based on your progress, and if you’re feeling tired or burnt out, you probably need to do block pulls less rather than more often.
2. Are block pulls safe?
Compared to conventional deadlifts from the floor, block pulls should be somewhat safer. The shorter range of motion and higher starting position means less low back stress. However, these benefits will soon vanish if you use too much weight or poor technique.
So, block pulls are pretty safe, but only if performed correctly and with appropriate loads.
3. How many reps and set should I do for block pulls?
Your rep scheme depends on your training goal. To build strength, you must lift heavy weights for low reps, typically in the 1-5 range. For muscle building, you need to do moderate to high reps (6-30) using lighter loads. However, to build muscle, you also need to take your sets to within a couple of reps of failure.
Regarding sets, provided you train hard enough, you should be able to fatigue your muscles in 2-4 sets. If you feel you need to do many more, you are either not training hard enough or are resting too long between sets. That said, strength-specific workouts often involve more sets than hypertrophy programs, e.g., six sets of three reps.
Check out this guide to learn more about effective program design.
4. Are deadlifts the only way to train the posterior chain
While deadlifts and block pulls are an effective way to develop your posterior chain, they’re not the only way to train this critical area. Other exercises you can do include:
Kettlebell swings
45-degree back extensions
Barbell hip thrusts
Good mornings
Read about these and other exercises in this article.
5. Are block pulls part of powerlifting?
While block pulls are not an official part of competitive powerlifting, powerlifters often do them as an assistance exercise to improve their lockout strength. However, variations of the block pull, such as the silver dollar deadlift, often feature in strongman competitions.
Because of the raised bar height and shorter range of motion, partial deadlift weights are almost always significantly higher than full deadlifts.
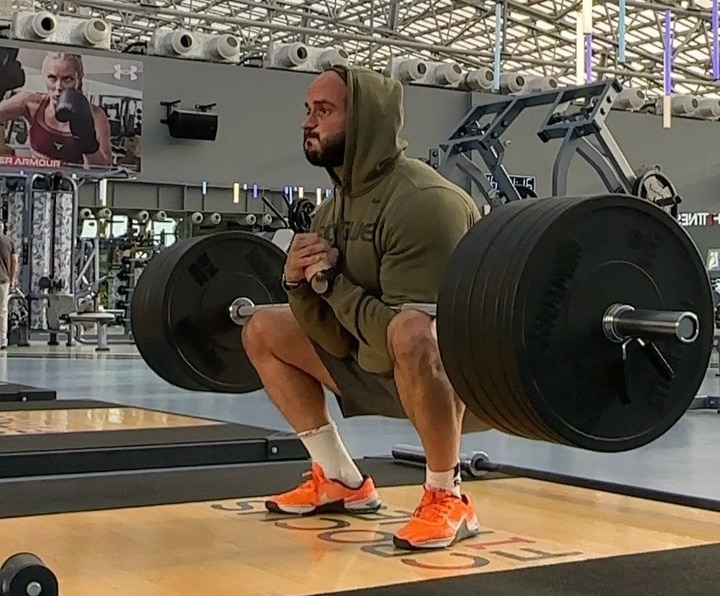
Image via @sirseaningtoniii Instagram
Block Pulls – Wrapping Up
Deadlifts are one of the most productive exercises you can do with a barbell. They’re functional as they replicate several everyday and sporting movements and are great for building full-body muscle and strength.
However, there is no law saying that you have to deadlift from the floor. In fact, if you are tall or inflexible, you may find that doing so leads to injuries.
Block pulls raise the bar to a more mechanically advantageous height, so you don’t have to bend over so far to reach it. In addition, they provide a way to train the upper part of your deadlift more, which may help you blast past your sticking points.
Whether you are an experienced deadlifter or a novice, block pulls are a very beneficial exercise, so try ‘em – you’re gonna like ‘em!
Tuck Crunch Guide: How-To, Muscles Worked, Benefits, and Variations
A versatile, entry-level ab exercise, tuck crunches use isometric loading of the lower body, and a regular crunch to stimulate the rectus abdominis six-pack muscles. It’s a also great learning variation as you should focus on core activation at both ends of where the abdominal muscles attach and function. No ab tools or equipment required, we can’t recommend this convenient variation enough.
But if you find tuck crunches too easy, there’s a simple way to progress them, plus you can and should utilize the more advanced variations and alternatives included below.
Check out our full tuck crunch guide below with simple how-to instructions, benefits, drawbacks, and programming tips!
Muscles Worked During Tuck Crunches
If you want to maximize your gains, it’s important that you understand how your muscles work so you can train them properly. Crunches are a core exercise that primarily involves one function of the abs explained below.
Rectus abdominis
The aim of any crunch variation is to improve your six-pack (If we’re being honest) muscles. Also called the rectus abdominis in scientific terms, your abs are long, twin muscles parallel to each other that extend from the lower chest area down to the pelvis region.
Read: How Many Abs Can You Have? 4-Pack vs 6-Pack vs 8-Pack
Not for aesthetic purposes, the rectus abdominis functions relative to its location, curling both ends the trunk, between the ribcage and pelvis, toward each other. This is experienced when you do a basic ab crunch which emphasizes the upper abs, or a leg lift that works the lower core muscles.
Obliques
Playing Robin to the rectus abdominis in tuck crunches, your obliques are side core muscles, found and functioning laterally. As a result, obliques do things like bend us sideways, and rotate our upper bodies. However, the obliques will always get action, no matter what exercise you do.
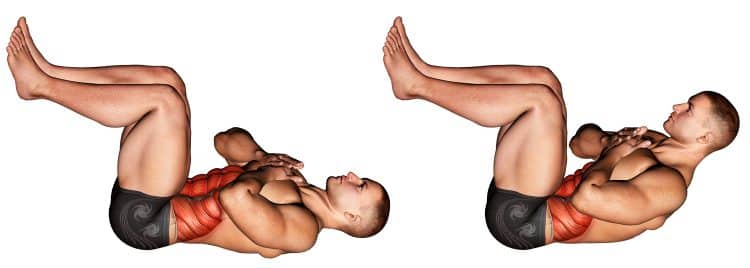
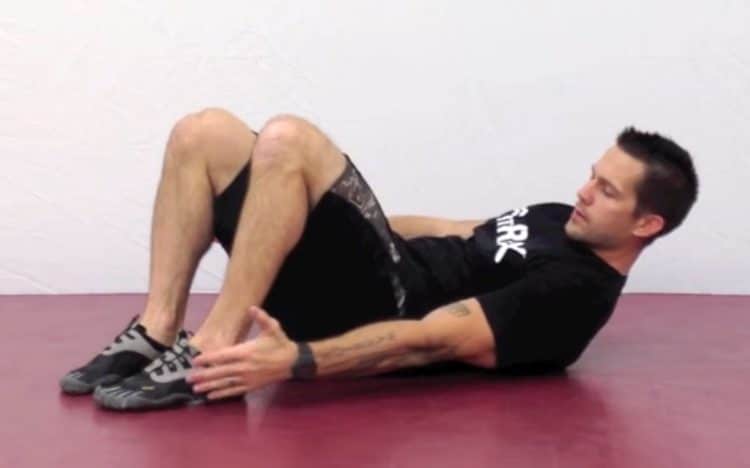
How To Do Tuck Crunches
Tuck crunches are a very beginner-friendly exercise, but it’ll be most effective if you understand the mechanics of a basic core crunch (one of the variation included below). Because you’re just incorporating the legs via hip flexion, to isometrically engage the lower abs.
You can find the simple tuck crunch exercise steps below, and we also included a quick video tutorial.
Steps
Find a cushioned but firm surface, or use an exercise mat.
Lie on your back, then lift your knees up perpendicular to the floor, and bend your legs at a 90-degree angle. Your lower back should be flat and pressed into the floor.
Cross your arms on your chest, tense your core, and use your ab muscles to curl your upper body toward your knees. Push as far as you can without lifting your upper back. Squeeze your abs hard, and exhale.
While maintaining a tense core, slowly reverse the motion by lowering your shoulders to the ground. Inhale, and prepare for the next rep. Continue for the desired number of repetitions.
It’s that easy and effective!
Here’s a short video example of tuck crunches.
Tips
You can also place your fingers behind your head during tuck crunches. However, do not pull up on your neck. Keep your head neutral and use your abs to control the movement.
Your lower back should not leave the ground during tuck crunches.
For increased ab activation, bend your knees in as you crunch your upper body, then extend your legs out as you drop your shoulder to the floor. Just make sure your back stays flat against the floor, which means you won’t be able to drop your legs too far down.
Hold a weight in both hands to drive more stimulation in your abs!
This Exercise
Target Muscle Group/s: Rectus abdominis
Secondary muscle group/s: Obliques
Type: Hypertrophy
Mechanics: Isolation
Equipment: Cushioned surface, exercise mat
Difficulty: Beginner/Intermediate
Benefits of Tuck Crunches
If you need convincing of why tuck crunches are a cool ab exercise, here are a few reasons.
Show off your midsection
As the summer months draw near, eyes will also right in that midsection area if you put together the right ab training routine. Tuck crunches are not only a good way to stimulate your core, but they’re so quick and simple that you can even do them before you hit the sand, and get a nice midriff pump!
No ab tools needed
No bars, cables, weights, or machines necessary… tuck crunches require nothing but a cushioned surface, your commitment, and intensity.
Related: The best six-pack workout you can do at home
Learn to use your lower body to load your core
While leg involvement is minimal in tuck crunches, incorporating your legs in ab training is good practice. Your legs weigh a lot and are a convenient way to add a lot more resistance. You can do gradual progressions starting from tuck crunches, incorporating the many leg crunch variations.
Drawbacks of Tuck Crunches
Tuck crunches are a good exercise choice, but they aren’t perfect. Here are some drawbacks of this movement.
You’ll eventually need more…
Unless you’re maintaining or using it to warmup (both strategies are beneficial), there will come a point when you need to step up your tuck crunch game. Think around the 35+ rep mark, then progress by holding a weight, or progress to more challenging variations.
Leg movement would be better!
In tuck crunches, your legs remain in one static position, not moving. While it may increase lower ab activation, it’s undoubtedly better to move your legs, whether it’s lifting them up and down, doing bicycle crunches, or pulling them in and out.
More lower body involvement will simulate a lower core crunch, contracting the abs more, which should translate to a more effective exercise.
But holding your legs steady is a a good way to introduce your legs in your ab training, or cool down after an intense workout.
Variations and Alternatives of Tuck Crunches
There are endless crunch variations and alternatives, however, we wanted to choose ones that closest replicate a similar body position and movement to tuck crunches.
Basic ab crunch
The standard ab crunch is known as the exercise in its most basic and beginner-friendly form. You should definitely learn how to do it correctly before introducing your legs into the movement. That means contracting your abs, and using them to curl your torso off the ground.
As simple as they seem, there’s a right and wrong way to do them, and it’s too easy to slack off.
Steps
Lie on your back on a cushioned yet firm surface such as a carpet or training mat.
Bend your knees, and place your feet flat on the floor roughly hip width apart. Your feet should be close enough to your butt that you can reach forward and touch your heels. Your lower and upper back should be flat against the floor.
Then place both hands behind your head and keep your elbows flared out to the sides, where they should stay throughout the movement.
Now tighten your core, and lift your shoulders in, squeezing your abdominals. Keep your head neutral.
Slowly lower your upper body to the floor and repeat until you’re satisfied.
Here’s a short and sweet video of the basic ab crunch.
Weighted tuck crunch
It’s as easy as picking up a five pound dumbbell, weight plate, or any evenly weighted object that you can hold in both hands. Crunches may have a reputation of being a bodyweight-based exercise. However, your abs are muscles like any other muscles, and they need progressive resistance to respond and develop.
If you’re more advanced in your training, you should always add more weight/ more reps, and variations that challenge your core further.
Steps
To avoid dropping a weight on yourself, first, place the weight on the floor, and then sit next to it.
Then, hold the weight with both hands in front of your chest, lie on your back, and lift both legs up while keeping your knees bent at 90 degrees. Your lower back should be flat on the floor.
Press the weight up over your chest and lock out your elbows.
Engage your core, and use your ab muscles to crunch up and forward while reaching for your toes. Squeeze your core muscles hard.
Slowly roll back to the starting position but don’t allow yourself to rest. Immediately perform the next repetition and continue until the set is completed.
Bicycle crunches
They look simple, but bicycle crunches done right are a crazy good core builder that also promotes more mobile hips. While more of a rotation exercise, the legs follow a similar movement to wind sprints, and they’re totally worth including in your workouts.
Steps
Lie down on an exercise mat or soft surface.
Place your fingertips behind your head near your ears and lift your feet about 12 inches off of the floor.
Then, pull your left knee into your abdominals while twisting your body to the left. Try to touch your left knee and right elbow. Contract your abs during this part of the movement.
Immediately do the opposite motion with your legs, and rotate to the right.
Alternate your legs until you’ve completed one set. Rest for 30 seconds, and repeat.
Pro tips:
Pretend you’re trying to touch your shoulder to the opposite knee. This will ensure that you get optimal trunk rotation, and hence fully stimulate the obliques.
Make sure to alternate between bent and extended legs, kicking your legs in circles like you’re riding a bicycle.
On a weight loss journey? Use our calories burned during bicycle crunches calculator to track your progress.
V-Ups
A worthy variation in our books, v-ups allows you to perform a bodyweight floor crunch using the full weight of your arms and legs at the same time, targeting both the upper and lower abdominals. It is advanced though, so you should be somewhat of a crunch master beforehand.
Steps
Lie on the floor face up with your legs straight out, feet pressed together, and arms extended above your head.
Brace your core by pushing the pelvis down, taking a breath in, and tensing the midsection.
Then, simultaneously lift your legs up toward the center of the body, and reach your arms toward your toes.
Reverse the motion and return to the starting position while keeping your heels a few inches off the floor. Your back should always be flat against the floor and your core tensed.
FAQs
What are the best sets and reps for tuck crunches?Because tuck crunches are a fairly basic bodyweight based ab crunch variation, we recommend doing 2-3 sets of high rep sets, or training to complete muscular failure.
Then when you become more advanced, switch to weighted tuck crunches (included in this guide), and aim for a 12-20 rep range, using a weight that challenges you and makes you work for the last five repetitions!
How far should I crunch? The idea is to crunch as far as you can forward without lifting your upper back. You want to squeeze hard and contract your core muscles, which is best with a full range of motion, getting as much spine flexion as possible.
Tuck crunches are too easy. How to make them harder? Grab a weight plate, dumbbell or evenly weighted object and hold it above your chest. You can also bend and extend your legs as you crunch. See variations and alternatives section for reference.
Wrapping Up
There’s really nothing more to it… tuck crunches are simple but ab gains friendly exercise when you’re ready to go beyond a basic crunch, need a quick ab pump, or a warmup before your more intense core training. It’s a great exercise to train both ends of your core, while developing your mind muscle connection, making your ab training even better, so you can get those dreamy abs!
Band Hip Abduction Guide: How-To, Muscles Worked, Benefits, and Variations
Most exercisers program their training around the major muscle groups (quads, glutes, back, chest, etc). While they do contribute the most to strength, muscle gains, and performance, they aren’t the only muscles in need of attention. The abductor muscles, for example, may get indirect stimulation from squats and lunges, but these exercises can’t do what band hip abductions can do, for instance.
Your hip abductor muscles in the butt and thighs, especially glute medius, and tensor Fascia latae (TFL), are important for swinging the leg laterally, lower body joint and muscle stability, performing functional movements, and preventing daily injuries from everyday activities.
But how often do we perform lateral isolation movements? For many, never.
All you need is a resistance band and a stable base to anchor it to, or you can opt for one of the variations using just a band and your legs. This article features the abductors’ anatomy, how-to, benefits, variations, and FAQs, and more.
Muscles Worked During Band Hip Abductions
Located on the outer hips, your abductors are important muscles for maintaining strength and stability in the lower body. There are two significant abductor muscles that take control of this movement pattern.
Gluteal muscles – medius, and minimus
You can think of your gluteal butt muscles as three siblings, from youngest to oldest. The gluteus minimus is the youngest (smallest), medius middle child, and maximus (oldest and biggest). Medius covers minimus, and is found deep to the maximus.
The two younger siblings, medius and minumus are given the chore of abducting or moving the leg outward away from the midline of the body. Therefore, band hip abductions rely heavily on these two muscles.
Tensor fascia latae
While it sounds like someone’s favorite Starbucks beverage, tensor fascia latae is a muscle that rides the outer thigh from the iliac crest, down and through the iliotibial (IT) band, before crossing the knee and inserting into the tibia. Together with the glute medius and minumus, TFL abducts, and internally rotates the hip. It also has an anatomical association with glute maximus, where it helps the former in hip abduction.
TFL other functions include hip flexion, although a weaker flexor than iliopsoas, knee flexion past 30 degrees, and, hip and knee stabilization, and tibial lateral rotation.
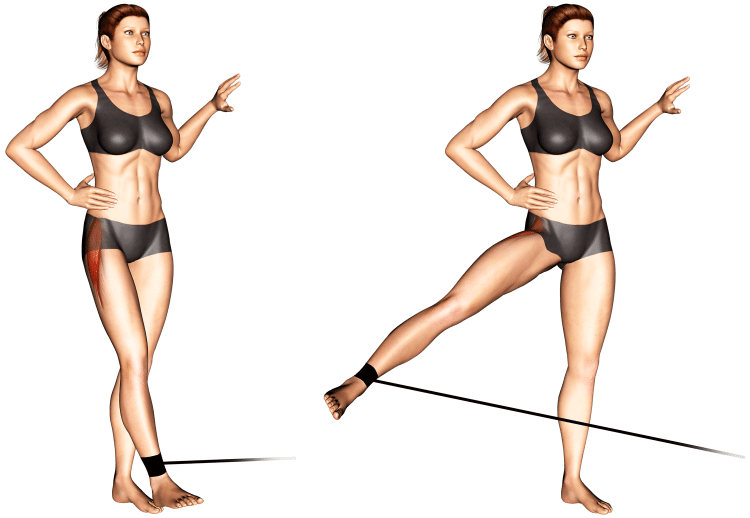
How To Do Band Hip Abductions
One of the biggest benefits of band hip abductions is that they’re relatively simply, and non intimidating. Anyone, including beginner exercises can do them.
Steps
Attach one end of the band/s to an object at lower shin height just above the ankle.
Stand sideways to the base and hold onto it if you need the stability. Then wrap the other end of the band around the ankle furthest away from the base, not the foot closest to the anchor point.
Take a few steps away from the base to stretch the band and create tension.
With your feet closer together, move the banded leg out and away from your body laterally while keeping your knee fully extended.
Pull your leg back in and repeat the exercise until you’ve completed the set. Then turn your body to face the opposite direction, attach the band to the other ankle, and repeat the movement. Make sure to alternate legs for each side to train your abductors equally.
Check out the short video tutorial below to see an example of band hip abductions.
Tips
Make sure there’s always a little tension (stretch) in the bands, even in the starting position. This will help keep your abductors active.
The band should not be rolling up and down your ankles or the base.
If you only have a loop band, you can wrap it around both ankles, and then work one leg at a time, while the other legs acts as the base.
This Exercise
Target Muscle Group: Gluteus medius
Type: Strength, function
Mechanics: Isolation
Equipment: Resistance band
Difficulty: Beginner
Benefits of Band Hip Abductions
Band hip abductions offer some nice benefits and only require a small commitment of your time. But they’re absolutely worth it if you take them seriously like the other important movements.
Remain a functional, performing beast
Strengthening and maintenance are two essential components of performance, and longevity. Band hip abductions are good for both when it comes to your hip abductors. They’re especially useful for preventing long term negative effects of “coma glutes”, or when the butt muscles shut off due to long inactivity and modern day tech heavy lifestyles.
Band hip abductions are an easy, low stress/physically taxing activity that anyone can pick up.
Change your plane
Some people only ever do a select few exercises, that happen to occur in the same plane, like squats, lunges, and leg extensions. But we can move sideways, and diagonal too in multiple planes, and it’s good to use these built in capabilities. Not just for performance reasons, but to help maintain healthy and mobile joints, that protect us from injuries.
Popular rehab exercise
Band hip abductions are great for assisting the rehabilitation of the outer hip muscles, or correcting structural issues like knee valgus, or knock knee syndrome, which is when the knees appear to collapse in toward each other (hence the reference to the knees knocking together), can be the result of weak hips. Using band hip abductions as part of a rehabbing program can help to create big improvements.
One study from 2018 found a connection between knee valgus and weak hips. Therefore, performing hip abduction exercises should improve the condition (1).
There’s also patellofemoral pain syndrome (PFPS), which as the name implies affects the patella or kneecap. Commonly caused by strenuous, repetitive activity, or misalignment of the kneecap due to various reasons, PFPS can be helped through a rehabbing program that includes hip abduction specific exercises.
User-friendly
The entry to do band hip abductions is minimal. Anyone can get up and do them because, well, there’s not much to it. You do, however, need decent hip mobility, and flexibility but at a basic functional human level. Not to mention, there are several variations.
Common Mistakes When Performing Band Hip Abductions
While it’s hard to mess up this movement, try not to do these things, and you’ll get the most out of this exercise.
Doing them too fast
We could see why someone would attach an ankle band and start pumping out reps like a cardio workout. But most people never really train these undervalued muscles with focused isolation movements. In the little time we train the abductors, it’s better to go slow, and feel the muscles working equally on each side. You can also more easily identify a weaker side, whereas using momentum can hide structural flaws.
Using too much resistance
Ego training or not understanding your capabilities is a common theme for many exercisers. And bands are no exception. If you cannot move your legs far enough away from your body, you’re not training the abductors to their full potential.
Variations and Alternatives of Band Hip Abductions
Band abductions is one way to do it. But there are advantages and disadvantages, These variations too have theirs. Check out the best alternative hip abductor exercises for you to try out.
Lying band hip abductions
Whether you perform them while lying on your side (clamshells) or back, you can accomplish something similar. But, you’ll need a loop band that you can wrap around both legs. Then, you’ll pull your legs apart, activating those hip abductor muscles.
Steps
Sit on the floor and wrap a loop band around your knees or ankles, then lie on your side, with both legs extended, and feet together.
Now lift the top leg up high, then slowly drop it back down, keeping a small amount of tension or stretch in the bands. Then repeat as many times as needed.
Seated band hip abductions
If you feel more in control doing band hip abductions seated, then its another great option. Just wrap the loop band around your knees while seated on a chair or bench, and do the same technique as explained for the lying variations.
Pro tip: Some people may feel it better if they wrap the band just below the knees. Feel free to experiment a little!
Monster/lateral bands walks
If monsters have taught us anything, it’s a better way to walk to build our glute medius and lateral thigh muscles… Monster walks are a booty band exercise that isometrically, and isotonically work the abductors by walking in a wide, quarter squat stance, maintaining tension in the bands.
Steps
Wrap a band around both legs on the lower thigh just above the knees and keep your legs far enough apart to create tension in the band.
Descend into a quarter squat and bend slightly forward at the waist. Note: The quarter squat stance will fire up your gluteus medius and tensor fasciae latae.
Tense your abs and take large normal forward making sure to maintain tension in the band/s.
Now take small steps backward maintaining the same technique.
Cable hip abductions
For home, bands are king. In the gym, cables are arguably better and it’s obvious why. You have control over the weight, the resistance is consistent (not varying the resistance based on how much the band is stretched), and the pulley won’t slide up and down. Additionally, most gyms have ankle strap attachments, so they’re also convenient.
Steps
1. Slide the cable pulley all the way down to the last notch on the cable railing. Then connect an ankle attachment, and secure it around the ankle furthest away from the cable machine.2. While standing sideways and just off center to the cable machine, hold onto it with one arm for balance, then take a step away until the cable is tight.3. Lift the strapped leg away from the opposite leg like you’re doing a side kick.4. Under control, reverse the movement to bring your leg back to the starting position.
Tips
Go light, and focus on performing a full lateral swing outward.
Aim for 10-15 reps per leg/set.
Machine hip abductions
Probably the most common variation, machine abductions are going to be preferred by most gym goers because they’re convenient, you can choose your weight, and both legs can work at the same time. Nowadays there are several variations, from the conventional seated machine abductor to standing versions.
Pro tip: Sit straight up with your back fully against the machine pad to target more of the abductors, or scoot your butt to the edge of the seat, lean forward and grab onto the machine to hit more of the overall glutes, as demonstrated in the video example below.
FAQs
Check out our frequently asked questions section for some band hip abduction training tips.
How many sets and reps of band hip abductions should I do? At a minimum, we recommend 2 sets x 12-15 reps performed slow, and controlled.
How often should I do band hip abductions? Like any muscles, you’ll get the most benefit from training it a few times per week. Depending on your level of experience, and goals, two to three times per week should be adequate.
Can I load band hip abductions heavy? You can certainly challenge yourself with this movement. After all, that’s the whole point of resistance training. However, band abductions should not be a max loaded movement.
It’s better to focus on performing each rep slow and under control, with a full range of movement. Plus, most people aren’t strong enough in this position.
Why are bands an effective tool for working the hip abductors? Bands are easy to access, and offer an effective way to train the abductors while standing. Because bands stretch, the pressure is lighter at the beginning of each rep, which may be a good way for exercisers and rehab patients to ease into the movement.
Wrapping Up
A car isn’t just an engine, there are several components that keep it running, just like your body. While squats will give you big quads, you’d have neither without strong, stable, and healthy joints. Your hip abductors are those smaller components that’ll keep you training, performing, and living free of pain and injury.
If you haven’t already, get yourself a band, or try one of the equipment free abductor variations. You may not see immediate, visible benefits, but what goes on in the background is just as important.
Average Bench Press By Age, Weight, Gender, and Experience Level (2023 Update)
It is no secret the bench press is one of the most badass exercises. Answering “How much do you bench?” with an obnoxious number has become a legit way of establishing your clout amongst the gym bros.
While this question might sound like casual inquiry, it is anything but that. Your answer will determine the respect you will get from people at your gym. It will dictate whether folks at your gym will vacate the bench or any other equipment, for that matter, as soon as you walk up to it. Finally, your response will decide if you will have an audience when you head into a set.
The bench press is one of the three big lifts in powerlifting and a bread and butter exercise in bodybuilding style workouts. However, powerlifters and bodybuilders have a slightly different approach to performing the exercise.
While powerlifters perform the lift with a back bridge, bodybuilders usually perform the movement with a slight back arch. Amongst other things, the rep tempo, repetitions performed, bar’s motion path, and foot placement vary between the two lifting styles.
In this article, you’ll learn about the average bench press by age, gender, weight, and experience level, how to perform the bench press with the correct form, and get better at the lift.
Trivia: Julius Maddox holds the world record for the heaviest bench press at a ming-boggling 782.6 pounds (355 kilograms) set in a sanctioned powerlifting meet in June 2022.
Average Bench Press By Age, Weight, Experience Level, and Gender
Before we get into the average bench press nitty-gritty, let’s address the elephant in the room — arm length.
Your arm length can influence your bench press. Many people believe that lifters with shorter limbs can bench press more weights than folks with longer limbs as the bar has to move through a shorter range of motion.
It could be one of the reasons the bench-pressing totals at the NFL and NBA draft combines are vastly different.
Related: 24 Strongest NFL Players in the World
How much can the average man bench press?
The average male bench press depends on several factors, including a lifter’s age, weight, and experience level.
Average Male Bench Press by Weight
Below is the National Strength and Conditioning Association-approved ExRx.net official Bench Press Standards chart:
Body weight (pounds)
Untrained
Novice
Intermediate
Advanced
Elite
114
85
110
130
180
220
123
90
115
140
195
240
132
100
125
155
210
260
148
110
140
170
235
290
165
120
150
185
255
320
181
130
165
200
275
345
198
135
175
215
290
360
220
140
185
225
305
380
242
145
190
230
315
395
275
150
195
240
325
405
319
155
200
245
335
415
320+
160
205
250
340
425
Per the data, an advanced or elite male athlete can, on average, lift more than twice as much weight as an individual who doesn’t lift.
Below is the 2023 Bench Press Standards chart from Symmetric Strength:
Body weight (pounds)
Untrained
Novice
Intermediate
Advanced
Exceptional
Elite
World Class
114
70
105
140
200
230
260
290
123
75
110
150
220
250
280
310
132
80
120
160
235
265
300
335
148
90
130
175
225
295
330
365
165
95
145
190
280
320
360
400
181
100
150
205
295
340
380
425
198
105
160
215
310
355
400
445
220
110
170
225
325
375
420
465
242
115
175
230
340
385
435
485
275
120
180
240
350
400
450
500
320
125
185
245
360
410
460
510
Note: These standards apply when the bar makes contact with the chest above the bottom of the sternum with a momentary pause and pressed to full elbow extension.
How much can the average woman bench press?
Women, on average, cannot lift as heavy as their male counterparts of the same age, weight, and experience level.
Average Female Bench Press by Weight
Per the same ExRx.net official Bench Press Standards chart listed above, here is the average bench press of women of different weights and experience levels:
Body weight (pounds)
Untrained
Novice
Intermediate
Advanced
Elite
97
50
65
75
95
115
105
55
70
80
100
125
114
60
75
85
110
135
123
65
80
90
115
140
132
70
85
95
125
150
148
75
90
105
135
165
165
80
95
115
145
185
181
85
110
120
160
195
198
90
115
130
165
205
199+
95
120
140
175
220
Unlike men, women at the advanced lifting stage cannot bench press twice as much as the females who don’t train. However, elite athletes can lift more than twice as much as their non-lifting peers.
The following is the Symmetric Strength 2023 Bench Press Standards chart for women:
Body weight (pounds)
Untrained
Novice
Intermediate
Advanced
Exceptional
Elite
World Class
97
45
65
90
130
150
165
185
105
65
95
125
185
210
235
265
114
70
105
140
200
230
260
290
123
75
110
150
220
250
280
310
132
80
120
160
235
265
300
335
148
90
130
175
255
295
330
365
165
95
145
190
280
320
360
400
181
100
150
205
295
340
380
425
198
105
160
215
310
355
400
445
200
105
160
215
315
360
400
445
Average Male and Female Bench Press by Age
Age
Total Weight
20-29
100 percent of your body weight
30-39
90 percent of your body weight
40-49
80 percent of your body weight
50-59
75 percent of your body weight
You shouldn’t get under a bar and expect to bench press 100 percent of your body weight just because you’re in your 20s. Depending on your genetics, you might have to train for at least a couple of years to reach the benchmarks mentioned in the table.
According to the data, lifters (male and female) are usually the strongest in their 20s and 30s. However, they experience muscle and strength atrophy in their 40s and 50s.
On average, men and women between 20 and 29 can bench press 100 percent of their body weight. The number goes down to 90 percent when they enter their 30s.
The bench press strength undergoes a further downgrade as an average individual can only lift 80 percent of their body weight in their 40s and 75 percent in their 50s.
A fall in natural testosterone levels is one of the biggest reasons for the strength downgrade. Testosterone is the male sex hormone and an anabolic steroid. It plays a key role in the development of male reproductive organs and secondary sexual characteristics such as increased muscle and bone mass and body hair growth.
Related: 7 Ways To Boost Your Testosterone Naturally
Overall Average Male and Female Bench Press
Per the Centers for Disease Control and Prevention’s National Center for Health Statistics (CDC), an average American male weighs 197.8 pounds, meaning the average bench press of a man in his 20s who doesn’t lift is 135 pounds or 175 pounds for a rookie lifter. The average bench press jumps to 215 pounds for an intermediate lifter, 290 pounds for an advanced lifter, and 360 pounds for an elite athlete. [1]
On the other hand, an average American female clocks in at 170.5 pounds. As per the table above, a 165 pounds woman (closest to 170.5 pounds) with no lifting experience can bench press 80 pounds or 95 for a novice.
The average bench press jumps to 115 pounds for an intermediately experienced woman of average weight and 145 pounds for an advanced lifter.
Calculate Your 1RM (One Rep Max)
Now that you know the average bench press for your age, weight, gender, and experience level, the next step should be to determine your one-rep max, meaning how much weight you can lift for a single rep on the bench press.
While you could find your 1RM with the trial and error method, it is risky and could lead to injuries. Check out our convenient bench press calculator to discover your one-rep max using different methods.
How to Bench Press
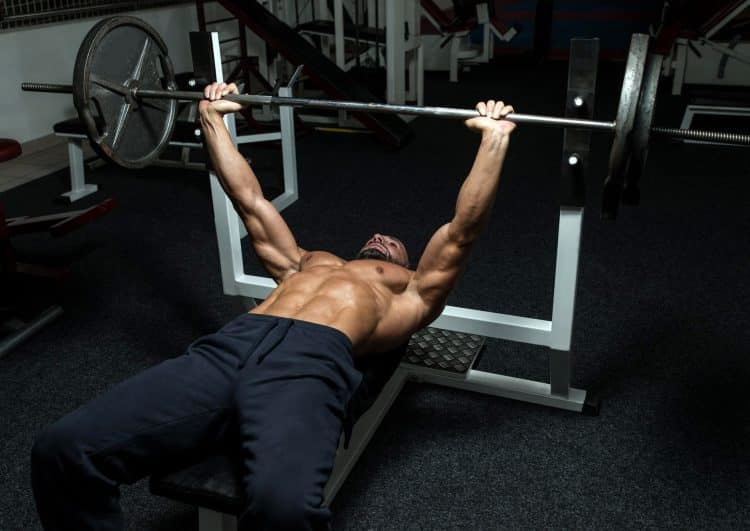
If your goal is to lift heavy and hit a PR, you should follow the powerlifting bench press method. This is how to bench press like a powerlifter:
Lie down on a flat bench. Your chest should be directly under the bar.
Grab the bar tightly with a slightly wider than shoulder-width grip.
Slowly pull yourself towards the bar so that you form a back bridge.
Plant your feet firmly on the floor. Your lower legs should form a 90-degree angle with your upper legs.
Unrack the bar and hold it over your chest — this will be your starting position.
Slowly lower the bar towards the bottom of your breastbone until you have made contact with your chest.
Pause at the bottom for a couple of seconds.
Explode back to the starting position.
Repeat for recommended reps.
Check out our barbell bench press (chest) guide to learn how to perform the exercise for achieving muscle hypertrophy.
How to Improve Your Bench Press
Here are a few ways to improve your bench press:
1. Progressive Overloading
If you want to improve your bench press, you should gradually increase the weight, frequency, or number of repetitions in your strength training routine.
However, make sure you’re not rushing through the process and biting off more than you can chew. Focus on lifting with the correct form to minimize the risk of injury.
Check Out: Muscle Development With Progressive Overload – The Concept You Must Know To Grow!
2. Incorporate Advanced Training Techniques Into Training
Advanced training principles like supersets, dropsets, intraset stretching, negatives, and forced reps can help you build strength and avoid hitting a plateau.
Additionally, performing other compound and isolation lifts can build your primary and secondary muscles and improve your bench press.
Related: The 25 Best Joe Weider Training Principles and Methods
3. Focus on Diet
You cannot achieve peak performance if you’re not meeting your daily calorie, micro, and macronutrient goals. Follow a nutrient-dense diet to ensure your gains do not stall.
Related: Our List of 40 Great Protein-Packed Foods
4. Don’t Overlook Recovery
It doesn’t matter how hard you work in the gym — you’re not going to see progress if you’re not giving your body enough time to rest and recuperate from your workouts.
You should also include stretching, foam rolling, and massages into your routine to fast-track your recovery.
Related: 8 Ways to Speed Up Recovery After Training
FAQs
What is a good bench press for a male?It is a subjective question, and the answer depends on your age, weight, gender, and experience level. Please refer to the table above to check the bench press weight against your body weight. The numbers in the advanced and elite columns can be considered ‘good.’
Which muscle groups does the bench press target?In a bench press, the chest is the primary target muscle, and your shoulders and triceps are the secondary muscle groups.
How much can the average man bench press?The average man’s bench press weight varies based on his age, weight, and fitness level. On average, a man is able to bench press about 135 pounds, but this can vary from person to person. The maximum weight a person can bench press is not necessarily a reliable measure of overall strength or fitness, other factors like muscle composition, body weight, and training can affect a person’s ability to bench press.
You might also like:
Wrapping Up
Whether the bench press is the correct exercise to assess your strength is a debate for another time. However, knowing the average bench press by age, weight, gender, experience level, and how you stack against it can give you a fair idea of your strength levels.
Remember, if you can bench your own body weight or more, don’t be shy to flaunt your numbers the next time someone directs a “How much do you bench?” at you. Rest assured, they’ll walk away impressed.
References
McDowell MA, Fryar CD, Ogden CL, Flegal KM. Anthropometric reference data for children and adults: United States, 2003–2006. National health statistics reports; no 10. Hyattsville, MD: National Center for Health Statistics. 2008.
Zercher Deadlift Guide: How To, Benefits, Progression, Muscles Worked, and Variations
The Zercher deadlift is the Zercher squat’s sibling. These exercises are the namesake of the 1930s strongman Ed Zercher. Although the strongman originally invented the Zercher squat, his lifting techniques have touched the deadlift, and this unconventional exercise has been growing in popularity recently. The Zercher exercises involve holding the barbell in your elbow crooks….
Band Lateral Raise Guide: Muscles Worked, How-To, Benefits, and Variations
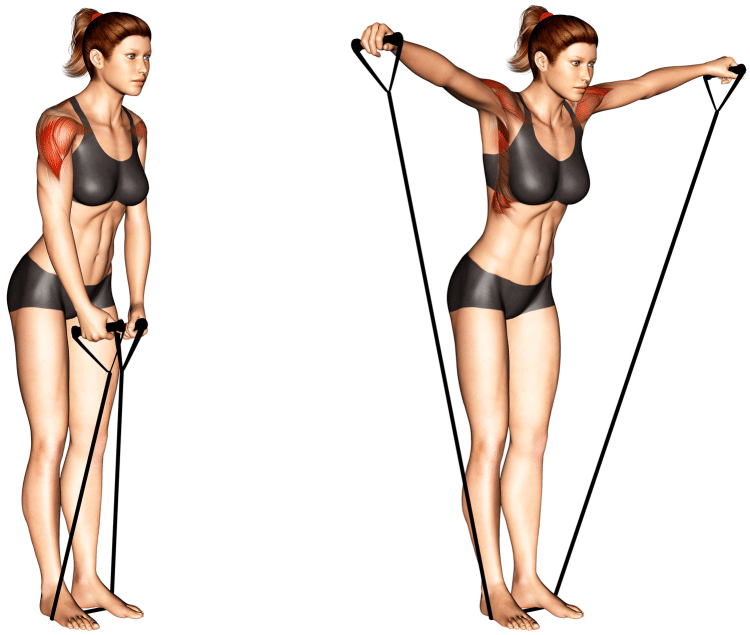
If you want to build half-moon-shaped delts at home, or on the go, then you need to get well acquainted with band lateral raises, and resistance bands in general… the ultimate budget and minimalist training tool. But make no mistake, if you know how to use them effectively, you can achieve gains a notch below other training methods like cables, and weights, (we will explain this drawback of bands later on).
If you need an alternative way to stimulate growth in your shoulders and improve your v-taper, then this guide will be a helpful resource for you. Keep reading to learn about lateral delts anatomy, how to accurately perform band raises, benefits you can expect, and the best variations, alternative, and optimal sets and reps.
How To Do Band Lateral Raises
When it comes to exercise technique, the more experienced you are, the more you can modify an exercise to your liking. But for people just starting out, it’s better to get the basics down, to ensure you’re training a muscle properly, using a full range of motion, and keeping yourself pain and injury free.
You can find detailed instructions with a video tutorial below.
Steps
Grab both ends of your resistance band and step on the center of it. Hold the ends of the band (where you grip it) together without stretching it, to make sure the bands are of equal length on both sides. Note: The closer your feet are to each other, the less resistance there will be and vice versa. You may need to do a few practice reps to find your optimal foot placement.
With your hands next to your outer thighs, stand up straight, bend your elbows slightly, breathe in, and brace your core.
Now raise both arms up laterally to your body, then stop when your hands are roughly shoulder level, or slightly higher. Keep your hands higher than your elbows. Breathe out during this phase of the rep. You should feel your outer delts contracting.
Slowly drop your arms to your sides but not all the way (a few inches away from your outer thighs), so that the band doesn’t lose its stretch. Breathe in, brace your core, and repeat.
Here’s a basic tutorial for anyone starting out.
Tips
Beginner exercisers will benefit most from starting with the lightest resistance band first. Focus on feeling the lateral delts work, and optimizing your form to avoid feeling pain in your shoulders.
If you feel pain in your shoulders, rotate your forearms so that your thumbs are pointing up to the ceiling.
If the resistance is too challenging when standing on the band with both feet, take one foot off the band. But still make sure both sides are even.
This Exercise:
Target Muscle Group: Deltoid lateral
Secondary Muscles: Deltoid anterior, serratus anterior, trapezius
Type: Hypertrophy
Mechanics: Isolation
Equipment: Resistance band
Difficulty: Intermediate
Muscles Worked
While primarily an exercise used to add muscle to your outer shoulder muscles, you’ll find that other muscles are involved in band lateral raises too. You can learn about their anatomy, and functional purpose in the following section.
Band Lateral Raise Muscles Worked
Deltoid lateral
When viewed from the front, your lateral or outer deltoid muscles, along with the rear delts are what help to create the half moon shape on the upper arm, right above the triceps. If you want impressive upper arms, developing this head is non negotiable.
Your side delts lift the arms up to either side of your body between 15-100 degrees, which is why lateral raises are most effective for targeting this head.
Deltoid anterior
Many exercisers find that the best way to perform lateral raises is to lift the dumbbells out but also slightly forward too. This engages the front delts, and it’s a good way to nail both heads at the same time. Although, of course, you want to focus more on the side delts.
Serratus anterior
The boxer’s muscle as they call it… your serratus anterior is actually a fan-shaped chest muscle (most of us never knew that) located in the rib area. Serratus anterior protracts the scapula, like when you throw a punch, and it works with the traps to lift objects overhead.
Upper, middle, and lower trapezius
You may hear to “relax the traps” as to not involve them in lateral raises. But it’s almost impossible to not involve them to some extent. After all, they do help to move the scapula and arms up (upper traps), back (mid traps), and down (lower traps).
Benefits of Band Lateral Raises
Band and other lateral raise variations allow you to give special, detailed attention to your outer delts. Here’s why you need them.
Want rounder delts?
Yeah, we thought so…
While pressing movements are also good for building your shoulders, prioritized, progressive lateral raises are going to help you create that wow factor, and 3D look (especially if you focus on your rear delts too). The side deltoids are also what helps to create your best V-taper, and make your waist appear smaller.
Related: How to Build a V-Taper – Training Guide and Nutrition Tips
Don’t have weights? No problem
Dumbbells can be expensive, and if you don’t train at a gym, you need alternatives. While we do have some out of the box bodyweight only band lateral raise variations for you later in this guide, bands are the most practical. They’re also more affordable, and portable. So you never have an excuse as to why you can train delts with limited equipment.
But even if you train at a gym, you may be too exhausted from heavy presses and other movements to include a few sets of focused side lateral raises. You can also do them at home using your bands when you have free time.
Drawbacks of Band Lateral Raises
There are a few potential negatives to consider when including band lateral raises in your workouts. However, none should deter you from doing them because they do have their place.
Bands lack consistent resistance
A problem absent in free weights, cables, and machines, bands do not provide the same challenge throughout the entirety of a repetition. The aformentioned tools are superior if you train at a gym, but having access to them is not always possible. And that’s okay! All tools can be valuable, and you can always use heavier bands. Plus, the more advanced you are, the more you can make bands work in your training program.
Can’t see the numbers
If you train at home, then the numbers don’t really matter as much as they do if you train at a gym, and are serious about tracking your poundages. With bands, you have to consider foot placement, hand placement, band quality, band wear and tear over time, etc. But you can note all of these things and make adjustments to maximize your band usage.
Common Mistakes When Performing Band Lateral Raises
It’s normal that a beginner exerciser trains below their potential. But these guides are designed to help you avoid common mistakes, and get straight to the good stuff.
Using bands that are too heavy
It’s very common that exercisers, especially beginners use bands that are above their strength capabilities. If you’re stepping on the band with one foot and you are straining to raise your arms, you need a lighter band. You won’t make progress this way and you’ll mess up your shoulders.
A lot of times, when people do band lateral raises, they don’t adjust their stance to give them an optimal workout. While we mentioned it before, move your feet closer together, or use one foot to lighten the resistance. If band raises are too easy for you, spread your feet out wider.
7 Variations and Alternatives of Band Lateral Raises
Here are some different, yet similar exercise variations that mimic band lateral raises. They all work, and will give you more rounded delts. However, we love to use a variety of movements to prevent boredom, and stimulate the same muscles with a different technique, which should maximize your muscular potential.
Single arm band lateral raise
Some exercisers prefer single arm lateral raises because it allows them to focus their attention on one delt at a time. While you can just alternate raising your arms while standing on the band with both feet, you can do cross body lateral raises. To do it, you’ll step on the band with either foot, and then use the opposite side arm to perform the exercise. There are several different ways to do it.
Dumbbell lateral raise
Dumbbell lateral raises will always be a classic variation. But a big supposed form flaw is lowering the arms too far down, and taking tension off the delts. Instead, most experts recommend performing lateral raises in a sweet spot.
You can also use weight plates, or anything two object of similar weight that you have lying around.
Steps
Hold your dumbbells together in front of your body with your palms facing each other, and keep your elbows slightly bent.
Then bend your knees and hips, and lean your upper body slightly forward. Tense your core muscles for stability.
Now, raise your arms up and out to the sides until the weight is about head level. Keep your hands higher than your elbows. Slowly lower the weights back down and repeat for the desired number of repetitions.
Cable lateral raise
In many ways, cable lateral raises are better than all of the other variations. It’s the combination of a numbered weight stack, constant muscle tension at every range of motion (if done correctly), various handle/attachment options, and freer range of movement than machines.
Step
Attach a single-grip handle to the lowest point of the cable pulley system.
Stand sideways to the cable pulley and grip the handle with the outside hand.
Either hold onto the cable system and lean away from it or take a step away and remain upright. The cable should have tension before you begin.
Hold the handle in front of or behind your body so that you feel a slight stretch in the delts.
With elbows slightly bent, raise your arm to shoulder level, leading with the elbow.
Slowly lower your arm back down until you feel a stretch in your delts and repeat. Don’t forget to do both sides.
Machine lateral raise
The best option if you don’t want to think too much, just select the weight and go. Lateral raise machines typically have arms with handles that move in a predetermined path, so you don’t have to stabilize the weight. If your gym has one of these machines, we see no reason not to use it.
Bodyweight wall side delt raise
If you don’t have weights, try this variation, as well as the exercise listed below this one. They use just your body weight to train the side delts, but you have to do them correctly, otherwise you can hurt yourself. So, we only recommend them for those with some training experience, and a good understanding of proper form.
Steps
Stand sideways to a wall with your feet together and roughly twelve inches away from the wall.
Then bend the arm closest to the wall at a roughly 90 to 45 degree angle, ball your fist, and lean your body against the wall. Keep your body upright.
Now tense your core muscles, and use your delts to push your body away from the wall. At this point, you can adjust your footing closer to the wall if it’s too hard, or move your feet farther away to make the exercise more challenging.
Complete the set by performing the desired number of reps, then switch sides and repeat. Make sure to alternate to train both sides equally.
You can also do this exercise on a rack or slippery surface like this example.
Side plank lateral raise
A genius idea to train your side delts using your body weight, Jeff Cavaliere of the popular YouTube channel Athlean X introduced this gamechanging variation a few years ago, and it’s a keeper for sure. Rather than lift your arm away from your body, your body is rotating away from your arm. So it essentially does the same thing, just using opposite movement. And your core will also get a great workout.
The drawback is that you need to be decently strong to move a portion of your body weight using your deltoids. There’s no lightening the load or picking the resistance.
Steps
Get in a standard plank position, propped up on your forearms and toes. Your body should form a straight line from head to toe, and you should be looking straight down at the floor.
Now rotate your torso to either side while pushing your forearm into the ground. Your upper body should resemble a side plank.
Return to a standard plank position, but don’t touch the other forearm to the floor. Repeat for the chosen number of reps and switch sides, and do the same thing.
Pro tip: Collapse your body to your left or right side, allowing your body weight to fall onto either shoulder during the negative phase of the exercise, if you want to stretch your delts, as shown in the video example below.
Note: Because of the potential complexity of this variation, we highly recommend watching the following video demonstration, as this exercise can be hard to replicate via written instructions alone.
Shoulder presses
An alternative method of hammering your outer delts is to do overhead presses with your elbows mostly lateral to your body. This guide will show you proper overhead pressing technique for building insane shoulders.
FAQs
Check out the following questions and answers section below, to help you program band lateral raises effectively.
How many sets and reps are best for band lateral raises? Here are the general recommendations for optimal sets and reps based on the desired goal. However, keep in mind, experience, and individual programming will ultimately determine the ideal sets and reps.
Additionally, lateral raises are best performed in a moderate to higher rep range due to the risk of should injury. Therefore, we do not suggest using maximal weight in a 3-5 rep range.
Remember to use a band resistance that challenges you, especially during the last several reps.
Hypertrophy/muscle gains: 2-4 sets x 8-20 reps
Strength focused: 6-8 reps
Muscle conditioning and hypertrophy: 2 sets x 25+ reps
What is the best type of resistance band to use for this exercise? Any long standard resistance band will work whether it’s a looped band or one with handles at the ends. Use what you have, but make sure the resistance is suitable for your experience level.
Wrapping Up
If you want impressive delts that draw eyes, then you need to prioritize shoulder training. That means including isolation work, specifically in the form of lateral raise variations. If you can’t train at a gym, and need a simple, portable way to get the job done, look to resistance band lateral raises.
They’re a great option for dialing in side delt gains, and you can always move up in band strength to continue making progress. Of course, bands do have their drawbacks, but they’re still worth every bit of use.
Penguin Taps Exercise Guide: How To, Benefits, Muscles Worked, and Variations
Don’t let the name of this exercise fool you. Penguins are cute; this exercise is not. The penguin taps exercise focuses on your midriff. The irony here is penguins are far from the most shredded animals. With that said, if you do their namesake exercise for long enough, you’ll have a magazine-cover-worthy midsection. The penguin…
A Dozen Lateral Raise Variations for Wider Shoulders
Wide, defined shoulders are the trademark of a quality physique. They’ll make you look great, whether you’re wearing a tank top or a suit. Well-developed shoulders do more than give you an athletic look. They also enhance your posture, improve your athletic performance and reduce your risk of injury.
To develop width in your shoulders, you need to target the lateral head of the deltoid. The most effective way to do that is with the lateral raise, which moves the muscle through its full range of motion. There are many ways to do the exercise, some of which are more effective than others.
In this article, we examine a dozen different variations of the lateral raise. We’ll show you how to do them for optimal benefit and how to include the lateral raise into your shoulder training routine.
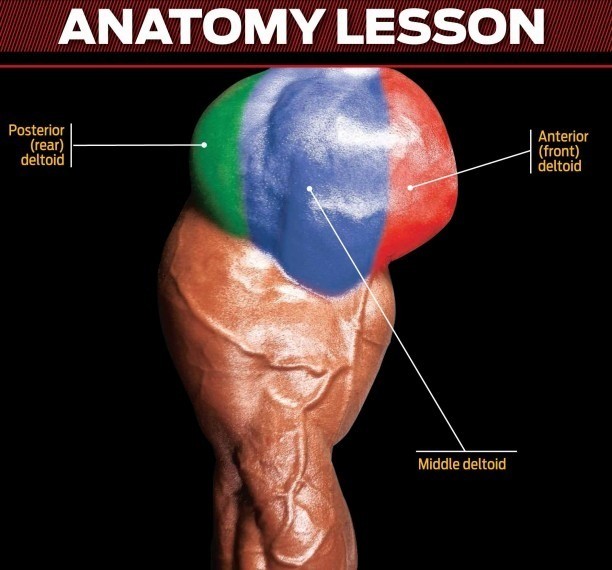
Shoulder Anatomy
The shoulder muscle consists of three heads, each with a different point of origin. That allows each of the three heads to have its own function and range of motion.
That is why you need to be doing specific exercises to target each of the three deltoid heads:
Our focus is on the lateral, or side, delts. So, let’s zoom in on the anatomy of that part of the shoulders.
The lateral head originates on the outer edge of the acromion process. This is where the shoulder blade, clavicle, and humerus (upper arm) join. The lateral head muscle fibers then run down the middle of the shoulder to insert into the deltoid tuberosity at the top of the upper arm. So, we could say the lateral delts make up the ‘meaty’ middle part of your shoulders.
The function of the lateral head is to raise the arms sideways. In technical terms, this is known as ‘lateral abduction of the humerus.’ This action contracts or shortens, bringing the muscle insertion to the origin.
The best exercises to develop the lateral head of the deltoid must follow the natural movement, which is to lift the arms up to the side from a position when the arms are alongside the torso to a point where they are perpendicular to the torso.
That leads us directly to the lateral raise.
Optimized Lateral Raise Form
Spend enough time in the gym, and you will see people doing the lateral raise in all sorts of ways. When we focus on the biomechanics of the muscle, though, we can identify some key form points. The first has to do with how high you should raise your arm.
The main goal of an exercise should be to take the muscle fibers from a point where they are fully extended (or lengthened) to the point when they are fully contracted (or shortened). That point of full contraction with the lateral delt is reached when you bring the arms up to a point where the arm is almost perpendicular.
However, you need to ensure that you keep the shoulder blade static and do not lift it. If the shoulder blade is allowed to rise during the movement (as when you shrug your shoulder blades), then the origin of the lateral deltoid moves away from the upper arm. This makes it hard to contract the muscle.
If you are used to bringing your arm up higher than a point where it is perpendicular to the torso, you should stop doing that. The range of motion of the lateral head is complete when the fibers are fully shortened and so fully contracted when you reach a point about 10-20 degrees less than perpendicular to the torso. If you come up any higher than this, you are actually taking the stress off the lateral head and reducing time under tension.
The start position of the lateral raise should see your arm right at your side. Many people begin with the hand in front of the torso. However, this slightly distorts the shoulder joint without any benefit to the lateral deltoid — it is already fully extended with your arm by your side.
Key Points:
Start with your arms by your side
Finish 10-20 degrees short of a perpendicular arm position
Do not shrug the shoulders — keep the shoulder blade static
12 Best Lateral Raise Exercises
The lateral raise is a simple movement that can be done with a wide range of training equipment, from cables to dumbbells and resistance bands. There are also angle variations that work the lateral delt slightly differently. Here are twelve ways to do this exercise to add width to your frame.
1. One-Arm Cable Lateral Raise
The one-arm cable lateral raise is my favorite lateral raise exercise. That’s because the cable resistance evens out the resistance curve. When you do the exercise with dumbbells, there is very little resistance at the start of the exercise and a whole lot of resistance at the top of the movement. With cables, however, there is a more even resistance curve, so you are challenged throughout the entire range of motion.
For maximum lateral deltoid engagement, set the height of the pulley to about the same height as your wrist in the start position. This means the cable will be perpendicular to the forearm in the first phase of the exercise. This angle makes the exercise hardest at the start of the exercise, where the muscle is strongest, and lightest at the end of the movement, where the muscle is weakest. This is known as early phase loading.
Steps:
Set the pulley on a cable machine to the height of your wrist.
Stand side on to the cable machine, about two feet away from the pulley.
Grab the pulley handle with your outside hand and assume a start position with your hand touching your outer thigh. Place your other hand on your hip and have your feet shoulder-width apart.
Pivot from the shoulder joint to bring your arm directly out to the side, stopping about 19 degrees short of a perpendicular position. Do not bend the elbow or lift the shoulder blade.
Lower under control and repeat.
2. Landmine Lateral Raise
The landmine lateral raise allows you to work the lateral delts through their full range of movement with the added benefits of greater core stability and grip strength development.
Steps:
Place an Olympic barbell into a landmine attachment and load a relatively light weight onto the bar.
Stand side-on to the bar with your feet shoulder-width apart and grab the bar with your closest hand.
Assume a starting position with your straightened arm in front of your torso.
Pivot from the shoulder joint to bring the bar up and out to the side to full arm extension.
Lower and repeat.
3. Dumbbell Side Lateral Raise
The dumbbell side lateral raise does an excellent job of moving the side deltoid through its full range of motion, from arms alongside the body position to up to a perpendicular position to the torso. Be sure to have your elbows slightly bent but locked in position throughout the exercise. The only movement should be through the shoulder joint. Don’t use a weight that is too heavy, or you’ll be forced to swing, and make sure you control the dumbbells all the way down to prevent momentum.
Steps:
Stand with your feet shoulder-width apart and a pair of dumbbells held at arm’s length.
In the starting position, the dumbbells should be touching your outer thighs with your elbows slightly bent.
Pivot from the shoulder to bring the arms out to just short of perpendicular to the torso.
Lower under control to the start position.
4. Machine Side Lateral Raise
If you are fortunate enough to train at a gym with a side lateral raise machine, you should definitely use it. This version helps you stay strict and keep your range of motion within the maximum muscle stimulation zone for an optimum time under tension. Keep the weight relatively light and focus on feeling the lateral delts burning.
Steps:
Sit on a side lateral machine facing the weight stack. Position the seat so your shoulder joint aligns with the machine’s pivot point. Place your elbows under the pads.
Keeping your spine neutral and your back up against the back pad, press up through the elbows to bring the pads up to a perpendicular position.
Lower under control and repeat.
5. Dumbbell Lateral Raise Hold
The lateral raise hold adds a three-second hold in the top position of the movement. This increases your time under tension, adding an isometric contraction element that will set your lateral delts on fire.
Steps:
Stand with your feet shoulder-width apart and a pair of dumbbells held at arm’s length.
In the starting position, the dumbbells should be touching your outer thighs with your elbows slightly bent.
Pivot from the elbow to bring the arms out to just short of perpendicular to the torso.
Hold this top position for a three-second count.
Lower under control to the start position.
6. Wall Press Lateral Raise
The wall press lateral raise is a strict version of the exercise that helps eliminate momentum and cheating. Press your non-working hand into the wall to stabilize the body.
Steps:
Stand side onto a wall with your inside hand pressing into it. Hold a dumbbell in the other hand alongside your thigh.
Pivot from the shoulder to bring your arm up and out to the side until it is just short of perpendicular to your torso (no higher).
Lower slowly, resisting the pull of gravity.
Stop at the end of the rep so that you do not allow momentum to carry you into the next rep.
7. Kneeling Lateral Raise
Because it eliminates the lower body from the movement, the kneeling lateral raise is a stricter version of the exercise than the standing lateral raise. If you tend to swing when you do the standing version, give the kneeling option a try.
Steps:
Grab a pair of dumbbells and kneel on the floor with the dumbbells at your sides.
Pivot from the shoulder to bring the arms out to just short of perpendicular to the torso. Maintain an upright position with a neutral spine.
Lower under control to the start position.
8. Y Raise
The Y Raise is a very strict version of the lateral raise that eliminates all potential for momentum. This is a popular shoulder rehab exercise when done with very light weights.
Steps:
Set the weight bench to a 45-degree angle and lie face down on it with a pair of dumbbells in your hands. Hang your arms down over the edge of the bench.
Keeping your arms straight, bring them out on an angle to form a ‘Y’ shape in the top position.
Lower under control and repeat.
9. Band Lateral Raise
The band lateral raise is a good option if you don’t have access to a cable machine or dumbbells. Choose a band that will allow you to do around 15 reps without cheating.
Steps:
Stand with your feet shoulder-width apart and a resistance band under your left midfoot. Hold the band with your right hand at your outer thigh. You want the band to be taut in this starting position.
Lift your right arm out to the side, stopping just short of perpendicular to your torso. Do not bend your elbow.
Lower the weight under control back to the starting position.
10. Lying Side Lateral Raise
The lying side lateral is a strict version of the lateral raise. It also provides early phase loading so that the exercise is easier at the beginning than at the end of the movement. This is the opposite resistance curve to the standing dumbbell lateral raise. That’s because the arm is perpendicular to gravity at the end of the movement.
Steps:
Lie on the floor on your side with your legs stacked and a light dumbbell in your upper hand. Hold the weight at arm’s length against your outer thigh. Place your other hand on the floor for support, or use it to cradle your head.
Pivot from the shoulder to bring your arm up to a position just short of being perpendicular to your torso. Keep the shoulder down, and do not bend the elbow.
Lower under control and repeat.
11. 1.5 Rep Lateral Raise
The 1.5 rep lateral raise ramps up the time under tension with the result that you’ll get a greater burn in the delts than the standard rep version. You may have to lighten the weight slightly to keep it strict. This version can be done with any variation of the lateral raise. The following guide uses the dumbbell version.
Steps:
Stand with your feet shoulder-width apart and a pair of dumbbells held at arm’s length.
In the starting position, the dumbbells should touch your outer thighs with your elbows slightly bent.
Pivot from the shoulder to bring the arms out to just short of perpendicular to the torso.
Lower under control halfway down.
Bring your arms back to the top position.
Lower to the start position.
12. Plate Lateral Raise
Don’t have dumbbells or a cable machine? No problem; you can still do the lateral raise with a pair of weight plates. Just make sure the weight is manageable enough that you can still resist the pull of gravity on the way down.
Steps:
Grab a pair of weight plates and stand with your feet shoulder-width apart. Hold the plates in front of your body at arm’s length with your palms facing you. You should have a slight bend in the elbows.
Keeping your arms locked, pivot from the shoulder joint to bring the plates out and up toward shoulder level.
As the plates come up, twist your wrists outward slightly.
Bring your arms up to just short of perpendicular to your torso.
Lower under control.
Shoulder Dumbbell Workout
Here’s a four-exercise workout that hits all three deltoid heads, allowing you to build both size and strength. In addition to the dumbbell side lateral raise, you’ll be doing:
Seated shoulder press for overall delt mass and power
Lying front deltoid press for the front delts
Rear delt flyes for the posterior delts
Here’s a form guide for these exercises:
Seated Shoulder Press
Grab a pair of dumbbells and sit on a bench with back support.
With your feet firmly planted on the floor, bring the weights up to shoulder level, with your palms facing forward. Your elbows should form a right angle. Keep your back slightly arched and your shoulder blades against the back pad.
Press the dumbbells directly overhead, stopping just short of lockout.
Lower under control and repeat.
Lying Front Deltoid Press
Set the pulleys on a double cable pulley machine at hip height while seated.
Position a bench about three feet in front of the machine.
Grab the handles with an underhand grip and sit on the bench.
From a starting position with your hands by your hips, scoop your arms up and forward to touch in front of your body.
Lower under control and repeat.
Rear Delt Flyes
Sit on the end of a bench with a pair of dumbbells in your hands.
Lean down to rest your chest on your thighs.
Bring the dumbbells together behind your legs, with your arms slightly bent..
Pivot from the shoulder joint to bring your arms out and up to shoulder level. Do not bend at the elbows.
Lower under control and repeat.
The Workout:
Exercise
Sets
Reps
Seated Shoulder Press
4
12,10,8,6
Lying Front Deltoid Press
6
30, 20, 15, 10
Dumbbell Side Lateral Raises
6
30, 20, 15, 10
Rear Delt Flyes
6
30, 20, 15, 10
The first exercise, the seated press, is your overall mass and strength builder. You should do four sets that are pyramided from 12 to 6. Add weight on each succeeding set. You should have a rep left in the tank’ on all but the last set of six, which should be an all-out max effort.
The next three exercises each target one of the three heads of the deltoids. The weight should be moderate, and the reps higher than an exercise that hits the entire muscle group. Ranging your reps from 30 to 10 allows you to work both the fast twitch and slow twitch muscle fibers for complete hypertrophy. You do not want to use a weight that you can do for less than 10 reps because it will probably lead to momentum and compromised form on these isolation-type movements.
You should perform this shoulder dumbbell workout twice weekly, allowing three days between sessions. That will provide enough time for the muscle to recover before the next bombardment!
It might seem that doing 22 sets is going overboard on a relatively small muscle group like the shoulders. We need to remember, however, that the deltoids are unique because of the separate origin points of the three heads. That, in effect, means that you are essentially working three different muscle groups in order to hit all three heads.
Wrap Up
The lateral raise is the only exercise you need to build awesome lateral deltoids. That’s because it moves the muscle head through its full range of motion. The biggest problem that I see with this exercise is people going too heavy. You need to use a weight that will still allow you to resist the pull of gravity on the way down. If you can’t, the weight is too heavy.
The best lateral raise variation is the one-arm cable lateral raise. If you’ve got access to a cable machine, I highly recommend using this as your standard movement. Then experiment with the 11 other versions to find the two or three that work best for you and rotate through them to add variety. Use a rep range between 10 and 30, keep it strict, and you’ll be rewarded with the wider, fuller shoulders that you’re aiming for.
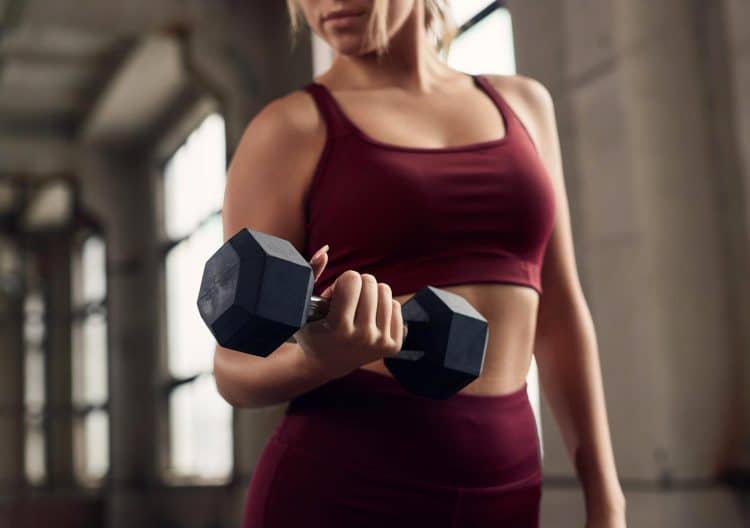
Bicep Curl Drop Set: Pump Your Guns and Maximize Muscle Gain!
The biceps are arguably the most loved muscle group. It is common to hear people skip leg days, but you’ll never hear of anyone missing arm day. Although the biceps curl ranks high on every lifter’s favorite exercise list, only a few have guns worth showing off.
The biceps is a small muscle group, and most lifters rely on curls (an isolation exercise) to add inches to their arms. Nonetheless, only a few succeed.
Usually, exercisers oscillate between doing too little and too much in their arms training regimen. While the first technique lacks training intensity to spark new muscle tissue growth, the latter leads to overtraining. Furthermore, both these techniques lead to a training plateau.
This is where the drop sets come in. Drop sets help increase your training intensity by adding more sets and reps to your training regimen, helping ignite new muscle growth and break through plateaus. Drop sets boost muscle growth by significantly enhancing your target muscle’s time under tension.
To build biceps that surpass people’s imagination, you must put in the work that most people cannot fathom. The bicep curl drop set is a step in the right direction.
The drop set is an advanced training technique that is not for the faint of heart. “Muscle-ripping pump” is a popular term in training jargon. Most lifters throw it around like it’s nobody’s business. The truth is that most trainers have never experienced a “muscle-ripping pump,” unless that is, they try the drop set.
In this article, we go over everything you need to learn about the biceps curl drop set to build bigger and stronger pythons, including the definition, step-by-step instructions, sample biceps drop set workout, its benefits, and tips to make the most of them.
What is a Drop Set?
A drop set is an advanced resistance training technique that helps spark hypertrophy by shocking your muscles through an uptick in training intensity. In a drop set, you perform an exercise with an appropriate weight for the desired number of repetitions, then lighten the load by 10–30% and perform another set to failure without pausing for rest between sets.
The number of reps you will perform will depend on your training objectives. Research has shown that performing 1-3 sets of 8-12 reps of an exercise with an appropriate weight is optimal for building muscle mass. On the other hand, 3-5 sets of 1-5 reps are ideal for building strength. [1]
Training for muscle failure in two non-stop sets fills your muscles with blood and lactic acid, which stretches the fascia and supplies your muscle fibers with the required nutrients for muscle growth.
You could also do a double drop set to take your muscle pumps to the next level. A double drop set involves dropping weights twice in the same set. To do a double drop set, complete a set to failure, lighten the load by 10-30%, and do another set; complete the round by doing another set after reducing the load by 10-30%.
Here is a sample barbell biceps curl double drop set using 95 pounds:
Set 1: 12 reps [95 pounds]
Set 2: Failure (8-12 reps) [85 pounds]
Set 3: Failure (8-12 reps) [65 pounds]
While performing a drop set, you must ensure that you’re following a picture-perfect form. Using momentum or a sleazy form increases your risk of injury as your muscles are already fatigued. You must stop your set as soon as you notice your form slipping.
How to Perform a Biceps Curl Drop Set
The drop set technique can be used for any biceps curl exercise. For the sake of this article, we’ll consider the dumbbell biceps curl. Drop sets require more logistical planning than traditional dumbbell curl sets. Hence, you must ensure that you already have everything you need by your side before you begin the drop set. Stopping to look for weights drops your training intensity and will hamper your muscle-building potential.
Use the following pointers to incorporate the biceps curl into your training schedule:
Choose The Weight
Most lifters are confused about the weights they should be lifting on the biceps curl drop set. While some people bite off more than they can chew, exposing themselves to an injury, others undersell themselves, leaving gains on the table.
As a rule of thumb, you should start your drop set with a weight that allows you to complete 8-12 reps of an exercise with the perfect form. Then, you must not lighten the load by more than 30% for the drop set to ensure optimal small-twitch muscle fiber stimulation. You must choose a weight that allows you to complete 8-12 reps in the drop sets.
For example, if you perform the first set of a dumbbell bicep curl with 45-pound dumbbells, you can only drop the weight to 30 pounds for the drop set. You can then use 20-pound dumbbells for the double-drop set.
Decreasing the weight in small increments (5-10%) can limit the number of repetitions you can perform. You must, however, ensure that you fail in the 8-12 rep range to induce hypertrophy and improve your muscle endurance.
Setup
Many lifters make the mistake of starting the bicep curl drop set without the proper engagement. While doing the dumbbell bicep curl drop set, you should have the 2-3 sets of dumbbells you will use around you and in your reach before starting the exercise.
Looking for dumbbells for your drop sets in the middle of your set will hamper your training intensity. If you wait too long between sets, you’ll end up recruiting your fast-twitch muscle fibers instead of the slow-twitch fibers, beating the purpose of this advanced training technique.
Plan
To make the most of drop sets, you must program them into your workouts strategically. Plan your workouts a week in advance so that you don’t end up using drop sets more than once in a workout and twice a week. Using this training technique too frequently can result in overtraining, increasing your risk of injury and leading you to a plateau.
Training Experience
The ‘advanced’ in advance resistance training technique exists for a reason. Beginners must resist the temptation of using drop sets in their workouts. Furthermore, you should only use it in exercises you have mastered. Experimenting with drop sets in a lift you are still learning increases your risk of injury.
Sample Bicep Curl Drop Set Workout
Given below is a biceps workout that involves a superset of dumbbell biceps curls:
In this workout, we have programmed the drop sets at the end to end the workout on a high. Start with the heaviest dumbbells and do as many reps as possible. Without resting between sets, switch to lighter dumbbells and curl to failure. Lighten the weights again, and work to failure without stopping for rest.
Benefits of Drop Set
Adding the drop set advanced training technique to your exercise regimen entails the following advantages:
Helps Build Muscle Mass
A 2018 study found that drop sets delivered more muscle gains by stimulating slow-twitch muscle fiber growth than the conventional sets during a six-week resistance training protocol. [2]
Drop sets are an incredibly versatile training principle. You could use them in any workout and for any exercise. You can do a drop set at the start of a workout to pre-exhaust your muscles, in the middle of the workout, or at the end to finish your training session with a mind-numbing pump.
Drop sets fill your muscles with blood and lactic acid, which stretches the fascia around the muscle and delivers the required nutrients to the muscle tissue for growth.
Improves Muscle Endurance
Our muscles consist of two types of muscle fibers — slow and fast-twitch. Although conventional strength training exercises are great for engaging fast-twitch muscle fibers, they do little to nothing for the slow-twitch fibers. The slow-twitch muscle fibers are endurance-based, meaning they require a greater time under tension than the fast-twitch fibers to fire up, and this is exactly what the drop sets deliver.
A study published in The Journal of Sports Medicine and Physical Fitness found that a single set of drop set can lead to better muscle gains than three sets of a conventional resistance training exercise. [3]
Time Effective
Drop sets are a great way to get a lot of work done in a short period. Folks that have hit a plateau and need to up their training volume but cannot afford to spend another 30-45 minutes in the gym should turn to drop sets.
Most drop sets take 15-20 seconds to complete. Lifters that generally do 15 sets in a workout can boost their training volume by 20% just by doing three drop sets of an exercise. Not to mention the insane training intensity that can be achieved using this training principle.
Bicep Curl Drop Set Tips
Here are some bicep curl drop set tips to get the best bang for your buck:
Exercise Type
Prefer doing drop sets in isolation exercises like the biceps curl that focus on a single muscle group. Since compound exercises have multiple moving parts, the risk of injury is significantly higher while doing drop sets.
Lifters tend to compromise on their form on compound lifts like the squat when fatigue starts to set in, increasing their odds of injury. It is easier to bail on a bicep curl drop set rep than to get out of a squat mid-rep.
Sets
You should not do drop sets for more than one exercise in a workout, as it can cause muscle overexertion, increasing your risk of injury. Furthermore, avoid doing more than double drop sets at a time.
Notably, ‘run the rack’ is another advanced training technique that is growing in popularity and involves lightening the load until you lift the lightest weight on the rack. It is a drop set variation that should be reserved for advanced athletes. The high volume and intensity of multiple drop sets can result in a lousy form and an unprecedented strain on your muscles, multiplying your injury odds.
Frequency
Since drop sets are so effective in delivering a muscle pump, many lifters tend to overdo them, increasing overtraining risk. Overtraining affects your central nervous system, and depending on your genetics and recovery program, it might take you months to come out of this phase.
You must limit drop set use to one exercise per workout. Furthermore, avoid performing drop sets more than twice weekly to allow your muscle enough time to recover from your high-intensity workouts.
Are Bicep Curl Drop Sets Safe?
Drop sets are an advanced resistance training technique and should not be used by newbies and rookie lifters. As you start incorporating drop sets into your training regimen, it should be done under an expert’s supervision to minimize the risk of injury.
You must then choose an appropriate weight and exercise for the drop set. Use a weight you can control for 8-12 reps per set and an exercise you have mastered. Doing drop sets on an unfamiliar exercise puts you in a delicate position, and a slight misstep can lead to an injury.
Wrapping Up
The bicep curl drop set is an advanced resistance training technique that will push your limits and challenge your muscles like never before. It will increase your training intensity by increasing the time under tension, helping you avoid and break through a training plateau.
Rookie lifters should start with the conventional drop sets, whereas more advanced lifters can utilize the double drop sets to fill their guns with blood and lactic acid. Finally, you must strategically program the drop sets into your biceps training routine. Doing too much too soon can lead to overtraining, which can stall your growth.
References
Krzysztofik M, Wilk M, Wojdała G, Gołaś A. Maximizing Muscle Hypertrophy: A Systematic Review of Advanced Resistance Training Techniques and Methods. Int J Environ Res Public Health. 2019 Dec 4;16(24):4897. doi: 10.3390/ijerph16244897. PMID: 31817252; PMCID: PMC6950543.
Fink J, Schoenfeld BJ, Kikuchi N, Nakazato K. Effects of drop set resistance training on acute stress indicators and long-term muscle hypertrophy and strength. J Sports Med Phys Fitness. 2018 May;58(5):597-605. doi: 10.23736/S0022-4707.17.06838-4. Epub 2017 Apr 26. PMID: 28474868.
Fink, Julius & Schoenfeld, Brad & Kikuchi, Naoki & Nakazato, Koichi. (2017). Effects of drop set resistance training on acute stress indicators and long-term muscle hypertrophy and strength. The Journal of sports medicine and physical fitness. 58. 10.23736/S0022-4707.17.06838-4.
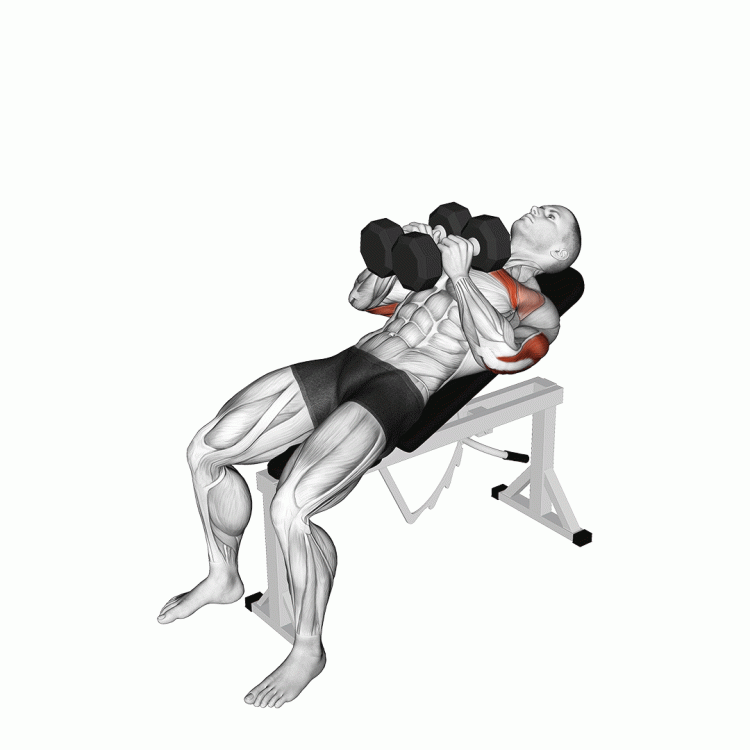
Incline Hex Press Exercise Guide: How To, Benefits, Muscles Worked, and Variations
Nothing says ‘ripped’ better than a striated chest. The problem is that most folks limit their chest workouts to the bench press, dumbbell press, and machine press, and although these exercises are great for building chest size and strength, they aren’t the best to improve your inner pecs.
The dumbbell fly is the most popular free-weight exercise for improving inner chest conditioning. However, it is far from perfect. Most exercisers can only lift half on this exercise of what they can on the dumbbell press. Try to push the envelope on the dumbbell fly, and you’ll feel more tension in your shoulder rotator cuffs and biceps than your pecs.
The dumbbell hex press is the perfect fix to this problem. This exercise requires you to press two dumbbells into each other while holding them over your chest using a neutral (palms facing each other) grip. Since this exercise requires you to squeeze two dumbbells together, it is also known as the “squeeze press.”
The upper chest is a lagging muscle group for most people. Even when lifters succeed in building half-decent upper pecs, their upper inner chest definition is non-existent. The incline hex press fixes this!
The incline hex press promotes a better mind-muscle connection with your pecs as you’ll actively press the dumbbells into each other, leading to a sick muscle pump. The blood carries oxygen and nutrients to the working muscles, boosting hypertrophy.
In this article, we go over everything you need to know about the incline hex press, including its benefits, most common mistakes, muscles worked, and the best variations and alternatives for adding variety to your workouts.
What is an Incline Hex Press?
The incline hex press is a dumbbell press variation that focuses on the upper-inner pecs, which is an underdeveloped muscle group for a majority of lifters. You perform this lift on an incline bench set at a 45-degree angle with the floor.
The hex press got its name from the hexagonal dumbbells that are used to perform this exercise. You could also perform the incline hex press with round plate dumbbells; it can, however, increase your triceps engagement as you’ll constantly have to balance the weights throughout the range of motion.
Since the hexagonal dumbbells have flat sides, they stay in place while you’re squeezing the two dumbbells together. Pressing two round dumbbells into each other can result in the dumbbells slipping.
The incline squeeze press might look finicky, but it will set your inner pecs on fire. Unlike the conventional dumbbell press exercises that limit the pectoral muscle contraction to the top of the movement, the incline hex press keeps your muscles under constant tension throughout the range of motion.
Muscles Worked During Incline Hex Press
The incline hex press works the following muscles:
Chest
The incline hex press primarily works your pectoral muscles. The exercise setup and your hand placement will emphasize your upper-inner chest. You must follow a full range of motion for optimal pec stimulation.
Shoulders
Incline chest press exercises result in anterior deltoid engagement. If you feel greater tension in your front delts than your upper-inner pecs, lower the incline of the bench and slow down your rep tempo.
Triceps
All pressing movements involve the triceps; the incline hex press is no different. Avoid locking out your elbows at the top of the movement to limit your triceps engagement.
Benefits of Incline Hex Press
Adding the incline hex press to your training regimen entails the following benefits:
Build Muscle Mass and Strength
Doing the incline hex press regularly will help develop your upper chest and improve your physique aesthetics. Research has shown that performing 3-4 sets and 8-12 reps of an exercise using an appropriate weight is optimal for inducing hypertrophy. [1]
Keeps the Chest Under Constant Contraction
The incline hex press requires squeezing the dumbbells together throughout the range of motion. Actively pressing the dumbbells together keeps your inner pectoral muscles engaged for the duration of the exercise, resulting in sick muscle pumps. It is also more optimal for inducing muscle tissue growth than exercises where you can only contract your muscles once throughout the ROM.
Boosts Mind-Muscle Connection
Since you are actively squeezing the dumbbells during this exercise, it helps achieve a better mind-muscle connection, delivering better muscle pumps. Furthermore, this enhanced mind-muscle connection will also carry over to other exercises.
Your Elbows are Less Likely to Flare
Many lifters tend to flare their elbows during conventional chest press exercises, such as the barbell bench press and dumbbell bench press. Not only does flaring your elbows remove tension from your chest, but it also overexerts your shoulder rotator cuffs, increasing your odds of injury. Because you’ll be pressing the dumbbells against each other in the incline hex press, your elbows will automatically pull into your sides, allowing better pectoral engagement.
How To Do Incline Hex Press
This is how to perform the incline hex press with the correct form:
Steps:
Set the upper pad of an incline bench at a 45-degree angle with the floor.
Lie supine on the bench with your feet flat on the floor while holding a dumbbell in each hand with a neutral (palms facing each other) grip.
Maintain the natural curvature of your spine, as it will help in better upper pec stimulation.
Hold the dumbbells over your chest and press them into each other.
While pressing the dumbbells into each other, extend your elbows and raise the dumbbells toward the ceiling.
Your arms should be perpendicular to the floor at the top of the movement.
Pause and contract your pecs at the top.
Slowly return to the start position.
Repeat for recommended reps.
Incline Hex Press Tips:
Keep your core braced throughout the exercise. It will improve your balance and stability.
Avoid locking out your elbows at the top, as it will remove the tension from your pecs and put it on your elbows and shoulders.
There should be enough distance between your lower back and the bench for your hand to pass through. This ensures that your chest is raised, resulting in better pectoral engagement.
Keep your chin tucked in throughout the exercise. It will help contract your pecs.
Squeeze the dumbbells as hard as possible throughout the range of motion to get the most out of this exercise and achieve a nasty inner chest pump.
This exercise is as much about pressing the dumbbells into each other as it is about performing the dumbbell press movement.
In This Exercise:
Target Muscle Group: Chest
Secondary Muscle Groups: Shoulders and Triceps
Type: Strength
Mechanics: Compound
Equipment: Dumbbells
Difficulty: Beginner
Best Rep Range:
Hypertrophy: 8-12
Strength: 1-5
Common Mistakes While Performing Incline Hex Press
Avoid these lapses to reduce your risk of injury and make the most of the incline hex press:
Not Squeezing the Dumbbells
Due to being accustomed to the conventional pressing exercises, many lifters tend to focus more on the pressing movement rather than pressing the dumbbells into each other during the incline hex press, resulting in inadequate inner pec engagement.
Pressing at an Angle
Some exercisers push the weights up and in front of their chest during the concentric (upward) motion of the incline chest press. It is more evident in lifters whose shoulders overpower their chest. Pressing the dumbbells at an angle results in greater anterior delt engagement. You must make sure that the dumbbells move vertically throughout the exercise.
Going Too Heavy Too Soon
Lifting too heavy on the incline hex press will limit your range of motion and your ability to squeeze the dumbbells together. You must focus on nailing your exercise form to get the best bang for your buck in this exercise.
Variations and Alternatives of Incline Hex Press
Add the following incline hex press variations and alternatives to your training regimen to build a barrel chest:
Medicine Ball Incline Hex Press
The medicine ball incline hex press involves holding a medicine ball between the dumbbells. This variation allows you to maintain parallel forearms throughout the range of motion, reducing the strain on your shoulder rotator cuffs.
Steps:
Set the back of an incline bench at a 45-degree angle with the floor.
Sit on the bench while holding a dumbbell in each hand using a neutral grip and a medicine ball on your lap.
Squeeze the ball between the dumbbells, lie on the bench, and bring the ball and dumbbells over your chest.
While maintaining the natural curvature of your spine, press the dumbbells toward the ceiling.
Make sure you press the medicine ball between the dumbbells throughout the range of motion.
Slowly return to the start position.
Rinse and repeat.
Pro Tip: Since this exercise requires holding a medicine ball between the dumbbells, ensure you use a weight you can control comfortably. You don’t want the ball crashing into your face between the reps.
Smith Machine Hex Press
The Smith machine hex press is a great exercise for advanced lifters as it allows you to go super heavy. You will need a V-handle bar for this exercise.
Steps:
Place a flat bench under the Smith machine barbell, so it is perpendicular to the bar.
The bench should be placed on one side of the barbell.
Place your upper back on the bench and your feet on either side under the bar.
Adjust the V-handle under the bar so it is above and in the center of your chest. Grab the handle with a supinated grip.
Ask your training partner to unrack the barbell.
Slowly lower the bar to your chest.
Press the bar to the ceiling.
Repeat for recommended reps.
Pro Tip: You must focus on pushing your hands toward each other while performing this exercise to fire up your inner pecs.
Incline Plate Press
The plate press is an excellent exercise for beginners who can’t balance the dumbbells in the hex press and folks who don’t have access to dumbbells.
Steps:
Lie on your back on an incline bench.
Hold a weight plate over your chest between your palms so it is in the center of your chest.
Your hands should be at the center of the weight plate, and the plate should touch your chest at the bottom.
While pressing your hands into the plate, extend your elbows.
Pause and contract your pecs at the top.
Slowly return to the starting position.
Repeat for recommended reps.
Pro Tip: Since you’ll be holding the plate at its center, it will limit your range of motion compared to using dumbbells. You can compensate for it by squeezing your pecs for longer at the top.
Svend Press
The Svend press is a variation of the plate press. It is done standing and involves pressing two weight plates into each other.
Steps:
Stand upright with a shoulder-wide stance.
Hold two 5-10-pound weight plates between your palms.
Press the plates together and hold them in front of your chest.
Extend your arms in front of you so they are parallel to the floor.
Slowly return to the starting position.
Pro Tip: Press your hands actively into the plates throughout the range of motion for optimal inner chest stimulation.
Check out our complete Svend press guide here!
Incline Neutral-Grip Dumbbell Press
Some people experience shoulder rotator cuff discomfort while performing the conventional dumbbell press. The neutral-grip dumbbell press pulls your elbows toward your sides, reducing the strain on the troubled muscles and tendons.
Steps:
Lie on an incline bench while holding a dumbbell in each hand using a neutral grip.
The dumbbells will be at the sides of your chest and over your shoulders at the starting position.
Lift the dumbbells toward the ceiling by extending your elbows. Bring the dumbbells together during the concentric (upward) movement.
Pause and contract your pecs at the top.
Slowly return to the starting position.
Repeat for recommended reps.
Pro Tip: Ensure that the dumbbells are moving straight up and down. Lifting the weights at an angle reduces the tension on your upper pecs and puts it on your front delts.
Check out our complete neutral-grip dumbbell press guide here!
Decline Close-Grip Push-Up
This is an incredibly effective exercise for folks who train at their homes and do not have access to weights. The decline close-grip push-ups focus on your upper inner pecs without overtaxing your joints.
Steps:
Place your feet on an elevated surface like a chair or table.
Place your hands next to each other on the floor. Your thumbs should be touching.
Your body, from head to heels, should be in a straight line throughout the exercise.
Slowly lower your chest to the floor by bending your elbows.
Your chest should be touching or a few inches off the floor at the bottom.
Return to the starting position.
Rinse and repeat.
Pro Tip: Perform this exercise on parallettes to increase your range of motion and better stimulate your inner pecs.
Check out our complete close-grip push-up guide here!
Wrapping Up
The incline hex press is an incredibly effective exercise for working your upper-inner pecs. It keeps constant tension on your target muscles throughout the range of motion without overburdening your shoulder rotator cuffs.
The incline hex press can also boost your mind-muscle connection, which will carry over to other exercises. Add this movement or one of its alternatives and variations in each training session to bring up your inner pectoral muscles. Best of luck!
References
Krzysztofik M, Wilk M, Wojdała G, Gołaś A. Maximizing Muscle Hypertrophy: A Systematic Review of Advanced Resistance Training Techniques and Methods. Int J Environ Res Public Health. 2019 Dec 4;16(24):4897. doi: 10.3390/ijerph16244897. PMID: 31817252; PMCID: PMC6950543.