Tag: abs
Core Workouts To Develop Abdominal Muscles
A strong, chiseled midsection with well-defined abs is a fitness goal that many aspire to achieve. Beyond the aesthetics, a strong core offers many benefits, from improved posture and reduced risk of injury to enhanced athletic performance and functional fitness. However, building a solid midsection requires a focused approach that combines targeted core workouts, […]
The post Core Workouts To Develop Abdominal Muscles first appeared on .

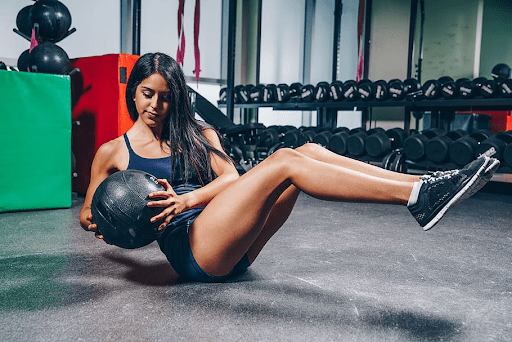
Two Best Love Handle Workouts For Building a Shredded Midriff
Love handles poking through your shirt can be the first sign of trouble. Most people are in denial at first when they start accumulating body fat. They blame their ‘ill-fitting’ shirts for their love handles or consistently tug on their shirts throughout the day to conceal them. Since you’re reading this article, I assume you are guilty of doing at least one of these at some point.
Ignoring these signs can worsen your spare tire situation, and it will require more work in the future to fix. Love handles can be notoriously difficult to lose. These are among the last fat stores to disappear during a fat loss program.
Before we get into the nitty gritty of love handle workouts, let’s get to the basics. Do you know how love handles got their name? I thought so.
Love handles is a colloquial expression that refers to excess fat deposits around the waistline, specifically on the sides of the abdomen and lower back. They got their name as an individual’s partner or loved ones often embrace them around the hips. Furthermore, it is often the body part your partner holds onto during a love-making session. The term ‘love handles’ will never be the same for you from this moment. You’re welcome!
In this article, we go over everything you need to know about love handles, including their causes, the associated risks, the holy grail of losing love handles, the best workouts and exercises, and the best lifestyle tips to see quick results.
What are Love Handles?
Love handles are protruding fat stores that sit above your hip bones and cover your external obliques. They are among the most stubborn areas to lose fat from. “Muffin tops” are a sign of poor physical fitness. Plus, they can hamper your physique aesthetics. The V-taper, characterized by broad shoulders and a narrow waist, is widely regarded as the epitome of aesthetic perfection. Love handles, on the other hand, hamper your shoulder-to-waist ratio.
Genetics, hormonal changes, poor diet, sedentary lifestyle, and overall body composition can influence love handle development. Besides their impact on your overall fitness and aesthetics, love handles can also lead to health conditions, such as cardiovascular disease and diabetes.
Contrary to what most people think, performing a few exercises in the transverse (axial) plane isn’t enough to shed the spare tire. Additionally, you cannot spot-reduce your love handles. You must follow a balanced diet and exercise regimen to achieve overall fat loss.
The love handles can be a tricky area to target with exercises. Performing the exercises with a picture-perfect form is crucial to achieving the desired results. You must also make mindful lifestyle choices to lose the love handles and keep them off.
Causes of Love Handles
Love handles develop as a consequence of weight gain. You gain weight when you are in a calorie surplus for a prolonged period, which includes consuming more calories daily than you expend. Your body converts the food into glycogen to use as fuel. However, your body stores excess glycogen as fat. Love handles tend to be the primary area where surplus fat accumulates in the body.
Besides a calorie surplus, here are the other factors that can cause weight gain — and love handles:
Genetical predisposition
Sedentary lifestyle
Hormonal changes
Age
Gender
Stress
Lack of sleep
Medication
Certain health conditions
Risks of Love Handles
While some may perceive muffin tops as endearing and dismiss them, it is important to acknowledge that love handles can have significant health implications. Here are some potential risks associated with love handles: [1]
Obesity
Increased risk of chronic diseases
Higher chances of contracting cardiovascular diseases
Insulin resistance and diabetes
Metabolic syndrome
Body image and psychological well-being
Kidney disease
The Secret To Losing Love Handles
If eating more calories daily than you can burn leads to excess fat accumulation and love handle development, guess how you can lose the spare tire? Right, by burning more calories in a day than you consume. It is known as a calorie deficit.
Many people believe they can trim their belly fat by doing abdominal exercises and do not need to change their diet. Unsurprisingly, most of these folks never achieve their weight loss goals and end up shopping for new pants and loose-fitting shirts to hide their body fat.
Weight loss ultimately comes down to calories in versus calories out. You can enter a calorie deficit by cutting your calorie intake or burning more calories through exercise. Using a combination of the two will get you the fastest results.
Two Best Workouts To Lose Love Handles
There are two popular ways of training your core. You could do it after a strength training workout to tone your midsection and develop a six-pack. The other method involves performing a high-intensity full-body workout to burn calories and increase fat loss. The HIIT workout is more prevalent among people that want to focus on losing weight, whereas the first type of core workout is favored by lifters that want to build muscle mass and strength.
Core-Strengthening Workout To Lose Love Handles
This type of workout consists of three to four exercises and is done after a resistance training session. Focus on your breathing pattern and contracting your target muscle group with each rep to get the best bang for your buck.
Here is how to perform each exercise in this workout:
Russian Twist
Sit on the floor with an upright torso, your knees bent, and heels on the ground. Lean back until your torso is at a 45-degree angle with the floor. Lift your feet off the floor and extend your arms so they are parallel to the floor and over your knees. Turn to your right side while breathing out. Contract your abs and obliques at the isometric contraction point. Return to the starting point and repeat on the other side. Alternate between sides for recommended reps. Advanced exercisers can hold onto a weight plate to make this exercise more challenging.
Woodchopper
Stand upright with a hip-width stance while holding a dumbbell with both hands in front of your hips. Interlace your fingers around the dumbbell’s handle for a firm grip. Lift the dumbbell across your body and over your right shoulder. Twist your left foot slightly during the upward motion and fix your eyes on the dumbbell. Bring down the dumbbell diagonally across your body so it is at the side of your left knee. Pause and contract your core during the downward motion. Repeat for recommended reps before switching sides.
Bicycle Crunch
Lie on your back on the floor. Hold your hands next to your ears and lift your legs so your thighs are perpendicular to the floor. Bring your left knee toward your chest while reaching across with your right elbow. Pause and contract your core. Return to the starting position and repeat on the other side.
Side Plank
Lie on your side on the floor. Place your elbow under your shoulder and stack your hips and legs. Plant your forearm on the floor so it is perpendicular to your body. Lift your hips off the floor; your body should be in a straight line from head to toe. Place your top hand on your hip. Hold this position for a minute. Without stopping for rest, repeat on the other side.
HIIT Workout To Burn Calories, Boost Fat Loss, and Get Rid of Love Handles
Given below is a full-body high-intensity interval training (HIIT) workout that will spike your heart and metabolic rate. This 17-minute HIIT workout will help you shed excess fat and build a shredded core. Perform two rounds of these exercises and limit rest duration between exercises to 30 seconds. You are allowed a two-minute breathing time after completing the first circuit. Also, do not stop for rest while changing sides in the side plank pulse.
Given below are step-by-step guides to performing these exercises:
High Knees
Stand upright with a shoulder-wide stance and place your hands on your hips. Brace your core, bend one leg, and lift your knee until your thigh is roughly level with the floor. Return the leg to the ground and repeat on the other side. Establish a steady rhythm.
Mountain Climber
Assume the push-up position; your hands should be under your shoulders and legs extended behind you. Your body should be in a straight line from head to toe. Lift one foot off the floor, bend at the knee, and bring it toward your chest. Return it to the start position and repeat on the other side. Alternate between sides in a rhythm.
Plank Jack
Get into the high plank position. Place your hands on the floor under your shoulders. Extend your legs behind you and place your feet together. Maintaining the high plank, jump and place your feet wider than shoulder-width apart. Jump and return to the starting position. Repeat in a rhythm.
Side Plank Pulses
Get into the side plank position so your body is in a straight line from head to toe. Lower your hips to the floor and return to the starting position. Repeat for the recommended reps before switching sides.
Sledgehammer Overhead Strikes
Grab a sledgehammer in front of your body with your left hand at the bottom of the handle and your right hand just above it. Swing the hammer around your right side and behind and over your head. Smash the tire in the center with full force. Switch hands and return the hammer to the overhead position while swinging the hammer around your left side. Repeat for recommended reps.
Cross-Body Mountain Climber
Get into the high plank position. Maintaining your body in a straight line from head to toe, lift one foot off the floor, bend your knee, and bring it toward the opposite shoulder. Contract your core at the top. Return to the start position and repeat on the other side. Perform this exercise using a steady rhythm.
Sit-Up Twist
Lie on your back on the floor, bend your knees, and plant your feet on the ground. Hold your hands next to your ears. Contract your abs and lift your torso off the floor. Turn to your side and bring your left elbow to your right knee during the upward motion. Return to the start position and repeat on the other side.
Most Effective Love Handle Exercises
Sticking to the same exercises can get really boring, really fast. If you dread doing the same movements in every workout, we have got you covered. Below is an exhaustive list of additional exercises that will help tone your love handles. Add these movements to your exercise arsenal to keep your workouts exciting.
Standing Dumbbell Side Bend
Stand upright with a hip-width stance while holding a dumbbell in each hand at your sides. Keeping your elbows locked, brace your core, and slowly lower the right dumbbell as low toward the floor as possible. It should at least be at your knee level at the bottom. Return to the start position. Complete the recommended reps on one side before switching to the other side. Read more about standing dumbbell side bend here.
Oblique V-Ups
Lie on your right side on the floor. Stack your legs while maintaining a slight bend in your knees. Place your right arm on the floor so it is perpendicular to your torso. Hold your left hand behind your head. Lower your head and left arm to the floor behind you; this will be your starting position. In a single motion, lift your legs off the floor and raise your knees toward the ceiling while bringing your left elbow to your knees.
Cable Side Crunch
Set a cable pulley at the highest setting and attach a D-handle bar. Grab the handle with a neutral (palm facing inward) grip and take a big step away from the pulley. Place your other hand on your hip. Holding the handle to your ear, perform a side crunch. Contract your core at the bottom of the movement. Repeat for reps before switching sides.
Read more about cable side crunch.
Side Jackknives
Lie on your left side on the floor; your hips and legs should be stacked. Place your left upper arm on the floor in front of your body so it is perpendicular to your torso. Keep your right hand on your right hip. Lift your right foot toward the ceiling while performing a side crunch. Pause and contract your obliques at the top. Rinse and repeat.
Read more about side jackknives.
Side Plank Twist
Get into the side plank position. Place your top hand behind your head. Your top elbow should be in line with your shoulders at the starting position. Bring your top elbow to the floor under your shoulders while keeping your legs stacked. Contract your core during the lowering movement and hold for a two-count at the bottom. Repeat for recommended reps before switching sides.
Standing Torso Twist
Stand upright with a hip-width stance. Extend your arms in front of your body so they are parallel to the floor. Interlace your fingers and turn to your right side as far as possible without bending your elbows. Twist your left leg during the turn for optimal range of motion and contract your abs and obliques. Return to the starting position and repeat on the other side. Experienced exercisers can hold onto a dumbbell or kettlebell to make this exercise more challenging.
Flutter Kicks
Lie supine on the floor with your legs extended. Place your hands under your hips for leverage. Brace your core and lift your feet a few inches off the floor. Raise your head off the floor. Without bending your knee, lift your right leg toward the ceiling while keeping your left leg in place. Return the right leg to the starting position while lifting the left leg toward the roof. Maintain a steady tempo for recommended reps. More on flutter kicks here.
Side Plank Knee Tucks
Get into the side plank position. Place your top hand next to your ear. Simultaneously, elevate your upper leg towards your chest while bringing your elbow to your knee, all in one fluid motion. Breathe out and contract your abs throughout the range of motion. Return to the start position and repeat for recommended reps before switching sides.
Standing Side Leg Lifts
Stand with your left side facing a sturdy elevated surface like a cable pulley machine. Hold on to the pulley machine with your hand. Hold your right leg slightly in front of your body. Bring the right leg toward the pulley while keeping your knee locked. Raise the leg out to your side as high as possible. Return to the starting position and repeat for recommended reps. You could also perform an oblique crunch during the concentric motion for better muscle contraction.
Side-to-Side Medicine Ball Slams
Place a medicine ball on the floor. Stand upright with a shoulder-width stance so the medicine ball is at your left foot’s side. Bend over and lift the ball off the floor. In a sweeping motion, lift the ball over your head. Raise onto the balls of your feet and slam the ball on your right side as hard as possible. Bend over and lift the ball. Alternate between sides for reps. Learn more about side-to-side medicine ball slams here.
Lateral Band Walk
Wear a loop resistance band around the bottom of your thighs. Take a wide stance so that band is engaged. Bend your knees slightly and hinge at your hips. Hold your hands in front of your chest. Take a wide step to your right side. Walk 10 steps to your right side and return to the starting position. Start with the opposite leg on the subsequent set.
Side Plank with Leg Lift
Get into the side plank position. Raise your top leg as high toward the ceiling as possible. Exhale and contract your core during the upward motion. Hold the position for a two-count. Slowly lower the leg to the starting. Repeat for recommended reps before switching sides. Experienced exercisers can wear ankle weights while performing this exercise for optimal oblique engagement. Also, perform a side crunch to target your love handles.
Side Plank Reach-Throughs
Assume the side plank position. Raise the top arm toward the ceiling so it is perpendicular to the floor; this will be your starting position. Lower your arm toward the floor and thread it between your body and the floor. Breathe out and contract your abs during this lowering motion. Repeat for reps and switch sides.
Clamshell
Lie on the floor on your side. Bend your knees while keeping your hips and legs tacked. Place your bottom arm under your head for support. Place the hand of your top arm on the floor for support. Keeping your ankles stacked, lift your top leg toward the ceiling as high as possible. Hold the contraction for two seconds. Tie a resistance band around your knees for better glute engagement.
Seated Side Bend with Dumbbell
Sit upright on an elevated surface, such as a flat bench, while holding a dumbbell in each hand. Place your feet on the floor wider than shoulder-width apart for better stability. While breathing out, lower the right dumbbell to the floor. Explode back to the starting position. Repeat for recommended reps before switching sides.
More Love Handle Exercises
Here are a few more love handle exercises that will help burn off the spare tire and give you the coveted sex lines:
Cable Woodchoppers
Stability Ball Side Bend
Side Lunge with Twist
Plank with Knee Tucks
Side Plank with Arm Reach
Crunch and Twist on Stability Ball
Side Plank Clamshells
Side Plank with Dumbbell Row
Kettlebell Windmill
Standing Side Bend with Resistance Bands
Heavy Farmer Walk
Single-Arm Dumbbell Row
Box Jump
Floor Wipers
Hanging Windshield Wiper
Tips For Losing Love Handles
Here are a few tips to speed up your fat loss and build a shredded six-pack:
Follow a Balanced and Healthy Diet
Folks serious about losing the spare tire must avoid following a cookie-cutter diet plan. You must follow a personalized diet plan that helps you lose 1-2 pounds weekly. According to the CDC, you must maintain a daily 500-1,000 calorie deficit to achieve this goal. [2]
Use this total daily calorie expenditure (TDEE) calculator to determine your goal daily calorie intake. Then, break it down into a suitable macronutrient split to lose fat and build muscle mass simultaneously.
Exercise
Although training is not mandatory on a weight loss program, it can help speed up your progress. Perform two daily cardio training sessions for optimal results — one HIIT and another low-intensity steady state (LISS).
Seeking professional help can help beginners save time and effort. A personal trainer can give you a customized training program and will teach you the correct exercise form. On the other hand, a registered nutritionist will ensure you are hitting your daily macro and micronutrient goals.
Make Healthy Lifestyle Choices
Losing weight and love handles and keeping them off might require a complete lifestyle change. Folks with desk jobs must add more physical activity to their days. You must choose the stairs over the elevator and bike to work when possible.
Start with a goal of walking 5,000 steps daily and slowly make your way up until you are logging 10,000 daily steps. Staying physically active will help burn calories throughout the day and keep your metabolic rate high.
Stay Hydrated
Drinking water at regular intervals can keep you satiated. Furthermore, it can help curb cravings. Drink at least a gallon of water daily to ensure optimal body functioning and overall well-being. Switch calorie-laden sugary drinks and sodas with plain water to speed up your weight loss.
Adequate hydration can also boost your metabolism. Your body is more effective at metabolizing stored fat and converting it into energy when you are hydrated. It can help improve your fat-burning process. Staying hydrated also enhances digestion and nutrient absorption, supporting your overall weight loss efforts.
Rest
Many people tend to overexert themselves while trying to lose weight and love handles, which can be counterproductive. Remember, you lose weight while you are asleep, and you must give your body enough to recover. Sleep at least seven to eight hours each night for optimal results.
Also, learn to listen to your body. If you are very sore after a workout, it is best to skip a training session and allow your body time to recuperate. Pushing too hard in the gym can lead to overtraining, which can negatively impact your central nervous system.
Avoid Stress
Your cortisol levels rise when you are under stress, which can increase your appetite, slow down your metabolism, and increase fat storage. Chronic stress can lead to greater inflammation, emotional eating, and impaired sleep.
Elevated cortisol levels can make it more challenging to lose weight, even when you are following a balanced diet and training program. Meditation, yoga, and journaling can help deal with chronic stress. However, you must consult a healthcare professional if these three methods don’t work for you.
Set a Goal and Track Your Progress
Starting your transformation journey with a specific, measurable, attainable, relevant, and time-bound goal can increase your chances of success. Having a deadline will also motivate you to stick to your fitness regimen.
You must have long-term and weekly goals. Track your progress every week to ensure you are on the right path. Stick to your regimen if the progress is favorable. Conversely, make necessary adjustments if the needle is not budging in the right direction.
Stay Consistent and Dedicated
Love handles can be a stubborn muscle group. Depending on your current and goal physique, it might take you weeks, if not months, to achieve your objective. Nonetheless, you must stick to your fitness regimen with military discipline and ensure you never miss a training session or meal.
You must also consistently challenge yourself by increasing your training intensity and volume to avoid hitting a plateau. Establishing healthy habits will reduce the friction in your training regimen and help you stick to the fit lifestyle for the long term.
FAQs
Can I lose love handles without exercise?Yes. The love handles vanish when there is a reduction in your overall body fat, which requires you to be in a calorie deficit. You can lose your love handles by limiting your calorie intake. That said, adding exercise to your fitness regime can help speed up your results.
Is it possible to have a flat stomach and love handles simultaneously?Some skinny individuals can also develop love handles, known as skinny fat. Skinny fat can result from several factors, including genetics, sedentary lifestyles, medication, or certain health conditions.
How much time will it take for me to lose my love handles?It will depend on your starting physique and ultimate objective. You cannot spot-reduce your love handles and must work toward overall body fat loss. A 500-1,000 daily calorie deficit can help you lose 1-2 pounds weekly.
Note: The content on Fitness Volt is for informative purposes only. Do not take it as medical advice to diagnose, prevent, or treat health problems. If you’re suffering from a health issue, are pregnant, or are under 18 years old, you should consult your physician before starting any new supplement, nutrition, or fitness routine.
Wrapping Up
Love handles can be stubborn, requiring dedication, determination, and consistency to burn them off. Avoid falling into the spot-reduction trap and focus on reducing your overall body fat to see quick, favorable results.
This article has two highly effective workout routines specifically designed for strength trainers and those engaged in full-body HIIT exercises to effectively target and eliminate love handles. So, what are you waiting for? Lace-up your shoes and get moving. Best of luck!
References
Patel P, Abate N. Body fat distribution and insulin resistance. Nutrients. 2013 Jun 5;5(6):2019-27. doi: 10.3390/nu5062019. PMID: 23739143; PMCID: PMC3725490.
Centers for Disease Control and Prevention. (2021). Losing Weight. Retrieved from https://www.cdc.gov/healthyweight/losing_weight/index.html
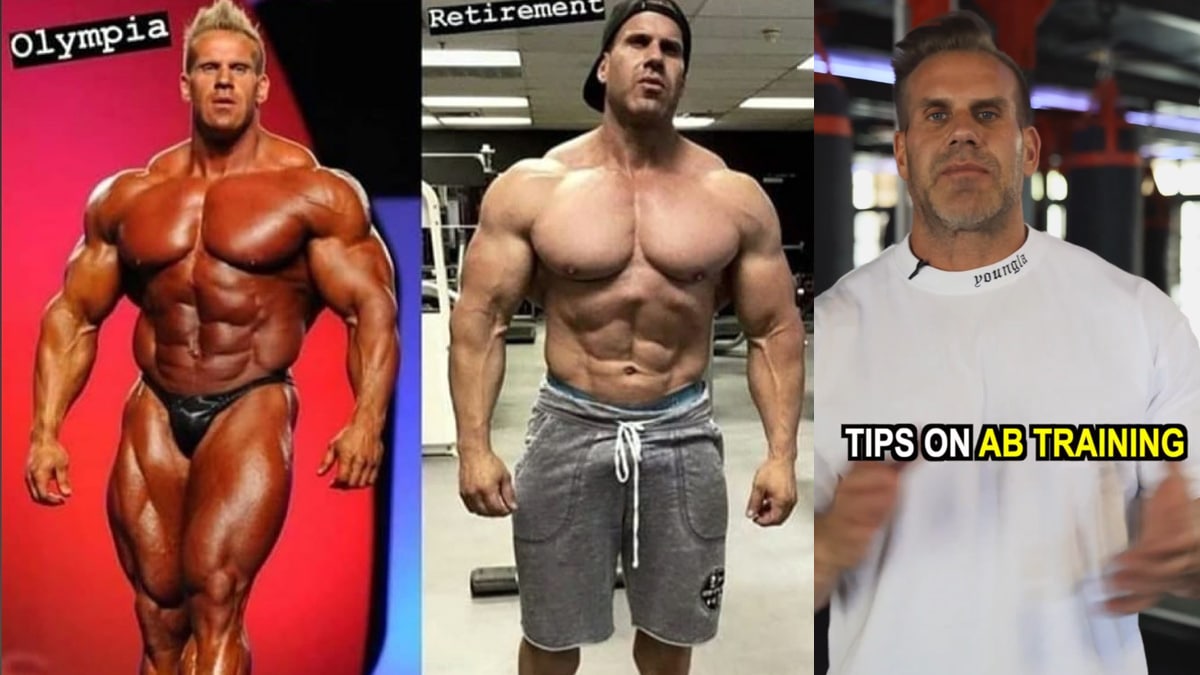
Jay Cutler Offers Tips for Sculpting Abs: ‘Remember You’re Trying to Condition Them, Not Build Muscle’
Bodybuilding legend Jay Cutler has managed to stay in astounding shape as he closes in on 50 years of age. In a recent offering to Instagram, Cutler shared his take on ab training and named crunches, hanging raises, and ropes as his favorite movements.
Jay Cutler was an imposing force during his bodybuilding career. His defined arms, chest, and detailed quads made him very difficult to stand against. He was also consistent and gritty, which helped him win a total of four Mr. Olympia titles. Having dethroned Coleman in 2006, Cutler continued to showcase his massive body on stage with great success. He pushed and defeated a slew of big names in the sport such as Kai Greene, Dennis Wolf, and Branch Warren.
Cutler’s rivalry with eight-time winner Ronnie Coleman was perhaps the most exciting in bodybuilding history. The two men were constantly pushing each other to new competitive heights. Cutler admitted that some of his workouts were inspired by Coleman’s high-volume training style. In addition, Cutler revealed that he was forced to eat 140 egg whites daily to retain enough size to compete with Coleman.
After retiring from bodybuilding, Cutler has kept a close eye on his fitness. He is approaching 50 years old but has maintained a fair balance of muscularity and conditioning. Before his next birthday, Cutler decided to transform his physique.
In the months to come, fans hope to see him guest pose in Aug. at the return of Masters Olympia following an 11-year absence. In his latest venture, he offered fans a quick lesson on ab training with summer abound.
Jay Cutler Gives Ab Training Tips, Says He Prefers Crunches, Hanging Raises, and Ropes
Cutler said he trains abs every other day and always focuses on 15-20 repetitions. He stressed that ab training is intended to condition the muscle, not ‘necessarily build’ it.
“Tips on ab training. I usually train abs every other day, especially when I’m training for a competition. Remember, the abs aren’t going to come out unless the body fat is low. But what is the ultimate rep range for your abs? I always focus on 15-20 repetitions.
Remember: you’re trying to condition the abs not necessarily build that muscle so I feel you need to do those exercises like the the crunches, like the ropes, like the hang raises, focus on 15-20 repetitions, condition the abs, get on the diet, and show the best physique. Summer is here,” Jay Cutler explained.
This isn’t the first time that Jay Cutler has offered up some useful training advice. Days ago, the bodybuilding icon shared an arm-building hypertrophy workout he used to win four Mr. Olympia titles. During the video, Cutler revealed that he was eating six meals daily. He admitted his goal was to achieve a full, round, and hard physique.
Additionally, Cutler is known for helping fans with workout techniques. Whether it’s his top three movements for building huge delts or a strategy for growing forearms and biceps, he understands how to maximize training results.
With his physique goal a primary focus, Cutler discussed ‘getting bigger’ and leaner without bulking recently. The 49-year-old said it’s a misconception that bulking diets are needed for adding quality size. However, Cutler mentioned that if leanness is the goal, then measures like fasted cardio and morning workouts would be best implemented.
As for PEDs, Cutler shared that he will only use testosterone replacement therapy for his latest transformation. When more extreme compounds like Trenbolone were discussed on his podcast, Cutler said he wasn’t interested.
RELATED: Jay Cutler, Milos Sarcev Talk Fantasy Battles: Jay vs Dorian Yates, Phil Heath vs. Ronnie Coleman
Jay Cutler is a living legend of the sport with a wealth of training knowledge. His ab workout tips are simple but effective, and they can help anyone achieve a shredded midsection.
Published: 13 June, 2023 | 4:44 PM EDT
30-Day Abs Challenge for A Rock-Hard Core
Most decent fitness information revolves around building good long-term diet and workout habits. This makes a lot of sense, as fitness and health should be life-long pursuits. Sadly, you cannot store fitness, and your strength and conditioning will soon decline if you stop working out or eating healthily.
There is a reason that ex-athletes often look so out of shape – they stopped training.
So, in most cases, long-term consistency will always beat short-term fitness fixes. That said, there is a time and a place for workouts and diets that are only meant to last a few weeks. Things like 30-day push-up challenges or 14-day diets can help restore lost momentum and bust through plateaus.
Short-term workout challenges and diets can also test and develop your willpower and intestinal fortitude, or guts. You’ll undoubtedly feel a sense of satisfaction on reaching the end of one of these challenges, which can be a reward in its own right.
This 30-day abs challenge will give you a hard, strong core and could even take you a few steps closer to developing a shredded six-pack.
Abs Anatomy Basics
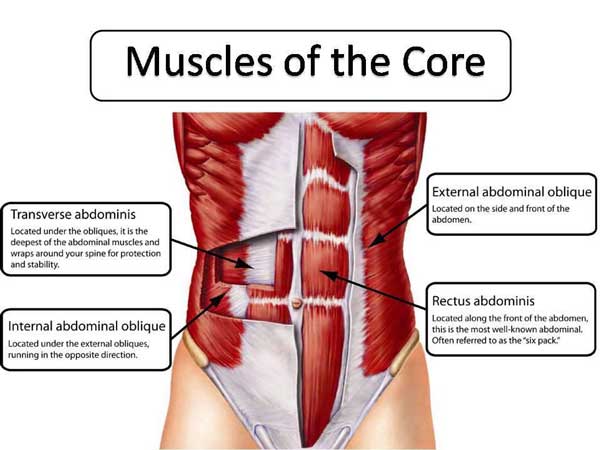
So, what muscles will you be working during this 30-day abs challenge? Rather than focus just on those at the front of your abdomen, this workout is designed to work all the muscles that encircle your waist and make up your core:
Rectus abdominis – located at the front of your abdomen, this is your six-pack muscle, although you’ll need to be pretty lean to see it. The functions of your rectus abdominis are flexion and lateral flexion of your spine. It also plays a part in compressing your abdominal contents.
Obliques – there are two sets of oblique muscles: internal and external. They work together to laterally flex and rotate your spine. The obliques are basically your waist muscles.
Transverse abdominis – encircling your midsection like a weightlifting belt, the TVA compresses your abdominal contents to produce intra-abdominal pressure, or IAP for short. This pressure helps stabilize your lumbar spine from within.
Erector spinae – the erector spinae is a group of three muscles that run up either side of your back. Together they extend and stabilize your lower and upper spine.
30-Day Abs Challenge – Program Overview
This is an abs specialization program. That means you’ll be working your abs more frequently than usual and with more volume and intensity than you’re probably used to. However, you won’t be training your abs every day, which could lead to injury and overtraining. Instead, you’ll be hitting your abs four days a week for one month straight.
It’s up to you on which days you train, but it’s generally best to avoid doing all your abs workouts in a row. We don’t want you to work your abs Monday, Tuesday, Wednesday, and Thursday.
Instead, separate at least a few of your abs workouts with a different form of training or a rest day. For example:
Monday – Abs Workout
Tuesday – Cardio/Strength Training
Wednesday – Abs Workout
Thursday – Abs Workout
Friday – Cardio/Strength Training
Saturday – Abs Workout
Sunday – Rest
Each workout contains four exercises so that you work all your core muscles equally. Each week involves different, more demanding exercises to ensure your core strength increases over the coming 30 days. The workouts themselves are also progressive, and the volume/intensity builds up over the course of the month.
In terms of equipment, you don’t need much to complete this 30-day abs challenge. In fact, you can do this challenge at home with a few items of basic workout gear.
However, you will need:
Exercise mat
Ab wheel or a barbell and weight plates
Resistance bands
Stability ball
Pull-up bar/captain’s chair
Medicine ball or dumbbell/kettlebell
Finally, this 30-day workout challenge is not designed for beginners. Instead, it’s aimed at intermediate or advanced exercisers looking to take their core conditioning to a new, higher level. Beginners should follow a less intense workout plan that focuses on building basic core strength.
30-Day Abs Challenge – Week One
Week one of our 30-day abs challenge starts with some fairly basic exercises and a moderate level of volume and intensity. Think of this as your warm-up week. Do three sets of each exercise, resting 60-90 seconds between efforts. However, regarding reps, continue each set until the target muscles start to fatigue. The reps quoted in the chart below are for guidance only.
#
Exercise
Sets
Reps
Recovery
1
RKC plank
3
20-30 seconds
60-90 seconds
2
Stability ball crunch
3
15-20
60-90 seconds
3
Reverse crunch
3
15-20
60-90 seconds
4
Side plank
3
15-20
60-90 seconds
1 – RKC Plank
Unlike regular planks, RKC (Russian kettlebell challenge) planks are designed to fatigue your abs as fast as possible. Brace and contract your core as hard as you can; seek failure, and don’t wait for failure to come to you! If you feel that you can go for more than 30 seconds, you weren’t bracing hard enough.
Steps:
Lie on the floor and rest on your elbows and forearms. Clasp your hands together if you wish. Brace your core and pull your shoulders back and down.
Lift your hips up so your body is straight. Contract your hands, arms, chest, shoulders, legs, and glutes.
Without holding your breath, contract your core as hard as possible.
Hold for as long as you can but, if you can do more than 30 seconds, you weren’t bracing hard enough.
Tips:
Rest your elbows on a folded mat for comfort.
Imagine you are trying to drag your toes toward your elbows to maximally engage your abs.
Do not hold your breath, as doing so can cause your blood pressure to rise.
2 – Stability ball crunch
While floor crunches are fine, they have a short range of motion, so they’re too easy for fitter, more experienced exercisers. Using a stability ball makes crunches much more challenging, especially now your abs are tired from the RKC planks.
Steps:
Sit on your stability ball. Walk your feet forward and lean back until the ball fills the curve of your lower back. Place your hands on your temples and brace your abs.
Press your lower back into the ball, curve your spine, and lift your upper back up to form a C shape.
Lean back, get a good stretch in your abs, and repeat.
Tips:
Make this exercise harder by holding a weight behind your head or across your chest.
Exhale as you lift your shoulders to maximally engage your abs.
Pause at the top of each rep for a more effective workout.
3 – Reverse Crunch
There is no such thing as upper abs vs. lower abs. Instead, your rectus abdominis is one long, flat muscle. That said, it is possible to use your abs to lift your shoulders or lift your hips by engaging different groups of muscle fibers. Reverse crunches tend to emphasize the lower fibers of the rectus abdominis, but the upper fibers are working, too.
Steps:
Lie on your back with your legs bent and feet in the air. Place your hands on the floor next to your hips.
Press your lower back into the floor and lift your hips off the floor. Pull your knees toward your shoulders.
Lower your hips and legs back down and repeat.
Tips:
Avoid pressing with your arms, which takes work away from the target muscles.
Exhale as you lift your legs to increase abs engagement.
Pause at the top of each rep to make this exercise more challenging and effective.
4 – Side plank
Where regular planks emphasize your rectus abdominis, side planks hit your obliques more. Most people find side planks harder than front planks, which makes sense given that the obliques are much smaller than the rectus abdominis muscle.
Steps:
Lie on your side so your body is straight and your hips and shoulders are square. Rest on your lowermost forearm and elbow. Brace your core.
Lift your hips and then hold them up for the required duration.
On completion, lower your hips to the floor, roll over, and repeat on the opposite side.
Tips:
Do not hold your breath, as doing so can cause your blood pressure to increase.
Lift your uppermost leg to make this exercise more challenging.
You can also do side planks with your supporting arm straight, like this:
30-Day Abs Challenge – Week Two
Week two of our 30-day abs challenge builds on what you achieved in week one. The exercises are slightly more difficult, so you should be ready to work a little harder. Your interset rest periods are also a little shorter. As before, reps are quoted for illustrative purposes only. Do as many reps as it takes to fatigue the target muscles.
#
Exercise
Sets
Reps
Recovery
1
Stability ball stir the pot
3
15-20
45-75 seconds
2
Serratus crunch
3
15-20
45-75 seconds
3
Hanging knee raises
3
15-20
45-75 seconds
4
Russian twist
3
15-20
45-75 seconds
1 – Stability ball stir the pot
Planks on a stable surface are fine, but you’re probably ready for a more challenging abs workout. Stability ball stir the pot is a much more dynamic and challenging way to do planks. This is an exercise you’ll love to hate!
Steps:
Place your forearms on a stability ball and then walk your feet out and back so your body and legs are straight. Brace your core.
Without dropping your hips, make small circles with your arms, alternating between clockwise and counterclockwise.
Keep your body extended and your core braced throughout.
Tips:
The larger the ball, the less challenging this exercise becomes.
Make larger circles to increase instability and make this exercise harder.
Move your feet further apart to make stir the pots a little easier.
2 – Serratus crunch
The serratus crunch is so-called because, as well as working your rectus abdominis, it also hits your serratus anterior muscles. While not strictly part of your core, these small but visually impressive muscles can add a lot to your appearance. Needless to say, this exercise also overloads your abs.
Steps:
Lie on your back with your legs bent and feet flat on the floor. Hold a weight in your hands (medicine ball, dumbbell, kettlebell) and extend your arms so they’re vertical. Press your lower back into the floor.
Contract your abs and lift your head and shoulders off the floor. Reach up with your arms as if you’re trying to touch the ceiling.
Lie back down and repeat.
Tips:
Exhale as you lift your shoulders to fully engage your abs.
You can also do this exercise with your legs raised.
Don’t go too heavy too soon; this exercise works best when you focus on the movement rather than the load.
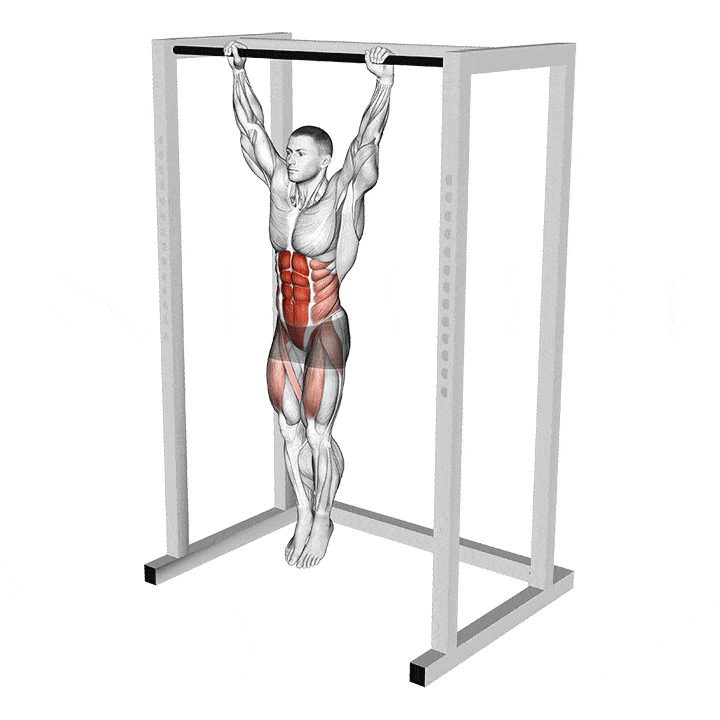
3 – Hanging knee raises
Like reverse crunches from last week’s program, hanging knee raises target the lower fibers of your rectus abdominis. However, lifting the entire weight of your legs makes this exercise much more challenging. On the downside, you will need a pull-up bar or captain’s chair to do this exercise.
Steps:
Hang from your pull-up bar with your arms straight. Alternatively, rest on your elbows on a captain’s chair station. Brace your abs.
Without using momentum to help you raise your legs, bend your knees and lift them up until they’re higher than your hips.
Lower your legs under control and repeat.
Tips:
Use lifting chalk or wrist straps if your grip fails before your abs.
Do not swing your knees up. Instead, move slowly and deliberately to keep the tension on your abs.
Too easy? Clamp a dumbbell between your feet to make this exercise more demanding:
4 – Russian Twist
It’s not really clear why Russian twists are so-called because they don’t have anything to do with Russia. Regardless, they’re a challenging and effective oblique and rectus abdominis exercise that most people love and hate in equal measure.
Steps:
Sit on the floor with your legs bent and feet flat.
Lean back until your body is inclined to about 45 degrees.
Extend your arms out in front of you at shoulder height.
Rotate your upper body as far as possible to the left and right. Do not lean back or lift your torso; keep the angle the same.
Continue for the specified number of reps.
Tips:
Hold a dumbbell or kettlebell to make this exercise more challenging.
Anchor your feet if necessary.
Maintain a neutral spine throughout. Do not round your lower back.
30-Day Abs Challenge – Week Three
Week three sees an increase in training volume as you progress from doing three sets of each exercise to four. There is also a slight increase in exercise difficulty. Don’t worry – you can handle it. And congratulations on reaching the halfway stage of this four-week challenge!
#
Exercise
Sets
Reps
Recovery
1
Ab wheel rollout
4
15-20
45-75 seconds
2
Bicycle crunch
4
15-20
45-75 seconds
3
Straight leg lifts
4
15-20
45-75 seconds
4
Resistance band Pallof press
4
15-20
45-75 seconds
1 – Ab wheel rollout
Ab wheel rollouts are a sort of moving plank. With this exercise, you extend your arms out in front of you to create a long lever which puts a lot of tension through your abs. This is a challenging core exercise, but after two weeks of intense core training, you are ready for it!
Steps:
Kneel down and place your ab wheel on the floor in front of your knees. Hold the handle with an overhand grip, arms straight, and core braced.
Push the ab roller away from you and lower your body toward the floor. Take care not to hyperextend your spine.
Use your abs and lats to pull the roller back to your legs and repeat.
Tips:
Shorten your range of motion if you feel this exercise in your lower back.
Kneel on a folded exercise mat or foam pad for comfort.
You can also do this exercise from standing. However, this is MUCH more demanding:
2 – Bicycle crunch
The bicycle crunch is a tough but popular abs exercise. It involves all your significant core muscles, as well as your hip flexors. Done slowly and through a full range of motion, this exercise will challenge even the strongest exerciser.
Steps:
Lie on your back with your legs straight and your hands on your temples. Press your lower back into the floor and lift your feet a few inches off the floor. Keep them up for the duration of your set.
Lift your head and shoulders and bend one leg. Twist and touch one knee to the opposite elbow.
Return to the starting position and then repeat on the opposite side.
Continue alternating for the duration of your set.
Tips:
Start with legs bent and feet on the floor to make this exercise more manageable.
Take care not to pull on your neck, which could lead to injury.
Try to touch the outside of your elbow to the outside of your knee to hit your obliques harder.
3 – Straight leg lifts
Straight leg lifts are a low-tech but high-effect abs exercise. Like hanging knee raises, they target the lower fibers of your abs and hip flexors. Doing straight leg raises after bicycle crunches will be a special kind of core-training hell!
Steps:
Lie down and press your lower back into the floor. Lift your feet a few inches off the floor. Rest your arms on the floor next to your hips.
Without using your arms for assistance, raise your legs up until they’re vertical.
Lower your legs down until your feet are a few inches above the floor and repeat.
Tips:
Keep your lower back pressed into the floor throughout. Do NOT allow your back to arch.
If necessary, place your hands under your butt to help keep your back flat.
Bend your legs to shorten the lever and make this exercise easier. You can also try raising one leg at a time.
4 – Resistance band Pallof press
The Pallof press is an anti-core exercise, meaning it works your muscles without involving any movement. Don’t let this put you off; the Pallof press is still a great way to work your abs, especially your obliques.
Steps:
Attach a resistance band to a chest-high anchor.
Grip the end of the band and stand sideways onto your anchor point. Hold your hands in front of your chest.
Stand with your feet about shoulder-width apart, knees slightly bent.
Extend your arms in front of you, noting how the tension on your core increases. Do NOT allow your torso to twist.
Bring your arms back in and repeat.
Do the same number of reps on both sides.
Tips:
Stand further away from your anchor point to put more tension on the band and make this exercise harder.
You can also do this exercise with a cable machine.
You can also do this exercise in a half-kneeling position for variety:
30-Day Abs Challenge – Week Four
Week four is graduation week, and we’re going to finish strong! As well as introducing another four new core exercises, you’ll also get shorter rests between sets, turning the intensity up to the max. Keep pushing hard all the way to the end, and keep reminding yourself it’s the final week of workouts.
#
Exercise
Sets
Reps
Recovery
1
Renegade row
4
15-20
30-60 seconds
2
V-sit
4
15-20
30-60 seconds
3
Flutter kick
4
15-20
30-60 seconds
4
Saxon side bend
4
15-20
30-60 seconds
1 – Renegade row
Renegade rows were invented by NFL strength and conditioning expert John Davies. It is a plank variation that also involves an anti-rotation element. It’s a challenging exercise, so don’t go too heavy too soon!
Steps:
Adopt the push-up position with a dumbbell in each hand. Your arms, legs, and body should be straight. Brace your core, and pull your shoulders down and back.
Keeping your body tight and still, bend one arm and row the dumbbell off the floor and into your lower ribs.
Place the dumbbell back on the floor, swap sides, and repeat.
Alternate arms for the duration of your set.
Tips:
Use hex-shaped dumbbells if available, as they tend to be more stable.
You can also do this exercise with kettlebells.
Bend your legs and rest on your knees to make this exercise easier.
2 – V-sit
The V-sit is an old-school abs strength and conditioning exercise. This is a tough move, but after three weeks of prep work, you’re ready for it. The V-sit is so-called because your body makes a V-shape at the midpoint of each rep.
Steps:
Lie on your back with your legs straight and arms above your head. Press your lower back into the floor and brace your abs.
Lift your legs and upper body simultaneously and reach up toward your toes. At this point, you should be balancing on your butt, body making a V-shape.
Lie back down and repeat.
Tips:
Place a folded matt under your lower back for comfort.
Make this exercise harder by holding a medicine ball and touching it to your feet.
Bend your legs and pull your knees into your chest to make this exercise easier.
3 – Flutter kick
Flutter kicks are a favorite abs exercise in the military. You’ll often see this exercise done by Navy SEALs, usually as they lie on a beach with waves breaking over them. Part punishment, part core strengthener, this challenging exercise will hammer the lower fibers of your rectus abdominis.
Steps:
Lie on your back with your legs straight, hands together, and under your butt.
Press your lower back into the floor and lift your feet a few inches off the floor.
Lift your head and shoulders a few inches off the floor.
Keeping your legs straight, kick your legs up and down like you are swimming. Four kicks equal one rep.
Continue for the prescribed number of reps.
Tips:
Stop your set if your lower back starts to lift off the floor.
The slower the tempo, the more challenging this exercise becomes.
Bend your knees slightly to shorten the levers and make this exercise easier.
4 – Saxon side bend
Saxon sidebands are named after old-school strongman and bodybuilder Arthur Saxon. Performing with his brothers, Saxon was known for his incredible feats of strength, which included lifting horses and pressing several times his body weight overhead. The Saxon side bend was one of his favorite abs exercises.
Steps:
Stand with your feet shoulder-width apart, knees slightly bent. Brace your core.
Raise and hold a weight (dumbbell, medicine ball) overhead.
Keeping your arms extended, lean to the left and then to the right for the prescribed number of reps. Only lean sideways, and not forward or backward.
Tips:
Take care not to twist your shoulders or hips.
Bend your arms and lower the weight to your head to make this exercise a little easier.
Because of the long levers involved, this is a challenging exercise, so don’t go too heavy too soon.
FAQs
Do you have a question about our 30-day abs challenge or core training in general? No sweat Boba Fett, because we’ve got the answers!
1. Will this challenge give me a six-pack?
Getting a six-pack is as much about your diet as it is your workout program. This 30-day abs challenge will definitely strengthen and harden your abs, but you won’t be able to see them unless you carve your body fat down to under ten percent for men and less than 15 percent for women.
Because of this, it’s often said that abs are built in the kitchen, although the saying should really be that abs are revealed in the kitchen.
Getting leaner invariably means eating less and exercising more to create a calorie deficit, so your body has no option but to burn stored body fat for fuel.
Read more about eating for ripped abs here.
2. Can I change the exercises in the 30-day abs challenge workouts?
If there are any exercises that you cannot do or that cause pain, feel free to do something else instead. However, try and use similar exercises so that you stay true to the spirit of the program. For example, you could do cable crunches instead of stability ball crunches, as they are basically the same movement. However, sit-ups and hanging leg raises are too dissimilar to be interchangeable.
If you are thinking of changing an exercise because you find it hard – don’t! This is a CHALLENGE, and it’s the hard exercises that will deliver the best results. Even if you can only do a few reps, stick with the hard moves. Your efforts will be rewarded in the end.
3. XYZ exercise hurts my back – what should I do?
If any of the exercises cause back pain, you should stop immediately and revisit your technique. Make sure you are doing the movement correctly. If it still causes pain, replace that exercise with something similar that doesn’t cause you problems. While exercise is good for everybody’s body, some movements may not suit your body type or fitness level.
4. How do I know if I’ve done enough reps?
One of the reasons that prescribing a rep range for a workout is so hard is that we have no way of knowing how strong you are. For some, 15 reps of leg raises will be too easy, but for others, it’ll be way too hard. If we tell you how many reps to do, we’d just be guessing.
So, instead, do as many reps as you can, stopping 2-3 short of failure. At this point, you should feel your muscles working (love that burn!), and your movements will probably noticeably slow down.
Push yourself close to failure, and your muscles will respond by getting stronger. But stop too soon, and your workout won’t be as effective as it could have been.
That said, try to do more reps workout by workout. This is called progressive overload, which is one of the cornerstones of effective training.
5. Will doing abs exercises help me lose belly fat?
Many people believe that doing exercises for a particular body part will melt fat from that area. This is called spot reduction. Unfortunately, there is no evidence to suggest that spot reduction happens, so it’s probably best to forget about this much-loved myth. The same is true for “sweating off fat” – that’s impossible, too.
Your body stores and burns fat globally, i.e., all over. While exercising, healthy eating and a calorie deficit will force your body to burn fat for fuel, you cannot influence from where that fat will come. It MAY be your abs, but it could also be your arms, butt, or chest.
So, while you can lose belly fat, we cannot guarantee that abs exercises will help give you a slimmer stomach. Forget about spot reduction, and focus on your entire body for the best fat-loss results.
30-Day Abs Challenge – Closing Thoughts
Sometimes, the best way past a fitness plateau is to smash through it! Sticking with your regular workout program is not the answer. Instead, you need to push the volume and intensity up a notch and get Hulk-mad, going beyond your normal limits.
This 30-day abs challenge might not give you a six-pack, but after four weeks, your core will be harder and stronger than ever before. Dial in your diet, and, who knows, you may even start to see your abs.
And the best part? You can do these workouts at home, so it’s virtually excuse-free.
So, what are you waiting for? Get started today!
Toes to Bar Exercise Guide: How To, Benefits, Muscles Worked, and Variations
A shredded midsection is the symbol of peak fitness. Although many people aspire to develop a well-defined six-pack that could rival the sculpted Greek statues, it usually remains that — an aspiration.
The benefits of a strong core extend beyond aesthetics. A strong core can improve your balance and functionality, which can boost your performance in compound exercises and daily tasks. Plus, it can improve your posture and reduce the risk of lower back pain and injury.
Most people avoid training their abs because they find the orthodox ab exercises, such as crunches and leg raises, boring and redundant. You have come to the right place if you’re looking for a challenging exercise that requires skill, strength, and endurance. Toes to bar is a compound exercise that primarily works your abs and also engages your arms, shoulders, lats, glutes, and hip flexors.
Toes to bar (TTB) is a gymnastics exercise and a mainstay in many CrossFit workouts. It is an extended and advanced version of the hanging leg raise. That said, performing the TTB requires significantly more core strength and practice.
In this article, we go over the basics of TTB, its benefits, muscles worked, correct exercise form, most common mistakes, and the best variations and alternatives to add to your training regimen.
What is a Toes to Bar?
Toes to bar involve lifting your feet to an overhead bar. Simple, right? Wrong. TTBs are more challenging than hanging leg raises, and depending on your experience level, it might take a long time to drill the movement.
Since the TTB is a compound movement, it helps improve your overall anterior chain strength. Plus, TTBs performed with a flawless form look dope. It is also an excellent way to show off your core strength.
There are two main toes to bar variations:
Strict Toes to Bar
The strict TTB is one of the most difficult abdominal exercises. It is generally included in a workout to test an exerciser’s midline strength. Save this TTB variation for after you’ve mastered the kipping TTB. Besides core strength, the strict TTB demands decent hip flexor, gluteal, and hamstring mobility.
Kipping Toes to Bar
The kipping TTB is a popular ab exercise in gymnastics and CrossFit workouts. As the name suggests, it involves using a kipping motion that makes touching your toes to the bar a little easier. On the other hand, the strict TTB involves touching the overhead bar with your toes while keeping your torso parallel to the floor.
Muscles Worked During Toes to Bar
Toes to bar works the following muscles:
Abs
The TTB primarily targets your abs. It engages the rectus and transverse abdominis and will leave you with a sick ab pump. The rectus abdominis runs along the front of your abdomen and is commonly known as the “six-pack.” Conversely, the transverse abdominis wraps around your trunk from front to back.
Hip Flexors
Hip flexors are located on the front of your upper thighs. These muscles are involved in flexing the hips and bringing the knee closer to the chest. Weak hip flexors can make it more challenging to complete a TTB.
Arms
Your grip and forearm strength are crucial factors that can dictate your performance in toes to bar. Plus, you might experience biceps recruitment during more extended TTB sets, which involve holding on to the bar for longer.
Lats
Your lats kick in as soon as you hang on to the pull-up bar. Furthermore, the kipping TTB variation can lead to greater lat engagement as you cycle between the hollow and arch positions.
Glutes and Hamstrings
You need good glutes and hamstring mobility to perform the TTB with optimal form. The glutes and hamstrings also help control the movement during the exercise’s eccentric (lowering) part.
Notably, the kipping toes to bar variation increases the demand on the grip, shoulder, and back.
Benefits of Toes to Bar
Adding the TTB to your training regimen entails the following advantages:
Build a Strong and Shredded Core
TTB is a challenging abdominal exercise that will help build a stronger and chiseled core. To avoid swinging between reps, you must keep your core contracted throughout the exercise. TTB will also strengthen your stabilizers, improving your overall balance and boosting your performance in compound exercises and everyday functioning.
Boosts Muscle Coordination
A TTB involves several moving parts. You must hang onto a pull-up bar, generate momentum by kipping, raise your toes to the bar, return to the start position, and repeat this process for the recommended reps. Adding TTB to your workouts will improve your muscle coordination, which will carry over to other exercises.
Improves Posture
Toes to bar strengthen your abdominal muscles and lower back, which can contribute to a better posture. Core exercises are a must for folks who spend most of their day sitting or hunched over their phones or computer screens.
Read also: Toes To Bar Workout Progression Routine
How To Do Toes to Bar
The TTB is a complex exercise, and you must master several steps to perform this movement correctly. Below I’ll take you over the kipping toes to bar step-by-step instructions that require a cyclical, ballistic motion.
Step 1: Grab an Overhead Bar
Jump and grab onto a pull-up bar with a slightly wider than shoulder-width overhand grip. You can use a hook (fingers over the thumb) or reverse hook grip (thumb over the index fingernail) on the bar.
Pro Tip: Avoid using a false grip on the bar. A thumbless grip will make it harder to hold onto the bar during the kipping motion.
Step 2: Generate a Kip
Kipping involves alternating between an arch and a hollow position to generate momentum. Initiate the kip by driving your head and chest forward and extending your legs behind you. Immediately kick your legs in front of your body as you push on the bar and bring your body behind it to get into a “hollow” position.
Pro Tip: Beginners can perform two to three kips to generate enough momentum before raising their legs.
Step 3: Raise Your Legs in the Hollow Position and Flick the Bar
After generating momentum and getting into a hollow position, contract your abs, lats, shoulder blades, glutes, and quads, and raise your legs toward the ceiling. Your toes should hit the bar at the top of the movement. Keep your head neutral throughout the range of motion, and look at the bar during the concentric (upward) phase of the lift. Looking ahead during the upward motion will make lifting your legs more difficult.
Pro Tip: Instead of locking out your knees and keeping your legs straight during the concentric motion, you could break it into two parts. First, bend your knees and bring your quads to your chest. Finish the movement by extending your knees and touching the bar with your toes. This technique is also known as the tuck-and-flick method.
Step 4: Return to the Extended Arch Position
After flicking the bar, lower your legs by extending your spine. Push your legs behind you and your torso forward to immediately enter the arched position. Use the momentum to get into the hollow position. Repeat for recommended reps.
Pro Tip: The eccentric motion of the tuck-and-flick method involves returning your legs to your chest and extending your knees as your legs move below your waist. Many exercisers find the tuck-and-flick method more convenient while stringing bigger sets.
Toes to Bar Tips:
It is common for beginners to experience ab cramps while performing TTBs. Stop your set and stretch out your abs if you experience the same.
Master the kipping TTB before trying the strict TTB.
Before attempting the kipping TTB, drill your kipping form. Perform three sets of 10 kips in alternate workouts until you have command over the exercise.
Use CrossFit grips to avoid ripping your hands on the pull-up bar. Remember, you are as strong as your grip on this exercise.
Advanced trainers can perform this exercise on gymnastic rings. The unstable rings lead to greater core and stabilizer recruitment.
In This Exercise:
Target Muscle Group: Abs
Type: Strength
Mechanics: Compound
Equipment: Bodyweight
Difficulty: Intermediate
Best Rep Range: 10-15
Common Mistakes While Performing Toes to Bar
Avoid the following toes to bar mistakes to get the best bang for your buck and limit your risk of injury:
Incorrect Hand Position
Most people fail to kip consistently and complete a TTB because of incorrect hand placement. Grabbing the bar too close will make touching your toes to the bar more difficult, whereas taking a snatch grip on the bar will lead to uncontrollable swinging. Grab the bar just outside shoulder-width for optimal range of motion.
Keeping Your Shoulders Under The Bar
Many rookies try to do a TTB while keeping their shoulders under the bar. Although you might be able to complete one TTB, you’ll likely not be able to control the eccentric motion, which will lead to uncontrollable swinging.
Not Using a Kip
In continuation with the previous point, strict TTB is significantly more difficult than the kipping variation. You must master kipping before attempting toes to bar. Begin the kip by pretending to perform a straight-arm pushdown and pull your torso behind the pull-up bar.
Banging Your Toes Into The Pull-Up Bar
Avoid banging your toes into the bar at the top of the motion. Many exercisers end up with bruised toes due to kicking the bar too hard. Bring your toes over the bar, or touch it lightly; this will get easier as you gain more experience.
Slowing the Eccentric Motion
Many trainers make the mistake of controlling the descent, which can break their momentum. You want to use the momentum from the eccentric motion to power your kip and the next rep. That said, you must control the eccentric motion on the strict TTB.
Variations and Alternatives of Toes to Bar
The following TTB variations and alternatives will help add variety to your training regimen:
Hanging Leg Raise
The hanging leg raise is an excellent progression exercise for the TTB.
Steps:
Hang onto a pull-up bar with a shoulder-wide overhand grip.
Brace your core and glutes, and lift your legs toward the ceiling until they are at least parallel to the floor. Keep your knees locked out throughout the range of motion.
Pause and contract your abs at the top.
Slowly return to the start position.
Repeat for recommended reps.
Pro Tip: Incorporating kipping into this exercise can help drill the TTB movement. Get into the arched position during the eccentric motion and a hollow position during the concentric lift.
Check out our complete hanging leg raise guide here!
Lying Leg Raise
Perform the lying leg raise on an elevated platform like a flat bench to mimic the arched position of the TTB.
Steps:
Lie supine with your hips on the edge of a flat bench. Your leg should be extended and parallel to the floor.
Hold the bench at your ear level for stability.
Keeping your legs straight, raise your lower body toward the ceiling until it is at a 90-degree angle with your torso.
Lower your legs toward the floor until your feet are a few inches off the floor.
Rinse and repeat.
Pro Tip: As you gain more experience, touch your knees to your head at the top of the movement. Progressing to this stage can take a long time as it requires significant core strength and flexibility.
Check out our complete lying leg raise guide here!
Knees To Elbow
Knees to elbow is the middle ground between the hanging leg raise and the toes to bar. This exercise involves touching your elbows with your knees.
Steps:
Grab onto a pull-up bar with a shoulder-wide grip.
Contract your abs, glutes, and quads.
Raise your quads to your chest by flexing your hips.
Bend your knees and touch your elbows at the top of the motion.
Return to the starting position.
Pro Tip: Kipping can make the exercise easier and help cycle through reps faster.
Hanging L-Sit
The hanging L-sit might look easy, but it requires a strong core. This exercise will improve your core and grip strength, which will translate to a better performance on the toes to bar.
Steps:
Hang onto a pull-up bar with a shoulder-wide pronated grip.
Keeping your elbows and knees locked, raise your legs until they are parallel to the floor.
Hold the position for as long as possible.
Pro Tip: Experienced exercisers can perform L-sit pull-ups. This variation will help build a stronger core, resulting in better lower body control during TTB.
Check out our complete L-sit guide here!
Controlled GHD Sit-Up
GHD sit-ups will help you build a robust midline. However, we will limit the extension on this exercise since we are using it as a TTB progression.
Steps:
Sit at the edge of the GHD pads and place your ankles between the foot pads.
Your torso should be perpendicular to the floor at the start position.
Hold your hands in front of your chest.
Contract your abs and slowly lean backward.
Your torso should at least break parallel to the floor at the bottom of the movement.
Return to the starting position.
Repeat for recommended reps.
Pro Tip: More experienced athletes can use the full range of motion and touch the floor with their fingers at the bottom.
Related: 9 Toes-to-Bar (TTB) Alternatives To Revamp Your Core
Wrapping Up
Toes to bar is a compound exercise that requires decent core strength and kipping practice. Mastering this exercise will help build a stronger core, boost your endurance, and bless you with sculpted abs.
So swing, reach, and touch your toes to the bar with fierce determination, knowing that every rep brings you closer to an extraordinary transformation. Each TTB will hurt, but it will all be worth it in the end.
Best of luck!
L-Sit Exercise Guide: How To, Benefits, Muscles Worked, and Variations
Some exercises look super easy, but when you try them, you fail to get even in the correct position; the L-sit is one of them.
The L-sit is a classic gymnastic movement that will set your core on fire. On the outside, the L-sit looks very easy. You sit on the floor, plant your hands next to your hips, and lift your hips and legs off the ground. However, this is easier said than done.
Beginners that do not have a gymnastics background will most likely find themselves grinding their teeth while they fail to lift themselves off the floor. I have had newbie exercisers tell me they are anatomically unfit to do the L-sit because they have a long torso and short arms. You might experience the same thing.
However, most people falter at doing the L-sit not because of their body mechanics but because of an incorrect form or a lack of core strength.
Since the L-sit is a bodyweight exercise, most people think that they should be able to do it from the get-go. This, however, is not the case. Like most gymnastic exercises, you will be better off starting with an L-sit progression plan.
In this article, we dive deep into the L-sit and cover its fundamentals, an effective progression plan; the muscles worked during an L-sit, its benefits, proper form, the most common mistakes, and the best variations and alternatives.
What is a L-Sit?
L Sit With Kettlebells
The L-sit is an isometric exercise that improves your core strength and balance. Isometric exercises involve static muscle contraction without visible movement in the joint’s angle. The L-sit is a fundamental gymnastic exercise that grew popular thanks to CrossFit. This exercise is also very popular in the calisthenics circuit.
Besides the conventional L-sit, CrossFit WODs (workout of the day) include several variations of this exercise, including L-sit bar pull-ups and L-sit ring pull-ups. The conventional L-sit demands decent core and hip flexor strength. On the other hand, the pull-up variations also engage most of your upper body, including the biceps, lats, traps, rhomboids, and teres major and minor.
Beginners should start practicing this exercise by placing their hands on an elevated object, such as yoga blocks, or perform this exercise on parallettes or parallel bars. If you still cannot perform this exercise, use the progression exercises listed in this article to build the required core strength.
Muscles Worked During L-Sit
The L-sit works the following muscles:
Abs: The core is the primary target muscle of the L-sit. This exercise requires you to keep your core contracted, resulting in a rectus and transverse abdominal recruitment.
Hip Flexors: These muscles run along the front of your upper thigh. You must engage your hip flexors to keep your legs parallel to the floor throughout the exercise.
Glutes and Quads: This exercise involves keeping your glutes and quads contracted to maintain a stable position.
Triceps: You’ll experience triceps stimulation as soon as you lock out your elbows and lift yourself off the floor. Furthermore, pointing your fingers behind you will engage your biceps.
Shoulders: The L-sit involves actively pushing into the floor, which will result in a sick deltoid pump. You will also experience trapezius muscle stimulation as this exercise requires pushing your shoulders back and down.
Benefits of L-Sit
Adding the L-sit to your training regimen entails the following benefits:
Build a Solid Core and Six-Pack
L-sits can help you build abs of steel. Holding your legs parallel to the floor while extended in the air will work muscles in your core that you didn’t know existed. A strong core can also improve your performance in compound exercise and daily functioning.
Enhance Stability and Balance
A strong core translates to robust stabilizer muscles, which can significantly improve your stability. The L-sit also improves your balance and performance in handstands, push-ups, toes-to-bar, deadlifts, and barbell squats.
Improve Posture
The L-sit strengthens the muscles responsible for maintaining an upright and stable spine, which can help improve your posture. This is an excellent exercise for people that spend most of their day sitting.
Boost Hip Flexor Strength
The hip flexors help bring the knee closer to the chest, meaning they are used in activities such as walking, running, jumping, and kicking. Since the L-sit involves holding your legs parallel to the floor, it engages and strengthens your hip flexors.
How To Do L-Sit
This is how to perform the L-sit with the correct form:
Steps:
Sit upright on the floor with your legs extended in front of you.
Place your hands on the floor next to your hips. Spread your hands and curl your fingers slightly so that your fingertips are pushing into the floor.
Straighten your arms and lock out your elbows. Simultaneously engage your lats and push your shoulders back and down.
Push your palms into the floor, engage your core, and lift your hips and legs off the floor. Your legs should be parallel to the floor throughout the exercise.
Your body should resemble an “L” at the top of the exercise.
Hold the position for as long as possible or a specific time.
Return to the starting position.
Repeat for the desired number of sets.
L-Sit Tips:
Keep your quads and glutes contracted and your toes pointed throughout the exercise.
Place your hands on yoga blocks if you have trouble pushing yourself off the floor.
Spreading your hands and pushing your fingertips and palms into the floor will help you maintain your balance.
Maintain an upright torso while pushing yourself off the floor. Bending forward will make lifting your legs off the floor more difficult.
Advanced exercises can wear a weighted vest to make this exercise harder.
In This Exercise:
Target Muscle Group: Abs
Type: Strength
Mechanics: Isometric
Equipment: Bodyweight
Difficulty: Intermediate
Best Rep Range: 30-60 seconds
L-Sit Progression Exercises
Use the following L-Sit progression exercises if you lack the strength to perform the conventional variation of the exercise:
Step 1: Boat Hold
The boat hold is an excellent core exercise that is suitable for trainers of all experience levels. It will help you build the foundational strength for L-sits.
Steps:
Sit upright on the floor and extend your legs in front of you.
Cross your arms in front of your chest.
Engage your core and tilt your torso backward. Anything between 1 to 2 o’clock will work.
Lift your legs off the floor while keeping your knees locked out.
Hold this position for as long as possible.
Pro Tip: If you have trouble maintaining your torso in position, place your hands next to your hips on the floor.
Step 2: Elevation
This L-sit progression exercise involves using an elevated platform, such as yoga blocks or parallettes. Furthermore, you will focus on lifting your hips off the floor while keeping your heels grounded.
Steps:
Sit on the floor with your legs extended and place parallettes on each side of your hips.
Grab the bars with an overhand grip. Your elbows will be bent at this position.
Extend your elbows while pushing your shoulders back and down. You must lock out your elbows at the top, and your hips should be off the floor.
Your heels should be the only point of contact with the floor.
Slowly return to the starting position.
Repeat for 15-20 reps.
Pro Tip: Avoid using your legs to push yourself into a lockout position. Conversely, beginners can bend their knees slightly and push their heels into the floor to generate force.
Step 3: Alternating Leg Lift
In this L-sit progression exercise, you’ll focus on the lockout and lifting one leg at a time.
Steps:
Sit upright on the floor and extend your legs in front of you.
Place your hands on your hip side.
Push your shoulders down and back, and extend your elbows. Your hips should be off the floor at this point. Your heels should be the only point of contact with the floor.
Contract your abs and lift your left leg off the floor until it is parallel to the floor.
Return your left leg to the floor and repeat with the right leg.
Alternate between sides for the recommended reps.
Pro Tip: As you get better at this exercise, lift your legs as high as possible without bending your knees. Hold for a five-second count before lowering your legs to the floor.
Step 4: Tuck Sits (on an elevated platform)
Tuck sits can be incredibly effective in building the required core strength and confidence to perform the L-sit. This is also the first exercise where we bring together most of what we’ve learned up to this point.
Steps:
Sit upright on the floor and extend your legs in front of you.
Bend your knees and plant your heels on the floor as close to your hips as possible.
Place your hands on the sides of your hips.
Push your shoulders back and down and extend your elbows to lift your hips off the floor.
Pull your quads to your chest as you lift your hips off the floor.
Hold for as long as possible.
Pro Tip: Holding your legs close to your chest is easier than maintaining straight legs. You can also use an elevated platform for this exercise if you have difficulty doing it on the ground.
Step 5: Tuck-Sit to L-Sit (on an elevated platform)
We push into the next gear with this L-sit progression exercise. This exercise begins in the tuck sit position and requires you to work into a full L-sit.
Steps:
Follow the steps mentioned above to get into a tuck-sit position.
While keeping your back straight, extend your legs until they are parallel to the floor.
You might lose balance as you extend your legs. In this case, pull your legs back to your chest.
Hold the L-sit position for as long as possible.
Pro Tip: Use elevated platforms for this exercise if you cannot do it on the floor. Performing this exercise on an elevated platform will ensure you have enough space to pull your legs into your chest without having your feet touch the floor.
Step 6: L-Sit
After you have spent enough time practicing the tuck-sit (step four) and tuck-sit to L-sit (step five), the conventional L-sit will be the natural next step. Use the steps mentioned in the “How To Do L-Sit” section to perform the L-sit.
Common Mistakes While Performing L-Sit
Avoid making the following mistakes while performing the L-sit to get the best bang for your buck:
Rounding Back
This is one of the most common mistakes exercisers commit while performing the L-sit. You must avoid hunching your back as you extend your elbows to lift your hips off the floor. Rounding your back makes it harder to lift your legs off the floor.
Skipping Warm-Up
Since the L-sit is a bodyweight exercise, many people skip warming up their bodies, which can hamper their performance. Before doing this exercise, you must spend 5-10 minutes warming up your wrists, arms, shoulders, abs, glutes, hamstrings, and legs to ensure you’re primed to hold this position for as long as possible.
Not Locking Out Your Elbows and Pushing Your Shoulder Back and Down
Maintaining soft elbows while performing the L-sit is a rookie mistake. You must lock out your elbows to ensure optimal stability and balance. Soft elbows usually lead to the rounding of the back. Also, you must push your shoulders back and down to gain an optimal height to lift your legs off the floor comfortably.
Variations and Alternatives of L-Sit
Add the following L-sit variations and alternatives to your training regimen to build a shredded midsection:
L-Sit Pull-Up
After mastering the L-sit, you can progress to the L-sit pull-up for an additional challenge. Most people tend to use their legs to perform a pull-up; however, since you’ll be holding your legs in front of you in this variation, this exercise is much more difficult than the conventional pull-up.
Steps:
Stand under a pull-up bar.
Grab the pull-up bar with a shoulder-wide grip.
Lift your legs until they are parallel to the floor.
Perform a pull-up while holding this position until your chin is over the bar.
Return to the starting position.
Repeat for recommended reps.
Pro Tip: Beginners can perform hanging L-sit until they develop the core strength to perform a pull-up.
L-Sit Pull-Up on Rings
Since you can pull your head between the rings, this exercise is a little easier than the L-sit pull-up on a pull-up bar, where you must pull your body at an angle. However, performing it on the rings requires more core stability.
Steps:
Jump and grab the gymnastic rings with a neutral (palms facing each other) grip.
Lift your legs until they are parallel to the floor.
While keeping your core contracted, perform a pull-up.
Return to the start position.
Repeat for reps.
Pro Tip: Keep your shoulders pulled back and down while performing pull-ups.
Plank
You need a strong core to perform the L-sit. Planks are an incredibly effective beginner-friendly exercise to build the requisite core strength.
Steps:
Get on all fours on the floor.
Place your elbows under your shoulders and plant your forearms on the floor. Your forearms should be parallel to each other.
Extend your legs behind you.
Your body should be in a straight line from head to toe.
Hold this position for as long as possible.
Pro Tip: As you get more experienced, make this exercise more difficult by wearing a weighted vest or placing a weight plate on your back.
Check out our complete plank guide!
Hollow Body Hold
Hollow body hold is an excellent exercise to build core strength. It is used widely in CrossFit gyms to improve your kipping pull-up mechanics.
Steps:
Lie supine on the floor. Extend your arms over your head.
Contract your abs and lift your legs off the floor. Simultaneously lift your shoulders and arms toward the ceiling.
Your hips and lower body should be the only point of contact with the floor.
Hold the position for as long as possible.
Pro Tip: Focus on actively pushing your arms and legs toward the ceiling throughout the exercise.
Check out our complete hollow hold guide!
Toes-To-Bar
Performing toes-to-bar requires significant core strength. You must keep your core engaged throughout the exercise to avoid swinging between reps.
Steps:
Grab a pull-up bar with an overhand shoulder-wide grip.
Lock out your elbows.
Press on the bar using your lats; this will pull your torso behind the bar.
Simultaneously lean back slightly and raise your legs toward the pull-up bar.
Touch your toes to the bar.
Lower your legs to the starting position.
Repeat for recommended reps.
Pro Tip: Perform a kip to stabilize your body and generate momentum to raise your toes to the bar.
Wrapping Up
The L-sit is an isometric exercise that will help you build a strong core, strengthen your stabilizers, improve your balance and posture, and boost hip flexor strength. Mastering this exercise is a must if you are into gymnastics or CrossFit.
The five beginner-friendly progression exercises listed in this article are excellent movements to work toward an L-sit. Perform the variations thrice weekly, and you should be able to perform a picture-perfect L-sit by the end of six weeks. Best of luck!
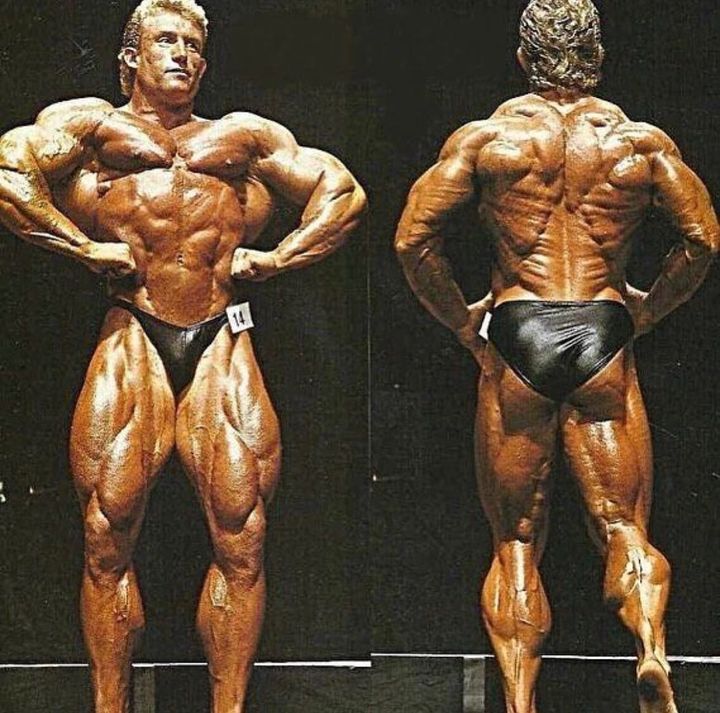
Bodybuilding Legend Dorian Yates Discusses 2-Exercise Ab Routine That Led to 6 Mr. Olympia Titles
Bodybuilding icon Dorian Yates reached the top of the Men’s Open division with hard work and a granite physique. In a recent Instagram post, Yates laid out the two-exercise abs routine that helped him achieve six Mr. Olympia titles.
Dorian Yates was a trailblazer in the Men’s Open division mostly throughout the 1990s. He was next to take the throne after the great Lee Haney, who left the sport as an eight-time titleholder. While dominating his class, Yates had a major influence on the overall look. As time passed, bodybuilders with overbearing size continued to find success years after his departure.
Yates followed an unconventional training style on his way to becoming one of the world’s best bodybuilders. He ignored commonly used practices regarding reps and sets in the weight room. Instead, Yates trained to the brink of failure regularly and pushed his body to extremes whenever he decided to train.
Dorian Yates / Instagram
In retirement, he’s an open source of bodybuilding knowledge for everyone. Whether he’s talking about the mindset it took to reach the top or reliving a hallucinogenic ayahuasca journey, Yates leads a busy and exciting life. This time, he’s offering fans two of his favorite abs exercises he used during the prime years of his career.
Dorian Yates Reveals Mr. Olympia-Winning Ab Routine: “I Usually Trained Abs Once Per Week”
Yates said ab training was typically included after a ‘heavy-duty shoulders and triceps session.’ His two-exercise routine consisted of two sets of bodyweight crunches to failure and two sets of bodyweight reverse crunches to failure.
“I usually trained abs once per week.
They were usually done after my heavy duty shoulders and triceps session. This was because I felt that shoulders and triceps was probably the ‘easiest’ workout of the week (well, easier than the others!) and didn’t take as much out of me, so I added them on to the end here.
My abs routine was simple:2x bodyweight crunches to failure2x bodyweight reverse crunches to failure
The six-time Mr. Olympia shared that he completed these exercises with hard contractions and a big exhalation of air at the peak of each movement. Personally, Yates never found ab training ‘that important’ because he was usually keeping a low body fat percentage during days of active competition.
But these were done with a hard contraction and a big exhalation of air at the peak contraction. We would squeeze our abs so hard that they’d be on the verge of cramping almost!
The physique that inspired me when I was younger, especially abs wise, was Bruce Lee’s, he had great abs. In my youth, I’d always be doing bodyweight exercises like sit-ups and pushups, with a poster of Bruce Lee watching over me!
As far as I remember, I always had a visible set of abs. In my early bodybuilding days, I would train them with weights but I noticed that they would grow fairly quick and would potentially look quite ‘blocky’.So I switched to contraction work with just my body weight.
In my opinion, it wasn’t really that important to train my abs as they were always visible due to my low body fat year round and my genetics did play a part here in helping me stay lean.Everyone has abs… it’s just a case of revealing them by lowering your body fat.” Dorian Yates shared.
In addition to maintaining his own health, Yates loves to offer wellness advice to his followers. He routinely offers guidance and tips on building muscle. One of the last topics he approached was training time. The legend explained that he preferred to keep his body guessing by training at times it wasn’t accustomed to.
Dorian has long been respected for his nuanced training methods and tactics. He’s learned and drawn from a number of legends such as Mike Mentzer and Tom Platz, who is highly regarded for his advanced, intense, and downright gritty leg training workout strategies. Last year, Platz extended his gratitude for Yates and was proud Dorian took his teaching seminar to heart decades ago.
At 61 years old, longevity has become a priority for Yates. Just last week, ‘The Shadow’ shared that he recently underwent a stem cell therapy procedure. After the treatment, Yates says he has more energy and mentioned his nagging shoulder pain is feeling better.
RELATED: Dorian Yates on Building Legs with Hamstring Curls: ‘Use a Full Range of Motion & Slow Negative’
Given his contributions to the sport, the bodybuilding community is fortunate to have a figure as forthcoming as Yates. Even in retirement, he continues to influence generations of bodybuilders after him.
Published: 8 June, 2023 | 1:18 AM EDT
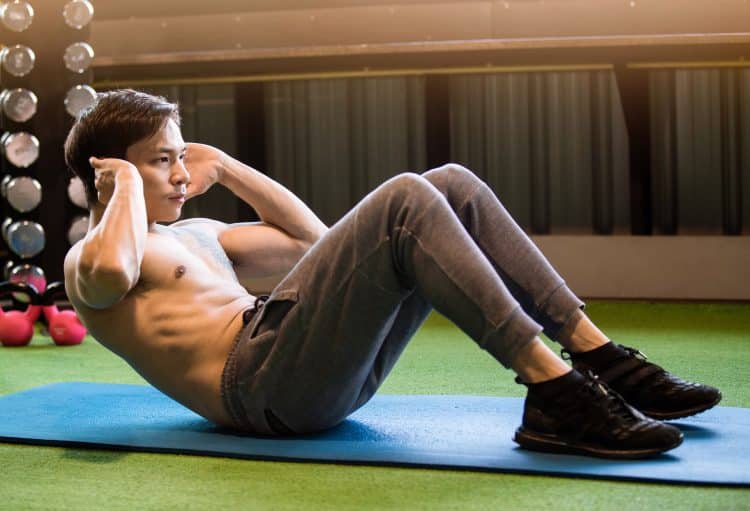
Sit-Up Exercise Guide: How To, Benefits, Muscles Worked, and Variations
The sit-up is one of the most popular exercises. It is taught in school PT classes, done at home, and is a part of the most complex metabolic conditioning workouts. This versatile exercise works your midsection and can help build a shredded six-pack. Sit-ups can also improve your posture, core strength, and balance.
Most people have a love-hate relationship with sit-ups. They love the results but hate doing the exercise. Although sit-ups look easy, they will have you begging for mercy halfway through a set. They are especially difficult for beginners that lack abdominal strength and endurance. Furthermore, many exercisers find sit-ups boring.
That said, thanks to their effectiveness and results, sit-ups are a part of most training regimens, and this doesn’t appear to be changing any time soon.
Notably, sit-ups are often confused with their cousin — crunches. Both these exercises look similar to an untrained eye, and ‘sit-ups’ and ‘crunches’ are often used interchangeably. However, these exercises have significant differences.
The biggest difference between the two exercises is their range of motion. The crunch is roughly a quarter of the sit-up’s range of motion (ROM). While performing the crunch, your lower back is always in contact with the floor; in fact, your upper back, too, barely leaves the floor. However, as the name implies, the sit-up involves sitting upright at the top of the range of motion.
The sizeable difference in the ROM leads to the isolation of your abdominal muscles while performing the crunch. On the other hand, sit-ups stimulate multiple muscle groups, including the abs, hip flexors, hips, and lower back.
In this article, I take you over the fundamentals of the sit-up, the muscles worked during this exercise, its benefits, proper form, the most common mistakes, and the best variations and alternatives.
What is a Sit-Up?
A shredded midriff and a six-pack are considered the epitome of fitness, and the sit-ups help you achieve just this. This exercise involves contracting your abs with every rep, which helps you develop a chiseled midsection. The sit-up is an isolation exercise that trains your abdominal muscles.
To perform a sit-up, lie supine and place your feet flat on the floor. While holding your hands at the side of your head, lift your torso off the floor by contracting your abs. Your upper body should be almost parallel to the floor at the top of the motion — anything between 12 and 1 ‘o clock is acceptable.
Since performing the sit-up requires no equipment, you can do it anywhere. As you gain more experience, you can make the exercise more challenging by incorporating additional resistance using a weighted vest or holding a dumbbell, weight plate, or kettlebell in front of your chest.
The sit-up primarily works the upper and middle abs. However, you can achieve better lower ab stimulation by performing this exercise on a decline bench. Conversely, beginners can perform this exercise on a stability ball, as it provides a little assistance at the bottom of the movement.
Muscles Worked During a Sit-Up
The sit-up works the following muscles:
Abs
Sit-ups work the rectus and transverse abdominis. The rectus abdominis is the long vertical muscle that runs down the front of your abdomen. It is also known as the six-pack. On the other hand, the transverse abdominis muscle wraps around the abdomen and provides stability and support to the spine and internal organs. The transverse abdominis plays a crucial role in core stability while performing sit-ups and other exercises.
Obliques
Sit-ups work the internal and external obliques. The external obliques are the fish-gill-like muscles at the side of the rectus abdominis and help with trunk rotation and bending movements. The internal obliques lie under the external obliques and also assist with trunk rotation and bending.
Hip Flexors
Hip flexors run along the front of your upper thigh. They are responsible for flexing the hip joint. Hip flexors engage during the sit-up’s concentric (upward) motion to lift the torso toward your thighs.
Hips
Your hips provide stability during the sit-ups. The hip joint flexion also allows you to move from a lying to a seated position. Strong hips will also help prevent lower back strain while performing the exercise.
Lower Back
Your lower back, especially the erector spinae, plays a crucial role by providing stability and maintaining proper spinal alignment while performing sit-ups. It helps you avoid rounding your lower back during the concentric motion.
Benefits of Sit-Ups
Here are the advantages of adding sit-ups to your training regimen:
Improved Core Strength
Performing sit-ups helps you build a stronger core, the benefits of which carry over to compound exercises. Furthermore, it improves your performance in daily activities, which helps you get done more quickly and effectively.
Boost in Athletic Performance
A strong core can help improve your athletic performance. Irrespective of your sport, sit-ups can improve your posture, stability, and form, which can boost your overall performance and results. It will also significantly delay the onset of fatigue.
Increase in Muscle Mass
Sit-ups can help build muscle mass and strength in the abdominal and hip muscles. This exercise can also be a valuable indicator of muscle loss. A 2016 study found that older women who could perform sit-ups were less likely to lose muscle mass with age. [1]
Improved Balance and Stability
Sit-ups help build a strong core, which improves your balance and stability. It can improve your performance in daily activities and other exercises. A stronger core can also help prevent falls in older adults.
Better Posture
Building a strong core helps keep your hips, spine, and shoulders in alignment, which helps promotes a better posture. Folks that have a desk job or spend the majority of their days sitting should make sit-ups a constant in their training regimen.
No Equipment
Sit-ups are a bodyweight exercise that you can do anywhere at your convenience. Plus, you can program this versatile exercise into most training regimens and use additional resistance for better results.
How To Do Sit-Up
This is how to perform the sit-up with the correct form:
Steps:
Lie supine on the floor. Bend your knees and plant your feet on the ground.
Hold your hands next to your ear.
Raise your torso off the floor by contracting your abs. Exhale sharply during the concentric movement.
Your torso should be perpendicular to the floor at the top of the movement.
Contract your abs as hard as possible.
Inhale as you slowly lower your torso to the floor.
Repeat for recommended reps.
Sit-Up Tips:
Your head should remain neutral throughout the range of motion. Bending your head during the concentric movement puts unnecessary strain on your neck.
Avoid interlacing your fingers behind your head as it increases your odds of bending your neck during the upward motion. Crossing your arms in front of your chest is a better alternative if you don’t prefer holding your hands next to your ears.
Exhale and contract your abs during the upward motion.
Keep your back straight throughout the range of motion. Rounding your back can strain your lower back.
Use an elevated surface to anchor your feet. This will help keep your feet planted on the floor and allow you to establish a better mind-muscle connection.
It is common for beginners to experience ab cramps while doing sit-ups. Stop the exercise if you experience cramps and stretch out your abs.
In This Exercise:
Target Muscle Group: Abs
Type: Strength
Mechanics: Isolation
Equipment: Bodyweight
Difficulty: Beginner
Best Rep Range: 8-12
Common Mistakes While Performing Sit-Up
These are some of the most common sit-up mistakes that you must avoid to maximize results and lower the risk of injury:
Using a Limited Range of Motion
Many people leave gains on the table by following an incorrect form and a restricted range of motion. Your back should be on the floor at the bottom, and it should be perpendicular to the floor at the top.
Using Momentum
Exercisers try to make this exercise easier by using momentum. Avoid throwing your arms toward your legs to lift your torso off the floor. Driving through your neck during the concentric motion can cause neck sprains.
Neck Strain
Sit-ups are a demanding exercise. You must keep your head, neck, and torso in a straight line throughout the exercise for optimal ab stimulation. Folks that interlace their fingers behind their necks or throw their heads forward during the concentric motion increase their odds of injury during the exercise.
Rounding Your Back at the Top
Think of your torso as a hardboard while doing sit-ups; it should move in a straight line. Rounding your back at the top of the motion causes unnecessary lower back strain. It will also hamper your form during the eccentric (lowering) motion.
Improper Breathing
Many people make the mistake of holding their breath while performing crunches. Breathing correctly while performing crunches can help amplify your results. Exhale sharply during the concentric motion and inhale during the eccentric motion.
Not Adding Variety To Your Training Regimen
Although crunches are a great exercise to build a shredded midriff, your training program must include exercises that train your torso from different angles for overall development. It will ensure you build a bulletproof midsection. This point is a perfect segue into…
Variations and Alternatives of Sit-Ups
Add the following sit-up variations and alternatives to your training regimen to build a shredded midsection:
Weighted Sit-Up
Weighted sit-ups are for advanced athletes. It involves holding additional resistance, such as a dumbbell, kettlebell, or weight plate, in front of your chest. The exercise form for this variation will remain the same as the conventional sit-up.
Pro Tip: Use an appropriate weight that allows you to keep your head and torso in a straight line throughout the range of motion. Using a weight that is too heavy can cause you to bend your head forward.
Stability Ball Sit-Up
Stability ball sit-ups are an excellent exercise for beginners as the exercise ball acts as a support at the bottom of the movement and delivers a pop that pushes you into the next rep.
Steps:
Sit upright on an exercise ball and plant your feet flat on the floor.
Hold your hands at your ear level and slide forward so your lower and middle back are on the exercise ball. Your shoulders should be hanging off the ball.
Exhale and contract your abs to lift your torso toward the ceiling.
Your torso should be perpendicular to the floor at the top.
Slowly return to the start position.
Rinse and repeat.
Pro Tip: Some trainers go down too fast during the eccentric motion to use the bounce from the ball to complete the next rep. However, this reduces the effectiveness of the exercise and increases your risk of lower back injury.
Reverse Crunch
Sit-ups and crunches work the upper and middle abs. On the other hand, reverse crunches focus on your lower abs. During a sit-up, your lower body remains steady while your upper body moves. The reverse is true for the reverse crunch.
Steps:
Lie with your back on the floor. Your body should be in a straight line at the starting position.
Place your hands under your hips for leverage.
Lift your feet off the floor so your heels are a few inches off the ground.
Pull your quads to your chest while bending your knees.
Your hips should be off the floor at the top.
Slowly return to the start position.
Repeat for recommended reps.
Pro Tip: Make this exercise more challenging by performing this exercise on an elevated platform, such as a flat bench. Let your feet touch the floor at the bottom of the movement for better abdominal stimulation.
Check out our complete reverse crunch guide!
V-Up
The V-up is a great exercise to build core strength, balance, stability, and coordination. This exercise targets your entire midsection, including your upper, middle, and lower abs.
Steps:
Lie flat on your back on the floor.
Extend your arms toward the ceiling so they are perpendicular to the floor. Simultaneously, raise your legs off the floor.
In a single motion, lift your legs toward the ceiling and bring your hands toward your feet.
Your body should resemble a “V” at the static contraction point at the top.
Slowly lower to the starting position.
Repeat for recommended reps.
Pro Tip: Experienced lifters can make this exercise more challenging by wearing ankle weights and holding a pair of dumbbells.
Check out our complete V-up guide!
Crunch
The crunch is the easier version of the sit-up and roughly involves a quarter of the sit-up’s range of motion. This exercise is a better option for people trying to maintain constant tension in their upper abs or undergoing rehabilitation.
Steps:
Lie supine on the floor. Bend your knees and plant your feet flat on the ground.
Hold your hands next to your ears.
Contract your core, and exhale as you lift only your head and shoulder blades off the ground.
Slowly lower to the starting position.
Repeat for reps.
Pro Tip: Like with sit-ups, you can perform crunches while holding onto weights or on a decline for greater abdominal stimulation.
Check out our complete crunch guide!
Bicycle Crunch
The bicycle crunch is one of the few ab exercises that simultaneously work your lower and upper body. This ab exercise is incredibly effective at working your lower and upper abs and obliques.
Steps:
Lie flat on the floor while facing the ceiling.
Hold your hands next to your ears and lift your legs off the floor.
Exhale as you bring your right knee to your chest while driving your left elbow to the knee.
Return to the starting position.
Repeat on the other side.
Alternate between sides for the recommended reps.
Pro Tip: Focus on your breathing to make the most of this exercise. Breathe out during the concentric motion and breathe in during the eccentric motion.
Check out our complete bicycle crunch guide!
Wrapping Up
The sit-up is a versatile beginner-friendly exercise that will help improve your core strength, balance, stability, and posture, boost your athletic performance and muscle mass, and can be done anywhere at your convenience.
Although sit-ups are a great exercise to work your midsection, your ab training routine should include a variety of movements to ensure overall development. Remember, building a six-pack requires patience, dedication, commitment, and a low body fat percentage. Nail each aspect of your training, diet, and recovery regimen, and your abs will rival those of Greek statues. Best of luck!
Related: Crunch and Sit-Up Alternatives
References
Abe T, Yaginuma Y, Fujita E, Thiebaud RS, Kawanishi M, Akamine T. Associations of sit-up ability with sarcopenia classification measures in Japanese older women. Interv Med Appl Sci. 2016 Dec;8(4):152-157. doi: 10.1556/1646.8.2016.4.7. PMID: 28180004; PMCID: PMC5283773.
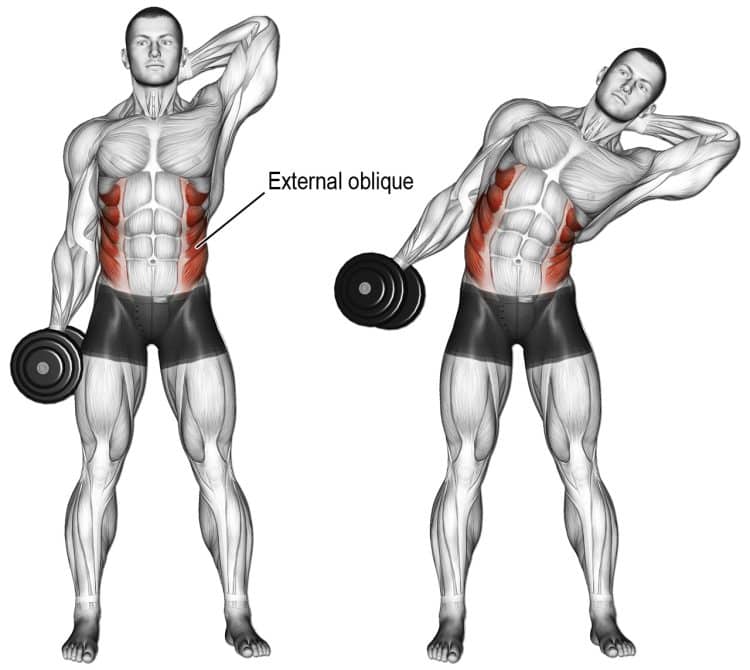
10 Best Core Exercises For Beginners (Killer Workout Included)
Core exercises are like a tough-love friend; they push you to be your best self even though you sometimes hate them for it. You might grumble and groan through the workout and even experience an ab cramp during one of those dreaded crunches, but in the end, you can’t help but love the results they bring.
Besides improving your physique aesthetics, core exercises can help improve your overall strength, balance, and stability, which can boost your performance in functional exercises and daily activities.
Contrary to what most people think, all core exercises are not the same. Some core exercises are more complex than others. For example, the front lever, back lever, L-sits, and toes-to-bar are best left to advanced lifters.
Before you move on to advanced core exercises, you must build a solid foundation by drilling the more basic movements. The best core exercises for beginners are versatile exercises that can be included in various training regimens and programmed according to your goals.
In this article, we cover the best core exercises for beginners, an ab workout that will help you achieve a ripped six-pack, tips for making the most of your training regimen, and the benefits of training your core.
What are Core Exercises?
Whether you want to perform a crunch, handstand, deadlift, or clean and jerk, you need a solid core. In contrast to the prevailing view, your ‘core’ isn’t limited to your abdominal muscles. It also includes your lower back, hips, and pelvis. Since your core includes multiple muscles, you must perform different exercises in your core workout to train the target muscles from several angles for optimal results.
The exercises in this article help boost the strength, stability, and flexibility of the core muscles, which are essential for proper body mechanics, balance, and posture.
Core exercises can be done in all three planes of movement:
Frontal Plane: Dumbbell side bend and hyperextension oblique crunch
Saggital Plane: Crunch and hanging leg raise
Transverse Plane: Russian twist and windshield wiper
We will include exercises in all three planes to ensure overall core development. To make the core workout for beginners more accessible, we have only included bodyweight exercises. It also allows you to perform them anywhere.
10 Best Core Exercises For Beginners
These are the most effective core exercises for beginners:
Plank
The plank is one of the most popular core exercises. It is an isometric exercise that allows for optimal muscle contraction without visible movement. This exercise is a must-have in every ab training regimen.
Steps:
Lie face-down on the floor.
Your body should be in a straight line from head to heels throughout the exercise.
Position your elbows under your shoulders and your forearms parallel to each other.
Get up on your toes.
Hold this position for the recommended time while contracting your glutes and abs.
Pro Tip: You could also perform a high plank variation of this exercise, which is considered more challenging. The high plank variation involves staying in a push-up position.
Check out our complete plank guide here!
Side Plank
Obliques are often overlooked in an ab workout; however, we are not leaving any stone unturned in this article. The side planks are a frontal plane exercise that will work your obliques and the rectus abdominis muscle.
Steps:
Lie on your left side on an exercise mat.
Your legs should be stacked, and your right arm should rest on your side.
Plant your left elbow under your shoulder.
Brace your core and glute and drive your left elbow into the floor to lift your hips off the floor. Your body, from head to toe, should be in a straight line.
Hold this position for the recommended time.
Repeat on the other side.
Pro Tip: Make the exercise harder by performing hip dips while holding the plank. Ensure that you keep your shoulders pulled back and down throughout the exercise.
Check out our complete side plank guide here!
Sit-Up
The sit-up is a staple in most ab training workouts. It works your rectus abdominis muscle with a focus on the upper abs.
Steps:
Lie supine on the floor with your knees bent and feet planted flat on the floor.
Hold your hands in front of your chest or at the sides of your head.
Lift your upper back off the floor by driving your lower back and hips into the floor.
Your torso should be a few inches away from your quads at the top.
Slowly lower to the starting position.
Repeat for recommended reps.
Pro Tip: Avoid interlacing your fingers behind your head, as it can strain your neck. Keep your reps slow and controlled, and avoid using momentum during the concentric (upward) motion.
Reverse Crunch
The reverse crunch is an incredibly effective exercise for the more stubborn lower abs. It might look easy, but it will smoke your core in no time.
Steps:
Lie on your back on the floor. Bend your knees and plant your feet on the floor.
Extend your arms at your sides.
Lift your feet off the floor and bring your thighs to your chest.
Pause and contract your abs.
Return to the starting position.
Repeat for reps.
Pro Tip: Extend your legs at the bottom of the movement to bump up the intensity of this exercise.
Check out our complete reverse crunch guide here!
Dead Bug
The dead bug is one of the best core exercises for beginners. Getting into the dead bug is easy, and it helps achieve optimal core activation.
Steps:
Lie flat on the floor while facing the ceiling.
Extend your arms so they are perpendicular to your torso.
Lift your legs off the floor; your legs should be at a 90-degree angle.
Slowly extend your right arm overhead while extending your left leg. At the bottom of the movement, both should be a few inches from hitting the floor.
Return to the starting position.
Repeat on the other side.
Alternate between sides for the recommended reps.
Pro Tip: Make the exercise harder by using ankle weights and dumbbells. You could perform this exercise for reps or time.
Check out our complete dead bug guide here!
Hollow Hold
The hollow hold is a variation of the dead bug. It is excellent for building a rock-solid core, which will translate to better performance in functional movements. The hollow hold is one of the best core exercises for CrossFit beginners.
Steps:
Lie face up on the floor with your body in a straight line from head to toe.
Extend your arm overhead.
Brace your core and glute, and lift your head, upper back, and arms off the floor. Your arms should be at a 45-degree angle with the floor.
Simultaneously, lift your legs until your body resembles a “V.”
Hold this position for as long as possible.
Pro Tip: Holding your hands together makes the exercise a little easier. On the flip side, you can hold onto dumbbells or a weight plate to make it harder.
Check out our complete hollow hold guide here!
Superman
The Superman exercise is the mirror opposite of the hollow hold. This exercise targets your lower back and glutes and can help improve your mobility.
Steps:
Lie face down on the floor with your arms extended overhead.
Lift your head and chest off the floor so that your arms are a few inches off the floor.
Contract your core, glutes, and lower back, and lift your knees and thighs off the floor.
Hold the position for as long as possible.
Pro Tip: Maintain a neutral head throughout the exercise to avoid straining your neck. Lift your arms and legs as high as possible.
Check out our complete Superman guide here!
Russian Twist
The Russian twist works your core in the transverse plane. It will help develop your obliques and six-pack. After mastering the movement, hold onto a kettlebell, dumbbell, or weight plate for better muscle stimulation.
Steps:
Sit on the floor with your knees bent and feet flat on the ground.
Lean back so your torso forms a 45-degree angle with the floor, and lift your feet off the floor.
Extend your arms straight in front of you. Your palms should be over your knees.
Keeping your pelvis stable, turn to your right side.
Slowly return to the starting position.
Repeat on the left side.
Pro Tip: Perform this exercise on a decline bench for greater core engagement. Adjust the angle of the bench according to your experience level.
Check out our complete Russian Twist guide here!
Lying Leg Raise
This exercise works your middle and lower abs. Keep your knees locked out and pull your toes toward your torso while performing the lying leg raise for optimal lower ab engagement.
Steps:
Lie face up on the floor with your body in a straight line.
Keeping your knees locked, lift your legs toward the ceiling until they are perpendicular to the floor.
Slowly return to the starting position.
Repeat for reps.
Pro Tip: Place your hands under your hips for leverage. You could also perform this exercise on an elevated platform like a flat bench for an extended range of motion.
Check out our complete lying leg raise guide here!
Heel Tap
Think of heel taps as crunches for your obliques. Maintain a constant rep tempo on this exercise for optimal midriff engagement.
Steps:
Lie supine on the floor with your knees bent and your feet flat on the ground.
Your heels should be next to your hips.
Extend your arms at your sides.
Lift your shoulders, upper back, and head off the floor.
Turn to your right side and touch the side of your foot.
Return to the starting position.
Repeat on your left side.
Alternate between sides for recommended reps.
Pro Tip: Increase the distance between your hips and heels as you get better at this exercise. You could also aim for touching your toes instead of the side of your feet.
Check out our complete heel tap guide here!
Best Core Workout For Beginners
Now that you know about the best core exercises for beginners, it is time to put the knowledge to work. We have programmed these 10 beginner-friendly core exercises into a HIIT workout, which can be completed within 15 minutes.
High-intensity interval training (HIIT) workouts are incredibly effective at annihilating your midsection quickly and helping you achieve washboard abs.
In this workout, you’ll perform each exercise for 60 seconds. You are allowed a 30-second rest between exercises. Feel free to take a small breather (1-5 seconds) if you are unable to perform an exercise unbroken.
Tips To Maximize Core Workout Results
Here are a few tips to get the best bang for your buck from your core workouts:
If your goal is to build a diced midsection, you must also focus on your diet. Furthermore, you must enter a calorie deficit to shed excess body fat.
As you get better at these exercises, you can make them more challenging by adding resistance using weight plates, dumbbells, kettlebells, or resistance bands.
Breathing plays a vital role during core workouts. You must exhale sharply during the concentric part of the motion to achieve optimal core activation. Breathe in as you return to the starting position.
Spend 5-10 minutes warming up your core with light dynamic and static stretches to reduce the risk of muscle cramps.
It is common to experience ab cramps (especially for beginners) during ab workouts. Spend 5-10 seconds between sets rubbing down your abs to reduce the risk of cramping.
Benefits of Core Exercises For Beginners
Given below are the advantages of adding core exercises to your training regimen:
Aesthetics
Who are we kidding? Most people do the borning crunches because of the aesthetic benefits attached to them. A chiseled midsection makes you stand out and is one of the best indicators of physical fitness.
Improve Functionality
Most compound exercises like the squat, bench press, deadlift, and Olympic lifts require a strong core. Doing core exercises can improve your performance in the gym and daily activities. [1]
Boost Balance, Stability, and Flexibility
Core exercises can improve your balance, stability, and flexibility as it works your midsection, lower back, hips, and pelvis. Perform core exercises regularly for at least 12 weeks to start noticing the difference. [2]
Improves Posture and Reduces the Risk of Lower Back Pain
Folks that spend most of their days hunched over a computer or phone are at a higher risk of developing poor posture and lower back pain. Performing core exercises can strengthen your spine-supporting muscles, which can help improve your posture and lower the risk of lower back pain and injury during training.
Do Not Require Any Equipment
All the best core exercises for beginners in this article are bodyweight movements that can be done anywhere at your convenience. Plus, core exercises are incredibly versatile and can be squeezed into any workout.
Wrapping Up
Adding core workouts into your training regimen helps you achieve more than a carved midsection. It improves your balance and stability, boosts your overall functionality, promotes a better posture, and reduces your risk of lower back pain and injury.
This article covers the 10 best core exercises for beginners. Follow the 15-minute HIIT workout detailed above to set your midriff on fire in a short period. Pair these exercises and workout with a robust diet and recovery program to achieve a diced six-pack. Best of luck!
More Core Exercises and Workouts:
References
Okada, Tomoko; Huxel, Kellie C; Nesser, Thomas W. Relationship Between Core Stability, Functional Movement, and Performance. Journal of Strength and Conditioning Research 25(1):p 252-261, January 2011. | DOI: 10.1519/JSC.0b013e3181b22b3e
Manjusha K, Nithya Narayanan Kutty, Shilpa Chandran. The Effectiveness of Core Strength Training to Improve Functional Mobility and Balance in Geriatric Population: A Literature Review. Ortho Res Online J. 9(1). OPROJ. 000701. 2021. DOI: 10.31031/OPROJ.2021.09.000701

The Best HIIT Ab Workout: Get Ripped Abs in Record Time
Most people perform a few ab exercises at the end of their strength training session. It’s no surprise they are nowhere close to their six-pack goal.
High-intensity interval training (HIIT) involves short bursts of high-intensity exercise followed by brief periods of rest or lower-intensity exercise. HIIT workouts for your abs are an incredibly effective method of trimming down your waistline and shedding the excess fat to reveal your abs.
HIIT ab workouts will increase your heart rate, help burn fat, and improve your overall fitness level in a shorter period than traditional cardio workouts. It makes these workouts the perfect fit for people with a busy schedule who cannot afford to spend 45-60 minutes in the gym.
In this HIIT ab workout, we will not only do the most intense abdominal exercises, but we will narrow down on the movements that will also increase your heart rate so that you are actively burning calories.
12 Best HIIT Ab Exercises
Add these ab movements to your exercise arsenal to build a cover photo-worthy six-pack:
High Knees
We will kick off the HIIT ab workout with high knees. It will warm up your abs and get your cardiovascular system going. Think of this exercise as a unilateral variation of the hanging knee-to-chest.
Steps:
Stand upright with a hip-width stance.
Hold your hands in front of your chest, palms facing down.
Lift your right foot off the floor and bring your thigh as close to your chest as possible. Simultaneously, lift your left heel off the floor so that your left toes are the only point of contact with the floor.
Return your right foot to the ground.
Immediately repeat on the left side.
Alternate between sides for the recommended time.
Speed up the exercise to bump up your training intensity. Both your feet should be off the floor during the leg transition.
Pro Tip: You want to keep your core braced throughout this exercise for optimal midsection stimulation.
Check out our detailed high knee exercise guide!
Mountain Climber
The mountain climber is a high knee variation; however, it places more tension on your core as you perform it in a high plank position. Perform this exercise for long enough, and it will also tax your shoulders and pectoral muscles.
Steps:
Start in a high plank position. Your hands should be under your shoulders and your body, from head to heels, in a straight line.
Brace your core muscles, bend your right knee, and bring it toward your chest.
Return it to the starting position.
Alternate between sides for the recommended time.
Start slow and increase the tempo while maintaining your form.
Both your feet should be off the floor during the leg transition.
Pro Tip: Avoid forming a bridge with your hips or letting them drop during the exercise, as it removes tension from your core and puts in on your lower back.
Check out our detailed mountain climber exercise guide!
Flutter Kick
The flutter kick is an often overlooked exercise in most ab workouts. However, it is an excellent movement to target the more stubborn lower abs.
Steps:
Lie on your back on the floor. Your body should be in a straight line from head to heels, and your legs should be placed together.
Place your hands under your hips for leverage.
Raise your legs and head off the floor. Keep your core braced throughout the exercise.
Lift your right leg as high as possible while keeping your left leg in place.
Return the right leg to the starting position while raising your left leg toward the ceiling.
Alternate between sides for the recommended time.
Pro Tip: Ensure your back is placed flat against the floor throughout the exercise. Arching your back will result in hip flexor stimulation and put unnecessary strain on your spine.
Check out our detailed flutter kick exercise guide!
Sit-Up
The sit-up is a staple in most ab training routines. However, you’ll be performing this exercise with high intensity in the HIIT ab workout to fire up your midsection.
Steps:
Lie supine on the floor. Bend your knees and place your feet flat on the floor.
Hold your hands next to your ears throughout the exercise.
Take a deep breath and lift your torso off the floor by contracting your abs.
Your torso should be perpendicular to the floor at the top of the motion. Exhale sharply and squeeze your abs.
Slowly lower to the start position.
Pro Tip: Avoid interlacing your fingers behind your head as it can sprain your neck during the concentric motion. Alternatively, hold your hands in front of your chest during the exercise.
Lying Leg Raise
The lying leg raise is one of those exercises that look super easy but will smoke your abs in no time. You must keep your legs straight for optimal lower ab engagement.
Steps:
Lie with your back on the floor. Your body should be in a straight line.
Place your hands under your hips for leverage.
Lift your legs off the floor so your heels are a few inches off the ground. This will be your starting position.
Raise your legs as high as possible while driving your lower back into the floor.
Slowly return to the starting position.
Repeat for the recommended time.
Pro Tip: Perform this exercise on an elevated surface, such as a flat bench, for an extended range of motion.
Check out our detailed lying leg raise exercise guide!
Bicycle Crunch
The bicycle crunch is an incredibly effective exercise that works your entire core, including your obliques and rectus abdominous.
Steps:
Lie supine on the floor.
Place your hands at the sides of your ears.
Lift your legs off the floor so your ankles are a few inches off the floor.
Bend your right knee, and bring it as close to your chest as possible.
Simultaneously, perform a cross-body crunch and touch your right knee with your left elbow.
Return to the start position.
Alternate between sides for the recommended time.
Pro Tip: Exhale sharply and contract your abs at the static contraction point at the top for optimal ab stimulation.
Check out our detailed bicycle crunch exercise guide!
Alternating Jackknife
This full-body exercise can help improve your flexibility and posture, besides giving you a shredded midsection.
Steps:
Lie with your back on the floor.
Extend your arms overhead.
Lift your right leg off the floor as high as possible. Simultaneously, lift your torso off the ground and bring your arms toward your toes in a sweeping motion.
Return to the starting position.
Alternate between sides for the recommended time.
Pro Tip: Feel free to bend your knees if you cannot touch your toes with straight legs.
Check out our detailed jackknife exercise guide!
Plank Jack
The plank jack will help you develop explosive lower body strength and a robust core. It involves jumping your feet out to the sides while holding a plank.
Steps:
Assume a high plank position. Your hands should be under your shoulders and legs together and extended behind you.
Brace your core and jump both feet out wide to each side as if you were doing a horizontal jumping jack.
Jump back to the starting position.
Rinse and repeat.
Pro Tip: Keep your shoulder blades pulled back and down throughout the exercise and actively push into the floor with your hands to maintain balance.
Side Plank Dip
This oblique exercise requires decent core strength to perform with a full range of motion.
Steps:
Lie on your side on the floor. Your legs should be stacked.
Place your elbow under your shoulder. Your forearm should be placed on the floor perpendicular to your body for balance.
Place your top arm on your side.
Lift your hips off the floor. Your body should be in a straight line.
Lower your hips toward the floor until they are a few inches off the ground.
Return to the starting position.
Repeat for the recommended time.
Switch sides.
Pro Tip: Lift your top arm toward the ceiling so it is perpendicular to the floor to take some weight off your core and make the exercise a little easier.
Wood Chopper
Although you could perform this exercise without additional resistance, we recommend using a light dumbbell for optimal core stimulation.
Steps:
Stand upright with a hip-width stance.
Hold a dumbbell with both hands.
Twist your torso to the right side and lift the weight up and across your body with straight arms.
Lower the dumbbell across your body toward the floor. Bend your knees slightly during the lowering motion.
Repeat for the recommended time before switching sides.
Pro Tip: Keep your eyes fixed on the dumbbell throughout the exercise.
Check out our detailed wood chopper exercise guide!
Floor Wiper
The floor wiper is one of the most challenging exercises in this workout. Beginners can substitute this exercise with the floor windshield wiper until they develop the required core strength to perform this movement with a full range of motion.
Steps:
Lie on your back on the floor.
Extend your arms on your sides and place your hands on the floor for stability.
Lift your legs off the floor so your heels are a few inches from the ground.
Contract your core and bring your feet as close to your left hand as possible in a sweeping motion while keeping your legs straight.
Return to the starting position.
Repeat on the right side.
Alternate between sides for the recommended time.
Pro Tip: As you gain more experience, hold a barbell over your chest for upper-body engagement during this exercise.
Check out our detailed floor wiper exercise guide!
Hollow Hold
The last exercise of the HIIT ab workout takes the intensity down a notch. However, this isometric exercise will leave you with a sore midsection.
Steps:
Lie on your back on the floor. Extend your arms overhead.
Lift your legs, arms, and head off the floor as high toward the ceiling as possible.
Your body should resemble a “V” during the isometric hold.
Keep your core contracted throughout the exercise.
Hold this position for the recommended time.
Pro Tip: Interlacing your fingers while holding the hollow hold position will make the exercise a little easier. However, this technique should only be used by beginners.
Check out our detailed hollow hold exercise guide!
HIIT Ab Workout For a Shredded Midriff
Now that you know the best exercise for a HIIT ab workout, it is time to put them to work. Perform two rounds of the HIIT ab workout circuit given below. Do each exercise for 40 seconds. You are allowed a 20-second rest after completing each exercise to catch your breath. Plus, rest for two minutes before starting the second round. Complete this HIIT workout within 25 minutes.
Exercise
Time (in seconds)
Rest (in seconds)
High Knees
40
20
Mountain Climber
40
20
Flutter Kick
40
20
Sit-Up
40
20
Lying Leg Raise
40
20
Bicycle Crunch
40
20
Alternating Jackknife
40
20
Plank Jack
40
20
Side Plank Dip
30 (each side)
20
Wood Chopper
30 (each side)
20
Floor Wiper
40
20
Hollow Hold
40
120
Perform the side plank dip and wood chopper for 30 seconds on each side. Transition to the other side without stopping for rest. You can rest for 20 seconds after doing these exercises for 60 seconds.
Benefits of HIIT Ab Workout
Adding a HIIT ab workout to your training regimen entails the following advantages:
Helps Target the Midriff and Burn More Calories
Studies show that HIIT workouts are more effective than conventional strength training workouts at burning calories, which can help you shed excess fat. Furthermore, the exercises in this HIIT ab workout will target your midsection, helping you achieve a toned midriff [1]. A study also found that HIIT workouts can help reduce body fat and waist circumference. [2]
Improves Endurance and Stamina
HIIT workouts can improve performance in both anaerobic and aerobic activities [3]. Performing the HIIT ab workout detailed in this article for 12 weeks will help improve your endurance and stamina.
Quick and Impactful
HIIT workouts are usually shorter than conventional weight training sessions as you perform each exercise for a specific length of time and rest for a short period between exercises. This training method is excellent for folks with a packed schedule.
Reduce The Risk of Lower Back Pain and Injury
Training your abs will also strengthen your lower back, reducing the risk of lower back pain and limiting the chances of injury while performing compound exercises, such as the deadlift, squat, and good mornings.
FAQs
Are HIIT workouts better than conventional ab workouts for building a six-pack?It depends on your current physique and training objectives. HIIT workouts should be favored over the conventional strength training style ab workouts if you need to burn fat while toning your abs. However, if you have a decent body fat percentage, the strength training ab workouts will help you achieve better results and a carved six-pack.
How often should I do the HIIT ab workout?Since this is a relatively long and intense HIIT ab workout, you should avoid doing it more than twice weekly. Also, you must space them out so that you have 48 hours to recover between your ab workouts.
Can HIIT ab workout help spot reduce body fat?HIIT workouts cannot help you spot reduce body fat. However, since this is an ab workout, it will help you tone your abs. Plus, HIIT workouts help you burn calories and lose overall body fat, which can reduce abdominal fat over time.
Wrapping Up
The 12 HIIT ab exercises and kickass workout detailed in this article will help you achieve a strong, defined core. This workout will be challenging, so be prepared to push yourself to the limit. Also, you must back up this HIIT ab workout with a balanced diet and recovery program to achieve your dream midsection.
This HIIT ab workout will improve your abdominal strength and definition and also boost your overall fitness level and energy. Keep your training intensity high and focus on your breathing to make the most of this workout. Best of luck!
References
Falcone PH, Tai CY, Carson LR, Joy JM, Mosman MM, McCann TR, Crona KP, Kim MP, Moon JR. Caloric expenditure of aerobic, resistance, or combined high-intensity interval training using a hydraulic resistance system in healthy men. J Strength Cond Res. 2015 Mar;29(3):779-85. doi: 10.1519/JSC.0000000000000661. PMID: 25162652.
Wewege M, van den Berg R, Ward RE, Keech A. The effects of high-intensity interval training vs. moderate-intensity continuous training on body composition in overweight and obese adults: a systematic review and meta-analysis. Obes Rev. 2017 Jun;18(6):635-646. doi: 10.1111/obr.12532. Epub 2017 Apr 11. PMID: 28401638.
Ouerghi N, Fradj MKB, Bezrati I, Khammassi M, Feki M, Kaabachi N, Bouassida A. Effects of high-intensity interval training on body composition, aerobic and anaerobic performance and plasma lipids in overweight/obese and normal-weight young men. Biol Sport. 2017 Dec;34(4):385-392. doi: 10.5114/biolsport.2017.69827. Epub 2017 Sep 20. PMID: 29472742; PMCID: PMC5819474.