Tag: Legs
GHD Exercise Guide: How To, Benefits, Muscles Worked, and Variations
Most people like to train their mirror muscles. What are those, you ask? These are the muscles that you can look at in the mirror while training them, such as the biceps, shoulders, chest, abs, and quadriceps. Looking at your pumped-up muscles in the mirror makes you want to train them more often.
On the other hand, since you cannot look at your posterior chain muscles, such as the back, glutes, hamstrings, and calves, it makes it more difficult to establish a mind-muscle connection with them. Since most people fail to achieve optimal muscle fiber stimulation and contraction while training their posterior chain muscles, it is usually a lagging muscle group for them.
That said, the posterior chain muscles, such as the glutes, back, and hamstrings are some of the biggest muscle groups in your body. Overlooking training them can lead to strength and muscle imbalances and increase your risk of injury.
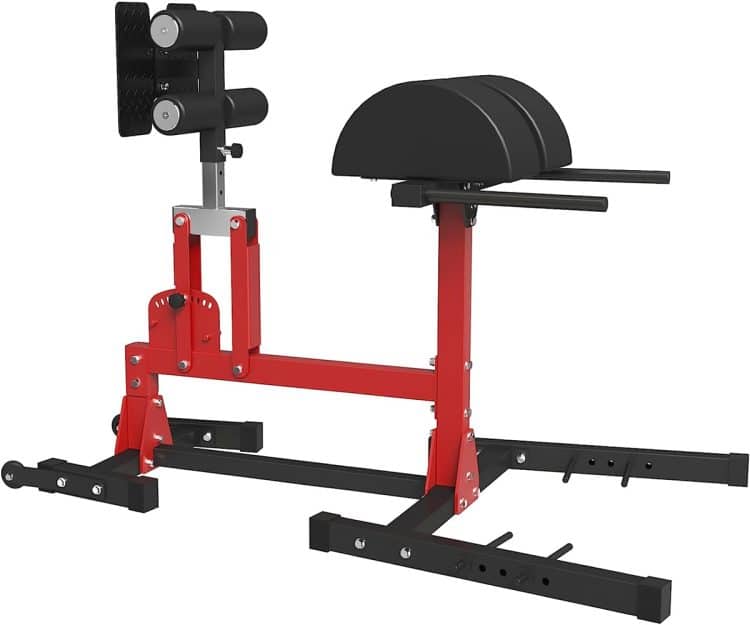
The GHD machine was developed to fix this issue. This ordinary-looking bench is one of the most versatile pieces of training equipment. An exerciser can perform several exercises on the GHD machine to improve their posterior chain.
Most people use ‘GHD’ glute-hamstring developer and ‘GHR’ glute-hamstring raise interchangeably. By making this mistake, these folks limit the possibilities of what they can achieve with this machine.
In this article, we go over everything you must know to make the most of the GHD machine, including the different exercises you can perform, the muscles worked, its benefits, common mistakes, and the best variations and alternatives. We have a lot to cover, so sit tight and read on.
What is GHD?
The glute-hamstring developer, popularly known as the GHD, is a hyperextension alternative. This isolation exercise builds endurance, strength, and muscle mass in the posterior chain (read: hamstrings, glutes, and lower back).
The GHD machine has become a mainstay in CrossFit gyms worldwide because of its effectiveness. The meteoric rise of CrossFit since 2014 has also led to the popularity of the GHD machine.
In contrast to the hyperextension machine, which usually has its thigh pads set at a 45-degree angle, the GHD machine has its pads parallel to the floor. This setup puts more demands on your posterior chain muscles.
Best GHD Exercises & How To Do Them
There are four main GHD machine exercises you must do to take your posterior chain gains to the next level. These exercises might look the same to an untrained eye. However, this guide will help you differentiate between them and learn the correct form to maximize results.
GHD Glute-Ham Raise (GHD Raise)
The GHD raise is one of the most popular GHD exercises, and it is the exercise most people are referring to while talking about GHDs. Glute-hamstring raises were allegedly developed by the Soviet Union weightlifting team to maximize their snatch and clean and jerk performance. As the name suggests, this exercise helps focus on the glutes and hamstrings.
How To Do the GHD Raise:
Mount the machine and place your knees on the support pads just shy of the center. Your hips should be over the pads at the bottom of the movement.
Hold onto the pads while you get into position.
Anchor your ankles between the foot pads.
Your lower legs should be parallel to the floor, and your torso should be 90 degrees with it.
Hold your hands in front of your chest and keep your back neutral throughout the exercise. This will be your starting position.
Take a deep breath, brace your core, and slowly lean your torso forward by extending your knees until it is parallel to the floor.
Breathe out sharply and flex your knees to return to the starting position.
Focus on contracting your glutes and hamstrings throughout the range of motion.
Repeat for the recommended reps.
Pro Tip: Your body, from the top of your knees to your head, should be in a straight line throughout the exercise. Avoid hinging your hips or rounding or overarching your back during this lift.
GHD Hip Extension
The GHD hip extension focuses on your glutes and is one of the best isolation exercises for folks with a lagging bum. You will also experience greater lower back engagement in this GHD variation.
How To Do the GHD Hip Extension:
Adjust the foot platform so that your hips are entirely off the support pads during the exercise.
Get on the GHD machine and place your feet between the foot pads.
Your feet should be pointing straight down during the exercise. Angling out your feet will put unnecessary strain on your adductors.
Cross your arms in front of your chest.
Lower your torso toward the floor so that your body is perpendicular to the floor, also known as the Superwoman position. Again, your hips should be off the pads. This will be your starting position.
Take a deep breath, brace your core, and lower your torso until it is almost perpendicular to the floor.
Contract your glutes and return to the starting position.
Rinse and repeat.
Pro Tip: Avoid breaking parallel during concentrics as it can remove tension from your glutes and put it on your lower back and hamstrings. Keep your shoulder blades pulled back and down and your chest proud throughout this exercise.
GHD Back Extension
The GHD back extension is a combination of the GHD raise and the GHD hip extension in that you will use the setup of the former, whereas you will follow the range of motion of the latter. That said, the focus of this exercise is your lower back. Your glutes and hamstrings will function as supporting muscles.
Since you’ll focus on your lower back in this exercise, you must round your back during eccentrics (lowering movement) and unfurl your back during concentrics.
How To Do the GHD Back Extension:
Adjust the foot pads so that the top of your hips is above the center of the pad.
Mount the GHD machine and place your ankles between the foot pads.
Cross your arms in front of your chest and get into a Superwoman position so your body is parallel to the floor.
Initiate the movement by tucking your chin into your upper chest.
Slowly round your back, one vertebra at a time, and lower your torso toward the floor.
Your belly should be wrapped around the top end of the pad at the bottom of the movement.
Reverse the movement to return to the starting position.
Squeeze your lower back during concentrics.
Keep the movement slow and controlled to avoid engaging your glutes and hamstrings.
Pro Tip: Compared to the hip extension, the back extension helps keep your hips static, putting more tension on your lower back.
GHD Hip and Back Extension
This is arguably the most complex GHD variation, as it combines everything you have learned up to now. You will experience greater glute and lower back engagement in this exercise, whereas your hamstrings will take a back seat.
Since this exercise has more moving parts than the previous GHD variations, you might need some time to master this exercise.
How To Do the GHD Hip and Back Extension:
Bring the foot pads close to the main support pads, as your hips should be clear of the pads during this exercise.
Get on the GHD machine and put your ankles between the foot pads.
With your arms crossed in front of your chest, assume the Superwoman position. Your hips should be clear off the pads, and your body should be in a straight line and parallel to the floor at the starting position.
Begin the movement by tucking your chin into your upper chest.
Slowly roll your shoulders, then your upper back, as you lower your torso toward the floor. Your upper body should be rounded and parallel to the floor at the bottom of the position.
At this position, arch your back and neutralize your spine.
Round your back again and reverse the motion by extending your hips to return to the starting position.
Contract your hips and lower back during concentrics.
Pro Tip: Since the last two exercises require rounding the spine, you should avoid using additional resistance on these GHD variations. Instead, focus on training the hips and lower back to failure by performing a hip number of reps.
Muscles Worked During GHD
All the four GHD variations explained above target the posterior chain. However, the primary and secondary working muscles vary for each exercise group. Here are the muscle groups worked with the GHD exercises:
Glutes & Hamstrings
The glutes and hamstrings are the primary target muscles of the GHD raises. The glutes are the biggest and strongest muscle in your body, and training them can improve your overall functionality and workout performance. The GHD machine is one of the best tools to develop your hamstrings.
Lower Back
Most exercises want you to avoid lower back engagement; the GHD is not one of them. Since the GHD exercises involve constant hip flexion and extension, you cannot escape lower back engagement, especially while doing a high number of reps.
Calves
Whether you are working above parallel (GHD raise) or in the lower half (hip and back extensions), you will achieve lower leg stimulation. You will experience your calves fire up to a greater degree in longer sets (more than 15 reps).
Given below is an overview of the primary and secondary muscles of the four GHD variations:
Exercise
Primary Target Muscles
Secondary Muscles
GHD Raise
Glutes and hamstrings
Lower back
GHD Hip Extension
Glutes
Lower back and hamstrings
GHD Back Extension
Lower back
Glutes and hamstrings
GHD Hip and Back Extension
Glutes and lower back
Hamstrings
Benefits of GHD
Adding the GHD machine to your training regimen entails the following benefits:
Builds Strength and Muscle Mass
The glute-hamstring developer can help you build stronger and more muscular glutes, hamstrings, and lower back. Adjust your training and volume to meet your objective.
Develop a Robust Posterior Chain
A strong posterior chain can improve your overall functionality, training, and athletic performance. Performing this exercise regularly can translate to better performance on compound movements that require posterior chain engagement.
Perfect For Exercisers of all Experience Levels
Since GHD exercises are isolation movements, they are easy to learn. That said, this machine is just as effective for advanced lifters as it is for newbies. Seasoned trainers can add to this exercise’s difficulty by using additional resistance.
Reduces Risk of Hamstring Injury
Research shows that adding eccentric-focused movements and isometric exercises can reduce your risk of injury during explosive movements [1]. People that deal with recurring posterior chain injuries should add this exercise to their exercise regimen after consulting their healthcare provider.
Common Mistakes While Performing GHD
Avoid committing the following errors to limit the risk of injury and get the best bang for your buck:
Replacing the GHD Machine with a Hyperextension Bench
Many people think that 45-degree hyperextension machines are the same as GHD machines. However, nothing could be further from the truth. The GHD machine is much more demanding on your hamstrings and glutes than the hyperextension bench.
Mixing Two GHD Movements
I cannot tell you how often I see people do GHD raises with a GHD hip extension setup. Remember, going all the way up, and all the way down is not always a good idea. You must get well-versed with the GHD variations to reduce your risk of injury.
Adding Weights Too Soon
Bodyweight versions of the GHD variations explained in this article are good enough for most people to build a strong and muscular posterior chain. You should only use additional resistance after you have drilled the movement.
Variations of GHD
Use the following GHD variations to add variety to your exercise regime:
Eccentric-Focused Glute-Ham Raise
You can use this technique in any of the four GHD variations mentioned in this article. In this exercise, you take three to five seconds on the eccentrics. Slowing down the negatives increases the time under tension, which leads to greater muscle stimulation [2]. Follow the same-old rep tempo during concentrics and the statics contraction points at the top and bottom.
Sorenson Hold
The Sorenson hold is an isometric GHD variation, meaning you hold the same position for a specific time. Think of the Sorenson hold as a plank for your glutes, hamstrings, and lower back.
How To:
Get in the same position as the GHD hip extension. Your hips should be clear of the pads.
Cross your arms in front of your chest.
Extend your hips and lower your torso so your body is parallel to the floor.
Hold this position for as long as possible. Aim for 30-60 seconds.
Repeat for recommended reps.
GHD Oblique Crunch
This GHD variation works your obliques and can help you develop shredded obliques and the coveted sex lines.
How To:
Adjust the foot pads of the GHD machine so that your hips rest on top of the pads.
Mount the GHD machine. Turn to your side so that your right shoulder is facing the ceiling. The side of your left hip should be on the left pad.
Secure your left foot between the foot pads and place your right foot on top of the pads.
Your body should be in a straight line and parallel to the floor at the starting position.
Lower your torso as low toward the floor as possible.
Return to the starting position.
Repeat for recommended reps before switching sides.
Alternatives of GHD
Here are some of the best alternatives to the GHD:
Nordic Curl
You could perform this exercise on a specialized Nordic curl or with a barbell. Since most people don’t have access to a Nordic curl bench, here is how to do this movement with a barbell.
How To:
Attach two-quarter plates on each end of a barbell and place them on the floor.
Kneel on the floor facing away from the bar and anchor your heels under it.
Your body, from your knees to your head, should be in a straight line at the starting position.
Hold your hands in front of your chest.
Slowly lower your torso toward the floor by leaning forward. Control the descent by contracting your hamstrings and glutes.
Break the fall with your hands.
Use your hands for a lift-off. Contract your glutes and hamstrings to return to the starting position.
Repeat for recommended reps.
Reverse Hyperextensions
This exercise flips the GHD hip extension on its head. Louie Simmons on Westside Barbell invented reverse hyperextension and a specialized machine for it. However, you can use a GHD machine for this exercise.
How To:
Stand facing the GHD machine.
Reach forward and grab the foot platform. Adjust the platform so your hips are hanging off the pads.
At the starting position, your body should be in a straight line and parallel to the floor.
Lower your legs toward the floor until they are a few inches from touching it.
Keeping your legs straight, extend your hips and raise your lower body as high toward the ceiling as possible.
Control the descent.
Repeat for recommended reps.
Good Morning
Good mornings are an incredibly effective exercise to work your posterior chain. Use a moderate weight on this exercise to limit the risk of injury.
How To:
Stand upright with a hip-width stance with a barbell across your shoulders.
Maintaining a slight bend in your knees, slowly lower your torso toward the floor while pushing your hips back. Keep your core braced throughout the exercise.
Your torso should be almost parallel to the floor at the bottom of the position.
Return to the starting position.
Romanian Deadlift
The Romanian deadlift is a compound full-body exercise to build overall strength and muscle mass. However, this exercise primarily targets the glutes, hamstrings, and lower back.
How To:
Stand straight with a shoulder-wide stance while holding a barbell against your thighs using an overhand grip.
Maintaining a slight bend in your knees, slowly lower the bar toward the floor by bending at your hips and pushing them back.
The bar should be below your knees at the bottom of the range of motion.
Pause at the bottom and contract your hamstrings and glutes.
Explode back to the starting position.
Rinse and repeat.
FAQs
Who should avoid the GHD raises?
Folks dealing with posterior chain or lower body injuries should avoid the GHD raises. That said, you should consult your healthcare provider before starting a new training or nutrition program, especially if you’re suffering from a health issue, are pregnant, or are under 18 years old.
Can I replace leg curls with GHD raises in my workout?
Leg curls and GHD raises are both isolation exercises that work the hamstrings. However, GHD also targets your glutes. On the other hand, the leg curl machine helps maintain constant tension on your hammies throughout the range of motion. Each machine has its unique benefits, and hence you should include both in your training regimen.
How often should I do the GHD raise?
Since GHD raises are an isolation exercise, they put incredible demand on your hamstrings. According to research, you must give your muscles at least 48 hours to recover between workouts. It will result in better strength and muscle gains and reduce your risk of injury and overtraining. [3]
Who should do the GHD exercises?
The GHD variations explained in this article are great for CrossFitters, Strongman athletes, Olympic weightlifters, bodybuilders, and even hobbyist exercisers. Building a strong posterior chain help virtually everyone.
Wrapping Up
The GHD machine is a versatile training equipment that can help build a stronger and more muscular posterior chain. It can also help develop a robust midline, using exercises like the GHD sit-ups and oblique crunches.
Folks with access to a GHD machine at their gym should add the four GHD exercises explained in this article to their training regimen. Adjust the programming and training frequency to meet your objectives. So, what are you waiting for? Get working on those glutes and hammies. Best of luck!
References
Jonhagen S, Nemeth G, Eriksson E. Hamstring Injuries in Sprinters: The Role of Concentric and Eccentric Hamstring Muscle Strength and Flexibility. The American Journal of Sports Medicine. 1994;22(2):262-266. doi:10.1177/036354659402200218
Burd NA, Andrews RJ, West DW, Little JP, Cochran AJ, Hector AJ, Cashaback JG, Gibala MJ, Potvin JR, Baker SK, Phillips SM. Muscle time under tension during resistance exercise stimulates differential muscle protein sub-fractional synthetic responses in men. J Physiol. 2012 Jan 15;590(2):351-62. doi: 10.1113/jphysiol.2011.221200. Epub 2011 Nov 21. PMID: 22106173; PMCID: PMC3285070.
Monteiro ER, Vingren JL, Corrêa Neto VG, Neves EB, Steele J, Novaes JS. Effects of Different Between Test Rest Intervals in Reproducibility of the 10-Repetition Maximum Load Test: A Pilot Study with Recreationally Resistance Trained Men. Int J Exerc Sci. 2019 Aug 1;12(4):932-940. PMID: 31523350; PMCID: PMC6719818.
3 Best Beginner Leg Workouts: Turn Your Chicken Legs Into Tree Trunks
Leg workouts are the most skipped workouts in a resistance training routine. It’s almost as if most lifters think that leg workouts are optional. So many lifters have such polarizing views about leg workouts because they had a shaky start with lower-body training.
Many beginners try to do too much too soon in their leg workouts; it gives them suboptimal results and increases their risk of injury. One of the most common mistakes a beginner lifter can make is to incorporate advanced exercisers, such as the Bulgarian split squat and the Jefferson squat, in their training regimen. Although these exercises look dope and can help induce hypertrophy, these lifts are best left to advanced trainers.
Starting the leg workouts on the right foot will set you on the correct trajectory toward your fitness goals. An effective beginner leg workout will help you drill the basic movements and make you look forward to your lower body workouts every week.
In this article, we go over the three best beginner leg workouts to unlock new strength and muscle gains. We also cover the advantages of performing leg workouts as a beginner and the tips to get the best bang for your buck.
Best Beginner Leg Workouts
This article contains three beginner-friendly workouts that will help you build bigger wheels.
But why three and not one, you ask?
A complete beginner should always begin with a bodyweight workout and stick to it for four to eight weeks. The first workout in this article will be a bodyweight workout to help you master the basic movements. The third workout introduces additional resistance to the mix.
What about the second workout? That’s a surprise!
The first workout will help you develop the necessary muscle mobility and strength to perform the exercises using weights with a full range of movement.
Although the bodyweight beginner leg workout might sound boring, it is a must for newbie lifters as it will help you build the necessary bone, tendon, ligament, and muscle strength to support weights for the more advanced workouts.
Bodyweight Beginner Leg Workout
Beginners must begin their lower body training journey with compound (multi-joint) exercises as it helps ignite strength and muscle gains while improving overall functionality, which boosts their physical performance in everyday tasks.
Here is how to perform each exercise with the correct form:
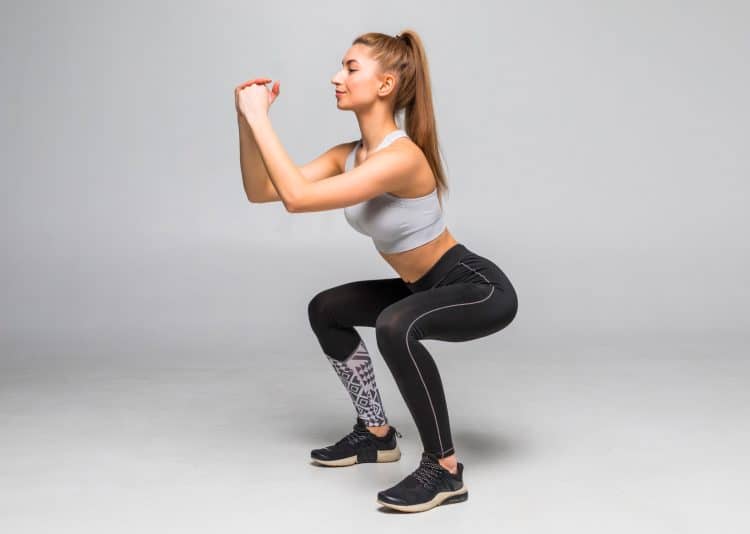
Air Squat
The squat is the king of leg exercises and should be a part of each lower-body training session. It helps develop strength and muscle mass, improve balance and mobility, and build a solid core. There are enough squat variations to keep your workouts interesting.
Steps:
Stand upright with a shoulder-wide stance.
Turn your toes outward slightly for a more comfortable ankle position.
Hold your hands in front of your chest throughout the exercise.
Push your hips back and down to lower yourself into a deep squat.
Pause at the bottom.
Explode back to the starting position while driving through your heels.
Repeat for recommended reps.
Pro Tip: Maintain the natural curvature of your spine throughout the movement. Avoid bending forward, as it will strain your lower back.
Check out our complete air squat guide here!
Step-Up
The step-up is a lunge variation. It is a potent booty builder and will help improve your mobility as it involves moving through a more extensive range of motion than the conventional lunge.
Steps:
Stand tall, facing an elevated platform, such as a flat bench or a plyo box. The height of the box should be at least 20 inches.
Lift your right foot off the floor and plant it on the elevated platform.
Drive through the right foot to lift your left leg off the floor. Place your left foot beside your right foot.
Return to the starting position.
Start with your left foot for the next rep.
Alternate between sides for the recommended reps.
Pro Tip: Avoid using your rear leg to push yourself off the floor. Further, keep an upright torso throughout the exercise.
Check out our complete step-up guide here!
Lateral Lunge
The lateral lunge is one of the most overlooked lower body movements. It is excellent for improving your hip mobility. The lateral lunge will boost your performance in leg exercises, especially those that require a wide stance, such as the sumo squat and deadlift.
Steps:
Stand erect with a hip-width stance.
Hold your hands in front of your chest.
Take a big step to your right while keeping your left foot planted on the floor.
Bend your right knee to lower yourself toward the floor. Your right thigh should at least be parallel to the floor at the bottom.
Forcefully push off from your foot to return to the starting position.
Repeat on the left side.
Alternate between sides for the recommended reps.
Pro Tip: As you gain more experience, you can achieve more depth by lifting the toes of the planted foot off the floor.
Check out our complete lateral lunge guide here!
Glute Bridge
This exercise targets your glutes and hamstrings. The glute bridge might look inconsequential but will leave you with a muscle-ripping pump.
Steps:
Lie on the floor on your back. Your arms should be at your sides.
Bend your knees and plant your feet flat on the floor.
Lift your hips toward the ceiling. Your body, from knees to head, should be in a straight line at the top.
Pause and contract your glutes at the top.
Slowly return to the starting position.
Repeat for recommended reps.
Pro Tip: Place the soles of your feet together for a greater emphasis on the outside of your glutes.
Check out our complete glute bridge guide here!
Stability Ball Leg Curl
The stability ball leg curl will smoke your hamstrings. This exercise also requires decent core strength to perform correctly.
Steps:
Lie supine on the floor with your feet on top of an exercise ball.
When your legs are extended, your ankles should be on top of the ball. This will be your starting position.
Raise your hips off the floor, keeping your weight on your shoulder blades and feet.
Bend your knees to bring the ball as close to your butt as possible.
Pause and contract your hams at the top.
Return to the starting position.
Pro Tip: You could start with a heavy wall ball if doing this exercise using an exercise ball feels too difficult.
Standing Calf Raise
Calves are often overlooked in a bodyweight training regimen. However, this is no ordinary training program.
Steps:
Place your toes on the edge of an elevated object, such as an aerobic step.
Place your hands on a wall for stability.
Lower your heels as close to the floor as possible.
Lift your heels as high as possible.
Pause and contract your calves at the top.
Slowly return to the starting position.
Pro Tip: Imagine getting on your toes like a ballerina at the top of the movement for optimal gastrocnemius muscle stimulation.
Check out our complete standing calf raise guide here!
Bodyweight HIIT Leg Workout For Beginners
Beginners can ramp up the intensity of the bodyweight leg workouts using the HIIT (high-intensity interval training) protocol. HIIT workouts involve short bursts of intense activity followed by periods of rest or lower-intensity exercise. Besides helping build muscle mass and strength, HIIT workouts can improve cardiovascular health, increase metabolic rate, and promote weight loss. Furthermore, since this type of workout takes less time to complete than conventional workouts, it is more suitable for people on a tight schedule. [1]
We’ll program the bodyweight beginner leg workout exercises into a HIIT format. Perform three rounds of the following circuit. Do each exercise for 45 seconds. You are allowed a 15-second rest after each exercise and a two-minute rest after finishing each round. This workout will take you 21.25 minutes to complete.
Weighted Beginner Leg Workout
The weighted beginner leg workout includes basic lower body exercises; these will help add size and strength to your wheels.
After doing the bodyweight leg workout for four to eight weeks, you can switch to the weighted beginner leg workout. It includes a balance of compound and isolation exercises to ignite new growth. Use a weight that allows you to reach muscle failure in the 8-12 rep range to boost muscle hypertrophy. Also, limit your rest duration between sets to 60-120 seconds to keep your training intensity high. [2]
Below is the form breakdown of each exercise:
Barbell Squat
The barbell back squat is a variation of the air squat and involves holding a bar across your shoulders while performing the lift.
Steps:
Stand erect with a hip-width stance with a barbell placed across your shoulders.
Keeping an upright torso, lower yourself into a squat by pushing your hips back and down.
Lower toward the floor until your thighs at least break parallel.
Explode back to the starting position.
Pro Tip: Keep your core and glutes braced throughout the exercise for better balance and stability.
Check out our complete barbell squat guide here!
Walking Lunge
The barbell walking lunge is more challenging than the forward or reverse lunge as it demands greater balance and core stabilizer engagement.
Steps:
Stand upright with a barbell placed across your shoulders.
Step forward with your right foot.
Lower until your left knee touches the floor and your right thigh is parallel to the floor.
Bring your left foot next to your right foot.
Alternate between sides for recommended reps.
Pro Tip: Use a weight that you can handle comfortably. You can switch to dumbbells if you’re having difficulty maintaining your balance with a barbell.
Check out our complete walking lunge guide here!
Leg Press
The leg press is one of the most abused training equipment. Most lifters load more weights onto the machine than they can handle and end up moving the sled only a few inches. Ensure you follow a full range of motion for optimal muscle stimulation.
Steps:
Load an appropriate weight onto the leg press machine.
Take a seat on the machine while maintaining the natural curvature of your spine.
Plant your feet shoulder-width apart on the foot platform.
Unrack the sled and unhook the safety bars.
Slowly lower the sled until your thighs are a few inches away from your chest.
Extend your legs while driving through your whole foot.
Avoid locking out your knees at the top.
Repeat for recommended reps.
Pro Tip: Use different foot positions to target your legs from different angles. A wider-than-shoulder-width stance targets your inner thighs, whereas a narrow foot placement targets your quad sweeps.
Check out our complete leg press guide here!
Leg Extension
The leg extension is a staple in most leg workouts. It is an isolation exercise that focuses on your quads.
Steps:
Sit on the leg extension machine and place your ankles behind the foot pad.
While keeping your hips glued to the seat, extend your knees so your legs are in a straight line.
Pause and contract your quads at the top.
Slowly return to the starting position.
Repeat for reps.
Pro Tip: Train to failure on this exercise to achieve a quad-ripping pump.
Check out our complete leg extension guide here!
Leg Curl
Similar to how the machine preacher curl targets the biceps, the leg curl targets and strengthens the hamstrings.
Steps:
Lay face down on the machine.
The ankle pad should be just above the back of your ankles.
Squeeze your hamstrings and curl the weight. The pad should touch your hips at the top of the movement.
Pause and contract your hams at the top.
Slowly return to the starting position.
Repeat for reps.
Pro Tip: Keep your toes pointed during this exercise for better hamstring isolation.
Check out our complete leg curl guide here!
Seated Calf Raise
While the standing calf raises stimulate the gastrocnemius muscle, the seated calf raise works the soleus muscle.
Steps:
Sit on the calf raise machine. Place your toes on the foot platform and the bottom of your quads under the thigh pads.
Unrack the machine and lower your heels as close to the floor as possible.
Raise your heels as high as possible.
Contract your calves at the top.
Pro Tip: Calves can be a stubborn muscle group to develop. Increase your training volume by doing more sets and reps if you have lagging lower legs.
Check out our complete seated calf raise guide here!
Benefits of Beginner Leg Workout
Here are the advantages of doing the beginner leg workout:
Builds Strength and Muscle Mass: These beginner leg workouts will help you pack on muscle mass and strength. It will also improve your overall physique symmetry and balance.
Helps Builds a Solid Foundation: Leg workouts can help build a solid foundation by increasing your overall strength, improving your posture, and boosting your athletic performance.
Improves Balance and Stability: Lower body exercises, especially unilateral movements like the lunge, can improve your balance and stability. It will also strengthen your stabilizer muscles.
Boosts Functionality: Most exercises in beginner leg workouts are compound movements that will improve your overall functionality and make you perform better in daily activities.
Burns More Calories: Leg workouts involve training half your body in a single workout, which results in greater calorie burning than training other smaller muscle groups.
Develops a Strong Mindset: Leg workouts demand more grit and determination than any other muscle group. Going hard and heavy in leg workouts will help you develop a killer mindset.
Tips To Consider During a Beginner Leg Workout
Use the following tips to make the most of your lower body training sessions:
Warm-Up: Spending 5-10 minutes warming up will improve your mobility and flexibility and lower your injury risk.
Cool Down: Stretching after a leg workout is an excellent way to kickstart your recovery process.
Mobility: You must have decent overall mobility to perform leg workouts. Poor mobility will limit your range of motion and make achieving depth in exercises like the squat and leg press uncomfortable.
Progressive Overload: You must consistently challenge your muscles by increasing your training intensity and volume to ensure constant growth and limit the risk of hitting a plateau. Increase the weights, number of sets, reps, and exercises, or reduce the rest between sets to progressively overload your muscles. You could also use advanced training techniques like super sets and drop sets to achieve this feat.
Diet and Recovery: Whether you are training to build muscle mass or strength, you must follow a macro-focused diet and sleep for at least seven to eight hours each night to speed up your recovery and get the best bang for your buck.
Wrapping Up
The three beginner leg workouts detailed in this article are an excellent starting point for those looking to build strength and size in their lower bodies. These will also help boost your overall functionality, improve your balance and stability, burn more calories, and develop a killer mindset.
You must start slowly and gradually increase the intensity and duration of the workouts. Seek expert help to nail down your training form and limit your risk of injury. Finally, back up the beginner leg workouts with balanced diet and recovery programs to unlock stellar gains. Best of luck!
References
Ito S. High-intensity interval training for health benefits and care of cardiac diseases – The key to an efficient exercise protocol. World J Cardiol. 2019 Jul 26;11(7):171-188. doi: 10.4330/wjc.v11.i7.171. PMID: 31565193; PMCID: PMC6763680.
Krzysztofik M, Wilk M, Wojdała G, Gołaś A. Maximizing Muscle Hypertrophy: A Systematic Review of Advanced Resistance Training Techniques and Methods. Int J Environ Res Public Health. 2019 Dec 4;16(24):4897. doi: 10.3390/ijerph16244897. PMID: 31817252; PMCID: PMC6950543.
Beginner Deadlift Program – 1 and 2 Workouts a Week
There aren’t many exercises that build muscle mass and strength like deadlifts. Working almost every muscle in your body, deadlifts are arguably the most productive thing you can do with a weighted barbell.
Deadlifts are highly functional, teaching you how to bend and lift heavy objects off the floor safely, i.e., using your legs and back together and without rounding your lumbar spine.
Regardless of what you’re training for, you’ll probably reach your goals sooner if you include deadlifts in your workouts.
All that said, deadlifts can also be intimidating, and many beginners are reticent to try them. Some so-called fitness experts make matters worse by labeling the deadlift as dangerous, stating that they cause back injuries.
The truth is that any exercise can cause injuries when performed incorrectly. Deadlifts are actually pretty safe when done properly and with an appropriate load. So, by all means, respect the deadlift but don’t fear it.
The programs in this article are designed to help you go from zero to certified deadlifting hero!
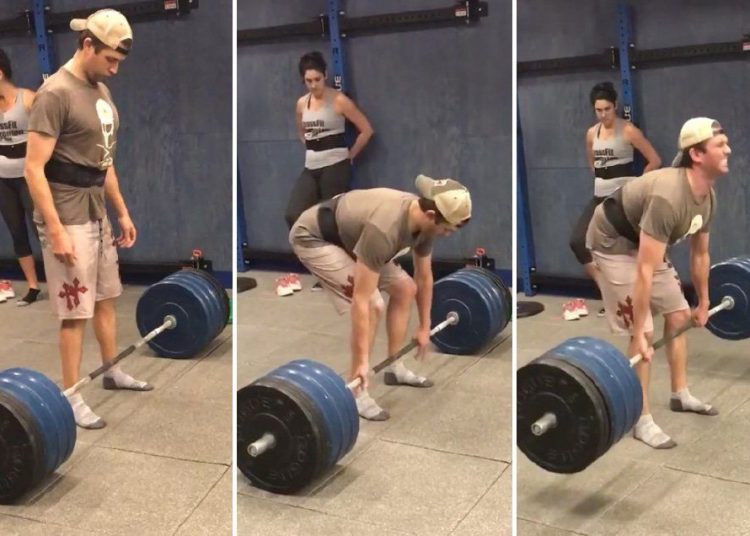
Deadlifting Form Basics
A correctly performed deadlift is a thing of beauty. With all your joints and muscles working in synergy, even heavy weights come off the floor relatively smoothly. However, while a well-performed deadlift is one of the best back-building exercises around, an ugly deadlift can expose you to a whole world of hurt.
So, it makes sense to start this article with an overview of how to deadlift. Follow these steps to make sure you are deadlifting with good technique. If in doubt, seek out a knowledgeable trainer and get some hands-on coaching.
Read more about mastering the deadlift here and common deadlift technique faults and how to fix them here.
Place your loaded barbell on the floor so it’s about mid-shin height. Officially, the bar should be nine inches off the deck. Using standard-sized Olympic plates means the bar should be at the correct height.
Stand in the center of the bar with your feet about hip-width apart. Keep your feet parallel or turn them slightly outward. The bar should be directly over the middle of your feet and around an inch from your shins.
Lean forward and hold the bar using a shoulder-width double overhand or mixed grip. Wrap your hands tightly around your bar and put your thumb on top of your first two fingers to reinforce your grip and avoid slipping. Use chalk if you’ve got sweaty palms.
Straighten your arms, lift your chest, arch your lower back, and pull your shoulders down and back. Your hips should be below shoulder height. Look at the floor around ten feet in front of you.
Inhale, brace your abs and get ready to lift. Pull the slack out of the bar, so your entire body feels coiled like a spring. Flex your lats and press the bar backward against your legs. It doesn’t have to drag up your shins and thighs but should be in light contact at all times.
Without bending your arms, press your feet into the floor and extend your knees and hips simultaneously. As you break the bar away from the floor, drive your hips forwards, continue extending your knees, and stand up.
Do not allow your hips to rise faster than the bar, as this increases the distance between the weight and your feet/legs, putting unnecessary stress on your lower back.
Your knees and hips should be locked out at the top of the movement, but there is no need to lean backward. Just stand up straight and proud!
Keeping your arms straight, push your hips back, bend your knees, and lower the bar down the front of your legs to the floor. Maintain control of the weight – don’t just drop it – but there is no need to go super-slow.
Let the weight settle on the floor, reset your grip and core, and blast out another rep!
Beginner Deadlift Program – 1 Day a Week
This program is for anyone who knows how to deadlift but doesn’t do it regularly. It’s also a good option for exercisers returning from a training break.
One deadlift workout per week might not sound like a lot, but this exercise is intense and cause severe residual systematic fatigue. Most beginners will soon start to feel overtrained if they deadlift more frequently. This workout also includes some basic deadlift accessory exercises to boost your general strength and deadlift performance.
Finally, make sure you warm up before doing this or any other strenuous workout. Begin with some light cardio followed by dynamic mobility and flexibility exercises for your lower body and back. Finish off with 1-2 sets of light deadlifts for practice and reinforce good technique.
#
Exercise
Sets
Reps
Recovery
1
Deadlift
3
6-8
2-3 minutes
2
Leg curl
2
10-12
90 seconds
3
Hip thrust
2
10-12
90 seconds
4
Romanian deadlift
2
12-15
90 seconds
5
RKC plank
3
20 seconds
90 seconds
Exercise Instructions
You’ll get more from this workout if you perform all the exercises with perfect form. The correct technique is generally safer and more effective, so make sure you follow these instructions.
1. Deadlift
Target muscles: Gluteus maximus, hamstrings, quadriceps, erector spinae, core, latissimus dorsi, trapezius, rhomboids, deltoids, biceps, triceps, and forearms.
What would a deadlift program be without deadlifts? According to Joe Weider’s priority principle, you should always put the most important exercises at the start of your program, which is why you’ll be deadlifting first.
Use a weight that allows you to perform 6-8 clean reps per set. This will take a little experimentation to identify, but you should get it within a workout or two.
Check out the instructions above to ensure you are deadlifting like a boss!
Tips:
Use gym chalk (not lifting straps) to reinforce your grip.
If you use a mixed grip, make sure you switch your hands around set by set.
Do your deadlifts in flat minimalist shoes or barefoot if possible.
2. Leg curl
Target muscles: Hamstrings.
The hamstrings play a big role in deadlifts, working alongside your glutes to extend your hips. Weak hamstrings will severely undermine your deadlift performance, and leg curls are one of the best ways to isolate and strengthen this vital muscle group.
Steps:
Lie on your front of the leg curl machine with your knees in line with the lever arm pivot point. Hold onto the handles and brace your core. Press your hips down onto the bench.
Bend your legs and curl your heels up toward your butt.
Extend your legs and repeat.
Tips:
Do not allow the weights to touch down between reps.
Squeeze rather than jerk the weight up to make this exercise as safe and effective as possible.
Do seated or standing leg curls if preferred.
3. Hip thrust
Target muscles: Gluteus maximus, hamstrings.
The barbell hip thrust is an awesome glute and hamstring exercise that’s also very lower back-friendly. It’s a popular deadlift accessory exercise that targets two vital muscles – the glutes and hammies. In most cases, as you get stronger with hip thrusts, your deadlifts will get stronger, too.
Steps:
Sit on the floor with your upper back against a sturdy bench. Rest and hold a barbell across your hips. Bend your legs and place your feet flat on the floor.
Drive your feet into the floor and lift your hips up so they form a straight line with your shoulders and knees.
Lower your butt back to the floor and repeat.
Tips:
Rest the bar on a squat bar pad or folded mat for comfort.
You can also do this exercise without a bench if more convenient.
Drive your heels into the floor, not your toes, to maximize posterior chain engagement.
4. Romanian deadlift
Target muscles: Gluteus maximus, hamstrings.
Unlike conventional deadlifts, Romanian deadlifts start from standing, and the weight never touches the floor. However, differences aside, this is an excellent posterior chain exercise that will boost your deadlift by improving your lockout strength. It’s also good for your upper back, grip, and hamstring flexibility.
Steps:
Stand with your feet hip-width apart and hold a barbell in front of your thighs. Bend your knees slightly, brace your core, and pull your shoulders down and back.
Hinging from the hips, push your butt back and lean forward, lowering the weight down the front of your legs. Do not round your lower back.
Drive your hips forward and stand back up.
Continue for the desired number of reps.
Tips:
Use a double overhand or mixed grip as preferred.
Lean as far forward as your flexibility allows, but do not round your lower back, as doing so can cause injury.
Use chalk or lifting straps to reinforce your grip as necessary.
Related: Complete Romanian Deadlifts (RDLs) guide.
5. RKC plank
Target muscles: Core.
The core is the collective term for the muscles of your midsection. Encircling your internal organs like a weightlifting belt, the core muscles contract inward when you brace to support your lumbar spine. As such, a strong core is critical for a big, safe deadlift. RKC planks are a very time-effective way to build core strength.
Steps:
Kneel on all fours and then rest your upper body on your forearms, hands parallel. Brace your core and walk your feet out and back so your body is straight.
Tense your legs, glutes, core, chest, shoulders, and arms as hard as possible.
Without holding your breath, maintain this position for 20 seconds.
Relax, rest, and repeat!
Tips:
Clench your fists to generate more full-body tension.
Imagine you are pulling your toes toward your elbows to engage your abs as much as possible.
If you can do this exercise for more than 20 seconds, you probably weren’t tensing your core hard enough!
Beginner Deadlift Program – 2 Days a Week
If you are already a regular deadlifter or have been doing our once-a-week deadlift program for a couple of months, you are probably ready to graduate to deadlifting twice a week.
However, to avoid burnout and injury, you won’t be doing the exact same workout both times. Instead, you’ll alternate between two types of deadlifts and several different accessory exercises.
As always, you must start your workouts with a thorough warm-up to ensure your joints, muscles, and nervous system are ready for what you’re about to do.
Do the following workouts several days apart, e.g., Monday and Thursday, to provide adequate time for rest and recovery. Take an extra rest day between workouts if you still feel tired.
Workout 1
#
Exercise
Sets
Reps
Recovery
1
Deadlift
5*
5
2-3 minutes
2
Snatch grip deadlift
3
6-8
2-3 minutes
3
Leg curl
3
10-12
90 seconds
4
Box jump
3
6-8
90 seconds
5
Stability ball dead bug
3
10-12
90 seconds
*Two moderately-heavy sets and three heavy sets.
Workout 2
#
Exercise
Sets
Reps
Recovery
1
Deficit deadlift
5*
5
2-3 minutes
2
Paused deadlift
3
4-6
2-3 minutes
3
Rack pull
3
4-6
2-3 minutes
4
Kettlebell swing
3
12-15
90 seconds
5
Ab wheel rollout
3
12-15
90 seconds
*Two moderately-heavy sets and three heavy sets.
Workout 1: Exercise Instructions
You’ll get more from these workouts if you perform all the exercises with perfect form, so make sure you follow these instructions:
1. Deadlift
Target muscles: Gluteus maximus, hamstrings, quadriceps, erector spinae, core, latissimus dorsi, trapezius, rhomboids, deltoids, biceps, triceps, and forearms.
The five by five (5 x 5) set and rep scheme is one of the best ways to build muscle mass and strength. It’s been popular for close to a century, and that’s because it works! Do your first two sets with a moderate weight, and then go heavy for your last three efforts. However, don’t go so hard that you cannot maintain that all-important perfect technique.
Tips:
Consider wearing a lifting belt for added lower back support.
When in doubt, rest longer between sets to maximize your performance.
Increase your weights by 2.5 to 5 pounds every week or two.
2. Snatch grip deadlift
Target muscles: Gluteus maximus, hamstrings, quadriceps, erector spinae, core, latissimus dorsi, trapezius, rhomboids, deltoids, biceps, triceps, and forearms.
Snatch grip deadlifts put you into a less biomechanically efficient position at the start of each rep. Making things harder will increase your speed and power off the floor, translating to a bigger deadlift a few months later. Don’t go too heavy too soon with this exercise; it’s harder than it sounds!
Steps:
Stand behind your barbell with your toes under the bar, feet shoulder to hip-width apart.
Reach down and grab the bar using a wider-than-shoulder-width double overhand grip.
Straighten your arms, lift your chest, drop your hips, and brace your abs.
Drive your feet into the floor and, without rounding your lower back, stand up straight.
Lower the weight back to the floor and repeat.
Tips:
Use straps and or chalk if necessary.
Tuck your thumbs under your fingers (hook grip) for a more secure hold on the bar.
The wider you put your hands, the more challenging this exercise becomes, so adjust your grip accordingly.
3. Leg curl
Target muscles: Hamstrings.
If you’ve done our once-a-week program, you’ll have already done leg curls for your hamstrings. If you haven’t, you are sure to appreciate how good this exercise is for isolating and strengthening your hammies. Use the seated leg curl machine if you used the prone model last time, or vice versa.
Check out the instructions above to ensure you are doing leg curls correctly.
4. Box jump
Target muscles: Quadriceps, gluteus maximus, hamstrings, calves.
A good deadlift starts with a powerful extension of the hips and knees. Because of the weight involved, you might move slowly, but you should always try to lift explosively. Box jumps are one of the most accessible lower body power exercises around. They’re also pretty knee-friendly.
Steps:
Stand a couple of feet away from a sturdy knee-high box. Your feet should be roughly hip-width apart. Ideally, use the same stance as you do for deadlifts.
Bend your knees, flex your hips, and swing your arms behind you.
Swing your arms forward and use this momentum to help you jump forward and up.
Land on the box with slightly bent knees to absorb the shock of landing.
Step down, reset your feet, and repeat.
5. Stability ball dead bug
Target muscles: Core, hip flexors.
Your core acts like a natural weightlifting belt during deadlifts, and the stronger it is, the more weight you’ll be able to lift. The stability ball dead bug might look like a simple abs exercise, but it’s actually very intense and one of the best ways to strengthen your anterior and deep core muscles.
Steps:
Lie on your back with your legs bent and knees over your hips. Brace your core and press your lower back into the floor. Hold a stability ball against your knees with both hands.
Extend your right leg and left arm, lowering them down toward the floor. Meanwhile, press your left leg and right hand into the ball.
Return to the starting position and then switch sides.
Continue for the desired number of reps.
Tips:
The more forcefully you push against the ball, the more demanding this exercise becomes.
Use a medium-sized stability ball for this exercise – 45-55cm is ideal.
Press your lower back into the floor throughout to fully engage your abs.
Workout 2: Exercise Instructions
1. Deficit deadlift
Target muscles: Gluteus maximus, hamstrings, quadriceps, erector spinae, core, latissimus dorsi, trapezius, rhomboids, deltoids, biceps, triceps, and forearms.
Deficit deadlifts force you to squat deeper at the start of each rep. This increases the range of motion and reduces your mechanical advantage for lift-off. As such, you’ll need to work harder at the start of each rep. This will make you stronger and faster off the floor.
Steps:
Place your barbell on the floor and place a bumper plate in the center. Stand on it with a narrow stance.
Reach down and grab the bar using a shoulder-width mixed or double overhand grip.
Straighten your arms, lift your chest, drop your hips, and brace your abs.
Drive your feet downward and, without rounding your lower back, stand up straight.
Lower the weight back to the floor and repeat.
Tips:
The thicker the plate you stand on, the more demanding this exercise becomes.
Take care not to round your lower back.
Use less weight than for conventional deadlifts; this exercise is TOUGH!
2. Paused deadlift
Target muscles: Gluteus maximus, hamstrings, quadriceps, erector spinae, core, latissimus dorsi, trapezius, rhomboids, deltoids, biceps, triceps, and forearms.
A lot of people struggle to lock out a heavy deadlift. This is called a sticking point. Paused deadlifts train you how to push past sticking points by stopping precisely where deadlifts are hardest. Incorporating this exercise into your deadlift workouts should mean fewer failed reps.
Steps:
Set up for deadlifts as normal.
Drive your feet into the floor, extend your hips and knees, and stand up. Pause for 2-3 seconds when the bar reaches your knees. Stay tight!
After pausing, push through to lock out and stand up straight.
Lower the bar back to the floor and repeat, pausing midway through every rep.
Tips:
Use 30-40% less weight than for conventional deadlifts.
Pause above and below your knees to see which works best for you.
The longer you pause, the more challenging this exercise becomes.
3. Rack pull
Target muscles: Gluteus maximus, hamstrings, quadriceps, erector spinae, core, latissimus dorsi, trapezius, rhomboids, deltoids, biceps, triceps, and forearms.
Rack pulls are partial deadlifts that start from just above knee height. This reduced range of motion allows you to lift heavier weights and work on your lockout strength. Rack pulls are also an excellent upper back and trap builder. A bigger, more muscular back will enhance your deadlift performance.
Steps:
Using a power rack, raise your barbell just above knee height.
Stand behind the bar and hold it with an overhand or mixed shoulder-width grip.
Hinge forward at the hips, brace your core, and pull your shoulders down and back.
Drive your hips forward and stand up.
Lower the bar back to the rack and repeat.
Tips:
Do not use a deadlift bar for this exercise, as doing so could damage it.
You can also do this exercise by raising the weights on blocks, i.e., block pulls.
It’s okay to use straps for rack pulls, as you could potentially be lifting more weight than you’re used to.
4. Kettlebell swing
Target muscles: Gluteus maximus, hamstrings, quadriceps, erector spinae, core.
Like box jumps in the previous workout, this exercise is designed to improve speed and power. The more explosively you break the bar away from the floor, the more likely you are to blast through your sticking points. Kettlebell swings are a safe, accessible, and effective explosive hip hinge exercise.
Steps:
Hold a kettlebell in front of your thighs and stand with your feet about shoulder-width apart. Brace your core and pull your shoulders back and down.
Bend your knees slightly, push your butt back, and hinge forward at the hips, lowering the weight between your knees.
Drive your hips forward and use this momentum to swing the weight forward and up to shoulder height.
Lower the weight and repeat.
Tips:
Imagine you are jumping forward to properly engage the correct muscles.
Do not swing the weight above shoulder height, as doing so increases the risk of injury.
Take care not to round your lower back or hyperextend your spine at any point.
5. Ab wheel rollout
Target muscles: Core, latissimus dorsi.
Ab wheel rollouts are one of the most effective core exercises. They’re basically a moving plank but also involve your lats and even the long head of your triceps. These are the same muscles you use during deadlifts to keep the barbell close to your legs. As such, the rollout is a very deadlift-specific core exercise.
Steps:
Kneel on the floor and place your wheel/roller in front of your knees. Use a folded exercise mat for comfort.
Hold the handles with an overhand grip. Brace your core and pull your shoulders down and back.
Keeping your arms straight, roll the wheel out in front of you and lower your torso down toward the floor. Do not hyperextend your lower back.
Pull the wheel back up to your knees and repeat.
Tips:
Shorten your range of motion if you feel this exercise in your lower back.
No ab wheel or roller? No problem! You can use a barbell loaded with small plates instead.
If your core is strong, you can do this exercise standing instead of kneeling.
Deadlift Program – FAQs
Do you have any questions about these programs or deadlifts in general? That’s okay because we’ve got the answers!
1. What weight should I use for deadlifts?
Sadly, this is the one question we can’t answer! Lots of things determine how much weight you should use for deadlifts, including your gender, experience level, genetics, and current one-repetition maximum.
The best advice we can give you is to use a weight that allows you to complete the prescribed number of reps, but only just. The last rep or two should feel challenging but not impossible. Leave about 1-3 reps in reserve. Think of this load as quite heavy and not your absolute max.
As you get stronger, gradually increase the weight by 2.5 to 5 pounds, so you continue to improve.
If you get to the end of a set and feel you have more to give, feel free to do an extra rep or two. Then, make a note in your training journal to put more weight on the bar next time.
Put these tips into action, and progress is all but guaranteed.
2. Do I need to wear a belt for deadlifts?
While you don’t have to wear a lifting belt for deadlifts, many people find them helpful. A belt gives you something to brace your abs against, so you can create more intra-abdominal pressure. IAP helps support your lumber spine and prevents it from rounding as you lift.
You should be able to produce plenty of IAP without a belt, but when lifting heavy weights, more support is seldom a bad thing.
If you wear a belt, save it for your heaviest sets so you can practice bracing naturally. Then put on your belt when you need some extra assistance.
3. What’s the difference between a double overhand and mixed grip for deadlifts?
A mixed grip, where one hand faces forward and one faces backward, stops the bar from rolling out of your fingers, making you less likely to drop the weight unexpectedly. Most lifters use a mixed grip for heavy deadlifts.
However, using a mixed grip puts a lot of tension on your supinated biceps and can result in muscle tears. You may also develop muscle imbalances if you always turn your hands the same way.
You can avoid these issues by alternating sides when using a mixed grip and using an overhand grip for your earlier, easier sets. Save your mixed grip for your heaviest sets.
Alternatively, you can just stick with the double overhand grip for all your sets, which is safer and more balanced despite being weaker. However, your grip will probably fail before your legs and back.
Weigh up all the options and decide which is right for you.
4. Are deadlifts dangerous?
All exercises can be dangerous when performed incorrectly, including the deadlift. However, because of the weights, joints, and muscles involved, improper deadlift form can cause serious injury. That said, deadlifts also teach you how to safely lift heavy weights from the floor, i.e., using your legs and lower back together.
Most deadlift injuries are caused by lifting too much weight or sloppy form. Avoid these mistakes, and deadlifts are probably no more dangerous than any other barbell exercise.
5. Can I change any of the exercises in the workouts?
Providing you keep the main exercises the same (deadlifts!), you are free to make alterations to these programs. However, you should select similar movements so as not to change the intended effects of the program. For example, you could do stiff-legged deadlifts instead of Romanian deadlifts. However, doing leg presses instead of leg curls would be a mistake.
Finally, don’t switch out an exercise simply because you find it difficult. It’s the hard exercises that drive most of your fitness and strength increases. Embrace the suck and don’t try and hide from it!
6. How should I incorporate these workouts into my weekly training program?
These deadlift workouts are designed to be part of a weekly split routine. As such, you need to slot them into your training plan. The main thing to remember is that you need to keep your deadlift workouts separate from your leg and back workouts. Training your legs and/or back the day before or after a deadlift workout will be too taxing for most people.
Possible splits include:
Monday – Deadlifts
Tuesday – Chest and Shoulders
Wednesday – Rest
Thursday – Legs (focusing on the quads and calves)
Friday – Back and Arms
Saturday – Rest
Sunday – Rest
Or:
Monday – Deadlifts (1)
Tuesday – Chest and Triceps
Wednesday – Legs (focusing on the quads and calves)
Thursday – Back and Biceps
Friday – Rest
Saturday – Deadlifts (2)
Sunday – Rest
Experiment with a few different training setups to see which you prefer.
7. What is the best diet when training for a bigger deadlift?
Sadly, there is no such thing as an official deadlift diet. Ultimately, your diet needs to match your body composition and performance goals and support your training.
If you want to get stronger and build muscle, the main thing you need is a daily calorie surplus of about 300-500 calories. This will give your body the energy it needs to recover and grow.
However, if you want to lose fat and get leaner, you need a 300-500 per day calorie deficit. This will force your body to burn fat for fuel. That said, you probably won’t build much muscle or get as strong when you are in a deficit.
Adopt the eating plan that best meets your caloric and nutrient goals. However, whether you want to lose or gain weight, make sure you are consuming adequate protein – typically one gram per pound of body weight.
More on Deadlifts:
Wrapping Up
While the occasional deadlift workout can be beneficial, you’ll get better results if you follow a more structured training plan. Powerlifters, who are arguably the best deadlifters on the planet, dedicate entire training sessions to this awesome exercise. This approach works for them, and it’ll work for you.
Use our beginner deadlift workouts, and your strength and performance will soon start to improve. However, remember that the deadlift is just one exercise, and your deadlift training should be part of a more-rounded workout plan.
The Best Calisthenic Leg Workout
Friends don’t let friends skip leg day, or so the popular meme says. However, most leg day workouts involve things like squats, deadlifts, hamstring curls, and leg presses – all of which require equipment and various weights to perform.
That’s no problem if you have access and the time to get to a well-equipped gym, but that’s not always practical or possible. For example, you might be on vacation or too busy and unable to find a couple of hours spare to travel and train.
The good news is that you don’t need a large selection of workout equipment or a pile of weights to get a good leg workout. In fact, your body weight is all you really need.
In this article, we share a challenging and effective calisthenic leg workout, so you can train your lower body anywhere and anytime.
What is Calisthenics?
The term “calisthenics” comes from the Greek words for beauty (kállos) and strength (sthenos). It is a form of training that relies on using body weight for resistance and is also known as bodyweight training.
Popular calisthenic exercises include push-ups, pull-ups, sit-ups, unweighted squats and lunges, and gymnastic and functional movements, including rope climbing and handstands.
Calisthenics has always been popular but has become even more so since COVID forced many gyms to close, as most exercises require no equipment and can be performed at home. Bodyweight training is widely used in the military and by amateur and professional athletes, especially martial artists.
You can use calisthenics to achieve almost any fitness goal, including muscle building, gaining strength, fat burning, improving endurance, and increasing general fitness. There are exercises to suit all experience levels, from raw beginners to very advanced.
The Benefits and Advantages of Calisthenics
Many people are skeptical that something as simple as calisthenics can provide a comprehensive workout. Let’s put those fears to rest by examining the benefits and advantages of calisthenic training!
Convenience
While you may need some way to do pull-ups or dips, most calisthenics exercises involve no specialist equipment. As such, you are free to work out almost anywhere and anytime. You can do calisthenics at home, in your garden, at a local park or playground, or in your hotel room.
Also, because you can do calisthenics anywhere you have enough space to move, you won’t have to waste time traveling to the gym to work out. A 45-minute calisthenic training session will only take 45 minutes, and not the couple of hours that traveling to and from a gym so often takes.
Lack of time and facilities can be a real barrier to exercise participation, but with calisthenics, these barriers are removed.
Economical
With no gym fees to pay and no training equipment to buy, calisthenics training is very easy on your pocket. In fact, you don’t need to spend a single cent to start working out with your body weight.
If you train at home, you don’t even need to buy specialist workout clothes – any old T-shirt and loose-fitting pants will suffice.
That said, a few relatively cheap items can add a lot to your calisthenic training, such as pull-up and dip bars, exercise mats, gymnastic rings, and parallettes. However, these tools are optional extras and not essentials.
Joint-friendly
While some calisthenic exercises are extremely tough, others are more straightforward and easy on your joints. Calisthenic exercisers often mirror everyday activities, so they’re easy to learn, and many will already be familiar to you, as things like push-ups, jump jacks, sit-ups, and squats are often part of high school physical education classes.
Most calisthenic exercises can be modified to suit not only your fitness but your height, weight, and limb length. For example, you can move your hands or feet in or outward to make your chosen exercise as comfortable as possible. Try doing that with leg extensions or the pec deck!
This all adds up to a workout that is usually very joint-friendly. Providing you don’t try to progress too quickly, calisthenic training does not typically lead to injuries.
Improve athleticism and functionality
With no machines to guide your movements or support your body, calisthenic training is not only good for your muscles but your nervous system too. Doing calisthenic exercises will improve your balance, mobility, coordination, proprioception, athleticism, and functional fitness and strength.
In other words, the fitness you develop through calisthenics will transfer seamlessly to your life outside of training.
This helps explain why calisthenics is so popular with sportspeople and the military – it improves real-world fitness, so you’ll not only look in shape but will actually BE in shape, too.
Versatility
Contrary to what you might think, calisthenics can be adapted to meet almost any training goal, from fat burning to muscle building to improving your general health and well-being. It all comes down to your choice of exercises and how they’re programmed and performed.
For example, you could superset (perform in pairs) high-rep push-ups and squat jumps to get a great fat-burning cardio workout. Alternatively, you could do low-rep pull-ups and single-leg pistol squats to build muscle mass and strength.
So, whatever you are training for, you can probably achieve it with calisthenics.
Related: Calisthenics vs. Weight Training – Which is Best?
Calisthenics Disadvantages and Drawbacks
While calisthenics training is mostly safe and effective, there are a couple of disadvantages and drawbacks to consider, too. These include:
Difficulty isolating muscles
Bodybuilders use single-joint or isolation exercises to target individual muscles and maximize hypertrophy or growth. This is usually not possible with calisthenic training. In contrast, most calisthenic exercises are compound or multi-joint and train several muscles at once.
While compound exercises are excellent for building strength and burning calories, some lifters enjoy doing isolation exercises, using them to target individual muscles, such as the biceps, triceps, or deltoids.
For this reason, some people like to combine compound calisthenic exercises with resistance band or isometric isolation exercises.
Limited progression options
While you can progress some calisthenic exercises by modifying them to make them more challenging, the primary source of progression is doing more reps. That’s okay when you’re starting out, but as you get fitter and stronger, you may find yourself doing 50, 80, or even 100 reps of some calisthenic exercises. This can be time-consuming and boring.
In contrast, with conventional strength training, you can simply up the weight to maintain your progress.
Your body weight may be a limiting factor
Some calisthenic exercises may be too hard or even impossible if you are heavy and/or a beginner. For example, push-ups and pull-ups can be especially challenging for larger people.
This is usually less of an issue with conventional strength training, where the load can be modified more easily.
It could be too convenient
Convenience can be a double-edged sword. On the one hand, it means you can work out anywhere and anytime. However, this can also create a lack of urgency, meaning you put your workout off until later, and may even skip it entirely. “I’ll do it later” can quickly turn into “I’ll do it tomorrow,” and, as the saying goes, tomorrow never comes.
One way around this is to plan your workouts in advance and have a set time to train, e.g., on rising or before dinner. Working out on the same days and at the same time makes it easier to be consistent.
The Best Calisthenic Leg Workout – Overview
The following workout is designed to be performed as part of a split routine, where you train different muscles on different days, for example:
Monday
Tuesday
Wednesday
Thursday
Friday
Saturday
Sunday
Legs
Upper body
Rest/cardio
Legs
Upper body
Rest/cardio
Rest
However, before starting any strenuous training, you should prepare your muscles and joints with some light cardio followed by dynamic mobility and flexibility exercises. Warming up will make your workout more comfortable and effective and could also help reduce your risk of injury.
Five to ten minutes is all you need, so don’t be tempted to skip this critical step. While not warming up may save you a few minutes, it could cost you months of lost progress if you pick up an otherwise avoidable injury.
All warmed up and ready to go? Good to hear! Here’s your calisthenic leg workout:
#
Exercise
Sets
Reps
Recovery
1
Reverse Nordic
2-4
Take each set to within 1-3 reps of failure.
60-90 seconds
2
Bulgarian split squat (1½ reps)
2-4
60-90 seconds
3
Glute bridge walkout
2-4
60-90 seconds
4
Single-leg Romanian deadlift
2-4
60-90 seconds
5a
Wall squat hold
2-4
N/A
5b
Squat jump
60-90 seconds
6
Single-leg calf raise
2-4
60-90 seconds
Exercises 5a and 5b are to be performed as a superset. Do the first exercise (wall squat hold), followed immediately by squat jumps. Rest a moment and repeat the pairing for the required number of sets.
The Best Calisthenic Leg Workout – Exercise Instructions
There are two ways to perform most exercises – the right way and the wrong way. The right way is safe and effective, while the wrong way is more likely to cause injuries and probably won’t produce such good results.
Follow these step-by-step instructions to ensure you do all the exercises in this workout correctly.
1. Reverse Nordic
Muscles targeted: Quadriceps, hip flexors, core.
People who train in a gym can do leg extensions to target their quadriceps. Calisthenic practitioners don’t have this option, but that doesn’t mean you can’t hammer your quads and strengthen your thighs. Think of reverse Nordics as natural leg extensions – no equipment required!
Steps:
Kneel on the floor with your toes pointed and the tops of your feet pressed into the floor. Your thighs and torso should be vertical. Brace your core.
Without bending your hips, lean backward and try to touch your calves with your hamstrings.
Drive your feet into the floor and push yourself back into the starting position.
Continue for the desired number of reps.
Tips:
Kneel on a folded gym mat or foam pad for comfort.
Only lean back as far as is comfortable. Increase your range of motion as you get stronger.
Use a resistance band for assistance if necessary:
2. Bulgarian split squat (1½ reps)
Muscles targeted: Quadriceps, hamstrings, gluteus maximus, hip abductors, hip adductors.
After hitting your quads hard with reverse Nordics, it’s time to work them in conjunction with your other lower body muscles with Bulgarian or rear foot elevated split squats. However, to compensate for the lack of external load, you’ll do this exercise using 1½-rep style.
Steps:
Stand with your back to a knee-high step or bench. Bend one leg and place the top of your foot on your platform. Hop forward and into a split stance.
Keeping your torso relatively upright, bend your legs and lower your rear knee down to within an inch of the floor.
Extend your leg and come halfway up.
Lower your knee back down to the floor, and then come all the way up.
That’s one rep – keep going!
Continue for the desired number of reps, and then switch legs.
Tips:
Do this exercise next to a wall and use it for balance if required.
Place a folded exercise mat under your rear knee for comfort.
Lean forward slightly to increase glute and hamstring engagement.
3. Glute bridge walkout
Muscles targeted: Hamstrings, gluteus maximus, core.
With no leg curl machine to use, you may be wondering how you’re going to train your hamstrings. Well, wonder no more – this exercise is the answer! Glute bridge walkouts are a low back-friendly posterior chain exercise that will fry your hamstrings in double-quick time.
Steps:
Lie on your back with your legs bent and feet flat. Press your lower back into the floor and brace your core.
Lift your hips up toward the ceiling.
Without touching your butt to the floor, walk your feet out and away until your legs are straight.
Walk your feet back in and repeat.
Tips:
Keep your core braced and hips up throughout.
Alternate your leading leg rep by rep.
Tale small steps to keep your muscles under tension for longer.
4. Single-leg Romanian deadlift
Muscles targeted: Hamstrings, gluteus maximus, core.
Now your hammies are warmed up and ready to go, it’s time to work them a little harder with single-leg Romanian deadlifts. This exercise will also enhance your balance and mobility, making it a very functional calisthenics move.
Steps:
Stand with your feet together. Shift your weight over onto one leg and brace your core. Bend your supporting knee slightly for balance.
Hinging from your hips, lean forward and reach down the front of your leg to the floor.
Extend your other leg out behind you as a counterbalance.
Stand up straight and repeat.
Continue for the desired number of reps, and then switch legs.
Tips:
Take care not to round your lower back, as doing so could lead to injury.
Do this exercise next to a wall and use it for balance if required.
You can also do this exercise with your non-working foot still on the floor, i.e., a B-stance or kickstand Romanian deadlift.
Related: Why the Single Leg Romanian Deadlift Deserves to Be the Hero of Your Workout
5a. Wall squat hold
Muscles targeted: Quadriceps, gluteus maximus, hamstrings.
Wall squat holds are an isometric lower body exercise. This means your muscles generate force without producing any movement. Don’t let the static nature of this exercise put you off – it’s still a very challenging way to work your quads, glutes, and hamstrings.
Steps:
Stand with your back to a smooth wall. Lean against the wall so your feet are about 24 inches from the baseboard.
Slide down the wall until your thighs are parallel to the floor.
Push your lower back into the wall as hard as possible.
Maintain maximal muscle tension for as long as you can.
Tips:
Descend below parallel to really hit your quads hard.
Take care not to hold your breath.
Do not rest your hands on your legs – keep them out of the way to ensure you can’t cheat and make this exercise easier.
5b. Jump squat
Muscles targeted: Quadriceps, gluteus maximus, hamstrings, gastrocnemius, soleus.
Doing squat jumps immediately after wall squats will set your legs on fire! However, this devilish exercise combo will also build muscle strength, size, and power without having to use a squat rack, leg press machine, or any weights. It’s low-tech but ultra-high-effect!
Steps:
Stand with your feet about shoulder-width apart, toes turned slightly outward.
Bend your legs and squat down until your thighs are roughly parallel to the floor.
Stand up quickly and leap into the air as high as possible.
Land on slightly bent knees to absorb the impact and repeat.
Tips:
Use your arms for added momentum.
End your set when your jump height starts to decrease.
Stand on a mat for a more cushioned landing.
6. Single-leg calf raise
Muscles targeted: Gastrocnemius, soleus.
No calf machine? No problem! You can get a great lower leg exercise with only your body and a sturdy step to stand on. Your calves are a small but often visible muscle group, so it’s important not to neglect them.
Steps:
Stand on a step so the ball of one foot is on the edge. Cross your other foot behind your supporting ankle.
Keeping your leg straight, lower your heel down toward the floor and get a good stretch in your calf.
Push up onto your tiptoes and repeat.
Switch legs and do the same number of reps on the other leg.
Tips:
Pause at the top and bottom of each rep to make this exercise more challenging.
Use your hands for balance as required.
Keep your glutes engaged and your core braced throughout.
Calisthenic Leg Workout – FAQs
Do you have a question about this workout or calisthenic training in general? No problem, because we’ve got the answers!
1. How many times a week should I do this workout?
While you could do this workout just once a week, you’ll get better results if you do it twice, e.g., Monday and Thursday. This provides a good balance between work and rest/recovery.
You could do it three times, but that’ll probably be too much for most people, especially if you push the sets close to failure. Remember to perform it in conjunction with a similar number of upper-body workouts.
2. What does “take each set to within 1-3 reps of failure” mean?
It’s almost impossible to tell you how many reps to do as your body weight and fitness will directly affect your performance and capabilities. So, rather than provide you with a rep range that’s too high or too low, you should simply do as many reps as you can in good form, be that 10, 20, or 30.
Just keep going until your muscles feel good and tired. Strive to do more reps as you get fitter and stronger, but never sacrifice good form for a couple more reps.
3. Is this a cutting or a bulking leg workout?
Your workout doesn’t really determine whether you are cutting or bulking. Instead, it’s your diet. To cut (lose fat), you need to have a dietary calorie deficit which forces your body to burn fat for fuel. A 500-calorie deficit will usually result in losing one pound per week.
In contrast, you need a calorie surplus to build muscle and gain weight. 500 extra calories a day should result in a one-pound weight gain per week.
So, adjust your diet according to your goals, and don’t worry too much about changing your workout for cutting or bulking.
4. Can I change any of the exercises?
Sure you can! However, make sure you use similar exercises that work the same muscle groups as those listed. For example, if you want to replace squat jumps, do something like jumping lunges, which involve all the same muscles. Stay true to the spirit of the program, and you won’t go wrong.
However, avoid swapping out an exercise just because you find it hard. It’s those challenging exercises that invariably produce the best results.
5. Is this workout suitable for beginners?
While a beginner could do this workout, it’s probably a little too challenging for most. It’s pretty long and contains some demanding movements that may be beyond the abilities of less experienced exercisers.
Do a basic calisthenic program for a few months, and then return to this plan when you feel you’re ready. Even then, just do a couple of sets of each exercise and stop before reaching failure. Doing too much too soon will undoubtedly cause severe delayed onset muscle soreness and could even lead to injury.
So, start slowly and build up gradually – getting in shape is a marathon, not a sprint!
Wrapping Up
While exercises like squats, leg presses, and deadlifts are undoubtedly effective, they’re not always practical or convenient. Going to the gym can take time many people don’t have, and gym memberships can be expensive. You COULD set up a home gym, but not everyone has the space or the budget to do so.
The good news is that you can develop a strong, muscular, well-conditioned lower body with calisthenic exercises and workouts. Using nothing except your body weight, you can train anywhere and anytime, and it won’t cost you a cent.
So, there really is no reason to skip leg day ever again. Do the workout in this article a couple of times a week to develop a lower body you can be proud of.
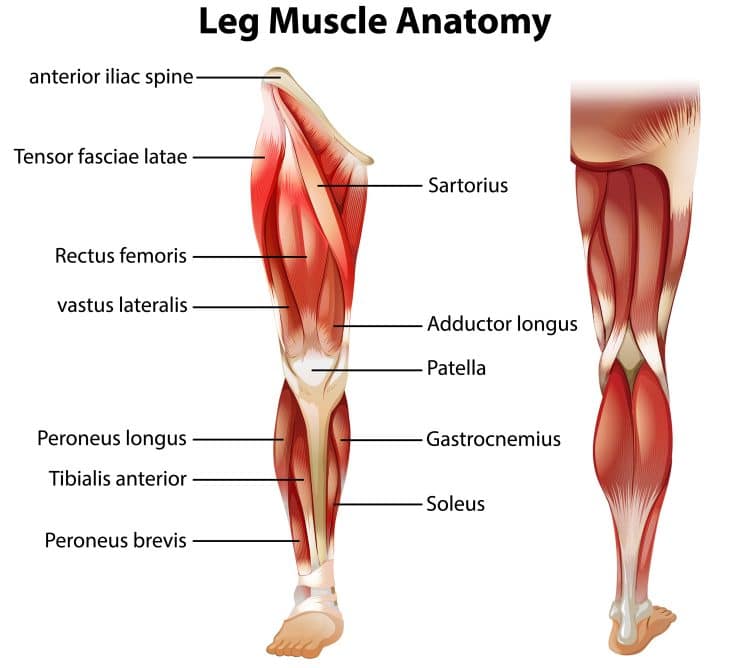
Three Leg Day Workouts for Women
A lot of guys, especially younger lifters, tend to skip leg day. Instead, they focus all their energy on training their pecs, lats, delts, and arms. This creates a very unbalanced physique, which is why many men are happy to be seen shirtless but keep their legs covered with long pants.
In contrast, many women are overly focused on training their lower bodies, especially their glutes. Some even train their legs every day, combining their lower body workouts with hours of leg-centric cardio.
So, why are so many women unhappy with the shape and condition of their legs?
In many cases, the reason is quantity over quality. In other words, some women’s leg workouts are high in volume and frequency but low in effective exercises. So instead of using a targeted approach, it’s more of a kitchen sink affair, with workouts containing so many exercises that many of them are actually redundant.
While such enthusiasm and dedication are to be applauded, there are better ways to use your training time and energy. These are valuable commodities that should be invested wisely and not wasted on unproductive or unnecessarily long workouts.
Get better results from your training time with these three tried and tested leg day workouts!
Leg Anatomy Basics
Before we get into the nitty-gritty of effective lower body training, let’s take a moment to look at the muscles you’ll be working. That way, you’ll be able to name the parts of your body you can feel during each workout.
The main muscles that make up your lower body are:
Gluteus maximus
Located on the back of your hips, the gluteus maximus (glutes for short) is the largest muscle in the human body and potentially the most powerful. The main role of the glutes is hip extension, but it’s also involved in external rotation and abduction of the hip.
Hamstrings
The hamstrings are a biaxial muscle that crosses the back of your knees and hips. As such, it has two main functions – knee flexion and hip extension. There are three hamstring muscles: biceps femoris, semimembranosus, and semitendinosus. You can develop the hamstrings by performing leg curls and hip hinging exercises.
Quadriceps
The quadriceps extend your knee and flex your hips. There are four quadriceps muscles: the rectus femoris, vastus lateralis, vastus medialis, and vastus intermedius. Known as the quads for short, these muscles are located on the fronts of your thighs.
Hip abductors
The hip abductors are located on the sides of your hips and thighs. They are responsible for lifting your legs out and away from the midline of your body. The hip abductors are the gluteus maximus and medius and tensor fascia latae.
Hip adductors
Located on the inside of your thighs, the hip adductors are responsible for drawing your legs in toward the midline of your body. The three hip adductor muscles are longus, brevis, and magnus, meaning longest, shortest, and biggest.
Triceps surae
Triceps surae is the collective name for the muscles of your calves – the gastrocnemius and soleus. These muscles work together to point your foot in a movement called plantar flexion. In addition, gastrocnemius, the uppermost calf muscle, also works with the hamstrings to flex your knees.
Six Benefits of Leg Training for Women
Most women don’t have to be told to train their lower bodies. After all, sculpted, toned legs are a common training goal. That said, in case you are unsure about the benefits of leg training for women, here is a list of six reasons why you should work your lower body hard and often!
Increased functional strength
Almost all strenuous activities involve your legs. A stronger lower body will make these activities easier and less tiring. For example, walking upstairs, running, and lifting heavy items off the floor are less demanding when you’ve got strong legs.
More shapely legs
While lower body-centric cardio can help increase muscle tone and endurance, if you want your legs to look their best, you need to include direct leg training in your workouts. You can use strength training to target each muscle with laser-like precision, sculpting your legs to create the lower body of your dreams.
Stronger bones and healthier joints
Lower body strength training is not just good for your muscles but also for your bones and joints. Like your muscles, your bones get stronger with training. Load-bearing exercises trigger the release of bone-building cells called osteoblasts. Increasing bone strength and density can help ward off age-related bone loss (osteopenia) and may prevent osteoporosis.
Strength training is also good for your joints, namely the hips and knees. Lifting weights makes your joints more mobile and stable and can help prevent or reduce knee and hip pain.
Increased calorie and fat burning
Your lower body contains about 40% of your total body muscle – possibly more, depending on your build and genetics. Powering these muscles through a workout requires a lot of energy, which is measured in calories. Leg workouts use far more energy than most upper-body workouts. Training your legs can help increase your weekly caloric expenditure, leading to fat and weight loss.
Better balance and coordination
Balance is your ability to keep your center of mass over your base of support. In contrast, coordination is your ability to move your limbs in a controlled, harmonious way. Freeweight and bodyweight leg exercises enhance both of these fitness qualities. Better balance and coordination mean that you won’t just look more athletic but will feel it, too.
Improved posture
Long periods of sitting can cause havoc with your posture and leave you with weak legs. Poor glute muscle tone, for example, can affect your lower back, leading to pain and poor posture.
Leg training, especially when you do standing exercises, can improve your posture so you can sit and stand more upright. Good posture makes you look slimmer and younger and takes pressure off your muscles and joints.
Leg Day Workouts for Women
Here are your three leg day workouts for women. But, before doing any of them, you must prepare your joints and muscles for what you’re about to do by warming up. Start with 5-10 minutes of easy cardio, e.g., air bike, rower, jogging, or jumping rope, followed by dynamic mobility and flexibility exercises for your lower body.
A ten-minute warm-up can save you months of lost training caused by an otherwise avoidable injury, so don’t skip it.
Ready? Then let’s get to work!
Home Leg Day Workout for Women
No gym? No problem! You can get a GREAT leg workout almost anywhere. All you need is a little space and an exercise mat. Do this workout at home, in your hotel room, at the park – anywhere you want!
#
Exercise
Sets
Reps
Recovery
1
Glute bridge
2-4
12-20
60-90 seconds
2
Plie squat
2-4
12-20
60-90 seconds
3
Side leg raises
2-4
12-20 per leg
60-90 seconds
4
Alternating lunges
2-4
12-20 per leg
60-90 seconds
5
Standing calf raise
2-4
12-20
60-90 seconds
1. Glute bridge
Target muscles: Gluteus maximus, hamstrings.
Steps:
Lie on your back with your legs bent and feet flat. Brace your core and press your lower back into the floor.
Drive your feet into the deck and lift your hips up so your body forms a straight line.
Pause for 1-2 seconds.
Lower your butt to the floor and repeat.
Make this exercise harder by using one leg at a time.
2. Plie squat
Target muscles: Adductors, quadriceps, hamstrings, gluteus maximus.
Steps:
Stand with your feet about 1.5 shoulder-widths apart. Turn your toes outward. Brace your core and pull your shoulders down and back.
Bend your legs, push your knees outward, and descend until your thighs are roughly parallel to the floor.
Stand back up and repeat.
3. Side leg raises
Target muscles: Hip abductors.
Steps:
Lie on your side so your body is straight. Rest your head on your outstretched arm.
Lift your uppermost leg up to about 45 degrees. Turn your hip slightly inward to maximize glute and adductor engagement.
Lower your leg and repeat.
On completion, roll over and do the same number of reps on the other side.
Make this exercise more challenging by putting a booty band around your knees.
4. Alternating lunges
Target muscles: Quadriceps, hamstrings, gluteus maximus.
Steps:
Stand with your feet together and your arms by your sides.
Take a large step forward, bend your legs, and lower your rearmost knee down to within an inch of the floor.
Push off your front leg and return to the starting position.
Do your next rep leading with the opposite leg.
Alternate legs for the duration of your set.
5. Standing calf raise
Target muscles: Calves
Steps:
Stand on the edge of a step, using your hands for balance.
Point your toes and rise up onto your tiptoes.
Lower your heels down and get a stretch in your calves.
Alternate between these two positions for the required number of reps.
Make this exercise harder by using one leg at a time.
Dumbbell Leg Workout for Women
Dumbbells are the perfect training tool for home exercisers, and gyms have them too. Use dumbbells to overload your muscles and build more strength. Choose weights that fatigue your muscles within the prescribed rep range.
#
Exercise
Sets
Reps
Recovery
1
Dumbbell Romanian deadlift
2-4
12-20
60-90 seconds
2
Dumbbell goblet squat
2-4
12-20
60-90 seconds
3
Dumbbell leg curl
2-4
12-20
60-90 seconds
4
Dumbbell lateral lunge
2-4
12-20 per leg
60-90 seconds
5
Dumbbell swing
2-4
12-20
60-90 seconds
6
Seated dumbbell calf raise
2-4
12-20
60-90 seconds
1. Dumbbell Romanian deadlift
Target muscles: Gluteus maximus, hamstrings.
Steps:
Stand with your feet together and a dumbbell in each hand, arms by your sides. Bend your knees slightly, brace your core, and pull your shoulders down and back.
Hinging from your hips, lean forward and lower the weights down toward the floor. Do not round your lower back.
Stand back up and repeat.
2. Dumbbell goblet squat
Target muscles: Quadriceps, hamstrings, gluteus maximus.
Hold a dumbbell in front of your chest, just below your chin. Stand with your feet shoulder-width apart, core braced, and shoulders back and down.
Bend your knees and squat down until your thighs are roughly parallel to the floor. Take care not to round your lower back.
Stand back up and repeat.
3. Dumbbell leg curl
Target muscles: Hamstrings.
Steps:
Lie on an exercise bench so your knees are on the edge. Clamp and hold a dumbbell between your feet. Secure it using a yoga strap or resistance band if necessary.
Bend your legs and curl the weight up until your knees are bent to 90 degrees.
Extend your legs and repeat.
You can also do this exercise lying prone on the floor.
Dumbbell lateral lunge
Target muscles: Quadriceps, hamstrings, gluteus maximus, abductors, adductors.
Steps:
Stand with your feet together and a dumbbell in each hand, arms by your sides. Brace your core and set your shoulders back and down.
Take a large step to your left, bend your left knee, and descend until your left thigh is close to parallel to the floor. Keep your right leg straight.
Push off your left leg and return to the starting position.
Repeat this movement to your right side.
Alternate sides for the specified number of reps.
5. Dumbbell swing
Target muscles: Gluteus maximus, hamstrings.
Steps:
Hold a single dumbbell in both hands and stand with your feet shoulder-width apart. Brace your core, pull your shoulders back and down, and bend your knees slightly.
Hinge forward from your hips and lower the weight down between your knees. Do not round your lower back.
Drive your hips forward and use this momentum to swing the weight forward and up to shoulder height.
Lower the weight and repeat.
6. Seated dumbbell calf raise
Target muscles: Calves
Steps:
Sit on an exercise bench or sturdy chair, so your knees are bent to 90 degrees and your shins are vertical. Rest the balls of your feet on a low step, e.g., a thick book, wooden block, or weight plates.
Rest and hold a dumbbell on each knee.
Extend your ankles and rise up onto your tiptoes.
Lower your heels down, get a stretch in your calves, and repeat.
Gym Leg Workout for Women
Access to a well-equipped gym means you’ve got everything you need to easily target your leg muscles. However, don’t get distracted and try to do every exercise you see. Instead, pick the best movements for each lower body muscle group. Remember – quality is always better than quantity!
#
Exercise
Sets
Reps
Recovery
1
Smith machine donkey kick
2-4
12-20 per leg
60-90 seconds
2
Leg press
2-4
12-20
60-90 seconds
3
Cable hip abduction
2-4
12-20 per leg
60-90 seconds
4
Cable hip adduction
2-4
12-20 per leg
60-90 seconds
5
Barbell hip thrust
2-4
12-20
60-90 seconds
6
Tiptoe farmer’s walk
2-4
40-60 seconds
60-90 seconds
1. Smith machine donkey kick
Target muscles: Gluteus maximus, hamstrings.
Set the bar on a Smith machine to around waist height.
Kneel on the floor beneath the bar and place the sole of one foot against it.
Extend your hip and drive the bar upward, taking care not to hyperextend your lower back.
Lower the bar and repeat.
Do the same number of reps on both sides.
2. Leg press
Target muscles: Quadriceps, gluteus maximus, hamstrings.
Sit on the leg press machine and place your feet on the footplate so they’re roughly shoulder-width apart. Release the weight catchers.
Bend your legs and lower the weight down until your knees are bent to at least 90 degrees. Do not round your lower back.
Extend your legs and repeat.
Reengage the weight catchers and then rest.
3. Cable hip abduction
Target muscles: Hip abductors.
Put an ankle strap around your lower leg and then attach it to a low pulley machine.
Stand sideways onto the machine, your working leg furthest from the weight stack. Hold the machine for balance.
Keeping your leg straight, raise your foot out and away from the midline of your body.
Lower your leg and repeat.
Do the same number of reps on both legs.
4. Cable hip adduction
Target muscles: Hip adductors.
Put an ankle cuff around your lower leg and then attach it to a low pulley machine.
Stand sideways onto the machine, your working leg closest to the weight stack. Hold the machine for balance.
Keeping your leg straight, cross your foot in front of you.
Return to the starting position and repeat.
Do the same number of reps on both legs.
5. Barbell hip thrust
Target muscles: Gluteus maximus, hamstrings.
Sit on the floor with your upper back resting against a sturdy bench. Rest a barbell across your hips. Bend your legs and put your feet flat on the floor.
Drive your feet into the floor and lift your hips to form a straight line with your knees and shoulders.
Lower your butt back to the floor, and then repeat.
6. Tiptoe farmer’s walk
Target muscles: Calves.
Stand with a dumbbell in each hand and your feet together. Brace your core and pull your shoulders down and back.
Rise up onto your tiptoes and then start walking around your training area.
Continue for the designated distance or until you are unable to keep your heels off the floor.
Leg Day for Women – FAQs
Do you have a question about these workouts or leg training for women in general? No problem, because we’ve got the answers!
1. How often should I train my legs?
It’s generally accepted that it takes 48-72 hours for a muscle to recover from training. This means you can work your legs every 2-3 days or 2-3 times per week. More workouts could lead to overtraining, while just one workout per week may not produce the results you want.
So, hit your legs 2-3 times per week, e.g., Monday and Thursday or Monday, Wednesday, and Friday. This will create a good balance between work and rest.
2. Can I change the exercises in these workouts?
While you are free to make changes to these programs, avoid using exercises that are too different. For example, while doing machine leg curls instead of dumbbell leg curls is fine, doing leg extensions instead of leg curls is not, as the replacement movement uses an entirely different muscle group.
So, make changes if you wish, but make sure you switch “like for like” and don’t use completely different movements. However, avoid changing the exercise order, as doing so can unbalance your entire workout.
3. Do I have to stick to the 12-20 rep range?
Unless you are training for pure strength, it really doesn’t matter all that much how many reps you do per set. Studies suggest that you can perform 5 to 35 reps per set and still make progress (1). Almost any rep count will work if you take your set close to momentary muscular failure.
However, if you want to build strength, you need to use heavy weights and do lower reps, typically 1-5. However, this is a very specialist type of training and not something many women (or men) need to do.
So, if you want to do eight, ten, twenty, or thirty reps per set, you are free to do so.
4. How do I make my thighs thinner?
Reducing the circumference of your thighs is usually more about your diet than your workout program. Invariably, big thighs are the result of excess fat storage rather than muscle mass. So if your thighs are bigger than you want and you’re not a weightlifter or bodybuilder, you probably need to adjust your diet and shed the excess fat.
However, it’s worth noting that no amount of dieting guarantees you’ll develop a “thigh gap” or achieve any other Instagram body standard, as your shape is primarily determined by your genetics.
So, don’t compare how you look to anyone else; just be the best you can be.
5. What is the best diet to use with these workouts?
Healthy eating and regular exercise go hand in hand – or they should! Eating right will make your workouts more productive, while an unhealthy diet could undermine your progress. However, there is no single perfect diet that’s right for everyone, and what you eat will depend on your fitness goals, likes and dislikes, cooking skills, and grocery budget.
So, rather than follow a cookie-cutter diet, why not take a shot at creating your own healthy eating plan? It’s actually easier than you think!
Check out this guide to overhauling your diet in six weeks. It could be the last diet you ever need.
Closing Thoughts
Friends don’t let friends skip leg day, or so the popular meme goes. That’s true for men AND women. Leg workouts offer a lot of benefits, including increased functional strength, better endurance, greater bone density, and enhanced fat burning.
In fact, leg training is so good for you it’s hard to think of many reasons not to do it.
Sure, leg training is demanding and can leave you tired and sore. But you’ll soon learn to love it when you see and feel how good it is for you.
So, give one of these leg day workouts for women a try. You’ll soon be on the way to leaner, shapelier, stronger legs.
References:
1 – Lasevicius T, Ugrinowitsch C, Schoenfeld BJ, Roschel H, Tavares LD, De Souza EO, Laurentino G, Tricoli V. Effects of different intensities of resistance training with equated volume load on muscle strength and hypertrophy. Eur J Sport Sci. 2018 Jul;18(6):772-780. doi: 10.1080/17461391.2018.1450898. Epub 2018 Mar 22. PMID: 29564973. https://pubmed.ncbi.nlm.nih.gov/29564973/
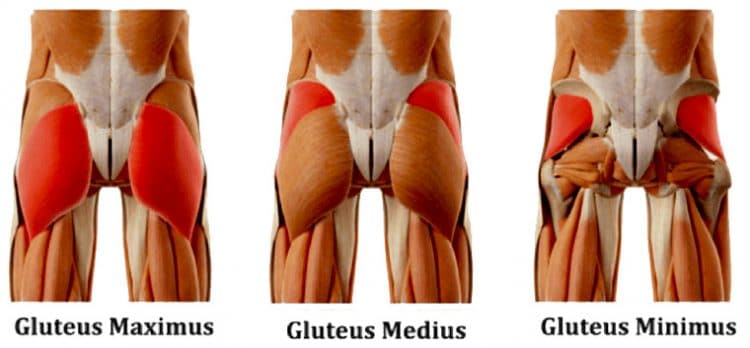
Build a Better Butt: Three Glute Workouts for Women
For years, six-pack abs were the fitness-fashion must-have. Actors, pop stars, athletes, B-listers – everyone had shredded abs and was happy to show them off. Entire workout programs revolved around getting a washboard stomach, and abs training exercise machines were on everyone’s Christmas list.
While ripped abs are still popular, they’ve been somewhat overshadowed by another muscle group – the glutes. Since the Kardashians hit the big time, glutes have become the fitness accessory that no woman can be seen without.
Unfortunately, prolonged sitting means that a lot of women’s glutes are flat, soft, and weak instead of rounded, strong, and firm. Glute amnesia is the term often used to describe how some people have literally forgotten how to contract their butts.
The good news is that the glutes are highly trainable and will quickly respond to regular workouts. You don’t even need a fancy gym to train your glutes – bodyweight and freeweight exercises can be very effective. When it comes to glute training, consistency is the key.
In this article, we share three tried-and-tested glute workouts for women. And yes, men can do them too!
Glute Anatomy Basics
When most people mention their glutes, they’re talking about their gluteus maximus. However, there are three glute muscles, each of which deserves your attention if you want to develop a muscular, aesthetically pleasing butt.
Gluteus maximus
The gluteus maximus is the most prominent muscle in the human body. It’s also potentially the strongest. Located on the rear and lateral aspect of your hips, the functions of the gluteus maximus are:
Hip extension
Hip abduction (superior/upper fibers)
Hip adduction (inferior/lower fibers)
Hip lateral rotation
Gluteus medius
The gluteus medius is found near the iliac crest of the pelvis, above and under the gluteus maximus. It works alongside the gluteus maximus and also has some additional functions of its own, too:
Hip abduction
Hip rotation
Pelvis stabilization
Gluteus minimus
The gluteus minimus is a small, triangular muscle located toward the back of the hip. Gluteus minimus also works with the gluteus maximus, but has some additional functions:
Hip abduction
Hip medial rotation
Pelvis stabilization
Bonus glute muscle: Tensor fascia latae
The tensor fascia latae, or TFL, is part of the glute complex, even though gluteus isn’t part of its name. The TFL a biaxial muscle, meaning it crosses two joints – the hip and the knee. As part of the glute group, TFL plays an essential role in the following:
Hip internal rotation
Hip abduction
Pelvis stabilization
To develop your best ever butt, you must pay attention to all the glute muscles. So, while the gluteus maximus is the biggest muscle in the glute complex, the other muscles also deserve your attention. After all, they’re vital for hip stability and performance. That’s why we’ve included a variety of exercises in the following glute workouts for women.
The Benefits of Glute Training for Women
Weak glutes are a modern-day epidemic. Prolonged sitting for work and leisure means that many people have feeble, flat, soft, underdeveloped glutes. Most women train their glutes because they want a better-looking butt. While this is no bad thing, there are several additional benefits to working your glutes hard and often.
These benefits include:
Less lower back pain
Back pain is a common problem affecting a significant percentage of adult women, and a lot of back pain is caused by weak glutes. If your glutes are weak, much of the work they should do falls on your lower back, e.g., bending and lifting objects off the floor. Stronger glutes mean less stress on your lower back and a lower risk of back pain.
Glute-related lower back pain is especially common during pregnancy, as the shift in your center of gravity pulls you forward, and you’ll need strong glutes to counter this effect. Stronger glutes will also help stabilize your sacroiliac (SI) joint, which is another common cause of lower back pain for women.
In many cases, stronger glutes are the most effective way to prevent and treat lower back pain – with your doctor’s approval, of course.
Better posture
Posture is the alignment of your joints, which can be good or bad. Good posture puts minimal stress on your joints, ligaments, and muscles and is very efficient. In contrast, poor posture puts far more pressure on your joints and connective tissue and is very inefficient. Poor posture can lead to muscle tension, fatigue, and chronic pain.
Weak glutes can affect the alignment and position of your lumbar spine or lower back. It can also reduce pelvic stability. Stronger glutes can help prevent common postural problems such as hyperlordosis or an over-arched lower back.
A better-looking butt
While training your glutes has a lot of functional benefits, there is no denying the aesthetic appeal of a strong, firm, muscular butt. Great-looking butts don’t happen by accident; if you want a rear you can be proud of, you must train it hard, often, and consistently.
Increased hip and knee stability
The hip is a very mobile ball and socket joint capable of a wide range of movements, including flexion, extension, medial and lateral rotation, abduction and adduction. However, that mobility comes at a price – reduced stability.
While increased mobility is generally a good thing, uncontrolled movement of the hip can cause hip pain and injuries and even affect your knees. For example, if your hips cave in while you are walking or running, you may experience pain in the medial part of your knees.
Strengthening the muscles around your hips will enhance joint stability and function, leading to more efficient movements and a lower risk of hip and knee pain.
Three Glute Workouts for Women
Here are your three glute workouts for women. But, before doing any of them, you must prepare your joints and muscles for what you’re about to do by warming up. Start with 5-10 minutes of easy cardio, e.g., air bike, rower, jogging, or jumping rope, followed by a few dynamic mobility and flexibility exercises for knees, hips, and lower back.
A ten-minute warm-up can save you months of lost training caused by an otherwise avoidable injury, so don’t skip it.
Ready? Then let’s get to work!
Bodyweight-Only Glute Workout
No time to go to the gym? Prefer home workouts? No problem! You can train your glutes almost using just your body weight. Do this workout at home, in your hotel room, in your garden, at the park – anywhere you want!
#
Exercise
Sets
Reps
Recovery
1
Glute bridge marches
2-4
12-20
60-90 seconds
2
Prisoner good-mornings
2-4
12-20
60-90 seconds
3
Frog pumps
2-4
12-20
60-90 seconds
4
Reverse lunges
2-4
12-20 per leg
60-90 seconds
5
Side leg raises
2-4
12-20 per leg
60-90 seconds
1. Glute bridge marches
Target muscles: Gluteus maximus, hamstrings, core.
Steps:
Lie on your back with your legs bent and feet flat. Brace your abs. Drive your feet into the floor and push your hips up so your knees, hips, and shoulders form a straight line.
Without lowering your hips, lift one leg up and push your knee up toward the ceiling.
Lower your foot to the floor, swap legs, and repeat.
Continue alternating legs for the prescribed number of reps.
2. Prisoner good-mornings
Target muscles: Gluteus maximus, hamstrings, core.
Steps:
Stand with your feet about hip-width apart. Bend your knees slightly.
Place your hands behind your head and push your elbows back to open your chest. Brace your core.
Hinging from your hips, lean as far forward as possible without rounding your lower back. Push your butt backward as you lean.
Drive your hips forward and stand up.
That’s one rep – keep going!
3. Frog pumps
Target muscles: Gluteus maximus, gluteus minimus, gluteus medius, hip abductors, hamstrings, core.
Lie on your back with your legs bent and the soles of your feet pressed together.
Push your knees apart.
Drive the outside of your feet into the floor and lift your hips up to form a straight line with your knees and shoulders.
Lower your butt back down to the floor and repeat.
Read more: Frog Pumps Exercise Guide: How To, Benefits, Muscles Worked, and Variations
4. Reverse lunges
Target muscles: Gluteus maximus, hamstrings, quadriceps, core.
Steps:
Stand with your feet together and your arms by your sides. Pull your shoulders down and back, and brace your core.
Take a large step backward, bend your legs, and lower your rearmost knee down to within an inch of the floor. Lean forward slightly to increase glute engagement.
Push off your back leg, bring your feet back together, and repeat on the opposite side.
Alternate legs for the required number of reps.
5. Side leg raises
Target muscles: Gluteus maximus, gluteus minimus, gluteus medius.
Steps:
Lie on your side so your body is straight and your head is resting on your outstretched arm.
Raise your uppermost leg to about 45 degrees, turning your hip slightly inward to maximize glute engagement.
Lower your leg and repeat.
Roll over and do the same number of reps on the other side.
You can make this exercise more challenging by putting a booty band around your knees or wearing an ankle weight.
Freeweight Glute Workout
Freeweights provide a low-tech way to overload your glutes and build more strength. Barbells and dumbbells are available at almost every gym. They are also ideal for home workouts as they’re cheap, compact, and easy to store between workouts.
#
Exercise
Sets
Reps
Recovery
1
Barbell Romanian deadlift
2-4
12-20
60-90 seconds
2
Barbell hip thrust
2-4
12-20
60-90 seconds
3
Dumbbell side leg raise
2-4
12-20 per leg
60-90 seconds
4
Dumbbell high step-up
2-4
12-20 per leg
60-90 seconds
5
Dumbbell sumo squat
2-4
12-20
60-90 seconds
1. Barbell Romanian deadlift
Target muscles: Gluteus maximus, hamstrings, core.
Hold a barbell in front of your hips with a double overhand grip. Stand with your feet hip-width apart, knees slightly bent.
Pull your shoulders back and down and brace your core.
Push your hips back and hinge forward, lowering the bar down your legs.
Descend as far as you can without rounding your lower back.
Push your hips forward, stand back up, and repeat.
2. Barbell hip thrust
Target muscles: Gluteus maximus, hamstrings, core.
Sit on the floor with your back against a sturdy bench. Rest and hold a barbell across your hips. Use a folded mat or squat par pad for comfort if required.
Push down with your feet and lift your hips up to form a straight line between your knees and shoulders.
Lower your butt back down to lightly touch the floor and repeat.
3. Dumbbell side leg raise
Target muscles: Gluteus maximus, gluteus minimus, gluteus medius.
Lie on your side with your legs straight and your head resting on your lowermost arm.
Hold a dumbbell in your other hand and rest it on your uppermost thigh.
Raise your top leg to about 45 degrees, lower it, and repeat.
The further down your thigh you hold the weight, the more challenging this exercise becomes.
On completion, roll over and do the same number of reps on the opposite leg.
4. Dumbbell high step-up
Target muscles: Gluteus maximus, hamstrings, quadriceps, core.
Hold a dumbbell in each hand, arms by your sides. Stand in front of a bench or step that’s about knee height.
Place one foot on the top of the platform, drive your foot down, and step up. Try not to push off with your trailing leg.
Step back down, switch legs, and repeat.
Continue alternating legs for the duration of your set.
5. Dumbbell sumo squat
Target muscles: Gluteus maximus, hamstrings, quadriceps, core.
Stand with your feet about 1.5 shoulder widths apart, toes turned slightly outward.
Hold a single dumbbell in front of your hips.
Pushing your knee outward, squat down as deeply as possible without rounding your lower back. Keep your weight on your heels to maximize glute engagement.
Drive your feet into the floor and stand back up.
Continue for the prescribed number of reps.
Gym Glute Workout for Women
Having access to a gym means there are lots of ways to train your glutes. In fact, there are so many choices that it can be hard to know where to start! Keep your training on track with this tried-and-tested gym-based glute workout.
#
Exercise
Sets
Reps
Recovery
1
Barbell booty band back squat
2-4
12-20
60-90 seconds
2
Cable machine pull-throughs
2-4
12-20
60-90 seconds
3
Dumbbell single-leg Romanian deadlift
2-4
12-20 per leg
60-90 seconds
4
Cable hip abduction
2-4
12-20 per leg
60-90 seconds
5
Barbell glute march
2-4
12-20
60-90 seconds
6
Reverse hypers
2-4
12-20
60-90 seconds
1. Barbell booty band back squat
Target muscles: Gluteus maximus, gluteus minimus, gluteus medius, hamstrings, quadriceps, core.
Put a booty band around your knees. Rest and hold a barbell across your upper back. Step out so your feet are about shoulder-width apart. Push your knees out against the resistance offered by the band.
Bend your knees and squat down until your thighs are roughly parallel to the floor. Keep pushing your knees outward. Do not round your lower back.
Stand back up and repeat.
2. Cable machine pull-throughs
Target muscles: Gluteus maximus, hamstrings, core.
Attach a rope handle to a low pulley machine.
Stand astride the cable with your back to the machine. Hold the handle in both hands in front of your hips. Take 1-2 steps forward to tension the cable.
Push your hips back and lean forward, reaching back and through your legs.
Drive your hips forward and stand up straight.
Continue for the prescribed number of reps.
You can also do this exercise with a resistance band.
3. Dumbbell single-leg Romanian deadlift
Target muscles: Gluteus maximus, hamstrings, core.
Hold a dumbbell in one hand and stand with your feet together.
Shift your weight over onto one leg. Bend your supporting knee slightly.
Hinging from your hips, lean forward and lower the weight down toward the floor. Extend your non-weight-bearing leg out behind you for balance.
Stand back up and repeat.
Use your non-working arm for support if required.
Switch legs and do the same number of reps on the other side.
4. Cable hip abduction
Target muscles: Gluteus maximus, gluteus minimus, gluteus medius.
Wrap a strap around your ankle and attach it to a low pulley machine.
Stand sideways onto the weight stack with your working leg furthest from the weight stack. Hold the machine for balance. Brace your core.
Keeping your leg straight, lift your foot out to the side, taking care not to twist your hips.
Lower your leg and repeat.
Do the same number of reps on both sides.
5. Barbell glute march
Target muscles: Gluteus maximus, hamstrings, core.
Lie on the floor with your legs bent and feet flat. Rest and hold a barbell across your hips. Use a folded mat or squat bar pad for comfort if required.
Drive your feet into the floor and raise your hips so they form a straight line with your knees and shoulders.
Keeping your hips up, extend your right leg.
Lower your foot back to the floor, swap legs, and repeat.
Continue alternating legs for the prescribed number of reps.
6. Reverse hypers
Target muscles: Gluteus maximus, hamstrings, core.
Lie on the machine so your hips are in line with the lever arm pivot point. Place your lower legs behind the restraint. Hold onto the support handles.
Extend your hips and legs out behind you, taking care not to hyperextend your spine.
Lower your legs and repeat.
No reverse hyper machine at your gym? Don’t worry; you can also do this exercise with a regular workout bench, like this:
Glute Workouts for Women – FAQs
Do you have a question about these workouts or glute training for women in general? No problem, because we’ve got the answers!
1. How often can I train my glutes?
While it might be tempting to train your glutes more often, 2-3 workouts per week should be sufficient for most women. Muscles take on average 48-72 hours to recover between workouts, so training them more often could impede rather than accelerate your progress.
So, train your glutes every 2-3 days for best results, e.g., Monday, Wednesday, and Friday, or Monday and Thursday.
2. Will these exercises and workouts fix my violin hips?
Violin hips, aka hip dips, are where your lower glutes/upper thighs curve slightly inward. Contrary to what a lot of influencers believe, this is NOT something that can be fixed with exercise or diet and is caused by your bone structure. Hip dips are perfectly natural and not something you need to try and alter.
While training your glutes will enhance your general butt shape, your hip dips are here to stay. So, don’t worry about them, and focus on the things you can control instead.
3. Do I have to stick to the 12-20 rep range?
To build maximal strength, you must train using heavy weights and low reps, typically 1-5 per set with 85% or more of your one-repetition maximum. However, if you aren’t training for strength, it really doesn’t matter how many reps you do per set.
In fact, studies suggest that you can perform anywhere from 5 to 35 reps per set and still make progress (1). Almost any rep count will work if you take your set close to failure.
12-20 is just a general guideline, and you can do eight, ten, twenty, or thirty reps per set if you wish.
4. What is the best diet to build a better butt?
Building a bigger, stronger butt is a type of hypertrophy training, better known as bodybuilding. As such, you’ll need to provide your body with the energy it needs for your workouts as well as muscle growth and repair.
Invariably, this means eating a slight calorie surplus, consuming enough protein, and eating mostly natural, clean foods.
It’s beyond the scope of this article to provide you with a diet to follow, but you can find all the information you need to write your own healthy eating plan in this step-by-step guide.
5. Can I just do core workouts to get in shape?
Your glutes are just a small selection of the 600+ muscles that make up the human body. Trying to get in shape by just training your glutes is like trying to keep your car running by only ever checking the tire pressure!
While these glute workouts will certainly help, you need to train the rest of your body if you want to be in good shape. That means including upper body, cardio, and core training in your weekly workout schedule.
Glute training IS undoubtedly important, but it’s just one of the things you need to do to be fit and healthy.
Glute Workouts – Closing Thoughts
Whether you are training for better health, improved athletic performance, or want to look your best, glute training can help. Unfortunately, many women have weak, soft glutes, often because they spend too much time sitting.
Use these workouts to sculpt your perfect butt. However, remember that while the glutes ARE important, the rest of your body deserves the same amount of care and attention. Nature abhors imbalances, and going all glutes all the time will probably cause more problems that it cures.
More Glute Workouts:
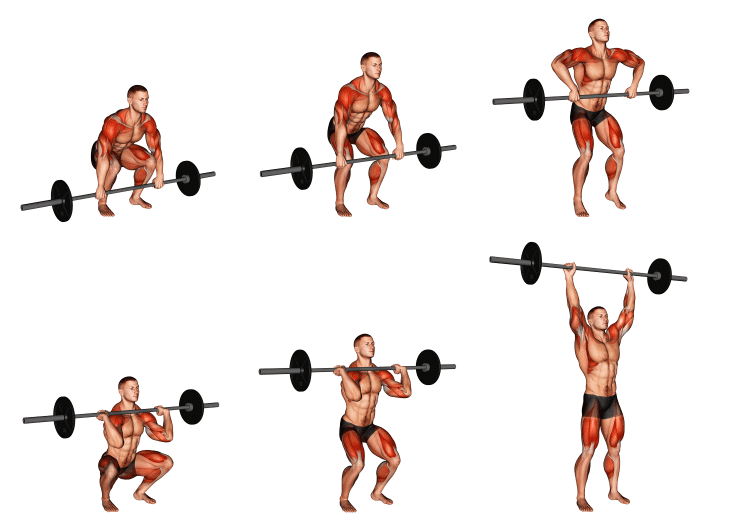
CrossFit Cluster Exercise Guide: How To, Benefits, Muscles Worked, and Variations
CrossFit is a unique sport. It involves beginner-friendly simple movements like the air squat, shoulder press, and kettlebell swings. On the flip side, it also incorporates demanding exercises such as rope climbs, pig flips, and Olympic lifts (clean and jerk and snatch) that get elite athletes on their knees.
Most CrossFit WODs (workout of the day) consist of circuits that combine two or more movements. The CrossFit cluster takes this a step further, merging the thruster with the clean into a single exercise.
Interestingly, the thruster is a combination of two exercises — the front squat and the push press. Adding the clean to the mix makes the cluster a blend of three compound (multi-joint) movements.
CrossFit has set itself apart by requiring its athletes to perform unique and challenging compound exercises that help you work your entire body in a short time. The cluster fits the bill perfectly.
In this article, we go over the fundamentals of the CrossFit cluster, and everything you need to know about it to master the movement, including its benefits, correct form, common mistakes, variations, and the muscles worked during this exercise.
What is a CrossFit Cluster?
A CrossFit cluster combines two exercises — the clean and the thruster. The compound exercise works your entire body. Most WODs have just the right amount of clusters as chippers or in a circuit to destroy you by the end of the workout.
Each cluster begins from the ground. You must lift the bar to your hip height and catch it in the front rack position at the bottom of a squat. The rest of the movement is the same as the thruster. From the bottom of the front squat, stand up by extending your knees and driving through your midfoot. As you’re about to achieve full knee extension, use the momentum to drive the bar overhead and lock out your elbows. Return the bar to the front rack position.
In the thruster, you would go right into a squat after catching the bar and repeat for the recommended reps. However, you will return the bar to the floor with each rep while doing the cluster. Adding the cleans makes the cluster much more demanding than the thrusters.
You must follow the perfect form while performing the cluster to avoid unnecessary strain on your lower back. Lifting with a rounded back is one of the most common mistakes while doing this exercise.
Muscles Worked During CrossFit Cluster
The CrossFit cluster is a full-body exercise, recruiting almost every muscle fiber in your body. It is such an effective compound exercise that we think this section should be titled “Muscles not worked in a CrossFit Cluster.” Nonetheless, here are the muscles stimulated in this exercise:
Legs
The cluster works your quads during the initial lift off the floor; your glutes and hamstrings are activated as you get into the squat after catching the bar. This exercise is a complete leg builder that will help you add strength and size to your lower body.
Back
While performing the cluster, you’ll experience latissimus dorsi, rhomboids, teres major and minor, and trapezius muscle engagement. Since this is a hip-hinge movement, you’ll also feel lower back stimulation.
Shoulders
From pulling the bar off the floor and pressing it overhead, you’ll experience shoulder engagement. Cycle through the cluster reps, and you’ll feel a sick anterior and lateral deltoid pump.
Arms
The first half of the movement involves pulling the bar to the front rack, resulting in biceps engagement. The second half requires you to press the bar overhead, which will fire up your triceps.
Core
Performing a clean, especially while lifting heavier, requires a strong core. Your midriff and stabilizers will also be in action as you press the bar overhead and complete a lockout. Folks that lack a solid core will have trouble completing a heavy overhead lockout.
Benefits of CrossFit Cluster
Adding the cluster to your exercise arsenal entails the following benefits:
Boosts Your Skills
CrossFit involves a lot of skills. Most WODs involve a healthy chunk of high-skill weightlifting moves such as the Olympic lifts and gymnastics moves like handstand walks and ring muscle-ups.
The cluster helps you improve at Olympic lifts by incorporating the clean, front squat, and overhead press into a single movement. It will aid in improving your technique and get you better results faster.
Full-Body Exercise
The cluster is a full-body exercise that will help you build overall strength and muscle mass. This compound exercise will improve your functionality, making you better at other exercises and day-to-day activities.
The cluster will also improve your metabolic conditioning, boosting your performance in demanding workouts.
Helps Build Strength and Muscle Mass
The compound exercise will boost your strength and muscle mass. You must, however, program your workouts accordingly. Stay in the 1-5 rep range to focus on strength. On the other hand, the 8-12 range is optimal for hypertrophy. [1]
Enhances Endurance and Stamina
Perform high-rep sets of clusters, and you’d be gasping for breath. Adding cluster ladders to your WODs will help you build stamina and endurance, translating to better performance in demanding workouts.
Improves Coordination
There are several moving parts in the cluster. You need to clean the barbell off the floor, perform a squat, and then do an overhead press. Doing this exercise regularly will help improve your hand-eye coordination.
How To Do a CrossFit Cluster
The CrossFit cluster is a complex lift. You must dial in your technique to get the best bang for your buck. There will be a lot of tips and tricks, so pay close attention. Here is how to perform the cluster with the perfect form:
Steps:
Place a barbell against your shins and stand upright with a shoulder-wide stance.
Grab the bar using a shoulder-wide hook grip. Your hip crease should be below your knees crease. This will help you use your quads in the initial phase of the lift.
Your chest should be open, and you should look straight ahead while at the bottom of the lift.
Pull the bar to your hip level while keeping it close to your body by driving through your midfoot.
Pull the bar faster as it crosses your knees, and you stand upright by extending your knees.
The bar should make contact with your hips. At this point, lean back slightly, generate momentum by getting on your heels, and pull the bar toward your shoulders.
In one motion, jump your feet wide and get under the bar to catch it in the front rack position at the bottom of the squat.
Get out of the hole explosively by driving through your midfoot.
Press the bar overhead as you reach the top of the movement.
Move your head through your arms to achieve a lockout.
Lower the bar to a front rack position.
Repeat for reps.
CrossFit Cluster Tips
Pull the slack out of the bar at the bottom by pulling the bar slightly off the floor. This will help ensure a smooth upward movement.
You can skip jumping your feet out if you are comfortable with your initial stance and can use it to push the weight overhead.
Your elbows should trace over the bar in the initial part of the lift and drop below the bar as you catch it in a squat. This will help you keep control of the barbell.
Avoid rounding your back or looking down in the initial phase of the cluster, as it can put unnecessary strain on your neck.
Driving through your heels or toes will throw you off balance. Drive through your midfoot to maintain your center of gravity.
This Exercise:
Target Muscle Groups: Back, Legs, Shoulders, Arms, and Core
Type: Strength
Mechanics: Compound
Equipment: Barbell
Difficulty: Intermediate
Best Rep Range: 8-12 Reps
Common Mistakes While Performing a CrossFit Cluster
Stay clear of the following cluster errors for optimal gains and to avoid injuries:
Improper Form
Like all the other exercises, you only get better at the cluster with practice. Since this is a compound movement, lifters tend to make several mistakes initially. You must not yank the bar off the floor in the first half of the lift, as it can throw you off balance.
Keep your chin tucked and your eyes locked straight ahead throughout the exercise. Tilting your head toward the ceiling or the floor will again make the lift unstable. Plus, many lifters get on their toes too soon. You must wait for the bar to reach your hip level before using your feet to generate extra momentum.
Not Warming Up
The cluster is a full-body exercise, meaning a lot can go wrong while performing this exercise. Many people increase their odds of injury by not warming up before a workout. You must spend 10-15 minutes warming up before a training session for optimal performance.
Furthermore, compound lifts like the cluster require a decent amount of mobility. You must work on improving your flexibility and mobility to get better at the Olympic lifts.
Going Too Heavy
This is one of the most common mistakes lifters make while doing the cluster. Since this exercise is a combination of three lifts, many people load the bar with more weight than they can handle, assuming that they can muscle through the lift. However, letting your ego get the better of you jeopardizes your form and puts you at a greater risk of injury.
Variations and Alternatives of CrossFit Cluster
Use the following cluster variations and alternatives to add variety to your training regimen:
Dumbbell Cluster
This cluster variation uses dumbbells instead of a barbell. Although many lifters might think it is easier than the conventional cluster, it is not the case. The dumbbell cluster requires a different skill.
Steps:
Grab a dumbbell in each hand and stand upright with a shoulder-wide stance.
Push your hips back, hinge at your hips, and bend your knees to lower the dumbbells to your floor. Place the dumbbells on the outside of your feet at the starting position.
Lift the dumbbell to your knees by driving through your quads and midfoot.
Drive your hips forward and extend your knees as the dumbbells cross the knees.
Generate momentum by lifting your heels off the floor when the dumbbells reach your hip level.
Drop under the dumbbells and catch them over your shoulders.
Explode out of the hole and push the dumbbells overhead as you complete the movement.
Pro Tip: Ensure you’re using your quads to power off the floor by getting your hip crease below your knee crease at the bottom of the movement.
Thruster
The thruster is a great exercise to forge a more robust cluster. It is just like the cluster, minus the cleans while doing multiple reps.
Steps:
Take a shoulder-width stance and stand upright with a barbell against your shins.
Grab the bar at shoulder-width using a hook grip.
Clean the bar into a front rack and get into a squat.
Explode out of the hole by driving through your midfoot.
Press the bar overhead as you extend your knees.
Lower the bar into a front rack.
Perform a squat.
Repeat for recommended reps.
Pro Tip: Hold the bar in the front rack position using a full grip. Balancing the bar using only your fingers can make the lift unstable.
Clean
The clean is an Olympic lift, which needs a lot of practice to master. However, sticking with this exercise will make you better at most other CrossFit compound lifts, as it will help develop a stronger base.
Steps:
Stand with a shoulder-wide stance with a barbell placed against your shins.
Grab the bar with a hook grip.
Maintaining an open chest and flat back, pull the bar to your knees using your quads.
Drive your hips forward and extend your knees to bring the bar to your hip level.
From here, lift your heels off the floor to pull the bar toward the ceiling.
Get under the bar and catch the bar in a front rack position while jumping your feet out.
Stand upright.
Pro Tip: Drive your knees outward during the initial phase of the lift, as it will help engage your legs to generate power.
Front Squat
The next two exercises on the list are among the nine basic movements of CrossFit. The front squat is a compound exercise that primarily works your quads.
Steps:
Start with the bar in a front rack position with your hands slightly wider than shoulder-width apart.
Use a shoulder-wide stance and turn your toes slightly outward.
While maintaining an upright torso, lower into a squat and go as deep as possible.
Return to the starting position.
Repeat for reps.
Pro Tip: You must have decent upper body, overhead, hip, and lower body mobility to perform a front squat with an upright torso.
Push Press
The push press is a basic CrossFit movement that will help you build upper body strength and explosiveness.
Steps:
Start in the front rack position and a shoulder-width stance.
Drop into a shallow stance.
Extend your knees rapidly and push the barbell overhead while raising your heels off the floor.
Lock out your elbows at the top and drive your head through your arms.
Lower the bar to the front rack position.
Repeat.
Pro Tip: Your elbows should be under the bar at the starting position, as it will help you generate power.
Wrapping Up
CrossFit is a high-intensity sport that combines weightlifting, gymnastics, and cardio. Olympic weightlifting exercises form the basis of the CrossFit resistance training WODs and help work your entire body in a short time.
The CrossFit cluster is one of the most effective functional exercises to help you build strength, muscle, endurance, and balance. Use the cluster alternatives and variations listed in this article to take your WODs to the next level. Best of luck!
References
Krzysztofik M, Wilk M, Wojdała G, Gołaś A. Maximizing Muscle Hypertrophy: A Systematic Review of Advanced Resistance Training Techniques and Methods. Int J Environ Res Public Health. 2019 Dec 4;16(24):4897. doi: 10.3390/ijerph16244897. PMID: 31817252; PMCID: PMC6950543.
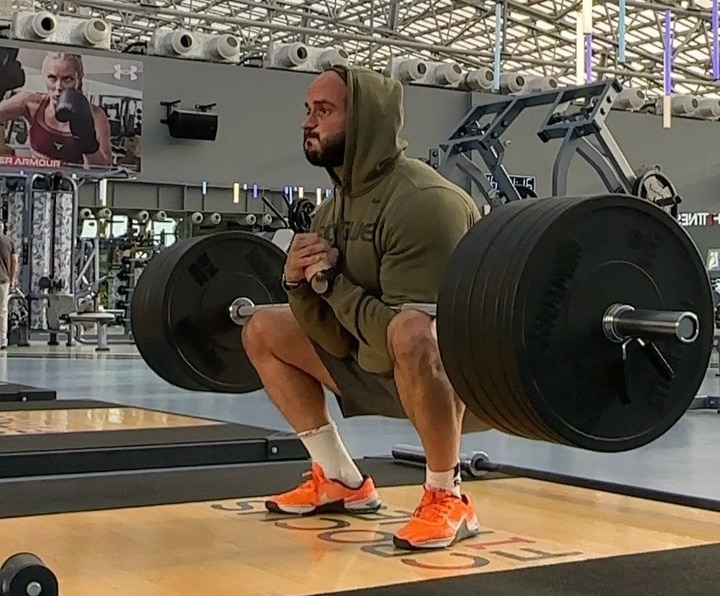
Zercher Deadlift Guide: How To, Benefits, Progression, Muscles Worked, and Variations
The Zercher deadlift is the Zercher squat’s sibling. These exercises are the namesake of the 1930s strongman Ed Zercher. Although the strongman originally invented the Zercher squat, his lifting techniques have touched the deadlift, and this unconventional exercise has been growing in popularity recently. The Zercher exercises involve holding the barbell in your elbow crooks….
PNBA Bikini Athlete Kat Vera Names 3 Exercises to Tone Your Glutes
3x Bikini champion Kat Vera lists the 3 exercises for toned glutes.
Glutes help give women a curvy physique, and a shapely, tone body is a big part of the judges scoring in the International Natural Bodybuilding Association (INBA)/Professional Natural Bodybuilding Association (PNBA) bikini division. PNBA bikini athlete Kat Vera named the three glute exercises you should do if you want to build strong and toned glutes. Recently Kat Vera posted these glutes movements and a demonstration of her doing them on Instagram. Vera’s post said:
“A must for a juicy glute day: hip thrusts, rdls, bulgarian split squats”
You can see Kat Vera’s Instagram post below.
Glute Exercises
The glute exercises Kat Vera suggests for toned glutes are hip thrusts, Romanian deadlifts, and split squats.
Hip Thrusts
Hip thrusts activate muscles in your hips, glutes, and quadriceps. This movement allows you to add resistance via machine, dumbbell, resistance band, and barbell. You’ll perform this movement with your back elevated on a surface and your legs in a bent-leg position to prepare for a hip extension.
Romanian Deadlifts
The Romanian deadlift (RDL) engages the muscles in your posterior chain–erector spinae, glutes, and hamstrings. The primary difference between this movement and barbell deadlifts is that barbell deadlifts are lifted from the floor, and RDL begins with dumbbells held in your hand at hip level. As a result, the RDL will engage more of your glutes and hamstrings compared to a barbell deadlift.
Split Squats
Splits squats are unilateral movements, meaning single-limb exercises. Since it’s a unilateral movement, you’ll activate your core more and challenge your balance, knee, and hip stability. In addition, single-leg movements will help correct muscular imbalances in your lower limbs. Split squats are an effective exercise for targeting your quads and glutes.
About Glutes
The glutes are the largest muscle in your body and are responsible for hip extension, internal rotation, and abduction of your hips. In addition, your glutes play an essential part in walking, running, and jumping. Therefore, a good strength training program will include exercises targeting your glutes.
Moreover, often, tight glutes lead to lower back pain. So aside from training your glutes through the correct exercises, it’s essential to stretch your glutes and foam roll them for mobility and to reduce lower back pain.
Glutes in Natural Bodybuilding
Of course, firm and toned glutes are essential in natural bodybuilding to rank well in competition. However, in some categories, your glutes will be more critical than others. For example, in the Men’s Physique class, competitors wear board shorts, so aesthetic glutes won’t be near as important as a shredded upper body. However, in the Bikini Divas class, women are wearing bikinis. Therefore, they need to have a degree of definition and toning in their glutes.
Furthermore, muscle mass in your glutes will help women look more shapely and give them an hourglass shape, with a small waist and wide hips. That’s because building your glutes will improve women’s waist-to-hip ratio.
Follow us on Instagram, Facebook, and Twitter for more tips from natural athletes!
Chris Bumstead & Iain Valliere Put Together A Huge Quad Workout
Iain Valliere continues to prepare for the Vancouver Pro and Chris Bumstead decided to join in.
Chris Bumstead was recently joined by his brother-in-law Iain Valliere for a quad workout to build incredible size in the legs. The two got together at the Revive Gym in Stuart, FL for the session.
Bumstead has been spending time in Florida as he prepares for yet another Olympia competition. He has been at the top of Classic Physique for years now. Bumstead is the reigning three-time Classic Physique Olympia champion and will be the favorite to win yet another title.
For Valliere, he is preparing to make his 2022 debut at the Vancouver Pro. The 2021 season was a busy one for Valliere. He won the Texas Pro and Tampa Pro in back-to-back weekend before the Arnold Classic, where he finished second to Nick Walker. Valliere then competed at the Olympia and ended in seventh place.
At this point, both competitors are making sure that all body parts are in top shape and ready to hit the stage. Below, you can find a full breakdown of the quad workout from Chris Bumstead and Iain Valliere.
[embedded content]
Chris Bumstead & Iain Valliere Quad Workout
Adductors Machine – 3 sets of 15-20
Leg Extension Machine – 4 sets of 15-20
Hack Squats – 4 sets of 12-20
Leg Press Machine – 3 sets of 8-12
Sissy Squat – 1 set to failure
Calf Raise Machine – 2 sets of 10-15, drop set to failure
Beginning Exercises
This workout consisted of six exercises and seemed to be broken down in three parts. The beginning exercises acted as a warmup in a way for Bumstead and Valliere. It began with the adductor machine, where the two were able to bang out 15-20 light reps to get going.
The quad portion began with leg extensions. This is one of the best movements to isolate the quad muscle. The duo was able to load up the machine with seven plates toward the end hitting 15-20 reps.
“For anyone wondering why I’ve been doing this one too. I find this one is just the easiest for me to get the most amount of deflection with the least amount of strain to my back and my ankles,” Valliere said.
[embedded content]
Hard-Hitting Quads
The second potion is where Chris Bumstead and Iain Valliere took on the hard-hitting exercises to target quads. They plan to hit hamstrings later in the week but focused on the front of the leg here.
“9 weeks out Van Pro, going back to Canada to for his first Pro show. He’s peeled, he’s strong, all that good shit. I’m fat, weak and all that other good shit. We are going to hammer some legs. This is purely a quad day. Hamstrings later on in the week,” Bumstead said.
The hack squat machine was next. This is one of the best exercises to perform if you want to build some tru size in the quads. Bumstead began by putting seven plates on the machine and performing 12 reps. Valliere was next and reached 20 reps.
The duo then performed three sets on the leg press machine. Bumstead performed to failure and completed eight reps. Valliere was able to get to 12. They continued on to finish the workout with exercises to failure.
Sets To Failure
The failure portion began with sissy squats, which the duo performed just one set of.
At the very end, there’s a quad push because it’s quad day. Just to strategize using the fancy equipment…When I was pushing, I feel like they were opening up, I’m getting deeper. I can keep my knees in front of me,” Bumstead said.
Finally, Chris Bumstead and Iain Valliere took on the calf raise machine. Calves are one of the most important body parts to train but often get overlooked. It is important that bodybuilders put the necessary time into them.
“I’m trying to suck my waist in and hold in right there, and just do calf raises like that, just to build the tight waist. Sometimes I forget, that’s why I wear a belt so I can keep my waist tight on everything because the belt makes you think about everything,” Bumstead said.
Iain Valliere is prepared to make his 2022 debut at the Vancouver Pro. Chris Bumstead is in the bulking portion of his Olympia prep, looking for his fourth consecutive title. The duo seems to be right where they want to as we creep into late May.
[embedded content]
For more news and updates, follow Generation Iron on Facebook, Twitter, and Instagram.