Tag: Seated rows
Cable Close Grip Seated Row Guide: Muscles Worked, How-To, Benefits, and Alternatives
When it comes to back training, bodybuilders have a saying: If you want to grow, you gotta row! While vertical lat pulldowns and pull-ups are undeniably effective, it’s horizontal rows that pack on the greatest back mass.
However, there are many different rowing exercises to choose from. Your options include bent-over barbell rows, Pendlay rows, T-bar rows, single-arm dumbbell rows, Kroc rows, seal rows, and machine rows.
In this guide, we lift the lid on another popular rowing exercise – the cable close grip seated row. It’s one of our favorites, and it should be one of yours too. However, given how badly this exercise is often performed, it’s evident that some technique revision is required!
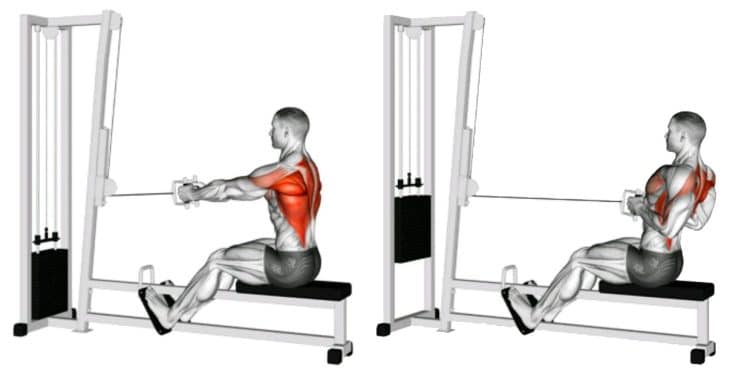
Cable Close Grip Seated Row – Muscles Worked
Cable close grip seated rows as a compound pulling exercise. That means they involve multiple muscles and joints working together. The main muscles trained by cable close grip seated rows are:
Latissimus Dorsi
The latissimus dorsi, or lats for short, are located on the sides of your upper back. When well developed, the lats look like wide, muscular wings. The functions of the lats are shoulder joint adduction and extension, the latter of which is part and parcel of cable close grip seated rows.
Trapezius
The trapezius is a large kite-shaped muscle that covers much of your upper back. Known as the traps for short, there are three groups of fibers that make up this muscle – upper, middle, and lower.
While all three sets of fibers are involved in cable close grip seated rows, the middle fibers, located across the shoulder blades, are the most active. These fibers pull your shoulder blades back and together in a movement called retraction.
Rhomboids
The rhomboids are located between your shoulder blades. They work with your mid traps to pull your shoulders back and together, which is called retraction.
Deltoids
The deltoids are your most significant shoulder muscles. Like the traps, there are three groups of fibers, called heads – anterior (front), medial (middle), and posterior (rear). All three deltoid heads are involved in cable close grip seated rows, but the posterior fibers are the most active.
Biceps
While cable close grip seated rows are undoubtedly an upper-back exercise, you’ll probably feel it in your biceps, too. Cable close grip seated rows involve a lot of elbow flexion, which is a function of the biceps. In fact, your biceps may fail before your bigger, stronger back muscles.
Forearms
Any exercise that involves your grip also trains your forearms, and cable close grip seated rows are no exception. Depending on your hand and grip strength, you may benefit from using gym chalk or lifting straps during this exercise so your hands don’t fail before your back muscles.
Core
Cable close grip seated rows are performed without support. As such, you’ll need to use your core muscles to stabilize your spine. Core is the collective term for the muscles of your midsection, including the rectus abdominis, obliques, transverse abdominis, and erector spinae. Bracing or tensing these muscles will ensure your spine remains rigid and stable during cable close grip seated rows.
How to Do Cable Close Grip Seated Row
Get more from cable close grip seated rows while keeping your risk of injury to a minimum by following these guidelines:
Attach a narrow parallel grip handle to a seated row machine or low pulley.
Sit on the bench and place your feet on the footrests. Grab the handle in both hands.
Sit up tall and straight with your arms extended in front of you and knees slightly bent.
Brace your core, and pull your shoulders down and back. Look straight ahead.
Lean forward slightly from your hips and allow your shoulder blades to slide forward. Do not round your lower back.
Shrug your shoulders back, sit up straight, bend your arms, and pull the handle into your abdomen.
Extend your arms and repeat.
Pro Tips:
Use gym chalk or lifting straps to reinforce your grip if required.
Keep your upper body stationary and vertical if you prefer.
Keep your upper arms close to your sides to fully engage all your back muscles.
Lead with your elbows to maximize muscle engagement.
Keep your wrists straight throughout.
Inhale as you bring the handle toward you, and exhale as you extend your arms.
Benefits and Drawbacks
Not sure if cable close grip seated rows deserve a place in your next back workout? Consider these benefits and then decide!
Reduced lower back stress
Exercises like bent-over and T-bar rows put a lot of stress on your lower back. In fact, some fitness coaches and trainers call these movements contraindicated, suggesting they should be avoided. While this is a little over-cautious, there is no denying that unsupported forward flexion can cause injuries, especially if you allow your lumbar spine to round.
However, cable close grip seated rows are much more lower back-friendly. You don’t have to waste energy supporting your upper body weight, so there is less stress on your back. Whether you suffer from back pain or just want to avoid it in the future, cable close grip seated rows are a sensible option.
A time-efficient exercise
Some rowing exercises are unilateral, meaning they train one side of your body at a time. While this is a useful way to identify and fix left-to-right strength imbalances, it can also make your workouts longer.
Bilateral cable close grip seated rows are more time efficient as you train both sides of your back simultaneously. This is a small but welcome advantage for exercisers with limited training time.
A complete upper back workout
While lat pulldowns and pull-ups are both popular and effective, they only tend to work your lats and have much less impact on the trapezius and rhomboids. As such, they can help you develop a wider back but won’t do as much for back thickness.
In contrast, cable close grip seated rows hit the lats AND the traps and rhomboids, making it a more self-contained back workout. Using cable close grip seated rows, you should be able to develop a back that’s both thick and broad.
Easy to adjust the weight
Cable close grip seated rows are usually performed on a machine with a selectorized weight stack. As such, you can quickly and easily change the weight. This makes cable close grip seated rows ideal for muscle-building drop sets. To perform a drop set, rep out to failure, reduce the weight by 10-15%, and immediately rep out again. Do 2-3 weight drops to fully exhaust the target muscles.
While cable close grip seated rows are a mostly beneficial exercise, there are also a couple drawbacks to consider:
Good postural awareness is a must
While cable close grip seated rows are relatively lower back-friendly, that depends on your form and posture. In other words, you need to sit up tall and straight to minimize lower back stress. This requires good postural awareness, and you’ll need to adopt the correct position by relying on your position sense and proprioception.
If you aren’t sure you are in good posture, video your cable close grip seated row workout and make adjustments accordingly.
Equipment requirements
Most commercial gyms have at least one cable seated row machine. But, because they’re usually quite large, heavy, and expensive, home exercisers may not have the space or the budget to put one in their garage or spare room gym.
The good news is there are several similar exercises you can do instead of cable close grip seated rows, which you’ll find described in the following section.
7 Cable Close Grip Seated Row Variations and Alternatives
Cable close grip seated rows are a highly effective upper back exercise, but that doesn’t mean you need to do them all the time. Here are several variations and alternatives you can use to keep your workouts productive and interesting:
1. Single-arm cable seated row
While training both sides of your back and arms at the same time can be an advantage for some, it isn’t for others. Bilateral training can lead to left-to-right strength and developmental imbalances. If you’ve got one side stronger than the other, single-arm cable seated rows could be the answer.
Steps:
Attach a D-shaped handle to a seated row machine or low pulley.
Sit on the bench and place your feet on the footrests. Grab the handle with one hand.
Sit up tall and straight with your arm extended in front of you and knees slightly bent.
Brace your core, and pull your shoulders down and back. Look straight ahead.
Lean forward slightly from your hips and allow your shoulder blades to slide forward. Do not round your lower back.
Shrug your shoulders back, sit up straight, bend your arm, and pull the handle into the side of your abdomen.
Extend your arm and repeat.
Rest a moment, switch sides, and do the same number of reps with the other arm.
Muscles targeted:
Primary: Latissimus dorsi, middle trapezius, rhomboids, posterior deltoids.
Secondary: Biceps, forearms, core.
Benefits:
Identify and fix left-to-right strength imbalances.
Less lower back stress than the bilateral version.
A useful anti-rotation core exercise.
Tips:
Keep your torso upright and shoulders squared throughout.
Use a thick handle to work on your grip strength.
You can also do this exercise with a rope handle.
2. Cable wide grip seated cable row
Regular cable close grip seated rows hit your lats and mid-upper back pretty equally. However, when you switch to a wide grip, your mid-traps, rhomboids, and posterior deltoids get more of a workout, and your lats must take a back seat. This is an excellent variation for developing upper back thickness and improving posture.
Steps:
Attach a long bar to a cable seated row machine.
Sit on the machine with your legs slightly bent and torso upright.
Hold the bar with a slightly wider than shoulder-width overhand grip.
Starting with your arms straight, bend your arms and pull the bar into your sternum.
Extend your arms and repeat.
Muscles targeted:
Primary: Middle trapezius, rhomboids, posterior deltoids, latissimus dorsi.
Secondary: Biceps, forearms, core.
Benefits:
An excellent way to emphasize the mid-upper back.
A good exercise for better posture.
A very effective movement for developing the posterior deltoids.
Tips:
Keep your elbows high throughout.
Pull your shoulders back and down while keeping your chest up.
Do not bend your wrists to pull the bar closer to your chest. Pull your elbows back instead.
3. Supinated grip seated cable row
Using a supinated or palms-up grip puts your biceps in a stronger position. As such, with this variation, you should be able to either lift more weight or do more reps. However, if you’ve got tight arms, you may find it hard, if not impossible, to fully extend your elbows. Try it and see how you get on; this exercise is not for everyone.
Steps:
Attach a straight bar to a cable seated row machine.
Sit on the machine with your legs slightly bent and torso upright.
Hold the bar with a shoulder-width supinated or underhand grip.
Starting with your arms straight, bend your arms and pull the bar into your abdomen.
Extend your arms and repeat.
Muscles targeted:
Primary: Latissimus dorsi, middle trapezius, rhomboids, posterior deltoids.
Secondary: Biceps, forearms, core.
Benefits:
A stronger position for the biceps.
A useful addition to close and wide grip seated cable rows.
A good back AND biceps builder.
Tips:
Lead with your elbows, and keep your upper arms close to your sides.
Adopt and maintain good posture throughout.
Try a narrow and medium-width grip to see which you prefer.
4. Resistance band seated row
No seated row machine? No problem! You can replicate this popular back exercise with a simple resistance band. All you need is a strong anchor and a suitable band. The type with handles at each is ideal. This is an excellent option for home workouts.
Steps:
Attach the middle of your band to a strong, low anchor.
Sit on the floor with your legs extended, knees slightly bent. Sit up straight, brace your core, and pull your shoulders back and down.
With one end of the band in each hand, pull the handles into your lower ribs.
Extend your arms and repeat.
Muscles targeted:
Primary: Latissimus dorsi, middle trapezius, rhomboids, posterior deltoids.
Secondary: Biceps, forearms, core.
Benefits:
An ideal exercise for home workouts.
Do this exercise almost anywhere and anytime, even while traveling.
A very joint-friendly back exercise.
Tips:
Sit on a low chair for comfort if necessary.
You can also do this exercise by looping your band around your feet.
Pull the handles into your chest to hit your upper back more than your lats.
5. Cable close grip standing row
While cable close grip seated rows are an excellent bodybuilding and strength training exercise, they’re not exactly functional. After all, other than at the gym, when was the last time you pulled a heavy weight toward you while sitting in a chair?
This standing variation is a little more functional and should carry over better to sports and activities outside of the gym.
Steps:
Attach a narrow parallel grip handle to an adjustable cable machine set to around mid-chest height.
Hold the handle with both hands and step back to tension the cable. Stand with your feet about shoulder width apart, knees slightly bent for stability.
Pull your shoulders back and down, brace your core, and look straight ahead.
Bend your arms and pull the handle into your abdomen.
Extend your arms and repeat.
Muscles targeted:
Primary: Latissimus dorsi, middle trapezius, rhomboids, posterior deltoids.
Secondary: Biceps, forearms, core.
Benefits:
More functional than seated cable rows.
Burns more calories than the seated variation, as you have to use your legs for support.
Less lower back stress and a reduced chance of rounding your lumbar spine.
Tips:
You can also do this exercise in a split stance.
Use a D-shaped handle and work one arm at a time if preferred.
Keep your upper arms close to your sides to maximize back engagement.
6. Inverted row
You don’t need a cable machine to train your upper back. In fact, all you really need is your body weight and a suitable bar. This exercise is ideal for home workouts and is also more functional than seated cable rows, as you have to stabilize your entire body to perform it correctly.
Steps:
Adjust the bar in a Smith machine or put a barbell in a squat rack at around hip height. Lock it in place so it won’t move.
Sit on the floor below the bar and hold it using an overhand, slightly wider than shoulder-width grip.
Extend your legs and lift your hips so your body is straight.
Starting with straight arms, bend your elbows and pull your chest up to the bar.
Extend your arms and repeat.
Muscles targeted:
Primary: Latissimus dorsi, middle trapezius, rhomboids, posterior deltoids.
Secondary: Biceps, forearms, core.
Benefits:
A very functional upper-back exercise.
An ideal exercise for home workouts.
Good for developing better posture.
Tips:
Make this exercise easier by bending your legs or raising the height of the bar.
Make it more challenging by putting your feet on a bench or wearing a weighted vest.
You can also do this exercise with gymnastic rings or a suspension trainer, e.g., a TRX.
7. Cable chest supported seated row
While cable close grip seated rows are already pretty lower back-friendly, there is still some stress on the muscles surrounding your lumbar spine. People with a history of lower back pain may find even this low amount of tension problematic. This rowing variation eliminates almost all lower back stress.
Steps:
Place an exercise bench in front of a low pulley machine so the backrest is upright and facing away from the weight stack.
Sit on the machine with your chest against the backrest, your feet flat on the floor, and the handles/bar in your hands.
Pull your shoulders down and back, and brace your core.
Bend your arms and pull your hands into your abdomen.
Extend your arms and repeat.
Muscles targeted:
Primary: Latissimus dorsi, middle trapezius, rhomboids, posterior deltoids.
Secondary: Biceps, forearms, core.
Benefits:
A very lower back-friendly rowing exercise.
An accessible exercise as most gyms have the necessary machine and benches.
An excellent exercise for beginners and older people.
Tips:
You can do this exercise using a dual pulley machine or a single cable.
Use a rope handle to increase your range of motion.
Keep your upper arms close to your sides to maximize upper back engagement.
Cable Close Grip Seated Row FAQs
Do you have a question about cable close grip seated rows or back training in general? No problem, because we’ve got the answers!
1. Which is better – Cable close grip seated rows or lat pulldowns?
Cable close grip seated rows and lat pulldowns involve many of the same muscles. However, where cable close grip seated rows are a horizontal pulling movement, lat pulldowns are vertical. This means cable close grip seated rows involve the mid traps and rhomboids more than lat pulldowns.
Does this make cable close grip seated rows better than pulldowns? That depends on what you want from your exercises. If you want to emphasize your lats, lat pulldowns are probably the way to go.
But, if you want to work your mid-traps and rhomboids more, cable close grip seated rows could be the best choice.
That said, these exercises complement one another, so if you can find space in your workouts for both of these movements, then you probably should.
2. Are cable close grip seated rows safe?
While no exercise is 100% safe, cable close grip seated rows are pretty low risk, especially if you avoid using too much weight and do them with the correct technique. They’re certainly safer than some other rowing exercises, such as bent-over and T-bar rows.
3. Cable close grip seated rows hurt my lower back – what gives?
If cable close grip seated rows hurt your lower back, you are probably rounding your lumbar spine or not sitting in good posture. Get someone to video you or give you feedback so you can determine what you are doing wrong.
Tight hamstrings and a weak core can make it harder to sit up straight, so address these problems if they affect you.
You may also feel your lower back if you are using too much weight.
Switch to the single-arm or chest-supported variations to hit the same muscles but with less pressure on your lower back.
4. How many sets and reps of cable close grip seated rows should I do?
Two to four sets of cable close grip seated rows should be sufficient for most people. If you feel like you need to do more than four sets, you are probably resting too long between efforts or not taking your sets close enough to failure.
Regarding reps per set, anywhere from around eight to 30 will work, providing you push your set to within a couple of reps of failure. However, lower reps, i.e., 8-15, are generally more time-efficient.
5. How often should I train my back?
While you could just train your back once per week, as some bodybuilders do, you’ll probably get better results from two back workouts. However, don’t just repeat the same session twice, as that will soon become boring. Instead, create two workouts with different exercises in each. This will help prevent boredom and overuse injuries. Do these workouts 2-3 days apart to allow time for recovery and growth.
For example:
Workout 1
Workout 2
Exercise
Sets x Reps
Exercise
Sets x Reps
1
Lat pulldowns
4 x 10-12
Pull-ups
4 x AMRAP*
2
Cable seated rows
3 x 12-15
Barbell rows
3 x 6-8
3
Single-arm rows
3 x 12-15
Seal rows
3 x 10-12
4
Dumbbell pullovers
2 x 15-20
Straight-arm pulldowns
2 x 12-15
*AMRAP = As Many Reps as Possible
Cable Close Grip Seated Row – Wrapping Up
Rows are one of the best ways to build a broad, muscular upper back. Horizontal pulling exercises like bent-over, T-bar, single-arm, and Pendlay rows are critical if you want strong, powerful lats, trapezius, and rhomboids.
That said, those exercises can also be hard on your lower back, and the risks may outweigh the benefits for some people. Cable close grip seated rows are more lower-back friendly than some other rowing exercises, and the easy-to-adjust weight stack mean they’re perfect for drop sets.
Combine horizontal rows with vertical pulldowns and pull-ups to hit back your muscles from all angles and build a physique you can be proud of!
Band Seated Row Exercise Guide: Muscles Worked, How-To, Benefits, and Variations
Resistance bands and (back) home workouts go together like peanut butter and chocolate. Especially because of the space and money needed for a good home gym setup. Exercises like band seated rows and similar variations take up no space (a band weighs little and can fit anywhere) and cost no more than a Jackson ($20 bill), yet they are so effective. Additionally, finding good and challenging exercises for the back at home (especially without a pull-up bar, or the ability to do one) requires more work.
The mighty band is the answer and this guide tells you why, and how to utilize band seated rows to get those back gains.
Muscles Worked During Band Seated Rows
Everything from your waist and up gets a piece of stimulation from band seated rows. Learn about the benefits of training each muscle and how they interact to assist during the exercise.
Infraspinatus – Part of the shoulder blade, infraspinatus helps form the shoulder area, while helping to keep it mobile and stable. Rows involve shoulder motion, which recruits infraspinatus.
Latissimus Dorsi – A massive muscle by surface area, latissimus dorsi or lats cover as much of the upper and lower back. It spreads out to the sides behind the arms, and is a major activator during pull movements, especially pull-ups.
Teres Major – The teres major forms a bridge from the scapula (shoulder blades) to the humerus (upper arm bone). This muscle partners with the latissimus dorsi above to perform extension, adduction, and internal rotation of the humerus.
Teres Minor – Found above teres major, minor also connects from scapula to upper arm bone. However, unlike major, the latter is a rotator cuff muscle that contributes to shoulder joint stability and function.
Trapezius Lower Fibers – As the name tells, traps are a trapezoid shaped muscles divided in three sections, upper, middle, and lower fibers. The lower traps do downward movement of the scapula, and help the upper traps move it upward. Rows effectively light the traps on fire!
Trapezius Middle Fibers – Above the lower fibers are the middle trapezius that draw the scapula back during rows, really emphasizing these muscles.
Brachialis – One of the best side effects of back training is the arm muscles come along for the ride. Brachialis is hidden under the outer biceps and come out on a lean physique. But aside from aesthetics, brachialis is a powerful arm flexor, bending the elbow during band seated rows, and all similar movements.
Brachioradialis – Contributing to grip performance, brachioradialis inhabits the upper and lateral forearm where it crosses the elbow, functioning to bend the arm, and supine/pronate the forearm. Pulls and curls will naturally build and strengthen these lower arm muscles.
Deltoid Posterior – If you include rows in your workouts, you can bet the rear delts will benefit too. While there are three heads that make up your shoulder, the posterior head supports rearward arm movements, while the front head lifts the arm forward, and the lateral head lifts the arm out to the side.
Deltoid lateral – Your middle delts also get an intense workout from band rows. This head gives width and roundness to the upper body, and raises the arms out to the sides.
Other muscles involved – Aside from the primary muscles worked, band seated rows also engage the rectus abdominis (six pack muscles) and oblique muscles to keep your torso strong. This creates better force transfer, and muscular efficiency.
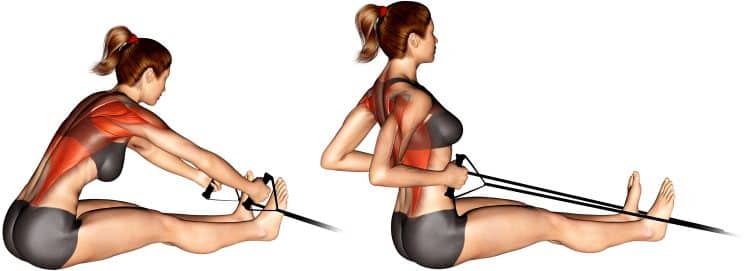
How To Do Band Seated Rows
To do band seated rows, you need the right tools, that include a quality resistance band, and a sturdy base like a power rack, thin pole, or even your feet if you can do it safely. And that’s half of it! The actual movement is not difficult, and most people can do it.
Below we’ve listed detailed band seated row steps and a short video demonstration.
Steps
Sit on the floor, a bench, or whatever is most comfortable for you.
Wrap one end of the resistance band around an immovable object like a power rack post, machine, or small pole. Then grab the other end and make sure both sides are even. The band should be at a height between your belly button and lower chest.
Move back to stretch the band, and do a few practice reps. The band should still be stretched when your arms are fully extended forward.
Sit up straight and pull your shoulders back.
Pull your elbows back behind your body, and squeeze your back muscles hard.
Stretch your arms forward and repeat steps 5 and 6 until you’ve completed the desired number of repetitions.
Tips
Having a platform to press your feet against is ideal if using very heavy resistance, to keep your body stable, and give you more pulling power.
You can also wrap looped bands under the bottom of your feet if you don’t have an object or base like a pole or piece of equipment.
Any type of band can work for this exercise.
Make sure the band is always stretched, to challenge and stretch your back muscles during the eccentric or negative phase of each rep.
This Exercise:
Target Muscle Group: Back
Secondary Muscles: Biceps, forearms
Type: Hypertrophy
Mechanics: Isolation
Equipment: Resistance band and solid base (optional)
Difficulty: Beginner
Benefits of Band Seated Rows
There is little to no reason not to incorporate band seated rows in your workouts. Here are the benefits that first come to mind when we think of this super effective exercise.
Resistance bands are versatility GOAT!
When we say the options are endless, it’s no exaggeration. Resistance bands are the GOAT (greatest of all time) of versatility. Not to mention they come in different forms, and levels of resistance.
If you have the right bands to match your strength level, and know what you’re doing, you can build as much muscle as you want. Of course, they do have some drawbacks as well, which we mentioned below. But overall, for the money and advantages, it’s hard to beat training bands for certain exercises.
Check out these resistance bands that we reviewed.
No excuse not to train your back
Without a pull-up bar or weights, one might say you’re screwed if training at home. While you should always find a way to train your back, and there are options, a five dollar band can be a gamechanger.
Not training your back and just doing push-ups, ad no rear training, is a recipe for muscle imbalance both functionally and aesthetically.
Comfort of movement
Unlike bulky weights or a bar that doesn’t move past your belly, using bands is arguably more comfortable. Consequently, you can focus on getting an amazing contraction.
Extremely user-friendly
99 percent of the population can do band seated rows. There’s not much to it, yet the benefits are worth it! In fact, similar variations are used for rehab purposes, because it’s so user-friendly.
Cheap and effective back workout
A resistance band can cost as low as a few bucks. There’s no reason not to have a few in your closet!
On the same side of the token, you get a fantastic upper body workout using bands and all of the possible variations. It’s much more practical for people who may not have the funds or time for gym training.
Drawbacks of Band Seated Rows
The pros outweigh the cons for sure. But we cannot ignore the few drawbacks of banded training.
Harder to gauge progress
One significant negative of resistance band exercises is that many people don’t take them seriously. Bands are not just a warm up or stretching device. They offer several levels of resistance, and can help to change your physique if you use them like other training tools.
When training with bands, you should make note of how far you are from the anchor point (where you attach the bands), and use a heavier strength band as you progress.
Try this Full-Body Resistance Band Workout For Home Exercisers
Bands are not as consistent…
Unlike free weights and machines, bands resistance is lighter at the start of a rep, and harder as it stretches out. Of course, you should pre-stretch the bands before starting the exercise, but more experienced exercisers know how to do it best.
Band training still requires technique to do right!
Another downside to band training is they can wear out, which may reduce their strength. Overall, though, for the person looking to improve their fitness, this shouldn’t be an issue.
Common Mistakes When Performing Band Seated Rows
Don’t make these mistakes and you’ll be good to go with band seated rows!
Sitting too close to the base
When using resistance bands, they should always be stretched, whether a little or a lot. You don’t want to sit too close to the base (where the other end of the band is wrapped around) so that when you reach forward, the band becomes un-stretched.
Using too much resistance
Ego training is nothing new. In fact, we’ve all done it and still do. Then there are the less experienced who don’t know any better.
That’s why it’s more important to focus on range of motion first, and then training heavy later. You’ll train the muscles correctly, get the most benefit, and also prevent pulling or injuring a muscles.
Mediocre range of motion
You should be training your back muscles through their entire range of motion. Otherwise, you won’t get a good stretch in your lats and surrounding muscles, shorting the potential of both phases of a rep that contribute to strength and hypertrophy gains!
Variations and Alternatives of Band Seated Rows
Band rows are typically for home or mobile training purposes. These variations and alternatives are superior at the gym, or if you can afford more hefty training equipment.
Standing band row
For a more athletic and functional variation, simply do the banded row while standing. You should also mix in training on your feet as it helps to develop and maintain our human ability to perform natural feats.
Steps
Secure the band around an object, and grip both ends evenly while standing on your feet.
With your arms outstretched in front of you, take a step or two back to stretch the band, and bend at the hips and knees. You can use a staggered stance with one foot forward and the other behind. Or, you can stand with your feet roughly shoulder width apart.
Push your chest up and keep your shoulders back, then pull your hands past your ribs and contract your back muscles.
Extend your arms forward until you feel a little stretch in your back muscles, and then repeat.
Below is a video example of standing rows, plus there are a few kneeling variations that remove leg involvement, focusing on just the upper body.
Standing bent over row
The best and most convenient banded row is the standing version that requires nothing but you and a band.
Steps
Grab the bands in both hands, and stand evenly on the center of the band with your feet shoulder width apart, then make sure both sides are the same length. Move your feet closer or further apart as needed. Just make sure there’s always tension in the band.
Bend your knees and hips then lean your torso forward at a roughly 45-degree angle to the floor.
Retract your shoulder blades, and straighten your back.
Tense your core, and drive your elbows back behind you, keeping them slightly flared out.
Squeeze your back muscles, stretch your arms back to the starting position, then repeat.
Cable seated row
The obvious closest variation or alternative to band seated rows is the cable version. Most people don’t own a cable machine, but a gym membership will give you access to one.
Overall, there are more advantages to using cables than bands. These include more handle options, a numbered weight stack, and equal resistance from start to finish of each rep. Additionally, cable training is more natural than using machines that lock you in a single movement path.
Machine seated row
Another must have in your back training rotation, the major advantage of machine rows include being locked in. That makes it very user friendly, eliminating the need to balance, stabilize, or think too much. Just sit, adjust the seat, assume proper training posture, and start rowing. The machine takes care of everything else.
Note: There are different machine variations, so you may need to read the machine label or ask for assistance.
Inverted suspension row
Almost as versatile as resistance bands, TRX trainers and similar alternative suspension trainers make it possible to do rows at home using your body’s resistance.
Ideally, you can set up your trainer in an area that allows you enough space to move freely, and consequently perform more advanced exercises. However, you can do an easier version if all you have is a door to hook your straps to.
Steps
Setup your suspension trainer so that it’s roughly about waist-height. Sit on the floor below the straps. Then grab the handles, allow your arms to fully extend, and place your feet flat on the floor. Lift your hips so that your body forms a straight line from your knees to your head.
Tense your core tight, bend your arms and pull your body up to the handles. Keep your elbows close to your sides and your wrists straight.
Extend your arms and repeat.
Pro tip: Build more strength and size by elevating your feet up onto a bench, or wear a weighted vest to add more resistance.
Related: Best TRX Back Exercises For a Thick Rock-Solid Back
Free weight rows
In its various forms, using dumbbells and barbells to perform row variations will get you the back you deserve. They’re more raw in nature, require total body activation, and recruit a ton of core. Additionally, you can buy a cheap barbell set for home training.
Check out our back training workouts that include a lot of free weight row variations.
FAQs
Are band seated rows as good as cable seated rows? Overall, cable rows have some major advantages over banded rows. However, for home training purposes, resistance bands are a viable tool that gets the job done when used ad progressed correctly.
What’s the best sets and reps for band seated rows? There’s no perfect one size fits all recommendation because we all have different goals. However, the majority of people will benefit from the following sets and rep ranges.
Note: We do recommend having a strategy in place to mix up the rep ranges, ad benefit from each one.
Strength: 3-4 sets x 5-7 reps
Hypertrophy and a little strength: 2-4 sets x 8-12 reps
Muscle endurance: 2-3 sets x 15+ reps
What type of band should I use for band seated rows? Almost any type of resistance band will work. Choose one based on your preference and budget.
Wrapping Up
By now you should be convinced of how awesome band seated rows are for building a sexier posterior! If you’ve ever trained at home, or prefer to make gains at home, it’s going to be a key tool in your back training arsenal. But the seated band row is just one band variation, and you should try the others that we also included in this guide.
Make sure to read through this article to understand the benefits and drawbacks of band seated rows, and always use a variety of exercises and techniques to reap the full benefits of training.