Tag: Core
Core Workouts To Develop Abdominal Muscles
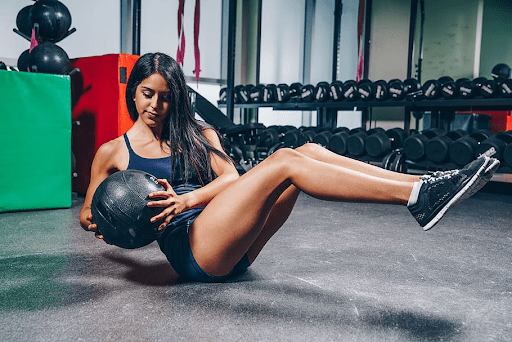
A strong, chiseled midsection with well-defined abs is a fitness goal that many aspire to achieve. Beyond the aesthetics, a strong core offers many benefits, from improved posture and reduced risk of injury to enhanced athletic performance and functional fitness. However, building a solid midsection requires a focused approach that combines targeted core workouts, […]
The post Core Workouts To Develop Abdominal Muscles first appeared on .
Half Moon Pose Ardha Chandrasana – Benefits, Common Mistakes, and Variations
The first thing that comes to mind in the half moon pose Ardha Chandrasana is being thrown off balance. And if you’re a beginner, intermediate yogi, or new to this technique, you’re stability and patience will definitely be challenged. But dust yourself off, focus, breathe, and bring yourself back into the pose, teaching yourself patience, and persistence in the process.
Being unilateral in nature, half moon pose shifts your weight onto one side, strengthening the standing leg, plus the hips, pelvis, and core, as it requires more overall muscular demand. But perhaps the greatest difficulty is maintaining the lateral cartwheel position in a plane of movement we rarely tap into.
But the half moon pose is a must-have technique in your posing regime, and we have some amazing technique tips and variations below.
Muscles Involved During Half Moon Yoga Pose
Balance may seem like its own thing, but that couldn’t be further from the truth. We need help from certain muscles to maintain the desired positions. The half moon is almost a full-body movement as it involves coordination and stability from several body parts.
Legs
Akin to a hip hinge movement like stiff legged deadlifts, the hamstrings (muscles on the rear on your thigh) stretch and load up, while the quadriceps (five headed anterior thigh muscles) keep the knee straight, and leg strong, and the calves root down to help posture and balance.
Glutes (medius)
You especially need strong glute medius muscles, which are one of the three muscles in your butt. That’s because these muscles, found in the lateral upper buttock, externally rotate the hip, and play an essential role in stabilizing the lower limbs and pelvis, which are highly activated in the half moon pose.
Core
You can see in half moon that the upper body leans forward at the hips. As a result, the muscles in your core have to take over to maintain the torso in proper position. These include the deeper and more superficial absominals that stabilize the spine, erectors that allow us to bend and stand up, and obliques that work during lateral motions and rotation.
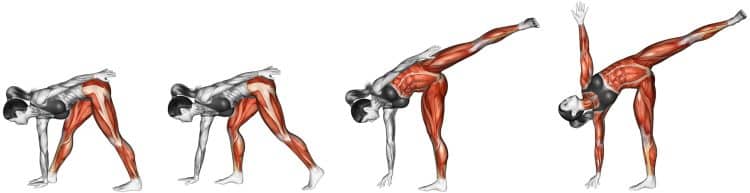
How To Do Half Moon Pose Ardha Chandrasana
The half moon pose may appear easy enough so long as you have the flexibility. But there’s a lot more to it, and you may need to work on your technique before you can get it down pat!
Note: The following video demonstration is the simple, straightforward version of half moon pose. There are longer versions that involve more warming up, pre pose techniques, etc.
Steps
Come into a front forward leaning lunge with the right foot in front, pointing straight forward, and back foot turned outward to the left.
Reach the left arm behind you and grab the back of the left leg/hip.
Reach the right arm to the floor and lean onto your finger tips, with the hand directly under the shoulder.
Rise up onto the front leg, and lift the rear leg up parallel to the floor. The lifted foot should be pointed to the left with the feet flexed by pulling the toes up toward the shin.
Root down into the floor with the standing leg by pressing with the four corners of your feet, and extend the bottom leg.
While looking down at the floor, extend the top arm vertical with the fingers pointing straight up toward the sky.
Now you can adjust your gaze to the side or look up at the top hand to challenge your balance further.
You’ll then perform the same technique but on the opposite leg.
Tips
When you feel advanced enough, try the half moon pose without touching the ground.
The half moon pose is commonly performed as a transition from or into another similar standing balancing hip focused posture, like triangle pose, for example.
An effective trick to get your body into the right position is to perform half moon pose with the back side of your body against a wall. It gives you stability, keeps everything in line and tells you where you need to straighten up.
Use a yoga block to elevate your upper body and free up space through the hips as you learn the half moon pose. You can also use a chair if a yoga block is still too low.
The half moon pose is an open hip posture, therefore, your feet position is very importance. The lead foot should point straight forward toward the head, while the back foot needs to face out to the side.
This Exercise
Target muscle groups: Legs, glutes, hips, core
Type: Yoga
Equipment: Mat
Difficulty: Intermediate
Benefits of Half Moon Pose Ardha Chandrasana
Balance based exercises are so beneficial alone, but you there’s much more to the moon pose that make it worth including in your yoga routine.
Build foundational strength and functional ability
Half moon ardha chandrasana is a strong pose that requires a solid and rooted foundation in your feet, ankles, legs, and hips. You may be wobbly in the beginning, but as you become more coordinated and in tune with your body, you’ll create a more unshakeable base. This will carry over to your athletic activities, weight room lifts, maintaining good walking balance, and preventing falls, which increases as we age.
The unilateral (affecting one side at a time) nature of the half moon pose is a good test of left to right side balance, and you’ll get instant feedback, so that you can work on fixing any imbalances.
Keep your patience
Patience combined with persistence is the secret recipe for progress and long term results. An intermediate posture, half moon isn’t as easy as balancing on one foot. In fact, it looks something like a ballet or gymnastics technique. Not to mention, it’s a lateral facing posture which is harder. Many who attempt the half moon will struggle and it will take time and patience to get right.
Great for those who sit too long
In modern culture, sitting for 4+ hours straight is pretty standard, with desk and remote type jobs being the norm, and electronic devices taking up most of our time. Implementing a light yoga routine that forces us to counteract the constant sitting and lying positions of our legs and hips is a very good idea.
You probably won’t start with the half moon pose as a beginner, but it is something to work up to as an intermediate.
Common Mistakes When Performing Half Moon Pose Ardha Chandrasana
Below are some common mistakes and reasons why you shouldn’t make them.
Pivoting the standing foot inward
It may feel more comfortable to pivot or turn the standing foot inward. This happens for a few reasons, but they should be identified and fixed.
The first is that many feel it gives them a better sense of balance control. But this is a manifestation of either tight hips or lack of balance ability. But by doing this, you’re actually closing the hip joint, but we want to keep the standing leg externally rotated, to keep the hips open.
But that’s also where it’s useful to have a yoga block for balance, so that you can more easily keep the lead foot forward.
Letting the raised leg move behind the hip
Something else that often happens is that the top, lifted leg moves back behind the hips. From the half moon pose, take a peek at the top leg and see of you can see the feet. If not, you know to move them slightly forward in line with your hips. You can also use a wall to train keeping your leg in proper alignment.
Slumping forward
We could see this one being very common, where the person simply leans forward and slumps over, without actively engaging the upper body.
To easily fix this, push your hand into the floor or your block to straighten the arm, roll the shoulder back, and then do the same for the top arm, retracting the shoulder toward the middle back. That’s how you’ll achieve the nice straight line in the arms and shoulders.
Variations of Half Moon Pose Ardha Chandrasana
Whether you’re still trying to figure out the half moon pose, or are ready for a more challenging variation with a twist (pun intended), definitely give these poses a try.
Half moon against a wall
We briefly mentioned this variation in the tips section of this guide. And it really is one of the easiest ways to get immediate feedback on your technique, but it’s also like having training wheels.
The wall provides stability, and reinforces correct half moon posture, allowing you to feel any gaps that need to be filled. It’s especially helpful for keeping the shoulders back and retracted, and keeping the top leg over the hips, as the wall stops it from moving back.
Knee down half moon pose
Here’s one outside of the box… try the half moon on half a leg! Removing a lot of the stability requirements, you’ll be lower to the ground, with the bottom shin behind you for better support. Most people can do this pose, even if you’re a beginner. But it’s a perfect training technique to help you improve your alignment and strengthen your foundation.
Steps
Sit in a tall kneeling position on your knees in the center of the mat.
Dig the right knee firmly into the mat and point it outward toward the top of the mat while not moving the left knee.
Then place your right hand down on your right side, either flat on the palm or on the fingertips.
Shift your weight to the right hand and knee so your body is leaning sideways onto that side.
Now extend the left leg and place the inside of your foot or toes are on the mat.
Activate your core, then raise the left leg up, tensing the glutes and outer thigh. Flex the toes by pulling them up toward the shin.
Your entire body should now be facing sideways, with the hips fully open, and stacked.
Push into the floor with your right knee and foot, and keep the core and lifted leg strong.
The you can simply reach the top arm overhead in line with the bottom arm.
Switch sides and do it again.
Revolved moon pose (parivrtta ardha chandrasana)
While the half moon is an open hip variation, the revolved moon pose is closed hip. In fact, it’s more similar to the warrior III pose, so the feet and legs are facing the same direction, unlike half moon where the lead foot is forward and the top foot points sideways.
Revolved moon can be very difficult though, forcing the person to flatten the palm on the floor, and making it hard to get the legs in position, causing a sagging pelvis.
The best thing to do here is use a yoga block, and make sure it’s placed directly under the shoulder. This will allow you to create more space in the lower body so that it’s easier to lift the back leg, which is the biggest limitation in the revolved moon technique. You want to keep the hips as neutral as possible, otherwise, the lifted leg will be pulled down, and that’s not what you want.
Tips
The glutes play a strong role in keeping the lifted leg up and firm in position.
The twist should occur in the torso, not the hips.
While a variation, it’s best not to program revolved moon and half moon back to back.
Bound revolved half moon pose (baddha parivrtta ardha chandrasana)
If you want to get deeper in a similar pose, this is one good way to do it. It combines elements of warrior III pose which keeps the hips closed, then you bind one leg, and twist into the opposite side.
Steps
Stand at the top of the mat with your feet close together, hands on the hips, shoulders down, and chest upright.
Soften your right knee, and bend it slightly.
Hinge forward at the hips and lean your upper body forward. Lift the left leg up behind you with the toes pointed down to the floor.
Reach down with your left arm extended and place your hand on the floor under the left shoulder.
Then reach back with your right hand, bend your left leg and grab the left foot. Keep your hips neutral and facing down toward the floor. Do not allow your body to rotate at any point during the pose.
Lift the left knee up and drop the head lower.
Now slowly twist your upper body as far as you can to the right. From here, go as deep as you can feel you can safely.
To come out of the pose, let the left foot come down to the floor, and transition to sitting on the mat.
Make sure to do the same thing but with the legs in opposite positions.
Chapasana or sugar cane pose
It’s hard to imagine what this pose looks like but if you do it correctly, you’ll resemble a bowed out sugar cane. Chapasana is also a type of backbend although performed from a side facing position, or half moon pose.
Let’s check out how it’s done.
Steps
Come into the half moon pose.
Bend the top leg back, and grab the left foot with your left hand.
Now curl the lower butt in and under, push the tailbone forward, pull your head all the way back back, and open up the chest. Your body should be bent back in what looks like a sugar cane bow.
Release the leg, return the feet to the floor, and bring the hands down to the floor under the shoulders.
Repeat on the opposite side.
Pro tip: If you cannot easily reach back and grab the top foot, pull the top knee into the chest first, then grab the leg, and slide it up to the foot as shown in the video demonstration below.
Wrapping Up
Half moon pose ardha chandrasana is not an easy technique, but don’t get bent out of shape so easily (at least not until you’re ready for the sugar cane pose variation). You’ll need a pair of loose hamstrings, strong quads and glutes, hip mobility, good balance, and most importantly patience, to master this technique.
But what’s nice about half moon is there are many training wheel variations from using a wall to a yoga block and even a chair, or kneeling technique. Then, when you crave a new challenge, try a revolved half moon or bend yourself into a sugar cane!
The 17 Best Standing Abs Exercises for All Fitness Levels
We love floor-based abs exercises as much as the next guy, but sometimes it’s nice not to have to lie on a sweaty gym mat or dirty floor to bust out some sit-ups or crunches.
Also, floor-based abs exercises are not exactly functional. After all, apart from sitting up in bed, when was the last time you used your abs to pull your torso upright? Floor abs exercises are often hard to load, too. You’ve got to rely on the weight of your upper body or legs to hit your abs. Depending on your body size and strength, this may be too much or too little weight to work your abs.
The good news is that there are LOTS of great abs exercises you can do while standing. Some are easy and ideal for beginners, while others are hardcore and perfect for more advanced exercisers.
In this article, we reveal the 17 best standing abs exercises for all fitness levels.
Abs Anatomy 101
When most exercisers talk about abs, they actually mean their core. The core is the collective term for all the muscles of the midsection. Some functional fitness experts also like to include additional muscles in their core collective, including the lats and glutes. However, that just complicates an already complex subject!
So, for the purposes of this article, when we say abs, we actually mean the core, and that covers the following muscles:
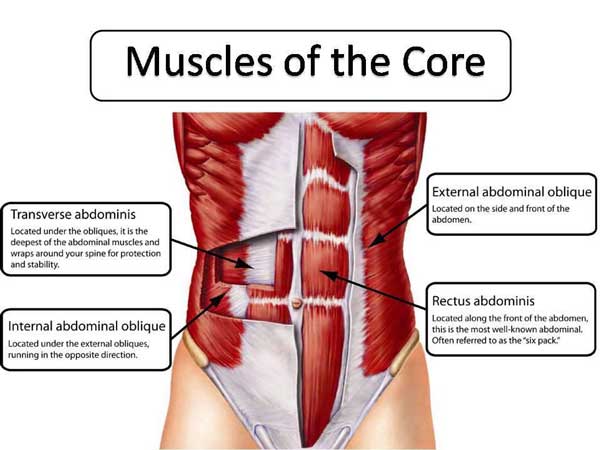
Core Muscles Anatomy
Rectus abdominus
The rectus abdominis is the long, flat muscle on the front of your stomach. It’s divided into vertical halves and horizontal sections by lines of ligamentous tissue, giving it that famous six-pack appearance.
However, you’ll need to be pretty lean to see these lines, typically below ten-percent body fat for men and under 15 percent for women.
The functions of the rectus abdominis are flexion and lateral flexion of the spine.
Obliques
The obliques are basically your waist muscles, and there are two sets – the internal and the external obliques. These muscles rotate and laterally flex your spine. However, when both sides co-contract, they also play a part in flexion and work alongside your rectus abdominis.
Transverse abdominis
Known as the TVA for short, this muscle encircles your midsection like a weightlifting belt. When you brace your abs, it contracts inward and compresses your internal organs. This creates intra-abdominal pressure, which helps to support your lumbar spine.
So, while you won’t be able to see your TVA working, you will be able to feel it. The TVA is involved in all standing abs exercises.
Erector spinae
The erector spinae is a group of three muscles, each of which is divided into three sections. These muscles run up either side of your spine and are involved in extension and lateral flexion. Many standing core exercises also involve the erector spinae, despite the fact they’re technically back muscles. In most cases, the erector spinae act as stabilizers.
All standing abs exercises involve all of these muscles. However, depending on the movement performed, some will be working harder than others. Therefore, in the exercise descriptions, we’ll list the muscles in order of which are doing most of the work.
The Benefits of Standing Abs Exercises
While there is nothing wrong with floor-based abs exercises, standing abs exercises offer some noteworthy advantages and benefits. These include:
Increased functionality
Your core plays a critical role in most human movements. In some situations, it acts as a stabilizer to prevent unwanted movement of your spine. In others, the core is responsible for generating force, e.g., pushing, pulling, and throwing.
Regardless of what they are doing, most of these activities occur when you’re on one or two legs and not lying on your back. Therefore, standing abs exercises are often more functional than their supine counterparts.
Comfort
Standing abs exercises are often more comfortable than similar exercises performed lying on the floor. An exercise mat will help, but one may not be available. With no pressure on your lower back, standing abs exercises are usually more comfortable than floor-based movements.
Convenience
Not everyone trains in a well-equipped gym. Some people prefer to work out in playgrounds, parks, or other large open spaces. Sure, you COULD take a mat with you for abs exercises, but that’s unnecessary if you do standing abs exercises.
With no mat required and often very little equipment, you can do some standing exercises anywhere and anytime, making them the perfect excuse-free workout.
No more mobility issues
Older exercises and people with mobility issues may find getting down on the floor to do sit-ups, crunches, etc., awkward. Getting back up may present an even more significant challenge. Many standing abs exercises are ideal for older exercises and anyone who finds getting down to floor level difficult.
Standing Abs Exercise Drawbacks
Standing abs exercises are generally safe and effective. However, there are a couple of drawbacks to consider, too:
Limited loading
While there are numerous standing abs exercises that utilize an external load, other movements rely on your body weight for resistance. Because of the direction of gravity, this may mean there is very little tension on the muscles you’re training.
You can contract the target muscles harder to get a better training effect, but, even then, some exercises will be too easy if you already have a well-conditioned core.
Lack of understanding
Standing abs exercises are a trending topic right now (#standingabs). Unfortunately, this means a lot of wannabe fitness experts are posting standing abs exercises with little understanding of how the core muscles work.
For example, holding a weight in your hands and then twisting your torso does NOT load your obliques. The force is vertical, whereas the obliques work in the transverse plane, i.e., horizontally. In essence, there is no resistance to rotation.
It doesn’t matter if you hold a 20-pound weight or a 100-pounder; twisting with a weight in your hands won’t challenge your obliques. However, your arms will probably get a good workout!
Similarly, doing standing crunches are all but pointless, as the weight (your upper body) is pulling your spine into flexion – your abs aren’t doing much, if any, of the work.
So, don’t make poor exercise choices. Remember that some self-certified fitness influencers are nothing but a pretty face with a six-pack and a loud voice and don’t actually know what they’re talking about.
Instead, think about the function of the muscles you want to engage, perform movements that work that muscle, and then apply a load, if necessary, to make that movement more challenging.
The 17 Best Standing Abs Exercises
Now you know the pros and cons of standing abs exercises and the muscles these movements work. So, it’s time to reveal the 17 best standing abs exercises for all fitness levels!
1. Standing cable crunch
Muscles targeted: Rectus abdominis, transverse abdominis.
The key to an effective crunch is shortening the distance between your sternum and pelvis. Making a discernable C-shape with your spine ensures that your abs do the work, not your hip flexors. If you can’t feel this exercise in the front of your abdomen, there is a good chance you are flexing your hips more than your spine.
Steps:
Fix a rope handle to a high cable pulley machine. Take one end in each hand and take a step backward to tension the cable.
Pull the handles down so your hands are in front of your shoulders.
Stand with your knees slightly bent, feet shoulder-width apart.
Flex your spine and draw your sternum down toward your pelvis.
Lift your chest to get a stretch in your abs, and repeat.
Benefits:
Easy to scale by reducing or increasing the load.
More effective than the kneeling variation of this exercise.
A very lower back-friendly core exercise.
Tips:
Exhale as you contract your abs to increase muscle engagement.
Hold the handles in one hand only to work the obliques more.
You can also do this exercise with a resistance band:
2. Pallof press
Muscles targeted: Obliques, rectus abdominis, transverse abdominis.
The Pallof press was invented by Bostonian physical therapist John Pallof. This is an anti-core exercise, meaning you’ll be using your midsection to prevent unwanted movement. This is how your core often has to work in nature, making Pallof presses a very functional abs exercise.
Steps:
Attach a D-shaped handle to a cable machine set to mid-chest height.
Stand side-on to the pulley with the handle in both hands. Your feet should be about shoulder-width apart, knees slightly bent. Brace your core.
Pull your hands into your chest and step away from the machine.
Without moving your hips or shoulders, extend your arms out in front of you.
Bend your arms and return your hands to your chest.
Repeat for the required number of reps and then switch sides.
Benefits:
Minimal lower back stress.
Very scalable – just add or subtract weight according to your needs.
An excellent exercise for integrating the upper and lower body with the core.
Tips:
The narrower your stance, the more challenging this exercise becomes.
Vary the height of your arms to work your core from different angles.
Do this exercise with a resistance band for home workouts.
3. Overhead Pallof press
Muscles targeted: Rectus abdominis, transverse abdominis.
Where regular Pallof presses are an anti-rotation exercise, this version is an anti-extension exercise, so it hits your anterior abs more than your obliques. This challenging exercise is basically a standing, moving plank.
Steps:
Attach a rope handle to a high pulley. Grab the handle and then turn your back to the machine. Hold your hands at shoulder height and brace your core. Adopt a split stance for balance.
Without leaning forward or backward, press your arms above your head.
Return your hands to your shoulders and repeat.
Benefits:
A full-body standing abs exercise.
Good for increasing core and upper body stability.
Can be made as hard or as easy as required by adjusting the weight
Tips:
You can also do this exercise with a resistance band.
The closer/narrower your feet, the more challenging this exercise will be.
Exhale as you raise your arms to increase core engagement.
4. Dumbbell side bend
Muscles targeted: Obliques, rectus abdominis, transverse abdominis.
Many people do this exercise with a dumbbell in each hand – don’t be one of them. Using two weights means one dumbbell counterbalances the other, rendering the exercise useless. Use one dumbbell only, and you’ll get a much better core workout.
Steps:
Hold a dumbbell in one hand, arm by your side. Stand with your feet about shoulder-width apart, knees slightly bent. Brace your core and pull your shoulders down and back.
Lean to the side and lower the weight down the outside of your leg.
Stand upright and repeat.
Benefits:
An effective dynamic oblique exercise.
Good for increasing lateral mobility.
A useful forearm and grip strengthening exercise.
Tips:
Keep your hips and shoulders squared – no twisting.
Use a kettlebell instead of a dumbbell if you wish.
Hold a weight in one hand only!
5. Landmine full-contact twists
Muscles targeted: Rectus abdominis, obliques, transverse abdominis.
A landmine is a simple device that turns a barbell into a functional workout machine. You can do many exercises with a landmine, and they’re all excellent. No landmine? No problem! Just wedge the end of your barbell into a corner or against the bottom of a squat rack. Full contact twists are an excellent standing core exercise.
Steps:
Place one end of your barbell in the landmine, and grab the other in both hands.
Lift the bar and hold it above your head with your hands close together, palms facing inward.
Brace your core and pull your shoulders down and back. Press the bar forward and down into the landmine.
Maintaining your core tension, rotate your shoulders and arms and lower the bar down to one side. Turn your hips in the same direction as your arms.
Lift the weight back to the center and repeat on the opposite side.
Continue alternating sides for the duration of your set, driving your arms forward and down throughout.
Benefits:
An excellent exercise for athletes.
Can be performed with heavy weights to develop a strong, powerful core.
A full-body, functional, total core strength exercise.
Tips:
Raise the weight explosively but lower it slowly to make this exercise as effective as possible.
Don’t just use your arms for this exercise; put your entire body into each rep.
Keep flexing your abs throughout.
6. Saxon side bend
Muscles targeted: Obliques, rectus abdominis, transverse abdominis.
The Saxon side bend is named after old-school professional strongman Arthur Saxon. As a strongman performer, Saxon did incredible feats of strength live onstage, often in front of enormous crowds. The Saxon side bend was one of his favorite exercises for developing core strength.
Steps:
Stand with your feet about shoulder-width apart, knees slightly bent. Hold and raise a weight above your head, e.g., a medicine ball or a single dumbbell.
Without twisting your shoulders or hips, lean from one side to the other to challenge your core.
Adjust your range of motion according to your flexibility and mobility.
Benefits:
You don’t need heavy weights for this exercise; a little goes a long way.
Good for improving lumbar spine lateral mobility.
An effective shoulder stability exercise.
Tips:
Don’t go too heavy too soon – this exercise is more strenuous than it looks!
Hold the weight in front of your chest to shorten the lever and make this exercise easier.
Do not allow your hips or shoulders to twist, as doing so makes this exercise less effective.
7. Cable high-to-low woodchop
Muscles targeted: Obliques, rectus abdominis, transverse abdominis.
This exercise is so-called because, when you do it, you look a little like you are chopping wood. The cable woodchop is an effective oblique strengthener and teaches you how to integrate your upper and lower body with your core.
Steps:
Attach a D-shaped handle to a high cable machine. Hold the handle in both hands and then stand sideways onto the pulley. Take 1-2 steps away to tension the cable.
Stand with your feet about shoulder-width apart, knees slightly bent.
Keeping your arms straight, turn your upper body through 180 degrees so your hands travel diagonally downward to hip height.
Return to the starting position and repeat.
Do the same number of reps on each side.
Benefits:
Easy to modify for all levels of exerciser.
Teaches you how to brace your core while using your upper and lower body.
A very lower back-friendly exercise.
Tips:
You can also do this exercise with horizontal arms or working from low to high.
Try shifting your weight from one leg to the other as you rotate your upper body.
No cable machine? Do this exercise with a resistance band attached to a sturdy anchor.
8. Standing oblique crunch
Muscles targeted: Obliques, rectus abdominis, transverse abdominis.
Not all standing abs exercises use cables or weights to strengthen your core. This movement might not be overly challenging, but it provides your abs and obliques with a pleasant workout. Best of all, you can do it anywhere and anytime, as no equipment is involved.
Steps:
Stand with your feet about shoulder-width apart. Clasp your hands behind your head and press your elbows out and back to open your chest. Brace your core.
Bend one leg and lift your knee out and up. Simultaneously lean sideways and lower your elbow down toward your need.
Lower your leg, stand back up, and repeat.
Do the required number of reps and then switch sides.
Benefits:
A standing, equipment-free abs exercise you can do anywhere and anytime.
Ideal for beginners.
A good way to mobilize your hips and lower back as you work your abs.
Tips:
Do this exercise with an alternating action if preferred.
Make this exercise harder by wearing ankle weights.
Pause at the mid-point of each rep to maximally contract your abs and make this exercise more effective.
9. Standing bicycle crunch
Muscles targeted: Rectus abdominis, obliques, transverse abdominis.
Regular bicycle crunches are an excellent, if highly challenging, abs exercise. This standing version is far more accessible, making it ideal for beginners. It’s also a useful teaching exercise before attempting full bicycle crunches and can also be used as a warm-up. However, the overload on your abs is pretty low, so make sure you contract your muscles hard to gain any benefits.
Steps:
Stand with your feet together, knees slightly bent for balance. Place your hands on your temples. Brace your abs.
Bend one leg and lift your knee up and across the front of your body. Simultaneously lean forward and lower your opposite knee to your elbow.
Stand up straight, lower your foot to the floor, and then repeat on the other side.
Continue alternating sides for the duration of your set.
Benefits:
A good standing abs exercise for beginners.
An excellent hip and spine mobility exercise.
A good move to prepare you for full bicycle crunches.
Tips:
Do not clasp your hands behind your neck, as you are more likely to pull with your arms if you do.
Pause at the midpoint of each rep for maximum effectiveness.
Drive your supporting foot into the floor to make balancing on one leg easier.
10. Single-arm dumbbell press
Muscles targeted: Obliques, rectus abdominis, transverse abdominis.
While dumbbell presses are usually viewed as an upper-body exercise, they also provide an effective abs workout. Done standing, the single-arm dumbbell press is as good for your abs as it is for your shoulders.
Steps:
Hold a dumbbell in one hand at shoulder height. Stand with your feet about shoulder-width apart, knees slightly bent. Brace your core.
Without leaning sideways, press your weight up and overhead to arm’s length.
Lower the weight back to your shoulder and repeat.
On completion of your set, swap sides and repeat.
Benefits:
An effective and accessible lateral core exercise.
A great time-saver – work your core, deltoids, and triceps simultaneously.
An excellent way to integrate your core with your upper body.
Tips:
Do the same number of reps on both sides.
Stand with your feet closer together to make this exercise harder.
You can also do this exercise with a barbell instead of a dumbbell:
11. Suitcase deadlift
Muscles targeted: Obliques, rectus abdominis, transverse abdominis.
When most people do deadlifts, they do them to build full-body strength or a bigger, more muscular back. However, this variation is a very effective if challenging standing abs exercise. You’ll need to use all your core muscles to maintain a neutral spine, so your abs will be acting as stabilizers. This is how your core usually works in nature, so this is a very functional movement.
Steps:
Place a kettlebell or dumbbell on the floor and stand next to it so the handle is parallel to your feet.
Bend down and hold the handle with a neutral or palms-in grip.
Pull your shoulders down and back, brace your core, and look straight ahead.
Drive your feet into the floor and stand up straight. Do not lean sideways or round your back.
Lower the weight back to the floor, allow it to settle for 1-2 seconds, and repeat.
Turn around and do the same number of reps on the opposite side.
Benefits:
A very functional exercise.
Teaches you how to safely lift heavy objects off the ground.
Helps identify and fix left-to-right strength imbalances.
Tips:
Use gym chalk to prevent your hands from slipping.
Perform this exercise in front of a mirror to ensure you don’t lean to the side.
You can also do this exercise with a barbell.
12. Single-arm farmer’s walk
Muscles targeted: Obliques, rectus abdominis, transverse abdominis.
This is another standing core exercise that many people do for an entirely different reason. Farmer’s walks are a well-known grip and general conditioning exercise. However, when performed using just one weight, it quickly becomes a very challenging abs workout.
Steps:
Hold a heavy dumbbell or kettlebell in one hand with your arm by your side. Brace your core and set your hips and shoulders so they are level.
Without leaning to either side, walk around your training area.
Having completed the required distance, lower the weight to the floor, swap hands, and repeat.
Benefits:
A very functional standing abs exercise.
An excellent way to spot and fix left-to-right strength imbalances.
A challenging grip-building exercise.
Tips:
Use chalk to stop your hands from slipping.
Keep your shoulders down and back throughout.
Lower the weight to the floor as you feel your grip starting to give out. Don’t drop the weight.
13. Standing ab wheel rollout
Muscles targeted: Rectus abdominis, transverse abdominis.
Standing abs exercises don’t come much more challenging than the infamous rollout. This exercise combines extended planks with a pull-over arm action, making it one of the most brutal core exercises around. Only attempt this move if you have mastered the kneeling ab wheel rollout.
Steps:
Stand with your feet about shoulder-width apart. Hold your ab wheel with an overhand grip.
Brace your core, bend your knees slightly, and lean forward to place the ab wheel on the floor in front of your feet.
Keeping your arms straight, push the roller out and away, lowering your body toward the floor. Extend your arms as far as you can without losing core tension.
Pull the wheel back toward your feet, lifting your hips up as you do so.
Continue for the prescribed number of reps.
Benefits:
Probably the most challenging standing abs exercise.
Provides an effective lat-building workout.
An ideal exercise for home workouts.
Tips:
Do this exercise facing a wall to prevent the wheel from rolling too far.
Only extend your arms as far as comfortable to avoid injuring your lower back.
Rest on your knees to make this exercise easier.
14. TRX Hip drops
Muscles targeted: Obliques, rectus abdominis, transverse abdominis.
The TRX was invented by a Navy SEAL who wanted a portable training device he could take on deployment. TRXs can be used to replicate many machine and dumbbell exercises, and there are several unique bodyweight movements you can do with this type of suspension trainer. TRX hip drops are an especially challenging lateral core exercise.
Steps:
Attach your TRX to a high anchor point. Hold the handles on both hands and raise your arms above your head so your body is straight.
Lean your hips out to the side so your body forms a distinct C shape.
Pull your hips back to the center and repeat.
Continue for the prescribed number of reps and then switch sides.
Benefits:
An excellent exercise for home workouts.
A very functional, challenging standing abs exercise.
Easy to change the difficulty by varying your range of motion.
Tips:
Place your feet closer together to make this exercise harder.
The longer the straps, the more challenging this exercise becomes.
You can also do this exercise with gymnastic rings and other types of suspension trainer.
15. Single-arm cable chest press
Muscles targeted: Rectus abdominis, obliques, transverse abdominis.
No, we haven’t included this exercise by mistake. Despite its name, the single-arm chest press is actually a terrific standing abs exercise. You’ll need to use all your core muscles to stabilize your midsection as you extend and bend your arm. But yes, it’s also a great chest exercise!
Steps:
Attach a single handle to a chest-high cable machine. Hold the handle and turn your back on the pulley so the wire runs outside or under your arm.
Step forward into a split stance for balance. Brace your core.
With your hips and shoulders still, press your arm forward and out to full extension.
Return the handle to the side of your chest, and repeat.
Switch sides and do the same number of reps with the opposite arm.
Benefits:
Teaches you how to stabilize your spine while moving your arms.
An excellent exercise for athletes.
An easy exercise to modify for all fitness levels.
Tips:
Bring your feet closer together to make this exercise more challenging.
Use your core to make sure your torso doesn’t twist.
Pair with single-arm cable rows to work your abs from the front and back.
16. Single-leg Romanian deadlift
Muscles targeted: Obliques, rectus abdominis, transverse abdominis.
Single-leg Romanian deadlifts are an excellent exercise for your glutes and hamstrings. However, you’ll also need to use your core to stabilize your spine and prevent your upper body from twisting. As such, it’s also a great standing abs exercise.
Steps:
Stand with your feet together and a dumbbell or kettlebell in your left hand. Shift your weight onto your right foot. Brace your core and pull your shoulders down and back.
Hinging from your hips, bend forward and lower the weight down the front of your leg. Lift your left leg out behind you for balance.
Stand back up and repeat.
Rest a moment and then change legs, remembering to switch hands, too.
Benefits:
Teaches you how to integrate your core with your upper and lower body.
A very lower back-friendly exercise.
An excellent balance-building workout.
Tips:
Do this exercise next to a wall and use your free hand for balance if required.
You can also keep your non-supporting foot resting lightly on the floor for balance, i.e., a kickstand or B-stance Romanian deadlift.
Keep your supporting knee slightly bent throughout.
17. Kettlebell around the world
Muscles targeted: Obliques, rectus abdominis, transverse abdominis.
Many of the best standing core exercises work one side of your abs at a time. This one is slightly different as it works your entire core in one straightforward movement. Done with light weights, this exercise is an excellent warm-up for your whole midsection. But, done with greater loads, it’s a challenging yet fun total abs exercise.
Steps:
Stand with your feet about shoulder-width apart, knees slightly bent for balance. Brace your abs. Hold a kettlebell in front of your hips.
Swing the weight around your waist, transferring from one hand to the other behind your back and in front of your hips.
Use your core muscles to resist being pulled toward the weight.
Continue for the desired number of reps, rest a moment, and then switch directions.
Benefits:
A very time-efficient exercise.
Very little lower back stress.
An excellent way to mobilize your shoulders and activate your deep core muscles before more demanding exercises.
Tips:
Keep your feet planted firmly on the floor to maintain your balance.
Lift your chest and set your shoulders down and back throughout.
Use gym chalk to stop the kettlebell handle from slipping out of your hands.
Standing Abs Exercises – FAQs
Do you have a question about standing abs exercises or core training in general? That’s okay because we’ve got the answers!
1. Will these standing abs exercises give me a six-pack?
While many of these exercises involve your six-pack muscle – the rectus abdominis – there is no guarantee that doing them will give you six-pack abs. That’s because, for the contours of your abs to be visible, you need to have a low body fat percentage. This is typically ten percent or less for men and below 15 percent for women.
It’s entirely possible to have well-develop abs but for them not to be visible because they’re hidden under a layer of fat.
So, while these standing abs exercises COULD lead to a six-pack, your results hinge on your diet as much as your workouts.
2. How many reps and sets should I do of these exercises?
You can do anywhere from 5 to 30 reps to train your abs. Low reps with heavy weights are best for building brute strength, while higher reps and lighter loads are better for endurance, hypertrophy, and general fitness.
However, some exercises lend themselves to higher or lower reps. For example, suitcase deadlifts work well with bigger loads, while standing bicycle crunches are more suitable for higher reps.
Very high reps, i.e., more than 30, are not recommended as they are largely a waste of time and not challenging enough to be effective.
Regardless, you should take each set to within a couple of reps of failure. Easy sets won’t have much of an effect on the condition of your abs.
Regarding the number of sets, 2-4 should be sufficient for most people. If you feel you need to do more than this, you probably aren’t training close enough to failure, or you are resting too long between sets.
3. XYZ exercise hurts my back – what gives?
While the majority of these standing abs exercises are very lower back-friendly, some will put a strain on your lumbar spine. Others can cause back pain when performed incorrectly or with too much weight.
So, if any of these exercises hurt your back, firstly, make sure you are performing them correctly. Perfect form is critical for a safe and pain-free workout. Then dial back the weight a little to see if that helps.
If you still feel your lower back, skip that movement and do something else. It could be that the exercise in question just doesn’t suit you.
4. Are standing abs exercises better than those performed lying down?
While standing abs exercises offer several advantages, that doesn’t mean they’re better than more traditional lying abs exercises. Ultimately, the best exercises for you are the ones you like, and that meet your workout needs.
If you want to isolate your abs, lying exercises are often best, as they don’t involve many additional muscle groups. But, if you want a more functional workout, standing exercises are arguably the better choice.
Or, you could just combine standing and lying abs exercises and enjoy all the benefits these two different types of training provide. There is no need to choose between them.
5. Will these exercises burn belly fat?
Many people think that doing lots of abs exercises will burn belly fat. Sadly, this is nothing but an old exercise myth. Your body stores and then burns fat from all over your body, not just from the areas you train. As such, if you want to burn fat and get lean, you need to work your entire body and not just where you want to lose the fat from.
So, sorry, these exercises will NOT burn belly fat.
Closing Thoughts
There is no need to head straight to the floor to train your abs. In fact, there are plenty of standing abs exercises that are every bit as effective as the ubiquitous crunches, sit-ups, and leg raises.
Movements like cable high-to-low woodchops, Saxon side bends, standing cable crunches, and standing bicycle crunches are ideal for those times when you don’t want to lie down or just want to hit your abs from a different, more functional angle.
Are standing abs exercises better than ab exercises done on the floor? Not necessarily. However, they may be more suitable for some exercisers and are worth including in any well-balanced core workout plan.
Spread Leg Forward Fold Upavistha Konasana — Benefits, Common Mistakes, and Variations
This one’s a throwback to gym class days when you were instructed to sit, spread your legs wide, and reach as far forward as you could for ten to twenty seconds. And you probably got pretty good at it with enough repetition, but once free from that school requirement, most of us said goodbye and good riddance! (no more torture). But wisdom is power, and those body aches and tight muscles aren’t going to relieve themselves…
Spread leg forward fold or Upavistha Konasana, is a fundamental pose that will benefit your entire body, and there’s an easy technique to progress into the full forward fold that we’ll show you in this guide. Plus learn key form tips and progress with some handpicked advanced variations.
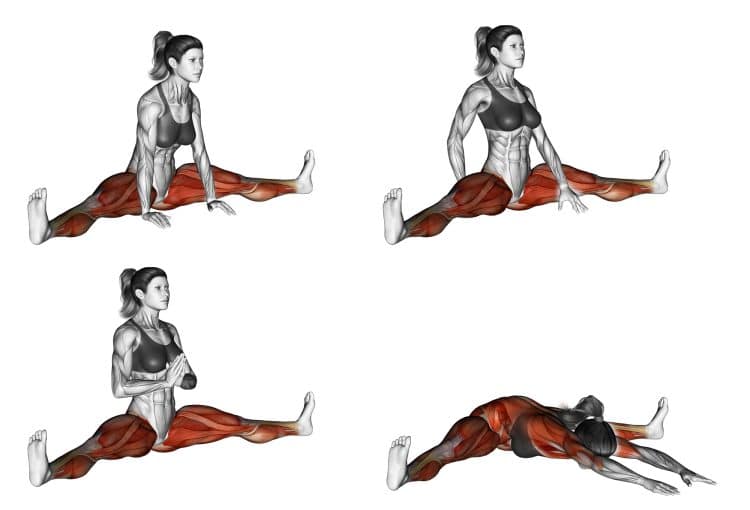
Muscles Involved During Spread Leg Forward Fold Upavistha Konasana
“Spread”, “leg”, “fold”… sounds like a whole lot of stretching going on, for various muscles. In fact, you can easily modify Upavistha Konasana to give yourself a major stretch in the posterior chain from the heels all the way through the trunk, and releasing tension in the neck.
Here’s a short anatomical lesson on the muscles stretched and strengthened in this pose.
Thighs
During spread leg forward fold, proper technique will activate the thighs, hips, and groin, giving them a nice stretch along the way. You’ll also get the adductors that draw the thigh inward. Keeping these muscles loose is a good way to maintain mobility in the lower body, and prevent hard injuries and muscle pulls.
Erector spinae
Elongating the torso, and stretching out the lower back is a big part of the seated forward fold. In fact, to exaggerate this benefit, you can grab the toes, giving you more room to move your upper body.
How to do Spread Leg Forward Fold Upavistha Konasana
For such a simple looking exercise, there are a lot of important steps that you can’t miss when setting up and executing this yoga technique. This is to ensure your body is in a comfortable, supportive, and ergonomic position.
Below are written steps as well as a very detailed, and appropriate video demonstration of the spread leg forward fold upavistha konasana.
Steps
Gently sit on your mat, with your knees bent, feet flat on the floor, and arms relaxed over your legs.
Then straighten your legs out in front of you, and spread them out wide.
Use your hands and gently adjust your glutes by pulling them out to ensure you’re able to maintain an upright posture and lengthened torso without limitation.
Flex your feet by pulling the toes back toward your ankle, and press the heels into the ground.
Now place your fingertips behind your butt on the floor, and pull the shoulder blades slightly toward each other, and down. Then lift your chest up.
Hold this position and feel a nice stretch throughout your body.
If you’re ready for a bigger stretch, place your hands in front of you on the floor, then slowly walk your hands forward as much as you comfortably can.
Now allow your upper body to sink down toward the floor to accentuate the stretch. But remember to maintain a lengthened back, not simply hunching over.
From here, if you do not have the flexibility to descend further, you can use a yoga bolster and/or stacked blankets for support.
Gently, lie your head down, looking to either side, and rest your elbows on the floor with your palms facing up.
Let your entire body relax and sink into the cushions, allowing your arms to also become heavy.
Bring awareness to your groin, feeling the wide position of your legs, while allowing your lower body to sink down into the floor.
Slowly breathe in and out.
Stay here for about 5 minutes.
To come out of the pose, turn your hands over onto your palms, then slowly sit up, walking your hands back toward you for support.
Before you finish the pose, and if you’re comfortable, from the sitting position, place the bolster/blankets on one leg, and lie your head down to that one side for 3-5 minutes. Repeat on the other side.
You’ve now performed the spread leg forward fold!
Check out the soothing demonstration of this yoga technique via the video tutorial provided below.
Tips
You can use a bolster, blankets, and yoga blocks for support as you gradually increase flexibility.
Holding straps around your feet is another great training tool that helps reinforce proper form, and train for improved flexibility.
Never push your body to the point of pain or discomfort. Many yoga poses require great flexibility, and joint mobility but the body needs time, progress, and persistence to achieve deep stretches.
Benefits of Spread Leg Forward Fold Upavistha Konasana
A phenomenal activity that we should all fit in our routines, spread leg forward fold has benefits that go well beyond an amazing body stretch. Here are other reasons why this pose can improve your mind and body.
Stretch your groin, hips, and back
From the spread leg forward fold you can emphasize the point of stretch. Reaching straight forward you’ll focus on stretching the torso and lower back. But you could change direction, leaning into either side, and increase the stretch in your hamstrings.
Stretching your lower back is helpful in preventing injuries by enhancing mobility, while the hamstrings are highly injury prone, and stretching is non-negotiable if you’re highly active. Plus, most people sit a lot, which affects the hips and legs.
Reduce and improve body stress, anxiety, and pain
For the same reason as above, stretching gives us relief from muscles that are overused, not used enough, or that have been injured. Nowadays, our butts are glued to our seats for hours on end, which can lock everything up, and that’s when you start to have issues with hips, knees, etc.
Well, stretching can do a lot to counteract that. In fact, one study on Spanish logistics workers found that implementing a stretching routine in the workplace effectively helped with bodily pain, exhaustion, while reducing anxiety, and improving mental and general health (1). It was seen as a potential low cost way to improve well-being in the workplace.
Additionally, as the above video example pointed out, this pose could potentially improve health situations common in women such as regulating menstruation. Although, we cannot make this claim definitely.
Fight smartphone posture
We’re wreaking havocs on our necks with our phones, laptops and tablets, maintaining terrible forward head posture. It’s said the average human heads weigh on average 5 kilograms or 11 pounds. That’s pretty heavy, and not fair to our necks and spine.
Performing daily stretching and yoga techniques is one of the best ways to hold ourselves accountable for bad posture. Because if we’re making the effort to maintain healthy bodies, then good posture should go along with that.
Additionally, there’s research that could support the positive effects of stretching and core exercises on posture and alignment (2).
Common Mistakes When Performing Spread Leg Forward Fold Upavistha Konasana
These common mistakes are counterproductive to achieving a proper spread leg forward fold pose.
Rounding your back
There are few instances where it’s good to round your back, like the cat pose, for example. However, the goal of upavistha konasana is lengthening the spine by reaching forward, and keeping the back straight. If you notice your back rounding, use assistance such as a bolster, block, or blankets, and slowly lower yourself, focusing on good form.
Rolling your feet forward
Throughout this pose, your feet and knees should be pointed up toward the ceiling. Rolling them forward could place too much pressure on your knees.
Forcing it too quickly
The spread leg forward fold appeals to beginners because it seems so simple and straightforward (pun intended). And as mentioned, most of us have done it at some point. However, if you don’t stretch these muscles regularly, you will be surprised at how bad your flexibility is. So don’t try to rush it just because you used to do it in grade school. Your muscles and body still need time to open up and adjust.
Variations of Spread Leg Forward Fold Upavistha Konasana
The sitting wide leg fold over is a nice pre-requisite for twist and standing fold over poses. Here are some alternatives we’d choose that are similar in nature.
Strap assisted spread leg forward fold
There are a few different ways that you can ease into a full forward leg spread. Many people may not have the flexibility to do it as shown in the primary example provided in this guide. So, you can actually wrap some short straps, belts, or similar under the bottoms of your feet while in a wide leg seated position, grab onto the ends, and gradually pull yourself closer.
This is actually a great form training technique, that reinforces keeping the legs grounded, shoulders down, and chest up. Remember, ground down with the legs, and lift up with the chest. Go as far down as you comfortably can, as your hamstring and back flexibility allows. Make sure to keep the legs pressed firmly into the floor, and use a blanket under your butt to modify the range of motion.
Spread leg forward fold holding toes
The advantage of grabbing your toes instead of reaching your arms forward is that you can get more range of motion. If you have the flexibility, you can lower your chest and chin to touch the floor, enhancing the stretch and activating more core.
Steps
With the legs spread wide, reach your arms toward your feet and grab the toes.
Hinge forward at the hips, slowly lower your chest toward the floor, and gently rest the front of your torso and chin to the ground if your flexibility enables you to do so. Your toes and kneecaps should be pointing toward the ceiling.
Hold here to get a good stretch, then you can reset, and repeat a few more times.
Spread leg parivrtta (revolving)
Getting some rotation in the pose is going to help open up the chest, and work the rotational oblique muscles of the core. This technique is also commonly performed standing on both feet, but it’s beneficial both ways.
Steps
From a spread leg seated position, inhale, and raise your arms overhead.
Exhale, bend sideways down to either leg and use the same side hand to grab the lower foot. Use the top hand to grab the top part of the foot.
Rotate your upper body toward the ceiling as far as you can, fixing your gaze up. Focus on breathing in and out.
Inhale, free your hands, and slowly come up to an upright position. Exhale and bring your arms down.
Repeat the prior steps on the other side, performing everything in reverse.
Seated forward bend
A basic pose in hatha yoga, the primary difference between seated forward bend and spread leg forward fold is the former is performed with the feet together in front of you. Also referred to as Paschimottanasana, this pose provides a stretch from neck to heels, and it’s just as mentally relaxing.
Steps
Sit on a yoga mat with your legs straight out in front of you and feet close together. Flex your toes back toward your shins.
Inhale, raise both arms overhead and stretch them toward the sky.
Exhale, bend forward from the hips, and reach as far forward as you can without straining or pain. If you’re flexibility allows, grip one wrist with the opposite hand past the bottom of your feet. Or, grab where you’re able to on your lower legs.
Stretch your spine forward, and rest your face and torso on the top of your legs. Make sure to breath in and out in this position.
From here, extend the arms forward, slowly sit up and inhale. Then, exhale and drop your arms down.
Urdhva upavistha konasana upward facing wide angle pose (Variation B)
Now you’ll get to focus on balance, total body stability, core strength, and flexibility. Keep in mind, there are more detailed examples of this upright seated wide legged pose, but for simplicity, we included the basic form steps with a video explanation and demonstration.
Variation B will teach you contrasting styles in muscle activation and relaxation, improving functional skills, and making you a more capable human!
Steps
Start in a sitting position with your knees propped up and feet flat on the floor.
Then come into a baddha konasana by opening your hips, and pressing the bottoms of your feet together close to your body.
Now hook your pointer, and middle fingers underneath your big toes, and grab the tops with your thumbs.
Inhale, pull the shoulders back and lift your feet up. From here, find balance on your sitting bones. Keep a straight spine.
Slowly straighten your legs up toward the sky, and out wide. If you must, keep the legs bent until you gain more flexibility in the future. In this position, make sure your tailbone is straight and not tucked under.
Hold this position for as long as you comfortably can.
Bend your legs, and bring your feet back together like in the starting position.
Now slowly straighten your legs our in front of you one side at a time. You’ve finished this version of a spread leg pose!
Wide legged forward bend prasarita padottanasana
The sitting fold over has a special place in a yoga stretching routine, but if you want more functional benefits, you should try it standing. We have an entire guide on this pose, that explains the benefits, and shows some cool variations.
Choose a surface where your feet will not slide.
From a standing position, spread your feet apart into a wide stance, creating roughly 4-5 feet of space in between. You want a wide stance but not so wide that you lose stability and balance.
Point your toes forward or slightly inward to activate the inner thighs and glutes, keep your legs straight and engaged, and focus your weight on your outer feet. Place your hands on your hips.
Now hinge forward at the hips, and lower your torso until your upper body is roughly parallel to the floor. Make sure to keep your back straight. Then, slowly stand up straight.
Repeat step 4, but now stretch your arms down to the floor and touch it with your fingertips.
Walk your hands back until your fingers and toes are in line, and press your palms flat on the floor.
Lift your head up and gently stretch toward the sky.
Then drop your head and body down toward the floor, while bending your elbows. Try to relax your upper body.
Gently rest the crown of your head on the floor. Hold this position for a few seconds, trying not to exceed 10 seconds at first.
Now come up onto your fingers, walk your hands forward, and bring your hands on your hips, one at time, then slowly stand up in the starting position.
Related: How to do fish pose Matsyasana
Wrapping Up
Back then you probably thought it was a useless technique, but little did you know such a simple technique could do so much good for your body. Granted, we probably accumulate the most bodily tension as we mature and face adult life, which is more reason for us to get deeper into these types of intense stretches, and yoga exercises.
Spread leg forward fold upavistha konasana is a nice entry level, all-around pose for the posterior chain, anterior body, hips, core, spine, and neck muscles. And it’s very safe to do, so long as you be patient, don’t force what won’t go, and use proper progressions as included in this guide under the variations section.
References
Montero-Marín J, Asún S, Estrada-Marcén N, Romero R, Asún R. Efectividad de un programa de estiramientos sobre los niveles de ansiedad de los trabajadores de una plataforma logística: un estudio controlado aleatorizado [Effectiveness of a stretching program on anxiety levels of workers in a logistic platform: a randomized controlled study]. Aten Primaria. 2013 Aug-Sep;45(7):376-83. Spanish. doi: 10.1016/j.aprim.2013.03.002. Epub 2013 Jun 12. PMID: 23764394; PMCID: PMC6985483.
Kim D, Cho M, Park Y, Yang Y. Effect of an exercise program for posture correction on musculoskeletal pain. J Phys Ther Sci. 2015 Jun;27(6):1791-4. doi: 10.1589/jpts.27.1791. Epub 2015 Jun 30. PMID: 26180322; PMCID: PMC4499985.
30-Day Abs Challenge for A Rock-Hard Core
Most decent fitness information revolves around building good long-term diet and workout habits. This makes a lot of sense, as fitness and health should be life-long pursuits. Sadly, you cannot store fitness, and your strength and conditioning will soon decline if you stop working out or eating healthily.
There is a reason that ex-athletes often look so out of shape – they stopped training.
So, in most cases, long-term consistency will always beat short-term fitness fixes. That said, there is a time and a place for workouts and diets that are only meant to last a few weeks. Things like 30-day push-up challenges or 14-day diets can help restore lost momentum and bust through plateaus.
Short-term workout challenges and diets can also test and develop your willpower and intestinal fortitude, or guts. You’ll undoubtedly feel a sense of satisfaction on reaching the end of one of these challenges, which can be a reward in its own right.
This 30-day abs challenge will give you a hard, strong core and could even take you a few steps closer to developing a shredded six-pack.
Abs Anatomy Basics
So, what muscles will you be working during this 30-day abs challenge? Rather than focus just on those at the front of your abdomen, this workout is designed to work all the muscles that encircle your waist and make up your core:
Rectus abdominis – located at the front of your abdomen, this is your six-pack muscle, although you’ll need to be pretty lean to see it. The functions of your rectus abdominis are flexion and lateral flexion of your spine. It also plays a part in compressing your abdominal contents.
Obliques – there are two sets of oblique muscles: internal and external. They work together to laterally flex and rotate your spine. The obliques are basically your waist muscles.
Transverse abdominis – encircling your midsection like a weightlifting belt, the TVA compresses your abdominal contents to produce intra-abdominal pressure, or IAP for short. This pressure helps stabilize your lumbar spine from within.
Erector spinae – the erector spinae is a group of three muscles that run up either side of your back. Together they extend and stabilize your lower and upper spine.
30-Day Abs Challenge – Program Overview
This is an abs specialization program. That means you’ll be working your abs more frequently than usual and with more volume and intensity than you’re probably used to. However, you won’t be training your abs every day, which could lead to injury and overtraining. Instead, you’ll be hitting your abs four days a week for one month straight.
It’s up to you on which days you train, but it’s generally best to avoid doing all your abs workouts in a row. We don’t want you to work your abs Monday, Tuesday, Wednesday, and Thursday.
Instead, separate at least a few of your abs workouts with a different form of training or a rest day. For example:
Monday – Abs Workout
Tuesday – Cardio/Strength Training
Wednesday – Abs Workout
Thursday – Abs Workout
Friday – Cardio/Strength Training
Saturday – Abs Workout
Sunday – Rest
Each workout contains four exercises so that you work all your core muscles equally. Each week involves different, more demanding exercises to ensure your core strength increases over the coming 30 days. The workouts themselves are also progressive, and the volume/intensity builds up over the course of the month.
In terms of equipment, you don’t need much to complete this 30-day abs challenge. In fact, you can do this challenge at home with a few items of basic workout gear.
However, you will need:
Exercise mat
Ab wheel or a barbell and weight plates
Resistance bands
Stability ball
Pull-up bar/captain’s chair
Medicine ball or dumbbell/kettlebell
Finally, this 30-day workout challenge is not designed for beginners. Instead, it’s aimed at intermediate or advanced exercisers looking to take their core conditioning to a new, higher level. Beginners should follow a less intense workout plan that focuses on building basic core strength.
30-Day Abs Challenge – Week One
Week one of our 30-day abs challenge starts with some fairly basic exercises and a moderate level of volume and intensity. Think of this as your warm-up week. Do three sets of each exercise, resting 60-90 seconds between efforts. However, regarding reps, continue each set until the target muscles start to fatigue. The reps quoted in the chart below are for guidance only.
#
Exercise
Sets
Reps
Recovery
1
RKC plank
3
20-30 seconds
60-90 seconds
2
Stability ball crunch
3
15-20
60-90 seconds
3
Reverse crunch
3
15-20
60-90 seconds
4
Side plank
3
15-20
60-90 seconds
1 – RKC Plank
Unlike regular planks, RKC (Russian kettlebell challenge) planks are designed to fatigue your abs as fast as possible. Brace and contract your core as hard as you can; seek failure, and don’t wait for failure to come to you! If you feel that you can go for more than 30 seconds, you weren’t bracing hard enough.
Steps:
Lie on the floor and rest on your elbows and forearms. Clasp your hands together if you wish. Brace your core and pull your shoulders back and down.
Lift your hips up so your body is straight. Contract your hands, arms, chest, shoulders, legs, and glutes.
Without holding your breath, contract your core as hard as possible.
Hold for as long as you can but, if you can do more than 30 seconds, you weren’t bracing hard enough.
Tips:
Rest your elbows on a folded mat for comfort.
Imagine you are trying to drag your toes toward your elbows to maximally engage your abs.
Do not hold your breath, as doing so can cause your blood pressure to rise.
2 – Stability ball crunch
While floor crunches are fine, they have a short range of motion, so they’re too easy for fitter, more experienced exercisers. Using a stability ball makes crunches much more challenging, especially now your abs are tired from the RKC planks.
Steps:
Sit on your stability ball. Walk your feet forward and lean back until the ball fills the curve of your lower back. Place your hands on your temples and brace your abs.
Press your lower back into the ball, curve your spine, and lift your upper back up to form a C shape.
Lean back, get a good stretch in your abs, and repeat.
Tips:
Make this exercise harder by holding a weight behind your head or across your chest.
Exhale as you lift your shoulders to maximally engage your abs.
Pause at the top of each rep for a more effective workout.
3 – Reverse Crunch
There is no such thing as upper abs vs. lower abs. Instead, your rectus abdominis is one long, flat muscle. That said, it is possible to use your abs to lift your shoulders or lift your hips by engaging different groups of muscle fibers. Reverse crunches tend to emphasize the lower fibers of the rectus abdominis, but the upper fibers are working, too.
Steps:
Lie on your back with your legs bent and feet in the air. Place your hands on the floor next to your hips.
Press your lower back into the floor and lift your hips off the floor. Pull your knees toward your shoulders.
Lower your hips and legs back down and repeat.
Tips:
Avoid pressing with your arms, which takes work away from the target muscles.
Exhale as you lift your legs to increase abs engagement.
Pause at the top of each rep to make this exercise more challenging and effective.
4 – Side plank
Where regular planks emphasize your rectus abdominis, side planks hit your obliques more. Most people find side planks harder than front planks, which makes sense given that the obliques are much smaller than the rectus abdominis muscle.
Steps:
Lie on your side so your body is straight and your hips and shoulders are square. Rest on your lowermost forearm and elbow. Brace your core.
Lift your hips and then hold them up for the required duration.
On completion, lower your hips to the floor, roll over, and repeat on the opposite side.
Tips:
Do not hold your breath, as doing so can cause your blood pressure to increase.
Lift your uppermost leg to make this exercise more challenging.
You can also do side planks with your supporting arm straight, like this:
30-Day Abs Challenge – Week Two
Week two of our 30-day abs challenge builds on what you achieved in week one. The exercises are slightly more difficult, so you should be ready to work a little harder. Your interset rest periods are also a little shorter. As before, reps are quoted for illustrative purposes only. Do as many reps as it takes to fatigue the target muscles.
#
Exercise
Sets
Reps
Recovery
1
Stability ball stir the pot
3
15-20
45-75 seconds
2
Serratus crunch
3
15-20
45-75 seconds
3
Hanging knee raises
3
15-20
45-75 seconds
4
Russian twist
3
15-20
45-75 seconds
1 – Stability ball stir the pot
Planks on a stable surface are fine, but you’re probably ready for a more challenging abs workout. Stability ball stir the pot is a much more dynamic and challenging way to do planks. This is an exercise you’ll love to hate!
Steps:
Place your forearms on a stability ball and then walk your feet out and back so your body and legs are straight. Brace your core.
Without dropping your hips, make small circles with your arms, alternating between clockwise and counterclockwise.
Keep your body extended and your core braced throughout.
Tips:
The larger the ball, the less challenging this exercise becomes.
Make larger circles to increase instability and make this exercise harder.
Move your feet further apart to make stir the pots a little easier.
2 – Serratus crunch
The serratus crunch is so-called because, as well as working your rectus abdominis, it also hits your serratus anterior muscles. While not strictly part of your core, these small but visually impressive muscles can add a lot to your appearance. Needless to say, this exercise also overloads your abs.
Steps:
Lie on your back with your legs bent and feet flat on the floor. Hold a weight in your hands (medicine ball, dumbbell, kettlebell) and extend your arms so they’re vertical. Press your lower back into the floor.
Contract your abs and lift your head and shoulders off the floor. Reach up with your arms as if you’re trying to touch the ceiling.
Lie back down and repeat.
Tips:
Exhale as you lift your shoulders to fully engage your abs.
You can also do this exercise with your legs raised.
Don’t go too heavy too soon; this exercise works best when you focus on the movement rather than the load.
3 – Hanging knee raises
Like reverse crunches from last week’s program, hanging knee raises target the lower fibers of your rectus abdominis. However, lifting the entire weight of your legs makes this exercise much more challenging. On the downside, you will need a pull-up bar or captain’s chair to do this exercise.
Steps:
Hang from your pull-up bar with your arms straight. Alternatively, rest on your elbows on a captain’s chair station. Brace your abs.
Without using momentum to help you raise your legs, bend your knees and lift them up until they’re higher than your hips.
Lower your legs under control and repeat.
Tips:
Use lifting chalk or wrist straps if your grip fails before your abs.
Do not swing your knees up. Instead, move slowly and deliberately to keep the tension on your abs.
Too easy? Clamp a dumbbell between your feet to make this exercise more demanding:
4 – Russian Twist
It’s not really clear why Russian twists are so-called because they don’t have anything to do with Russia. Regardless, they’re a challenging and effective oblique and rectus abdominis exercise that most people love and hate in equal measure.
Steps:
Sit on the floor with your legs bent and feet flat.
Lean back until your body is inclined to about 45 degrees.
Extend your arms out in front of you at shoulder height.
Rotate your upper body as far as possible to the left and right. Do not lean back or lift your torso; keep the angle the same.
Continue for the specified number of reps.
Tips:
Hold a dumbbell or kettlebell to make this exercise more challenging.
Anchor your feet if necessary.
Maintain a neutral spine throughout. Do not round your lower back.
30-Day Abs Challenge – Week Three
Week three sees an increase in training volume as you progress from doing three sets of each exercise to four. There is also a slight increase in exercise difficulty. Don’t worry – you can handle it. And congratulations on reaching the halfway stage of this four-week challenge!
#
Exercise
Sets
Reps
Recovery
1
Ab wheel rollout
4
15-20
45-75 seconds
2
Bicycle crunch
4
15-20
45-75 seconds
3
Straight leg lifts
4
15-20
45-75 seconds
4
Resistance band Pallof press
4
15-20
45-75 seconds
1 – Ab wheel rollout
Ab wheel rollouts are a sort of moving plank. With this exercise, you extend your arms out in front of you to create a long lever which puts a lot of tension through your abs. This is a challenging core exercise, but after two weeks of intense core training, you are ready for it!
Steps:
Kneel down and place your ab wheel on the floor in front of your knees. Hold the handle with an overhand grip, arms straight, and core braced.
Push the ab roller away from you and lower your body toward the floor. Take care not to hyperextend your spine.
Use your abs and lats to pull the roller back to your legs and repeat.
Tips:
Shorten your range of motion if you feel this exercise in your lower back.
Kneel on a folded exercise mat or foam pad for comfort.
You can also do this exercise from standing. However, this is MUCH more demanding:
2 – Bicycle crunch
The bicycle crunch is a tough but popular abs exercise. It involves all your significant core muscles, as well as your hip flexors. Done slowly and through a full range of motion, this exercise will challenge even the strongest exerciser.
Steps:
Lie on your back with your legs straight and your hands on your temples. Press your lower back into the floor and lift your feet a few inches off the floor. Keep them up for the duration of your set.
Lift your head and shoulders and bend one leg. Twist and touch one knee to the opposite elbow.
Return to the starting position and then repeat on the opposite side.
Continue alternating for the duration of your set.
Tips:
Start with legs bent and feet on the floor to make this exercise more manageable.
Take care not to pull on your neck, which could lead to injury.
Try to touch the outside of your elbow to the outside of your knee to hit your obliques harder.
3 – Straight leg lifts
Straight leg lifts are a low-tech but high-effect abs exercise. Like hanging knee raises, they target the lower fibers of your abs and hip flexors. Doing straight leg raises after bicycle crunches will be a special kind of core-training hell!
Steps:
Lie down and press your lower back into the floor. Lift your feet a few inches off the floor. Rest your arms on the floor next to your hips.
Without using your arms for assistance, raise your legs up until they’re vertical.
Lower your legs down until your feet are a few inches above the floor and repeat.
Tips:
Keep your lower back pressed into the floor throughout. Do NOT allow your back to arch.
If necessary, place your hands under your butt to help keep your back flat.
Bend your legs to shorten the lever and make this exercise easier. You can also try raising one leg at a time.
4 – Resistance band Pallof press
The Pallof press is an anti-core exercise, meaning it works your muscles without involving any movement. Don’t let this put you off; the Pallof press is still a great way to work your abs, especially your obliques.
Steps:
Attach a resistance band to a chest-high anchor.
Grip the end of the band and stand sideways onto your anchor point. Hold your hands in front of your chest.
Stand with your feet about shoulder-width apart, knees slightly bent.
Extend your arms in front of you, noting how the tension on your core increases. Do NOT allow your torso to twist.
Bring your arms back in and repeat.
Do the same number of reps on both sides.
Tips:
Stand further away from your anchor point to put more tension on the band and make this exercise harder.
You can also do this exercise with a cable machine.
You can also do this exercise in a half-kneeling position for variety:
30-Day Abs Challenge – Week Four
Week four is graduation week, and we’re going to finish strong! As well as introducing another four new core exercises, you’ll also get shorter rests between sets, turning the intensity up to the max. Keep pushing hard all the way to the end, and keep reminding yourself it’s the final week of workouts.
#
Exercise
Sets
Reps
Recovery
1
Renegade row
4
15-20
30-60 seconds
2
V-sit
4
15-20
30-60 seconds
3
Flutter kick
4
15-20
30-60 seconds
4
Saxon side bend
4
15-20
30-60 seconds
1 – Renegade row
Renegade rows were invented by NFL strength and conditioning expert John Davies. It is a plank variation that also involves an anti-rotation element. It’s a challenging exercise, so don’t go too heavy too soon!
Steps:
Adopt the push-up position with a dumbbell in each hand. Your arms, legs, and body should be straight. Brace your core, and pull your shoulders down and back.
Keeping your body tight and still, bend one arm and row the dumbbell off the floor and into your lower ribs.
Place the dumbbell back on the floor, swap sides, and repeat.
Alternate arms for the duration of your set.
Tips:
Use hex-shaped dumbbells if available, as they tend to be more stable.
You can also do this exercise with kettlebells.
Bend your legs and rest on your knees to make this exercise easier.
2 – V-sit
The V-sit is an old-school abs strength and conditioning exercise. This is a tough move, but after three weeks of prep work, you’re ready for it. The V-sit is so-called because your body makes a V-shape at the midpoint of each rep.
Steps:
Lie on your back with your legs straight and arms above your head. Press your lower back into the floor and brace your abs.
Lift your legs and upper body simultaneously and reach up toward your toes. At this point, you should be balancing on your butt, body making a V-shape.
Lie back down and repeat.
Tips:
Place a folded matt under your lower back for comfort.
Make this exercise harder by holding a medicine ball and touching it to your feet.
Bend your legs and pull your knees into your chest to make this exercise easier.
3 – Flutter kick
Flutter kicks are a favorite abs exercise in the military. You’ll often see this exercise done by Navy SEALs, usually as they lie on a beach with waves breaking over them. Part punishment, part core strengthener, this challenging exercise will hammer the lower fibers of your rectus abdominis.
Steps:
Lie on your back with your legs straight, hands together, and under your butt.
Press your lower back into the floor and lift your feet a few inches off the floor.
Lift your head and shoulders a few inches off the floor.
Keeping your legs straight, kick your legs up and down like you are swimming. Four kicks equal one rep.
Continue for the prescribed number of reps.
Tips:
Stop your set if your lower back starts to lift off the floor.
The slower the tempo, the more challenging this exercise becomes.
Bend your knees slightly to shorten the levers and make this exercise easier.
4 – Saxon side bend
Saxon sidebands are named after old-school strongman and bodybuilder Arthur Saxon. Performing with his brothers, Saxon was known for his incredible feats of strength, which included lifting horses and pressing several times his body weight overhead. The Saxon side bend was one of his favorite abs exercises.
Steps:
Stand with your feet shoulder-width apart, knees slightly bent. Brace your core.
Raise and hold a weight (dumbbell, medicine ball) overhead.
Keeping your arms extended, lean to the left and then to the right for the prescribed number of reps. Only lean sideways, and not forward or backward.
Tips:
Take care not to twist your shoulders or hips.
Bend your arms and lower the weight to your head to make this exercise a little easier.
Because of the long levers involved, this is a challenging exercise, so don’t go too heavy too soon.
FAQs
Do you have a question about our 30-day abs challenge or core training in general? No sweat Boba Fett, because we’ve got the answers!
1. Will this challenge give me a six-pack?
Getting a six-pack is as much about your diet as it is your workout program. This 30-day abs challenge will definitely strengthen and harden your abs, but you won’t be able to see them unless you carve your body fat down to under ten percent for men and less than 15 percent for women.
Because of this, it’s often said that abs are built in the kitchen, although the saying should really be that abs are revealed in the kitchen.
Getting leaner invariably means eating less and exercising more to create a calorie deficit, so your body has no option but to burn stored body fat for fuel.
Read more about eating for ripped abs here.
2. Can I change the exercises in the 30-day abs challenge workouts?
If there are any exercises that you cannot do or that cause pain, feel free to do something else instead. However, try and use similar exercises so that you stay true to the spirit of the program. For example, you could do cable crunches instead of stability ball crunches, as they are basically the same movement. However, sit-ups and hanging leg raises are too dissimilar to be interchangeable.
If you are thinking of changing an exercise because you find it hard – don’t! This is a CHALLENGE, and it’s the hard exercises that will deliver the best results. Even if you can only do a few reps, stick with the hard moves. Your efforts will be rewarded in the end.
3. XYZ exercise hurts my back – what should I do?
If any of the exercises cause back pain, you should stop immediately and revisit your technique. Make sure you are doing the movement correctly. If it still causes pain, replace that exercise with something similar that doesn’t cause you problems. While exercise is good for everybody’s body, some movements may not suit your body type or fitness level.
4. How do I know if I’ve done enough reps?
One of the reasons that prescribing a rep range for a workout is so hard is that we have no way of knowing how strong you are. For some, 15 reps of leg raises will be too easy, but for others, it’ll be way too hard. If we tell you how many reps to do, we’d just be guessing.
So, instead, do as many reps as you can, stopping 2-3 short of failure. At this point, you should feel your muscles working (love that burn!), and your movements will probably noticeably slow down.
Push yourself close to failure, and your muscles will respond by getting stronger. But stop too soon, and your workout won’t be as effective as it could have been.
That said, try to do more reps workout by workout. This is called progressive overload, which is one of the cornerstones of effective training.
5. Will doing abs exercises help me lose belly fat?
Many people believe that doing exercises for a particular body part will melt fat from that area. This is called spot reduction. Unfortunately, there is no evidence to suggest that spot reduction happens, so it’s probably best to forget about this much-loved myth. The same is true for “sweating off fat” – that’s impossible, too.
Your body stores and burns fat globally, i.e., all over. While exercising, healthy eating and a calorie deficit will force your body to burn fat for fuel, you cannot influence from where that fat will come. It MAY be your abs, but it could also be your arms, butt, or chest.
So, while you can lose belly fat, we cannot guarantee that abs exercises will help give you a slimmer stomach. Forget about spot reduction, and focus on your entire body for the best fat-loss results.
30-Day Abs Challenge – Closing Thoughts
Sometimes, the best way past a fitness plateau is to smash through it! Sticking with your regular workout program is not the answer. Instead, you need to push the volume and intensity up a notch and get Hulk-mad, going beyond your normal limits.
This 30-day abs challenge might not give you a six-pack, but after four weeks, your core will be harder and stronger than ever before. Dial in your diet, and, who knows, you may even start to see your abs.
And the best part? You can do these workouts at home, so it’s virtually excuse-free.
So, what are you waiting for? Get started today!
Toes to Bar Exercise Guide: How To, Benefits, Muscles Worked, and Variations
A shredded midsection is the symbol of peak fitness. Although many people aspire to develop a well-defined six-pack that could rival the sculpted Greek statues, it usually remains that — an aspiration.
The benefits of a strong core extend beyond aesthetics. A strong core can improve your balance and functionality, which can boost your performance in compound exercises and daily tasks. Plus, it can improve your posture and reduce the risk of lower back pain and injury.
Most people avoid training their abs because they find the orthodox ab exercises, such as crunches and leg raises, boring and redundant. You have come to the right place if you’re looking for a challenging exercise that requires skill, strength, and endurance. Toes to bar is a compound exercise that primarily works your abs and also engages your arms, shoulders, lats, glutes, and hip flexors.
Toes to bar (TTB) is a gymnastics exercise and a mainstay in many CrossFit workouts. It is an extended and advanced version of the hanging leg raise. That said, performing the TTB requires significantly more core strength and practice.
In this article, we go over the basics of TTB, its benefits, muscles worked, correct exercise form, most common mistakes, and the best variations and alternatives to add to your training regimen.
What is a Toes to Bar?
Toes to bar involve lifting your feet to an overhead bar. Simple, right? Wrong. TTBs are more challenging than hanging leg raises, and depending on your experience level, it might take a long time to drill the movement.
Since the TTB is a compound movement, it helps improve your overall anterior chain strength. Plus, TTBs performed with a flawless form look dope. It is also an excellent way to show off your core strength.
There are two main toes to bar variations:
Strict Toes to Bar
The strict TTB is one of the most difficult abdominal exercises. It is generally included in a workout to test an exerciser’s midline strength. Save this TTB variation for after you’ve mastered the kipping TTB. Besides core strength, the strict TTB demands decent hip flexor, gluteal, and hamstring mobility.
Kipping Toes to Bar
The kipping TTB is a popular ab exercise in gymnastics and CrossFit workouts. As the name suggests, it involves using a kipping motion that makes touching your toes to the bar a little easier. On the other hand, the strict TTB involves touching the overhead bar with your toes while keeping your torso parallel to the floor.
Muscles Worked During Toes to Bar
Toes to bar works the following muscles:
Abs
The TTB primarily targets your abs. It engages the rectus and transverse abdominis and will leave you with a sick ab pump. The rectus abdominis runs along the front of your abdomen and is commonly known as the “six-pack.” Conversely, the transverse abdominis wraps around your trunk from front to back.
Hip Flexors
Hip flexors are located on the front of your upper thighs. These muscles are involved in flexing the hips and bringing the knee closer to the chest. Weak hip flexors can make it more challenging to complete a TTB.
Arms
Your grip and forearm strength are crucial factors that can dictate your performance in toes to bar. Plus, you might experience biceps recruitment during more extended TTB sets, which involve holding on to the bar for longer.
Lats
Your lats kick in as soon as you hang on to the pull-up bar. Furthermore, the kipping TTB variation can lead to greater lat engagement as you cycle between the hollow and arch positions.
Glutes and Hamstrings
You need good glutes and hamstring mobility to perform the TTB with optimal form. The glutes and hamstrings also help control the movement during the exercise’s eccentric (lowering) part.
Notably, the kipping toes to bar variation increases the demand on the grip, shoulder, and back.
Benefits of Toes to Bar
Adding the TTB to your training regimen entails the following advantages:
Build a Strong and Shredded Core
TTB is a challenging abdominal exercise that will help build a stronger and chiseled core. To avoid swinging between reps, you must keep your core contracted throughout the exercise. TTB will also strengthen your stabilizers, improving your overall balance and boosting your performance in compound exercises and everyday functioning.
Boosts Muscle Coordination
A TTB involves several moving parts. You must hang onto a pull-up bar, generate momentum by kipping, raise your toes to the bar, return to the start position, and repeat this process for the recommended reps. Adding TTB to your workouts will improve your muscle coordination, which will carry over to other exercises.
Improves Posture
Toes to bar strengthen your abdominal muscles and lower back, which can contribute to a better posture. Core exercises are a must for folks who spend most of their day sitting or hunched over their phones or computer screens.
Read also: Toes To Bar Workout Progression Routine
How To Do Toes to Bar
The TTB is a complex exercise, and you must master several steps to perform this movement correctly. Below I’ll take you over the kipping toes to bar step-by-step instructions that require a cyclical, ballistic motion.
Step 1: Grab an Overhead Bar
Jump and grab onto a pull-up bar with a slightly wider than shoulder-width overhand grip. You can use a hook (fingers over the thumb) or reverse hook grip (thumb over the index fingernail) on the bar.
Pro Tip: Avoid using a false grip on the bar. A thumbless grip will make it harder to hold onto the bar during the kipping motion.
Step 2: Generate a Kip
Kipping involves alternating between an arch and a hollow position to generate momentum. Initiate the kip by driving your head and chest forward and extending your legs behind you. Immediately kick your legs in front of your body as you push on the bar and bring your body behind it to get into a “hollow” position.
Pro Tip: Beginners can perform two to three kips to generate enough momentum before raising their legs.
Step 3: Raise Your Legs in the Hollow Position and Flick the Bar
After generating momentum and getting into a hollow position, contract your abs, lats, shoulder blades, glutes, and quads, and raise your legs toward the ceiling. Your toes should hit the bar at the top of the movement. Keep your head neutral throughout the range of motion, and look at the bar during the concentric (upward) phase of the lift. Looking ahead during the upward motion will make lifting your legs more difficult.
Pro Tip: Instead of locking out your knees and keeping your legs straight during the concentric motion, you could break it into two parts. First, bend your knees and bring your quads to your chest. Finish the movement by extending your knees and touching the bar with your toes. This technique is also known as the tuck-and-flick method.
Step 4: Return to the Extended Arch Position
After flicking the bar, lower your legs by extending your spine. Push your legs behind you and your torso forward to immediately enter the arched position. Use the momentum to get into the hollow position. Repeat for recommended reps.
Pro Tip: The eccentric motion of the tuck-and-flick method involves returning your legs to your chest and extending your knees as your legs move below your waist. Many exercisers find the tuck-and-flick method more convenient while stringing bigger sets.
Toes to Bar Tips:
It is common for beginners to experience ab cramps while performing TTBs. Stop your set and stretch out your abs if you experience the same.
Master the kipping TTB before trying the strict TTB.
Before attempting the kipping TTB, drill your kipping form. Perform three sets of 10 kips in alternate workouts until you have command over the exercise.
Use CrossFit grips to avoid ripping your hands on the pull-up bar. Remember, you are as strong as your grip on this exercise.
Advanced trainers can perform this exercise on gymnastic rings. The unstable rings lead to greater core and stabilizer recruitment.
In This Exercise:
Target Muscle Group: Abs
Type: Strength
Mechanics: Compound
Equipment: Bodyweight
Difficulty: Intermediate
Best Rep Range: 10-15
Common Mistakes While Performing Toes to Bar
Avoid the following toes to bar mistakes to get the best bang for your buck and limit your risk of injury:
Incorrect Hand Position
Most people fail to kip consistently and complete a TTB because of incorrect hand placement. Grabbing the bar too close will make touching your toes to the bar more difficult, whereas taking a snatch grip on the bar will lead to uncontrollable swinging. Grab the bar just outside shoulder-width for optimal range of motion.
Keeping Your Shoulders Under The Bar
Many rookies try to do a TTB while keeping their shoulders under the bar. Although you might be able to complete one TTB, you’ll likely not be able to control the eccentric motion, which will lead to uncontrollable swinging.
Not Using a Kip
In continuation with the previous point, strict TTB is significantly more difficult than the kipping variation. You must master kipping before attempting toes to bar. Begin the kip by pretending to perform a straight-arm pushdown and pull your torso behind the pull-up bar.
Banging Your Toes Into The Pull-Up Bar
Avoid banging your toes into the bar at the top of the motion. Many exercisers end up with bruised toes due to kicking the bar too hard. Bring your toes over the bar, or touch it lightly; this will get easier as you gain more experience.
Slowing the Eccentric Motion
Many trainers make the mistake of controlling the descent, which can break their momentum. You want to use the momentum from the eccentric motion to power your kip and the next rep. That said, you must control the eccentric motion on the strict TTB.
Variations and Alternatives of Toes to Bar
The following TTB variations and alternatives will help add variety to your training regimen:
Hanging Leg Raise
The hanging leg raise is an excellent progression exercise for the TTB.
Steps:
Hang onto a pull-up bar with a shoulder-wide overhand grip.
Brace your core and glutes, and lift your legs toward the ceiling until they are at least parallel to the floor. Keep your knees locked out throughout the range of motion.
Pause and contract your abs at the top.
Slowly return to the start position.
Repeat for recommended reps.
Pro Tip: Incorporating kipping into this exercise can help drill the TTB movement. Get into the arched position during the eccentric motion and a hollow position during the concentric lift.
Check out our complete hanging leg raise guide here!
Lying Leg Raise
Perform the lying leg raise on an elevated platform like a flat bench to mimic the arched position of the TTB.
Steps:
Lie supine with your hips on the edge of a flat bench. Your leg should be extended and parallel to the floor.
Hold the bench at your ear level for stability.
Keeping your legs straight, raise your lower body toward the ceiling until it is at a 90-degree angle with your torso.
Lower your legs toward the floor until your feet are a few inches off the floor.
Rinse and repeat.
Pro Tip: As you gain more experience, touch your knees to your head at the top of the movement. Progressing to this stage can take a long time as it requires significant core strength and flexibility.
Check out our complete lying leg raise guide here!
Knees To Elbow
Knees to elbow is the middle ground between the hanging leg raise and the toes to bar. This exercise involves touching your elbows with your knees.
Steps:
Grab onto a pull-up bar with a shoulder-wide grip.
Contract your abs, glutes, and quads.
Raise your quads to your chest by flexing your hips.
Bend your knees and touch your elbows at the top of the motion.
Return to the starting position.
Pro Tip: Kipping can make the exercise easier and help cycle through reps faster.
Hanging L-Sit
The hanging L-sit might look easy, but it requires a strong core. This exercise will improve your core and grip strength, which will translate to a better performance on the toes to bar.
Steps:
Hang onto a pull-up bar with a shoulder-wide pronated grip.
Keeping your elbows and knees locked, raise your legs until they are parallel to the floor.
Hold the position for as long as possible.
Pro Tip: Experienced exercisers can perform L-sit pull-ups. This variation will help build a stronger core, resulting in better lower body control during TTB.
Check out our complete L-sit guide here!
Controlled GHD Sit-Up
GHD sit-ups will help you build a robust midline. However, we will limit the extension on this exercise since we are using it as a TTB progression.
Steps:
Sit at the edge of the GHD pads and place your ankles between the foot pads.
Your torso should be perpendicular to the floor at the start position.
Hold your hands in front of your chest.
Contract your abs and slowly lean backward.
Your torso should at least break parallel to the floor at the bottom of the movement.
Return to the starting position.
Repeat for recommended reps.
Pro Tip: More experienced athletes can use the full range of motion and touch the floor with their fingers at the bottom.
Related: 9 Toes-to-Bar (TTB) Alternatives To Revamp Your Core
Wrapping Up
Toes to bar is a compound exercise that requires decent core strength and kipping practice. Mastering this exercise will help build a stronger core, boost your endurance, and bless you with sculpted abs.
So swing, reach, and touch your toes to the bar with fierce determination, knowing that every rep brings you closer to an extraordinary transformation. Each TTB will hurt, but it will all be worth it in the end.
Best of luck!
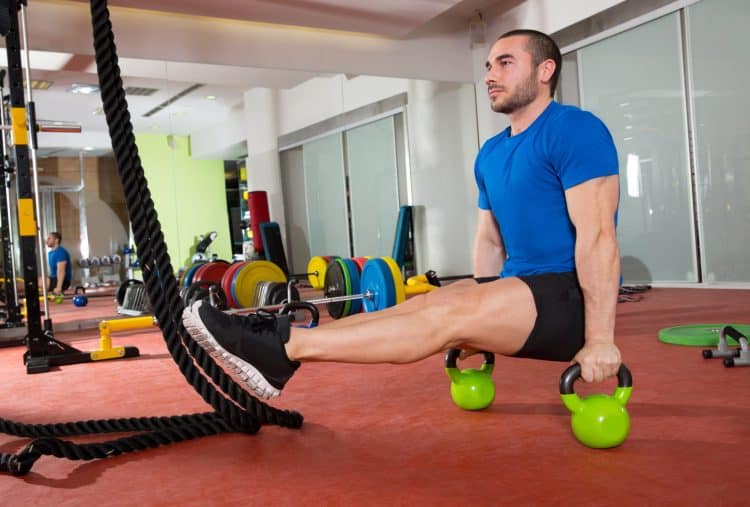
L-Sit Exercise Guide: How To, Benefits, Muscles Worked, and Variations
Some exercises look super easy, but when you try them, you fail to get even in the correct position; the L-sit is one of them.
The L-sit is a classic gymnastic movement that will set your core on fire. On the outside, the L-sit looks very easy. You sit on the floor, plant your hands next to your hips, and lift your hips and legs off the ground. However, this is easier said than done.
Beginners that do not have a gymnastics background will most likely find themselves grinding their teeth while they fail to lift themselves off the floor. I have had newbie exercisers tell me they are anatomically unfit to do the L-sit because they have a long torso and short arms. You might experience the same thing.
However, most people falter at doing the L-sit not because of their body mechanics but because of an incorrect form or a lack of core strength.
Since the L-sit is a bodyweight exercise, most people think that they should be able to do it from the get-go. This, however, is not the case. Like most gymnastic exercises, you will be better off starting with an L-sit progression plan.
In this article, we dive deep into the L-sit and cover its fundamentals, an effective progression plan; the muscles worked during an L-sit, its benefits, proper form, the most common mistakes, and the best variations and alternatives.
What is a L-Sit?
L Sit With Kettlebells
The L-sit is an isometric exercise that improves your core strength and balance. Isometric exercises involve static muscle contraction without visible movement in the joint’s angle. The L-sit is a fundamental gymnastic exercise that grew popular thanks to CrossFit. This exercise is also very popular in the calisthenics circuit.
Besides the conventional L-sit, CrossFit WODs (workout of the day) include several variations of this exercise, including L-sit bar pull-ups and L-sit ring pull-ups. The conventional L-sit demands decent core and hip flexor strength. On the other hand, the pull-up variations also engage most of your upper body, including the biceps, lats, traps, rhomboids, and teres major and minor.
Beginners should start practicing this exercise by placing their hands on an elevated object, such as yoga blocks, or perform this exercise on parallettes or parallel bars. If you still cannot perform this exercise, use the progression exercises listed in this article to build the required core strength.
Muscles Worked During L-Sit
The L-sit works the following muscles:
Abs: The core is the primary target muscle of the L-sit. This exercise requires you to keep your core contracted, resulting in a rectus and transverse abdominal recruitment.
Hip Flexors: These muscles run along the front of your upper thigh. You must engage your hip flexors to keep your legs parallel to the floor throughout the exercise.
Glutes and Quads: This exercise involves keeping your glutes and quads contracted to maintain a stable position.
Triceps: You’ll experience triceps stimulation as soon as you lock out your elbows and lift yourself off the floor. Furthermore, pointing your fingers behind you will engage your biceps.
Shoulders: The L-sit involves actively pushing into the floor, which will result in a sick deltoid pump. You will also experience trapezius muscle stimulation as this exercise requires pushing your shoulders back and down.
Benefits of L-Sit
Adding the L-sit to your training regimen entails the following benefits:
Build a Solid Core and Six-Pack
L-sits can help you build abs of steel. Holding your legs parallel to the floor while extended in the air will work muscles in your core that you didn’t know existed. A strong core can also improve your performance in compound exercise and daily functioning.
Enhance Stability and Balance
A strong core translates to robust stabilizer muscles, which can significantly improve your stability. The L-sit also improves your balance and performance in handstands, push-ups, toes-to-bar, deadlifts, and barbell squats.
Improve Posture
The L-sit strengthens the muscles responsible for maintaining an upright and stable spine, which can help improve your posture. This is an excellent exercise for people that spend most of their day sitting.
Boost Hip Flexor Strength
The hip flexors help bring the knee closer to the chest, meaning they are used in activities such as walking, running, jumping, and kicking. Since the L-sit involves holding your legs parallel to the floor, it engages and strengthens your hip flexors.
How To Do L-Sit
This is how to perform the L-sit with the correct form:
Steps:
Sit upright on the floor with your legs extended in front of you.
Place your hands on the floor next to your hips. Spread your hands and curl your fingers slightly so that your fingertips are pushing into the floor.
Straighten your arms and lock out your elbows. Simultaneously engage your lats and push your shoulders back and down.
Push your palms into the floor, engage your core, and lift your hips and legs off the floor. Your legs should be parallel to the floor throughout the exercise.
Your body should resemble an “L” at the top of the exercise.
Hold the position for as long as possible or a specific time.
Return to the starting position.
Repeat for the desired number of sets.
L-Sit Tips:
Keep your quads and glutes contracted and your toes pointed throughout the exercise.
Place your hands on yoga blocks if you have trouble pushing yourself off the floor.
Spreading your hands and pushing your fingertips and palms into the floor will help you maintain your balance.
Maintain an upright torso while pushing yourself off the floor. Bending forward will make lifting your legs off the floor more difficult.
Advanced exercises can wear a weighted vest to make this exercise harder.
In This Exercise:
Target Muscle Group: Abs
Type: Strength
Mechanics: Isometric
Equipment: Bodyweight
Difficulty: Intermediate
Best Rep Range: 30-60 seconds
L-Sit Progression Exercises
Use the following L-Sit progression exercises if you lack the strength to perform the conventional variation of the exercise:
Step 1: Boat Hold
The boat hold is an excellent core exercise that is suitable for trainers of all experience levels. It will help you build the foundational strength for L-sits.
Steps:
Sit upright on the floor and extend your legs in front of you.
Cross your arms in front of your chest.
Engage your core and tilt your torso backward. Anything between 1 to 2 o’clock will work.
Lift your legs off the floor while keeping your knees locked out.
Hold this position for as long as possible.
Pro Tip: If you have trouble maintaining your torso in position, place your hands next to your hips on the floor.
Step 2: Elevation
This L-sit progression exercise involves using an elevated platform, such as yoga blocks or parallettes. Furthermore, you will focus on lifting your hips off the floor while keeping your heels grounded.
Steps:
Sit on the floor with your legs extended and place parallettes on each side of your hips.
Grab the bars with an overhand grip. Your elbows will be bent at this position.
Extend your elbows while pushing your shoulders back and down. You must lock out your elbows at the top, and your hips should be off the floor.
Your heels should be the only point of contact with the floor.
Slowly return to the starting position.
Repeat for 15-20 reps.
Pro Tip: Avoid using your legs to push yourself into a lockout position. Conversely, beginners can bend their knees slightly and push their heels into the floor to generate force.
Step 3: Alternating Leg Lift
In this L-sit progression exercise, you’ll focus on the lockout and lifting one leg at a time.
Steps:
Sit upright on the floor and extend your legs in front of you.
Place your hands on your hip side.
Push your shoulders down and back, and extend your elbows. Your hips should be off the floor at this point. Your heels should be the only point of contact with the floor.
Contract your abs and lift your left leg off the floor until it is parallel to the floor.
Return your left leg to the floor and repeat with the right leg.
Alternate between sides for the recommended reps.
Pro Tip: As you get better at this exercise, lift your legs as high as possible without bending your knees. Hold for a five-second count before lowering your legs to the floor.
Step 4: Tuck Sits (on an elevated platform)
Tuck sits can be incredibly effective in building the required core strength and confidence to perform the L-sit. This is also the first exercise where we bring together most of what we’ve learned up to this point.
Steps:
Sit upright on the floor and extend your legs in front of you.
Bend your knees and plant your heels on the floor as close to your hips as possible.
Place your hands on the sides of your hips.
Push your shoulders back and down and extend your elbows to lift your hips off the floor.
Pull your quads to your chest as you lift your hips off the floor.
Hold for as long as possible.
Pro Tip: Holding your legs close to your chest is easier than maintaining straight legs. You can also use an elevated platform for this exercise if you have difficulty doing it on the ground.
Step 5: Tuck-Sit to L-Sit (on an elevated platform)
We push into the next gear with this L-sit progression exercise. This exercise begins in the tuck sit position and requires you to work into a full L-sit.
Steps:
Follow the steps mentioned above to get into a tuck-sit position.
While keeping your back straight, extend your legs until they are parallel to the floor.
You might lose balance as you extend your legs. In this case, pull your legs back to your chest.
Hold the L-sit position for as long as possible.
Pro Tip: Use elevated platforms for this exercise if you cannot do it on the floor. Performing this exercise on an elevated platform will ensure you have enough space to pull your legs into your chest without having your feet touch the floor.
Step 6: L-Sit
After you have spent enough time practicing the tuck-sit (step four) and tuck-sit to L-sit (step five), the conventional L-sit will be the natural next step. Use the steps mentioned in the “How To Do L-Sit” section to perform the L-sit.
Common Mistakes While Performing L-Sit
Avoid making the following mistakes while performing the L-sit to get the best bang for your buck:
Rounding Back
This is one of the most common mistakes exercisers commit while performing the L-sit. You must avoid hunching your back as you extend your elbows to lift your hips off the floor. Rounding your back makes it harder to lift your legs off the floor.
Skipping Warm-Up
Since the L-sit is a bodyweight exercise, many people skip warming up their bodies, which can hamper their performance. Before doing this exercise, you must spend 5-10 minutes warming up your wrists, arms, shoulders, abs, glutes, hamstrings, and legs to ensure you’re primed to hold this position for as long as possible.
Not Locking Out Your Elbows and Pushing Your Shoulder Back and Down
Maintaining soft elbows while performing the L-sit is a rookie mistake. You must lock out your elbows to ensure optimal stability and balance. Soft elbows usually lead to the rounding of the back. Also, you must push your shoulders back and down to gain an optimal height to lift your legs off the floor comfortably.
Variations and Alternatives of L-Sit
Add the following L-sit variations and alternatives to your training regimen to build a shredded midsection:
L-Sit Pull-Up
After mastering the L-sit, you can progress to the L-sit pull-up for an additional challenge. Most people tend to use their legs to perform a pull-up; however, since you’ll be holding your legs in front of you in this variation, this exercise is much more difficult than the conventional pull-up.
Steps:
Stand under a pull-up bar.
Grab the pull-up bar with a shoulder-wide grip.
Lift your legs until they are parallel to the floor.
Perform a pull-up while holding this position until your chin is over the bar.
Return to the starting position.
Repeat for recommended reps.
Pro Tip: Beginners can perform hanging L-sit until they develop the core strength to perform a pull-up.
L-Sit Pull-Up on Rings
Since you can pull your head between the rings, this exercise is a little easier than the L-sit pull-up on a pull-up bar, where you must pull your body at an angle. However, performing it on the rings requires more core stability.
Steps:
Jump and grab the gymnastic rings with a neutral (palms facing each other) grip.
Lift your legs until they are parallel to the floor.
While keeping your core contracted, perform a pull-up.
Return to the start position.
Repeat for reps.
Pro Tip: Keep your shoulders pulled back and down while performing pull-ups.
Plank
You need a strong core to perform the L-sit. Planks are an incredibly effective beginner-friendly exercise to build the requisite core strength.
Steps:
Get on all fours on the floor.
Place your elbows under your shoulders and plant your forearms on the floor. Your forearms should be parallel to each other.
Extend your legs behind you.
Your body should be in a straight line from head to toe.
Hold this position for as long as possible.
Pro Tip: As you get more experienced, make this exercise more difficult by wearing a weighted vest or placing a weight plate on your back.
Check out our complete plank guide!
Hollow Body Hold
Hollow body hold is an excellent exercise to build core strength. It is used widely in CrossFit gyms to improve your kipping pull-up mechanics.
Steps:
Lie supine on the floor. Extend your arms over your head.
Contract your abs and lift your legs off the floor. Simultaneously lift your shoulders and arms toward the ceiling.
Your hips and lower body should be the only point of contact with the floor.
Hold the position for as long as possible.
Pro Tip: Focus on actively pushing your arms and legs toward the ceiling throughout the exercise.
Check out our complete hollow hold guide!
Toes-To-Bar
Performing toes-to-bar requires significant core strength. You must keep your core engaged throughout the exercise to avoid swinging between reps.
Steps:
Grab a pull-up bar with an overhand shoulder-wide grip.
Lock out your elbows.
Press on the bar using your lats; this will pull your torso behind the bar.
Simultaneously lean back slightly and raise your legs toward the pull-up bar.
Touch your toes to the bar.
Lower your legs to the starting position.
Repeat for recommended reps.
Pro Tip: Perform a kip to stabilize your body and generate momentum to raise your toes to the bar.
Wrapping Up
The L-sit is an isometric exercise that will help you build a strong core, strengthen your stabilizers, improve your balance and posture, and boost hip flexor strength. Mastering this exercise is a must if you are into gymnastics or CrossFit.
The five beginner-friendly progression exercises listed in this article are excellent movements to work toward an L-sit. Perform the variations thrice weekly, and you should be able to perform a picture-perfect L-sit by the end of six weeks. Best of luck!
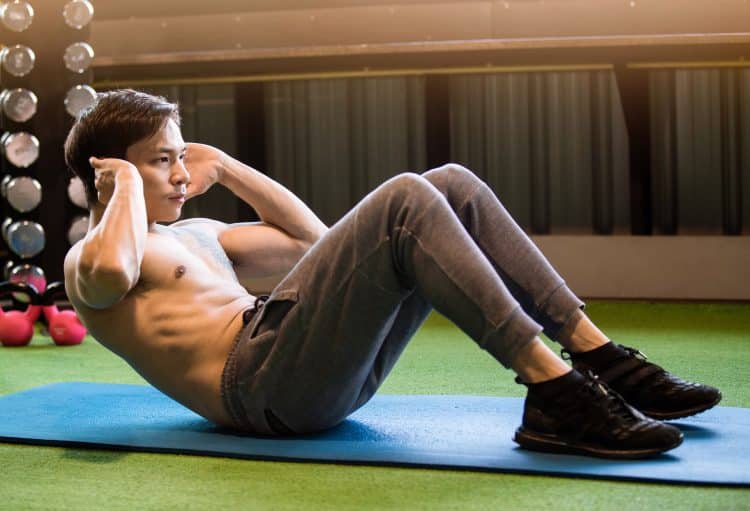
Sit-Up Exercise Guide: How To, Benefits, Muscles Worked, and Variations
The sit-up is one of the most popular exercises. It is taught in school PT classes, done at home, and is a part of the most complex metabolic conditioning workouts. This versatile exercise works your midsection and can help build a shredded six-pack. Sit-ups can also improve your posture, core strength, and balance.
Most people have a love-hate relationship with sit-ups. They love the results but hate doing the exercise. Although sit-ups look easy, they will have you begging for mercy halfway through a set. They are especially difficult for beginners that lack abdominal strength and endurance. Furthermore, many exercisers find sit-ups boring.
That said, thanks to their effectiveness and results, sit-ups are a part of most training regimens, and this doesn’t appear to be changing any time soon.
Notably, sit-ups are often confused with their cousin — crunches. Both these exercises look similar to an untrained eye, and ‘sit-ups’ and ‘crunches’ are often used interchangeably. However, these exercises have significant differences.
The biggest difference between the two exercises is their range of motion. The crunch is roughly a quarter of the sit-up’s range of motion (ROM). While performing the crunch, your lower back is always in contact with the floor; in fact, your upper back, too, barely leaves the floor. However, as the name implies, the sit-up involves sitting upright at the top of the range of motion.
The sizeable difference in the ROM leads to the isolation of your abdominal muscles while performing the crunch. On the other hand, sit-ups stimulate multiple muscle groups, including the abs, hip flexors, hips, and lower back.
In this article, I take you over the fundamentals of the sit-up, the muscles worked during this exercise, its benefits, proper form, the most common mistakes, and the best variations and alternatives.
What is a Sit-Up?
A shredded midriff and a six-pack are considered the epitome of fitness, and the sit-ups help you achieve just this. This exercise involves contracting your abs with every rep, which helps you develop a chiseled midsection. The sit-up is an isolation exercise that trains your abdominal muscles.
To perform a sit-up, lie supine and place your feet flat on the floor. While holding your hands at the side of your head, lift your torso off the floor by contracting your abs. Your upper body should be almost parallel to the floor at the top of the motion — anything between 12 and 1 ‘o clock is acceptable.
Since performing the sit-up requires no equipment, you can do it anywhere. As you gain more experience, you can make the exercise more challenging by incorporating additional resistance using a weighted vest or holding a dumbbell, weight plate, or kettlebell in front of your chest.
The sit-up primarily works the upper and middle abs. However, you can achieve better lower ab stimulation by performing this exercise on a decline bench. Conversely, beginners can perform this exercise on a stability ball, as it provides a little assistance at the bottom of the movement.
Muscles Worked During a Sit-Up
The sit-up works the following muscles:
Abs
Sit-ups work the rectus and transverse abdominis. The rectus abdominis is the long vertical muscle that runs down the front of your abdomen. It is also known as the six-pack. On the other hand, the transverse abdominis muscle wraps around the abdomen and provides stability and support to the spine and internal organs. The transverse abdominis plays a crucial role in core stability while performing sit-ups and other exercises.
Obliques
Sit-ups work the internal and external obliques. The external obliques are the fish-gill-like muscles at the side of the rectus abdominis and help with trunk rotation and bending movements. The internal obliques lie under the external obliques and also assist with trunk rotation and bending.
Hip Flexors
Hip flexors run along the front of your upper thigh. They are responsible for flexing the hip joint. Hip flexors engage during the sit-up’s concentric (upward) motion to lift the torso toward your thighs.
Hips
Your hips provide stability during the sit-ups. The hip joint flexion also allows you to move from a lying to a seated position. Strong hips will also help prevent lower back strain while performing the exercise.
Lower Back
Your lower back, especially the erector spinae, plays a crucial role by providing stability and maintaining proper spinal alignment while performing sit-ups. It helps you avoid rounding your lower back during the concentric motion.
Benefits of Sit-Ups
Here are the advantages of adding sit-ups to your training regimen:
Improved Core Strength
Performing sit-ups helps you build a stronger core, the benefits of which carry over to compound exercises. Furthermore, it improves your performance in daily activities, which helps you get done more quickly and effectively.
Boost in Athletic Performance
A strong core can help improve your athletic performance. Irrespective of your sport, sit-ups can improve your posture, stability, and form, which can boost your overall performance and results. It will also significantly delay the onset of fatigue.
Increase in Muscle Mass
Sit-ups can help build muscle mass and strength in the abdominal and hip muscles. This exercise can also be a valuable indicator of muscle loss. A 2016 study found that older women who could perform sit-ups were less likely to lose muscle mass with age. [1]
Improved Balance and Stability
Sit-ups help build a strong core, which improves your balance and stability. It can improve your performance in daily activities and other exercises. A stronger core can also help prevent falls in older adults.
Better Posture
Building a strong core helps keep your hips, spine, and shoulders in alignment, which helps promotes a better posture. Folks that have a desk job or spend the majority of their days sitting should make sit-ups a constant in their training regimen.
No Equipment
Sit-ups are a bodyweight exercise that you can do anywhere at your convenience. Plus, you can program this versatile exercise into most training regimens and use additional resistance for better results.
How To Do Sit-Up
This is how to perform the sit-up with the correct form:
Steps:
Lie supine on the floor. Bend your knees and plant your feet on the ground.
Hold your hands next to your ear.
Raise your torso off the floor by contracting your abs. Exhale sharply during the concentric movement.
Your torso should be perpendicular to the floor at the top of the movement.
Contract your abs as hard as possible.
Inhale as you slowly lower your torso to the floor.
Repeat for recommended reps.
Sit-Up Tips:
Your head should remain neutral throughout the range of motion. Bending your head during the concentric movement puts unnecessary strain on your neck.
Avoid interlacing your fingers behind your head as it increases your odds of bending your neck during the upward motion. Crossing your arms in front of your chest is a better alternative if you don’t prefer holding your hands next to your ears.
Exhale and contract your abs during the upward motion.
Keep your back straight throughout the range of motion. Rounding your back can strain your lower back.
Use an elevated surface to anchor your feet. This will help keep your feet planted on the floor and allow you to establish a better mind-muscle connection.
It is common for beginners to experience ab cramps while doing sit-ups. Stop the exercise if you experience cramps and stretch out your abs.
In This Exercise:
Target Muscle Group: Abs
Type: Strength
Mechanics: Isolation
Equipment: Bodyweight
Difficulty: Beginner
Best Rep Range: 8-12
Common Mistakes While Performing Sit-Up
These are some of the most common sit-up mistakes that you must avoid to maximize results and lower the risk of injury:
Using a Limited Range of Motion
Many people leave gains on the table by following an incorrect form and a restricted range of motion. Your back should be on the floor at the bottom, and it should be perpendicular to the floor at the top.
Using Momentum
Exercisers try to make this exercise easier by using momentum. Avoid throwing your arms toward your legs to lift your torso off the floor. Driving through your neck during the concentric motion can cause neck sprains.
Neck Strain
Sit-ups are a demanding exercise. You must keep your head, neck, and torso in a straight line throughout the exercise for optimal ab stimulation. Folks that interlace their fingers behind their necks or throw their heads forward during the concentric motion increase their odds of injury during the exercise.
Rounding Your Back at the Top
Think of your torso as a hardboard while doing sit-ups; it should move in a straight line. Rounding your back at the top of the motion causes unnecessary lower back strain. It will also hamper your form during the eccentric (lowering) motion.
Improper Breathing
Many people make the mistake of holding their breath while performing crunches. Breathing correctly while performing crunches can help amplify your results. Exhale sharply during the concentric motion and inhale during the eccentric motion.
Not Adding Variety To Your Training Regimen
Although crunches are a great exercise to build a shredded midriff, your training program must include exercises that train your torso from different angles for overall development. It will ensure you build a bulletproof midsection. This point is a perfect segue into…
Variations and Alternatives of Sit-Ups
Add the following sit-up variations and alternatives to your training regimen to build a shredded midsection:
Weighted Sit-Up
Weighted sit-ups are for advanced athletes. It involves holding additional resistance, such as a dumbbell, kettlebell, or weight plate, in front of your chest. The exercise form for this variation will remain the same as the conventional sit-up.
Pro Tip: Use an appropriate weight that allows you to keep your head and torso in a straight line throughout the range of motion. Using a weight that is too heavy can cause you to bend your head forward.
Stability Ball Sit-Up
Stability ball sit-ups are an excellent exercise for beginners as the exercise ball acts as a support at the bottom of the movement and delivers a pop that pushes you into the next rep.
Steps:
Sit upright on an exercise ball and plant your feet flat on the floor.
Hold your hands at your ear level and slide forward so your lower and middle back are on the exercise ball. Your shoulders should be hanging off the ball.
Exhale and contract your abs to lift your torso toward the ceiling.
Your torso should be perpendicular to the floor at the top.
Slowly return to the start position.
Rinse and repeat.
Pro Tip: Some trainers go down too fast during the eccentric motion to use the bounce from the ball to complete the next rep. However, this reduces the effectiveness of the exercise and increases your risk of lower back injury.
Reverse Crunch
Sit-ups and crunches work the upper and middle abs. On the other hand, reverse crunches focus on your lower abs. During a sit-up, your lower body remains steady while your upper body moves. The reverse is true for the reverse crunch.
Steps:
Lie with your back on the floor. Your body should be in a straight line at the starting position.
Place your hands under your hips for leverage.
Lift your feet off the floor so your heels are a few inches off the ground.
Pull your quads to your chest while bending your knees.
Your hips should be off the floor at the top.
Slowly return to the start position.
Repeat for recommended reps.
Pro Tip: Make this exercise more challenging by performing this exercise on an elevated platform, such as a flat bench. Let your feet touch the floor at the bottom of the movement for better abdominal stimulation.
Check out our complete reverse crunch guide!
V-Up
The V-up is a great exercise to build core strength, balance, stability, and coordination. This exercise targets your entire midsection, including your upper, middle, and lower abs.
Steps:
Lie flat on your back on the floor.
Extend your arms toward the ceiling so they are perpendicular to the floor. Simultaneously, raise your legs off the floor.
In a single motion, lift your legs toward the ceiling and bring your hands toward your feet.
Your body should resemble a “V” at the static contraction point at the top.
Slowly lower to the starting position.
Repeat for recommended reps.
Pro Tip: Experienced lifters can make this exercise more challenging by wearing ankle weights and holding a pair of dumbbells.
Check out our complete V-up guide!
Crunch
The crunch is the easier version of the sit-up and roughly involves a quarter of the sit-up’s range of motion. This exercise is a better option for people trying to maintain constant tension in their upper abs or undergoing rehabilitation.
Steps:
Lie supine on the floor. Bend your knees and plant your feet flat on the ground.
Hold your hands next to your ears.
Contract your core, and exhale as you lift only your head and shoulder blades off the ground.
Slowly lower to the starting position.
Repeat for reps.
Pro Tip: Like with sit-ups, you can perform crunches while holding onto weights or on a decline for greater abdominal stimulation.
Check out our complete crunch guide!
Bicycle Crunch
The bicycle crunch is one of the few ab exercises that simultaneously work your lower and upper body. This ab exercise is incredibly effective at working your lower and upper abs and obliques.
Steps:
Lie flat on the floor while facing the ceiling.
Hold your hands next to your ears and lift your legs off the floor.
Exhale as you bring your right knee to your chest while driving your left elbow to the knee.
Return to the starting position.
Repeat on the other side.
Alternate between sides for the recommended reps.
Pro Tip: Focus on your breathing to make the most of this exercise. Breathe out during the concentric motion and breathe in during the eccentric motion.
Check out our complete bicycle crunch guide!
Wrapping Up
The sit-up is a versatile beginner-friendly exercise that will help improve your core strength, balance, stability, and posture, boost your athletic performance and muscle mass, and can be done anywhere at your convenience.
Although sit-ups are a great exercise to work your midsection, your ab training routine should include a variety of movements to ensure overall development. Remember, building a six-pack requires patience, dedication, commitment, and a low body fat percentage. Nail each aspect of your training, diet, and recovery regimen, and your abs will rival those of Greek statues. Best of luck!
Related: Crunch and Sit-Up Alternatives
References
Abe T, Yaginuma Y, Fujita E, Thiebaud RS, Kawanishi M, Akamine T. Associations of sit-up ability with sarcopenia classification measures in Japanese older women. Interv Med Appl Sci. 2016 Dec;8(4):152-157. doi: 10.1556/1646.8.2016.4.7. PMID: 28180004; PMCID: PMC5283773.
The Best Anti-Core Exercises for Increased Lumbar Stability
When most people talk about core training or working out in general, they tend to mean exercises that involve movement. For the core, that means things like crunches, sit-ups, hanging leg raises, Russian twists, side bends, etc.
These exercises usually feature a concentric or shortening phase followed by an eccentric or lengthening phase. After all, what goes up, must come down, right?
However, in many instances, the core muscles work isometrically, generating force without changing length. They contract to prevent unwanted movement, which is what the term core stability means.
Training to prevent movement might seem kinda odd. Still, it’s actually critical for various sports and activities in and out of the gym. For example, squats and deadlifts require incredible levels of static core stability, as do overhead barbell presses, push-ups, and barbell curls.
Fitness experts call these static core strengtheners anti-core exercises. The anti refers to how the core muscles work to prevent movement rather than cause it.
Whether you are training for improved aesthetics, better performance, weight loss, or health, anti-core exercises deserve a place in your workouts. If nothing else, preventing unwanted movement of your lumbar spine could help stop lower back injuries.
In this article, we reveal the best anti-core exercises.
Core Anatomy Basics
Core is the collective term for the muscles that encircle your midsection. Some fitness folk also like to include other muscles in the core, such as the glutes and lats, but that just confuses matters. So, for the purposes of this article, the core is the muscles in and around the abdominal region.
The primary muscles that make up the core are:
Rectus abdominis
Located on the front of your abdomen, the rectus abdominis is the large, flat muscle that, when you are lean, has that unique six-pack appearance. The rectus abdominis is responsible for the flexion of your spine and also contributes to lateral flexion.
In anti-core terms, the rectus abdominus prevents extension and lateral flexion of the spine.
Obliques
The obliques are essentially your waist muscles. There are two sets of obliques on each side of your abdomen – internal and external. They work together to rotate and laterally flex your spine.
In anti-core terms, the obliques prevent rotation as well as initiating it.
Transverse abdominis
Known as the TVA for short, this muscle surrounds your abdominal contents like a corset or weightlifting belt. It contracts inward to increase intra-abdominal pressure, stabilizing your spine from within.
If prizes were being given for the most critical anti-core muscle, the TVA would be a shoo-in for the gold medal!
Erector spinae
Erector spinae is a group of muscles that run up either side of your spine, including the
iliocostalis, longissimus, and spinalis, each of which can be subdivided into three further sections. The erector spinae are responsible for extending your spine as well as lateral flexion.
In anti-core terms, the erector spinae prevents flexion and lateral flexion.
Movements of the spine
The spine is a column of 33 individual bones called vertebrae. It’s divided into five sections:
Cervical spine – your neck – made up of 7 vertebrae
Thoracic spine – your upper back – made up of 12 vertebrae
Lumbar spine – your lower back – made up of 5 vertebrae
Sacrum – part of your pelvis – made up of 5 immovable/fused vertebrae
Coccyx – your “tailbone” – made up of 4 immovable/fused vertebrae
The cervical, thoracic, and lumbar vertebrae are separated by intervertebral discs, which are sections of tough fibrous cartilage. These discs absorb shock and compress to allow movement.
Speaking of which, the spine is capable of four main movements:
Flexion, i.e., bending forward
Extension, i.e., bending backward
Lateral flexion, i.e., bending sideways
Rotation, i.e., twisting
Movements can also be combined, e.g., flexion with rotation during a twisting crunch.
As such, there are four groups of anti-core exercises, each one designed to prevent one (or more) of these movements. For example, anti-extension exercises emphasize the rectus abdominis, while anti-rotation exercises emphasize the obliques. However, all anti-core exercises involve the transverse abdominis.
Benefits and Drawbacks of Anti-Core Exercises
Not sure if you need to include anti-core exercises in your workouts? Consider these benefits and then decide!
Very functional
Functional training is a very misused term. Many people confuse functional training with technically demanding exercises involving a lot of balance, e.g., squats on a stability ball or curls while slacklining. While these are impressive feats, they’re not examples of real functional training.
In contrast, functional training means doing exercises that have a carry-over to your life outside of the gym, i.e., they improve how you function.
Anti-core exercises train your midsection in a very functional way. People often have to use their core muscles this way during their daily lives, in the gym, or on the sports field. Anti-core exercises will have a significant carry-over to your everyday life.
Spine-friendly
Like any joint, the spine is prone to wear and tear. If you do a lot of crunches, sit-ups, Russian twists, etc., you can cause stress to both the vertebrae and intervertebral discs, and these structures can become worn and damaged.
By their very nature, anti-core exercises involve no movement, so there will much less stress on your vertebrae, spinous ligaments, or discs. In fact, anti-core exercises should not cause lower back stress or pain of any sort – done correctly, of course!
Easy to learn
With no movements to think about, most anti-core exercises are very straightforward and easy to learn. You just have to keep still and prevent movement. That’s not to say these exercises are easy – far from it. However, from a technical performance perspective, the learning curve for most anti-core exercises is pretty short.
While anti-core exercises are mostly beneficial and safe, there are also a few drawbacks to consider:
Usually done for time instead of reps
Many anti-core exercises are held for a predetermined time, e.g., 30 seconds. This means you’ll need to use a timer or be able to see a clock with a second hand. Also, some people prefer to pump out reps, and keeping still may be less appealing.
Elevated blood pressure
Isometric anti-core exercises can cause a short-term increase in blood pressure (1). This is because the muscles are contracted, which reduces blood flow. This should be no issue for people with healthy blood pressure but could be problematic for anyone with hypertension.
This problem can be reduced by never holding your breath during anti-core exercises. Breath-holding can have a significant effect on blood pressure.
Speak to your doctor if you have high blood pressure before doing any of the exercises in this article.
Five Best Anti-Flexion Core Exercises
Anti-flexion exercises emphasize your erector spinae muscles. These exercises are good for improving your posture and protecting your lower back from pain and injuries.
1. Back extension hold
Anti-flexion exercises don’t come much simpler than the back extension hold. Done for time, this exercise teaches you to use your back muscles to resist the pull of gravity. Back extension holds are an excellent stepping stone onto more demanding exercises and is ideal for beginners.
Steps:
Mount your back extension machine (45-degree or horizontal) and get into the mid-point of the exercise so your body is straight. Brace your core and engage your glutes and hamstrings.
Without holding your breath, maintain your position for as long as possible.
Yes, all that shaking is perfectly normal.
Relax, rest a moment, and repeat.
Muscles targeted:
Erector spinae, core, gluteus maximus, hamstrings.
Benefits:
Very easy to learn.
Very accessible as most gyms have a back-extension machine.
Easy to progress/regress by altering the time of each hold.
Tips:
Work up to holding for 2-3 minutes per rep.
Make this exercise harder by holding a weight to your chest or using resistance bands.
Keep your knees slightly bent throughout for comfort and safety.
2. Cobra Superman hold
No back-extension machine? No problem! You can work on your anti-flexion strength with this straightforward floor exercise. On the downside, it can be a little uncomfortable, so make sure you use a mat to avoid any unnecessary pain.
Steps:
Lie on the floor on your front and place your hands on your temples.
Lift your head, chest, arms, legs, and feet a few inches off the floor so you’re balancing on your abdomen and hips only.
Hold this position for as long as possible.
Muscles targeted:
Erector spinae, gluteus maximus, hamstrings, core, trapezius, rhomboids, deltoids.
Benefits:
An ideal exercise for home workouts.
No equipment required.
Good for improving spine mobility.
Tips:
Place a folded mat under your hips for comfort.
Take care not to hyperextend your spine.
Do not hold your breath.
3. Dual kettlebell front rack carry
While stationary exercises like back extension and Superman/cobra holds are effective, they don’t teach you to stabilize your spine during movement. As such, they’re good preparatory exercises but also need to be progressed. Dual kettlebell front rack carries train you to resist flexion while moving your legs, so they’re much more functional.
Steps:
Rack and hold two kettlebells on your shoulders. Pull your shoulders down and back, and brace your core. Look straight ahead.
Keeping your torso upright, walk around your training area until you start to tire.
Lower the weights to the floor, rest, and repeat.
Muscles targeted:
Erector spinae, gluteus maximus, hamstrings, core, trapezius, rhomboids, deltoids.
Benefits:
A highly functional exercise.
Good for integrating your core with your upper and lower body.
An excellent general strength and conditioning exercise.
Tips:
Use dumbbells instead of kettlebells if preferred.
Use gym chalk to stop your hands from slipping.
Use one weight only to add anti-lateral flexion to this exercise.
4. Romanian deadlift
While most people do RDLs to strengthen their glutes and hamstrings, it’s actually a very effective anti-flexion exercise. However, you need to be able to resist flexion in isolation first, e.g., with back extension holds, before attempting this exercise.
Steps:
Hold a barbell with an overhand, shoulder-width grip. Stand with your feet between shoulder and hip-width apart, knees slightly bent.
Brace your core and pull your shoulders down and back.
Hinging from your hips, lean forward and lower the bar down the fronts of your legs. Do NOT round your lower back.
Drive your hips forward, stand up straight, and repeat.
Muscles targeted:
Erector spinae, gluteus maximus, hamstrings, core, trapezius, rhomboids, deltoids, forearms.
Benefits:
An excellent exercise for your entire posterior chain.
Easy to scale by adding or subtracting weight.
A proven way to learn how to hip hinge, which is a prerequisite for many more demanding exercises, such as kettlebell swings and power cleans.
Tips:
Remove your shoes to keep your heels on the floor and your weight toward the back of your feet.
Use chalk or lifting straps to reinforce your grip.
Keep your chest up and your lower back slightly but tightly arched throughout.
Related: Romanian Deadlifts (RDLs) Guide
5. Deadlift
The barbell deadlift is one of the best bang-for-your-buck exercises you can do. Working a large percentage of the muscles in your body, deadlifts have the potential to build muscle size and strength like no other. However, the key to a good deadlift is keeping your spine extended, which is what also makes them an excellent anti-flexion exercise.
Steps:
Place a loaded barbell on the floor. Ideally, the bar should be about mid-shin height.
Stand with your toes under the bar, feet between shoulder and hip-width apart.
Bend down and hold the barbell with an overhand or mixed shoulder-width grip.
Straighten your arms, drop your hips, and lift your chest. Brace your core and pull your shoulders back and down.
Drive your feet into the floor and stand up, ensuring your hips don’t rise faster than the bar.
Push your hips back, bend your legs, and lower the weight back to the floor.
Allow it to settle for a couple of seconds, reset your core and grip, and repeat.
Muscles targeted:
Erector spinae, gluteus maximus, hamstrings, quadriceps, core, trapezius, rhomboids, deltoids, forearms.
Benefits:
One of the most productive barbell exercises you can do.
Teaches you how to lift heavy objects off the floor safely.
A very time-efficient exercise that trains multiple muscle groups at the same time.
Tips:
Place your barbell on blocks or in a power rack if you tend to round your back when deadlifting from the floor.
Do NOT bounce the bar off the floor. Instead, allow the weight to “go dead” between reps for safety and best results.
Experiment with an overhand and mixed grip to see which you prefer.
Related: 9 Weeks to a Bigger Deadlift Program
Five Best Anti-Extension Core Exercises
Anti-extension exercises target your rectus abdominis. Working on your anti-extension strength will lessen the likelihood of hyperextending your spine during athletic and everyday activities.
1. Plank
The plank is the original anti-extension core exercise. With roots in yoga and Pilates, this exercise has been around for centuries. However, despite being so common, many people do this exercise incorrectly. Don’t be one of them!
Steps:
Kneel down and rest your forearms on the floor. Your elbows should be under your shoulders, lower arms parallel. Brace your core and pull your shoulders back and down.
Walk your feet out and back to form a straight line with your shoulders and hips.
Hold this position for the required duration. However, do not hold your breath.
Muscles targeted:
Rectus abdominus, core, hip flexors.
Benefits:
No equipment required.
An excellent preparatory exercise for more advanced movements.
An easy exercise to progress or regress.
Tips:
Try to increase muscle tension instead of holding for excessively long durations.
Bend your legs and rest on your knees to make this exercise easier.
Rest your forearms on a stability ball to make this exercise more challenging.
Related: Plank Progressions and Variations for Stronger Abs
2. Dead bug
Dead bugs teach you to resist extension while moving your arms and legs, which is how your core muscles often have to work in nature. This is a highly functional anti-core move that’s suitable for all levels of exerciser.
Steps:
Lie on your back with your legs bent and arms extended up toward the ceiling. Brace your core and press your lower back into the floor.
Extend your left arm and right leg and lower them to the floor. Keep your lower back pressed down.
Return to the starting position and repeat on the opposite side.
Continue alternating arms/legs for the duration of your set.
Muscles targeted:
Rectus abdominus, core, hip flexors.
Benefits:
A very lower back-friendly exercise.
A very functional anti-extension core exercise.
No equipment required, so ideal for home workouts.
Tips:
Make this exercise easier by only lowering your arms OR legs.
Make it more challenging by lowering both arms and legs together.
Increase the intensity of this exercise by holding dumbbells or a medicine ball.
3. Overhead Pallof press
The Pallof press was invented by Bostonian physical therapist John Pallof. Unlike many anti-core exercises, this one uses weights to overload your muscles. As such, it can be progressed just like any other strength-training exercise, i.e., by increasing the load. Unlike the traditional anti-rotation Pallof press, this is an anti-extension exercise.
Steps:
Attach a rope handle to a high pulley. Grab the handle and then turn your back to the cable machine. Hold your hands at shoulder height. Brace your core and adopt a split stance for balance.
Without leaning forward or backward, raise your arms above your head. Note how the tension on your core increases as you extend your arms.
Lower your hands back to your shoulders and repeat.
Muscles targeted:
Rectus abdominis, core, pectoralis major, latissimus dorsi, deltoids.
Benefits:
Can be made as easy or as challenging as required by adjusting the weight.
Teaches you how to integrate your upper and lower body with your core.
A good exercise for improving shoulder mobility and stability.
Tips:
The narrower/closer your feet are, the more challenging this exercise becomes.
You can also do this exercise with a resistance band.
Experiment with different height cables to see what works best for you.
4. Rollout
Rollouts are like a moving plank. As you extend your arms, the tension on your core increases dramatically, and you’ll have to work harder to prevent lumbar spine extension. Rollouts also provide an intense lat workout. An ab roller is an excellent investment!
Steps:
Kneel down and hold your roller with an overhand grip. Place the roller on the floor in front of your knees. Brace your core and pull your shoulders back and down.
Push the roller out in front of you and lower your chest and abdomen down to the floor. Do not allow your lower back to extend.
Using your abs and lats, pull the roller back up to your legs.
That’s one rep – keep going!
Muscles targeted:
Rectus abdominus, core, latissimus dorsi, triceps.
Benefits:
A low-tech exercise that’s ideal for home workouts.
Can be modified to suit most levels of exerciser.
A challenging, effective anti-extension core exercise.
Tips:
Do this exercise from standing for a more intense workout.
Don’t extend your arms so far to make this exercise less challenging.
No ab roller? No problem! You can also do this exercise with a barbell.
Related: Rollouts: Benefits, Technique, And Alternatives
5. Extended plank
Planks are an excellent exercise. However, if you can do them for over a minute or two, they probably aren’t challenging enough to increase core strength. This variation takes your hands and feet further apart to make them much more demanding.
Steps:
Firstly, lie on your back with your arms stretched out to the side. Make marks on the floor with your fingertips to determine your “wingspan.”
Next, place your feet on one mark and your hands on the other. This is your extended plank position.
Brace your core and hold the extended plank position for as long as possible, taking care not to hyperextend your lumber spine or hold your breath.
Muscles targeted:
Rectus abdominus, core, hip flexors.
Benefits:
No equipment required.
A much more challenging way to do planks.
An excellent anti-extension move for advanced exercisers.
Tips:
Shorten the distance between markers if you cannot do this exercise correctly, or you can feel it in your lower back.
Ensure your hands are dry and won’t slip to avoid accidentally face-planting the floor.
This is a very challenging core exercise, so proceed with caution.
Five Best Anti-Lateral Flexion Core Exercises
Anti-lateral flexion exercises strengthen your obliques, rectus abdominis, and erector spinae muscles, albeit one side at a time. Improving your ability to resist lateral flexion will ensure you can keep your torso upright when dealing with unilateral or unbalanced loads.
1. Side plank
The side plank is an excellent introduction to anti-lateral flexion exercises. It’s a little harder than front planks but just as simple to learn. This exercise is popular in group workout classes for a reason!
Steps:
Lie on your side and rest on your forearm. Your body and legs should be straight. Brace your core.
Lift your hips off the floor and hold them up for the required duration.
Lower your hips back to the floor, roll over, and repeat on the opposite side.
Muscles targeted:
Obliques, rectus abdominus, erector spinae, deltoids.
Benefits:
No equipment required, so ideal for home workouts.
Easy to learn and master, so perfect for novice exercisers.
An excellent preparatory exercise for more demanding anti-lateral flexion movements.
Tips:
Rest your elbow on a folded exercise mat or foam pad for comfort.
Bend your legs to make this exercise easier.
You can also do this exercise with your supporting arm extended:
2. Single-arm farmer’s walk
Exercises don’t come much more functional than the single-arm farmer’s walk. However, despite its simplicity, this exercise can be extremely challenging. All you need is a single dumbbell, kettlebell, or heavy bag, so this exercise is ideal for home workouts.
Steps:
Hold a heavy weight in one hand, arm by your side. Brace your core and make sure your hips and shoulders are level.
Without leaning sideways, go for a walk around your training area.
On completion, lower the weight to the floor, swap hands, and repeat.
Muscles targeted:
Obliques, rectus abdominus, erector spinae, forearms.
Benefits:
A highly functional core.
Can be modified for all levels of strength by increasing or reducing the weight.
An excellent way to develop a stronger, more enduring grip.
Tips:
Chalk your hands or use lifting straps to reinforce your grip if necessary.
Walk in zigzags to destabilize the weight and make this exercise more demanding.
Take care not to lean sideways or shrug your shoulders during this exercise.
3. Single-arm waiter’s walk
The single-arm waiter’s walk is similar to the farmer’s walk, but the weight is held overhead and not down by your side. This increases the stability demand of this exercise. Take care not to go too heavy too soon with this exercise; it’s harder than it looks!
Steps:
Lift and hold a single dumbbell or kettlebell overhead. Brace your core and engage your shoulders and upper back to stabilize the load.
Without leaning sideways, go for a walk around your training area.
On completion, lower the weight to the floor, swap sides, and repeat.
Muscles targeted:
Obliques, rectus abdominus, erector spinae, deltoids.
Benefits:
A challenging and effective anti-lateral flexion exercise.
Builds stronger, more stable shoulders.
Can be modified for all levels of strength by increasing or reducing the weight.
Tips:
Chalk your hands or use lifting straps to reinforce your grip if necessary.
Walk in zigzags to destabilize the weight and make this exercise more demanding.
Take care not to lean sideways or shrug your shoulders during this exercise.
4. Single-arm overhead press
Overhead presses are great for building bigger shoulders and triceps. However, when you switch from using both arms to just one, they become an excellent ant-lateral flexion exercise. Requiring just one weight, this anti-core move is ideal for home workouts.
Steps:
Hold a dumbbell or kettlebell in one hand at shoulder height. Stand with your feet shoulder-width apart and brace your core. Make sure your hips and shoulders are level.
Without leaning sideways, press your weight up and overhead to arm’s length.
Lower the weight back to your shoulder and repeat.
Switch hands and do the same number of reps with your other arm.
Muscles targeted:
Obliques, rectus abdominus, erector spinae, deltoids.
Benefits:
A very functional upper-body and core exercise.
An excellent way to identify and fix left-to-right strength imbalances.
A very accessible, practical exercise.
Tips:
Do this exercise in front of a mirror to ensure you’re keeping your shoulders level.
Use less weight than you would for a two-handed overhead press.
You can also do this exercise with a barbell, which is an exercise called the javelin press:
5. Suitcase deadlift
The suitcase deadlift is so-called because it’s the same technique you’d use to pick up a single bag at the airport. This awesome exercise teaches you how to maintain a neutral and stable spine while generating force with your legs.
Steps:
Place a kettlebell or dumbbell on the floor and then stand sideways on to it. The handle should run parallel to your feet.
Squat down and grab the handle with a neutral or palms-in grip.
Pull your shoulders down and back, brace your core, and look straight ahead.
Drive your feet into the floor and stand up straight, taking care not to lean sideways.
Lower the weight back to the flood and repeat.
Turn around and do the same number of reps on the opposite side.
Muscles targeted:
Obliques, rectus abdominus, erector spinae, gluteus maximus, hamstrings, forearms.
Benefits:
A high degree of crossover with activities outside of the gym.
An effective and functional anti-lateral flexion exercise.
An excellent deadlift assistance exercise.
Tips:
Use gym chalk or lifting straps to stop your hands from slipping.
Do this exercise in front of a mirror to ensure your torso, hips, and shoulders are straight.
Experiment with your stance width to see what works best for you.
Five Best Anti-Rotation Core Exercises
Anti-rotation exercises target your obliques. Having stronger obliques will help you prevent unwanted twisting during activities like running, kicking, and throwing. Anti-rotation is especially important during contralateral activities where you use one arm and the opposite leg, e.g., running.
1. Bird-dogs
Bird-dogs are one of the most basic anti-rotation exercises around. Ideal for beginners, this exercise teaches you how to stabilize your core as you move your arms and legs. Bird-dogs are also an excellent muscle activation exercise and are perfect for warm-ups.
Steps:
Kneel on all fours with your shoulders over your hands and your hips over your knees.
Brace your core and set your shoulders down and back.
Keeping your hips and shoulders level, extend your right arm and left leg.
Lower them back to the floor and repeat.
On completion of your set, swap sides and do the same number of reps with the opposite arm and leg. Or, if preferred, you can use an alternating arm and leg action.
Muscles targeted:
Obliques, rectus abdominis, gluteus maximus, hamstrings, deltoids, erector spinae.
Benefits:
An excellent exercise for lower back pain sufferers.
A great movement for beginners.
No equipment required, so ideal for home workouts.
Tips:
Kneel on a folded exercise mat for comfort.
Use ankle/wrist weights to make this exercise more challenging.
You can also do this exercise in a high plank position like this:
2. Pallof press
The Pallof press is one of the most widely-performed anti-rotation core exercises. Popular with almost every type of exerciser, it’s safe to say that this move delivers. If you’ve never done Pallof presses before, you are in for a treat, but if you’re already doing them, you should definitely continue!
Steps:
Attach a D-shaped handle to a cable machine set to mid-chest height.
Stand side-on to the pulley and hold the handle on both hands. Your feet should be about shoulder-width apart, with your knees slightly bent. Brace your core.
Pull your hands into your chest and step away from the machine to load the cable.
Without moving your hips or shoulders, extend your arms out in front of you. Feel how the tension on your muscles increases as you straighten your arms.
Bend your arms and return your hands to your chest.
Repeat for the required number of reps and then switch sides.
Muscles targeted:
Obliques, rectus abdominis, erector spinae, pectoralis major, deltoids, triceps,
Benefits:
An ideal exercise for beginners.
A very spine-friendly anti-core exercise.
Very scalable – just adjust the load to reflect your current strength.
Tips:
You can also do this exercise with a resistance band.
Vary the height of your arms to work your core from different angles.
Try doing Pallof presses in a half-kneeling position for variety, like this:
3. Single-leg Romanian deadlift
While regular Romanian deadlifts are an excellent anti-flexion exercise, switching to one leg/one arm means you’ll also have to work hard to prevent twisting. This exercise is also great for improving balance and stability and is ideal for runners and other athletes.
Steps:
Stand with your feet together and a dumbbell or kettlebell in your left hand. Shift your weight over onto your right foot. Brace your core and pull your shoulders back and down.
Hinge forward from your hips and lower the weight down the front of your leg. Extend your left leg out behind you for balance.
Stand back up and repeat.
Rest a moment and then do the same number of reps on the opposite leg, remembering to switch hands, too.
Muscles targeted:
Obliques, hamstrings, gluteus maximus, rectus abdominis, erector spinae.
Benefits:
A time-efficient way to train your core and lower body simultaneously.
An excellent exercise for better balance and coordination.
Easier on your lower back than two-legged Romanian deadlifts.
Tips:
Rest your non-working foot lightly on the floor for balance if needed, i.e., B-stance or kickstand RDLs.
Try holding the weight in the same hand rather than the opposite hand. This is considerably more demanding.
Do this exercise next to a wall or handrail for balance if required.
Related: Why the Single Leg Romanian Deadlift Deserves to Be the Hero of Your Workout
4. Renegade row
Renegade rows are among the most challenging anti-rotation exercises, even with light to moderate weights. However, if you’ve mastered Pallof presses and can do bird-dogs in your sleep, this is the exercise you’ve been waiting for!
Steps:
With a dumbbell in each hand, squat down, and place them on the floor.
Walk your feet out into the push-up position. Brace your core and tense your legs.
Bend one arm and row your dumbbell up and into your lower ribs.
Lower the weight back to the floor, switch arms, and repeat.
Alternate arms for the required number of reps.
Muscles targeted:
Obliques, rectus abdominus, latissimus dorsi, biceps, triceps, deltoids, erector spinae.
Benefits:
A total core exercise that teaches you to stabilize your core as you move your arms and legs.
A time-efficient conditioning exercise that burns lots of calories.
A challenging movement that’s ideal for intermediate and advanced exercisers.
Tips:
Wear a weighted vest to make this exercise even harder.
Use hexagonal dumbbells for increased stability and safety.
Combine renegade rows with push-ups for a complete upper-body and core workout:
Related: Renegade Rows Guide
5. Single-arm cable chest press
While the single-arm chest press is not an especially good exercise for your pecs, it is an excellent anti-rotation core exercise. It teaches you how to integrate your core with your upper and lower body.
Steps:
Attach a D-shaped handle to a chest-high cable machine. Hold the handle and turn your back on the machine so the cable runs outside your arm. Adopt a split stance for balance. Brace your core.
Keeping your hips and shoulders stationary, push your arm forward and out to full extension.
Bend your arm, bring the handle back to your chest, and repeat.
Switch sides and do the same number of reps with the other arm.
Muscles targeted:
Obliques, rectus abdominus, pectoralis major, deltoids, triceps, erector spinae.
Benefits:
A very lower back-friendly anti-rotation exercise.
Infinitely scalable by increasing or reducing the weight.
Suitable for beginner, intermediate, and advanced exercisers.
Tips:
Press up at an incline to change the feel of this exercise.
Do this exercise with your feet together to challenge your core and balance more.
Do this exercise with a resistance band or in a half-kneeling position:
Anti-Core Exercises – FAQs
Do you have a question about anti-core exercises? No problem, because we’ve got the answers!
1. How many reps and sets should I do?
There is no magic number of reps you should use to train your core. You will make progress whether you do 10 or 30 reps per set. That said, lower reps are generally more time-efficient, so it’s worth choosing exercises that are demanding enough to fatigue your muscles relatively quickly, e.g., between 12-20. Wherever possible, avoid very high-rep sets, e.g., 50.
In terms of sets, 3-5 should be sufficient for most people. If you can do more, the chances are that you a) aren’t getting close enough to failure or b) are resting too long between efforts.
2. How often should I do anti-core exercises?
It’s generally accepted that it takes 48-72 hours for a muscle or muscle group to recover from a workout. As such, you should aim to do anti-core exercises 2-3 times per week on non-consecutive days, e.g., Monday and Thursday, or Monday, Wednesday, and Friday. This provides a good balance between work and recovery.
Training your core more often, i.e., daily, won’t necessarily produce better results, and could even lead to overtraining.
3. Will anti-core exercises give me a six-pack?
While doing anti-core exercises will develop your six-pack muscle (the rectus abdominis) and other critical core muscles, you won’t be able to see them until your body fat percentage is low enough. This usually means under ten percent for men and 15 percent for women.
It’s true what they say – six-pack abs are made in the kitchen, and your diet will determine if your abs and core muscles are visible.
4. Are anti-core exercises safe?
Because they involve minimal movement, most anti-core exercises are very safe. As long as you brace and stabilize your spine correctly, there should be very little stress on your intervertebral discs or spinous ligaments, so many are even okay for folk who suffer from back pain.
That said, exercises that involve additional movements, e.g., suitcase deadlifts and single-arm overhead presses, are somewhat riskier than static exercises like planks and side planks.
However, if performed correctly and with appropriate loads, there is a very low risk of injury with most anti-core exercises.
5. Do I have to do anti-core exercises – aren’t regular core exercises enough?
While all core exercises are beneficial, anti-core exercises are often more functional. That’s because you often need to use these muscles to prevent unwanted movement of your lumbar spine, e.g., during deadlifts, push-ups, and overhead presses.
If your core is strong, you may not need to do a lot of anti-core training. However, if your lumbar spine lacks the stability it needs, then anti-core exercises are a must.
Wrapping Up
Whether you’re training for performance, aesthetics, or health, your workouts should include anti-core exercises. Anti-core exercises teach you how to stabilize your lumbar spine, which will protect you from lower back injury.
A more stable spine will also let you do more reps with heavier loads, making the rest of your workout more effective.
With 20 anti-core exercises to choose from, you have more than enough options to keep you busy and progressing for years to come. Include anti-core exercises in all your midsection workouts for best results.
References:
Hanson P, Nagle F. Isometric Exercise: Cardiovascular Responses in Normal and Cardiac Populations. Cardiol Clin. 1987 May;5(2):157-70. PMID: 2884033. https://pubmed.ncbi.nlm.nih.gov/2884033

How to Do a Tree Pose (Vrksasana): Muscles Worked, Benefits, and Variations
Tree pose, also known as Vrksasana is a body posture reminiscent of a healthy, tall, and resilient tree. Rooted down by the feet, and supported by the pelvis and core muscles, this yoga technique combines balance, coordination, flexibility, pelvic stability, core strength, and upper body mobility. But you’re also reaping the rewards of increased focus, and concentration while opening the hips, lengthening the spine, and strengthening the legs and feet.
For such a simple pose, Vrksasana sure carries along lots of advantages, and there are lots of reasons to do it daily. In this guide, we want to walk you through a proper tree pose while discussing the advantages, drawbacks, commonly performed mistakes and more.
Muscles Worked
While the tree pose is NOT a “muscle-building exercise”, it is a body and mind-building pose that will help keep your muscles loose, flexible, and functional as they move the joints. Learn about the muscles targeted with this technique.
Legs
Powerful and resilient, the legs represent the trunk while the feet are the roots that ground you in the tree pose. The weight bearing leg takes on more of the load than normal, while the glutes, hips and pelvis help to stabilize the trunk and act as support for the remaining steps.
Core
Strong core muscles support an upright posture and open diaphragm, which translates to healthier breathing, and hence better focus, and energy.
Shoulders
Lifted shoulders also help open the chest and back area to release tension, and promote posing stamina.
How To Do The Tree Pose (Vrksasana)
If you have the flexibility, and experience, the tree pose may be easy for you. But for everyone else, it will take some practice. While this technique appears to be simple and easy, well, try it and see if that’s true. You may be very surprised at how difficult it can be.
That’s why we created this step by step guide with video demonstrations, tips, and how to fix common mistakes. The key is to be patient, don’t rush, and make sure your body is aligned, tall, and balanced, while engaging the necessary muscles.
Steps
Stand tall with your feet together.
Slowly lift one knee up to roughly belly button height, then grab the front of the knee with both hands to keep the leg up.
From here, root down through all four corners of your standing foot, and align your pelvis and core to find your balance. Keep your pelvis straight and in line with your body, and low back lengthened.
Then grab the ankle of your lifted leg with the same-side hand, and rotate your thigh outward to open the hips.
Now flex your foot by lifting the toes up, then bring the sole of your foot as high as you can on the standing-leg inner thigh with your toes facing down.
Press your foot into the squishy part of your thigh and pull your thigh into the foot to keep it in place and avoid it sliding down the leg.
Here you can bring your hands together by your heart, or extend your arms overhead. Hold for 30-60 seconds.
Take your foot off the inner thigh, bring the knee to waist height, then place it back on the floor.
You can then switch legs, pulling the opposite foot to your inner thigh, and repeat the movement.
Check the short tree pose video demonstration below.
If you have 12 minutes for a more in-depth tutorial that shows all the technique tips and tricks, we highly recommend watching the following video.
Tips
Before you start the pose, spread your toes and bring awareness to your feet. After all, the feet are the roots and you want to feel a strong base before beginning.
Before you lift the leg and foot into position on your inner thigh, ease yourself into it by first lifting one heel off the ground with the toes still on the ground.
Remember to keep the pelvis tucked in and aligned with your torso. Do not let your buck curl up and arch the lower back.
Gently push yourself into the correct position if the pelvis shifts back or to the side when the foot is pressed into the inner thigh.
Use a wall or place your foot on the lower leg, rather than the top of the inner thigh for support, if you have trouble balancing.
It’s important to root your feet and stand tall in maintaining good balance.
Keep in mind, everyone may not have the same exact form during the tree pose.
If you want more of a challenge, try closing your eyes or looking up at the ceiling to train your balance.
Benefits of Tree Pose Vrksasana
There may not appear to be so many benefits of the tree pose, but we can assure you that there are many worthwhile. Here are the unique benefits of this exercise.
A functional test of balance, coordination and concentration
Challenging indeed, but consequently beneficial, tree pose tests and grows your balance, positional awareness, and concentration. Seldom do basic exercises have you stand on one leg to complete an exercise. Tree pose involved various elements, making you more functional and coordinated.
It’s so beneficial for the aging population who incur injuries from balance issues, in addition to the sports crowd.
One sided
The tree pose is asymmetrical in nature, with the left and right sides performing a different function. This develops proprioception (physical awareness of the body and coordination), unilateral function (training one side at a time), and trains us to perform as humans.
Tree Pose
Posture pose
The tree pose can challenge you to maintain good posture, by standing upright, and consciously focusing on being a tall tree! Today we slouch more than ever, looking down at our devices, and this technique gently helps to reinforce and focus on good body position.
Stretches the full body
We don’t do stretches like this often enough. Lifting the foot and placing it against the inner thigh opens the hips and stretches the groin area, while you’ll also feel it in the quads, and hamstrings via knee and hip flexion. Move up the torso, raise the arms overhead, and the upper chest and latissimus dorsi fibers lengthen, as well as the shoulders and arms.
Keeps you flexible
It takes practice to stretch the groin area if you lack the flexibility to pull your heel into the upper inner thigh region. As school kids, the butterfly stretch hit this area but most of us never did it again. Tree pose is a great way to bring it back into your routine!
Activates the core muscles
Balancing on one leg will naturally recruit your core muscles to do more to stabilize your body. It’s a nice routine for anyone, and especially elderly individuals who need a light, functional activity to help maintain their coordination and stability.
A pelvis exercise
Your pelvis is bones that connect the trunk and legs near the hips. When you stand on one leg, the pelvis is called upon for extra duty where it supports the weight of the upper body, and maintains stability there to keep you in proper posture. From there, you can comfortably perform the moving parts of the pose such as raising the arms overhead.
Builds patience
We live in a very instant world where we can get an immediate dopamine rush without having to wait like we did in the old days. This has caused us to become less patient, more anxious, irritated and yeah you get the point. The tree pose, and yoga, in general, is a form of meditative exercise that can help calm our nerves, reduce anxiety, and teach us that patience creates worthwhile rewards.
Drawbacks of Tree Pose
Take a look at this pose in motion, and it’s easy to see the potential drawbacks. But don’t mistake drawbacks with negatives as practice will change them into positives.
You’ll need some darn good balance!
There’s no way around it, you must have exceptional balance to the do the tree pose. However, we’d assume most people practicing this pose are capable of standing on one leg. But if you’re doing it for the first time and hardly test your balance, it will be difficult.
The good news is that a wall or chair can be used as a progression to a non-supported variation of tree pose.
But you should also take your time with the tree pose, and practice easing yourself onto one leg, and establishing your balance.
Can be frustrating to learn
For beginners especially, it can sometimes be frustrating when you can’t quite nail a pose. Balance, groin flexibility, and are the big annoyances during tree pose.
Common Mistakes While Performing The Tree Pose
While there’s no cookie cutter technique, there are general form cues and recommendations to ensure you stay injury free, maximize the muscles involved, and enjoy the process. Here are some things to avoid.
You can actually place your foot on the lower leg below the knee, if above the knee is too difficult yet. However, we do not recommend placing your foot directly on your knee, which will put unnecessary pressure on this joint. The knee is to meant to bend to the side, but rather back.
Not using the weight bearing/standing leg
If you’re doing nothing with the standing leg, you’re doing the tree pose wrong. You need the counter pressure from the standing weight bearing leg not only to keep the foot from sliding down, but to keep your body straight, which will allow you to have a tall posture and maintain your balance.
Clenching your toes
It’s normal to want to dig your toes into the mat to maintain your balance. But it’s more accurate to relax the toes, so that you can tense the quads and pull them up, to lift the hips in the proper position. Then you’ll have a more efficient tree pose.
Rotating the knees and hips to the side
When the foot is pressed into the upper thigh, there may be a tendency for some people to swing the bent leg and rotate the body. Focus on keeping your body facing one direction and don’t deviate or turn your body. The only thing that should be moving is your arms, whatever you decide to do with them during the pose.
Wandering eyes
Your eyes are also important for maintaining your balance during the tree pose. If you’re looking around, you’ll probably have a difficult time standing on one leg, much less doing anything else. Try to fix your gaze on a spot on the wall and keep it there.
Variations of Tree Pose Vrksasana
A base to other variations, tree pose is a fundamental pose that opens up the door to these similar, but individually unique exercises.
Tree pose with a block
Some people need to ease themselves into a pose, and using a block is a great idea. You can use it to inch your way higher up the leg, while having something to hold your foot up and in position. It will also allow you to focus on engaging the leg muscles and working that flexibility before you go full on tree pose. When you can move beyond this beginner technique, place your foot on the lower leg below the knee.
Steps
Stand tall with your feet roughly hip width apart.
Place a block long ways between your feet.
Find your balance on one leg by rooting down into the four points of your foot.
Bend the other foot and lift your knee up, then place the ball and toes of that foot on the top of the block. Keep your heel close to the ankle bone of the weight bearing leg.
Now focus on keeping your body squared up, with the hips straight, and body nice and tall.
Lift the foot off the block for a few seconds and try to find how you’ll gain balance on the standing leg. Do it a few more times.
Now, switch your legs and repeat.
Windy tree
As the name implies, a windy tree blows the branches from side to side. This can actually challenge your core muscles, stretch your midsection, improve total body stability, balance, focus, and your mind.
Steps
Find your tree pose stance, then raise your arms in the air in the form of a V.
Wave your arms from side to side while rotating your body from left to right.
If you thought tree pose was challenging, bring your feet a little higher on your hips, and try to do the same thing. You’ll also stretch out your abductor muscles on the outer thigh if performed correctly.
Steps
From a standing position, bend your left leg, pull the left foot up, and hold it across the top of your right thigh in the hip crease. Flare your toes and flex your foot. You can hold your foot in place, or let go and try to keep it there.
Stay in this position and try to feel out the movement, and get accustomed to holding your feet there, or bring your arms to a prayer position or raise them overhead.
Arms reaching to sky
There’s nothing like leaning forward and reaching your arms toward the sky to throw off your balance, or rather, force you to maintain it. Try the tree pose with this additional step.
Steps
Get into tree pose stance with one foot pressed into the opposite thigh.
Hinge forward at the hips, rotate your torso toward the bent leg, and lean forward.
Extend the top arm toward the sky, and use the bottom arm to stabilize yourself.
Toe stand pose
You need to be a vrksasana master to get deep down in this sitting pose, and support your entire weight on your toes, while crossing one foot over the opposite thigh. It requires an extreme degree of focus or you can easily be thrown off course.
Steps
Start from a full tree pose with one foot pressed into the opposite inner thigh.
Next grab your foot and pull it into your hip crease. Flare your toes and flex your foot.
Now hinge at the hips, bend your upper body down, extend your arms toward the floor, and slowly drop down on your hands.
Then walk your hands forward, rise up onto the toes of the standing leg, then bend the standing leg and slowly drop your butt down to within a few inches from the floor.
Keep your hands on the floor for support, and instead of sitting all your weight on your calf muscle, focus on pushing into the ground with your toes and lifting yourself up.
Wrapping Up
Balance, coordination, positional awareness, and every functional foundation are vital abilities that we need, yet often fail to maintain. Planting yourself in the tree pose on a weekly basis will help counteract aging’s effects on our balance, while keeping our groins and hips healthier, reinforcing good posture, and easing our minds from the stressful modern culture. Then when you’re ready for something more advanced, you can step into more complex variations that will challenge your body, mind, and spirit on higher levels.